Add Authorization to Your ASP.NET Core Web API Application
Auth0 allows you to add authentication and access user profile information in almost any application type quickly. This guide demonstrates how to integrate Auth0 with any new or existing ASP.NET Web API application using the Microsoft.AspNetCore.Authentication.JwtBearer package.
If you haven't created an API in your Auth0 dashboard yet, you can use the interactive selector to create a new Auth0 API or select an existing API that represents the project you want to integrate with.
Alternatively, you can read our getting started guide, which will help you set up your first API through the Auth0 Dashboard.
Note that every API in Auth0 is configured using an API Identifier; your application code will use the API Identifier as the Audience to validate the access token.
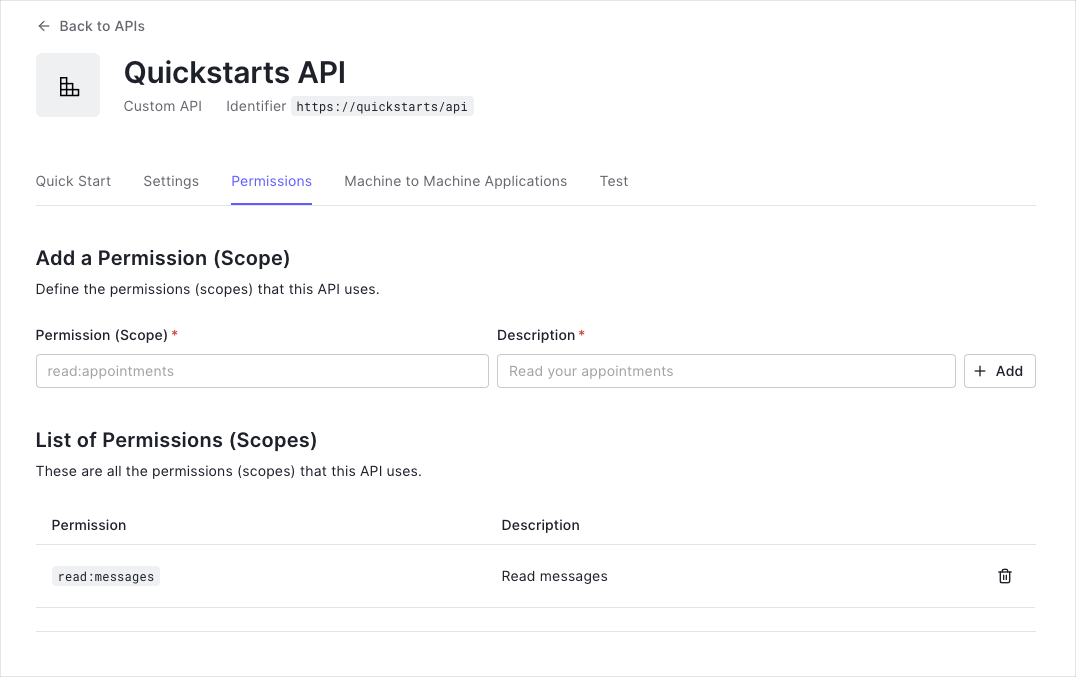
Permissions let you define how resources can be accessed on behalf of the user with a given access token. For example, you might choose to grant read access to the messages resource if users have the manager access level, and a write access to that resource if they have the administrator access level.
You can define allowed permissions in the Permissions view of the Auth0 Dashboard's APIs section.
To allow your application to validate access tokens, add a reference to the Microsoft.AspNetCore.Authentication.JwtBearer Nuget package:
Install-Package Microsoft.AspNetCore.Authentication.JwtBearerWas this helpful?
Set up the authentication middleware by configuring it in your application's Program.cs file:
-
Register the authentication services by making a call to the
AddAuthenticationmethod. ConfigureJwtBearerDefaults.AuthenticationSchemeas the default scheme. -
Register the JWT Bearer authentication scheme by making a call to the
AddJwtBearermethod. Configure your Auth0 domain as the authority and your Auth0 API Identifier as the audience, and be sure that your Auth0 domain and API Identifier are set in your application's appsettings.json file.
- Add the authentication and authorization middleware to the middleware pipeline by adding calls to the
UseAuthenticationandUseAuthorizationmethods under thevar app = builder.Build();method.
To ensure that an access token contains the correct scopes, use Policy-Based Authorization in the ASP.NET Core:
- Create a new authorization requirement called
HasScopeRequirement, which will check whether thescopeclaim issued by your Auth0 tenant is present, and if so, will check that the claim contains the requested scope. - Under your
Program.csfile'svar builder = WebApplication.CreateBuilder(args);method, add a call to theapp.AddAuthorizationmethod. - Add policies for scopes by calling
AddPolicyfor each scope. - Register a singleton for the
HasScopeHandlerclass.
The JWT middleware integrates with the standard ASP.NET Core Authentication and Authorization mechanisms.
To secure an endpoint, add the [Authorize] attribute to your controller action (or the entire controller if you want to protect all of its actions).
When securing endpoints that require specific scopes, make sure that the correct scope is present in the access_token. To do so, add the Authorize attribute to the Scoped action and pass read:messages as the policy parameter.
The way in which you call your API depends on the type of application you are developing and the framework you are using. To learn more, read the relevant application Quickstart:
Get an access token
Regardless of the type of application you are developing or the framework you are using, to call your API, you need an access token.
If you are calling your API from a Single-Page Application (SPA) or a Native application, after the authorization flow completes, you will get an access token.
If you are calling the API from a command-line tool or another service where a user entering credentials does not exist, use the OAuth Client Credentials Flow. To do so, register a Machine-to-Machine Application, and pass in the Client ID as the client_id parameter, the Client Secret as the client_secret parameter, and the API Identifier (the same value you used to configure the middleware earlier in this quickstart) as the audience parameter when making the following request:
curl --request POST \
  --url 'https://{yourDomain}/oauth/token' \
  --header 'content-type: application/x-www-form-urlencoded' \
  --data grant_type=client_credentials \
  --data 'client_id={yourClientId}' \
  --data client_secret=YOUR_CLIENT_SECRET \
  --data 'audience={yourApiIdentifier}'
Was this helpful?
var client = new RestClient("https://{yourDomain}/oauth/token");
var request = new RestRequest(Method.POST);
request.AddHeader("content-type", "application/x-www-form-urlencoded");
request.AddParameter("application/x-www-form-urlencoded", "grant_type=client_credentials&client_id=%24%7Baccount.clientId%7D&client_secret=YOUR_CLIENT_SECRET&audience=%24%7BapiIdentifier%7D", ParameterType.RequestBody);
IRestResponse response = client.Execute(request);
Was this helpful?
package main

import (
	"fmt"
	"strings"
	"net/http"
	"io/ioutil"
)

func main() {

	url := "https://{yourDomain}/oauth/token"

	payload := strings.NewReader("grant_type=client_credentials&client_id=%24%7Baccount.clientId%7D&client_secret=YOUR_CLIENT_SECRET&audience=%24%7BapiIdentifier%7D")

	req, _ := http.NewRequest("POST", url, payload)

	req.Header.Add("content-type", "application/x-www-form-urlencoded")

	res, _ := http.DefaultClient.Do(req)

	defer res.Body.Close()
	body, _ := ioutil.ReadAll(res.Body)

	fmt.Println(res)
	fmt.Println(string(body))

}
Was this helpful?
HttpResponse<String> response = Unirest.post("https://{yourDomain}/oauth/token")
  .header("content-type", "application/x-www-form-urlencoded")
  .body("grant_type=client_credentials&client_id=%24%7Baccount.clientId%7D&client_secret=YOUR_CLIENT_SECRET&audience=%24%7BapiIdentifier%7D")
  .asString();
Was this helpful?
var axios = require("axios").default;

var options = {
  method: 'POST',
  url: 'https://{yourDomain}/oauth/token',
  headers: {'content-type': 'application/x-www-form-urlencoded'},
  data: new URLSearchParams({
    grant_type: 'client_credentials',
    client_id: '{yourClientId}',
    client_secret: 'YOUR_CLIENT_SECRET',
    audience: '{yourApiIdentifier}'
  })
};

axios.request(options).then(function (response) {
  console.log(response.data);
}).catch(function (error) {
  console.error(error);
});
Was this helpful?
#import <Foundation/Foundation.h>

NSDictionary *headers = @{ @"content-type": @"application/x-www-form-urlencoded" };

NSMutableData *postData = [[NSMutableData alloc] initWithData:[@"grant_type=client_credentials" dataUsingEncoding:NSUTF8StringEncoding]];
[postData appendData:[@"&client_id={yourClientId}" dataUsingEncoding:NSUTF8StringEncoding]];
[postData appendData:[@"&client_secret=YOUR_CLIENT_SECRET" dataUsingEncoding:NSUTF8StringEncoding]];
[postData appendData:[@"&audience={yourApiIdentifier}" dataUsingEncoding:NSUTF8StringEncoding]];

NSMutableURLRequest *request = [NSMutableURLRequest requestWithURL:[NSURL URLWithString:@"https://{yourDomain}/oauth/token"]
                                                       cachePolicy:NSURLRequestUseProtocolCachePolicy
                                                   timeoutInterval:10.0];
[request setHTTPMethod:@"POST"];
[request setAllHTTPHeaderFields:headers];
[request setHTTPBody:postData];

NSURLSession *session = [NSURLSession sharedSession];
NSURLSessionDataTask *dataTask = [session dataTaskWithRequest:request
                                            completionHandler:^(NSData *data, NSURLResponse *response, NSError *error) {
                                                if (error) {
                                                    NSLog(@"%@", error);
                                                } else {
                                                    NSHTTPURLResponse *httpResponse = (NSHTTPURLResponse *) response;
                                                    NSLog(@"%@", httpResponse);
                                                }
                                            }];
[dataTask resume];
Was this helpful?
$curl = curl_init();

curl_setopt_array($curl, [
  CURLOPT_URL => "https://{yourDomain}/oauth/token",
  CURLOPT_RETURNTRANSFER => true,
  CURLOPT_ENCODING => "",
  CURLOPT_MAXREDIRS => 10,
  CURLOPT_TIMEOUT => 30,
  CURLOPT_HTTP_VERSION => CURL_HTTP_VERSION_1_1,
  CURLOPT_CUSTOMREQUEST => "POST",
  CURLOPT_POSTFIELDS => "grant_type=client_credentials&client_id=%24%7Baccount.clientId%7D&client_secret=YOUR_CLIENT_SECRET&audience=%24%7BapiIdentifier%7D",
  CURLOPT_HTTPHEADER => [
    "content-type: application/x-www-form-urlencoded"
  ],
]);

$response = curl_exec($curl);
$err = curl_error($curl);

curl_close($curl);

if ($err) {
  echo "cURL Error #:" . $err;
} else {
  echo $response;
}
Was this helpful?
import http.client

conn = http.client.HTTPSConnection("")

payload = "grant_type=client_credentials&client_id=%24%7Baccount.clientId%7D&client_secret=YOUR_CLIENT_SECRET&audience=%24%7BapiIdentifier%7D"

headers = { 'content-type': "application/x-www-form-urlencoded" }

conn.request("POST", "/{yourDomain}/oauth/token", payload, headers)

res = conn.getresponse()
data = res.read()

print(data.decode("utf-8"))
Was this helpful?
require 'uri'
require 'net/http'
require 'openssl'

url = URI("https://{yourDomain}/oauth/token")

http = Net::HTTP.new(url.host, url.port)
http.use_ssl = true
http.verify_mode = OpenSSL::SSL::VERIFY_NONE

request = Net::HTTP::Post.new(url)
request["content-type"] = 'application/x-www-form-urlencoded'
request.body = "grant_type=client_credentials&client_id=%24%7Baccount.clientId%7D&client_secret=YOUR_CLIENT_SECRET&audience=%24%7BapiIdentifier%7D"

response = http.request(request)
puts response.read_body
Was this helpful?
import Foundation

let headers = ["content-type": "application/x-www-form-urlencoded"]

let postData = NSMutableData(data: "grant_type=client_credentials".data(using: String.Encoding.utf8)!)
postData.append("&client_id={yourClientId}".data(using: String.Encoding.utf8)!)
postData.append("&client_secret=YOUR_CLIENT_SECRET".data(using: String.Encoding.utf8)!)
postData.append("&audience={yourApiIdentifier}".data(using: String.Encoding.utf8)!)

let request = NSMutableURLRequest(url: NSURL(string: "https://{yourDomain}/oauth/token")! as URL,
                                        cachePolicy: .useProtocolCachePolicy,
                                    timeoutInterval: 10.0)
request.httpMethod = "POST"
request.allHTTPHeaderFields = headers
request.httpBody = postData as Data

let session = URLSession.shared
let dataTask = session.dataTask(with: request as URLRequest, completionHandler: { (data, response, error) -> Void in
  if (error != nil) {
    print(error)
  } else {
    let httpResponse = response as? HTTPURLResponse
    print(httpResponse)
  }
})

dataTask.resume()
Was this helpful?
Call a secure endpoint
Now that you have an access token, you can use it to call secure API endpoints. When calling a secure endpoint, you must include the access token as a Bearer token in the Authorization header of the request. For example, you can make a request to the /api/private endpoint:
curl --request GET \
  --url http://localhost:3010/api/private \
  --header 'authorization: Bearer YOUR_ACCESS_TOKEN'
Was this helpful?
var client = new RestClient("http://localhost:3010/api/private");
var request = new RestRequest(Method.GET);
request.AddHeader("authorization", "Bearer YOUR_ACCESS_TOKEN");
IRestResponse response = client.Execute(request);
Was this helpful?
package main

import (
	"fmt"
	"net/http"
	"io/ioutil"
)

func main() {

	url := "http://localhost:3010/api/private"

	req, _ := http.NewRequest("GET", url, nil)

	req.Header.Add("authorization", "Bearer YOUR_ACCESS_TOKEN")

	res, _ := http.DefaultClient.Do(req)

	defer res.Body.Close()
	body, _ := ioutil.ReadAll(res.Body)

	fmt.Println(res)
	fmt.Println(string(body))

}
Was this helpful?
HttpResponse<String> response = Unirest.get("http://localhost:3010/api/private")
  .header("authorization", "Bearer YOUR_ACCESS_TOKEN")
  .asString();
Was this helpful?
var axios = require("axios").default;

var options = {
  method: 'GET',
  url: 'http://localhost:3010/api/private',
  headers: {authorization: 'Bearer YOUR_ACCESS_TOKEN'}
};

axios.request(options).then(function (response) {
  console.log(response.data);
}).catch(function (error) {
  console.error(error);
});
Was this helpful?
#import <Foundation/Foundation.h>

NSDictionary *headers = @{ @"authorization": @"Bearer YOUR_ACCESS_TOKEN" };

NSMutableURLRequest *request = [NSMutableURLRequest requestWithURL:[NSURL URLWithString:@"http://localhost:3010/api/private"]
                                                       cachePolicy:NSURLRequestUseProtocolCachePolicy
                                                   timeoutInterval:10.0];
[request setHTTPMethod:@"GET"];
[request setAllHTTPHeaderFields:headers];

NSURLSession *session = [NSURLSession sharedSession];
NSURLSessionDataTask *dataTask = [session dataTaskWithRequest:request
                                            completionHandler:^(NSData *data, NSURLResponse *response, NSError *error) {
                                                if (error) {
                                                    NSLog(@"%@", error);
                                                } else {
                                                    NSHTTPURLResponse *httpResponse = (NSHTTPURLResponse *) response;
                                                    NSLog(@"%@", httpResponse);
                                                }
                                            }];
[dataTask resume];
Was this helpful?
$curl = curl_init();

curl_setopt_array($curl, [
  CURLOPT_PORT => "3010",
  CURLOPT_URL => "http://localhost:3010/api/private",
  CURLOPT_RETURNTRANSFER => true,
  CURLOPT_ENCODING => "",
  CURLOPT_MAXREDIRS => 10,
  CURLOPT_TIMEOUT => 30,
  CURLOPT_HTTP_VERSION => CURL_HTTP_VERSION_1_1,
  CURLOPT_CUSTOMREQUEST => "GET",
  CURLOPT_HTTPHEADER => [
    "authorization: Bearer YOUR_ACCESS_TOKEN"
  ],
]);

$response = curl_exec($curl);
$err = curl_error($curl);

curl_close($curl);

if ($err) {
  echo "cURL Error #:" . $err;
} else {
  echo $response;
}
Was this helpful?
import http.client

conn = http.client.HTTPConnection("localhost:3010")

headers = { 'authorization': "Bearer YOUR_ACCESS_TOKEN" }

conn.request("GET", "/api/private", headers=headers)

res = conn.getresponse()
data = res.read()

print(data.decode("utf-8"))
Was this helpful?
require 'uri'
require 'net/http'

url = URI("http://localhost:3010/api/private")

http = Net::HTTP.new(url.host, url.port)

request = Net::HTTP::Get.new(url)
request["authorization"] = 'Bearer YOUR_ACCESS_TOKEN'

response = http.request(request)
puts response.read_body
Was this helpful?
import Foundation

let headers = ["authorization": "Bearer YOUR_ACCESS_TOKEN"]

let request = NSMutableURLRequest(url: NSURL(string: "http://localhost:3010/api/private")! as URL,
                                        cachePolicy: .useProtocolCachePolicy,
                                    timeoutInterval: 10.0)
request.httpMethod = "GET"
request.allHTTPHeaderFields = headers

let session = URLSession.shared
let dataTask = session.dataTask(with: request as URLRequest, completionHandler: { (data, response, error) -> Void in
  if (error != nil) {
    print(error)
  } else {
    let httpResponse = response as? HTTPURLResponse
    print(httpResponse)
  }
})

dataTask.resume()
Was this helpful?
Call the /api/private-scoped endpoint in a similar way, but ensure that the API permissions are configured correctly and that the access token includes the read:messages scope.
Checkpoint
You should now be able to call the /api/private and /api/private-scoped endpoints.
Run your application, and verify that:
GET /api/privateis available for authenticated requests.GET /api/private-scopedis available for authenticated requests containing an access token with theread:messagesscope.
Next Steps
Excellent work! If you made it this far, you should now have login, logout, and user profile information running in your application.
This concludes our quickstart tutorial, but there is so much more to explore. To learn more about what you can do with Auth0, check out:
- Auth0 Dashboard - Learn how to configure and manage your Auth0 tenant and applications
- Auth0 Marketplace - Discover integrations you can enable to extend Auth0’s functionality

Sign up for an or to your existing account to integrate directly with your own tenant.