.NET Android and iOS
By Frederik Prijck
This tutorial demonstrates how to add user login with Auth0 to a .NET Android or iOS application. We recommend that you log in to follow this quickstart with examples configured for your account.
I want to integrate with my app
15 minutesI want to explore a sample app
2 minutesGet a sample configured with your account settings or check it out on Github.
Configure Auth0
Get Your Application Keys
When you signed up for Auth0, a new application was created for you, or you could have created a new one. You will need some details about that application to communicate with Auth0. You can get these details from the Application Settings section in the Auth0 dashboard.
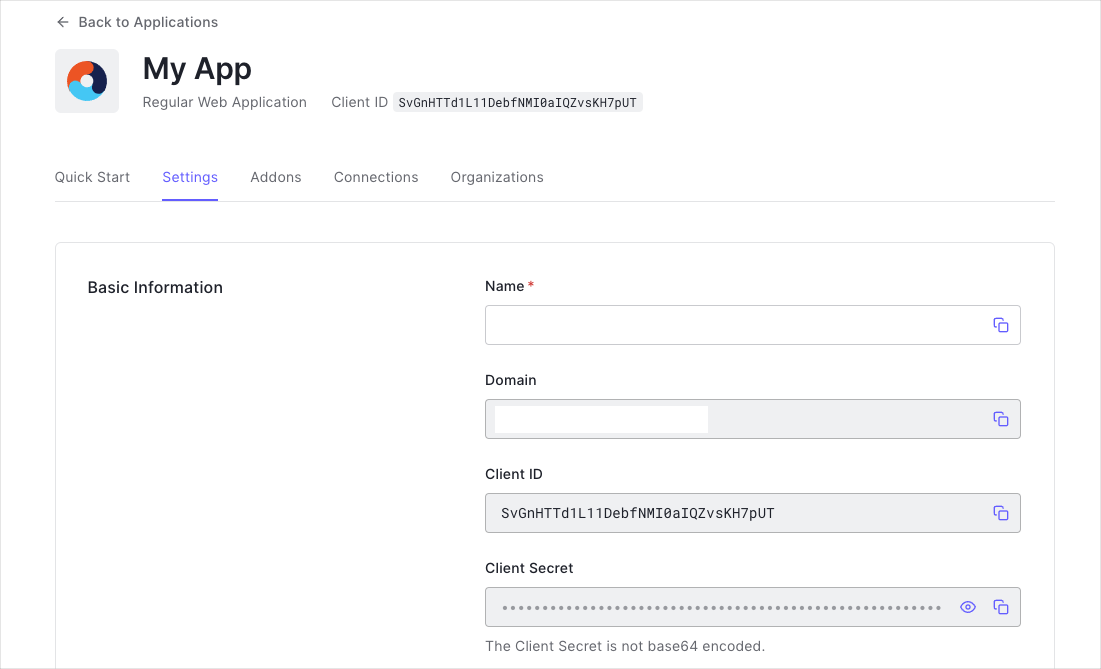
You need the following information:
- Domain
- Client ID
Configure Callback URLs
A callback URL is a URL in your application where Auth0 redirects the user after they have authenticated. The callback URL for your app must be added to the Allowed Callback URLs field in your Application Settings. If this field is not set, users will be unable to log in to the application and will get an error.
Callback URLs are the URLs that Auth0 invokes after the authentication process. Auth0 routes your application back to this URL and appends additional parameters to it, including an access code which will be exchanged for an ID Token, Access Token, and Refresh Token.
Since callback URLs can be manipulated, you will need to add your application's URL to your application's Allowed Callback URLs for security. This will enable Auth0 to recognize these URLs as valid. If omitted, authentication will not be successful.
-
For Android, the callback URL will be in the format
YOUR_ANDROID_PACKAGE_NAME://{yourDomain}/android/YOUR_ANDROID_PACKAGE_NAME/callbackWas this helpful?
/where
YOUR_ANDROID_PACKAGE_NAMEis the Package Name for your application, such ascom.mycompany.myapplication. -
For iOS, the callback URL will be in the format
YOUR_BUNDLE_IDENTIFIER://{yourDomain}/ios/YOUR_BUNDLE_IDENTIFIER/callbackWas this helpful?
/where
YOUR_BUNDLE_IDENTIFIERis the Bundle Identifier for your application, such ascom.mycompany.myapplication.
Ensure that the Callback URL is in lowercase.
Configure Logout URLs
A logout URL is a URL in your application that Auth0 can return to after the user has been logged out of the authorization server. This is specified in the returnTo query parameter. The logout URL for your app must be added to the Allowed Logout URLs field in your Application Settings. If this field is not set, users will be unable to log out from the application and will get an error.
Install Dependencies
If you are using Visual Studio, simply open the Package Manager Console (View -> Other Windows -> Package Manager Console), and install the package:
For Android:
Install-Package Auth0.OidcClient.AndroidXWas this helpful?
For iOS:
Install-Package Auth0.OidcClient.iOSWas this helpful?
Alternatively, if you are using Visual Studio for Mac, please perform the following steps:
- With the project loaded in Visual Studio for Mac, Ctrl+click (or right click) on the Packages folder of the project in the Solution Pad, and select Add Packages...
- The Add Packages dialog will appear. Search and locate the package called
Auth0.OidcClient.AndroidXorAuth0.OidcClient.iOSdepending on your platform. - Tick the checkbox next to the package to select it, and click the Add Package button
Trigger Authentication
To integrate Auth0 login into your application, instantiate an instance of the Auth0Client class, configuring the Auth0 Domain and Client ID:
using Auth0.OidcClient;

var client = new Auth0Client(new Auth0ClientOptions
{
    Domain = "{yourDomain}",
    ClientId = "{yourClientId}"
}, this);
Was this helpful?
Then, call the LoginAsync method which will redirect the user to the login screen. You will typically do this in the event handler for a UI control such as a Login button.
var loginResult = await client.LoginAsync();Was this helpful?
Handing the callback URL
After a user has logged in, they will be redirected back to your application at the Callback URL that was registered before. In both Android and iOS you need to handle this callback to complete the authentication flow.
Android
Register an intent which will handle this callback URL. An easy way to do this is to register the intent on the same activity from which you called the LoginAsync method to initiate the authentication flow.
[Activity(Label = "AndroidSample", MainLauncher = true, Icon = "@drawable/icon",
    LaunchMode = LaunchMode.SingleTask)]
[IntentFilter(
    new[] { Intent.ActionView },
    Categories = new[] { Intent.CategoryDefault, Intent.CategoryBrowsable },
    DataScheme = "YOUR_ANDROID_PACKAGE_NAME",
    DataHost = "{yourDomain}",
    DataPathPrefix = "/android/YOUR_ANDROID_PACKAGE_NAME/callback")]
public class MainActivity : Activity
{
    // Code omitted
}
Was this helpful?
Replace YOUR_ANDROID_PACKAGE_NAME in the code sample above with the actual Package Name for your application, such as com.mycompany.myapplication. Also ensure that all the text for the DataScheme, DataHost, and DataPathPrefix is in lower case. Also, set LaunchMode = LaunchMode.SingleTask for the Activity, otherwise the system will create a new instance of the activity every time the Callback URL gets called.
Now write code to handle the intent. You can do this by overriding the OnNewIntent method. Inside the method you need to call the Send method on the ActivityMediator to complete the authentication cycle:
protected override async void OnNewIntent(Intent intent)
{
    base.OnNewIntent(intent);

    Auth0.OidcClient.ActivityMediator.Instance.Send(intent.DataString);
}
Was this helpful?
iOS
Register the URL scheme for your Callback URL which your application should handle:
- Open your application's
Info.plistfile in Visual Studio for Mac, and go to the Advanced tab. - Under URL Types, click the Add URL Type button
- Set the Identifier as
Auth0, the URL Schemes the same as your application's Bundle Identifier, and the Role asNone
This is an example of the XML representation of your info.plist file after you have added the URL Type:
<key>CFBundleURLTypes</key>
<array>
    <dict>
        <key>CFBundleTypeRole</key>
        <string>None</string>
        <key>CFBundleURLName</key>
        <string>Auth0</string>
        <key>CFBundleURLSchemes</key>
        <array>
            <string>YOUR_BUNDLE_IDENTIFIER</string>
        </array>
    </dict>
</array>
Was this helpful?
You need to handle the Callback URL in the OpenUrl event in your AppDelegate class. You need to notify the Auth0 OIDC Client to finish the authentication flow by calling the Send method of the ActivityMediator singleton, pass along the URL that was sent in:
using Auth0.OidcClient;

[Register("AppDelegate")]
public class AppDelegate : UIApplicationDelegate
{
    public override bool OpenUrl(UIApplication application, NSUrl url, string sourceApplication, NSObject annotation)
    {
        ActivityMediator.Instance.Send(url.AbsoluteString);

        return true;
    }
}
Was this helpful?
Run the application
With the above code in place, a user can log in to your application using Auth0.

Accessing the User's Information
The returned login result will indicate whether authentication was successful and if so contain the tokens and claims of the user.
Authentication Error
You can check the IsError property of the result to see whether the login has failed. The ErrorMessage will contain more information regarding the error which occurred.
var loginResult = await client.LoginAsync();

if (loginResult.IsError)
{
    Debug.WriteLine($"An error occurred during login: {loginResult.Error}")
}
Was this helpful?
Accessing the tokens
On successful login, the login result will contain the ID Token and Access Token in the IdentityToken and AccessToken properties respectively.
var loginResult = await client.LoginAsync();

if (!loginResult.IsError)
{
    Debug.WriteLine($"id_token: {loginResult.IdentityToken}");
    Debug.WriteLine($"access_token: {loginResult.AccessToken}");
}
Was this helpful?
Obtaining the User Information
On successful login, the login result will contain the user information in the User property, which is a ClaimsPrincipal.
To obtain information about the user, you can query the claims. You can, for example, obtain the user's name and email address from the name and email claims:
if (!loginResult.IsError)
{
    Debug.WriteLine($"name: {loginResult.User.FindFirst(c => c.Type == "name")?.Value}");
    Debug.WriteLine($"email: {loginResult.User.FindFirst(c => c.Type == "email")?.Value}");
}
Was this helpful?
You can obtain a list of all the claims contained in the ID Token by iterating through the Claims collection:
if (!loginResult.IsError)
{
    foreach (var claim in loginResult.User.Claims)
    {
        Debug.WriteLine($"{claim.Type} = {claim.Value}");
    }
}
Was this helpful?
Logout
To log the user out call the LogoutAsync method.
BrowserResultType browserResult = await client.LogoutAsync();Was this helpful?