---
title: "3 IAM Examples to Support Digital Transformation"
description: "From basic website authentication to implementing an OpenID Connect server and API authentication: This article covers 3 IAM examples to support your Digital Transformation."
authors:
- name: "Jared Hanson"
url: "https://auth0.com/blog/authors/jared-hanson/"
date: "Mar 7, 2018"
category: "Identity & Security,Identity,Digital Transformation"
tags: ["authentication", "authorization", "oauth", "openid", "digital-transformation"]
url: "https://auth0.com/blog/3-iam-examples-to-support-digital-transformation/"
---
# 3 IAM Examples to Support Digital Transformation
**TL;DR:** We recently [hosted a webinar](https://resources.auth0.com/webinars/3-iam-examples/) that covered modern identity management and what it takes to implement both Authentication and Authorization to support your Digital Transformation. In this article, we'll cover these implementations ranging from basic authentication, to an OpenID Connect server, and API authentication.
## Introduction
Identity and Access Management (IAM) encompasses the security protocols and processes that allow the correct users to access the correct content, at the correct times. Cloud-based IAM providers, such as _Auth0_, have created simpler and more intuitive ways of managing user access, and they form an important part of **digital transformations.**
Digital transformation, for those unaware, is not just a buzzword. It encapsulates the process of heavily utilizing modern, digital technologies to radically change businesses.
> Look beyond the hype and you'll find a daunting task at the heart of digital transformation. Rather than focusing on any single IT project, digital transformation describes a series of projects that, together, change every facet of an organization, from back office operations to customer interactions, often with the end goal of making these different processes intrinsically linked.
[http://www.itpro.co.uk/strategy/28047/what-is-digital-transformation](http://www.itpro.co.uk/strategy/28047/what-is-digital-transformation)
As we go through this article, we will cover three _IAM_ use cases. Firstly, we will cover implementing authentication on a basic website. This is the situation most people will find themselves in and the most common use case of the three. Once we've covered basic website authentication, we will move onto standard federated logins.
The second scenario we will cover is _**Enterprise SSO**_. We shall create a fake example company named _Acme,_ whos enterprise customers demand a way of logging into Acme's various services without having to remember a range of username and passwords. By using OpenID Connect, we will show how they can allow their customers' employees to log in with corporate credentials.
Finally, we will cover API integration. When we want to allow our customers to integrate our service into their line-of-business applications in custom ways.
## A Basic Website
Something we're all familiar with is the basic user registration and login that we find on our favorite websites. To access various areas and features of most websites, we usually have to create an account with them. From a high level, all this consists of is a database containing our usernames/email addresses and a complex hash of our passwords (hopefully). Throughout this article, we'll use an example data model in which crucially, the core Users table will never change the schema, only the data references will change. The basic data model looks like this:
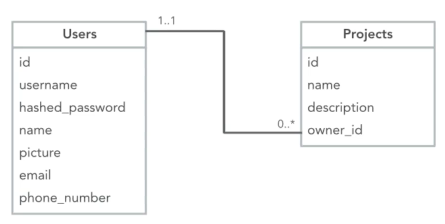
Our sample data model is that of a simple project management tool, in which Users own Projects. Very basic. Now, what we need is a way for our users to register their details for our application.
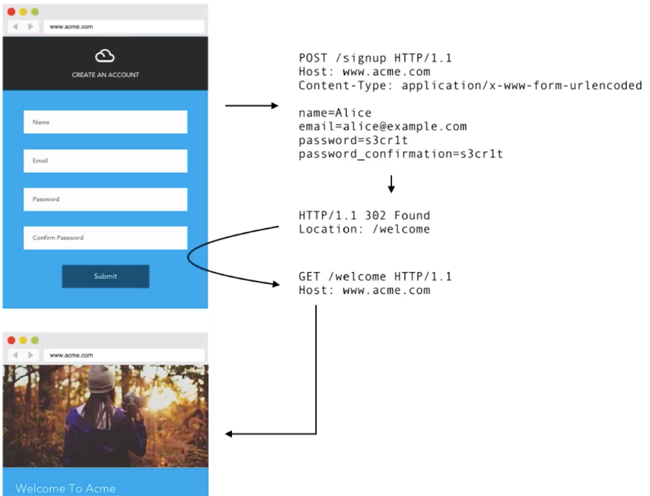
As you can see in the image, our app now contains a standard sign up for new users to register for our service. From a back end perspective, the form uses a `POST` action to submit the form data to our `/signup` resource. Our back end then writes this data to our chosen database and forwards the user onto the specified route upon successful completion. Once we have a user signup implemented, a user login is the next thing we need to address. The basic login flow for our simple web app looks like this:
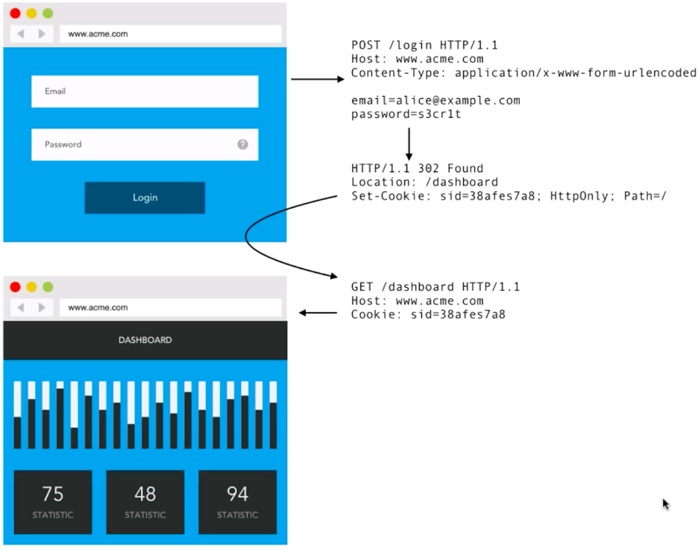
In our login flow, users submit their email address and password, which issues a `POST` request to our `/login` resource. Our application back end takes the credentials supplied, issues a database lookup and ensures the details are correct. If so, our app will issue a HTTP forward request onto the specified resource, containing a Session Cookie.
In the image above, you can see that the Session Cookie is set as a HTTP Header, and is actually the most important factor in this flow. The Cookie will contain tokenized information about our users perhaps including metadata such as the user's name and avatar, so as to reduce database hits going through our web app. Besides containing the user's metadata, the Session Cookie is (more importantly) also the authorization credential for all subsequent requests as the user browses our application.
With this implemented, our application now has a basic user authentication system set up. Being basic, there are many features that we haven't addressed here, but that would really need implementing. Password hashing, password complexity verification, password reset functionality, and multi-factor authentication to name a few. Luckily, by using a system such as [Auth0's Hosted Login](https://auth0.com/docs/hosted-pages/login), we save the worry of having to implement these, as they come as standard. Out of the box, Auth0 offer the features mentioned above plus many more. You can have a fully functional user management system setup in minutes.
## Single Sign On (SSO) for Enterprise
If you've used services such as Amazon Web Services, Slack, GitHub or Salesforce, you will notice that they all have a Single Sign On (SSO) implementation so that users can access those services with their corporate credentials. As we add SSO federated capabilities into our sample application, we do have one constraint in that (as mentioned above), we do not want to change the data table schema.
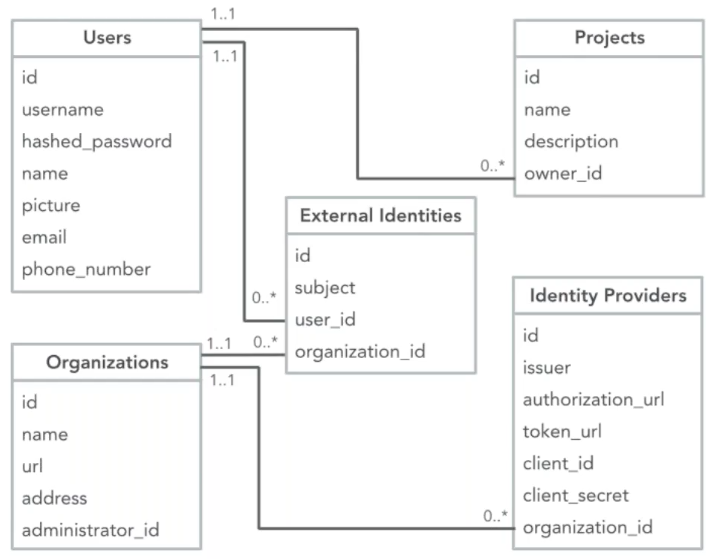
Our `Users` and `Projects` tables do not change, but the relationships evolve to include our external identity providers.
For our Federated SSO implementation, we're going to implement an _Identifier-first_ login prompt. Our application will only ask for an email address for the user:
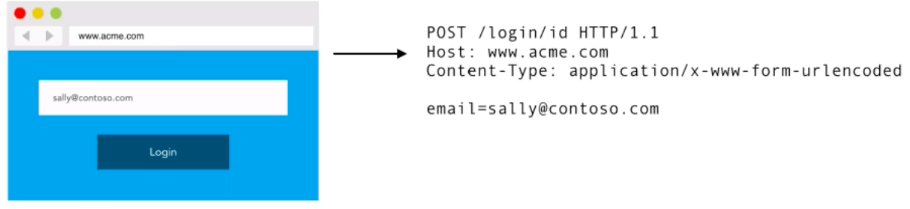
The point of this is to look up the SSO identity provider associated with this email address, which in this case is **_cotoso.com_**, so the user will be redirected there to log in.
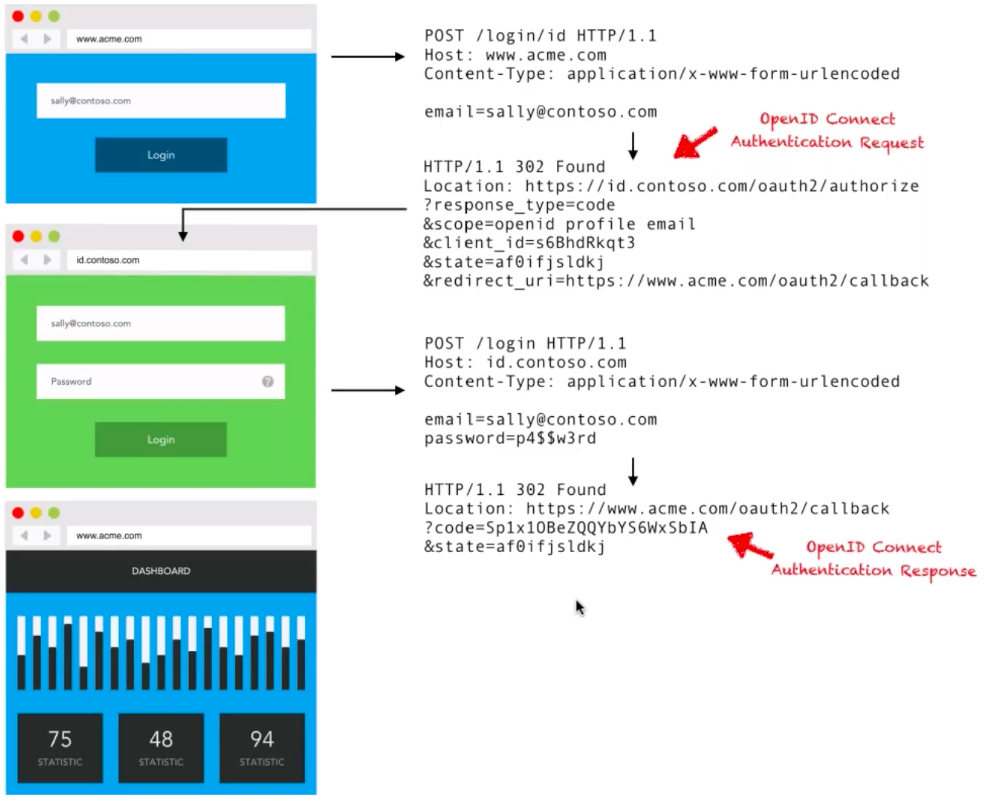
As shown in the image above: once the user _(sally@contoso.com)_ enters her email address, our application determines that _contoso.com_ is our Identity Provider and redirects her there. Sally then logs into her _contoso.com_ corporate account, and _contoso.com_ verifies it. She is then redirected back to our application with access granted.
As part of this OpenID Connect authentication response, the `code` returned in the OpenID Connect Auth Response above is exchanged for an `ID Token`. The `ID Token` is what conveys the identity information from _contoso.com_ to our application, and looks like this:
``` json
{
"iss": "https://id.contoso.com",
"sub": "2482899761001",
"name": "Sally",
"email": "sally@contoso.com"
}
```
As with all ID Tokens, there is an _Issuer_ and an _Identifier_. The Issuer being `https://id.contoso.com`, and the _Identifier_ being the subject `"sub": "2482899761001"`. In the auth flow above, our application (acme.com) will now look at this ID Token, identify Sally, and forward her onto our Dashboard, setting a Session Cookie for future requests.
From a database point-of-view, this SSO flow will look like this:
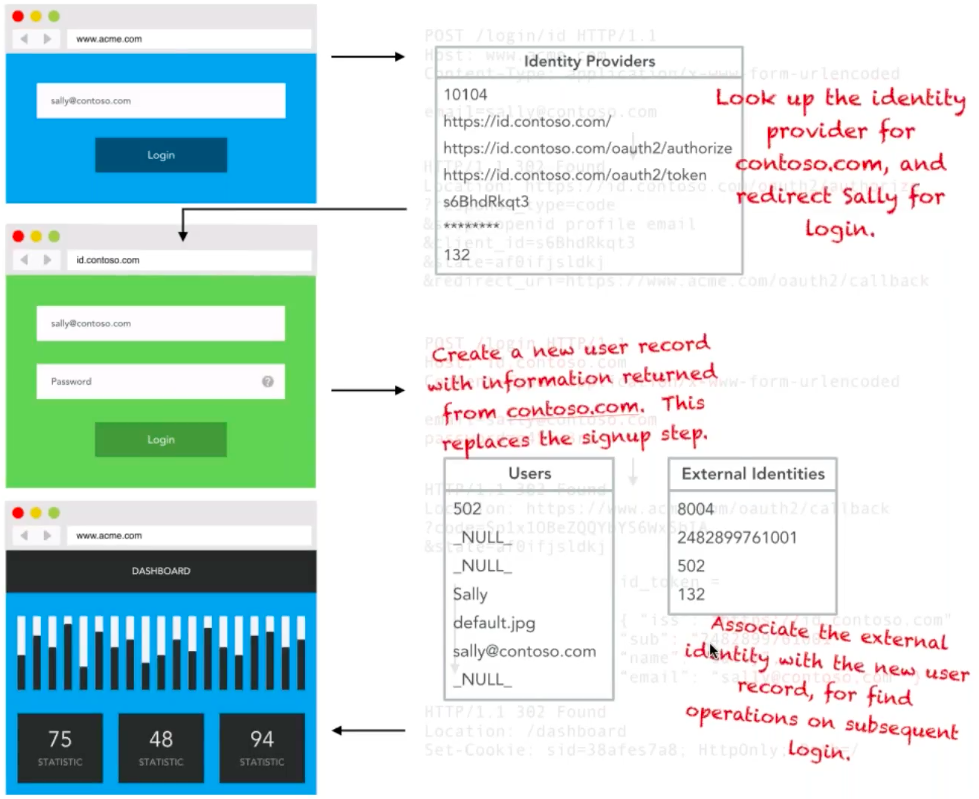
Firstly, our application will perform a lookup for the identity provider _contoso.com_, and redirect Sally to that login. Once Sally has logged in on _contoso.com_ and has been redirected back to our application, one of two things will happen. If Sally has never registered with our application before, a User record will be created for her, with the information returned from _contoso.com_. This would replace the sign up step we implemented in the basic example above. Our application will then associate the external identity with the new user record for find operations on subsequent logins.
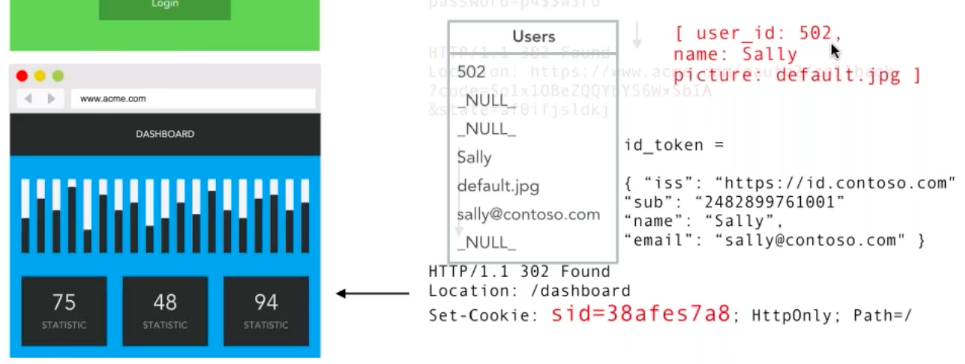
Similar to our earlier basic example, upon successful login, a _Session Cookie_ is set to portray the information required for subsequent requests.
With the above, we now have Single Sign On implemented on our acme.com sample application. Worth noting here is that in this SSO implementation, we have chosen an identifier-first login prompt with no option for a password. In reality, we would need to implement a password option for users that have existing non-federated accounts. Beside this, we should also implement a SAML integration, and support for account linking an unlinking.
By choosing to use an IDaaS provider like _Auth0_, we can get all of these features, plus many more straight out of the box. Using [Auth0 for SSO](https://auth0.com/single-sign-on) allows us configuration of any enterprise connection, including Active Directory, LDAP, ADFS, SAML, and more with just a few lines of code.
## API Authorization
For the final implementation example of this article, we're going to look at API Authorization. We need to implement API auth so that our customers can integrate our service into their applications in ways not offered as standard, and to allow them deeper integrations. Once again, let's take a look at our data model, now including API auth:

Although the model now looks slightly more complex, following our aforementioned constraint; our `Users` and `Projects` schemas have not been changed. The schemas for SSO providers have not changed either. What has changed are the tables on the left, which introduce support for other people getting access to _Acme's_ APIs. If you are familiar with Facebook sign-on or GitHub etc, the terms above are fairly typical. `Clients` are the applications a user may build/use to access APIs and services, `Resource Servers` are the APIs themselves, and the Authorization Grants `(AuthZ Grants)` track the permissions that have been granted between the users and the applications.
For our API Authorization example, we are going to imagine that our sample company (Acme.com) have a customer named _Fabrikam.com,_ who wish to allow their customers to pull a list of their `Projects` from the _Acme_ API to display on their own dashboard.
From a simple button on the _Fabrikam.com_ website, their customers will be redirected through an OAuth2 Authorization request to the _Acme_ website, returning an Auth code on successful submission. Using the OAuth2 auth flow of [Client Credentials Grant](https://auth0.com/docs/api-auth/tutorials/client-credentials), this Auth code will then be swapped for an **Access Token** and used in the web application's _Authorization Header_ using the `Bearer` protocol.
Let's take a look at how the API Auth flow works visually:
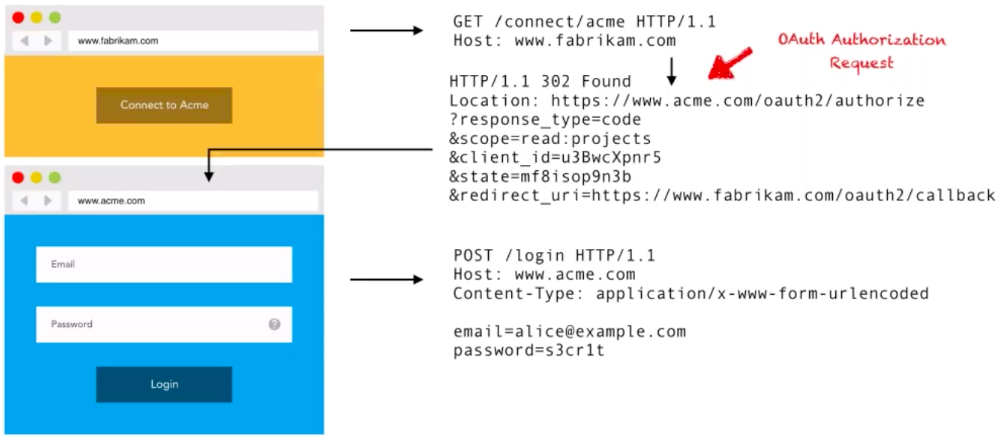
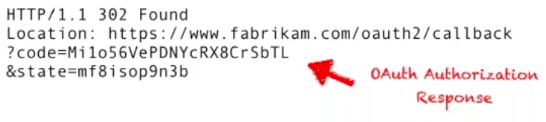
As you can see from the image above, the customer of _Fabrikam.com_ clicks on the 'Connect to Acme' button on their Dashboard. This click then issues a GET request to the `/connect/acme` route, which from the back end initiates an OAuth2 request to the _Acme.com_ server. The _Fabrikam.com_ customer is then prompted to log in using their _Acme_ credentials. On success, the _Acme.com_ server issues the OAuth2 Authorization Response to the `callback_url` specified in the initial request. In a similar manner to the _OpenID Connect_ example above, this response contains a `code` that will be exchanged for an **Access Token:**
Following the [Client Credentials Grant flow](https://auth0.com/docs/api-auth/tutorials/client-credentials), the _Fabrikam.com_ back end swaps the above code for the Access Token needed for subsequent API requests. The Access Token returned will have the following appearance:
``` json
access_token = eYJ0eXAi0...
{
"iss": "https://www.acme.com",
"aud": "https://api.acme.com/v1/",
"sub": "501",
"scp": [ "read:projects" ]
}
```
This _Access Token_ is similar to the _ID Token_ shown in the previous example, but instead of just identifying the user, it is also responsible for allowing _Fabrikam_ to make API calls subsequent to this Authentication event happening. This Token contains _Acme_ as the issuer, the API route to be used, the `subject` referring to the user id of "502", and the request _permissions_ in the `scope`. With the _Access Token_ now available to _Fabrikam.com_, it is used with requests for the customer's `Projects` from the _Acme.com_ API.
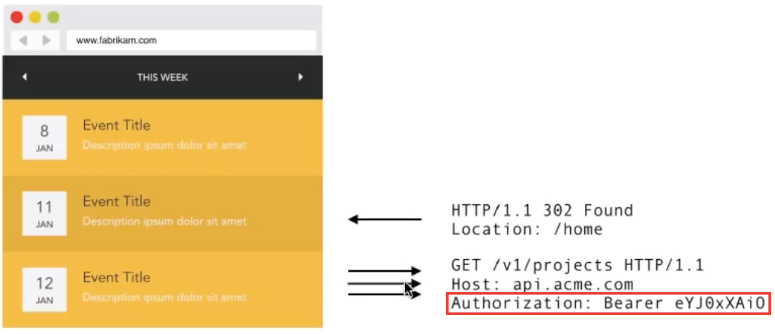
As the image shows, _Fabrikam_ sends the encoded token in the `Authorization` Header of the request, using the `Bearer` protocol, in all subsequent API requests. The _Acme.com_ API successfully returns the customer's `Projects` which are listed in the Dashboard, as shown. That brings to a close the OAuth2 Client Credentials grant for API Auth example. However, we can take this a step further still. What if we wanted to combine this API Auth with the Enterprise SSO implementation in our previous example?
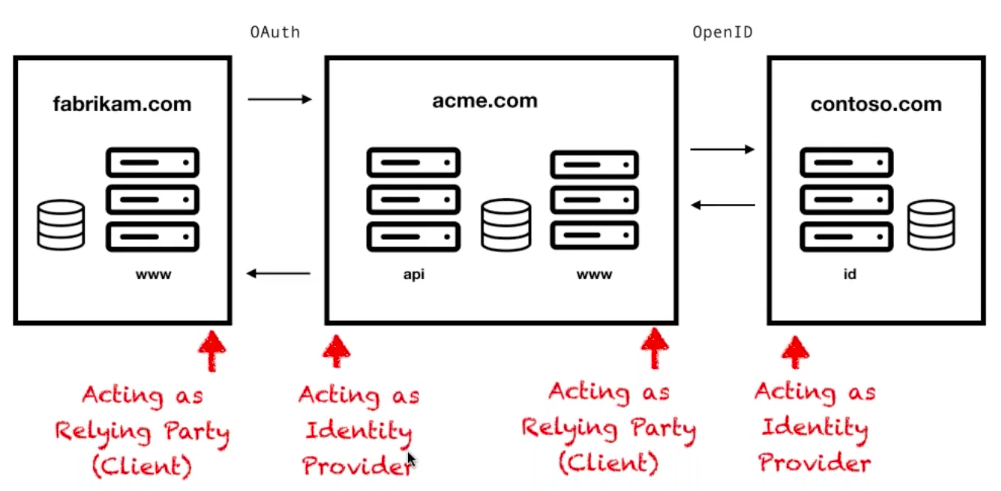
There may arise a scenario in which _Fabrikam.com_ want to integrate with _Acme's_ APIs, but a user at _Acme_ authenticates with corporate credentials for _Contoso.com_ (who is an enterprise customer) as within our previous example. The flow becomes a multi-step process, with the first request coming from _Fabrikam_ to _Acme_, then _Acme_ to _Contoso_, with the responses flowing back in the opposite direction, back to _Fabrikam._. The interesting point of this scenario is that _Acme_ is acting as both an Identity Provider (when providing API authorization), and a Relying Party (when it's consuming identity information). This pattern may sound complex, but it is a very common scenario. Most SaaS companies both provide services, as well as authenticating users from other companies, meaning they have to implement both sides of the protocol (client and provider). The following diagram shows this implementation layout:
Happily, as you will have noticed throughout this article, OAuth 2.0 and OpenID Connect have the same protocols, because OpenID Connect is just an extension of OAuth. This saves us a lot of hassle on implementation. At this point, with Authentication becoming a more prominent feature, it might be worth setting up a single, centralized server to handle all of the Auth requests coming through our app _(Acme)_.
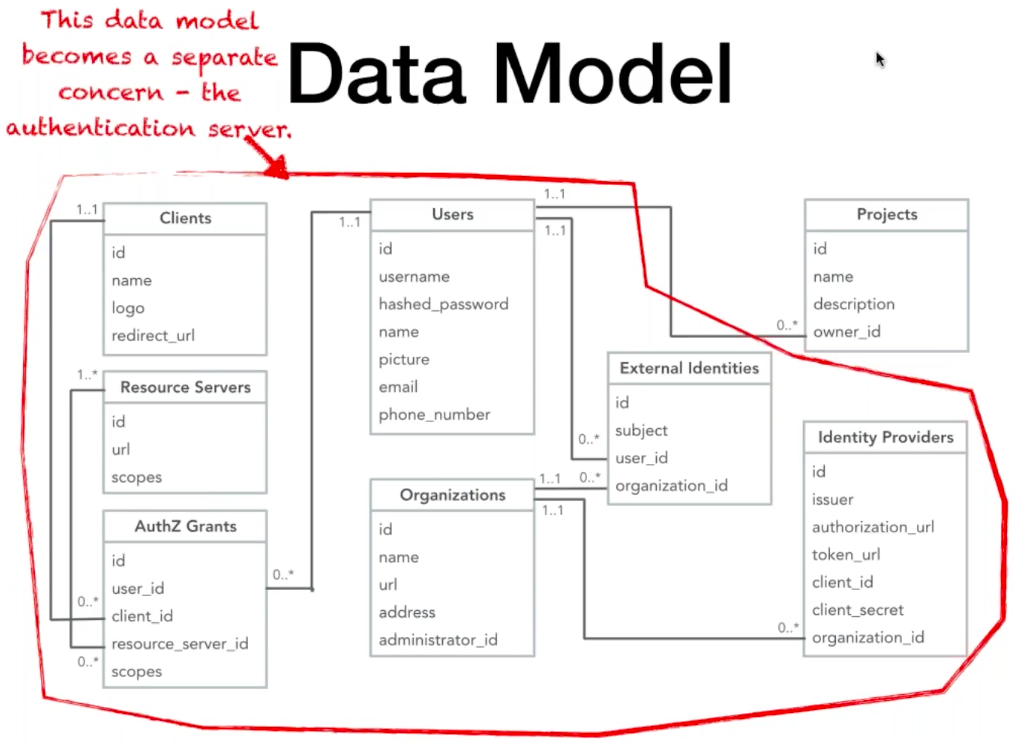
If we revisit our data model, we can see that all of the tables in our model, except for the `Projects` table, can be treated as a separate concern, and become our authentication server:
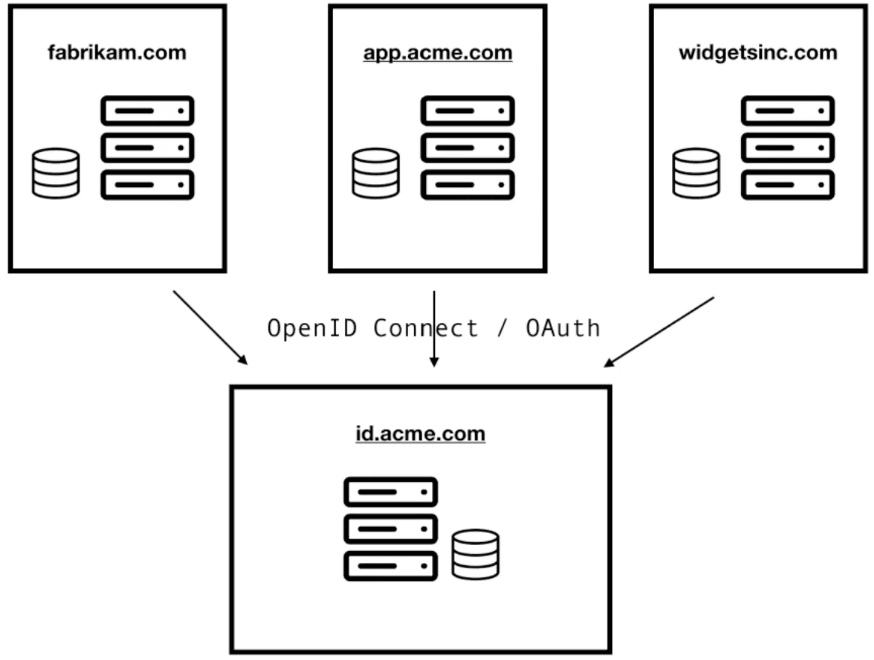
We can take advantage of this in our architecture by creating the aforementioned centralized Auth server on a subdomain such as `id.acme.com`, and piping all of our Authorization / Authentication requests through there. The applications authenticating and being granted authorization through this centralized server may be third-party applications, such as _Fabrikam.com_ or _Contoso.com_, but also internal applications such as `app.acme.com`. Setting up this single centralized server is a nice and clean way to solve a lot of Auth challenges, with a single protocol and a single implementation. The architecture for this server could look like the following:
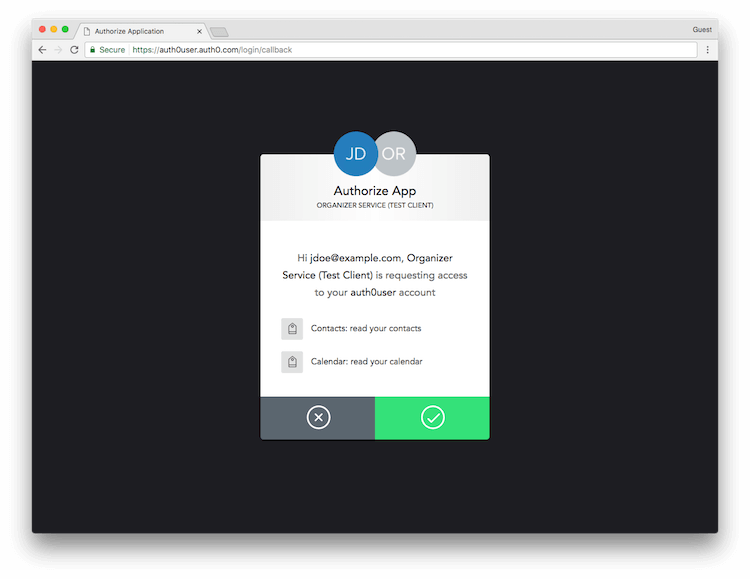
So with this, we have a fully functional OAuth 2.0 server implementation. Whilst this implementation is entirely functional, there are a few extra features not included in this example, that you would want to implement in the real world. One of the biggest is a _Consent Prompt_ ensuring users have the options of granting the application access, such as the following:
Besides this, consent and token revocation is also a must-have feature that would need implementing. Lastly, token introspection and JWTs for stateless authorization are both desirable features one would ideally implement.
If you wanted a fully-featured OAuth 2.0 server with all of the functionality mentioned above, it is definitely worth checking out an IDaaS provider to save you all of the implementation hassles. [Auth0](https://auth0.com/docs/protocols/oauth2) offers out of the box, fully featured OAuth 2.0 implementations that take care of all of the architecture above, plus offer more features and functionality; and all implemented without having to build and manage it yourself.