---
title: "Add Authorization to a Sinatra API using Auth0"
description: "Learn how to implement a Sinatra API and protect its endpoints using Auth0"
authors:
- name: "Carla Urrea Stabile"
url: "https://auth0.com/blog/authors/carla-stabile/"
date: "Mar 13, 2023"
category: "Developers,Tutorial,Ruby"
tags: ["ruby", "sinatra", "authorization"]
url: "https://auth0.com/blog/add-authorization-to-sinatra-api-using-auth0/"
---
# Add Authorization to a Sinatra API using Auth0
[Sinatra](https://sinatrarb.com/) is one of the most popular Ruby frameworks for developing web applications and APIs, used by over 200K applications. Sinatra is a [Domain Specific Language (DSL)](https://en.wikipedia.org/wiki/Domain-specific_language) for creating web applications and APIs in Ruby; it's not your typical web app Model-View-Controller framework but ties specific URLs directly to relevant Ruby code and returns its output in response.
In this blog post, you'll learn how to build a Sinatra API and protect its endpoints using Auth0. You'll build **Sinatra Songs API**, a songs CRUD API, and learn about the top songs of Frank Sinatra because there's no Sinatra API without some Frank Sinatra in it! 😉
## Project Requirements
For this project, you'll use the following versions:
- Ruby 3.1.2
- Sinatra 3.0.2
- An **Auth0 account**. If you don't have one, you can sign up for a free Auth0 account here.
You'll build a **Sinatra Songs API** from scratch, but if you need it, you can check out [the project repository](https://github.com/auth0-blog/sinatra-auth0-songs-api), which has two branches. The `main` branch contains the songs CRUD API, and the [`add-authorization` branch](https://github.com/auth0-blog/sinatra-auth0-songs-api/tree/add-authorization) includes the code used to connect with Auth0 and protect your endpoints.
## Building the Songs API
Let's start by creating a new project. In your terminal, create a new folder called `sinatra-auth0-songs-api` and make it your current directory.
### Installing Sinatra
Let's go ahead and install Sinatra. First, you'll need to create a `Gemfile` to handle all your dependencies.
Create a new file, `Gemfile`, in the root of your project and fill it up with the following:
```ruby
# Gemfile
# frozen_string_literal: true
source 'https://rubygems.org'
ruby File.read('.ruby-version').strip
gem 'sinatra', '~> 3.0', '>= 3.0.2'
gem 'puma'
```
You can specify the ruby version in the `Gemfile`; this is a common practice I personally like because [as explained in the Bundler docs](https://bundler.io/guides/gemfile_ruby.html#specifying-a-ruby-version): *This makes your app fail faster in case you depend on specific features in a Ruby VM. This way, the Ruby VM on your deployment server will match your local one.*
To do so, you specify a file called `.ruby-version` and populate it with the Ruby version you'll use, as follows:
```bash
3.1.2
```
Finally, install the gems by running the following:
```bash
bundle install
```
And just like that, Sinatra 🎩 is installed! You also installed [`puma`](https://github.com/puma/puma) as a web server.
### Creating the song model
Let's create a class to represent a song. Create a new folder, `models`, and a new file, `song.rb` inside the `models` directory.
Populate the `song.rb` file with the following code:
```ruby
# models/song.rb
# frozen_string_literal: true
# Class to represent a Song
class Song
attr_accessor :id, :name, :url
def initialize(id, name, url)
@id = id
@name = name
@url = url
end
def to_json(*a)
{
'id' => id,
'name' => name,
'url' => url
}.to_json(*a)
end
end
```
You are defining a `Song` class with three attributes: `id`, `name`, and `url`. You are also implementing a more [specialized version](https://github.com/flori/json#more-examples) of the [`to_json` method from Ruby](https://apidock.com/rails/Hash/to_json), which will act as a serializer when you render a song as JSON in the controller.
### Implement CRUD API
So far, you've only worked with Ruby; now it's time to get hands-on with Sinatra.
Create a new file, `api.rb` from your terminal and add the following content to the `api.rb` file, which will serve as a skeleton for the API:
```ruby
# api.rb
# frozen_string_literal: true
require 'sinatra'
require 'json'
before do
content_type 'application/json'
end
get '/songs' do
return {todo: :implementation}.to_json
end
get '/songs/:id' do
return {todo: :implementation}.to_json
end
post '/songs' do
return {todo: :implementation}.to_json
end
put '/songs/:id' do
return {todo: :implementation}.to_json
end
delete '/songs/:id' do
return {todo: :implementation}.to_json
end
```
Let's break down what's going on in the `api.rb` file.
First, you are requiring the `sinatra` and `json` gems.
```ruby
require 'sinatra'
require 'json'
```
Unlike Rails, **in Sinatra, you have to load everything yourself**. This could be great because it removes all the Rails magic 🔮 by forcing you to be explicit with what you are using.
Next, you are defining a `before` filter:
```ruby
before do
content_type 'application/json'
end
```
As explained in the [Sinatra Docs](https://sinatrarb.com/intro.html#filters), **`before` filters are evaluated before each request**.
In this case, you are setting the [Content-Type header](https://developer.mozilla.org/en-US/docs/Web/HTTP/Headers/Content-Type) to `application/json`, meaning you are making the client aware that all the responses from this server have JSON format.
Next, you define the routes:
```ruby
get '/songs' do
# ...
end
get '/songs/:id' do
# ...
end
post '/songs' do
# ...
end
put '/songs/:id' do
# ...
end
delete '/songs/:id' do
# ...
end
```
These routes represent the [CRUD](https://it.wikipedia.org/wiki/CRUD) you'll be implementing.
- Create: POST `/songs`
- Read: GET `/songs`
- Read: GET `/songs/:id`
- Update: PUT `/songs/:id`
- Delete: DELETE `/songs/:id`
Well, it's more like *CRRUD*, but you get the point. 🫠
With your API skeleton in place, you can run the server and test the endpoints.
To run the server from your terminal:
```bash
ruby api.rb
```
Once the server is running, your terminal will look as follows:
```bash
➜ sinatra-auth0-songs-api git:(main) ✗ ruby api.rb
== Sinatra (v3.0.2) has taken the stage on 4567 for development with backup from Puma
Puma starting in single mode...
* Puma version: 6.0.0 (ruby 3.1.2-p20) ("Sunflower")
* Min threads: 0
* Max threads: 5
* Environment: development
* PID: 98050
* Listening on http://127.0.0.1:4567
* Listening on http://[::1]:4567
Use Ctrl-C to stop
```
Now you can access the endpoints on `http://localhost:4567`. I've created a [POSTMAN Collection](https://www.getpostman.com/collections/fdda888ac816a7e82f2c), so you can test the endpoints yourself. You can also use `curl` like so:
```bash
➜ curl -v http://localhost:4567/songs
{"todo":"implementation"}%
```
### Populate the API with the `songs.json` file
To have some data in the API, you can download the [`songs.json` file](https://github.com/auth0-blog/sinatra-auth0-songs-api/blob/main/songs.json) from the repository accompanying this article, which was populated using data from the [LastFM API](https://www.last.fm/api). The `songs.json` file contains Frank Sinatra's Top 10 Tracks in a simplified version of what LastFM provides with the following format:
```json
{
"id": 1,
"name": "My Way",
"url": "https://www.last.fm/music/Frank+Sinatra/_/My+Way"
}
```
Let's implement a helper to read from the `songs.json` file and load the data once the Sinatra API starts.
Create a new folder, `helpers`, and a `songs_helper.rb` inside of it and populate it with the following code:
```ruby
# helpers/songs_helper.rb
# frozen_string_literal: true
require_relative '../models/song'
require 'json'
# Class to read songs from a JSON file
class SongsHelper
def self.songs
filepath = File.join(File.dirname(__FILE__), '../songs.json')
file = File.read(filepath)
data = JSON.parse(file)['songs']
data.map do |song|
Song.new(song['id'], song['name'], song['url'])
end
end
end
```
The `SongsHelper` class implements a `songs` method that reads the `songs.json` file and maps its content into an array of `Song` objects.
Next, in your `api.rb` file, you can call the `SongsHelper.songs` function to load the songs:
```ruby
# api.rb
# frozen_string_literal: true
require 'sinatra'
require 'json'
# 👇 new code
require_relative 'helpers/songs_helper'
songs ||= SongsHelper.songs
# 👆 new code
# existing code ...
```
You are importing the `helpers/songs_helper` file, calling the `songs` method, and storing it in a `songs` variable.
Note in a real-world app, you'd have a proper database, and there will be no need to do this step, but to keep this tutorial simple, we won't have a database and will work with the data coming from the `songs.json` file.
Using the `songs` variable, you can now manage the `GET songs` request as follows:
```ruby
# api.rb
# frozen_string_literal: true
require 'sinatra'
require 'json'
require_relative 'helpers/songs_helper'
songs ||= SongsHelper.songs
before do
content_type 'application/json'
end
# 👇 new code
get '/songs' do
return songs.to_json
end
# 👆 new code
# existing code ...
```
The `GET songs` request will now retrieve an array of songs, testing it out with `curl`:
```bash
➜ curl http://localhost:4567/songs
[
{"id":1,"name":"My Way","url":"https://www.last.fm/music/Frank+Sinatra/_/My+Way"},
{"id":2,"name":"Strangers in the Night","url":"https://www.last.fm/music/Frank+Sinatra/_/Strangers+in+the+Night"},
{"id":3,"name":"Fly Me to the Moon","url":"https://www.last.fm/music/Frank+Sinatra/_/Fly+Me+to+the+Moon"},
{"id":4,"name":"That's Life","url":"https://www.last.fm/music/Frank+Sinatra/_/That%27s+Life"},
{"id":5,"name":"I've Got You Under My Skin","url":"https://www.last.fm/music/Frank+Sinatra/_/I%27ve+Got+You+Under+My+Skin"},
{"id":6,"name":"Come Fly With Me","url":"https://www.last.fm/music/Frank+Sinatra/_/Come+Fly+With+Me"},
{"id":7,"name":"The Way You Look Tonight","url":"https://www.last.fm/music/Frank+Sinatra/_/The+Way+You+Look+Tonight"},
{"id":8,"name":"Fly Me to the Moon (In Other Words)","url":"https://www.last.fm/music/Frank+Sinatra/_/Fly+Me+to+the+Moon+(In+Other+Words)"},
{"id":9,"name":"Theme from New York, New York","url":"https://www.last.fm/music/Frank+Sinatra/_/Theme+from+New+York,+New+York"},
{"id":10,"name":"Jingle Bells","url":"https://www.last.fm/music/Frank+Sinatra/_/Jingle+Bells"}
]%
```
Let's now implement the song details' route, `songs/:id`. To do so, let's introduce the concept of helpers and implement a new one.
In your `api.rb` file, add the following content:
```ruby
# frozen_string_literal: true
require 'sinatra'
require 'json'
require_relative 'helpers/songs_helper'
songs ||= SongsHelper.songs
# 👇 new code
helpers do
def id_param
halt 400, { message: 'Bad Request' }.to_json if params['id'].to_i < 1
params['id'].to_i
end
end
# 👆 new code
# existing code ...
```
In Sinatra, [helpers](https://sinatrarb.com/intro.html#helpers) refer to a top-level method that defines helper methods to use in route handlers and templates.
In this case, you are defining a helper `id_param` that checks first if the `params` hash is defined. The `params` hash is a hash that Sinatra makes available for you in your route blocks, and it will automatically include relevant data from the request.
In the `id_param` method, you are showing a `Bad Request` error if the `params['id']` value is not positive. When it is a valid value, you return it and convert it to an integer. You'll use the `id_param` method for all the routes that require `:id` in the route, meaning:
- GET `/songs/:id`
- PUT `/songs/:id`
- DELETE `/songs/:id`
Now, going back to the `api.rb` file, you can implement the song details route by making use of the `id_param` helper method as follows:
```ruby
# existing code ...
get '/songs' do
return songs.to_json
end
get '/songs/:id' do
# 👇 new code
song = songs.find { |s| s.id == id_param }
halt 404, { message: 'Song Not Found' }.to_json unless song
return song.to_json
# 👆 new code
end
# existing code ...
```
You are using Ruby's [`Enumerable#find`](https://apidock.com/ruby/v2_5_5/Enumerable/find) method to find the song in the `songs` array that has the ID sent in the params. If the song was not found, then you'll return a `404 NOT FOUND` error. Otherwise, you'll return the `song` in JSON format.
Let's test it out with `curl`:
```bash
➜ curl http://localhost:4567/songs/1
{"id":1,"name":"My Way","url":"https://www.last.fm/music/Frank+Sinatra/_/My+Way"}%
```
*Noice*. At this point, you have implemented both of the read routes from your Songs API. Time to create, update, and delete.
Let's start by the create route. You can create a new song by providing a `name` and a `url`. In `curl`, that POST request will look as follows:
```bash
curl -X POST 'http://localhost:4567/songs' \
-H 'Content-Type: application/json' \
-d '{
"name": "A new song",
"url": "http://example.com"
}'
```
You must pass the `name` and `url` in the request's body and declare that they come with the correct JSON format. You'll also need to do this when updating a song. This is a hint for you to implement a helper.
Let's implement a new helper, `json_params`, that will check the body is indeed in JSON format.
In your `api.rb`, add the following code:
```ruby
# api.rb
# frozen_string_literal: true
require 'sinatra'
require 'json'
require_relative 'helpers/songs_helper'
songs ||= SongsHelper.songs
helpers do
# existing code ...
# 👇 new code
def json_params
request.body.rewind
@json_params ||= JSON.parse(request.body.read).transform_keys(&:to_sym)
rescue JSON::ParserError
halt 400, { message: 'Invalid JSON body' }.to_json
end
# 👆 new code
# existing code ...
end
# existing code ...
```
The `json_params` method reads from the `request.body` and parses it using `JSON.parse`. If there is a `JSON::ParseError`, meaning the body was not in JSON format, the method will return `400 Bad Request`.
You should also validate that the body parameters are only the required ones: `name` and `url`. Let's create a new helper that will implement that validation:
```ruby
# api.rb
# existing code ...
helpers do
# existing code ...
def json_params
request.body.rewind
@json_params ||= JSON.parse(request.body.read).transform_keys(&:to_sym)
rescue JSON::ParserError
halt 400, { message: 'Invalid JSON body' }.to_json
end
# 👇 new code
def require_params!
json_params
attrs = %i[name url]
halt(400, { message: 'Missing parameters' }.to_json) if (attrs & @json_params.keys).empty?
end
# 👆 new code
# existing code ...
end
# existing code ...
```
The `require_params!` method will be the main method that you'll use in your routes. Firstly, it calls `json_params` to initialize the instance variable `@json_params` and is available in the `api.rb` context. Then, the `require_params!` method verifies that `@json_params.keys` includes any of the values `name` or `url` and no other parameter. You can think of it as an attempt of [Rails' `permit` method](https://apidock.com/rails/ActionController/Parameters/permit). Otherwise, it returns `400 Bad Request`.
The `name` and `url` params are only required when creating and updating a song. You can create a `before` filter to accomplish this.
In your `api.rb`, add the following:
```ruby
# frozen_string_literal: true
require 'sinatra'
require 'json'
require_relative 'helpers/songs_helper'
songs ||= SongsHelper.songs
# 👇 new code
set :method do |*methods|
methods = methods.map { |m| m.to_s.upcase }
condition { methods.include?(request.request_method) }
end
# 👆 new code
helpers do
# ... existing code
end
before do
content_type 'application/json'
end
# 👇 new code
before method: %i[post put] do
require_params!
end
# 👆 new code
```
Let's break this down. You added two new things: one is a `set` and the other is a `before` filter which you are already familiar with.
The [`set` method](https://sinatrarb.com/configuration.html) takes a setting name and value and creates an attribute on the application.
In this case, you'll use it to **identify the HTTP method**. The setting name is `:method`, and it takes an array of symbols as an argument. Then, you use a [`condition`](https://sinatrarb.com/intro#conditions), meaning **you want this `before` filter only to execute when the `condition` is true**, in this case, when the HTTP method is `POST` or `PUT`.
In the `before` filter, you are passing a list of symbols representing the HTTP methods where you want this code to execute, and then you call the `require_params!`.
Now let's add the code for creating and updating songs in your `api.rb`.
First, to create a new song, you'll handle the `POST /songs` request:
```ruby
# existing code ...
before method: %i[post put] do
require_params!
end
# existing code ...
# 👇 new code
post '/songs' do
create_params = @json_params.slice(:name, :url)
if create_params.keys.sort == %i[name url]
new_song = { id: songs.size + 1, name: @json_params[:name], url: @json_params[:url] }
else
halt(400, { message: 'Missing parameters' }.to_json)
end
songs.push(new_song)
return new_song.to_json
end
# 👆new code
# existing code ...
end
# existing code ...
```
The `post /songs` route tries to keep things simple. First, it verifies that **both params `name` and `url` are present** in the `@json_params` hash; keep in mind the `require_params!` filter already made sure these are the only parameters being passed. If the `name` and `url` are present, you can create a new song. Note you are just incrementing the `songs.size` value by 1 and then pushing the new song to the `songs` array. In a real-life application, you would create a new record in your database. If the `name` or `url` parameters are missing, then you return a `400 Bad Request` error.
Let's proceed to add the code for the update route, `put /songs/:id`:
```ruby
# api.rb
# existing code ...
# 👇 new code
put '/songs/:id' do
song = songs.find { |s| s.id == id_param }
halt 404, { message: 'Song Not Found' }.to_json unless song
song.name = @json_params[:name] if @json_params.keys.include? :name
song.url = @json_params[:url] if @json_params.keys.include? :url
return song.to_json
end
# 👆new code
# existing code ...
end
```
When requested to update a song, your code attempts to find the song in the `songs` array using the `id_param`, similar to the song details route. If it's not found, it returns a `404 Not Found` error. If the song is found, **it updates only the field that was sent in the request body** and finally returns the song in JSON format.
Last but not least, there is the delete song route, `delete /songs/:id`. Let's add it to the `api.rb` file:
```ruby
# api.rb
# existing code ...
# 👇 new code
delete '/songs/:id' do
song = songs.find { |s| s.id == id_param }
halt 404, { message: 'Song Not Found' }.to_json unless song
song = songs.delete(song)
return song.to_json
end
# 👆new code
# existing code ...
end
```
The delete song method is very similar to the update song method, but instead, it calls the [`Array#delete` ](https://apidock.com/ruby/Array/delete) function and renders the song in JSON format as well.
Your Songs API is finished! But not secured 😩. At this point, your code must be very similar to the one on the [main branch of the repository.](https://github.com/auth0-blog/sinatra-auth0-songs-api)
## Protect Your Endpoints with Auth0
Up until here, you have created a CRUD Songs API, but anyone can call any endpoint. You want to make sure **only authorized users can create, update, and delete songs.**
To achieve this, you'll use [**Auth0** as your identity access management (IAM) provider](https://auth0.com/docs/get-started/identity-fundamentals/introduction-to-auth0).
Note that from this point on, you will be writing the code that is already implemented in the [`add-authorization`](https://github.com/auth0-blog/sinatra-auth0-songs-api/tree/add-authorization) branch, so you can use it as a guide.
### Connect your Sinatra API with Auth0
Before you jump into the code, you'll need to create a new Auth0 API. Head to the [API section of your Auth0 dashboard](https://manage.auth0.com/#/apis) and click the "Create API" button. Fill out the form with the following values:
* **Name**: Sinatra Songs API
* **Identifier**: `https://sinatra-auth0-songs-api`
* **Signing Algorithm**: RS256 (this should be the default selection)
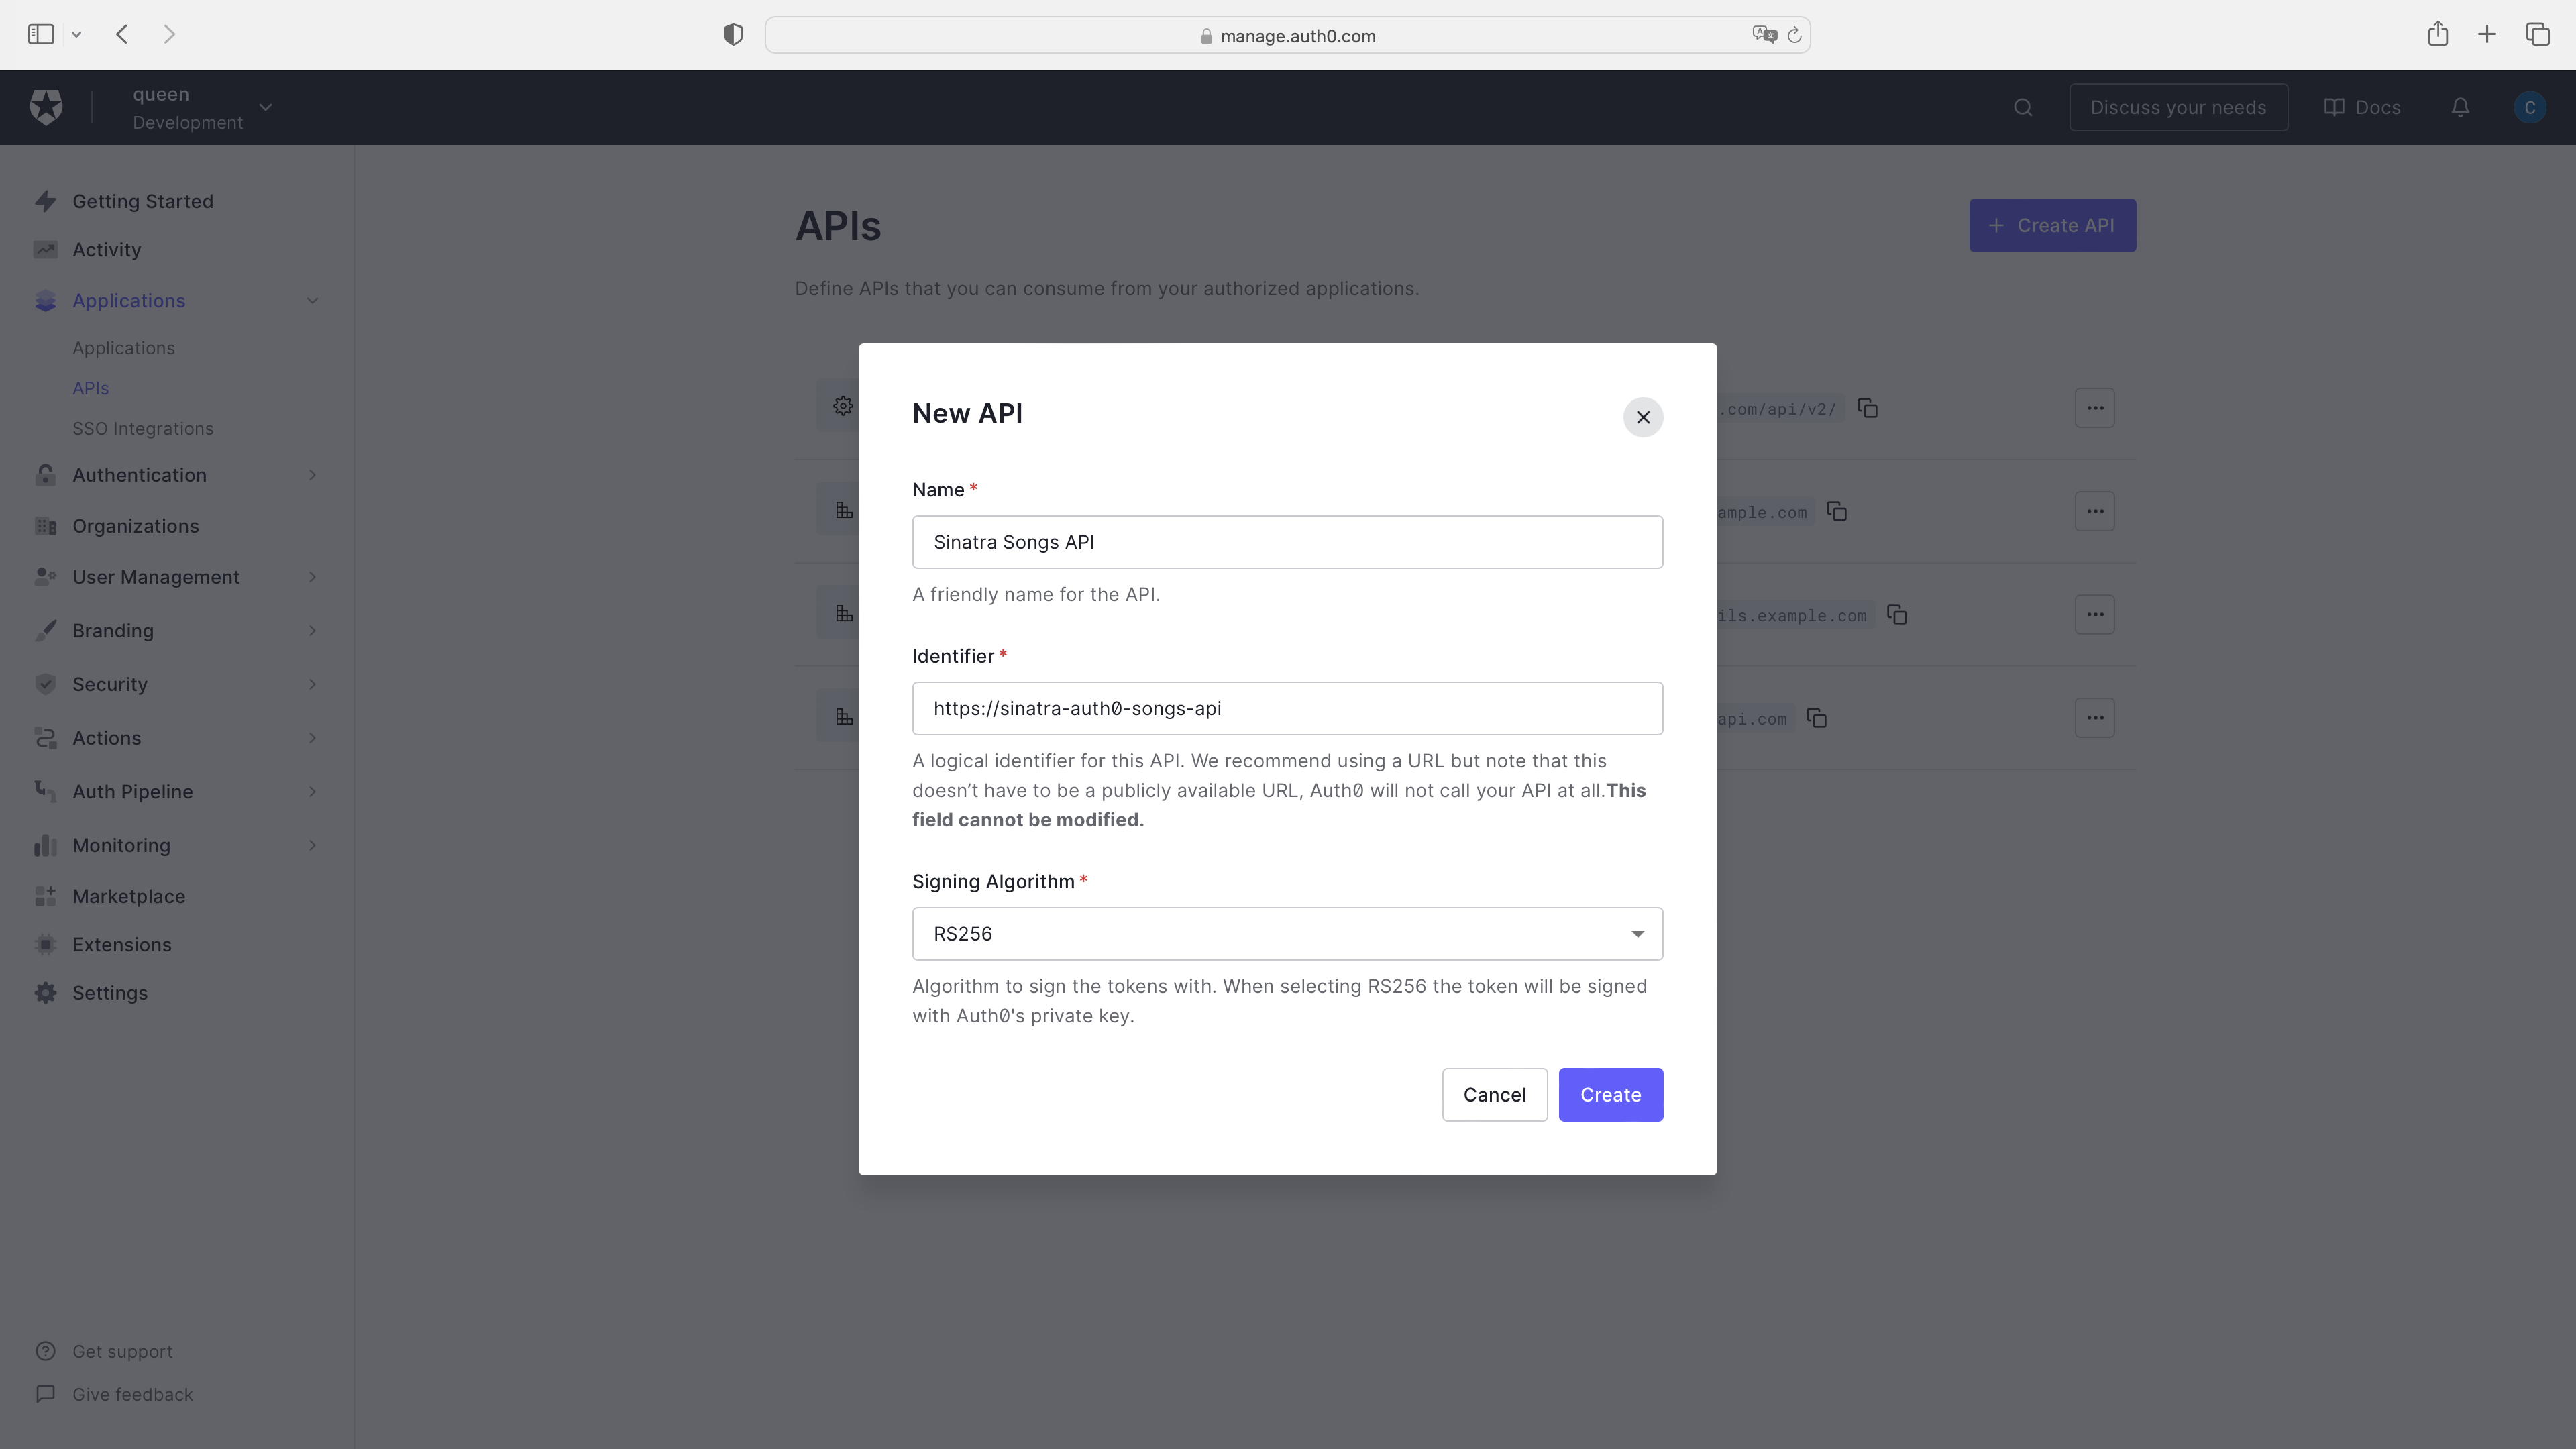
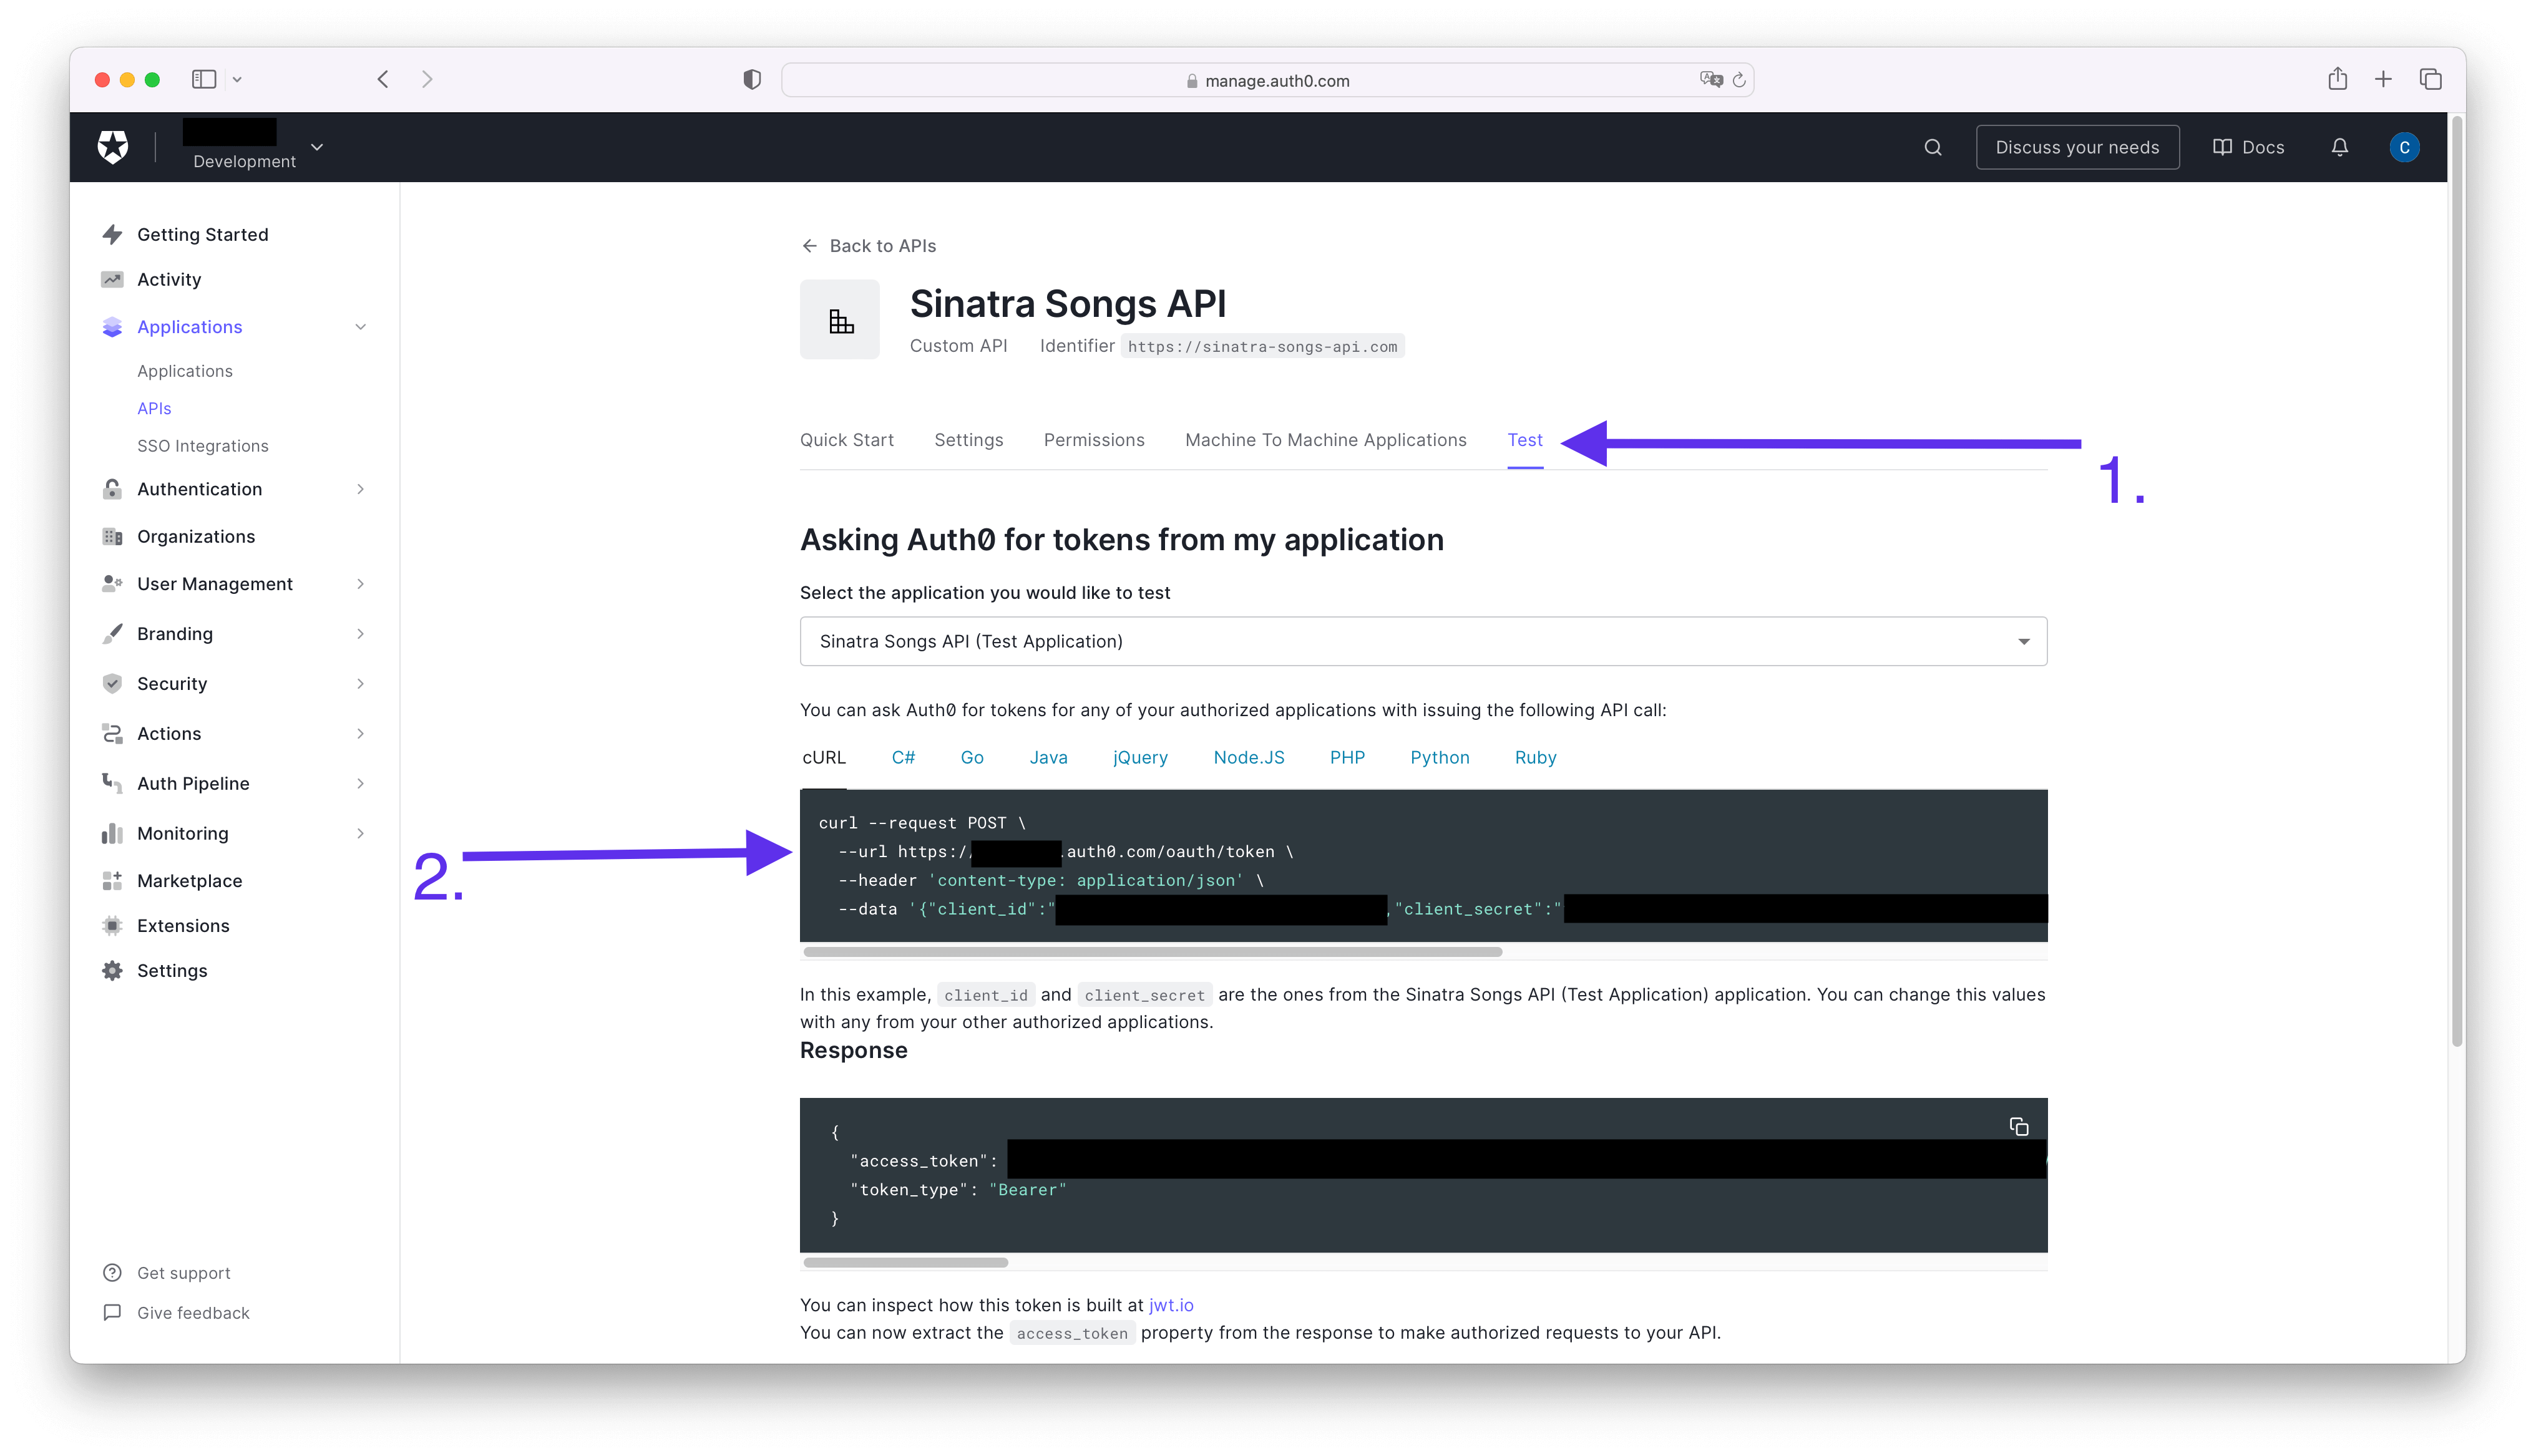
Copy the `identifier` value (`https://sinatra-auth0-songs-api`) — you'll need it when setting up your Sinatra API. You'll also need to grab your **Auth0 Domain**. Unless you're using a custom domain, this value will be `[TENANT_NAME].[REGION].auth0.com`. If you're unsure what this value is, open the "Test" tab in your API's settings and look at the `url` argument in the code sample under "Asking Auth0 for tokens from my application":
Once you've finished creating your API, you can head to the command line and start installing the dependencies.
### Install dependencies
You'll need a few gems, so let's go ahead and add them to the `Gemfile`:
```ruby
gem 'dotenv'
gem 'jwt'
```
Next, in your terminal, run:
```bash
bundle install
```
You are installing the [**dotenv gem**](https://github.com/bkeepers/dotenv) to read environment variables from a local `.env` file. You can use the [`.env.example` file](https://github.com/auth0-blog/sinatra-auth0-songs-api/blob/add-authorization/.env.example) from the repository as a template and copy its content to a `.env` file in the root of your project.
Remember in the previous step; you had to save your Auth0 domain and identifier? Well, this is where you get to use it.
Paste your `AUTH0_DOMAIN` and `AUTH0_IDENTIFIER` into your `.env` file.
You also installed the [**JWT gem**](https://github.com/jwt/ruby-jwt), which is a Ruby implementation of the JWT standard and will help you later on to validate JWT tokens, you'll learn more about those in a bit.
### Validate the access token
In order to protect your API's endpoints, you'll use what's called **token-based authorization**. Basically, your Sinatra Songs API will receive an [**access token**](https://auth0.com/docs/secure/tokens/access-tokens); the passed access token informs the API that the bearer of the token has been authorized to access the API and perform specific actions specified by the [scope](https://auth0.com/docs/get-started/apis/scopes/openid-connect-scopes).
Finally, your API will validate the access token by making sure it has the proper structure and that it was issued by the correct [**authorization server**](https://auth0.com/docs/authenticate/protocols/oauth#roles), in this case, Auth0.
### Create an Auth0 Client class
The first step to validate the access token is to create a new class to take care of the process.
In your `helpers` folder, create a new file called `auth0_client_helper.rb` and add the following code:
```ruby
# helpers/auth0_client_helper.rb
# frozen_string_literal: true
require 'jwt'
require 'net/http'
# AuthoClient helper class to validate JWT access token
class Auth0ClientHelper
# Auth0 Client Objects
Error = Struct.new(:message, :status)
Response = Struct.new(:decoded_token, :error)
# Helper Functions
def self.domain_url
"https://#{ENV['AUTH0_DOMAIN']}/"
end
def self.decode_token(token, jwks_hash)
JWT.decode(token, nil, true, {
algorithm: 'RS256',
iss: domain_url,
verify_iss: true,
aud: (ENV['AUTH0_AUDIENCE']).to_s,
verify_aud: true,
jwks: { keys: jwks_hash[:keys] }
})
end
def self.get_jwks
jwks_uri = URI("#{domain_url}.well-known/jwks.json")
Net::HTTP.get_response jwks_uri
end
# Token Validation
def self.validate_token(token)
jwks_response = get_jwks
unless jwks_response.is_a? Net::HTTPSuccess
error = Error.new(message: 'Unable to verify credentials', status: :internal_server_error)
return Response.new(nil, error)
end
jwks_hash = JSON.parse(jwks_response.body).transform_keys(&:to_sym)
decoded_token = decode_token(token, jwks_hash)
Response.new(decoded_token, nil)
rescue JWT::VerificationError, JWT::DecodeError
error = Error.new('Bad credentials', 401)
Response.new(nil, error)
end
end
```
There are a few things going on in this class, and I've explained it extensively in the [**Rails API Authorization By Example Guide**](https://developer.auth0.com/resources/guides/api/rails/basic-authorization), particularly the section [**Validate a JSON Web Token (JWT) in Rails** under *"What is the Auth0Client class doing under the hood?"*](https://developer.auth0.com/resources/guides/api/rails/basic-authorization#validate-a-json-web-token-jwt-in-rails). Of course, I made a few changes to modify the code from Rails to Sinatra, but the main idea remains.
With that being said, let's take a look at the main method in this class: the `validate_token` method.
```ruby
def self.validate_token(token)
jwks_response = get_jwks
unless jwks_response.is_a? Net::HTTPSuccess
error = Error.new(message: 'Unable to verify credentials', status: :internal_server_error)
return Response.new(nil, error)
end
jwks_hash = JSON.parse(jwks_response.body).transform_keys(&:to_sym)
decoded_token = decode_token(token, jwks_hash)
Response.new(decoded_token, nil)
rescue JWT::VerificationError, JWT::DecodeError
error = Error.new('Bad credentials', 401)
Response.new(nil, error)
end
```
Let's break down what the `validate_token` method is doing:
1. First, you call the `get_jwks` method, which in summary calls Auth0's `well-known` endpoint and returns the [**JSON Web Key Set (JWKS)**](https://auth0.com/docs/secure/tokens/json-web-tokens/json-web-key-sets) used to verify all Auth0-issued JWTs for your tenant. If there was an error getting the JWKS, then you throw an error because the token could not be validated.
2. Next, you parse the JWKS into a hash to make it easier to work with in Ruby.
3. Finally, you call the `decode_token` method, which uses the JWT gem to decode the access token as follows:
```ruby
JWT.decode(token, nil, true, {
algorithm: 'RS256',
iss: domain_url,
verify_iss: true,
aud: (ENV['AUTH0_AUDIENCE']).to_s,
verify_aud: true,
jwks: { keys: jwks_hash[:keys] }
})
```
The `domain_url` gets your `AUTH0_DOMAIN` from the environment variables, and you set your `AUTH0_AUDIENCE` in the `aud` value. Finally, you pass the `jwks_hash` you created earlier in the `jwks` argument.
To learn more about the `JWT.decode` arguments, you can refer to the [**Rails API Authorization By Example Developer Guide**](https://developer.auth0.com/resources/guides/api/rails/basic-authorization#validate-a-json-web-token-jwt-in-rails), section *"What is the Auth0Client class doing under the hood?"*.
### Create an `authorize!` helper
The `Auth0ClientHelper` class is already doing most of the work to validate the access token. Now you need to actually call it in the endpoints you want to protect.
For that, you can use a helper, similar to how you used it earlier.
Go to your `api.rb` file and add the following code:
```ruby
# api.rb
# existing code ...
helpers do
# existing code ...
# 👇 new code
def authorize!
token = token_from_request
validation_response = Auth0ClientHelper.validate_token(token)
return unless (error = validation_response.error)
halt error.status, { message: error.message }.to_json
end
def token_from_request
authorization_header_elements = request.env['HTTP_AUTHORIZATION']&.split
halt 401, { message: 'Requires authentication' }.to_json unless authorization_header_elements
unless authorization_header_elements.length == 2
halt 401, { message: 'Authorization header value must follow this format: Bearer access-token' }.to_json
end
scheme, token = authorization_header_elements
halt 402, { message: 'Bad credentials' }.to_json unless scheme.downcase == 'bearer'
token
end
# 👆 new code
end
# existing code ...
```
Well, you actually added two helpers but the `token_from_request` method is the helper of the `authorize!` helper 😛.
The `authorize!` helper gets the token from the request by calling the `token_from_request` method. This method checks the `HTTP_AUTHORIZATION` header and splits it to verify it is well-formed.
A well-formed [`Authorization` header](https://developer.mozilla.org/en-US/docs/Web/HTTP/Headers/Authorization) using the bearer scheme looks like this:
```
Authorization: Bearer eyJhbGciOiJSUzI1NiIsInR5cCI6IkpXVCJ9.eyJzdWIiOiIxMjM0NTY3ODkwIiwibmFtZSI6IkpvaG4gRG9lIiwiYWRtaW4iOnRydWUsImlhdCI6MTUxNjIzOTAyMn0.NHVaYe26MbtOYhSKkoKYdFVomg4i8ZJd8_-RU8VNbftc4TSMb4bXP3l3YlNWACwyXPGffz5aXHc6lty1Y2t4SWRqGteragsVdZufDn5BlnJl9pdR_kdVFUsra2rWKEofkZeIC4yWytE58sMIihvo9H1ScmmVwBcQP6XETqYd0aSHp1gOa9RdUPDvoXQ5oqygTqVtxaDr6wUFKrKItgBMzWIdNZ6y7O9E0DhEPTbE9rfBo6KTFsHAZnMg4k68CDp2woYIaXbmYTWcvbzIuHO7_37GT79XdIwkm95QJ7hYC9RiwrV7mesbY4PAahERJawntho0my942XheVLmGwLMBkQ
```
Then, the `token_from_request` method verifies if the `Authorization` header is present, if the token is present, and if it has the correct scheme. Otherwise, it will return `401 Unauthorized`.
Once the token is retrieved from the `Authorization` header, the `authorize!` helper calls the `validate_token` method of the `Auth0ClientHelper` class to validate the token. If the token was validated without errors, the `authorize!` method finished its execution. If there is any error during the validation, it returns it with a proper status and message.
### Protect your API endpoints with the `authorize!` helper
The last step to protect your endpoints is to call the `authorize!` helper *before* any client tries to call them.
So as you saw earlier, a `before` filter is the way to go.
In your `api.rb` file, you already had a `before` filter that you can reuse, so let's modify it:
```ruby
# api.rb
# existing code ...
# old code
# before method: %i[post put] do
# require_params!
# end
# old code
# 👇 new code
before method: %i[post put delete] do
require_params!
authorize!
end
# 👆 new code
# existing code ...
```
First, you added the `delete` method to the `before` filter because you want only authorized users to be able to create, update and delete songs.
Then you call the `authorize!` helper that will perform the authorization validation.
That's it! You can now test your endpoints with `curl` as follows:
```bash
curl -X POST 'http://localhost:4567/songs' \
-H 'Authorization: Bearer YOUR_TOKEN' \
-d '{
"name": "A new song"
"url": "http://example.com"
}'
```
Once you replace the `YOUR_TOKEN` placeholder with a valid access token, the result of this request will be the following:
```bash
{"id":11,"name":"A new song","url":"http://example.com"}
```
To get a valid access token for your API, follow the steps shown in the section [*Connect your Sinatra API With Auth0*](#Connect-your-Sinatra-API-with-Auth0).
## Summary
In this blog post, you learned about the Ruby framework Sinatra and how to create a basic CRUD API to manage Frank Sinatra songs.
You created a new Auth0 account and a new API from the dashboard. You used the JWT gem to validate an access token issued by Auth0 and finally secured your API endpoints for creating, updating, and deleting songs by using token-based authorization and the bearer scheme.
I hope you enjoyed this post. Do you use any other Ruby frameworks? Let me know in the comments!
Thanks for reading!