---
title: "Add OpenID Connect to Angular Apps Quickly"
description: "This tutorial shows you how to add authentication to your Angular App with Auth0"
authors:
- name: "Matt Raible"
url: "https://auth0.com/blog/authors/matt-raible/"
date: "Jan 18, 2022"
category: "Developers,Tutorial,Angular"
tags: ["angular", "authentication", "openid"]
url: "https://auth0.com/blog/add-oidc-to-angular-apps-quickly/"
---
# Add OpenID Connect to Angular Apps Quickly
AngularJS 1.0 was released in October 2010. At the time, it was considered one of the most revolutionary and popular web frameworks ever to see the light of day. Developers loved it, and created many apps with it. However, as a pioneer in the JS framework space, AngularJS had some growing pains and significant issues. The team went back to the drawing board for a major breaking release with Angular 2. It took two years to develop and influenced many devs to hop onto other frameworks in the meantime.
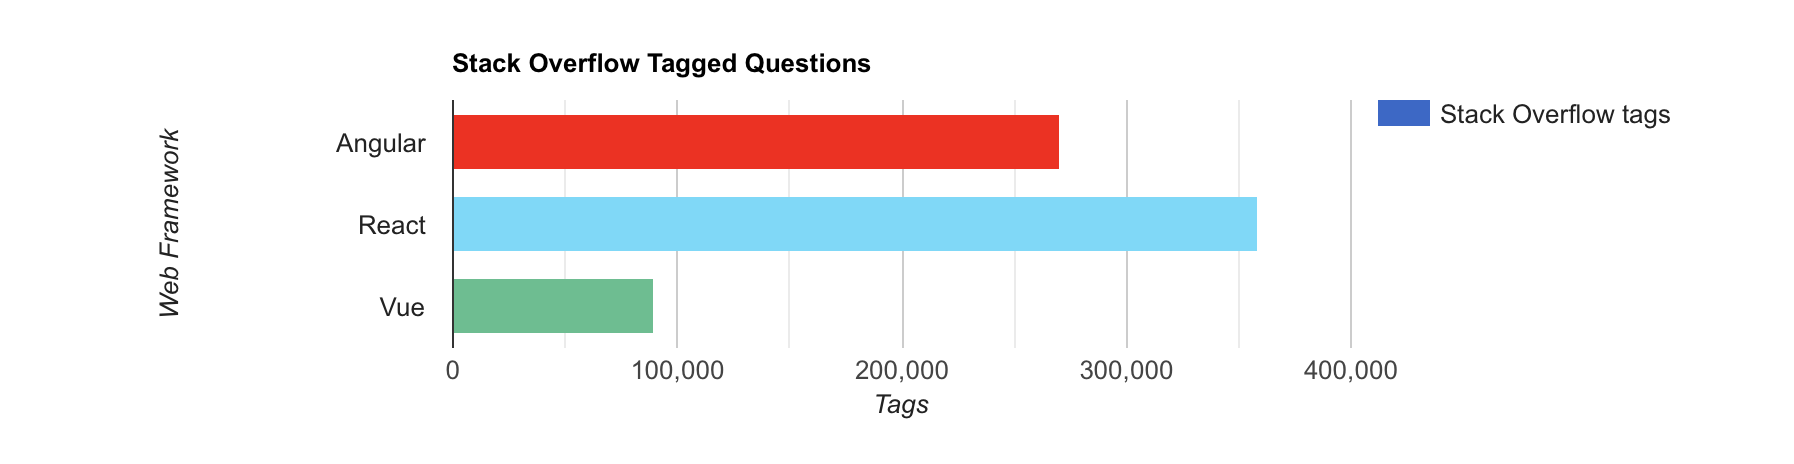
Today, five years after Angular 2 was released, we just call it “Angular” and its version numbers have far less meaning. Five years is a long time for a modern JS web framework to live and thrive. If you look at the number of Stack Overflow questions, you’ll see that users struggle with React far more than Angular.
I kid, I kid. 😅
I don’t think Stack Overflow tags indicate that developers have a hard time with the framework; I think they indicate a thriving community. The more people use technology, the more they submit questions for it.
[hotframeworks.com](https://hotframeworks.com/) lists a score that combines GitHub stars with Stack Overflow tags and says the top six web frameworks are as follows (at the time of this writing):
1. React
2. ASP.NET MVC
3. Angular
4. Ruby on Rails
5. AngularJS
6. Vue.js
Angular is still very popular among developers. If you’re developing an Angular app today, you probably need a way to authenticate your users. That’s where OpenID Connect (OIDC) can help you. OIDC is a layer on top of OAuth 2.0 that provides identity.
In this tutorial, I'll show you how to add OIDC authentication with Auth0 to a new Angular app in just a few steps.
### Prerequisites:
* A favorite text editor or IDE. I recommend [IntelliJ IDEA](https://www.jetbrains.com/idea/), but I know many JavaScript developers prefer [Visual Studio Code](https://code.visualstudio.com/).
* [Node.js](http://nodejs.org/) v14+ and npm installed.
If you would rather follow along by watching a video, check out the screencast below from [the OktaDev YouTube channel](https://youtu.be/YiR7XFgsD8w).
## Create an Angular App
First, you’ll need to create a new Angular app with routing enabled. Install the Angular CLI globally, then create an app.
```shell
npm i -g @angular/cli@13
ng new auth0-demo --routing
```
You’ll be prompted to select your favorite stylesheet format. The selection you make doesn’t matter for this example since we’re focused on functionality rather than updating visuals.
## Add Authentication with OpenID Connect
To add authentication with Auth0, you’ll first need a [free Auth0 account](https://a0.to/blog_signup). Install the [Auth0 CLI](https://github.com/auth0/auth0-cli#installation) and run `auth0 login` to register your account. Then, run `auth0 apps create`. Use the name `auth0-demo` and specify a description of your choosing. Select Single Page Web Application and use `http://localhost:4200/home` for the Callback URL. Specify `http://localhost:4200` for the rest of the URLs. We’re using 4200 as the port here because that’s the default for local Angular development.

You can also use the Auth0 Console to create an OIDC app:
* [Log in](https://auth0.com/auth/login) to Auth0 or [create an account](https://a0.to/blog_signup) if you don’t have one. Go to **Applications** > **Create Application**.
* Choose **Single Page Web Applications** as the application type and click **Create**.
* Click **Angular**, then the **Settings** tab.
* Add `http://localhost:4200/home` as an Allowed Callback URL and `http://localhost:4200` as a Logout URL.
* Specify `http://localhost:4200` as an Allowed Origin and click **Save Changes** at the bottom.
Once you have a new Angular app and Auth0 OIDC set up, you can use [OktaDev Schematics](https://github.com/oktadev/schematics#angular--auth0) to add OAuth 2.0 and OIDC support to your Angular app. Be sure to execute this command in the folder for the app itself (`auth0-demo`) adjacent to `package.json`.
```shell
ng add @oktadev/schematics --auth0
```
The Auth0 CLI will prompt you for an issuer URL and client ID, which were displayed when setting up the app in Auth0. If you used the CLI, it would have shown the issuer URL right above the client ID.
```shell
=== dev-0ua1y-go.us.auth0.com application created
CLIENT ID TJgZxGnlSkqUe6JfMFSipZcFsbpl6LS2
```
This process will perform the following steps for you:
1. Install the [Auth0 Angular SDK](https://github.com/auth0/auth0-angular).
2. Add `src/app/auth-routing.module.ts` with your OIDC configuration and initialization logic.
3. Configure an `AuthHttpInterceptor` that adds an `Authorization` header with an access token to outbound requests.
4. Create a `HomeComponent` and configure it with authentication logic.
5. Update unit tests for `AppComponent` and `HomeComponent` to mock Auth0.
To see all the changes it makes to your files, see [this pull request on GitHub](https://github.com/oktadev/auth0-angular-example/pull/1/files). If you’re interested in learning more about Schematics, I recommend reading my [Use Angular Schematics to Simplify Your Life](https://developer.okta.com/blog/2019/02/13/angular-schematics) tutorial.
### Test your Angular authentication flow
Run `ng serve` in your app, and you should see a login button at `http://localhost:4200/home`.
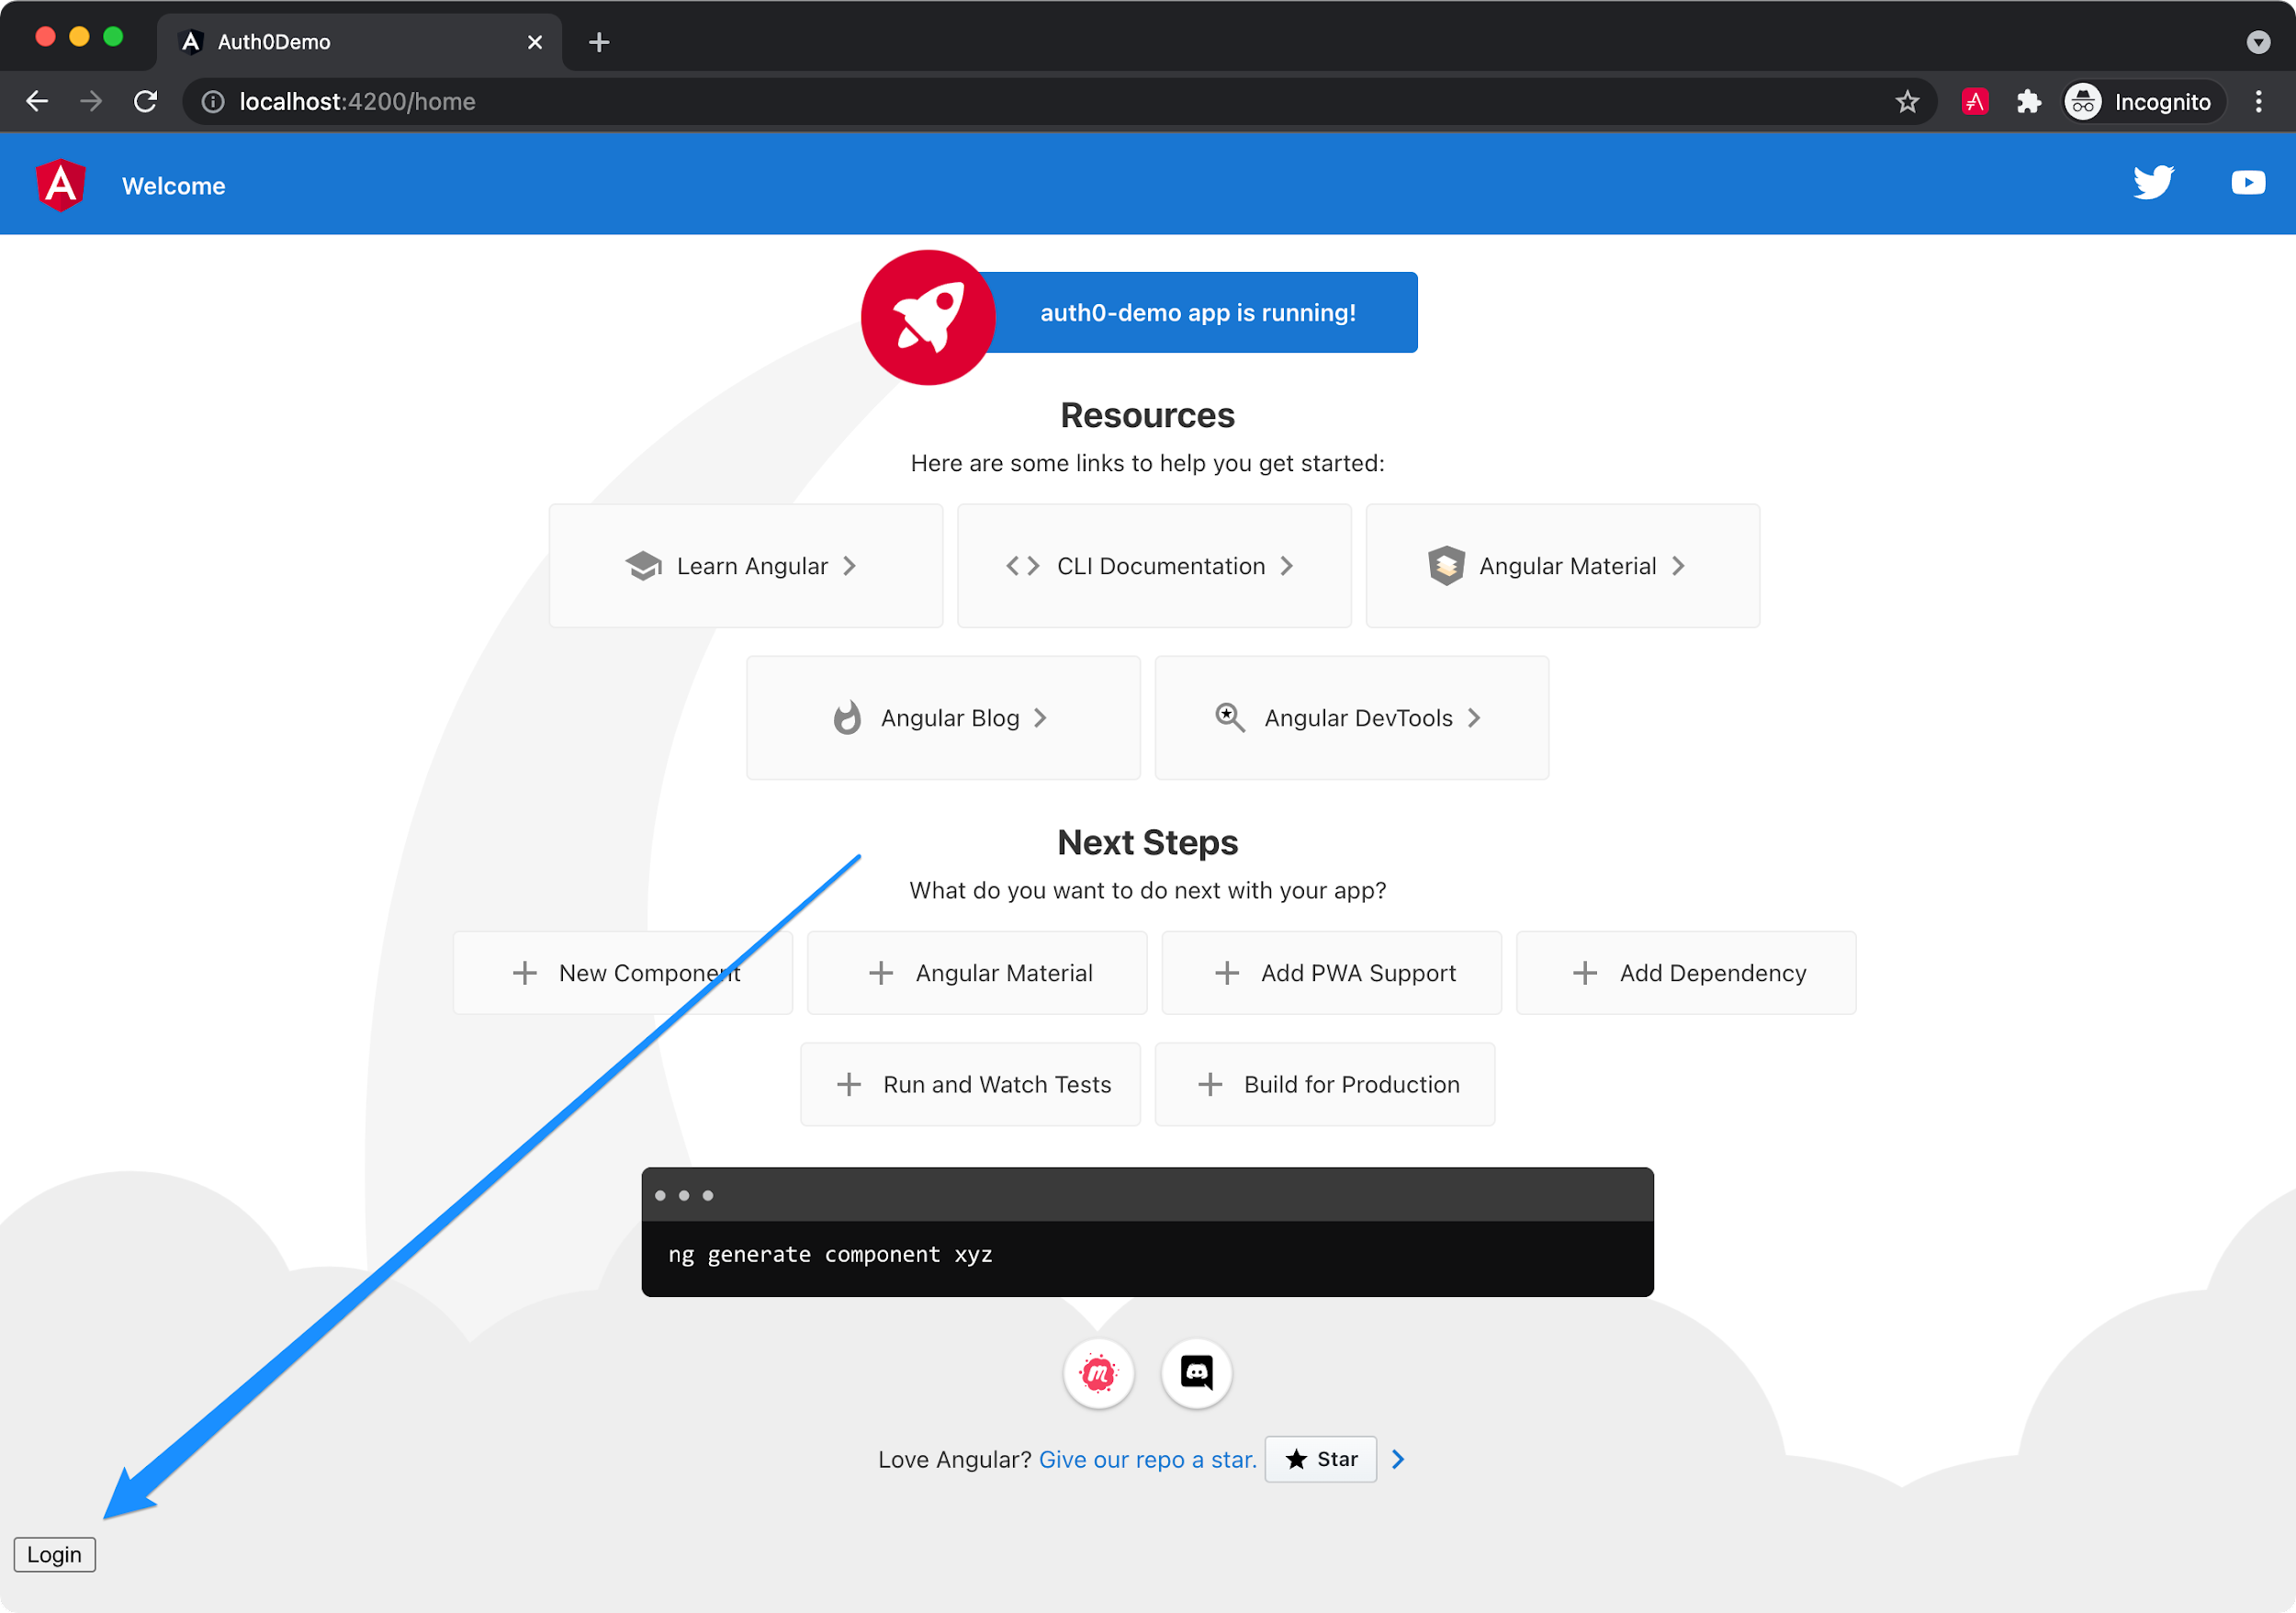
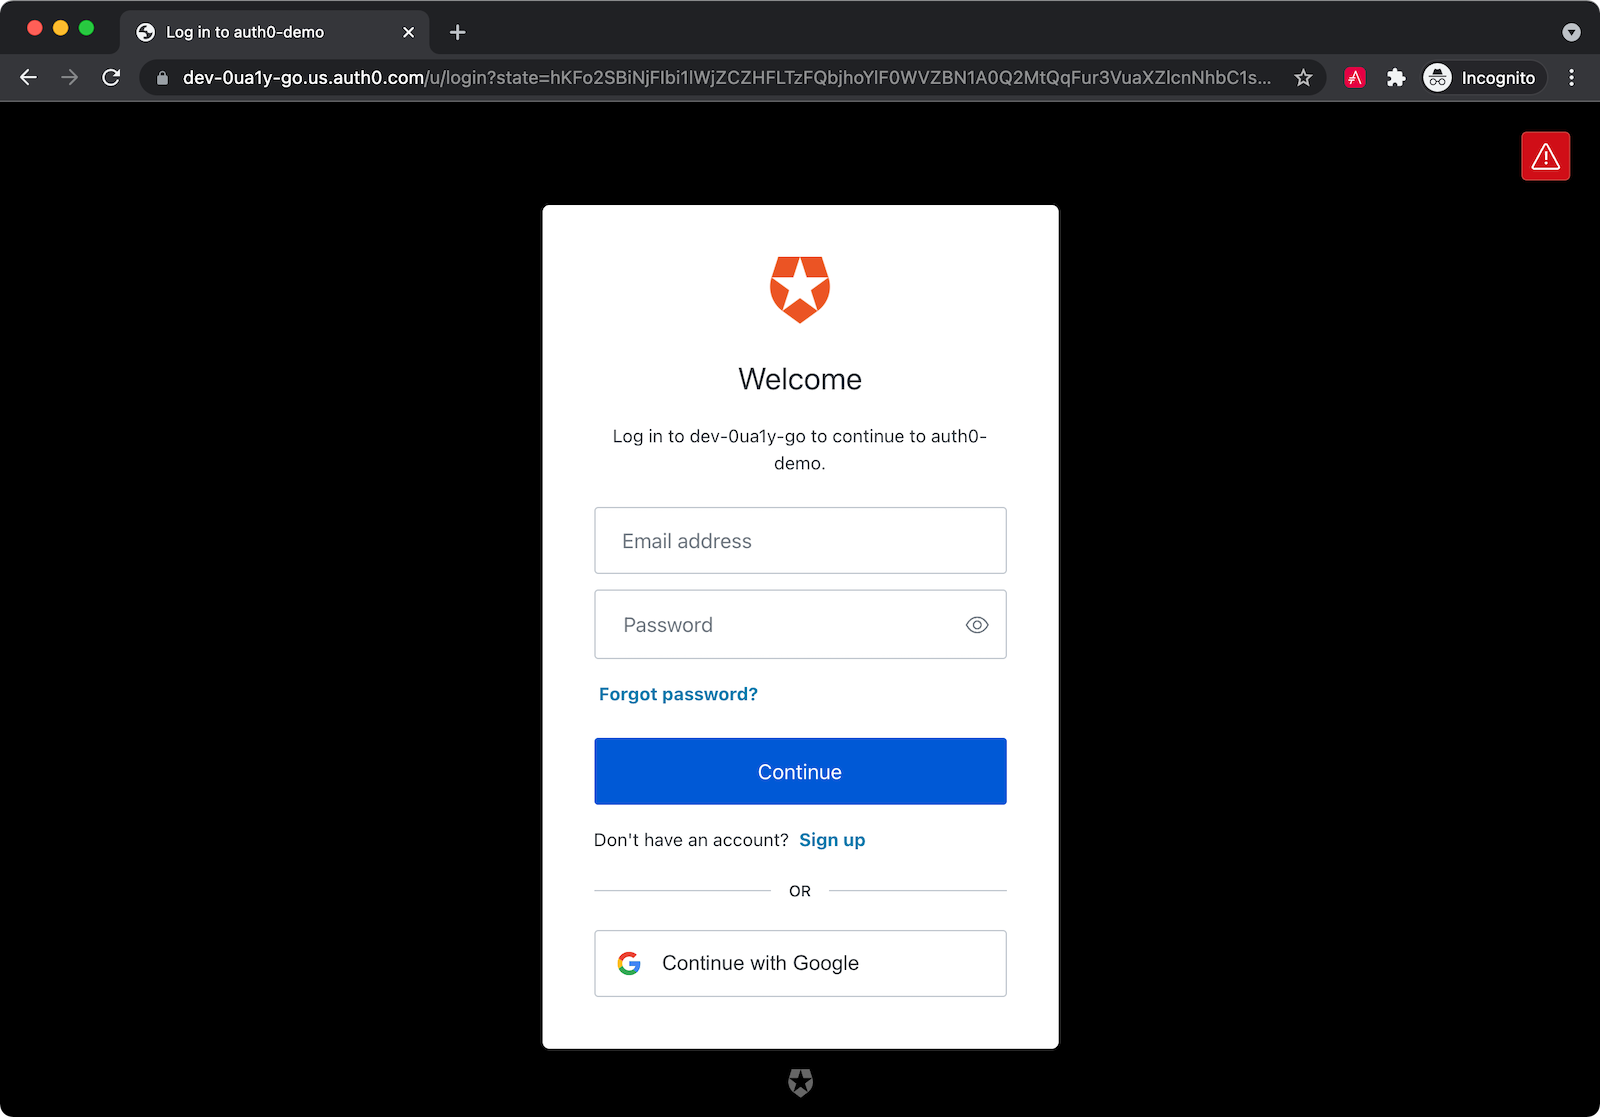
Click the **Login** button and sign in with one of the configured users for your Auth0 application. Because this is just a demo, you probably haven’t done that - more likely, you should sign up as a new user.
After login, you’ll be redirected back to your app, and you’ll see a **Logout** button displayed in the bottom left corner.

### Display the authenticated user’s name
To display the authenticated user’s name, you can use the `user$` observable on the `AuthService` instance.
Modify `src/app/home/home.component.html` to display a welcome message to the user.
```html
Welcome, {{user?.name}}!
```
Refresh your app, and you should see your name displayed.
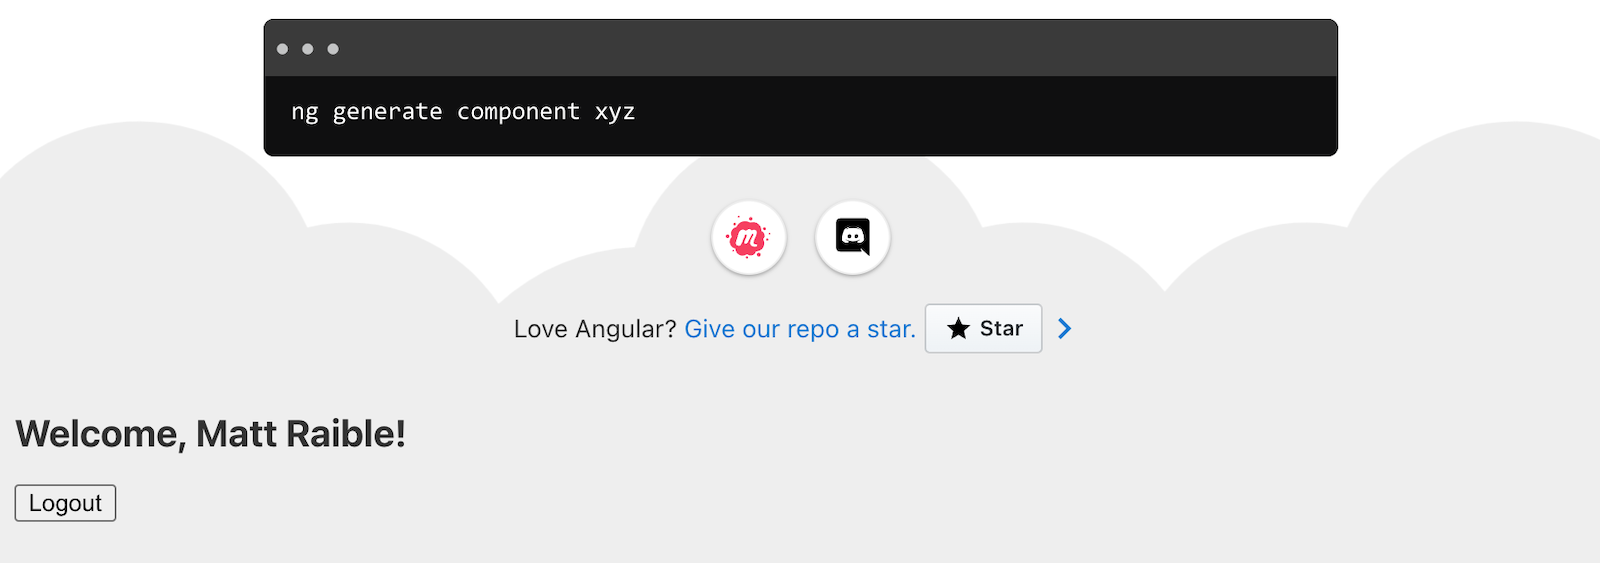
If everything works—congrats!
## Learn more about Angular and OpenID Connect
I hope you enjoyed this quick tutorial on using Auth0 and OIDC for authentication in your Angular apps. If you’re looking for a more detailed step-by-step tutorial, please read [The Complete Guide to Angular User Authentication with Auth0](https://auth0.com/blog/complete-guide-to-angular-user-authentication/).
You can find the source code for the example on GitHub in the [@oktadev/auth0-angular-example](https://github.com/oktadev/auth0-angular-example) repository.
To learn more about Angular and OIDC, check out the following blog posts:
* [What You Need to Know about Angular v13](https://developer.okta.com/blog/2021/11/10/angular-v13)
* [The Things to Keep in Mind about Auth](https://developer.okta.com/blog/2021/10/29/things-to-keep-in-mind-about-auth)
* [A Quick Guide to Angular and GraphQL](https://developer.okta.com/blog/2021/10/22/angular-graphql)
I [just published a mini-book book on Angular](https://raibledesigns.com/rd/entry/the_angular_mini_book_1) that might interest you too. It's called [The Angular Mini-Book](https://www.infoq.com/minibooks/angular-mini-book/) and is available as a free download from InfoQ. The book is written tutorial-style and shows you how to develop a bare-bones application, test it, and deploy it. Then you'll move on to adding Bootstrap, Angular Material, continuous integration, and authentication. You'll also learn how to integrate Angular with Spring Boot (a popular REST API framework) and use security best practices like HTTPS and a content security policy.
If you liked this tutorial, chances are you'll like others we publish. Please follow [Auth0](https://twitter.com/auth0) and [OktaDev](https://twitter.com/oktadev) on Twitter to get notified when we publish new developer tutorials.
 I [just published a mini-book book on Angular](https://raibledesigns.com/rd/entry/the_angular_mini_book_1) that might interest you too. It's called [The Angular Mini-Book](https://www.infoq.com/minibooks/angular-mini-book/) and is available as a free download from InfoQ. The book is written tutorial-style and shows you how to develop a bare-bones application, test it, and deploy it. Then you'll move on to adding Bootstrap, Angular Material, continuous integration, and authentication. You'll also learn how to integrate Angular with Spring Boot (a popular REST API framework) and use security best practices like HTTPS and a content security policy.
If you liked this tutorial, chances are you'll like others we publish. Please follow [Auth0](https://twitter.com/auth0) and [OktaDev](https://twitter.com/oktadev) on Twitter to get notified when we publish new developer tutorials.
I [just published a mini-book book on Angular](https://raibledesigns.com/rd/entry/the_angular_mini_book_1) that might interest you too. It's called [The Angular Mini-Book](https://www.infoq.com/minibooks/angular-mini-book/) and is available as a free download from InfoQ. The book is written tutorial-style and shows you how to develop a bare-bones application, test it, and deploy it. Then you'll move on to adding Bootstrap, Angular Material, continuous integration, and authentication. You'll also learn how to integrate Angular with Spring Boot (a popular REST API framework) and use security best practices like HTTPS and a content security policy.
If you liked this tutorial, chances are you'll like others we publish. Please follow [Auth0](https://twitter.com/auth0) and [OktaDev](https://twitter.com/oktadev) on Twitter to get notified when we publish new developer tutorials.