---
title: "Adding a UI to an Auth0-secured MCP server with Skybridge"
description: "MCP clients can render UIs as iframes inside ChatGPT and Claude, but getting Auth0-verified identity into that UI is trickier than it looks. Skybridge's auth0Provider fixes that in eight lines."
authors:
- name: "Julien Vallini"
url: "https://auth0.com/blog/authors/julien-vallini/"
date: "Aug 24, 2026"
category: "Developers,Tutorial"
tags: ["mcp", "react", "mcp-server", "ai", "ai agents"]
url: "https://auth0.com/blog/adding-ui-auth0-secured-mcp-server-skybridge/"
---
# Adding a UI to an Auth0-secured MCP server with Skybridge
*TL;DR: An MCP server can return more than text. With MCP Apps it can return a React view that the host renders right in the conversation. You will scaffold one with Skybridge, put Auth0 in front of it using the new `auth0Provider`, and replace the name the view currently greets you by, which the model supplies and could just as easily make up, with one the access token proves. The auth config is about eight lines. What Auth0 needs underneath those eight lines is the part worth reading.*
Securing an [MCP server](https://auth0.com/blog/an-introduction-to-mcp-and-authorization/) is well-trodden by now: protect the transport, verify the bearer token, scope what the agent can do. The tool runs, returns text, the model reads it.
What has changed is what a server can return. ChatGPT and Claude will now render a view that the server ships next to its data: a real interface, in an iframe, in the conversation. Users click things instead of describing what they want.
That is a different identity problem than a headless server has. Your UI is running inside someone else's product and it needs to know who is signed in. The tool call needs a verified token before it touches your data. And anonymous requests should not get as far as a handler.
## What is Skybridge?
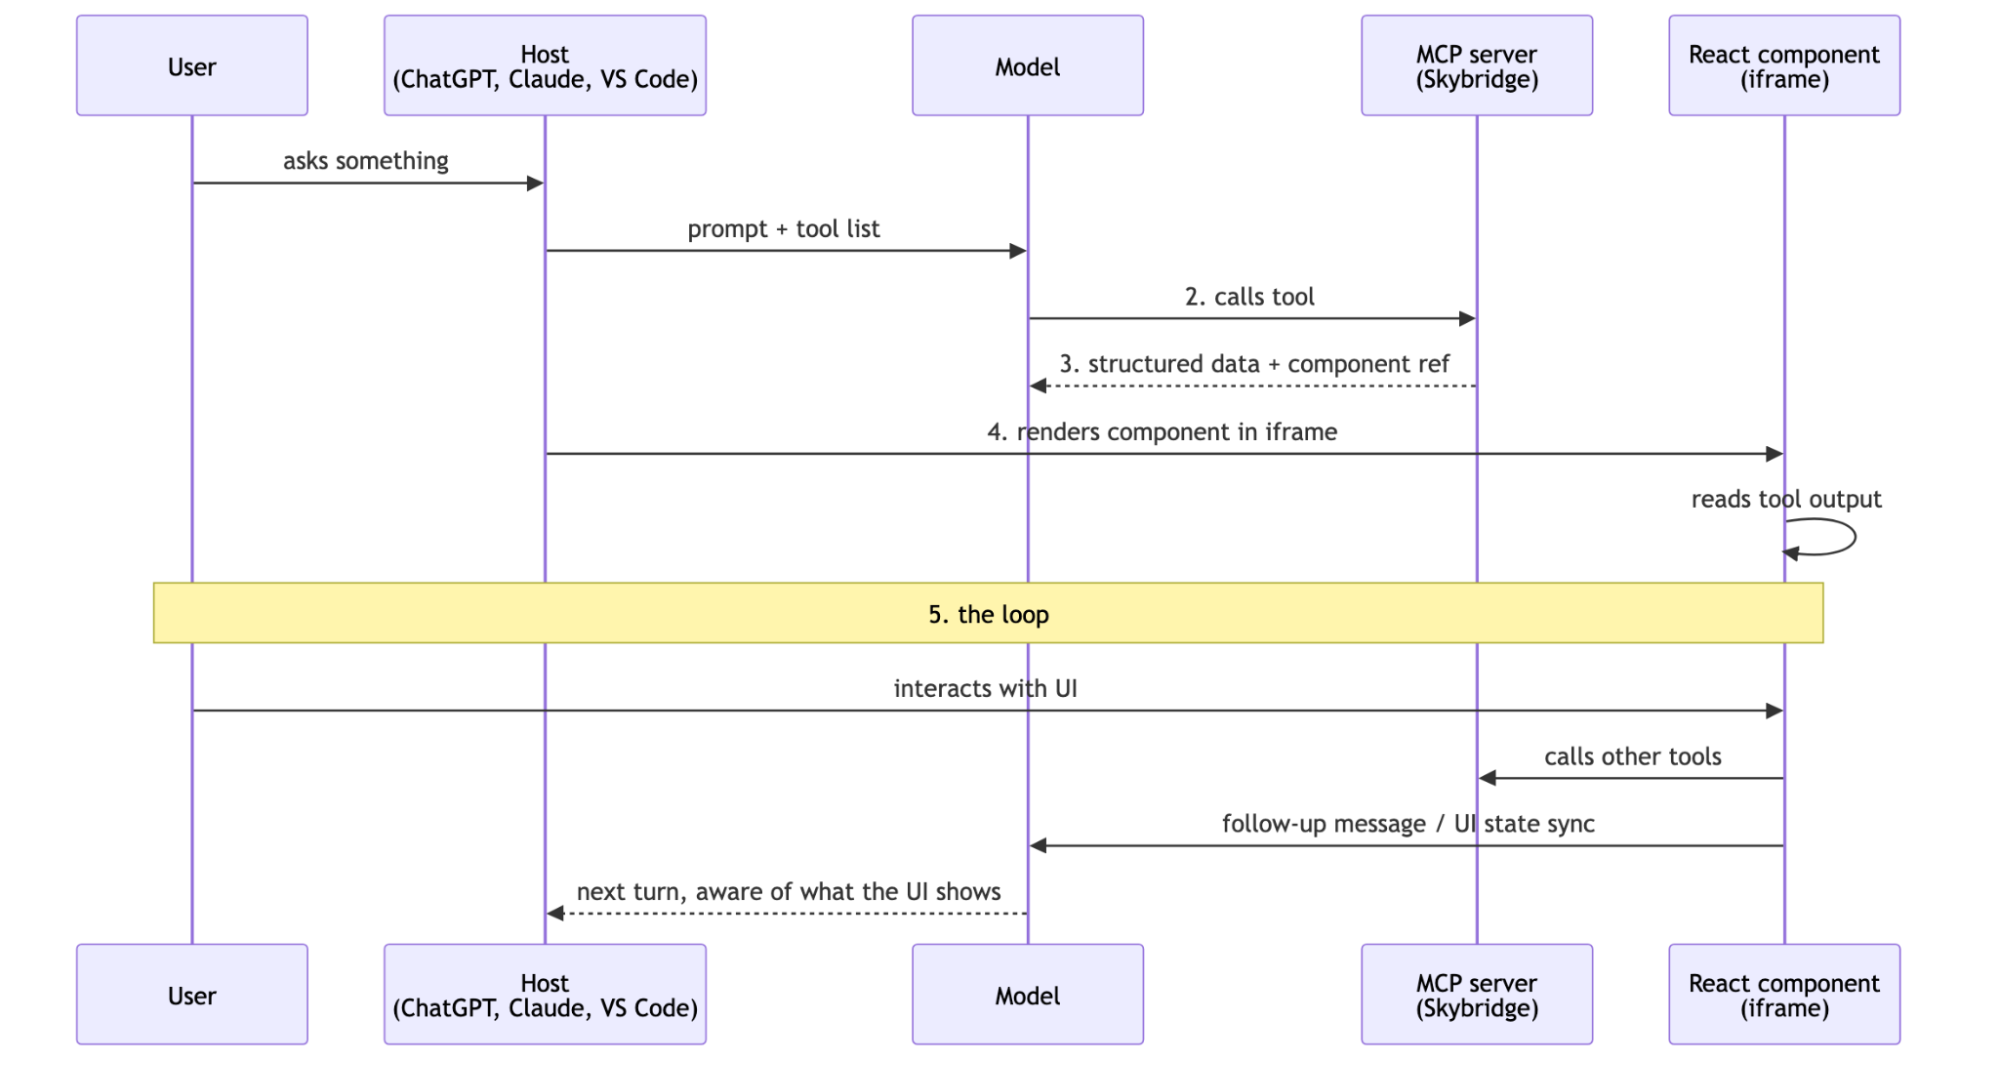
[Skybridge](https://www.skybridge.tech/) is a fullstack open-source TypeScript framework for MCP apps. The loop it implements:
1. Your MCP server exposes a tool.
2. A host (ChatGPT, Claude, VS Code) calls it.
3. The tool returns structured data plus a reference to a React component.
4. The host renders that component in an iframe beside the conversation.
5. The component reads the tool output, and can call other tools, send follow-up messages, and sync UI state back to the model.
Server and views live in one project, in one language. Skybridge bundles the views, serves them, and works out at load time which host runtime it is talking to. It covers ChatGPT's Apps SDK runtime and the open MCP Apps spec behind the same API, so you write the code once.
Auth comes from branded OAuth providers: small adapters that turn an identity platform into a wired-up authorization layer. `auth0Provider` is the one we want.
## 1. Scaffold the MCP App with Skybridge
Create the project and pick the **demo template**:
```shell
npm create skybridge@latest
```
```shell
npm run dev
```
Port 3000 gets you two things: the MCP server at `/mcp`, and Skybridge DevTools at the root. DevTools is a local emulator that speaks MCP to your server and renders views the way a host does, so you can iterate without deploying anything or connecting ChatGPT.
The demo is an onboarding deck, and it is built out of exactly the pieces we care about. Two tools in `src/server.ts`:
```typescript
.registerTool(
{
name: "start",
description: "Onboard Skybridge",
inputSchema: {
name: z.string().optional().describe("The user name."),
},
view: { component: "onboarding", description: "Onboarding deck" },
// annotations and _meta omitted for brevity
},
async ({ name }) => ({
structuredContent: { name },
content: [{ type: "text", text: `User name: ${name ?? "friend"}` }],
isError: false,
}),
)
```
`start` returns the onboarding view. And `get-fortune-cookie`, which has no view of its own, because the view calls it.
Look at what the view does with that `name`. In `src/views/components/steps/tool-output.tsx`:
```typescript
const { output } = useToolInfo<"start">();
const name = output?.name;
// ...
Greetings, {name ?? "stranger"} !
```
That is a personalized greeting built on a value the **model** passed in. The goal of this article is to modify this behaviour to use the connected user name instead of what the model provided.
The layout, for orientation:
```shell
src/
├── server.ts # MCP server: auth, tools, views
├── helpers.ts # Typed hooks, generated from your server type
└── views/
├── onboarding.tsx # The view `start` returns
└── components/steps/ # The individual steps
```
## 2. Wire Up Auth0
The whole auth config, added to the `McpServer` constructor:
```typescript
import { auth0Provider, McpServer } from "skybridge/server";
const server = new McpServer(
{ name: "alpic-openai-app", version: "0.0.1" },
{ capabilities: {} },
{
oauth: await auth0Provider({
domain: process.env.AUTH0_DOMAIN, // acme.us.auth0.com
audience: process.env.AUTH0_AUDIENCE, // your Auth0 API Identifier
serverUrl: process.env.SERVER_URL, // this server's public URL
scopes: ["openid", "profile", "email"],
}),
},
);
```
`auth0Provider` fetches your tenant's OIDC discovery document when the server starts and builds the authorization layer from it. Passing it as `oauth:` gives you:
- Protected Resource Metadata at `/.well-known/oauth-protected-resource`, so clients can find out where to authenticate.
- Authorization Server Metadata at `/.well-known/oauth-authorization-server`, derived from your tenant's real discovery document.
- [Bearer JWT verification](https://auth0.com/docs/authenticate/protocols/oauth) on every `/mcp` request against your tenant's JWKS, checking issuer and audience.
- A 401 with a `WWW-Authenticate` challenge for anonymous or invalid requests. This happens at the transport, so no tool handler ever has to check whether the caller is authenticated.
Nothing to mount, no middleware ordering to get right. Either the token verifies or the request never reaches your code.
If you would rather read a finished version than build one, [`examples/auth-auth0`](https://github.com/alpic-ai/skybridge/tree/main/examples/auth-auth0) in the Skybridge repo is the reference implementation. Same provider, wired into a coffee shop finder that sorts the signed-in user's favorites first.
### Why Auth0 needs one extra step
Here is the one place where Auth0's model and the MCP authorization spec do not line up, and it is what the `serverUrl` parameter above is doing.
Auth0 issues opaque access tokens by default. You get a verifiable JWT only when the `/authorize` request carries an `audience` naming a registered API. No audience, no JWT, and an opaque token gives your resource server nothing to check against a JWKS.
MCP clients do not send `audience`. They send a resource indicator (RFC 8707), `resource=https://your-server.com`, which is how the spec says "I want a token for this resource server." Auth0 does not translate that into an audience today. So a stock MCP client pointed straight at your tenant comes back with an opaque token, and verification fails.
`auth0Provider` fixes this by putting Skybridge in the authorization path:
1. Your server advertises itself as the authorization server. That is what `serverUrl` is for. The metadata it serves carries your server's URL as `issuer`.
2. The `authorization_endpoint` in that metadata is Auth0's, with `?audience=` already on it.
3. The client discovers that endpoint and follows it. The audience goes along for the ride, so Auth0 mints a JWT with your API as `aud`.
4. Verification still trusts Auth0 as the issuer, because the token's `iss` claim is Auth0's, not your server's.
5. [Auth for MCP went GA on May 6, 2026](https://auth0.com/blog/auth0-auth-for-mcp-servers-generally-available/), with native RFC 8707 support via the 'Resource Parameter Compatibility Profile' toggle in Auth0 Settings. Since this is off by default, the current approach remains correct.
No token proxying, and nothing self-minted. Auth0 is still the only thing issuing anything here. All Skybridge changes is what gets advertised, so the client's request shows up shaped the way Auth0 wants it. Your tenant's login, consent, MFA and rules all run as usual.
#### A note on scopes
The config above narrows scopes to `openid profile email` instead of passing through the tenant's full `scopes_supported`. That is on purpose.
MCP clients register themselves via [Dynamic Client Registration](https://auth0.com/docs/get-started/applications/dynamic-client-registration), which makes them third-party clients as far as Auth0 is concerned. Auth0 will not grant a third-party client your tenant's whole OIDC scope set. Advertise more than it is willing to grant and the authorization request fails with *"not all authorizations granted,"* an error whose cause is a long way from where it surfaces.
So advertise what the app actually needs, and add your own API scopes here as you add them.
## 3. Configure Your Auth0 Tenant
There are six steps to configure your tenant. The first two are routine. The last three are the ones that silently break DCR logins when you skip them.
**1. Register an API.** Applications → APIs → Create API. Name it and give it an Identifier like `https://your-mcp-server.com`. That identifier is your `audience`. It is just a string and does not have to resolve anything. Leave signing on RS256.
**2. Set the default audience.** Settings → Tenant Settings → API Authorization Settings, and set Default Audience to that same identifier. It is belt and braces next to the audience the provider appends, and it keeps tokens verifiable for any client that reaches `/authorize` some other way.
**3. Enable Dynamic Client Registration.** Go to Settings → Advanced. There is no way to register MCP clients by hand, since a user connecting from ChatGPT is a client you have never seen before. DCR is what lets them register themselves.
DCR does mean anyone who can reach your discovery endpoint can create a client in your tenant. That is how MCP clients connect. [Auth0's MCP documentation](https://auth0.com/docs/get-started/auth0-mcp-server) covers the controls around it.
**4. Enable application connections, and promote your connection to domain level.** Still in Tenant Settings, turn on Enable Application Connections so DCR-created clients pick up your connections. Then go to Authentication → enterprise or social connection, and under the Advanced section on the connection's Settings tab, enable Promote Connection to Domain Level. Domain-level promotion is required because third-party (DCR) clients can only use domain-level connections.
**5. Enable application connections, and promote your connection to domain level.** Still in Tenant Settings, turn on Enable Application Connections so DCR-created clients pick up your connections. Then go to Authentication → your connection → Applications, and enable Promote Connection to Domain Level.
**6. Allow user access on the API.** Your API → Application Access, and under Application Access Policy set User-Delegated Access to Allow, ensuring it is enabled for your apps.
Then `.env`:
```shell
AUTH0_DOMAIN=your-tenant.us.auth0.com
AUTH0_AUDIENCE=https://your-mcp-server.com
SERVER_URL=http://localhost:3000
```
`SERVER_URL` is where clients will reach the server. Locally that's `localhost:3000`, in production it is your deployed URL. It has to be right, since it is what gets advertised as the authorization server. If you decide to use Skybridge embedded tunnel to test your local code on an actual host, set the `SERVER_URL` to the endpoint given by the tunnel.
## 4. Replace the Model's Guess with a Verified Identity
Now the `name` input can go. Drop it from the schema and get the user from Auth0 instead.
An Auth0 access token for a custom API does not carry profile claims — that surprises people. `name` and `email` are ID token claims, and your resource server only ever sees the access token. What the verified token gives you is the subject. The [profile comes from `/userinfo`](https://auth0.com/docs/secure/tokens/access-tokens), and the `auth0` SDK has a client for it:
```shell
npm install auth0
```
```typescript
import { UserInfoClient } from "auth0";
import { type AuthInfo, auth0Provider, McpServer } from "skybridge/server";
const userInfo = new UserInfoClient({ domain: process.env.AUTH0_DOMAIN });
// ...
.registerTool(
{
name: "start",
description: "Onboard Skybridge",
view: { component: "onboarding", description: "Onboarding deck" },
},
async (_args, extra) => {
const auth = extra.authInfo as AuthInfo;
const { data } = await userInfo.getUserInfo(auth.token);
const name = data.name ?? "friend";
return {
structuredContent: { name },
content: [{ type: "text", text: `Signed in as ${name}` }],
isError: false,
};
},
)
```
The view does not change at all. `useToolInfo<"start">()` still reads `output.name`, and the greeting still renders. What changed is where that name came from: the verified token rather than the conversation. The model cannot influence it, and there is no longer an input for it to fill in wrongly.
A few things about `extra.authInfo`:
`authInfo` comes from the verified token. No parsing, no signature checking, no branch for whether the request is authenticated. If your handler is running, the token is good.
`auth.extra?.subject` is the Auth0 subject, and that is what you would key your own records on. Not the email, which can change.
`auth.token` is the raw token, which is what `getUserInfo` needs. It is also the starting point for [token exchange, if a tool needs to act for the user against some other API](https://auth0.com/blog/the-many-faces-of-oauth2-token-exchange/).
If you would rather not make that call on every invocation, an Auth0 Action can stamp the name onto the access token as a namespaced custom claim with `api.accessToken.setCustomClaim`. It then arrives already verified with the request, and the handler is a single line. The claim has to be namespaced: bare `name` is a standard OIDC claim and Auth0 drops it.
And note where the name is returned. `content` is what the model reads. `structuredContent` is what the view gets: typed, structured, and never round-tripped through the model. Identity belongs in `structuredContent` precisely so the UI can show who is signed in without the model relaying it.
### The view's own tool calls are authenticated too
The demo's third onboarding step has a button that calls a tool from inside the view:
```typescript
const { callTool, isPending, data } = useCallTool("get-fortune-cookie");
```
That request goes over the same MCP session the host already authenticated, so it lands on the same 401 wall as everything else. You did not add anything to make that true.
The view never holds the token, and it is the part people get wrong when reasoning about iframes: the. `useCallTool` asks the **host** to make the call, and the host attaches the credentials it obtained during the OAuth flow. Your access token is not sitting in iframe JavaScript where a third-party script could reach it.
So `get-fortune-cookie` is protected by the same tenant rules as `start`, without a second auth path to maintain.
## 5. Test It
DevTools first, at `http://localhost:3000`. Call `start` while signed out and you should get a 401, which is transport-level auth doing its job. Sign in, call it again, and the deck comes back greeting you by name instead of "stranger."
DevTools calls tools directly, so it says nothing about how a model behaves around them. For that, start the tunnel:
```shell
npm run dev:tunnel
```
That publishes your local server, and the Playground comes with it, at the tunnel URL suffixed with `/try`. It's a chat with a real model wired to your app, views rendering inline, no host registration involved. Update `SERVER_URL` to the tunnel URL first, as above. The tunnel URL is stable across restarts, so that is a one-time edit.
The Playground is where you watch the whole flow the way a user hits it: the model picks `start`, the call comes back 401, you sign in through Auth0, and the deck renders with your verified name. Then the fortune cookie button, whose call rides the same authenticated session.
Real hosts come after that. The same tunnel URL registers as an app in ChatGPT or a custom connector in Claude, and the host walks the OAuth flow and [registers itself over DCR](https://auth0.com/blog/setting-up-testing-cross-app-access-auth0/) on the way. The new client shows up under Applications in your dashboard, named after whichever host connected.
## 6. Deploy
Skybridge builds to a standard Node server, so it runs anywhere that can host one. Set the environment variables wherever you deploy, with `SERVER_URL` pointing at the real public URL:
```shell
AUTH0_DOMAIN=your-tenant.us.auth0.com
AUTH0_AUDIENCE=https://your-mcp-server.com
SERVER_URL=https://your-mcp-server.com
```
[Alpic](https://alpic.ai/), the team behind Skybridge, has a one-click path: connect the repo and every commit deploys.
## Next Steps
The demo app went from greeting whoever the model said you were to greeting whoever Auth0 says you are. Underneath that: a server that verifies Auth0-issued JWTs before any handler runs, a view that renders in the conversation knowing who's signed in, and a button in that view whose tool call is covered by the same session.
Auth0 did the part you would not want to build yourself, which is login, consent, MFA, connections, and JWTs your resource server can verify against a JWKS. Skybridge did the wiring, plus the one adjustment that makes Auth0's audience requirement work with clients that only speak resource indicators.
Get started by [signing up](https://auth0.com/signup) for free with Auth0, then head to the [Skybridge repository](https://github.com/alpic-ai/skybridge). Auth0's free plan covers up to 25,000 monthly active users and includes Auth for MCP, so nothing here requires a paid tier to try or to ship small.