
Access Control refers to granting or denying specific requests to access certain data and in what circumstances. You've already learned about the different authorization models and that, depending on your application needs, you can use one over the other. In this blog post, you'll learn about Role-Based Access Control (RBAC) and how to implement it in your Rails API.
What are Roles?
Before diving into Role-Based Access Control (RBAC), let's discuss roles first.
A role defines what a user can or can't do within an organization. Roles are associated with access rights and permissions to use resources. Roles may reflect the organizational structure and often also different departments. For example, a sales department manager may have access rights to sales reports that are not accessible by HR personnel.
What is Role-Based Access Control (RBAC)?
Role-Based Access Control (RBAC) is an access control mechanism where decisions are based on the roles individual users take on as part of an organization. In other words, RBAC refers to assigning permissions to users based on their role within an organization. It offers a simple, manageable approach to access management that is less prone to error than assigning permissions to users individually.
In an RBAC system, roles implicitly let an application determine what a user can or can't do, even though there are still permissions involved. These permissions are intrinsic to the role definition; the application reads the user's roles and then infers their permissions.
Benefits of RBAC
RBAC is flexible in that it can take on organizational characteristics regarding policy and structure. If roles in an organization are defined, and they are relatively constant or change slowly over time, RBAC is easy to implement.
RBAC allows systems to have a clear separation of duties between users. It also reduces the potential for error when assigning roles and helps you comply with regulatory and statutory requirements for confidentiality and privacy.
Drawbacks of RBAC
One of the main known problems that RBAC has is called Role Explosion, and it happens when the level of granularity needed for your access control is too detailed. This is a common problem in large enterprise systems which require access control of finer granularity than what RBAC can provide. Another drawback is that translating organizational structures into an RBAC model involves a lot of work.
 Want to take your Authorization to the next level? → fga.dev
Implementation Levels of RBAC
According to "The NIST Model for Role-Based Access Control: Towards a Unified Standard", there are four levels of RBAC implementations, which are organized in a four-step sequence of increasing functional capabilities:
- Flat RBAC: It's the basic concept of RBAC, where users are assigned to roles, permissions are assigned to roles, and users acquire permissions by being members of a role. This is how RBAC is implemented in Auth0.
- Hierarchical RBAC: adds a requirement to supporting role hierarchies; you could have roles representing an organization's hierarchy that enable sharing and inheritance of permissions between roles; an example would be representing the role of an engineering manager and engineering director, where the director inherits all the permissions a manager already has.
- Constrained RBAC: adds a requirement of enforcing separation of duties; no user can make certain changes without the approval of at least another user with a different role. For example, if a manager wanted to give a raise to one of their direct reports, they would need approval from someone from HR who can access the payroll.
- Symmetric RBAC: adds a requirement for permission-role review and user-role review, meaning all organizational roles are reviewed on a regular basis. This implementation prevents that, for example, as people get promoted within a company, they are assigned new roles without ever being unassigned from previous ones.
In this blog post, we'll focus on Flat RBAC, but it's important that you know there are other implementations out there.
Building the Starter Application
In the blog post, What's the Right Authorization Model for My Application?, we described an expense management app where users can submit expense reports and other users can approve or reject them.
In this blog post, we want to cover the following use cases:
- Users can create, update, read, and delete expense reports.
- Only users that have the admin role can approve expense reports.
So let's go ahead and start building these use cases.
Pre-Requisites
- Ruby Version Manager (RVM)
- Ruby 3.1.2
- Ruby on Rails 7.0.6
- An Auth0 Account.
- A registered API with Auth0, you can name it "RBAC Rails" and use
https://rbac-railsas the identifier. - A registered Client application with Auth0, I'll use a Regular Web App. Note this is only for testing purposes of this tutorial.
Get an Auth0 Account for free.
Get started →Note: Copy and save the name of your Auth0 Tenant; you'll use it to define your Auth0 Domain.
This article assumes that you are a developer with some knowledge of Ruby On Rails. If you are not, you can still follow the general approach and implement the solution with any framework.
Set Up the Starter Application
You can download the starter app from this GitHub repository or by running the following command on your terminal:
git clone https://github.com/auth0-blog/rails-api-authorization
Next, open the project in the editor of your choice and copy the .env_example file into a new file called .env. You'll need to fill up the AUTH0_DOMAIN and AUTH0_AUDIENCE values. By default, your domain is yourTenant.yourRegion.auth0.com, and your audience is the identifier of the Auth0 API you created, in this case, https://rbac-rails.
Next, install the dependencies by running bundle install on your terminal, followed by rails db:create to create the development database.
Your starting point is in the main branch of the repository. In this project, you'll see that some files are already involving Auth0. For details, refer to the Add Authorization to a Ruby on Rails API.
Building Models
The project is an Expense Management application where the main entities are the user, the Expense, and the Report. A rough representation of the application in an entity-relationship diagram would be as follows:
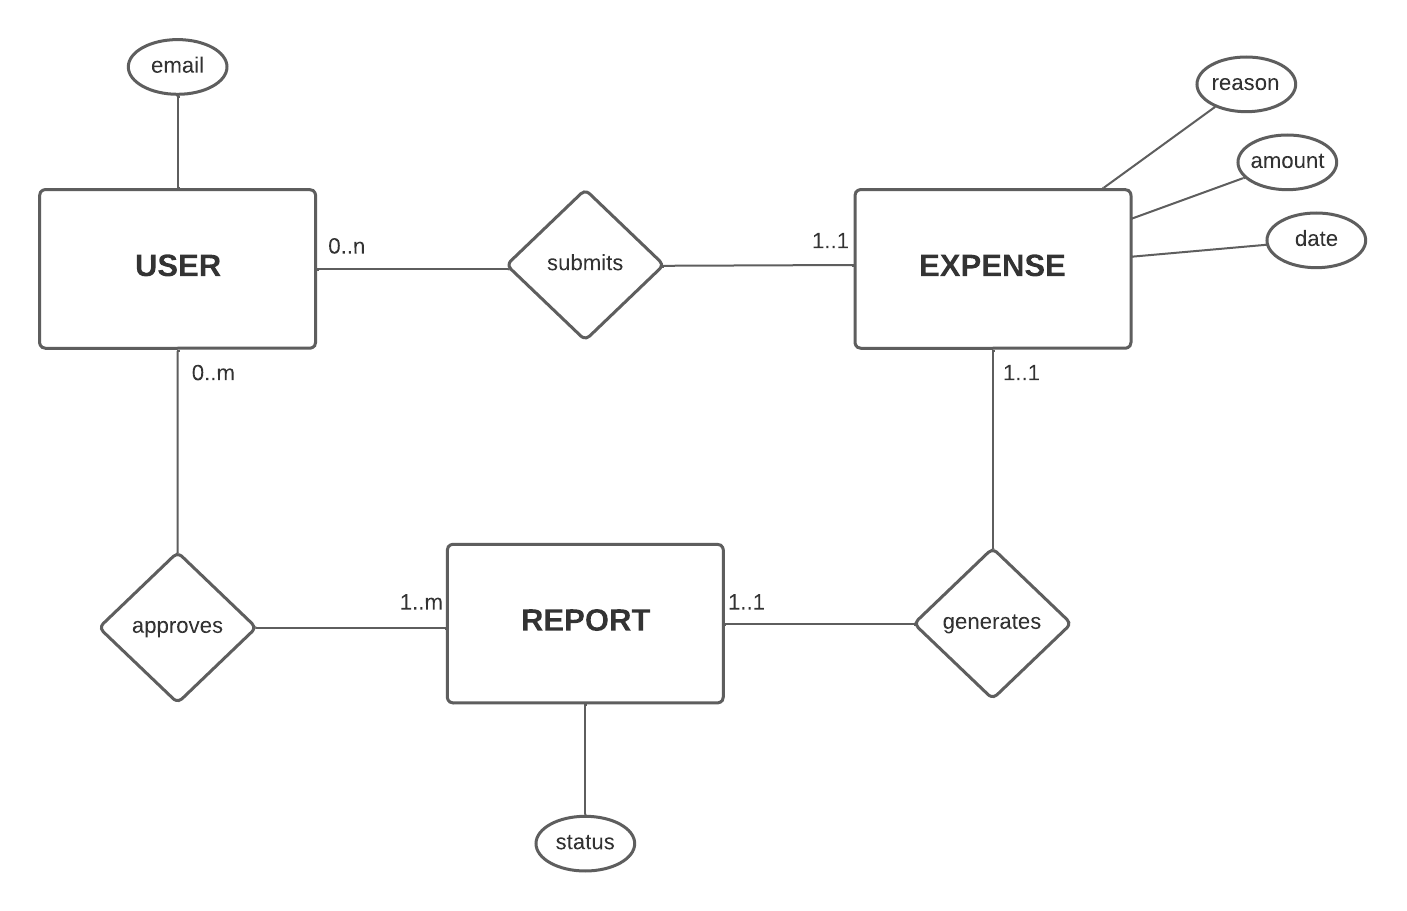
Please don't take this diagram as the ultimate solution because you'll iterate on it. Let's focus on it as a first definition to understand how the user, expense, and reports relate to each other and their attributes.
Now let's go ahead and represent this model in Rails. Let's start with the User model.
In your terminal, run the following command:
rails generate model User email:string
Next, open the app/models/user.rb file and add the following validation to ensure the email has the correct format, is unique, and always present:
class User < ApplicationRecord
  validates :email, format: { with: URI::MailTo::EMAIL_REGEXP }, presence: true, uniqueness: true
end
Now, let's create the Expense model. Expenses have a reason, a date, and an amount, but also, each expense belongs to a user. Hence, as the Rails Associations documentation states, you also need to add the foreign key to this table, which we'll call submitter_id to make it clear who submitted the expense. In your terminal, run:
rails generate model Expense reason:string date:datetime amount:float submitter_id:integer
Similarly, you can add some validations to keep data consistent in the expense table:
class Expense < ApplicationRecord
  belongs_to :submitter, class_name: 'User', foreign_key: :submitter_id

  validates :reason, presence: true
  validates :amount, presence: true, numericality: { greater_than: 0 }

  validates :date, presence: true
  validate :date_is_prior_to_today

  private

  def date_is_prior_to_today
    return if date.blank? || date <= Date.today

    errors.add(:date, "expense date must be prior or today")
  end
end
As mentioned above, each expense belongs to a User that we'll call the submitter, and it's referenced through the foreign key submitter_id. Because you are still in development mode, you can add this reference to the migration file manually.
Go to the db/migrate/YYYYMMDDHHmm_create_expenses.rb, where YYYYMMDDHHmm is the date and time when you created the expense model, and add the following line:
class CreateExpenses < ActiveRecord::Migration[7.0]
  def change
    create_table :expenses do |t|
      t.string :reason
      t.datetime :date
      t.float :amount
      # t.integer :submitter_id # 👈 Old code
      t.references :submitter, foreign_key: { to_table: :users } # ✨ New code
      t.timestamps
    end
  end
end
You should also add a reference to the user model about the expenses they own; in your app/models/user.rb, add the following:
class User < ApplicationRecord
  has_many :expenses, foreign_key: :submitter_id # ✨ New code

  validates :email, format: { with: URI::MailTo::EMAIL_REGEXP }, presence: true, uniqueness: true
end
Lastly, let's create the report model. When a user submits an expense, you'll create a report that can be approved or rejected by another user, which we'll call the approver. To generate this model, run the following in your terminal:
rails generate model Report submitter_id:integer approver_id:integer expense_id:integer status:string
Then, in the app/models/report.rb file, let's add a validation to the status attribute to indicate it can only be approved or rejected, as well as the references to the submitter, approver, and the expense:
class Report < ApplicationRecord
  belongs_to :submitter, class_name: 'User'
  belongs_to :approver, class_name: 'User', optional: true
  belongs_to :expense

  validates :status, inclusion: { in: ['approved', 'rejected'] }, presence: true
end
Let's also reflect these references in the corresponding migration and also set the default status of a report to rejected in db/migrate/YYMMDDHHmm_create_reports.rb and add the following:
class CreateReports < ActiveRecord::Migration[7.0]
  def change
    create_table :reports do |t|
      t.string :status, default: 'rejected', null: false
      t.references :approver, foreign_key: { to_table: :users }
      t.references :submitter, foreign_key: { to_table: :users }
      t.references :expense, foreign_key: { to_table: :expenses }
      t.timestamps
    end
  end
end
To be consistent, let's add the associations to the report to the user and expense model as follows:
class User < ApplicationRecord
  has_many :expenses, foreign_key: :submitter_id
  # ✨ New code 👇
  has_many :submitted_reports, class_name: 'Report', foreign_key: 'submitter_id'
  has_many :reports_to_review, class_name: 'Report', foreign_key: 'approver_id'
  # ✨ New code 👆

  validates :email, format: { with: URI::MailTo::EMAIL_REGEXP }, presence: true, uniqueness: true
end
class Expense < ApplicationRecord
  belongs_to :submitter, class_name: 'User', foreign_key: :submitter_id
  has_one :report # ✨ New code

  validates :reason, presence: true
  validates :amount, presence: true, numericality: { greater_than: 0 }

  validates :date, presence: true
  validate :date_is_prior_to_today

  private

  def date_is_prior_to_today
    return if date.blank? || date <= Date.today

    errors.add(:date, "expense date must be prior or today")
  end
end
This way, if you have an instance of a user, you can call submitted_reports or reports_to_review to see those reports. Similarly, you can access the report of an expense with the report has_one association.
Now normally, you'd run rails db:migrate right after you create a new model (or that's how I'd do it anyways 😅), so let's go ahead and run it in your terminal; you should see something like:
➜  rbac-rails ✗ rails db:migrate
== 20230711160712 CreateUsers: migrating ======================================
-- create_table(:users)
   -> 0.0009s
== 20230711160712 CreateUsers: migrated (0.0010s) =============================

== 20230711160748 CreateExpenses: migrating ===================================
-- create_table(:expenses)
   -> 0.0013s
== 20230711160748 CreateExpenses: migrated (0.0013s) ==========================

== 20230711165729 CreateReports: migrating ====================================
-- create_table(:reports)
   -> 0.0018s
== 20230711165729 CreateReports: migrated (0.0019s) ===========================
If you want to get some data to understand and play around with the models and associations you just created, you can add the following to the db/seeds.rb:
User.create!(email: "user1@example.com")
User.create!(email: "user2@example.com")
User.create!(email: "approver@example.com")

Expense.create!(reason: "trip1", date: 1.days.ago.to_date, amount: 100, submitter_id: 1)
Expense.create!(reason: "trip1", date: 3.days.ago.to_date, amount: 55, submitter_id: 2)

Report.create!(approver_id: 3, expense_id: 1, status: "approved", submitter_id: 1)
Report.create!(approver_id: 3, expense_id: 2, status: "rejected", submitter_id: 2)
Next, run rails db:seed in your terminal. To play around with these objects, you can access the Rails console from your terminal by running rails c.
Building Controllers
Now that you've modeled the domain of the expense management application let's go ahead and implement the interface for it. You'll define the following endpoints:
- Users: Classic CRUD.
- POST
/users - PUT/PATCH
/users/:id - GET
/users - GET
/users/:id - DELETE
/users/:id
- POST
- Expenses: Classic CRUD but depending on the user because an expense doesn't make sense without a submitter.
- POST
/users/:user_id/expenses/ - PUT/PATCH
/users/:user_id/expenses/:id - GET
/users/:user_id/expenses/ - GET
/users/:user_id/expenses/:id - DELETE
/users/:user_id/expenses/:id
- POST
- Reports: List the submitted reports and those ready to review by the user making the request and approve reports.
- GET
/users/:user_id/reports/submitted - GET
/users/:user_id/reports/review - PUT
/users/:user_id/reports/:id/approve
- GET
Looks like a lot of work but luckily for you, Rails takes care of most of it with the scaffold command.
So let's generate the controller for the user entity. In your terminal, run the following command:
rails g scaffold_controller User
This command will generate the controller, routes, and test files. Open the app/controllers/users_controllers.rb. You'll see all the routes for a classic CRUD are there. The only thing you'll change is the user_params method to make it more secure and require that when you modify a user, only the email is permitted:
class UsersController < ApplicationController
  before_action :set_user, only: %i[ show update destroy ]

  # GET /users
  def index
    @users = User.all

    render json: @users
  end

  # GET /users/1
  def show
    render json: @user
  end

  # POST /users
  def create
    @user = User.new(user_params)

    if @user.save
      render json: @user, status: :created, location: @user
    else
      render json: @user.errors, status: :unprocessable_entity
    end
  end

  # PATCH/PUT /users/1
  def update
    if @user.update(user_params)
      render json: @user
    else
      render json: @user.errors, status: :unprocessable_entity
    end
  end

  # DELETE /users/1
  def destroy
    @user.destroy
  end

  private
    # Use callbacks to share common setup or constraints between actions.
    def set_user
      @user = User.find(params[:id])
    end

    # Only allow a list of trusted parameters through.
    def user_params
      # params.fetch(:user, {})
      params.require(:user).permit(:email) # ✨ New code
    end
end
Next, let's scaffold the expense endpoints. For that, run the following command in your terminal:
rails g scaffold_controller Expense
Open the app/controllers/expenses_controller.rb and let's make the following changes to make the expense dependent on the user:
class ExpensesController < ApplicationController
  before_action :set_user # ✨ New code
  before_action :set_expense, only: %i[ show update destroy ]

  # GET users/:user_id/expenses
  def index
    @expenses = Expense.where(submitter_id: @user.id) # ✨ New code

    render json: @expenses
  end

  # GET users/:user_id/expenses/1
  def show
    render json: @expense
  end

  # POST users/:user_id/expenses
  def create
    # ✨ New code 👇
    ActiveRecord::Base.transaction do
      @expense = Expense.new(expense_params)
      @expense.submitter_id = @user.id

      if @expense.save
        Report.create(expense: @expense, submitter_id: @expense.submitter_id)
        render json: @expense, status: :created
      else
        render json: @expense.errors, status: :unprocessable_entity
        raise ActiveRecord::Rollback # Rollback the transaction if saving the expense fails
      end
    end
    # ✨ New code 👆
  end

  # PATCH/PUT users/:user_id/expenses/1
  def update
    if @expense.update(expense_params)
      render json: @expense
    else
      render json: @expense.errors, status: :unprocessable_entity
    end
  end

  # DELETE users/:user_id/expenses/1
  def destroy
    @expense.report.destroy # ✨ New code
    @expense.destroy
  end

  private
    # Use callbacks to share common setup or constraints between actions.
    def set_expense
      @expense = Expense.find(params[:id])
    end

    # ✨ New code 👇
    def set_user
      @user = User.find(params[:user_id])
    end
    # ✨ New code 👆

    # Only allow a list of trusted parameters through.
    def expense_params
      params.require(:expense).permit(:reason, :date, :amount) # ✨ New code
    end
end
Note you could have generated this controller manually since you are making some changes, but I chose to use the scaffold option for simplicity.
In the ExpensesController#create action, after creating an expense, you create a Report; in the ExpensesController#destroy action, you delete the Report associated with the expense.
Now in the config/routes.rb file, let's adapt the routes to match the initial proposal:
Rails.application.routes.draw do
  resources :users do
    resources :expenses
  end
end
Finally, let's create the reports controller. Run the following command in your terminal:
rails g controller Reports submitted review approve show
Next, open the app/controllers/reports_controller.rb file and copy the following content:
class ReportsController < ApplicationController
  before_action :set_report, only: %i[ show approve ]
  before_action :set_user

  # GET users/:user_id/reports/submitted
  def submitted
    @reports = Report.where(submitter_id: @user.id)

    render json: @reports
  end

  # GET users/:user_id/reports/review
  def review
    @reports = Report.where(approver_id: @user.id)

    render json: @reports
  end

  # GET users/:user_id/reports/1/approve
  def approve
    @report.status = "approved"
    @report.save

    render json: @report
  end

  # GET users/:user_id/reports/1
  def show
    render json: @report
  end

  private
    # Use callbacks to share common setup or constraints between actions.
    def set_report
      @report = Report.find(params[:id])
    end

    def set_user
      @user = User.find(params[:user_id])
    end
end
Here you are adding endpoints to see the submitted reports of a user, the ones the user approves of, and to show the report's details.
Open the config/routes.rb file and add the following:
Rails.application.routes.draw do
  # Old code 👇
  # get 'report/submitted'
  # get 'report/review'
  # get 'report/approve'
  # get 'report/show'
  # Old code 👆

  resources :users do
    resources :expenses
    # ✨ New code 👇
    resources :reports, only: [:show] do
      put 'approve', on: :member
      collection do
        get 'submitted'
        get 'review'
      end
    end
    # ✨ New code 👆
  end
end
With these changes, you'll have a functional API for the expense management application. If you want to test the endpoints, you can run your Rails server by running rails s in your terminal, and you can use this Postman collection I've created to test the endpoints.
Securing Endpoints with Auth0
As mentioned earlier, for securing the endpoints of a Rails API with Auth0, you can check the Add Authorization to a Ruby on Rails API Quickstart or if you want a more extensive explanation of each step, you can check the Authorization by Example Guide
The starter application includes all the necessary files to implement authorization in your Rails API. So you'll ensure your endpoints can only be accessed by authenticated users, meaning those who have previously requested an access token. Authentication is usually the first step in authorization, which is why many people confuse these two terms.
For testing purposes, you can go to the Auth0 Dashboard, and in your Auth0 API Test tab, you will find a valid access token.
Let's secure the controllers, starting with the UsersController. Open the app/controllers/users_controller.rb and add the following line:
class UsersController < ApplicationController
  before_action :authorize
  #...
end
Add the same line for the other two controllers in app/controllers/expenses_controller.rb and app/controllers/reports_controller.rb.
If you try to test your endpoints now, you'll get a 401 Unauthorized status code, accompanied by an error message { "message": "Requires authentication" }. You can find the implementation details of the authorize method in the Secured concern in app/controllers/secured.rb.
To make requests to your secured API, you have to add an Authorization header with the value Bearer yourAccessTokenHere and replace the token with the one you got from the Test tab in your Auth0 API.
Until this point, everything you've implemented is available in the
expenses-app-setupbranch in GitHub.
Creating and Assigning Roles with Auth0
To this point, you've secured the endpoints of your API only to allow authenticated users to make requests to it. Any user with an access token can do anything in your API.
You want only admin users to be able to review and approve expense reports. For that, you'll use Auth0's RBAC implementation and check for the admin role in your app's code.
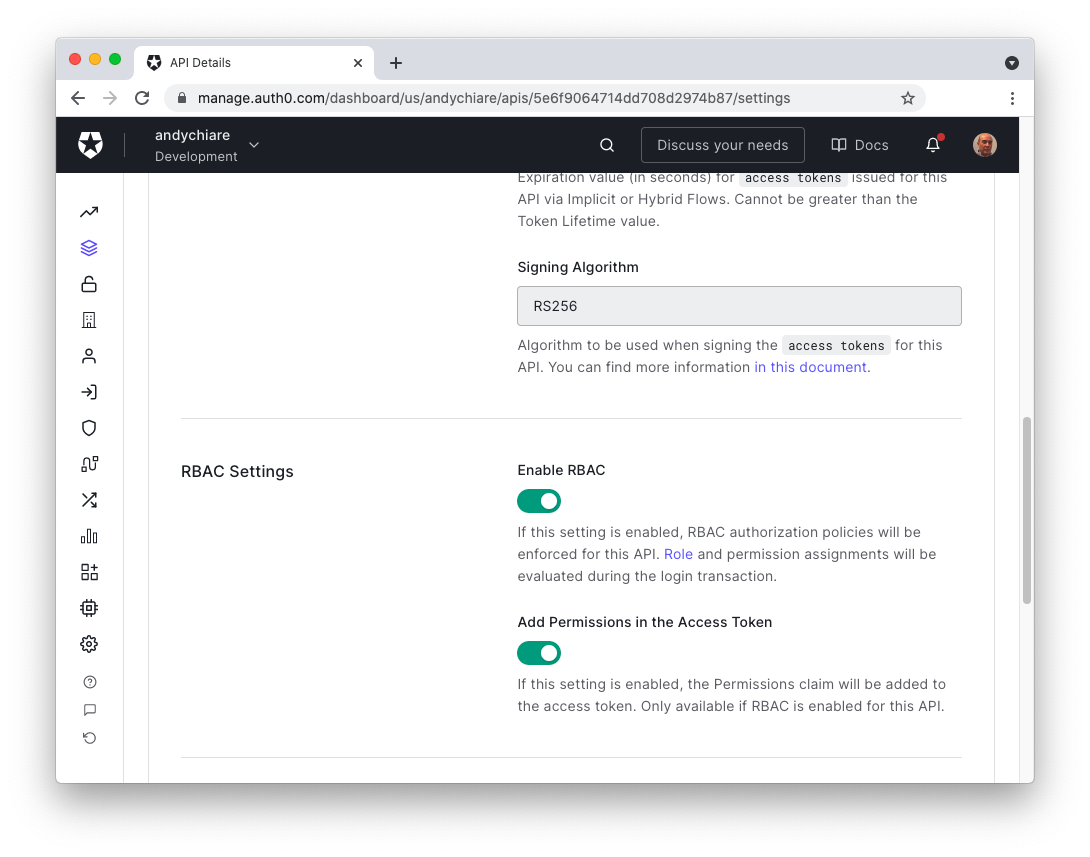
Enable RBAC on your Auth0 API
Go to the Auth0 Dashboard, then on the sidebar, click on APIs and select the API you created for this project. You'll land in the API settings, scroll down and find the RBAC Settings option, then click on the toggle to Enable RBAC and click the Save button to save your changes.
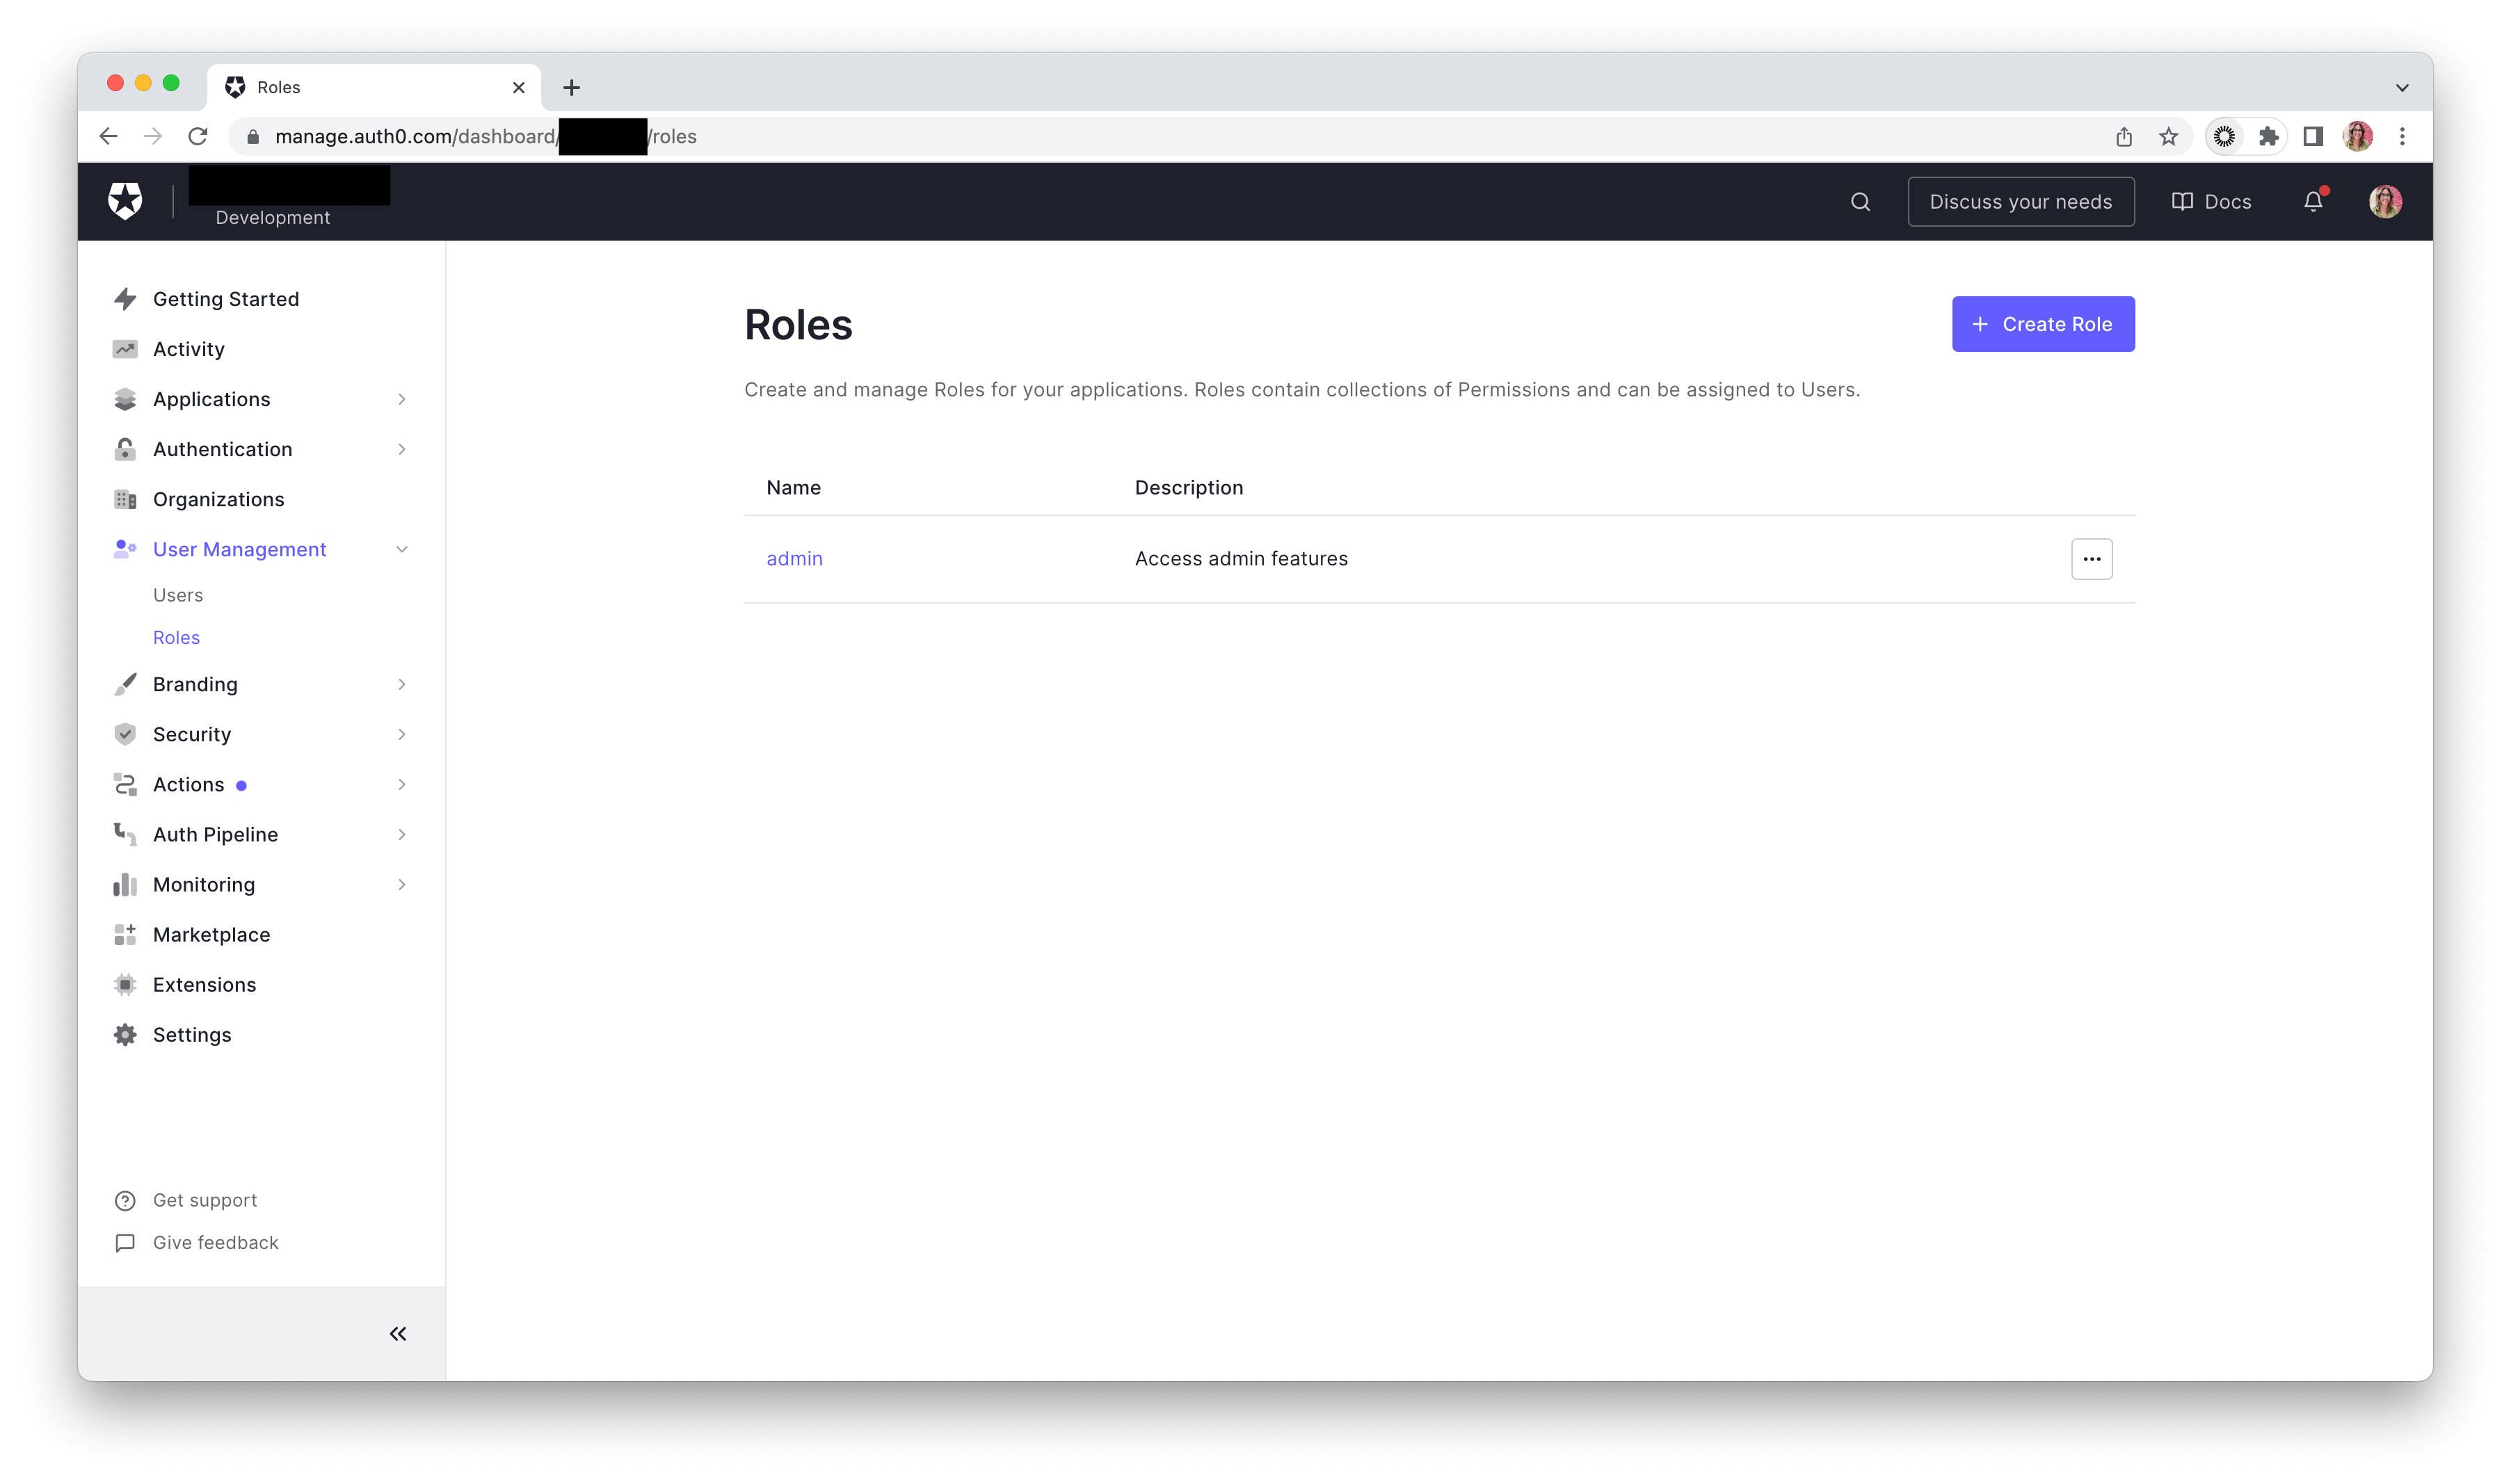
Create the Admin Role on Auth0
From the Auth0 Dashboard, click on User Management on the sidebar, then Roles. Click on the + Create Role button and create a new role, name it admin and add a meaningful description, then click on Create.
Note: In Auth0, a role is a collection of permissions. In this article, you won't be covering permissions, and we are implementing a true Role-Based Access Control, where you should check the role of the user to determine whether a user can access a resource. In your case, when a user tries to approve an expense report, an RBAC mechanism should check whether that user has the Admin role. Remember that this approach is very coarse and can be applied to very simple scenarios. It gets messy as the number of roles grows and users get multiple roles.
Including Roles in the Access Token
Now that you have the admin role, you need to be able to send it to your Rails API. A simple way to do this with Auth0 is by adding the user's role to the access token issued at login time.
Adding roles to the access token is not a built-in feature, so a way to do it is by adding an Auth0 Action to the login flow. An Action is a JavaScript function that allows you to customize the standard behavior of different Auth0 flows.
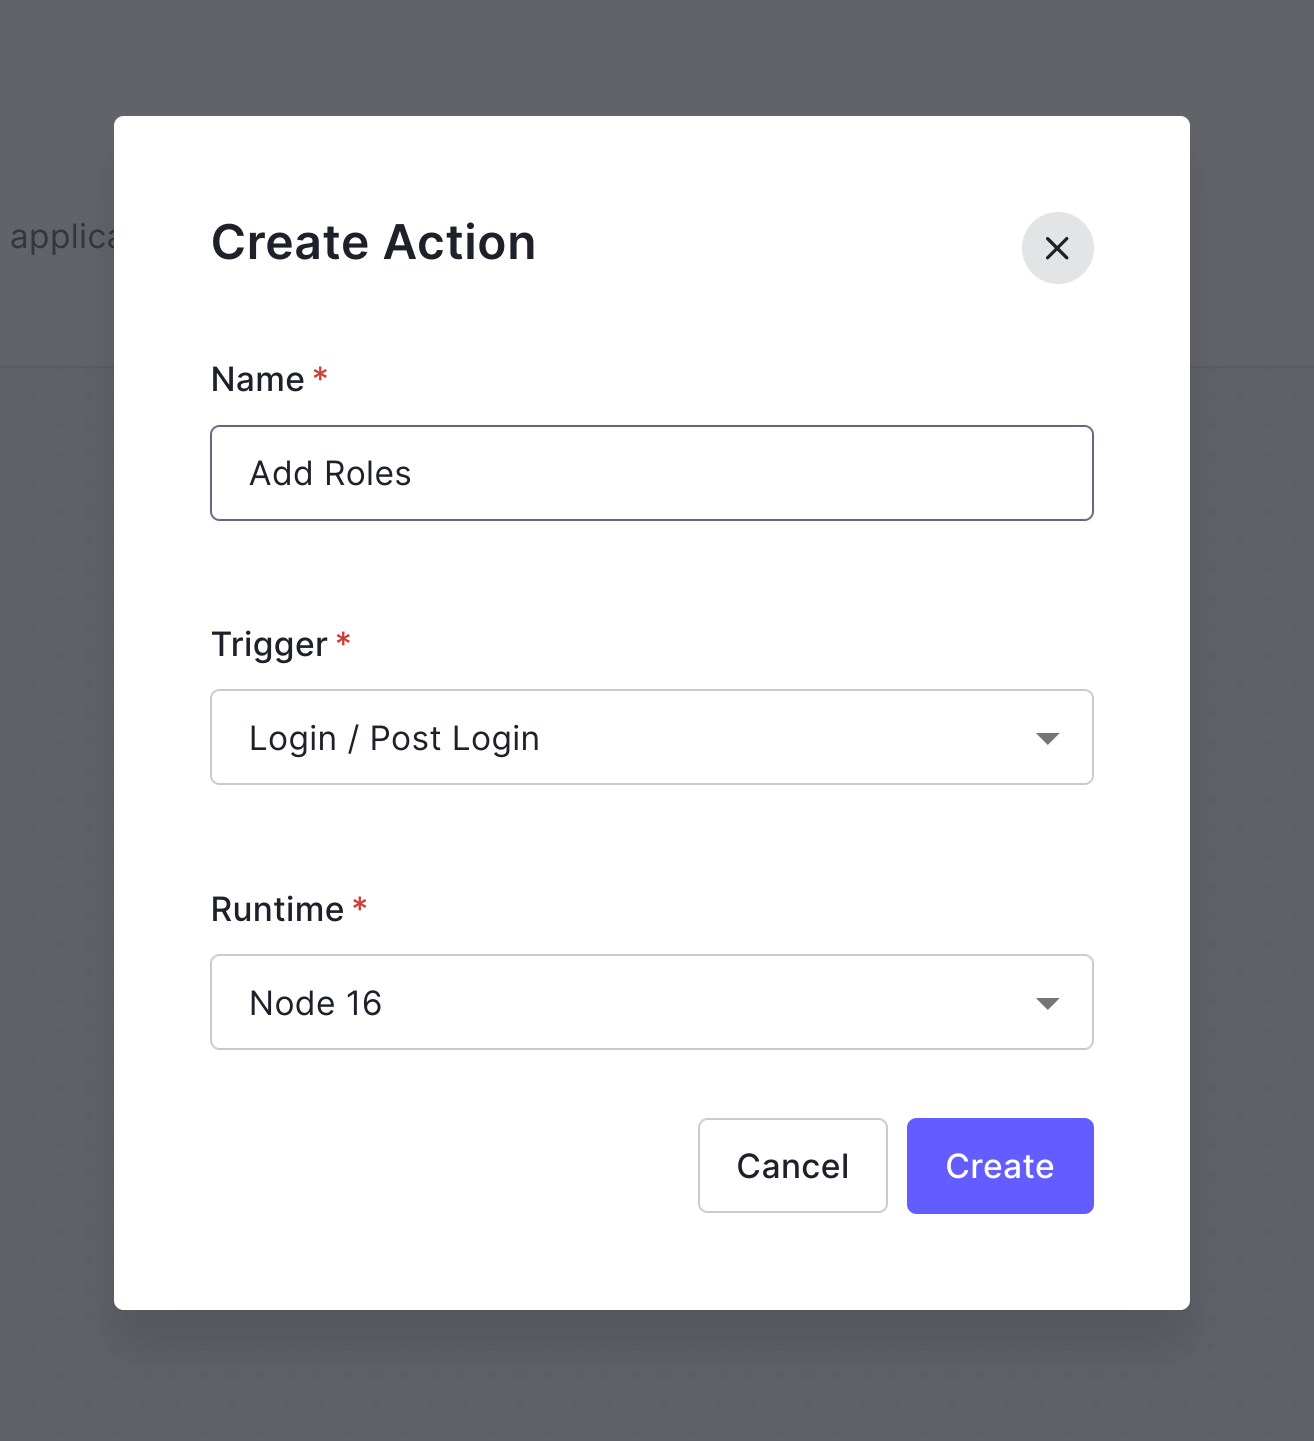
From the Auth0 Dashboard, click on Actions and then Library. Next, click on the Build Custom button. In the modal that opens up, add a name for the action, select the Login/Post Login trigger, and then click on Create.
The Actions editor will open, and inside the onExecutePostLogin function, add the following code:
exports.onExecutePostLogin = async (event, api) => {
  const namespace = 'rbac_rails';
  if (event.authorization) {
    api.accessToken.setCustomClaim(`${namespace}/roles`, event.authorization.roles);
  }
}
In this code, you check for the authorization event and add a custom claim to the access token. This claim will be rbac_rails/roles, and the value will be the user's roles logged in. For more info about adding custom claims to an access token, you can check the Actions documentation.
Then click on the Deploy button to deploy your action. Next, from the Auth0 Dashboard, go to Actions, click on Flows, then select Login. You'll see a diagram that represents the login process. On the right, you'll see Add Action. Click on Custom and then drag the action you created in the previous step, drop it between the Start and Complete steps of the login process, and click the Apply button.
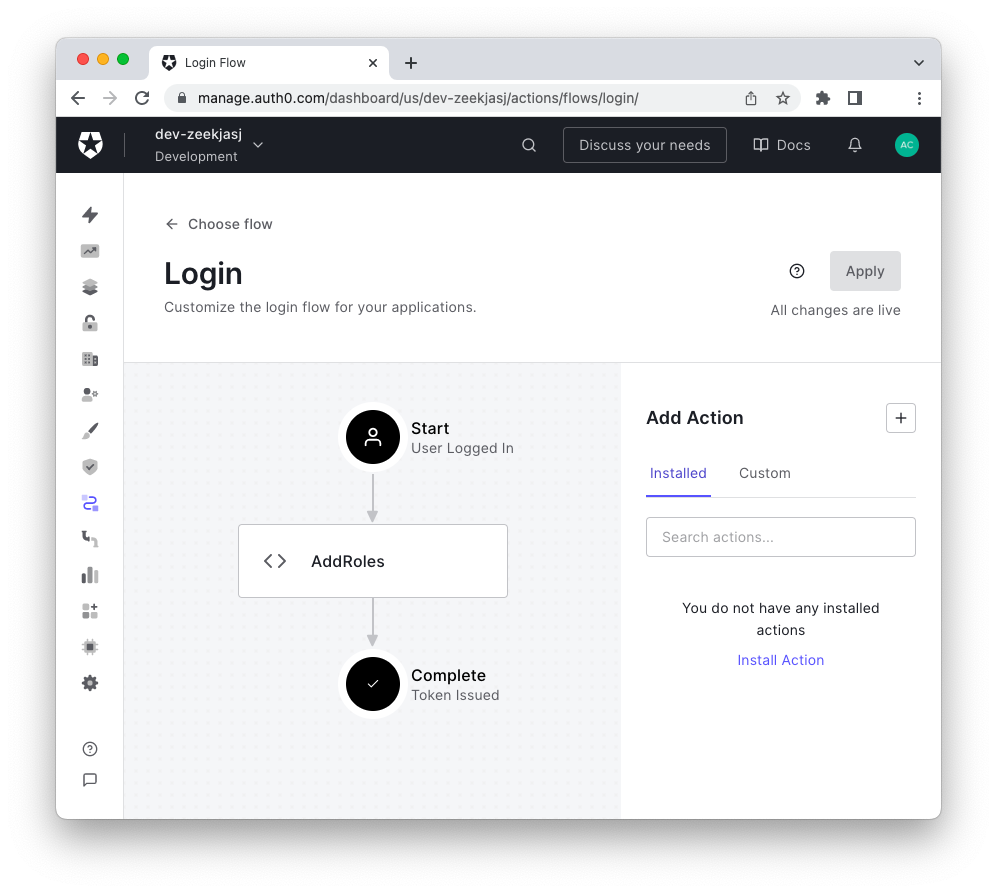
From now on, all the access tokens issued when a user logs in will include the user's roles.
If you want to test and see the roles in the access token, you can create a new user in the Auth0 Dashboard and assign the admin role to it.
To generate an access token, you can request it from the client application that consumes your API. For the sake of this tutorial, I set up a testing Auth0 Regular Web Application which I called "Rails RBAC" and used the Auth0 CLI to test the login by running the following command:
auth0 test login AUTH0_APP_CLIENT_ID --audience AUTH0_AUDIENCE
Where AUTH0_APP_CLIENT_ID is the client ID of the "Rails RBAC" application and AUTH0_AUDIENCE is the identifier of the Auth0 API you created in the beginning. This command will generate a response like:
 ▸    A browser window needs to be opened to complete this client's login flow.
 ▸    Once login is complete, you can return to the CLI to view user profile information and tokens.

 Do you wish to proceed? Yes

Waiting for login flow to complete... done
Fetching user metadata... done

=== YOUR_AUTH0_DOMAIN user metadata and token

{
    "user_info": {
        "sub": "google-oauth2|10045748574385348",
        "name": "admin user",
        "given_name": "admin",
        "family_name": "user",
        "nickname": "admin.user",
        "picture": "https://lh3.googleusercontent.com/a/....",
        "locale": "en",
        "updated_at": "2023-07-20T15:58:13.18Z"
    },
    "tokens": {
        "access_token": "eyJhbGc...",
        "id_token": "eyJhbGc..",
        "token_type": "Bearer",
        "expires_in": 86400
    }
}
You can decode your access token using the JWT.io tool, and you'll see the user's roles are in there.
If you want to learn more about the Auth0 CLI, you can read our documentation.
Everything is ready to go from Auth0, so let's go ahead and check for the roles in the Rails API.
Checking for Roles in your Rails API
To check for the user's roles in the access token, you'll make the following changes:
- Add the custom claim name you added to the access token, in your case,
rbac_rails/rolesas an environment variable asAUTH0_ROLES. - Add the new variable,
AUTH0_ROLES, in yourauth0.yamlfile. - Update the
Auth0Clientclass to read and validate the user's roles - Update the
Securedconcern to handle the user's roles and respond appropriately. - Check the role in the
ReportsController#approveaction
Let's start by adding the AUTH0_ROLES environment variable. Open the .env file and the following line:
PORT=6060
CLIENT_ORIGIN_URL=http://localhost:4040
AUTH0_AUDIENCE=YOUR_AUTH0_AUDIENCE
AUTH0_DOMAIN=YOUR_AUTH0_DOMAIN
AUTH0_ROLES=rbac_rails/roles # ✨ New line
Next, open the config/auth0.yaml file and add the following lines:
development:
  domain: <%= ENV.fetch('AUTH0_DOMAIN') %>
  audience: <%= ENV.fetch('AUTH0_AUDIENCE') %>
  roles: <%= ENV.fetch('AUTH0_ROLES') %> # ✨ New line

production:
  domain: <%= ENV.fetch('AUTH0_DOMAIN') %>
  audience: <%= ENV.fetch('AUTH0_AUDIENCE') %>
  audience: <%= ENV.fetch('AUTH0_AUDIENCE') %>
  roles: <%= ENV.fetch('AUTH0_ROLES') %> # ✨ New line
In the app/lib/auth0_client.rb, add the following code:
# frozen_string_literal: true

require 'jwt'
require 'net/http'

class Auth0Client

  # Auth0 Client Objects
  Error = Struct.new(:message, :status)
  Response = Struct.new(:decoded_token, :error)
  # 👇 New code
  Token = Struct.new(:token) do
    def validate_roles(roles)
      required_roles = Set.new roles
      token_roles = Set.new token[0][Rails.configuration.auth0.roles]
      required_roles <= token_roles
    end
  end
  # 👆 New code

  # Helper Functions
  def self.domain_url
    "https://#{Rails.configuration.auth0.domain}/"
  end

  def self.decode_token(token, jwks_hash)
    JWT.decode(token, nil, true, {
                 algorithm: 'RS256',
                 iss: domain_url,
                 verify_iss: true,
                 aud: Rails.configuration.auth0.audience.to_s,
                 verify_aud: true,
                 jwks: { keys: jwks_hash[:keys] }
               })
  end

  def self.get_jwks
    jwks_uri = URI("#{domain_url}.well-known/jwks.json")
    Net::HTTP.get_response jwks_uri
  end

  # Token Validation
  def self.validate_token(token)
    jwks_response = get_jwks

    unless jwks_response.is_a? Net::HTTPSuccess
      error = Error.new(message: 'Unable to verify credentials', status: :internal_server_error)
      return Response.new(nil, error)
    end

    jwks_hash = JSON.parse(jwks_response.body).deep_symbolize_keys

    decoded_token = decode_token(token, jwks_hash)

    # 👇 New code
    Response.new(Token.new(decoded_token), nil)
  rescue JWT::VerificationError, JWT::DecodeError => e
    error = Error.new('Bad credentials', :unauthorized)
    Response.new(nil, error)
  end
end
In the Auth0Client class, you're adding a new struct to represent the access token and creating a method that validates that the user's roles in the token match those passed as an argument. You'll use this method in the Secured concern next.
Go to the app/controllers/concerns/secured.rb file, and add the following code:
# frozen_string_literal: true

module Secured
  extend ActiveSupport::Concern

  REQUIRES_AUTHENTICATION = { message: 'Requires authentication' }.freeze
  BAD_CREDENTIALS = {
    message: 'Bad credentials'
  }.freeze
  MALFORMED_AUTHORIZATION_HEADER = {
    error: 'invalid_request',
    error_description: 'Authorization header value must follow this format: Bearer access-token',
    message: 'Bad credentials'
  }.freeze
  # 👇 New code
  INSUFFICIENT_ROLES = {
    error: 'insufficient_roles',
    error_description: 'The access token does not contain the required roles',
    message: 'Permission denied'
  }.freeze
  # 👆 New code

  def authorize
    token = token_from_request

    return if performed?

    validation_response = Auth0Client.validate_token(token)

    # 👇 New code
    @decoded_token = validation_response.decoded_token
    # 👆 New code

    return unless (error = validation_response.error)

    render json: {message: error.message}, status: error.status
  end

  # 👇 New code
  def validate_roles(roles)
    raise 'validate_roles needs to be called with a block' unless block_given?
    return yield if @decoded_token.validate_roles(roles)

    render json: INSUFFICIENT_ROLES, status: :forbidden
  end
  # 👆 New code

  private

  def token_from_request
    authorization_header_elements = request.headers['Authorization']&.split

    render json: REQUIRES_AUTHENTICATION, status: :unauthorized and return unless authorization_header_elements

    unless authorization_header_elements.length == 2
      render json: MALFORMED_AUTHORIZATION_HEADER, status: :unauthorized and return
    end

    scheme, token = authorization_header_elements

    render json: BAD_CREDENTIALS, status: :unauthorized and return unless scheme.downcase == 'bearer'

    token
  end
end
Here you are storing the @decoded_token in an instance variable. Remember, @decoded_token is an instance of Auth0Client::Token and, therefore, can call the Auth0Client::Token#validates_roles method. Here, you're implementing a new method with the same name, Secured#validate_roles, which returns if the access token contains the same roles as the ones passed as arguments or 403 FORBIDDEN error with the error message defined in the INSUFFICIENT_ROLES variable.
Now in the app/controllers/reports_controller.rb file, find the approve action and add the following line:
class ReportsController < ApplicationController
  before_action :set_report, only: %i[ show approve ]
  before_action :set_user
  before_action :authorize

  # ...

  # GET users/:user_id/reports/1/approve
  def approve
    validate_roles [ADMIN] do
      if @report.is_approver?(@user)
        @report.status = "approved"
        @report.save
      end

      render json: @report
    end
  end
In the controller, you're passing a list of roles, in this case only containing the ADMIN role, to the Secured#validates_roles method. Then, if the validation is successful, you check if the user can approve the report, and if so, you update the report's status to approved and save the record.
Note I defined a constant for the admin role; you can do so in the ApplicationController as follows:
class ApplicationController < ActionController::API
  include Secured

  ADMIN='admin' # ✨ New code
end
And also implement a helper method is_approver? in the report model. Open the app/models/report.rb and add the following:
class Report < ApplicationRecord
  belongs_to :submitter, class_name: 'User'
  belongs_to :approver, class_name: 'User', optional: true
  belongs_to :expense

  validates :status, inclusion: { in: ['approved', 'rejected'] }, presence: true

  # 👇 New code
  def is_approver?(user)
    self.approver.id == user.id
  end
  # 👆 New code
end
With these changes, you're expenses management app now has a Role-Based Access Control 🎉
Although, once you've finished the application, you realize you're lacking something...🫣
With the application as is right now, any user can see the expenses and reports of other users. Because you already implemented RBAC, you think of adding a new role, but that doesn't make sense because you can't create a role, "expense readers". After all, every user has this role with their expenses and reports.
It seems you need more granularity... I guess you'll need to find out how to do that in the next blog post. 😏
Conclusion
Roles are a set of transactions that a user or set of users can perform within the context of an organization. Role-Based Access Control (RBAC) is an access control mechanism where decisions are based on individual users' roles as part of an organization. RBAC is flexible in that it can take on organizational characteristics regarding policy and structure. Still, it can lead to the problem of Role Explosion, especially in big organizations.
About the author

Carla Urrea Stabile
Staff Developer Advocate
I've been working as a software engineer since 2014, particularly as a backend engineer and doing system design. I consider myself a language-agnostic developer but if I had to choose, I like to work with Ruby and Python.
After realizing how fun it was to create content and share experiences with the developer community I made the switch to Developer Advocacy. I like to learn and work with new technologies.
When I'm not coding or creating content you could probably find me going on a bike ride, hiking, or just hanging out with my dog, Dasha.