---
title: "Android Development: 15 Libraries You Should Be Using"
description: "Let's take a look at some awesome libraries that can help us create better Android apps."
authors:
- name: "Idorenyin Obong"
url: "https://auth0.com/blog/authors/idorenyin-obong/"
date: "Dec 21, 2021"
category: "Developers,Tips,Android"
tags: ["android", "development", "libraries", "tips"]
url: "https://auth0.com/blog/android-development-15-libraries-you-should-be-using/"
---
# Android Development: 15 Libraries You Should Be Using
**TL;DR:** In this article, we will take a brief look at 15 libraries that can help us in our day-to-day Android development. With them, we will be able to create apps that perform better and that provide better user experience.
## Popular Android Libraries
Libraries are major game changers in software development irrespective of platform or stack. With libraries, we leverage the efforts of other developers to perform actions/functions faster, more effective, and with lesser boilerplate codes. In this article, we will look at various categories in Android development and the common libraries used in them.
## Android Libraries—Image Loading
Image loading libraries come in very handy to avoid high memory consumption caused by loading multiple images at the same time. Images are the greatest source of Out of Memory errors in Android development. These libraries, therefore, reduce the hassle of loading and caching images together with minimizing memory usage to provide a seamless user experience. Let's take a look at two of the commonly used image loading libraries: Glide and Picasso.
### Glide
[Glide](https://github.com/bumptech/glide) is an image loading library focused on smooth scrolling. Glide ensures image loading is both as fast and as smooth as possible by applying smart automatic down-sampling and caching to minimize storage overhead and decode times. It also re-uses resources like byte arrays and automatically releases application resources where necessary. At the time of writing, Glide's latest version requires a minimum SDK of API 14 (Android 4.0) and requires a compile SDK of API 26 (Android 8.0) or later.
#### Using Glide
We first need to make sure we have the Maven and Google repositories in our project `build.gradle` file:
```groovy
repositories {
mavenCentral()
google()
}
```
Then, we add the library dependency in our app-module `build.gradle` file and sync it to make the library available for use:
```groovy
implementation 'com.github.bumptech.glide:glide:4.4.0'
annotationProcessor 'com.github.bumptech.glide:compiler:4.4.0'
```
We can then load an image from a remote URL with a single line of code:
```java
GlideApp
.with(this)
.load("https://res.cloudinary.com/demo/video/upload/dog.png")
.into(imageView);
```
The `with` method can take a `Context`, `Activity`, `Fragment` or `View` object. The `load` method takes a remote URL or a drawable file (e.g `R.drawable.image`). The `imageView` instance, passed as an argument to the `into` method, should be of type [`ImageView`](https://developer.android.com/reference/android/widget/ImageView.html).
> __Note that__, if your `gradle` version is below 3.0, you should use the `compile` keyword instead of `implementation` to add dependencies.
### Picasso
[Picasso](http://square.github.io/picasso/) is another great image library for Android. It's created and maintained by [Square](http://square.github.io/), a company that is heavily dependent and contributor to the open source world, that caters to image loading and processing. By using Picasso, the process of displaying images from external locations is simplified. Picasso supports complex image transformations, automatic caching to disk, `ImageView` recycling, and download cancellation in an adapter.
The library handles every stage of the process. It starts by handling HTTP requests and also handles the caching of the image. Just as Glide does.
#### Using Picasso
The first thing we need to do is to add the Picasso dependency in our app-module `build.gradle` file:
```groovy
implementation 'com.squareup.picasso:picasso:2.5.2'
```
After that, we sync our `gradle` file and load an image resource with a single line of code:
```java
Picasso
.with(this)
.load("https://res.cloudinary.com/demo/video/upload/dog.png")
.into(imageView);
```
As we can see, the API provided by Picasso is very similar to the one provided by Glide.
Over time, there has been series of arguments and controversies as to which library performs better. Below is a table showing the strengths and flaws of them both.
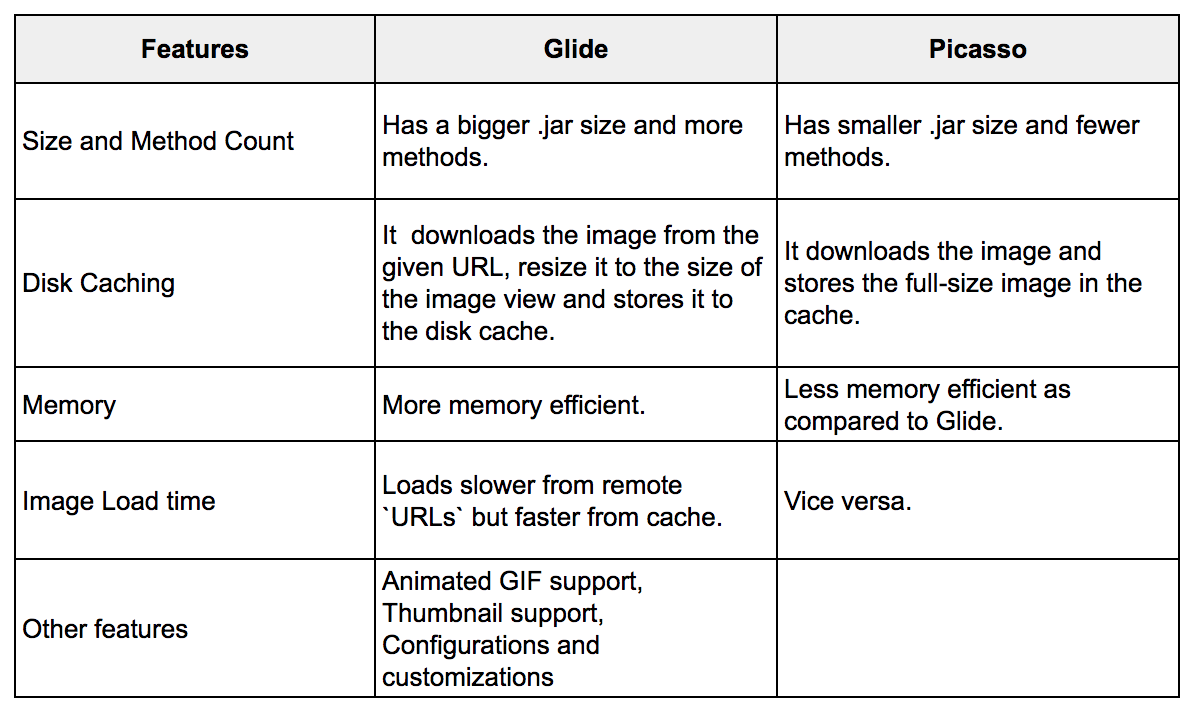
[*source: Glide vs Picasso*](https://medium.com/@multidots/glide-vs-picasso-930eed42b81d)
## Android Libraries—Videos
Displaying videos poses to be another difficult task during development. The process and details to take care of can be too numerous to handle. In this category, there are a few available options. However, as the most popular and powerful one is ExoPlayer, we will focus this section on it.
### ExoPlayer
[ExoPlayer](https://github.com/google/ExoPlayer) is an Android media player library developed by Google. It provides an alternative to Android’s MediaPlayer API for playing audio and video (both locally and over the internet) with some added advantages. ExoPlayer supports features not currently supported by Android’s MediaPlayer API, [like DASH and SmoothStreaming adaptive playbacks](https://google.github.io/ExoPlayer/guide.html). One of ExoPlayer’s biggest advantage is its easy customization.
#### Using ExoPlayer
The first step is to make sure we have the JCenter and Google repositories included in the project `build.gradle` configuration file:
```groovy
repositories {
jcenter()
google()
}
```
Next, we need to add a Gradle compile dependency to the same file:
```groovy
implementation 'com.google.android.exoplayer:exoplayer:2.6.0'
```
Then, in our layout resource file, we add the `SimpleExoPlayerView` component:
```xml
```
After that, in the corresponding Activity class, we instantiate ExoPlayer's classes:
```java
SimpleExoPlayerView simpleExoPlayerView;
SimpleExoPlayer player;
```
We then initialize our `simpleExoPlayerView` in the `onCreate` method of our Activity:
```java
simpleExoPlayerView = findViewById(R.id.simple_exoplayer_view);
```
And, in the `onStart` method, we call the `setupPlayer` method:
```java
@Override
protected void onStart() {
super.onStart();
setupPlayer();
}
```
And the `setupPlayer` method:
```java
void setupPlayer(){
BandwidthMeter bandwidthMeter = new DefaultBandwidthMeter();
TrackSelection.Factory videoTrackSelectionFactory =
new AdaptiveTrackSelection.Factory(bandwidthMeter);
TrackSelector trackSelector =
new DefaultTrackSelector(videoTrackSelectionFactory);
//initialize the player with default configurations
player = ExoPlayerFactory.newSimpleInstance(this, trackSelector);
//Assign simpleExoPlayerView
simpleExoPlayerView.setPlayer(player);
// Produces DataSource instances through which media data is loaded.
DataSource.Factory dataSourceFactory =
new DefaultDataSourceFactory(this, Util.getUserAgent(this, "CloudinaryExoplayer"));
// Produces Extractor instances for parsing the media data.
ExtractorsFactory extractorsFactory = new DefaultExtractorsFactory();
// This is the MediaSource representing the media to be played.
MediaSource videoSource = new ExtractorMediaSource(videoUri,
dataSourceFactory, extractorsFactory, null, null);
// Prepare the player with the source.
player.prepare(videoSource);
}
```
Here, we initialized the `player` with some default configurations and then assigned it to the `SimpleExoPlayerView` instance. The `videoUri` is of type `Uri`. Every file stored our device has a `Uri` turning it into a unique address to that file. If we intend to display a video from a remote `URL`, we have to parse it this way:
```java
Uri videoUri = Uri.parse("any_remote_url");
```
With this, we have a basic implementation of `ExoPlayer`. Google provides a [great tutorial with more information on how to get started with this library](https://codelabs.developers.google.com/codelabs/exoplayer-intro).
## Android Libraries—Networking
Nowadays, virtually every mobile app needs some sort of network communication to perform one function or the other. Previously, if we wanted to make a network request, we would have to execute an `Async` task class and use [`HttpsUrlConnection`](https://developer.android.com/reference/javax/net/ssl/HttpsURLConnection.html) to fetch data. However, this is not very effective especially when we are dealing with APIs that return large data.
Luckily for us, there are great networking libraries available to help us optimize this process while managing threads and the device’s resources properly. Among the alternatives, there are two that stand out: Retrofit and Volley. As Retrofit is the most popular between the two, let's take a look at it.
### Retrofit
[Retrofit](http://square.github.io/retrofit/) is a [type-safe](https://en.wikipedia.org/wiki/Type_safety) HTTP client for Android and Java developed and maintained by Square (the same company that supports Picasso). Retrofit is the most used networking library in Android development. In Retrofit, with just annotations, you can easily add a request body, manipulate endpoints, manipulate headers, add query parameters, and choose request methods. Retrofit also handles parsing to POJOs very well by using converters.
#### Using Retrofit
To use Retrofit, first, we need to add the dependency to our app `build.gradle` file:
```groovy
implementation 'com.squareup.retrofit2:retrofit:2.3.0'
```
We would also need to insert dependency for converters that we intend to use. Converters handle the mapping of Java objects to the response body. You can read more about converters [here](https://github.com/square/retrofit/wiki/Converters).
```groovy
implementation 'com.squareup.retrofit2:converter-gson:2.3.0'
implementation 'com.squareup.retrofit2:converter-scalars:2.3.0'
```
The first converter in the list above (`converter-gson`), as the name states, maps to and from the JSON format. The second is used when we want to deal with primitive data types like `String`. After importing the desired converters, we then create an interface to configure the endpoints that will be accessed :
```java
public interface ApiService {
@GET("/data")
Call fetchData(@Body JsonObject jsonObject);
}
```
From the snippet, we have an endpoint `/data` that requires a `JsonObject` `@Body` for the request. We also have a `ResponseClass` which will be mapped to the expected response body of our request. However, the class is omitted here for brevity. To map JSON objects to POJOs, we can use the [JsonSchema2Pojo](https://www.jsonschema2pojo.org) library.
After defining the endpoints available, we then create a Retrofit client:
```java
public class RetrofitClient {
static ApiService getService(){
OkHttpClient.Builder httpClient = new OkHttpClient.Builder();
Retrofit.Builder builder = new Retrofit.Builder()
.baseUrl("http://127.0.0.1:5000/")
.addConverterFactory(GsonConverterFactory.create());
Retrofit retrofit = builder
.client(httpClient.build())
.build();
return retrofit.create(ApiService.class);
}
}
```
When building our Retrofit object, we can add as many converters as we want. This provides us a variety of options to parse our data. Thereafter, we make a network request by calling:
```java
RetrofitClient.getService().fetchData(jsonObject).enqueue(new Callback() {
@Override
public void onResponse(Call call, Response response) {
}
@Override
public void onFailure(Call call, Throwable t) {
}
});
```
Where `jsonObject` contains the request parameters. This request will be made to the `http://127.0.0.1:5000/data` endpoint, as defined in the previous code snippet. As we can see in this last snippet, Retrofit also provides us callback methods to give us the status of the request.
## Android Libraries—Dependency Injection
[Dependency injection](https://en.wikipedia.org/wiki/Dependency_injection) is a concept where an object does not need to configure its dependencies. Instead, dependencies are passed in by another object. This principle helps us to decouple our classes from their implementation. It is worth noting that this is a good software engineering practice because it makes our code loosely-coupled, which makes it easier to maintain and test. There are a number of dependency injection libraries but Dagger2 seems to be the lord of them.
### Dagger2
[Dagger2](https://github.com/google/dagger) is a fully static, compile-time [dependency injection](http://en.wikipedia.org/wiki/Dependency_injection) framework for both Java and Android. It is an upgrade to the earlier [version (Dagger1)](https://github.com/square/dagger) created by [Square](http://square.github.io/) that is now maintained by Google. The recent Dagger version includes Android specific helpers for Android. Specifically, the auto-generation of subcomponents using a new code generator. Dagger2 is very deep and may require just more than the brief sample usage for adequate understanding, but let's take a look at it anyway.
#### Using Dagger2
As always, first, we need to add the dependencies to our app-module `build.gradle` file:
```groovy
implementation 'com.google.dagger:dagger:2.14.1'
annotationProcessor 'com.google.dagger:dagger-compiler:2.14.1'
// we add this so we can use the android support libraries
implementation 'com.google.dagger:dagger-android-support:2.14.1'
annotationProcessor 'com.google.dagger:dagger-android-processor:2.14.1'
```
After that, we can create an activity builder module class to enable Dagger create sub-components for the activity that will need dependencies.
```java
@Module
public abstract class ActivityBindingModule {
@ContributesAndroidInjector()
abstract MainActivity mainActivity();
}
```
We can optionally create a module class with specific dependencies to an activity. We then have to add the modules to the constructor of the `@ContributesAndroidInjector` annotation for that activity, for instance:
```java
@ContributesAndroidInjector(modules = {MainActivityModule.class} )
abstract MainActivity mainActivity();
```
We can also create another module class to provide dependencies to be used beyond just one activity class.
A `module` class is annotated with `@Module` and is responsible for providing objects. Objects are provided by creating methods (usually annotated with `@Provides` or `@Binds`) that have the same return type as what is to be provided. The sample module class below provides a `String` for our app:
```java
@Module
public abstract class AppModule {
@Provides
static String providesString(){
return "I love Auth0";
}
}
```
With `@Module` in place, we then create an abstract class or an interface. It will be named `AppComponent` in our case. The `AppComponent` is annotated with `@Component`. The annotation takes in the module classes created earlier including the `AndroidSupportInjection` class which is from the support library. Dagger generates a class which then implements this interface. The class provides the injected instances from the modules passed. The `Component` interface looks like this :
```java
@Singleton
@Component(modules = {AndroidSupportInjectionModule.class, AppModule.class, ActivityBindingModule.class})
public interface AppComponent extends AndroidInjector {
@Override
void inject(App instance);
@Component.Builder
interface Builder {
@BindsInstance
Builder application(Application application);
AppComponent build();
}
}
```
`AppController` is our application class for the app where objects are initialized once throughout the app life-cycle. Our `AppController` looks this way:
```java
public class App extends Application implements HasActivityInjector {
@Inject
DispatchingAndroidInjector activityDispatchingAndroidInjector;
@Override
public void onCreate() {
super.onCreate();
DaggerAppComponent.builder().application(this)
.build().inject(this);
}
@Override
public DispatchingAndroidInjector activityInjector() {
return activityDispatchingAndroidInjector;
}
}
```
We had to create an instance of `DispatchingAndroidInjector` and return it in the implemented method. The reason for this is to perform members-injection on activities. Then, we built our `Component` and injected the `Application` class into it.
Finally, in the activity where we intend to use dependencies, we implement `HasSupportFragmentInjector` and access our dependencies by just using the `@Inject` annotation:
```java
public class MainActivity extends AppCompatActivity implements HasSupportFragmentInjector {
@Inject
DispatchingAndroidInjector fragmentDispatchingAndroidInjector;
@Inject
String string;
@Override
protected void onCreate(Bundle savedInstanceState) {
AndroidInjection.inject(this);
super.onCreate(savedInstanceState);
Log.d("TAG",string);
}
@Override
public AndroidInjector supportFragmentInjector() {
return fragmentDispatchingAndroidInjector;
}
}
```
We did something similar to what we did in the `App` class. The only difference is that we are implementing `HasSupportFragmentInjector` so the `DispatchingAndroidInjector` has `Fragment` in its type now. The logic is this: the `Application` will contain `Activities`, and these will house `Fragments`. Thereafter, we called `AndroidInjection.inject(this)` in our `onCreate` method.
From our brief example, if we run the app, we should see `I love Auth0` printed on the log. We were able to inject the dependencies instead of initializing it in the class. This is just a bit of what Dagger2 has to offer. For more information, there are two great articles on Medium that we can reference:
- [New Android Injector with Dagger 2 — part 1](https://medium.com/@iammert/new-android-injector-with-dagger-2-part-1-8baa60152abe)
- [Dagger 2.11 with Android](https://medium.com/@idee4ril/dagger-2-11-with-android-a606c132826c)
## Android Libraries—View Binding
View binding libraries emerged when there was a need to reduce the boilerplate code when assigning views to variables and having access to them in the activity class. Libraries in this area are limited. Basically, there are two that worth mentioning: ButterKnife and Android Databinding.
### Butterknife
[ButterKnife](http://jakewharton.github.io/butterknife/) is a view binding library developed by [Jake Wharton](https://twitter.com/JakeWharton). Butterknife is a library that helps us assign `ids` to views easily thereby avoiding the excess `findViewById`. According to the documentation, “Butterknife is like Dagger only infinitely less sharp”. This means that view binding can be seen as a form of dependency injection. In ButterKnife, annotations are used to generate boilerplate code for us instead.
### Using Butterknife
to use Butterknife, we need to add the dependencies in our app-module `build.gradle` file as follows:
```groovy
implementation 'com.jakewharton:butterknife:8.8.1'
annotationProcessor 'com.jakewharton:butterknife-compiler:8.8.1'
```
Then, in our activity, we use the `@BindView` annotation to assign an `id` to its view:
```java
class MainActivity extends AppCompatActivity {
@BindView(R.id.firstname) EditText firstName;
@Override public void onCreate(Bundle savedInstanceState) {
super.onCreate(savedInstanceState);
setContentView(R.layout.main_activity);
ButterKnife.bind(this);
// TODO ...
}
}
```
Note that, in the code snippet above, we initialized ButterKnife in our `onCreate` method by using its `bind` method. Alternatively, if we want to use `ButterKnife` in a `Fragment` we initialize it in the `onCreateView` method this way:
```java
View view = inflater.inflate(R.layout.sample_fragment, container, false);
ButterKnife.bind(this,view);
```
With ButterKnife, we also avoid creating `OnClickListeners`. For instance, we can use an `@OnClick` annotation together with the view to add a click listener to a view:
```java
@OnClick(R.id.button)
void buttonClicked() {
// TODO ...
}
```
We can access the full documentation of ButterKnife [here](http://jakewharton.github.io/butterknife/) to explore more functionalities of the library.
### Android Databinding Library
The [Android Databinding Library](https://developer.android.com/topic/libraries/data-binding/index.html) is inbuilt to the Android Support Library. It requires at least Android studio version `1.3` to work. This library, unlike ButterKnife, does not make use annotations.
### Using Databinding Library
Enable data binding in the app-module `build.gradle` file and sync:
```java
android {
....
dataBinding {
enabled = true
}
}
```
Thereafter, we set the root tag of our layout file to `layout`:
```xml
```
An activity binding class is then generated for us (`ActivityMainBinding`) based on the naming of the layout: `activity.main.xml`. We will use an instance of this class to access our views. We also have another class, `DataBindingUtil`, generated to handle other utilities.
Then in our activity class:
```java
public class MainActivity extends AppCompatActivity {
ActivityMainBinding binding;
@Override
protected void onCreate(Bundle savedInstanceState) {
super.onCreate(savedInstanceState);
binding = DataBindingUtil.setContentView(this, R.layout.activity_main);
binding.textview.setText("Hello world!");
}
}
```
The Android Databinding Library offers a replacement for `onClick` listeners together with a whole lot of other features. These features can be found in the official [docs](https://developer.android.com/topic/libraries/data-binding/index.html).
These two libraries, ButterKnife and Android Databinding Library, significantly reduce the amount of code written to access views. However, the Android DataBinding library looks like a winner here because it is easier to setup, it achieves the result with fewer code as compared to ButterKnife and offers more functionalities.
## Android Libraries—Reactive Programming
Reactive programming is a paradigm where data is emitted from a component (a source) to another component (a subscriber). This helps us to handle asynchronous tasks effectively. Reactive programming libraries are, therefore, libraries that help in passing the data from sources to subscribers. The most popular alternative available for Android developers is RxJava2 and RxAndroid. As such, let's take a look at them.
### RxJava2 & RxAndroid
[RxJava](https://github.com/ReactiveX/RxJava) is a library that lets us implement reactive programming and, as such, create reactive applications. [RxJava2](https://github.com/ReactiveX/RxJava/wiki/What%27s-different-in-2.0) is an update to the earlier version of RxJava. In RxJava2, we have `Observables`, `Observers`, and `Schedulers`.
`Observables` are the data sources and they exist in various types: `Observer`, `Single`, `Flowable`, `Maybe`, and `Completable`. Each of these types has a unique use case which we can read more about [here](https://mindorks.com/course/demo/learn-rxjava/chapter/id/2).
Notably, the `Flowable` comes with a [backpressure](https://github.com/ReactiveX/RxJava/wiki/Backpressure) support. Backpressure is when an `Observer` can signal to the `Observable` that the latter is emitting values too fast. `Observers` are the data receivers (or consumers) while `Schedulers` help to manage threads.
[RxAndroid](https://github.com/ReactiveX/RxAndroid), on the other hand, is an extension of RxJava2. It offers functionalities just peculiar to the Android platform, like the provision of a `Scheduler` that schedules on the main thread or any given `Looper`.
#### Using RxAndroid
To use RxAndroid, we need to add the dependency to our app-module `build.gradle` file:
```groovy
compile 'io.reactivex.rxjava2:rxandroid:2.0.1'
// Because RxAndroid releases are few and far between, it is recommended you also
// explicitly depend on RxJava's latest version for bug fixes and new features.
compile 'io.reactivex.rxjava2:rxjava:2.1.7'
```
Then, we create an instance of a `CompositeDisposable` in our class. The `CompositeDisposable` is simply a container that can hold multiple disposables:
```java
disposables.add(
Observable.just("Hello world!")
// Run on a background thread
.subscribeOn(Schedulers.io())
// Be notified on the main thread
.observeOn(AndroidSchedulers.mainThread())
.subscribeWith(new DisposableObserver() {
@Override
public void onComplete() {
}
@Override
public void onError(Throwable e) {
}
@Override
public void onNext(String value) {
}
})
);
```
In the code snippet above, what we added to our `disposables` variable consists of the data source which will emit one string, the thread where the process will take place, the thread where our observer will be notified of the result, and our subscriber/observer. The `DisposableObserver` is our observer, which provides us with three implemented methods. First is `onNext` which is called whenever data is emitted, next is `onError` to show that an error occurred, and finally `onCompleted` to show that the `Observable` has finished emitting data and won't call `onNext` anymore.
We then clear resources when our activity is in the background to avoid memory leaks:
```java
@Override
protected void onPause() {
super.onPause();
disposables.clear();
}
```
There is a basic, but interesting, tutorial by Mindorks to help you get started with RxJava2 [here](https://mindorks.com/course/learn-rxjava).
## Android Libraries—Testing
Testing is simply executing a software with the aim of finding bugs. Testing has evolved over time and has gone beyond just being one of the final stages of a software development process. In fact, testing could be adopted as an early part of the coding stage where tests are written first, then the logic of the software is then implemented to only pass what the test expects. This is usually referred to as [_Test Driven Development_](https://en.wikipedia.org/wiki/Test-driven_development). It is good practice to write tests for our applications as it helps us to spot bugs quickly and enhance our application. There are a number of test libraries with different strengths available for Android development. Let's take a look at four of them: JUnit, Mockito, Robolectric, and Espresso.
### JUnit
[JUnit](http://junit.org/) is a framework used for unit testing. Unit testing is a type of testing where individual units of the source code are tested. The framework contains a set of `assert` methods to check an expected result against the actual result. JUnit makes heavy use of annotations. Just to name a few, we have `@Test` (to identify a test method), `@Before` (to declare a method that should be called before a test is called), and `@After` (to declare a method that should be called after a test).
#### Using JUnit
First, we add the dependency in our app-module `build.gradle` file:
```groovy
testImplementation 'junit:junit:4.12'
```
Then our sample test class looks like this:
```java
public class ExampleUnitTest {
@Test
public void additionIsCorrect() throws Exception {
assertEquals(4, 2 + 2);
}
}
```
Here, we checked to affirm that the addition of two and two equals four. JUnit tests are usually very fast because they run on the JVM and don’t require the device or an emulator. We can learn more about JUnit testing [here](http://www.vogella.com/tutorials/JUnit/article.html).
### Mockito
Most times, the classes we intend to write tests for depend on other classes. Configuring these classes just for this purpose can be hectic. This is where Mockito comes in. It is a mocking framework that helps us create and configure mock (fake) objects. It is usually used with together with JUnit.
### Using Mockito
First, we need to make sure the JCenter repository, `jcenter()` is in our project `build.gradle` file. Next, we add the dependencies to the app-module `build.gradle` file and sync:
```groovy
testCompile 'junit:junit:4.12'
// required if we want to use Mockito for unit tests
testCompile 'org.mockito:mockito-core:2.13.0'
// required if we want to use Mockito for Android tests
androidTestCompile 'org.mockito:mockito-android:2.13.0'
```
Then we use Mockito like that:
```java
@Test
public void mockitoTest throws Exception {
List mockedList = mock(List.class);
//using mock object
mockedList.add("one");
mockedList.clear();
//verification
verify(mockedList).add("one");
verify(mockedList).clear();
}
```
Here, we mocked a list, added data to it, and cleared it. We then verified that these actions were performed. We can learn more testing with Mockito in the official [documentation](http://static.javadoc.io/org.mockito/mockito-core/2.13.0/org/mockito/Mockito.html#0.1).
### Robolectric
[Robolectric](http://robolectric.org/) is another unit testing library. The difference to JUnit is that this Robolectric was created aiming to help Android developers. Robolectric handles inflation of views, resource loading, and lots of other stuff. This allows tests to do most things we could do on a real device that have Android framework dependencies without launching a device as in Espresso. In a way, Robolectric simulates the Android SDK for our tests. With Robolectric, we do not need additional mocking frameworks such as Mockito.
#### Using Robolectric
To use Robolectric, we add the dependency in our app `build.gradle` file:
```groovy
testCompile "org.robolectric:robolectric:3.6.1"
```
Then we create a sample test class:
```java
@RunWith(RobolectricTestRunner.class)
@Config(constants = BuildConfig.class)
public class MyActivityTest {
@Test
public void checkActivityNotNull() throws Exception {
Activity activity = Robolectric.setupActivity(MyActivity.class);
assertNotNull( activity );
}
}
```
This is a very basic test that sets up our activity and just checks that it is not null. We can learn more about testing with Robolectric right [here](http://www.vogella.com/tutorials/Robolectric/article.html)!
### Espresso
[Espresso](https://developer.android.com/training/testing/espresso/index.html) is a test framework which is part of the [Android Testing Support Library](https://developer.android.com/tools/testing-support-library/index.html). This test framework allows us to create user interface tests for our Android apps. This means that, with Espresso, we can write tests that can check if the text of a `TextView` matches another text. Espresso tests run on both actual devices and emulators and behave as if an actual user was using the app.
#### Using Espresso
First, we add these dependencies to our app-module `build.gradle` file:
```groovy
androidTestCompile 'com.android.support.test.espresso:espresso-core:3.0.1'
androidTestCompile 'com.android.support.test:runner:1.0.1'
```
Then, still in the same `gradle` file, we set the instrumentation runner. Let's not forget to sync our Gradle files after that:
```groovy
defaultConfig {
applicationId "com.my.awesome.app"
minSdkVersion 15
targetSdkVersion 26
versionCode 1
versionName "1.0"
testInstrumentationRunner "android.support.test.runner.AndroidJUnitRunner"
}
```
Then, we can create a test file (e.g. `EspressoSampleTest`) that will look like this:
```java
@RunWith(AndroidJUnit4.class)
public class EspressoSampleTest {
@Rule
public ActivityTestRule mActivityRule =
new ActivityTestRule(MainActivity.class);
@Test
public void isHelloWorldDisplayed() {
onView(withText("Hello world!"))
.check(matches(isDisplayed()));
}
}
```
This test class checks to see if "Hello World!" is displayed when `MainActivity` is opened.
From our study of the various test libraries, we deduce that JUnit competes with no one as it works together with other libraries. Espresso gives us a good platform for our user interface tests. Both Mockito and Robolectric have similar capabilities, but Robolectric achieves testing with fewer code. Robolectric also offers more functionalities like being able to test views. Robolectric also has the advantage of being supported by Google engineers.
## Android Libraries—Database Helpers
Offline data persistence is very important to enhance user experience. We usually need our applications to store important information that will be required on a next startup of the app or to make data available when no internet connection is available. As storing data is more complex than just combining key and value pairs, numerous libraries have been created to make storing this task easier in Android. In this section, we will look at one great persistence library: Room.
### Room
[Room](https://developer.android.com/topic/libraries/architecture/room.html) is a persistence library which is part of the Android [Architecture Components](https://developer.android.com/topic/libraries/architecture/index.html). Room provides local data persistence with minimal boilerplate code. It provides an abstraction layer over SQLite, thereby making it easier to work with databases in our app. This library comes with a lot of advantages such as verifying SQL queries at compile time, rejecting database queries on the main thread (except when explicitly stated while initializing the database), providing implementation best practices, etc.
Room is composed of three main components: the Database, the DAO (Data Access Objects), and Entities. Each of them is co-related in order to make the library functional. The `Entity` class represents a database table and has to be annotated with `@Entity`. The variables in the class represent the columns the table will have. The DAO is an interface that contains the methods used for accessing the database. Room uses the interface to generate an implementation class for us.
There are four specific annotations for the basic DAO operations: `@Insert`, `@Update`, `@Delete`, and `@Query`. Then, we have the Database class. This is an abstract class annotated with `@Database` and that extends `RoomDatabase`. This class defines the list of entities and their DAOs to be used.
#### Using Room
To use Room, we first need to add the Google Maven repository in our project `build.gradle` file. Note that recent Android projects are pre-configured with this though:
```groovy
allprojects {
repositories {
// ... other repositories
google()
}
}
```
Then, we add the Room dependencies in our app-module `build.gradle` file:
```groovy
implementation "android.arch.persistence.room:runtime:1.0.0"
annotationProcessor "android.arch.persistence.room:compiler:1.0.0"
```
Next, we create our `Entity` class. As usual, we will go for something pretty simple. We will have two columns: `id` and `name`. The `id` column will be our primary key and it will be autogenerated to make every row added unique.
```java
@Entity(tableName = Person.TABLE_NAME)
public class Person {
public static final String TABLE_NAME = "person";
String name;
@PrimaryKey(autoGenerate = true)
public int id;
}
```
It's a best practice to name our tables with lowercase letters all through. As this is not the same convention when naming Java classes, we can use a custom name for our tables. Ordinarily, Room uses the class name as the table name. Thereafter, we create our DAO. The DAO is going to give an interface into the database itself and will take care of querying and storing our data. Next, we create our DAO to contain the methods to be used for the database manipulation:
```java
@Dao
public interface PersonDao {
// Adds a person to the database
@Insert
void insert(Person person);
// Removes a person from the database
@Delete
void delete(Person person);
// Gets all people in the database
@Query("SELECT * FROM "+Person.TABLE_NAME)
List getAllPeople();
}
```
The interface is self explanatory with the annotations placed on its various methods. Thereafter, we can create the database class. This is an abstract class responsible for maintaining the database and providing instances to our DAOs :
```java
@Database(entities = {Person.class}, version = 1)
public abstract class AppDatabase extends RoomDatabase {
public abstract PersonDao getPersonDao();
}
```
With these classes in place, we can get an instance of our database and start making queries. It's recommended to make just one instance of our database throughout the app life-cycle. We can do this in our `Application` class:
```java
public class App extends Application {
private static AppDatabase appDatabase;
@Override
public void onCreate() {
super.onCreate();
// initialize the db once during the app lifecycle
appDatabase = Room.databaseBuilder(
getApplicationContext(),
AppDatabase.class,
"person.db"
).build();
}
public static AppDatabase provideDb(){
return appDatabase;
}
}
```
Then we can insert data into our database by accessing the database instance. This is done by calling the `insert` method of our DAO class:
```java
Executors.newSingleThreadExecutor().execute(new Runnable() {
@Override
public void run() {
// insert into the database
Person person = new Person();
person.name= "Idorenyin Obong"
App.provideDb().getPersonDao().insert(person);
}
});
```
Here, we created an instance of `Person` and inserted into the database. We only assigned the name because the `id`, as mentioned before, will be automatically generated for us. Notice that we also created a new thread to execute the query in a background. We can equally adopt the above pattern to perform other manipulating operations on the database.
Google offers a [nice tutorial](https://codelabs.developers.google.com/codelabs/android-persistence/#0) to help us get started with this library.
## Android Libraries-Custom Fonts
Almost every Android developer is passionate about the look and feel of their app. Sometimes we might need to go the extra mile into choosing a unique font for the app to give it the same feel across all devices. In situations like this, there are some libraries that can help us to use a custom font for all our texts in the app.
### Calligraphy
[Calligraphy](https://github.com/chrisjenx/Calligraphy) is one of the most popular custom font libraries available and it is quite easy to get along with. With this library, we can easily declare a single font across our whole application or define fonts individually to a text.
### Using Calligraphy
As usual, we add the dependency in our app-module `build.gradle` file and sync it:
```groovy
implementation 'uk.co.chrisjenx:calligraphy:2.3.0'
```
Then, we create an `assets` folder and insert our custom font there. We can do that by right-clicking the app root folder in our project directory in Android Studio, select "New", choose "Folder", and then "Assets Folder". This will generate an assets folder. Thereafter, we initialize the library and set our default font in the `Application` class:
```java
public class App extends Application {
@Override
public void onCreate() {
super.onCreate();
CalligraphyConfig.initDefault(new CalligraphyConfig.Builder()
.setDefaultFontPath("red-velvet.ttf")
.setFontAttrId(R.attr.fontPath)
.build()
);
}
}
```
Finally, we override the `attachBaseContext` method in each of our activities:
```java
@Override
protected void attachBaseContext(Context newBase) {
super.attachBaseContext(CalligraphyContextWrapper.wrap(newBase));
}
```
And we are good to go! This gives us the Red Velvet font as our app’s default font. We can also decide to apply a particular font to a single text like this:
```xml
```
### Custom Fonts with Support Library
Thanks to the Android Support Library, from version `26` upward, we can make use of custom fonts without having to increase our app dependencies. This is so because in one way or the other we find the `appcompat` dependency in our `build.gradle` file. It is automatically added when creating a new Android project.
```groovy
implementation 'com.android.support:appcompat-v7:26.1.0'
```
#### Using Custom Fonts with Support Library
First, we create a `fonts` resource folder. We can do this by right-clicking the `res` folder and then choose "New → Android resource" directory. After that, we have to choose font as the resource type and select OK. We then add the desired font files in the `font` resource directory (e.g. `redvelvet`).
We can apply the custom fonts directly in our XML layouts:
```xml
```
Additionally, we can create a new font family. A font family is a set of font files along with their style and weight details. Right click on the font source folder, select "New" and then "New Font Resource File", insert a name and select OK. A sample font family looks like this:
```xml
```
When we apply a font to our `XML` layout, the system picks the correct font based on the text style we used. Apart from applying the fonts in the `XML` layouts, we can also apply them programmatically and in multiple forms as we can see in the official [docs](https://developer.android.com/guide/topics/ui/look-and-feel/fonts-in-xml.html). Another great resource about using custom fonts with Support Library can be found [here](https://segunfamisa.com/posts/custom-fonts-with-android-support-library).
## Job Scheduling
More often than not, our Android applications might need to perform operations out of the user's interaction. This requires handling tasks asynchronously and intelligently to optimize the app’s performance and the device in general. This can equally be called handling tasks in the background.
Android has its own API for scheduling background tasks, [JobScheduler](https://developer.android.com/reference/android/app/job/JobScheduler.html), which comes with a drawback: it can only be used when supporting API 21 (Android 5.0) or later.
Two other common options in this category are [Android-job library](https://github.com/evernote/android-job) by [Evernote](https://evernote.com) and [Firebase Jobdispatcher](https://github.com/firebase/firebase-jobdispatcher-android) by Firebase.
Firebase Jobdispatcher comes at another cost which is the need for Google Play Services. However, it is compatible all the way back to API 9 (Android 2.3). Android-job combines the effort of Android's JobScheduler and Firebase Jobdispatcher to provide a firm job scheduling library. Little wonder, it has been widely adopted.
### Android-job
[Android-job](https://github.com/evernote/android-job) is an Android library used to handle jobs in the background. Depending on the Android version either the `JobScheduler`, `GcmNetworkManager` or `AlarmManager` will be used. This is why this library wins the heart of all. Instead of using separate APIs within one codebase and checking for API versions to know which scheduling API to use, Android-job reduces our code size together with the stress and does this for us. This library requires API 14 (Android 4.0) or later.
### Using Android-job
To use Android-job, we add the dependency in our app-module `build.gradle` file and sync it:
```groovy
compile 'com.evernote:android-job:1.2.1'
```
Then, we initialize our `JobManager` in the `Application` class:
```java
public class App extends Application {
@Override
public void onCreate() {
super.onCreate();
JobManager.create(this).addJobCreator(new SampleJobCreator());
}
}
```
The `Application` class is used to initialize objects just once throughout the app lifecycle. The `SampleJobCreator` is a class which returns instances of a `Job` based on the job’s unique tag. The `SampleJobCreator` can look like this:
```java
public class SampleJobCreator implements JobCreator {
@Override
@Nullable
public Job create(@NonNull String tag) {
switch (tag) {
case FirstJob.TAG:
return new FirstJob();
default:
return null;
}
}
}
```
Finally, our `Job` class named `FirstJob` looks like this:
```java
public class FirstJob extends Job {
public static final String TAG = "first_job_tag";
@Override
@NonNull
protected Result onRunJob(@NonNull Params params) {
// run your job here
return Result.SUCCESS;
}
public static void scheduleJob(long timeJobShouldStart) {
new JobRequest.Builder(ReviewStayJob.TAG)
.setExact(timeJobShouldStart)
.build()
.schedule();
}
}
```
In the code snippet above, we tell the `Job` what to do in the `onRunJob` method. Then, we schedule a job by just calling `FirstJob.scheduleJob(timeinMills)` (where `timeInMillis` is of datatype `long`). The [GitHub repo](https://github.com/evernote/android-job) gives us more complex scheduling options like telling our job just to run when the device is charging, among others.
## Conclusion
We have seen how libraries significantly reduce the amount of boilerplate code written to perform various functions while developing for Android. We also able took a quick look on how to use these libraries in most cases. Knowing the best libraries available out there can help us improve the quality of our apps and make us produce more in less time. So, no doubt, knowing and using these libraries leads to a win-win situation.