---
title: "Android Tutorial: Building and Securing Your First App (Part 1)"
description: "Learn how to develop and secure Android applications with ease."
authors:
- name: "Bruno Krebs"
url: "https://auth0.com/blog/authors/bruno-krebs/"
date: "Dec 21, 2021"
category: "Developers,Tutorial,Android"
tags: ["android", "app", "native", "mobile", "secure", "identity", "identity-management", "tutorial", "java"]
url: "https://auth0.com/blog/android-tutorial-building-and-securing-your-first-app-part-1/"
---
# Android Tutorial: Building and Securing Your First App (Part 1)
**TL;DR:** In this part of the tutorial, you will learn how to develop a simple to-do list Android app from scratch. Here, you will start by scaffolding your app with the help of Android Studio. After that, you will build a list to show to-do items and you will create a form to enable users to update this list. In the end, you will also learn how to secure your to-do app with Auth0. If you need to, you can check the full code developed throughout this tutorial in [this GitHub repository](https://github.com/auth0-blog/to-do-android-app-part-1).
---
## Prerequisites
To follow along with this tutorial, there are two things you will need and a third one that you can benefit from. First, you will need Java Development Kit 7 (JDK 7) or higher on your computer. If you don't have it, [follow the instructions here to download a JDK](https://docs.oracle.com/cd/E19182-01/820-7851/inst_cli_jdk_javahome_t/).
Second, you will need Android Studio, the official Integrated Development Environment (IDE) for Android. If you don't have it yet, you can [download Android Studio from this resource](https://developer.android.com/studio).
Lastly, if you have prior knowledge around Java development, you will benefit a lot from it. However, this is not a hard requirement. If you are new to Java (but have experience with some other programming languages), you might still find it easy to follow the instructions here.
## Scaffolding an Android App
Scaffolding a new Android application is quite easy. For starters, open the Android Studio and, on the splash screen, click on _Start a new Android Studio project_. After clicking on it, the IDE will ask you to _choose your project_. Make sure you are on the _Phone and Tablet_ tab, click on the _Empty Activity_ option, then click on _Next_.

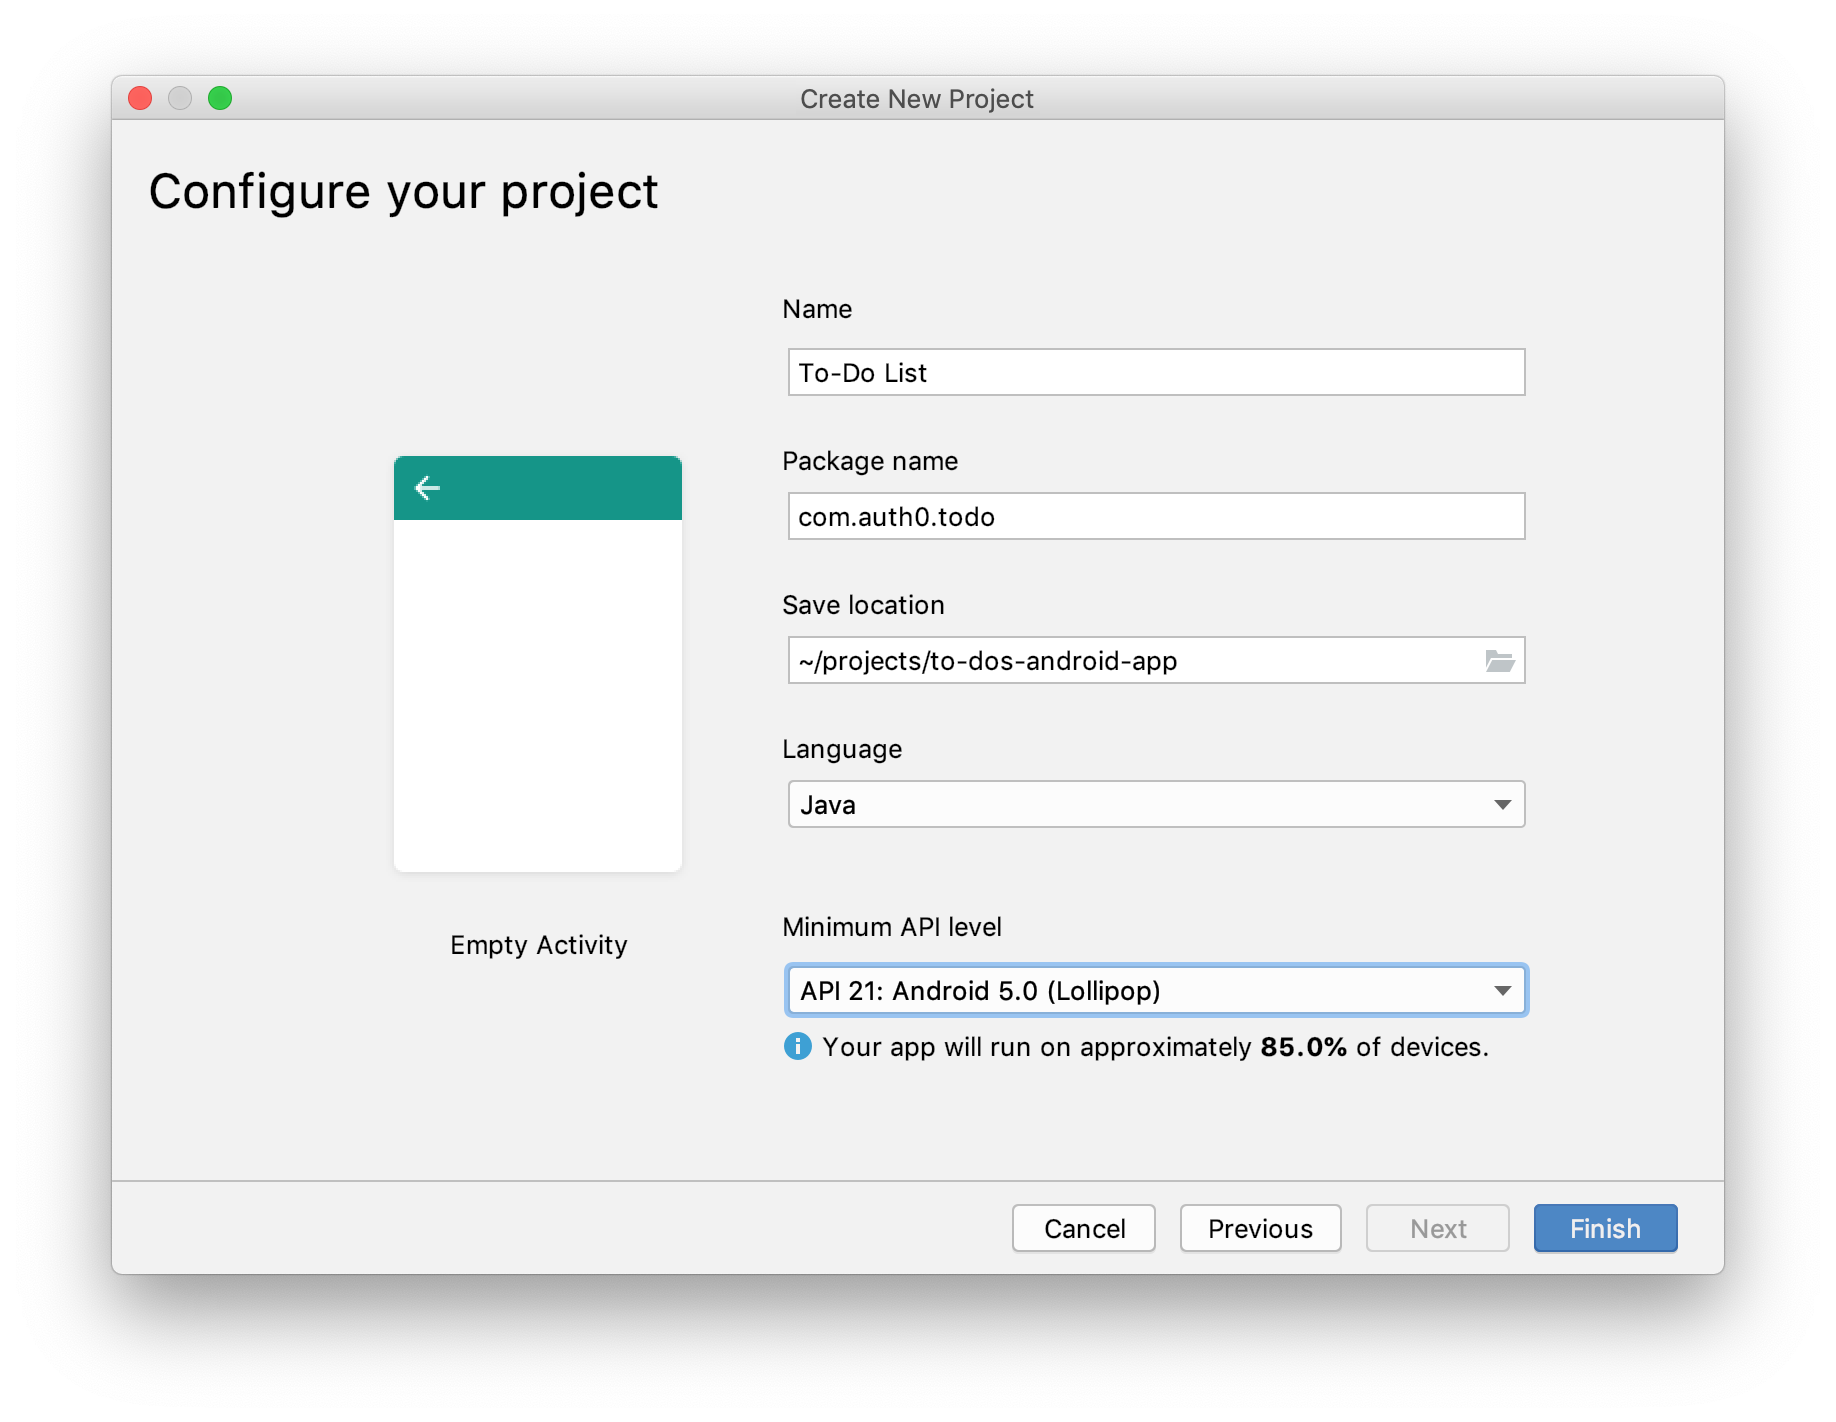
After clicking on this button, the IDE will show you a form that you can fill in as follows:
- _Name_: "To-Do List"
- _Package name_: `com.auth0.todo`
- _Save location_: Use the default value or adjust to your needs.
- _Language_: "Java"
- _Minimum API level_: "API 21: Android 5.0 (Lollipop)"
From the properties above, there are two items that you can change: name and save location. Apart from that, you can also change the package name, but be aware that this tutorial uses this value _multiple_ times (so, you will have to replace them a lot too). The other two properties, language and minimum API level, must remain untouched. So, leave them like that and click on the _Finish_ button.
After clicking on the finish button, Android Studio will scaffold your new project for you, and it will open its source code on a new window. Now, the next thing you can do is to run your new (and empty) app to confirm that everything is in place. For that, you have two options: you can run the app on a real device (like your Android mobile phone), or you can use an emulator. The latter is the easiest approach but, [check this resource if you want to learn how to run it on a real device](https://developer.android.com/training/basics/firstapp/running-app#RealDevice).
If you opt to use an emulator, you can proceed as follows:
- In the IDE, click on the green _Run_ button in the toolbar.
- In the _Select Deployment Target_ window, click _Create New Virtual Device_.
- In the _Select Hardware_ screen, select a phone device, such as Nexus 5, and then click _Next_.
- In the _System Image_ screen, select the version with the highest API level. If you don't have that version installed, the IDE will show a _Download_ link. If that is the case, click the link and complete the download.
- Click _Next_.
- On the _Android Virtual Device (AVD)_ screen, leave all the settings alone and click _Finish_.
- Back in the _Select Deployment Target_ dialog, select the device you just created and click _OK_.
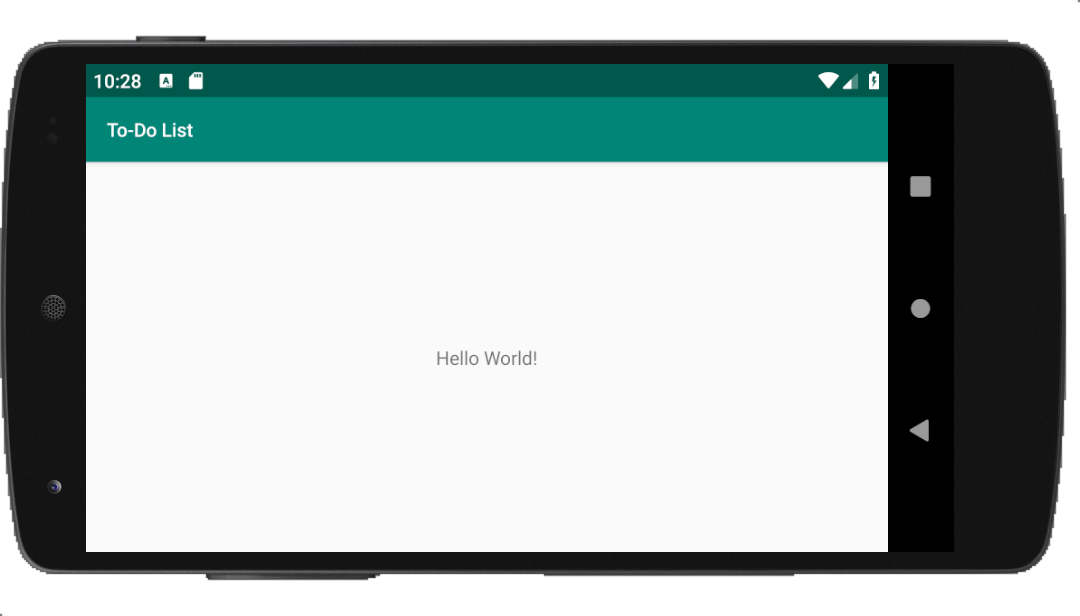
Clicking on the _OK_ button will make Android Studio start the emulator (it can take a couple of minutes as it is the first time you are using it) and open the app on it. You should now see "Hello World!" displayed in the app running on the emulator.
## Adding Android Material to Your Project
By default, the Android framework provides a bunch of UI components that you can use to build your app. These components are quite flexible and there is nothing wrong on using them. However, as their default appearance is a bit ugly, you will be better off using some more advanced component framework.
In this tutorial, to avoid having to invest too much time on the UI and to avoid ending up with an ugly app, you will use one of the most popular component libraries available: [Android Material](https://material.io/develop/android/). This library provides components that adhere to [the _Material Design_ visual language](https://material.io/design/introduction) that Google created. This visual language allows developers to:
- rely on classic principles of good design;
- and to unify the user experience across platforms, devices, and input methods.
To install this library, open the `./app/build.gradle` in your project, and update the `dependencies` section as follows:
```gradle
// ./app/build.gradle
dependencies {
// ... leave the rest untouche and add ...
implementation 'com.google.android.material:material:1.0.0'
}
```
After adding this dependency to your project, you will need to click the _Sync Now_ link that the IDE shows to download the Material library (if you don't, you won't be able to use the Material components in your project). Then, click on the _Refactor_ menu in your IDE (at the horizontal menu at the top) and click on the _Migrate to AndroidX_ option. You will need this to [update your app's dependencies and code to use the new `androidx` package and the `com.google.android.material` library](https://github.com/material-components/material-components-android/blob/master/docs/getting-started.md#1-depend-on-our-library).
Lastly, you can open the `AndroidManifest.xml` file and replace the value that you have on the `android:theme` property of the `application` element:
The new value you are using is changing [the _theme_ (the look and feel)](https://developer.android.com/guide/topics/ui/look-and-feel/themes) of your app to a darker one.
That's it for the moment. In the next section, you will use your first Android Material component.
## Showing a Static List of To-Do Items
After testing your hello-world app and adding Android Material to your project, it is time to start developing your new app. To begin with, you will remodel the main _activity_ of your Android app to show a list of static to-do items.
> An _activity_ is a single, focused thing that the user can do. Almost all activities interact with the user, so the `Activity` class takes care of creating a window for you in which you can place your UI (User Interface). - [Android Docs](https://developer.android.com/reference/android/app/Activity)
In Android, to define how an activity will look like, you will usually use [_layout resources_](https://developer.android.com/guide/topics/resources/layout-resource). These resources are XML files that reside in the `./app/src/main/res/layout/` directory of your application. For example, if you open this directory, you will see a file called `activity_main.xml` there. Then, if you open the `MainActivity` class source code (`./app/src/main/java/com/auth0/todo/MainActivity.java`), you will see that this class calls the `setContentView` method passing `R.layout.activity_main` as the parameter.
With that information, the Android framework will know that you want to use the `activity_main` `layout` resource (`R` stands for resource, hence `R.layout.activity_main`) to set the content view (`setContentView`) of the `MainActivity` class. Knowing that, the framework will interpret this file to compose your UI.
Now that you know more about how this process works, open the `activity_main.xml` file, and replace its code with this:
The only change on this file is that you are adding a component called `ListView` that has `@id/to_do_items` as its identifier (note that the `+` sign after `@` is telling Android that you are defining this `id` here, not using it). Don't worry about the other properties now. After creating your first Android application, you can learn more about them.
With that in place, you will create a new layout resource that your app will use to show each to-do item in particular. So, create a new file called `to_do_item.xml` inside `./app/src/main/res/layout/` and add the following code to it:
Although verbose, this XML file is quite simple to understand. Here, you are using a `LinearLayout` component to serve as the parent of another component called `MaterialCardView`. Then, inside this card view, you are defining a `TextView` that will receive the description of the to-do item it represents.
> **Note:** The primary reason to nest cards inside `LinearLayout` is to define some space around (`android:padding...`) each one of them.
Now, to make your app use this new layout resource, you will need to create an _adapter_. Adapters, [as explained by the official documentation](https://developer.android.com/reference/android/widget/Adapter), exist to act as a bridge between view and the underlying data. In this case, you will use an _adapter_ to make your app use the new _resource_ to render to-do items on the `ListView` you added to the `activity_main.xml` file.
As you are dealing with to-do items, you will name this adapter `ToDoListAdapter`. To add this class to the project, create a new package called `util` inside `com.auth0.todo`. Then, create the `ToDoListAdapter` class inside the new package and add the following code to it:
```java
// ./app/src/main/java/com/auth0/todo/util/ToDoListAdapter.java
package com.auth0.todo.util;
import android.content.Context;
import android.view.LayoutInflater;
import android.view.View;
import android.view.ViewGroup;
import android.widget.BaseAdapter;
import android.widget.TextView;
import com.auth0.todo.R;
import java.util.ArrayList;
import java.util.List;
public class ToDoListAdapter extends BaseAdapter {
private LayoutInflater inflater;
private List toDoList = new ArrayList<>();
public ToDoListAdapter(Context context) {
toDoList.add("My first task");
toDoList.add("My second task");
inflater = LayoutInflater.from(context);
}
@Override
public View getView(int position, View view, ViewGroup parent) {
String message = (String) getItem(position);
if (view == null) {
view = inflater.inflate(R.layout.to_do_item, null);
}
TextView textView = view.findViewById(R.id.to_do_message);
textView.setText(message);
return view;
}
@Override
public Object getItem(int position) {
return toDoList.get(position);
}
@Override
public long getItemId(int position) {
return position;
}
@Override
public int getCount() {
return toDoList.size();
}
}
```
As you can see, this class extends `BaseAdapter` and overrides four of its methods (`getView`, `getItem`, `getItemId`, and `getCount`) to render the to-do list. To do so, the `getView` method receives a `position` parameter and uses it to get the item (`getItem`) of the to-do list it must render. Then, `getView` extracts the `message` of this to-do item and uses it to populate the `TextView` element (the one you put inside `MaterialCardView`).
> **Note:** Your app will call `getView` for each one of the to-do items the adapter holds. The app will know how many items the adapter has through the `getCount` method and, as explained, will use `getItem` to get each one in particular.
For now, your adapter is using a static to-do list that contains two items. You are defining this static list on the constructor of the `ToDoListAdapter` class.
After defining the adapter, you will have to open the `MainActivity` class and update it as follows:
```java
// ./app/src/main/java/com/auth0/todo/MainActivity.java
// ... other import statements ...
import android.widget.ListView;
import com.auth0.todo.util.ToDoListAdapter;
public class MainActivity extends AppCompatActivity {
private ToDoListAdapter toDoListAdapter;
@Override
protected void onCreate(Bundle savedInstanceState) {
// ... super.onCreate and setContentView ...
// create and configure the adapter
this.toDoListAdapter = new ToDoListAdapter(this);
ListView toDoItemsListView = findViewById(R.id.to_do_items);
toDoItemsListView.setAdapter(toDoListAdapter);
}
}
```
The new version of this class is defining a field that references the `ToDoListAdapter` class, and it is using the `onCreate` lifecycle method to create and configure this adapter. As you can see, you are making the `ListView` element (the one you added to `activity_main.xml`) use your new adapter (`setAdapter(toDoListAdapter)`).
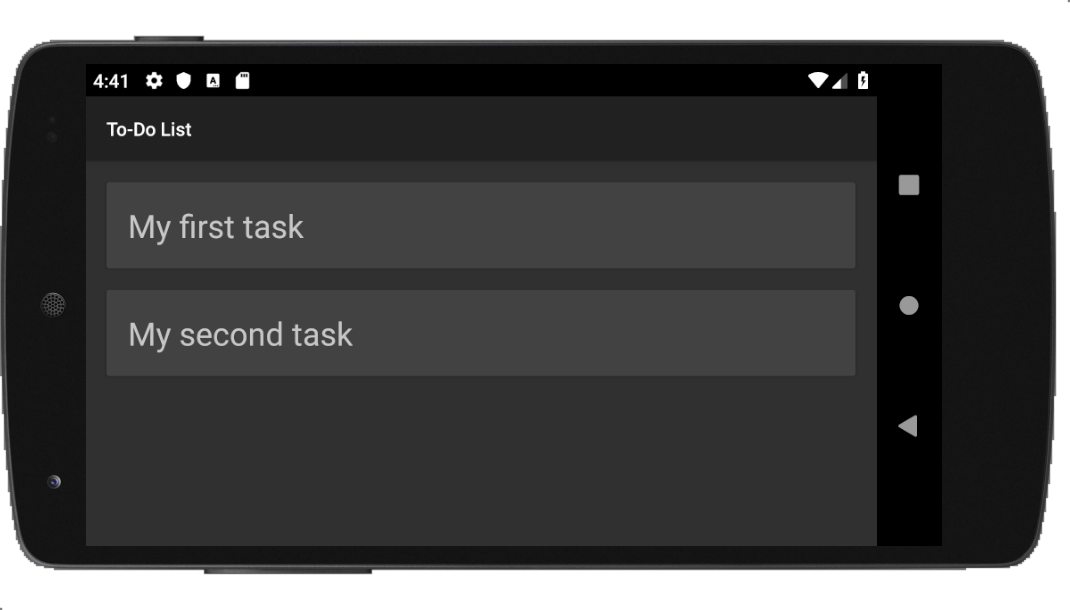
After these changes, if you hit the play button again, you will see the new version of your app with a static to-do list (and with a dark theme).
## Allowing Users to Insert To-Do Items
Now that you have built an app capable of showing a list of to-do items, the next logical thing to do is to enhance it to enable users to insert more items. To accomplish this, you will create a new activity that will implement this feature. So, for starters, create a new file called `activity_to_do_form.xml` inside `./app/src/main/res/layout/` (this will be the layout resource of the activity) and add the following code to it:
This layout resource is using a [`ConstraintLayout`](https://developer.android.com/training/constraint-layout) to put two elements side by side:
- an `EditText` where users will input the description of the new to-do item;
- a `Button` that, when clicked, will add the to-do item in the list.
Note that the layout above is using two string resources: `@string/to_do_message` and `@string/button_insert`. On Android development, it is a [best practice to use String resources](https://developer.android.com/guide/topics/resources/localization) to declare static text. So, open the `strings.xml` file and replace its contents with this:
To-Do ListDescribe your to-do itemInsert
This will make your input text show (while empty) a message saying "Describe your to-do item", and will add "Insert" as the label of the button.
Next, you will create the activity's class that will render and handle this layout. In this case, you will create a file called `ToDoFormActivity.java` inside the `com.auth0.todo` package and you will add the following code to it:
```java
// ./app/src/main/java/com/auth0/todo/ToDoFormActivity.java
package com.auth0.todo;
import android.app.Activity;
import android.content.Intent;
import android.os.Bundle;
import android.view.View;
import android.widget.EditText;
import androidx.appcompat.app.AppCompatActivity;
public class ToDoFormActivity extends AppCompatActivity {
@Override
protected void onCreate(Bundle savedInstanceState) {
super.onCreate(savedInstanceState);
setContentView(R.layout.activity_to_do_form);
}
public void addToDoItem(View view) {
EditText editText = findViewById(R.id.editText);
String message = editText.getText().toString();
Intent returnIntent = new Intent();
returnIntent.putExtra("item", message);
setResult(Activity.RESULT_OK, returnIntent);
finish();
}
}
```
Here, on the `onCreate` method, you are defining that this activity will use the `activity_to_do_form` layout resource. As this resource has a button that depends on a method called `addToDoItem`, you are defining it here as well. This method, when triggered, reads the `message` inserted by the user and send it back to the main activity.
Now you are probably wondering: "What does 'send it back to the main activity' really mean?" As you will soon see, the main activity will start this activity through a method called `startActivityForResult`. By using this method, the activity is telling Android that it wants to create a temporary `ToDoFormActivity` to get a result back from it (in this case, the message that the user writes on the text field).
To wrap the creation of the new activity, you will need to register it in your app. So, open the `AndroidManifest.xml` file and update it as follows:
...
Having done that, open the `activity_main.xml` file and update it as follows:
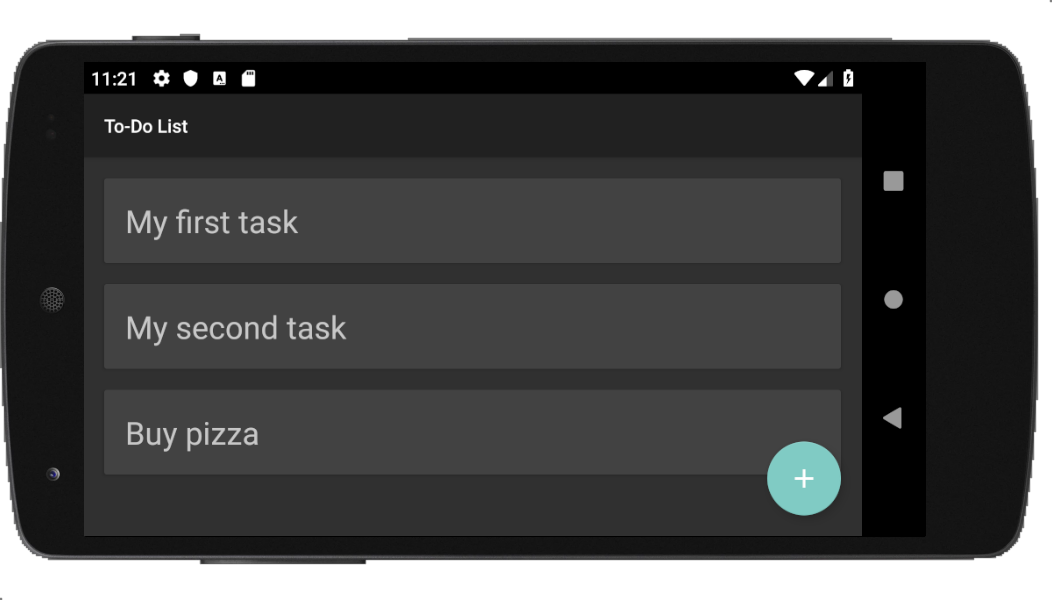
This will add a [Floating Action Button (a.k.a, FAB)](https://material.io/develop/android/components/floating-action-button/) to your main activity. If you take a close look at the XML you just added, you will see that, among other things, it is defining that this button will call `openToDoForm` when clicked. Also, the XML is telling Android that it wants to use an icon (`android:src`) that has the following id: `@drawable/ic_add_white_24dp`.
So, first, you will create the icon that will appear on the button. To do this, create a file called `ic_add_white_24dp.xml` inside `./app/src/main/res/drawable/` and insert the following code to it:
This file defines a vector that will draw a plus (`+`) sign in your button.
Now, you can open the `MainActivity` class and update it as follows:
```java
// ./app/src/main/java/com/auth0/todo/MainActivity.java
package com.auth0.todo;
// ... other import statements ...
import android.content.Intent;
import android.view.View;
public class MainActivity extends AppCompatActivity {
// ... ToDoListAdapter and onCreate definition ...
public void openToDoForm(View view) {
startActivityForResult(new Intent(this, ToDoFormActivity.class), 1);
}
@Override
protected void onActivityResult(int requestCode, int resultCode, Intent data) {
if (requestCode == 1) {
if (resultCode == RESULT_OK) {
String newItem = data.getStringExtra("item");
this.toDoListAdapter.addItem(newItem);
}
}
}
}
```
Here, you are adding two new methods:
- `openToDoForm`: This method, as mentioned before, will use the `startActivityForResult` method to start the `ToDoFormActivity` (and to get a result back from it).
- `onActivityResult`: This method will get the value inserted on the `ToDoFormActivity` and add to the `toDoListAdapter` instance.
> **Note:** To use `startActivityForResult`, you have to inform an integer that represents the "operation" you want the new activity to perform. In the code above, you are using `1` to represent this operation. That's why you check if `requestCode == 1` inside the `onActivityResult` method. [Check this resource to learn more about `startActivityForResult`](https://developer.android.com/training/basics/intents/result).
If you recall, your `ToDoListAdapter` class you created earlier doesn't have a method called `addItem`. So, open this class and add the method:
```java
// ./app/src/main/java/com/auth0/todo/util/ToDoListAdapter.java
// ... package definition and import statements ...
public class ToDoListAdapter extends BaseAdapter {
// ... other fields and methods ...
public void addItem(String newItem) {
toDoList.add(newItem);
notifyDataSetChanged();
}
}
```
This change will make your adapter add the new item to the `toDoList` instance and will make the adapter notify (through the `notifyDataSetChanged`) the UI about the change. This notification will allow Android to adjust the view accordingly (i.e., create the card for the new item).
With that in place, you have finished creating and integrating the form that will allow users to add new to-do items. So, click on the green play button to reload your app, and test it to see if everything is working as expected.
> **Note:** If you change the orientation of your device (from vertical to horizontal, for example), you might end up losing the new items added to the to-do list. This problem happens because Android reconstructs the view on such scenarios, calling the `onCreate` lifecycle method again (which ends up creating a new `ToDoListAdapter` instance). On the second part of this tutorial, you will fix this situation by adding a backend API to support your app.
## Securing Android Apps with Auth0
Cool, you now have a simple to-do application that persists items in memory. In the second part of this tutorial, you will learn how to integrate this Android app with a backend API. The idea is to be able to provide a persistent database to your app, so your users can rest assured they will have access to their items even if they lose their phones. However, the best thing you can do now is to learn how to secure your app.
By using Auth0, as you will see, providing means so users can authenticate themselves is quite easy. You will have to start by creating an Auth0 account (or logging into an existing one), then you will have to configure some properties in your Auth0 dashboard, then you will need to make some changes in your code. After that, you will have a consistent, full-featured identity management system that will allow users to [sign up, sign in](https://auth0.com/docs/getting-started/overview), [reset passwords](https://auth0.com/docs/universal-login/password-reset), activate [multifactor authentication](https://auth0.com/docs/multifactor-authentication), and more.
If this sounds interesting, keep reading!
### Creating and configuring an Auth0 account
For starters, if you don't have one yet, you can sign up for a free Auth0 account now (if you already have one, feel free to reuse it). After that, go to [the _Applications_ section](https://manage.auth0.com/#/applications) of your Auth0 dashboard and click on _Create Application_.
When you click on this button, Auth0 will show you a dialog where it will ask you for two things:
- _Name_: Here, you can type an identifier for your application (e.g., "Android To-Do App").
- _Application Type_: Here, you will have to choose "Native".
After filling in this form, click on the _Create_ button. Doing so will make Auth0 redirect you to the _Quick Start_ section of your new application. From there, head to the _Settings_ section, and search for the _Allowed Callback URLs_ field. In this field, insert the following value:
- `to-do:///android/com.auth0.todo/callback`
> **Note:** You will have to replace `` with the value available on the _Domain_ property of your new Auth0 Application (you can find it at the top of the page). Also, if you have chosen to use a package name different than `com.auth0.todo`, you will have to change that too.
The authentication process at Auth0 happens on a [hosted login page](https://auth0.com/docs/universal-login). That is, when your app starts the authentication process, it will open the login page in a browser and, after the authentication takes place, will redirect your user back to your app. This redirection works because your app will register a [deep link](https://developer.android.com/training/app-links/deep-linking) (the one you are adding to the _Allowed Callback URLs_ field) in the Android device. Then, as you will configure Auth0 to call this deep link, the device will know that it has to open your app again (passing any information that the deep link provides).
Therefore, after updating the _Allowed Callback URLs_ field, click on the _Save Changes_ button at the bottom of the page and leave the page open. You will need to copy some values from it in a bit.
### Adding and configuring the Auth0 dependency
Having created your Auth0 Application, the next thing you will do is to add and configure [the library that will let you secure your Android app with Auth0](https://github.com/auth0/Auth0.Android). To install it, open the `build.gradle` file and update it as follows:
```gradle
// ./app/build.gradle
// ... apply plugin ...
android {
// ... sdk version ...
defaultConfig {
// ... other properties ...
manifestPlaceholders = [auth0Domain: "@string/com_auth0_domain", auth0Scheme: "to-do"]
}
// ... buildTypes ...
}
dependencies {
// ... other dependencies ...
implementation 'com.auth0.android:auth0:1.15.1'
}
```
Then, click on the _Sync Now_ link that the IDE shows to download this dependency.
> **Note:** The `manifestPlaceholders` you added above helps the Auth0 dependency register an `intent-filter` to capture the result of the authentication process. In other words, when Auth0 redirect your users back to your app (through the deep link you configured previously), the library will intercept this call and do its job.
Now, to configure this dependency with your Auth0 Application properties, you will open and update the `strings.xml` file. While you are manipulating this file, you can also add two labels that you will use soon:
Log InLog Out
As you can see, this change is defining the `login` and `logout` labels and two Auth0 properties: `com_auth0_client_id` and `com_auth0_domain`. You will need to replace the values you are passing to these properties with the ones that the Auth0 Application exposes. More specifically, you will need to copy _Client ID_ and _Domain_ from your Auth0 Application to replace `` and `` respectively.
### Adding a menu to your app
Now that you configured the Auth0 library, the next thing you will do is to add a menu for your app. This will be a dynamic menu that will allow users to either log in or log out (depending, of course, on their current status).
To start defining this menu, create a new directory called `menu` inside `./app/src/main/res/`. Then, create a file called `menu.xml` inside `menu` and add the following code to it:
This menu is quite simple. It contains a single `item` just with an `id` and an empty `title`. You will define the title of the menu, along with its behavior, programmatically.
Now, as the menu will only cover two scenarios (login and logout), you will define two menu listeners: `LoginListener` and `LogoutListener`. When your users click on the menu, your app will call one of these listeners to either start the authentication process or end the user session.
To define the first listener, create a class called `LoginListener` inside the `com.auth0.todo.util` package and add the following code to it:
```java
// ./app/src/main/java/com/auth0/todo/util/LoginListener.java
package com.auth0.todo.util;
import android.view.MenuItem;
import com.auth0.todo.identity.AuthenticationHandler;
public class LoginListener implements MenuItem.OnMenuItemClickListener {
private AuthenticationHandler authenticationHandler;
public LoginListener(AuthenticationHandler authenticationHandler) {
this.authenticationHandler = authenticationHandler;
}
@Override
public boolean onMenuItemClick(MenuItem item) {
authenticationHandler.startAuthenticationProcess();
return true;
}
}
```
As you can see, this class implements an interface called `MenuItem.OnMenuItemClickListener`. It also defines a constructor that receives an instance of a class called `AuthenticationHandler`. You will create this class soon. Lastly, it defines that the `onMenuItemClick` will trigger a method called `startAuthenticationProcess`. As its name suggests, this method will start the authentication process.
After defining the login listener, you will create the `LogoutListener` inside the same package and add the following code to it:
```java
// ./app/src/main/java/com/auth0/todo/util/LogoutListener.java
package com.auth0.todo.util;
import android.view.MenuItem;
import com.auth0.todo.identity.AuthenticationHandler;
public class LogoutListener implements MenuItem.OnMenuItemClickListener {
private AuthenticationHandler authenticationHandler;
public LogoutListener(AuthenticationHandler authenticationHandler) {
this.authenticationHandler = authenticationHandler;
}
@Override
public boolean onMenuItemClick(MenuItem item) {
authenticationHandler.logout();
return true;
}
}
```
The behavior of this class is quite similar to the other one. The difference is that, instead of starting the authentication process, this class will log the user out.
### Handling the authentication process
After defining some important pieces of your menu, the next thing you will do is to create the two central pieces of the identity management solution of your app. For starters, create a package called `identity` inside `com.auth0.todo`. Then, inside this package, create a class called `AuthenticationHandler` with the following code:
```java
// ./app/src/main/java/com/auth0/todo/identity/AuthenticationHandler.java
package com.auth0.todo.identity;
import android.app.Dialog;
import android.content.Intent;
import android.widget.Toast;
import com.auth0.android.Auth0;
import com.auth0.android.authentication.AuthenticationAPIClient;
import com.auth0.android.authentication.AuthenticationException;
import com.auth0.android.authentication.storage.CredentialsManagerException;
import com.auth0.android.authentication.storage.SecureCredentialsManager;
import com.auth0.android.authentication.storage.SharedPreferencesStorage;
import com.auth0.android.callback.BaseCallback;
import com.auth0.android.provider.AuthCallback;
import com.auth0.android.provider.WebAuthProvider;
import com.auth0.android.result.Credentials;
import com.auth0.todo.MainActivity;
import androidx.annotation.NonNull;
import androidx.appcompat.app.AlertDialog;
public class AuthenticationHandler implements AuthCallback, BaseCallback {
private Auth0 auth0;
private AuthAwareActivity originalActivity;
private Class nextActivity;
private SecureCredentialsManager credentialsManager;
private Credentials credentials;
AuthenticationHandler(AuthAwareActivity originalActivity) {
this.originalActivity = originalActivity;
// configuring Auth0
auth0 = new Auth0(originalActivity);
auth0.setOIDCConformant(true);
AuthenticationAPIClient client = new AuthenticationAPIClient(auth0);
credentialsManager = new SecureCredentialsManager(originalActivity, client, new SharedPreferencesStorage(originalActivity));
}
public void startAuthenticationProcess() {
WebAuthProvider.init(auth0)
.withScheme("to-do")
.withScope("openid profile email offline_access")
.withAudience("https://to-dos-api")
.start(originalActivity, this);
}
public void logout() {
credentialsManager.clearCredentials();
originalActivity.runOnUiThread(new Runnable() {
@Override
public void run() {
String message = "See you soon!";
Toast.makeText(originalActivity, message, Toast.LENGTH_SHORT).show();
originalActivity.refreshMenu();
if (originalActivity instanceof MainActivity) return;
originalActivity.startActivity(new Intent(originalActivity, MainActivity.class));
}
});
}
void refreshCredentials(Class nextActivity) {
this.nextActivity = nextActivity;
credentialsManager.getCredentials(this);
}
public String getAccessToken() {
return credentials.getAccessToken();
}
public boolean hasValidCredentials() {
boolean hasValidCredentials = this.credentialsManager.hasValidCredentials();
if (hasValidCredentials && credentials == null) {
refreshCredentials(null);
}
return hasValidCredentials;
}
@Override
public void onFailure(@NonNull final Dialog dialog) {
originalActivity.runOnUiThread(new Runnable() {
@Override
public void run() {
dialog.show();
}
});
}
@Override
public void onFailure(AuthenticationException exception) {
new AlertDialog.Builder(originalActivity)
.setTitle("Authentication Error")
.setMessage(exception.getMessage())
.show();
}
@Override
public void onSuccess(@NonNull Credentials credentials) {
credentialsManager.saveCredentials(credentials);
this.credentials = credentials;
if (nextActivity == null) {
originalActivity.runOnUiThread(new Runnable() {
@Override
public void run() {
originalActivity.refreshMenu();
}
});
return;
}
originalActivity.startActivity(new Intent(originalActivity, nextActivity));
}
@Override
public void onFailure(CredentialsManagerException error) {
startAuthenticationProcess();
}
}
```
Don't get scared by the verbosity of this class, nor by the errors that the IDE shows regarding not knowing what `AuthAwareActivity` stands for (you will create this class soon). The `AuthenticationHandler` class is a bit big, but it is easy to demystify. Here you can check a list with the most important details that you must be aware of:
- This class implements the `AuthCallback` interface to be able to decide what to do in case of failure or success. If you take a close look, you will see that the interface defines (and this class implements) three methods: two `onFailure` and one `onSuccess`. You will read about them in a bit.
- This class implements the `BaseCallback` interface. This is needed because you want this class to call the `SecureCredentialsManager` that Auth0 provides to get the credentials (if any) of the current user. This process is done inside the `refreshCredentials` method that the `AuthAwareActivity` implements.
- This class defines a method called `startAuthenticationProcess` that initiates the authentication process. That is, this method opens the Auth0 hosted login page in a browser so users can choose how they want to sign in or sign up.
- This class defines a method called `logout` that, when requested, clears user credentials and that makes sure they are sent back to the main activity (it wouldn't make sense letting unauthenticated users add new to-do items, right?).
- This class defines a method called `getAccessToken` that returns an [access token](https://auth0.com/docs/tokens/overview-access-tokens) that the app can use to communicate with a backend API. You will use this method (and learn more about access tokens) on the second part of the tutorial while integrating the app with the backend.
- This class defines a method called `hasValidCredentials` that verifies if the user has valid credentials or not. What is interesting here is that, if the user doesn't have valid credentials, this method calls the `refreshCredentials` to get new ones.
As you can see, this class will do the heavy lifting for you when it comes to authentication and identity management.
Now, you will create another important class: `AuthAwareActivity`. Create this class inside the `com.auth0.todo.identity` package and add the following code to it:
```java
// ./app/src/main/java/com/auth0/todo/identity/AuthAwareActivity.java
package com.auth0.todo.identity;
import android.os.Bundle;
import android.view.Menu;
import android.view.MenuInflater;
import android.view.MenuItem;
import com.auth0.todo.R;
import com.auth0.todo.util.LoginListener;
import com.auth0.todo.util.LogoutListener;
import androidx.annotation.Nullable;
import androidx.appcompat.app.AppCompatActivity;
public abstract class AuthAwareActivity extends AppCompatActivity {
protected AuthenticationHandler authenticationHandler;
protected Menu menu;
@Override
protected void onCreate(@Nullable Bundle savedInstanceState) {
super.onCreate(savedInstanceState);
this.authenticationHandler = new AuthenticationHandler(this);
}
public void refreshMenu() {
MenuItem firstOption = menu.findItem(R.id.first_action);
// reconfiguring button
if (!authenticationHandler.hasValidCredentials()) {
firstOption.setTitle(R.string.login);
firstOption.setOnMenuItemClickListener(new LoginListener(authenticationHandler));
} else {
firstOption.setTitle(R.string.logout);
firstOption.setOnMenuItemClickListener(new LogoutListener(authenticationHandler));
}
}
@Override
public boolean onCreateOptionsMenu(Menu menu) {
MenuInflater inflater = getMenuInflater();
inflater.inflate(R.menu.menu, menu);
this.menu = menu;
refreshMenu();
return true;
}
}
```
The main purpose of creating this class is to define a common behavior for the activities of your Android app. In this case, you are defining that you want all the subclasses of this class (you will refactor your two activities soon to extends this one) to create an instance of `AuthenticationHandler`. Also, you are defining that these activities will have a menu that shows either a login or a logout button depending on the result of a call to `hasValidCredentials`.
### Wrapping up the integration with Auth0
To wrap things up, the last thing you will have to do is to refactor your two activities to extend the `AuthAwareActivity` class. First, you can open the `ToDoFormActivity` class and update it as follows:
```java
// ./app/src/main/java/com/auth0/todo/ToDoFormActivity.java
// ... package definition and other import statements ...
import com.auth0.todo.identity.AuthAwareActivity;
public class ToDoFormActivity extends AuthAwareActivity {
// ... leave the body of the class untouched ...
}
```
Then, open the `MainActivity` class and change it as follows:
```java
// ./app/src/main/java/com/auth0/todo/MainActivity.java
// ... package definition and other import statements ...
import com.auth0.todo.identity.AuthAwareActivity;
public class MainActivity extends AuthAwareActivity {
// ... leave the rest untouched ...
public void openToDoForm(View view) {
if (authenticationHandler.hasValidCredentials()) {
startActivityForResult(new Intent(this, ToDoFormActivity.class), 1);
}
}
// ... leave the rest untouched ...
}
```
Here, besides changing the base class of the `MainActivity` one, you are also changing the behavior of the floating action button to block unauthenticated users from accessing the _new item_ form.
> **Note:** As you are replacing `AppCompatActivity` with `AuthAwareActivity` on the two classes above, you can also remove the import statement that references the former.
After making these final changes, you are ready to take your secured Android application for a spin. So, click on the green play button to load the new version of your app, then click on the login menu to start the authentication process. If you sign in successfully, you will be able to use the _new item_ form again.
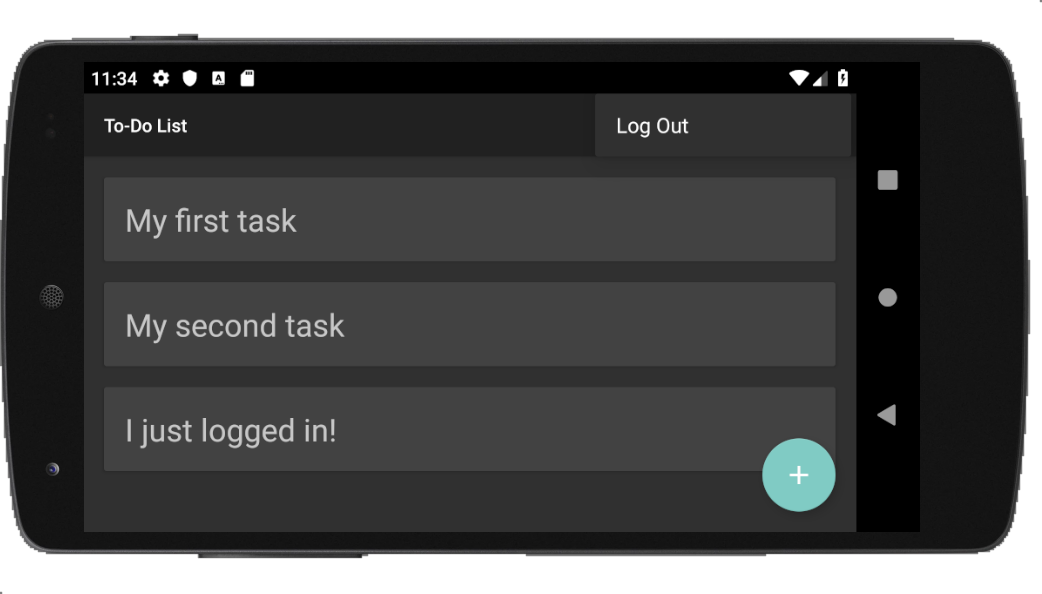
## Recap and Next Steps
In the first part of this tutorial, you started by learning how to scaffold a simple hello-world Android application. After that, you enhanced this app to show a to-do list, and you added a form to enable users to update this list. In the end, you learned how to secure your application with Auth0.
This setup gives you a solid basis for the next part of this tutorial. There, you will learn how to integrate your app with a backend API to make things even more interesting. By doing that, your app will become more resilient (as the user data will stay live on the backend API), and you will learn cool things like issuing HTTP requests from your Android app.
Sounds interesting? If so, see you there!