---
title: "A Guide to Auth0 Authorization with Scopes, Roles, and Client Grants Explained"
description: "Learn how to master Auth0 authorization by understanding the relationship between scopes, roles, and client grants. "
authors:
- name: "Andre Hochstein"
url: "https://auth0.com/blog/authors/andre-hochstein/"
- name: "Jan Singer"
url: "https://auth0.com/blog/authors/jan-singer/"
date: "May 19, 2026"
category: "Identity & Security"
tags: ["authorization", "scopes", "roles", "client grants"]
url: "https://auth0.com/blog/auth0-authorization-guide-scopes-roles-client-grants/"
---
# A Guide to Auth0 Authorization with Scopes, Roles, and Client Grants Explained
Every application that handles user data makes authorization decisions — and many get them wrong. [Broken Access Control](https://owasp.org/Top10/2025/A01_2025-Broken_Access_Control/) has topped [the OWASP Top 10 since 2021](https://auth0.com/blog/why-broken-access-control-still-dominates-owasp-top-10/), remaining the foremost security threat in web applications.
The gap between "who are you?" and "what can you do?" is where breaches happen. Let's define both precisely:
* **Authentication**: The process of verifying identity — the login prompt, the password check, the multi-factor challenge. It answers: "Who are you?"
* **Authorization**: The process of enforcing policy after identity is established. It answers: "What are you allowed to do?"
## Why Authorization Is Your Application's First Line of Defense
A robust authorization strategy is your application's most critical internal safeguard. The guiding principle behind it is simple yet powerful: [**The Principle of Least Privilege**](https://auth0.com/blog/oauth2-access-tokens-and-principle-of-least-privilege/).
Any user or application should only receive the absolute minimum set of permissions required to perform its legitimate function — nothing more. Implementing this correctly reduces your attack surface and eliminates authorization-related technical debt.
To implement it correctly with Auth0, you need to understand four core components.
## The Core Components of Auth0 Authorization
Each component plays a distinct role in determining who can do what, and in which context.
1. **Roles:** A Role is a named collection of Permissions assigned to users. Instead of assigning dozens of permissions directly, you create a role (like *Inventory Manager*), assign it the relevant permissions, and then assign that role to users.
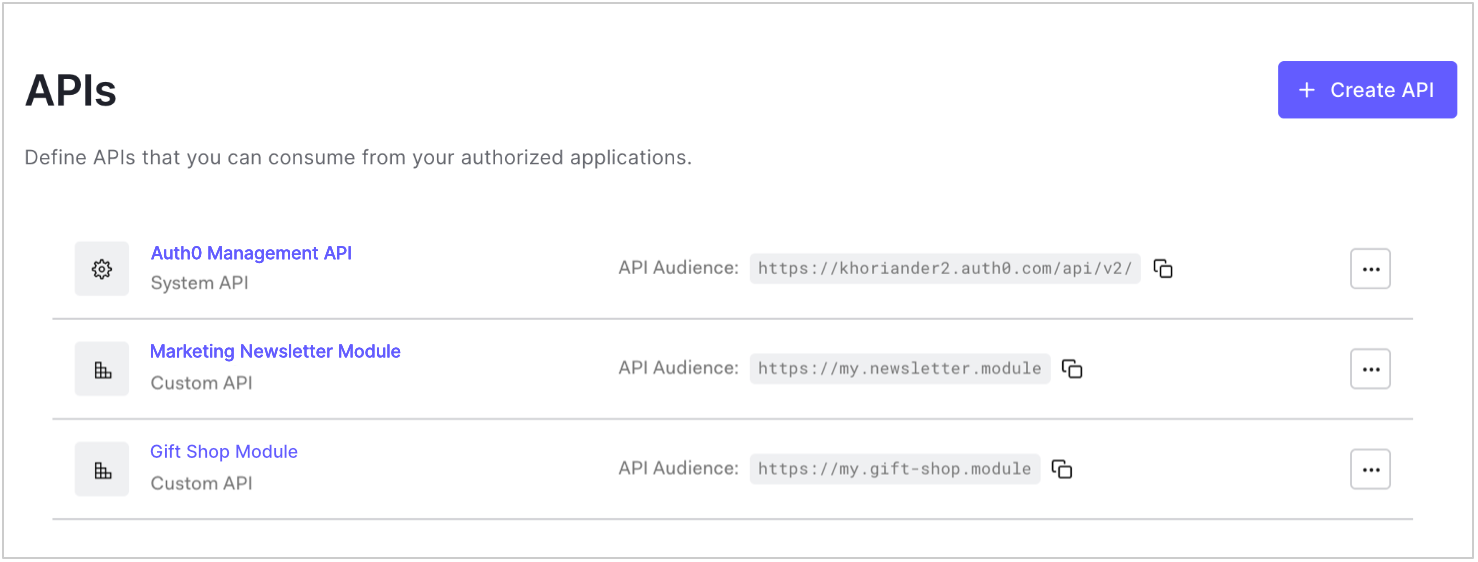
2. **Permissions:** A Permission is a granular operation defined on your API (for example, *read:orders*). Permissions are the most fundamental unit of authorization, defined in your API’s settings in the Auth0 dashboard.
3. **Client Grants:** A Client Grant defines which permissions an application itself is authorized to request. A Client Grant assigns permissions directly to an application itself. This serves two purposes: securing Machine-to-Machine (M2M) communication via the [Client Credentials Flow](https://auth0.com/docs/get-started/authentication-and-authorization-flow/client-credentials-flow), and acting It acts as a **permission ceiling** for the user-facing applications — enforcing least privilege regardless of who logs in.
4. **Scopes:** Scopes serve dual duty. They are the permissions an application *requests* during the authorization flow, and — after Auth0 evaluates your configuration — the permissions actually *granted* in the access token. The gap between requested and granted is where your security policy lives. For further information about the difference between permissions, privileges and scopes you can take a look at a previous blog, [Permissions, Privileges, and Scopes](https://auth0.com/blog/permissions-privileges-and-scopes/).
## The Two Settings That Control Token Permissions
The four components above are *what* you define. The following two settings control *how* Auth0 combines them when minting an access token.
* **RBAC (Enable Role-Based Access Control):** When enabled, Auth0 evaluates the user's assigned Role and its associated Permissions during the authorization flow. When disabled, user-level permissions are not factored into the token — the user's role is effectively ignored.
**Auth0 Dashboard under APIs > [Your API] > Settings > RBAC Settings**
 There you scroll to the RBAC settings and toggle Enable RBAC.
 * **Application Access Policy (For user access):** This setting determines whether the application's Client Grant acts as a permission ceiling:
* **Allow:** The application is trusted without restriction. Token scopes are derived from the user's permissions alone (requires RBAC to be enabled to have effect).
* **Allow via Client Grant:** The application's Client Grant becomes a hard boundary. Only permissions explicitly granted to the application can appear in the token — regardless of what the user's role authorizes.
* **Deny**: The application is not trusted, and consequently, it is restricted from accessing any API permissions..
**Auth0 Dashboard under APIs > [Your API] > Application Access**
* **Application Access Policy (For user access):** This setting determines whether the application's Client Grant acts as a permission ceiling:
* **Allow:** The application is trusted without restriction. Token scopes are derived from the user's permissions alone (requires RBAC to be enabled to have effect).
* **Allow via Client Grant:** The application's Client Grant becomes a hard boundary. Only permissions explicitly granted to the application can appear in the token — regardless of what the user's role authorizes.
* **Deny**: The application is not trusted, and consequently, it is restricted from accessing any API permissions..
**Auth0 Dashboard under APIs > [Your API] > Application Access**
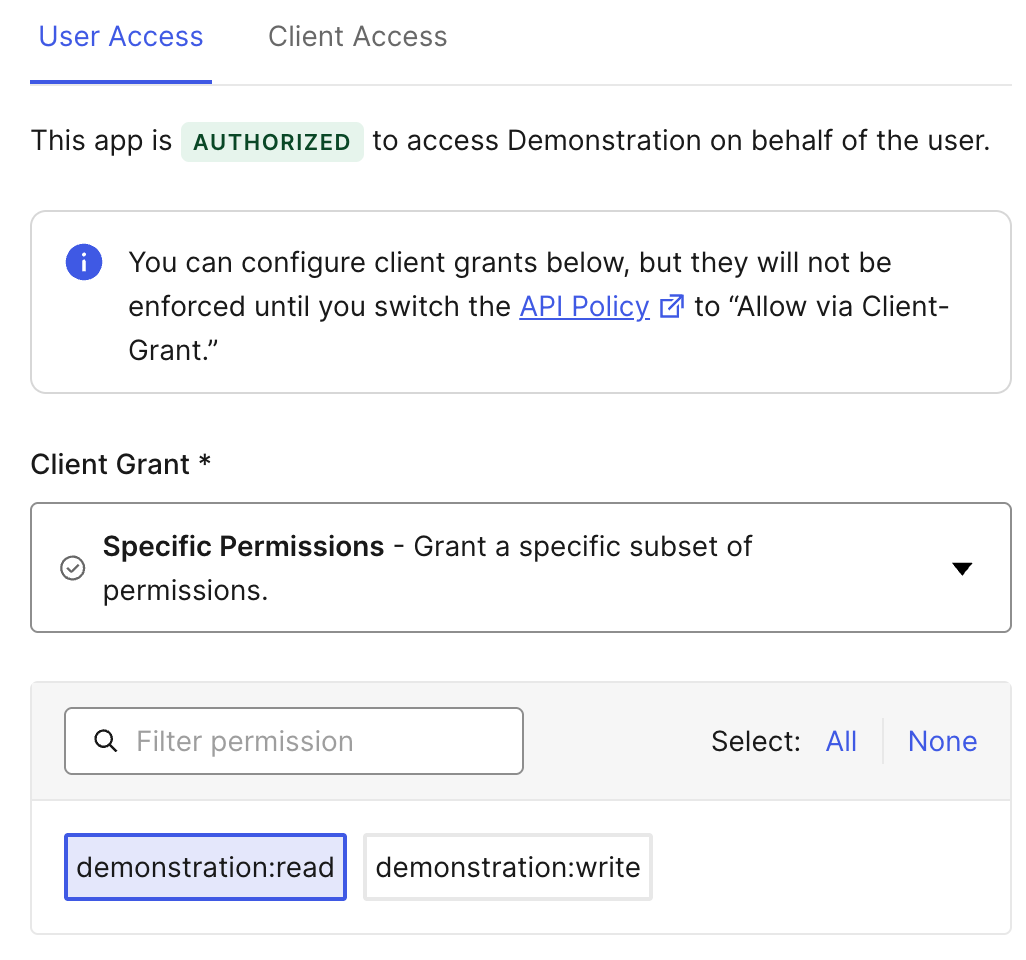
 Click the “Edit” Button for your API to grant the specific permissions for the “Allow via client-grant” policy:
 The combination of these two settings produces three fundamentally different authorization models. The following scenarios demonstrate each one.
## Three Scenarios Featuring Auth0 Authorization in Action
The same four building blocks, configured differently, produce radically different security outcomes.
### Scenario 1: The Internal Admin Portal (User-Centric Control)
* **Use Case**: An internal retail app where a **Support Agent** can only read orders (`read:orders`), but an **Inventory Manager** can read and write products (`read:products`, `write:products`).
* **Configuration**:
* **API RBAC**: Enabled
* **Application Access Policy -> For user access**: Allow
* **Result**: The access token’s scopes are determined solely by the user's assigned role. The application itself has no permission ceiling — it trusts Auth0's RBAC to govern access entirely.
Example decoded JWT scope claim for the Support Agent:
```json
{
"scope": "read:orders"
}
```
Example decoded JWT scope claim for the Inventory Manager:
```json
{
"scope": "read:products write:products"
}
```
**What happens if you get it wrong**: If you enable RBAC but forget to assign a Role to a user, the token arrives with zero scopes — and your API rejects every request. RBAC with no roles assigned means no access, not full access. This is the least **privilege** working as designed.
**When to use this model**: Internal tools and admin portals where user identity and role are the only trust signals you need.
### Scenario 2: The Third-Party Partner App (Application-Centric Control)
* **Use Case**: A B2B SaaS partner application that must only be allowed to read analytics data (`read:analytics`), even if an admin with `delete:analytics` privileges logs in.
* **Configuration**:
* **API RBAC**: Disabled
* **Application Access Policy -> For user access**: Allow via Client Grant
* **Result**: The application's Client Grant creates a permission ceiling. The token contains only the scopes granted to the application itself, regardless of the user's permissions.
Example decoded JWT scope claim — even for an admin user:
```json
{
"scope": "read:analytics"
}
```
The admin's `delete:analytics` permission never reaches the token. This configuration directly addresses **OWASP A01:2025 Broken Access Control** by ensuring that even a compromised admin session cannot exceed the application's permission boundary.
**What happens if you get it wrong:** If you set this policy but forget to configure the Client Grant, the application has *no* granted permissions — the token is empty, and all API calls fail.
**When to use this model:** External integrations, partner apps, and any scenario where the application must be constrained regardless of who authenticates.
### Scenario 3: The Secure Mobile App (The Principle of Least Privilege in Action)
* **Use Case**: A healthcare mobile app that is only allowed to read patient data (`read:patient_history`), while the doctors using it have broader permissions (including `write:patient_history`) that they use in a separate full-featured web portal.
* **Configuration**:
* **API RBAC**: Enabled
* **Application Access Policy -> For user access**: Allow via Client Grant
* **Result**: The final scopes in the token are the **intersection** of the user's permissions and the application's permissions. The `write:patient_history` permission is excluded because the mobile app’s Client Grant does not include it — even though the doctor’s role does.
Example decoded JWT scope claim:
```json
{
"scope": "read:patient_history"
}
```
**What happens if you get it wrong:** If you enable RBAC but set the policy to "Allow" instead of "Allow via Client Grant," the Client Grant ceiling is bypassed entirely — the doctor's full `write:patient_history` permission flows into the mobile app's token, creating exactly the privilege escalation this model is designed to prevent.
**When to use this model:** Mobile apps, regulated industries, multi-tenant SaaS — any scenario where both the user *and* the application must be independently trusted.
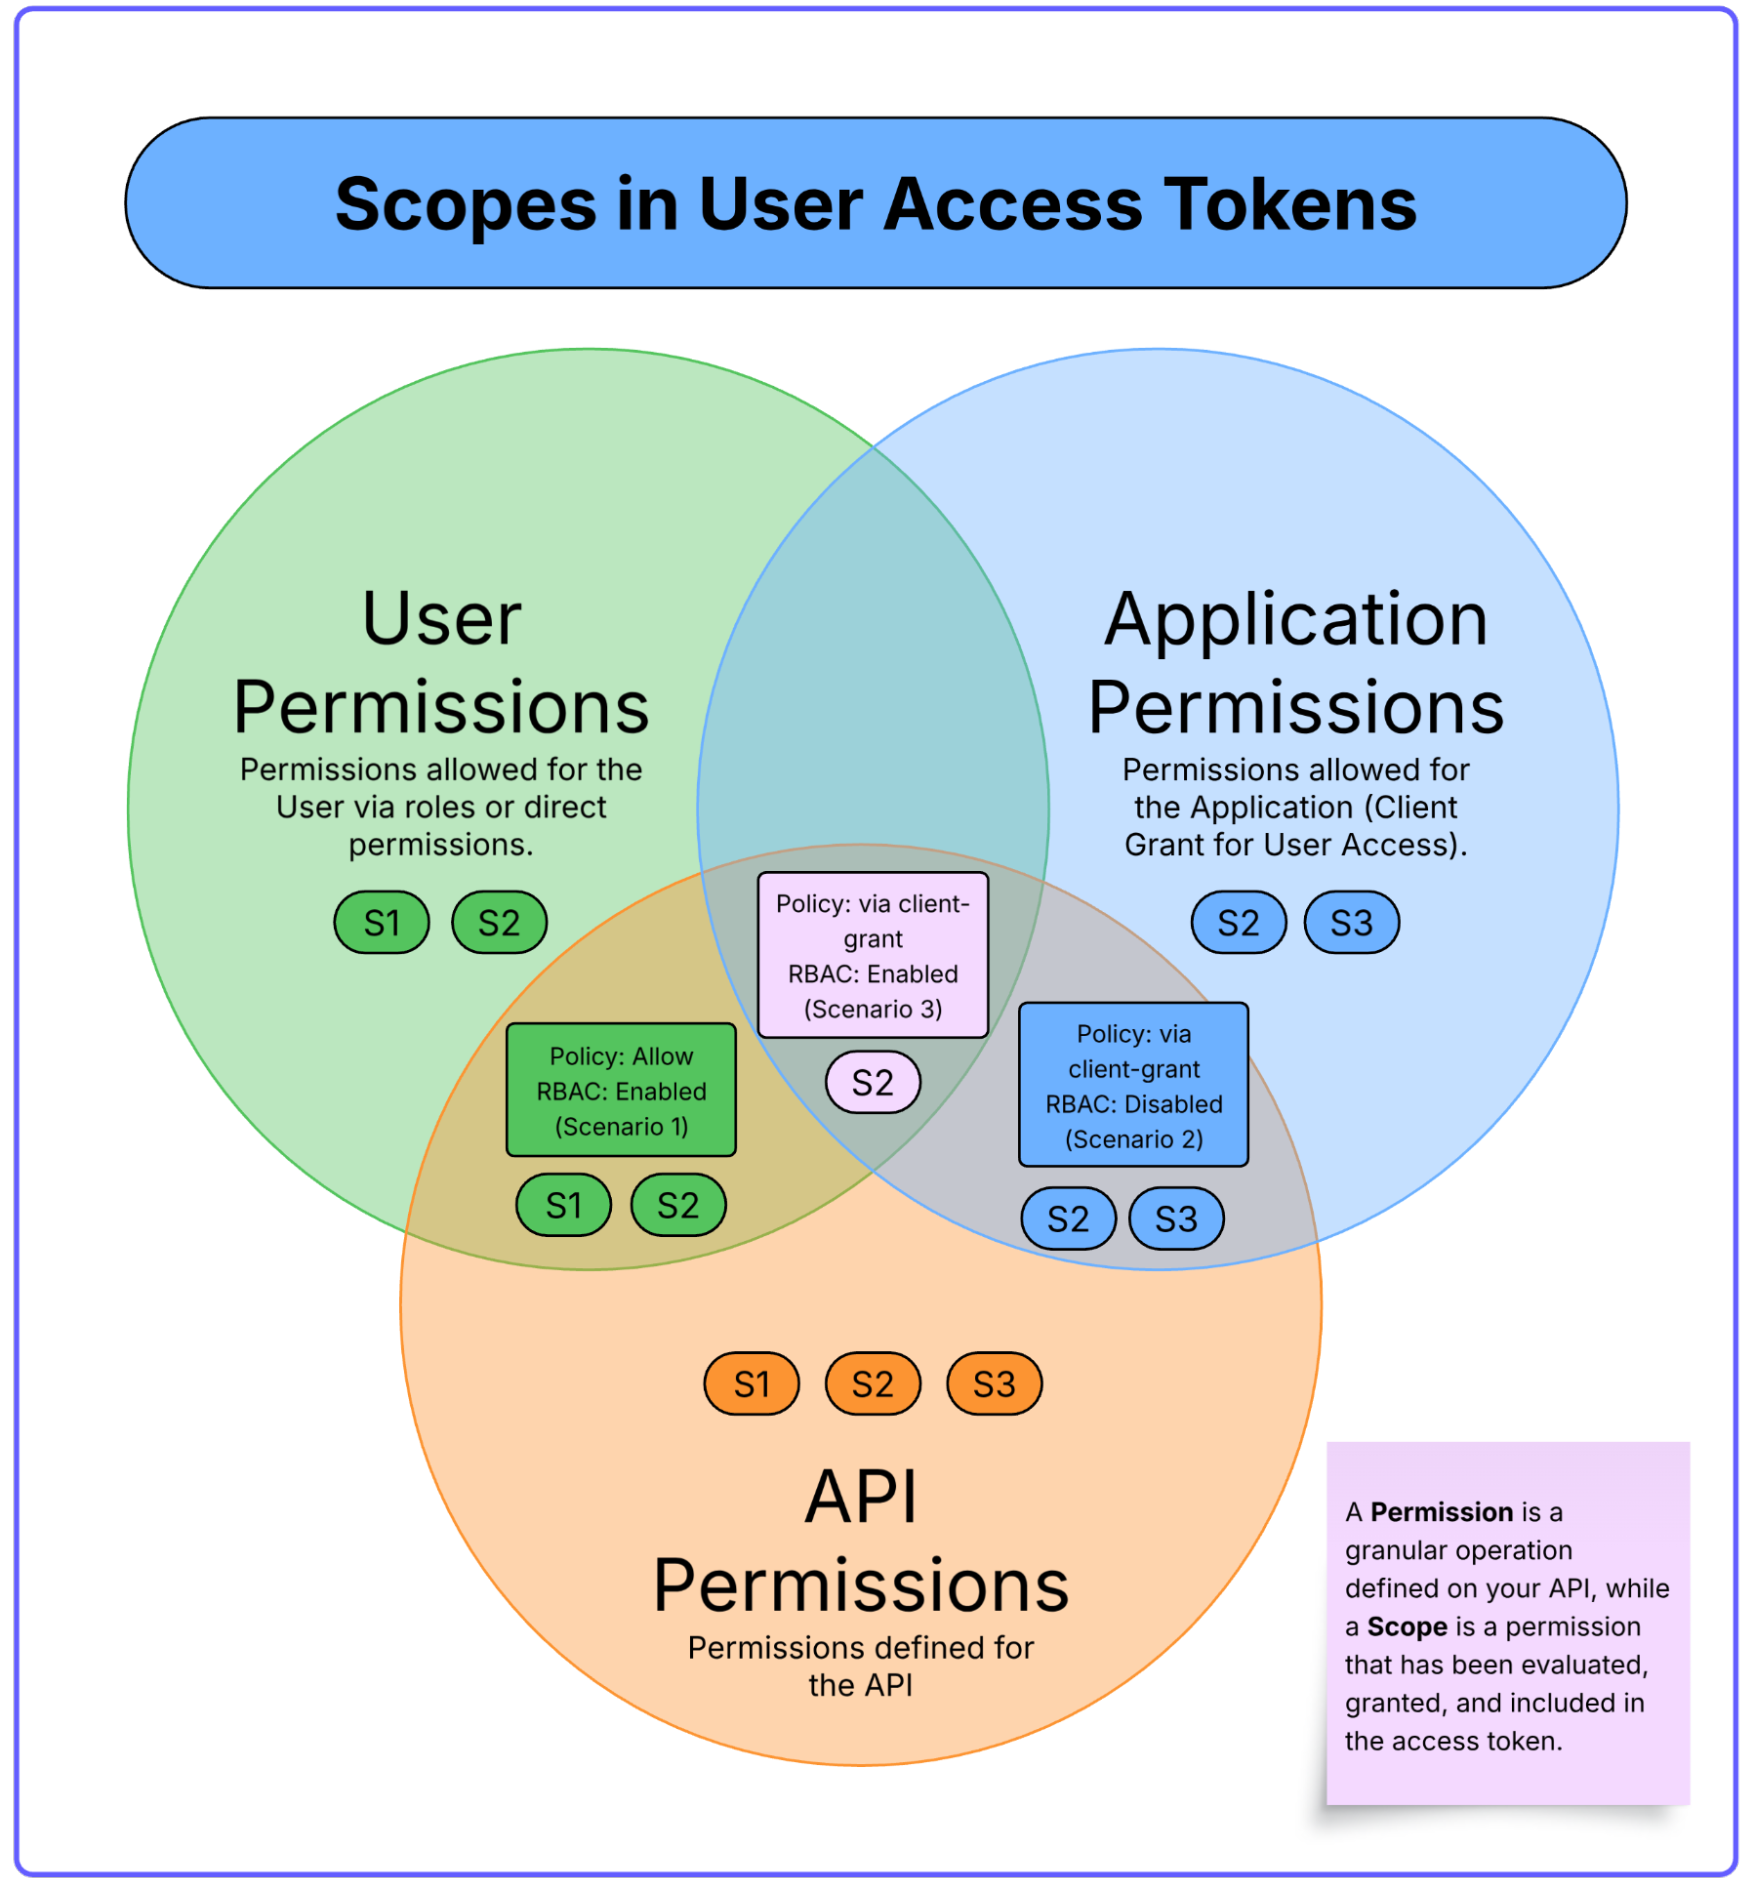
## How the Scopes of a Token Are Calculated
The access token an application receives is the calculated result of several factors intersecting at the moment of the request. Auth0 evaluates four inputs:
* **Audience:** The API the token is intended for.
* **Requested Scopes:** The permissions the application asks for in the authorization request.
* **User's Permissions:** The complete list of permissions granted to the user via their assigned roles.
* **Application's Permissions:** The permissions explicitly granted to the application via its Client Grant.
Auth0 processes these inputs based on your API's configuration to mint the final token. In every case, the **requested scopes** **act as a filter** — **you never receive more than you ask for**, even if the user and app are both authorized for more.
Auth0 issues JWTs by default when you specify an audience (decode them at [jwt.io](http://jwt.io) for debugging). It will deliver an opaque access token by default if no audience is specified. For details on token formats, see the [Auth0 Access Token documentation](https://auth0.com/docs/secure/tokens/access-tokens).
The combination of these two settings produces three fundamentally different authorization models. The following scenarios demonstrate each one.
## Three Scenarios Featuring Auth0 Authorization in Action
The same four building blocks, configured differently, produce radically different security outcomes.
### Scenario 1: The Internal Admin Portal (User-Centric Control)
* **Use Case**: An internal retail app where a **Support Agent** can only read orders (`read:orders`), but an **Inventory Manager** can read and write products (`read:products`, `write:products`).
* **Configuration**:
* **API RBAC**: Enabled
* **Application Access Policy -> For user access**: Allow
* **Result**: The access token’s scopes are determined solely by the user's assigned role. The application itself has no permission ceiling — it trusts Auth0's RBAC to govern access entirely.
Example decoded JWT scope claim for the Support Agent:
```json
{
"scope": "read:orders"
}
```
Example decoded JWT scope claim for the Inventory Manager:
```json
{
"scope": "read:products write:products"
}
```
**What happens if you get it wrong**: If you enable RBAC but forget to assign a Role to a user, the token arrives with zero scopes — and your API rejects every request. RBAC with no roles assigned means no access, not full access. This is the least **privilege** working as designed.
**When to use this model**: Internal tools and admin portals where user identity and role are the only trust signals you need.
### Scenario 2: The Third-Party Partner App (Application-Centric Control)
* **Use Case**: A B2B SaaS partner application that must only be allowed to read analytics data (`read:analytics`), even if an admin with `delete:analytics` privileges logs in.
* **Configuration**:
* **API RBAC**: Disabled
* **Application Access Policy -> For user access**: Allow via Client Grant
* **Result**: The application's Client Grant creates a permission ceiling. The token contains only the scopes granted to the application itself, regardless of the user's permissions.
Example decoded JWT scope claim — even for an admin user:
```json
{
"scope": "read:analytics"
}
```
The admin's `delete:analytics` permission never reaches the token. This configuration directly addresses **OWASP A01:2025 Broken Access Control** by ensuring that even a compromised admin session cannot exceed the application's permission boundary.
**What happens if you get it wrong:** If you set this policy but forget to configure the Client Grant, the application has *no* granted permissions — the token is empty, and all API calls fail.
**When to use this model:** External integrations, partner apps, and any scenario where the application must be constrained regardless of who authenticates.
### Scenario 3: The Secure Mobile App (The Principle of Least Privilege in Action)
* **Use Case**: A healthcare mobile app that is only allowed to read patient data (`read:patient_history`), while the doctors using it have broader permissions (including `write:patient_history`) that they use in a separate full-featured web portal.
* **Configuration**:
* **API RBAC**: Enabled
* **Application Access Policy -> For user access**: Allow via Client Grant
* **Result**: The final scopes in the token are the **intersection** of the user's permissions and the application's permissions. The `write:patient_history` permission is excluded because the mobile app’s Client Grant does not include it — even though the doctor’s role does.
Example decoded JWT scope claim:
```json
{
"scope": "read:patient_history"
}
```
**What happens if you get it wrong:** If you enable RBAC but set the policy to "Allow" instead of "Allow via Client Grant," the Client Grant ceiling is bypassed entirely — the doctor's full `write:patient_history` permission flows into the mobile app's token, creating exactly the privilege escalation this model is designed to prevent.
**When to use this model:** Mobile apps, regulated industries, multi-tenant SaaS — any scenario where both the user *and* the application must be independently trusted.
## How the Scopes of a Token Are Calculated
The access token an application receives is the calculated result of several factors intersecting at the moment of the request. Auth0 evaluates four inputs:
* **Audience:** The API the token is intended for.
* **Requested Scopes:** The permissions the application asks for in the authorization request.
* **User's Permissions:** The complete list of permissions granted to the user via their assigned roles.
* **Application's Permissions:** The permissions explicitly granted to the application via its Client Grant.
Auth0 processes these inputs based on your API's configuration to mint the final token. In every case, the **requested scopes** **act as a filter** — **you never receive more than you ask for**, even if the user and app are both authorized for more.
Auth0 issues JWTs by default when you specify an audience (decode them at [jwt.io](http://jwt.io) for debugging). It will deliver an opaque access token by default if no audience is specified. For details on token formats, see the [Auth0 Access Token documentation](https://auth0.com/docs/secure/tokens/access-tokens).
 A Summary of Logic from the Three Scenarios
| Scenario | Core Principle | Key Auth0 Configuration | Final Token Scopes (Simplified) |
| ----- | ----- | ----- | ----- |
| **1. The Admin Portal** | The User's Role is King | **RBAC:** Enabled
A Summary of Logic from the Three Scenarios
| Scenario | Core Principle | Key Auth0 Configuration | Final Token Scopes (Simplified) |
| ----- | ----- | ----- | ----- |
| **1. The Admin Portal** | The User's Role is King | **RBAC:** Enabled
**Policy:** Allow | `Token = User Permissions ∩ Requested Scopes` |
| **2. The Partner App** | The Application is King | **RBAC:** Disabled
**Policy:** Allow via Client Grant | `Token = App Permissions ∩ Requested Scopes` |
| **3. The Secure Mobile App** | The Intersection is King | **RBAC:** Enabled
**Policy:** Allow via Client Grant | `Token = (User Permissions ∩ App Permissions) ∩ Requested Scopes` |
Token scopes are an authorization *claim*, not enforcement. Your API must validate the `scope` claim on every request. In most frameworks, this means adding scope-checking middleware that compares the required scope for each endpoint against the [scopes](https://auth0.com/blog/on-the-nature-of-oauth2-scopes) present in the decoded JWT. If the required scope is missing, return `403 Forbidden`. Auth0's [API quickstarts](https://auth0.com/docs/quickstart/backend) provide implementation examples for every major language and framework.
## Four Rules for Architecting a Resilient Authorization Strategy
1. **Name permissions using `verb:resource` format.** Define permissions like `read:orders`, `write:products`, and `delete:analytics` your API settings. This convention maps cleanly to scope claims in your JWTs, makes policy audits trivial, and is self-documenting across teams.
2. **Default to minimum access, always.** Start every user, role, and client grant with zero permissions and add deliberately. It is always easier to grant a permission later than to revoke one after an incident.
3. **Centralize coarse-grained authorization logic in Auth0 — not your code.** Configure Roles, Permissions, and Client Grants in the Auth0 Dashboard. When your business rules change, update them in one place without redeploying your application.
## The Auth0 Advantage
Auth0 operationalizes this strategy through three capabilities:
* **Decoupled policy management:** Roles and permissions are configured in the Dashboard, not your codebase. Your team updates policies without a deployment.
* **Extensible logic via Actions:** [Auth0 Actions](https://auth0.com/docs/customize/actions/actions-overview) let you inject custom authorization logic into the login flow. For example, use a post-login Action to add a user's department to the token for downstream filtering..
* **Unified model for users and machines:** The same API and permission definitions secure both interactive user sessions and M2M service communication, eliminating the need for parallel authorization architectures.
## Beyond Roles with Fine-Grained Authorization (FGA)
What if the Inventory Manager from Scenario 1 should only manage products *in their assigned warehouse*? Or the doctor from Scenario 3 should only read histories *of patients in their care unit*?
These questions require evaluating the **relationship** between a specific user and a specific resource — something roles and scopes alone cannot express. This is **Relationship-Based Access Control (ReBAC)**, and it's exactly what [Auth0 FGA](https://auth0.com/blog/relationship-based-access-control-rebac/) is built for.
**The practical signal:** When your access rules shift from *"does this user have this role?"* to *"does this user have a relationship to this specific object?"* — you've outgrown standard RBAC.
## Put It Into Practice
1. **Experiment:** These features are available on every Auth0 plan. [Sign up for a free account](https://auth0.com/signup) and replicate one of the three scenarios from this post.
2. **Go deeper:** Read the official documentation on [Role-Based Access Control](https://auth0.com/docs/manage-users/access-control/rbac) and [API Authorization](https://auth0.com/docs/get-started/set-up-apis).
3. **Ask questions:** Join the [Auth0 Community Forum](https://community.auth0.com/) — architects, developers, and Auth0 engineers discuss real-world authorization challenges daily**.**
**Authorization is not a feature you bolt on — it's an architectural decision. Auth0 gives you the tools to make it right from the start.**