


Overview
This is part two of a two-part tutorial that will show you how to build a user signup counter using Arduino. In part one, you built an Arduino project that displays a number on two 7-segment displays.
Now you will learn how to integrate your project with your Auth0 tenant to display the user signup count. First, you'll build and deploy a user count API, and then you will set up a rule that increments the user count. You will then call the API in an Arduino sketch. Finally, you will add authentication to your API and update the rule and Arduino sketch to call the API securely.
Build user count API
To store the user count, you’ll build a simple API with two endpoints to increment and read the user count. You’ll then set up an Auth0 rule that will increment the user count each time a new user logs in.
You can find a finished API example here: User Count API
Note: For simplicity, since there is quite a bit to cover in the Arduino sketch sections, this tutorial uses node-persist to keep track of the user count. However, to persist the count through container restarts once deployed to Heroku, you will need to set up a database to store the count, such as Heroku Postgres.
To build the API, first create a new directory called user-count-api:
mkdir user-count-api && cd user-count-apiInitiate npm and press Enter a few times to configure the package.json for your project:
npm initInstall the express and node-persist npm packages:
npm install express node-persistCreate a new file called server.js and open it up in an editor. If you’re on macOS or Linux, use this command:
touch server.jsIf you’re on Windows, use this command:
bash
call > server.js
Use the following code to set up the GET and POST endpoints:
const express = require('express');
const storage = require('node-persist');

const app = express();
const port = process.env.PORT || 8000;

app.use((error, req, res, next) => {
  return res.status(500).json({ error: error.toString() });
});

app.get('/', async (req, res) => {
  try {
    await storage.init();
    const userCount = await storage.getItem('userCount');
    res.send({userCount: userCount});
  } catch (error) {
    next(error);
  }
});

app.post('/', async (req, res) => {
  try {
    await storage.init();
    let oldUserCount = await storage.getItem('userCount') || 0;
    oldUserCount++;
    const newUserCount = await storage.setItem('userCount', oldUserCount);
    const userCount = newUserCount.content.value;
    res.send({userCount});
  } catch (error) {
    next(error);
  }
});

app.listen(port, () => console.log(`Listening on port ${port}`));
Start the API:
npm startTest out the API in a new console window:
curl -X POST http://localhost:8000/Each time you run the cURL request, the returned userCount increases.
If you look inside the user-count-api directory, you'll find a new folder called .node-persist. The node-persist package keeps track of data saved by the setItem() method in this folder. You can alter the JSON file directly to change the user count manually. If you already have users in your Auth0 tenant, you can update the user count to be the actual count.
Deploy the user count API to Heroku
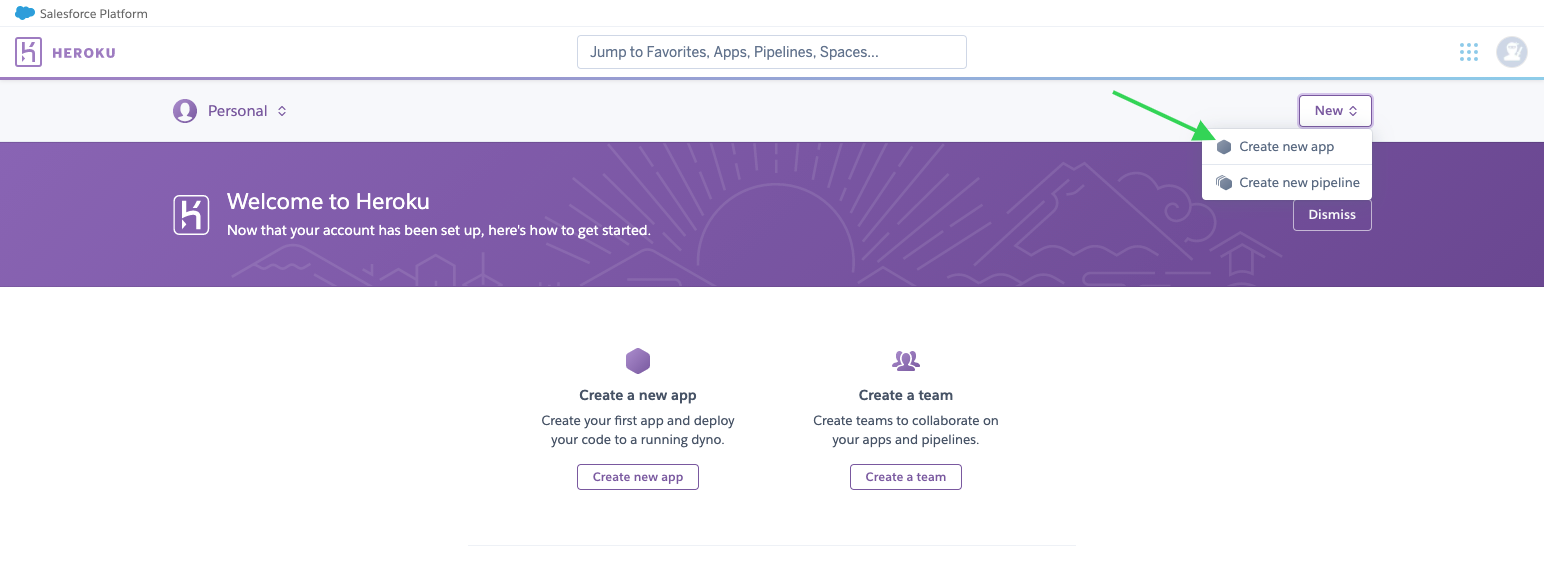
Heroku is a cloud-based Platform as a Service (PaaS) that makes it simple to deploy apps. To get started, create a free account or login.
Click New and select Create new app:
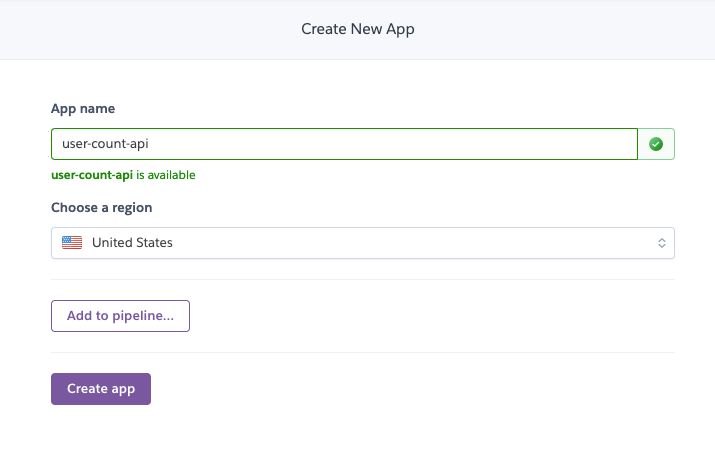
Give the API a name and click Create app:
Follow the instructions under Deploy using Heroku Git.
First, download and install the Heroku CLI. Once installed, authenticate:
heroku loginFrom the API directory, initialize git using the command below, but be sure to replace YOUR_API_NAME with the name of your API:
git init
heroku git:remote -a YOUR_API_NAME
Before committing the code, create a .gitignore file to ignore node modules. If you’re on macOS or Linux, use this command:
echo 'node_modules/' > .gitignoreIf you're on Windows, use this command. It's almost the same as the macOS/Linux version, except that there aren't any quotes around node_modules/:
echo node_modules/ > .gitignoreCommit and deploy the API:
git add .
git commit . -m 'Initial commit'
git branch -M main
git push heroku main
Near the bottom of the deployment logs, you can see the URL of the API. Visit the URL to see the API response.
remote: -----> Build succeeded!
remote: -----> Discovering process types
remote:        Procfile declares types     -> (none)
remote:        Default types for buildpack -> web
remote:
remote: -----> Compressing...
remote:        Done: 32.7M
remote: -----> Launching...
remote:        Released v3
remote:        https://user-count-api.herokuapp.com/ deployed to Heroku
remote:
remote: Verifying deploy... done.
To https://git.heroku.com/user-count-api.git
 * [new branch]      main -> main
Create a rule to increment the user count
The API is deployed, but now you will need to increment the user count every time a new user is created for your Auth0 tenant. To accomplish this, you will create a rule.
Rules are javascript functions that run after a user logs into your application. Rules can determine if it is the first time a user logs in via the context object. You can take advantage of this fact to only increment the user count the first time a user logs in.
From your Auth0 dashboard, navigate to Auth Pipeline > Rules and click + CREATE RULE. Select Empty rule and give the rule a name:
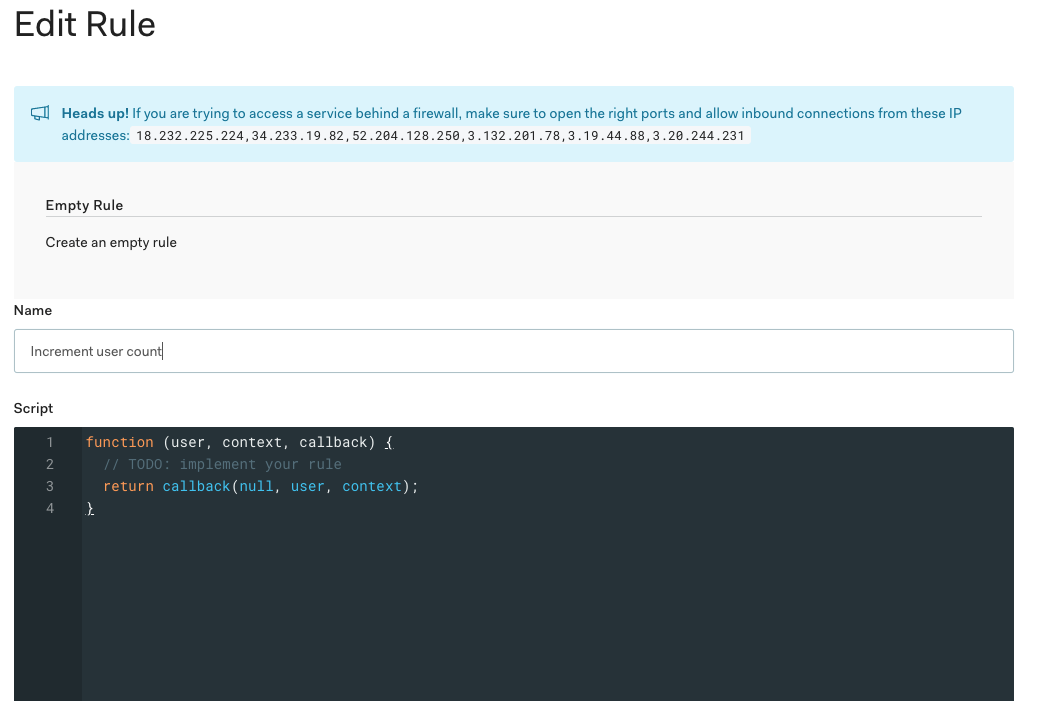
Use the following code to send a POST request to your user count API, but be sure to replace YOUR_HEROKU_API_URI with your deployed API's URI:
async function (user, context, callback) {
  const axios = require('axios@0.19.2');

  const count = context.stats && context.stats.loginsCount ? context.stats.loginsCount : 0;
  console.log(count);
  if (count > 1) {
    return callback(null, user, context);
  }

  try {
    const userCountAPI = 'https://user-count-api.herokuapp.com/';
    await axios.post(userCountAPI);
    return callback(null, user, context);
  } catch (err) {
    console.error(err);
    return callback(null, user, context);
  }
}
Save and enable the rule by clicking SAVE CHANGES. Test your rule by navigating to Getting Started in your dashboard and click Try it out under Try your Login box. Sign up a new user and check your user count API to see the user count increase.
Call API with Arduino
Now that your API is deployed and you've created a rule to increment the user count, it's time to write an Arduino sketch that will allow the NodeMCU to retrieve the user count.
If you haven’t done so already, you’ll need to install the following libraries: * Adafruit LED Backpack Library * Adafruit GFX * ArduinoJson
Note: You may have already installed the Adafruit libraries when you tested the prototype in part one. If you haven’t, go to Tools > Manage Libraries… in the Arduino IDE and install each required library.
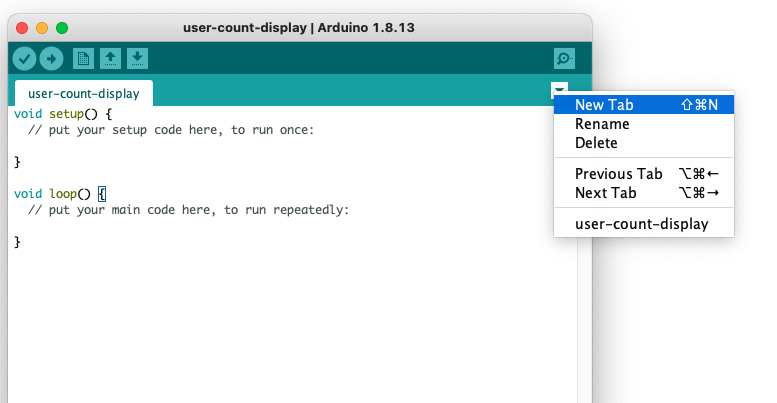
Open up the Arduino IDE and click File > New. The file will contain boiler plate code:
void setup() {
  // put your setup code here, to run once:
}

void loop() {
  // put your main code here, to run repeatedly:
}
The setup function executes as soon as the sketch is uploaded to a board. This is where you will initialize the Serial Monitor, the Adafruit 7-segment displays, and the Wi-Fi connection.
As you might have guessed, the loop() function executes over and over again. At the end of this function, you'll add a delay so that this loop does not occur too quickly.
Above the setup() and loop() functions, you will need to:
1. Import required libraries into the project, and
2. Declare the variables which the setup() and loop() functions will use.
Click File > Save and name the project user-count-display.
Import the libraries you need for connecting to Wi-Fi and parsing JSON by adding the following to the top of the sketch:
#include <ESP8266WiFi.h>
#include <ESP8266HTTPClient.h>
#include <ArduinoJson.h>
Create a new tab in your project by clicking the down arrow on the top right of the IDE window. Name it arduino_secrets.h.
This is an external file that will contain sensitive information, such as your Wi-Fi network name and password. Keep this in a separate file so that if you push it to a remote repository, you can add arduino_secrets.h to the .gitignore and protect sensitive information.
In the arduino_scecrets.h file add the following with your network information:
#define SECRET_SSID "YOUR_NETWORK_NAME"
#define SECRET_PASS "YOUR_NETWORK_PASSWORD"
Back in the user-count-display tab, below the imported libraries and above the setup() function, import and declare the network variables:
#include "arduino_secrets.h"

char ssid[] = SECRET_SSID;
char pass[] = SECRET_PASS;
Next, add the following to the setup() function:
void setup() {
  Serial.begin(115200);

  WiFi.begin(ssid, pass);

  while (WiFi.status() != WL_CONNECTED) {
    delay(1000);
    Serial.print("Connecting..");
  }

  Serial.print("Connected!");
}
This code allows you to:
- Connect to Wi-Fi,
- Initialize the Serial Monitor, and
- View the connection state in the Serial Monitor.
The Serial Monitor is a part of the Arduino software. It allows you to send and receive messages with a programmable board, much like a console.
Connect the NodeMCU to your computer with the micro USB cable, then click the magnifying glass icon at the top right of the IDE window to view the Serial Monitor output:
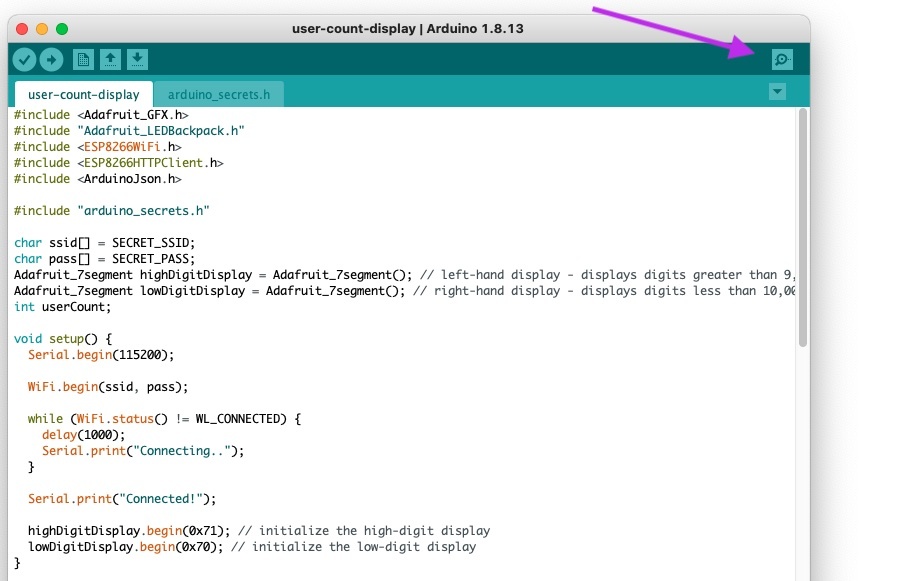
Ensure that the Serial Monitor is set to the right baud rate, which is the measure of serial data transmission in bits per second. In the code above, the baud rate is set to 115200 (Serial.begin(115200);).
Upload the program by clicking the right-facing arrow icon on the top left of the IDE window. You should see the connection status in the Serial Monitor:
09:46:16.490 -> Connecting..Connecting..Connecting..Connecting..Connected!If it can’t connect, it will just keep printing Connecting... If this happens, double-check your network name and password.
Once you’ve confirmed that you can connect to Wi-Fi, it's time to call the user count API. First, declare an integer variable right above the setup() code block:
...

char pass[] = SECRET_PASS;
int userCount; // ← Add this line to declare the variable for storing the user count

void setup() {

...
Next, add the following to the loop() function. Be sure to replace YOUR_HEROKU_API_URL with your Heroku API’s URL. Use http instead of https for now. You'll update this to use a secure connection when you add authentication later on:
void loop() {
  if (WiFi.status() == WL_CONNECTED) { // Check Wi-Fi connection status
    HTTPClient http; // Declare an object of class HTTPClient
    http.begin("http://YOUR_HEROKU_API_URL"); // Specify request destination
    int httpCode = http.GET(); // Send the request

    if (httpCode > 0) { // Check the response code
      String payload = http.getString(); // Get the request response payload
      Serial.println(payload); // Print the response payload
      DynamicJsonDocument doc(1024);
      deserializeJson(doc, payload);
      userCount = doc["userCount"];
      Serial.println(userCount);
    }

    http.end(); // Close connection
  }

  delay(30000); // Send a request every 30 seconds
}
Upload the sketch and view the Serial Monitor output:
10:14:24.224 -> Connecting..Connecting..Connecting..Connected! {"userCount":22}
10:14:29.694 -> 22
Now that the NodeMCU can connect to Wi-Fi and retrieve the user count, you can now show the user count on the 7-segment displays.
Import the Adafruit libraries at the top of the file:
#include <Adafruit_GFX.h>
#include "Adafruit_LEDBackpack.h"
#include <ESP8266WiFi.h>
#include <ESP8266HTTPClient.h>
#include <ArduinoJson.h>
Right above userCount, declare the variables used to represent the 7-segment displays:
...

char pass[] = SECRET_PASS;
Adafruit_7segment highDigitDisplay = Adafruit_7segment(); // left-hand display - displays digits greater than 9,999
Adafruit_7segment lowDigitDisplay = Adafruit_7segment(); // right-hand display - displays digits less than 10,000
int userCount;

...
In the setup() function, initialize the displays, providing the correct I2C address for each display.
Reminder: the display with the shorted A0 solder jumper has the address 0x71. The other display uses the default 0x70 address.
void setup() {
  Serial.begin(115200);

  WiFi.begin(ssid, pass);

  while (WiFi.status() != WL_CONNECTED) {
    delay(1000);
    Serial.print("Connecting..");
  }

  Serial.print("Connected!");

  highDigitDisplay.begin(0x71); // initialize the high-digit display
  lowDigitDisplay.begin(0x70); // initialize the low-digit display
}
In the loop() function, show the user count on the displays:
void loop() {
if (WiFi.status() == WL_CONNECTED) { // Check Wi-Fi connection status
HTTPClient http; // Declare an object of class HTTPClient
http.begin("http://YOUR_HEROKU_API_URL"); // Specify request destination
int httpCode = http.GET(); // Send the request
if (httpCode > 0) { // Check the returning code
String payload = http.getString(); // Get the request response payload
Serial.println(payload); // Print the response payload
DynamicJsonDocument doc(1024);
deserializeJson(doc, payload);
userCount = doc["userCount"];
Serial.println(userCount);
uint16_t highDigits = userCount / 10000, // Value on left (high digits) display
lowDigits = userCount % 10000; // Value on right (low digits) display
highDigitDisplay.print(highDigits, DEC);
lowDigitDisplay.print(lowDigits, DEC);
// Place zeroes in front of the lowDigit value if userCount is greater than 10,000
if (highDigits) {
if (lowDigits < 1000) {
lowDigitDisplay.writeDigitNum(0, 0);
}
if (lowDigits < 100) {
lowDigitDisplay.writeDigitNum(1, 0);
}
if (lowDigits < 10) {
lowDigitDisplay.writeDigitNum(3, 0);
}
} else {
highDigitDisplay.clear();
}
highDigitDisplay.writeDisplay();
lowDigitDisplay.writeDisplay();
}
http.end(); // Close connection
}
delay(30000); // Send a request every 30 seconds
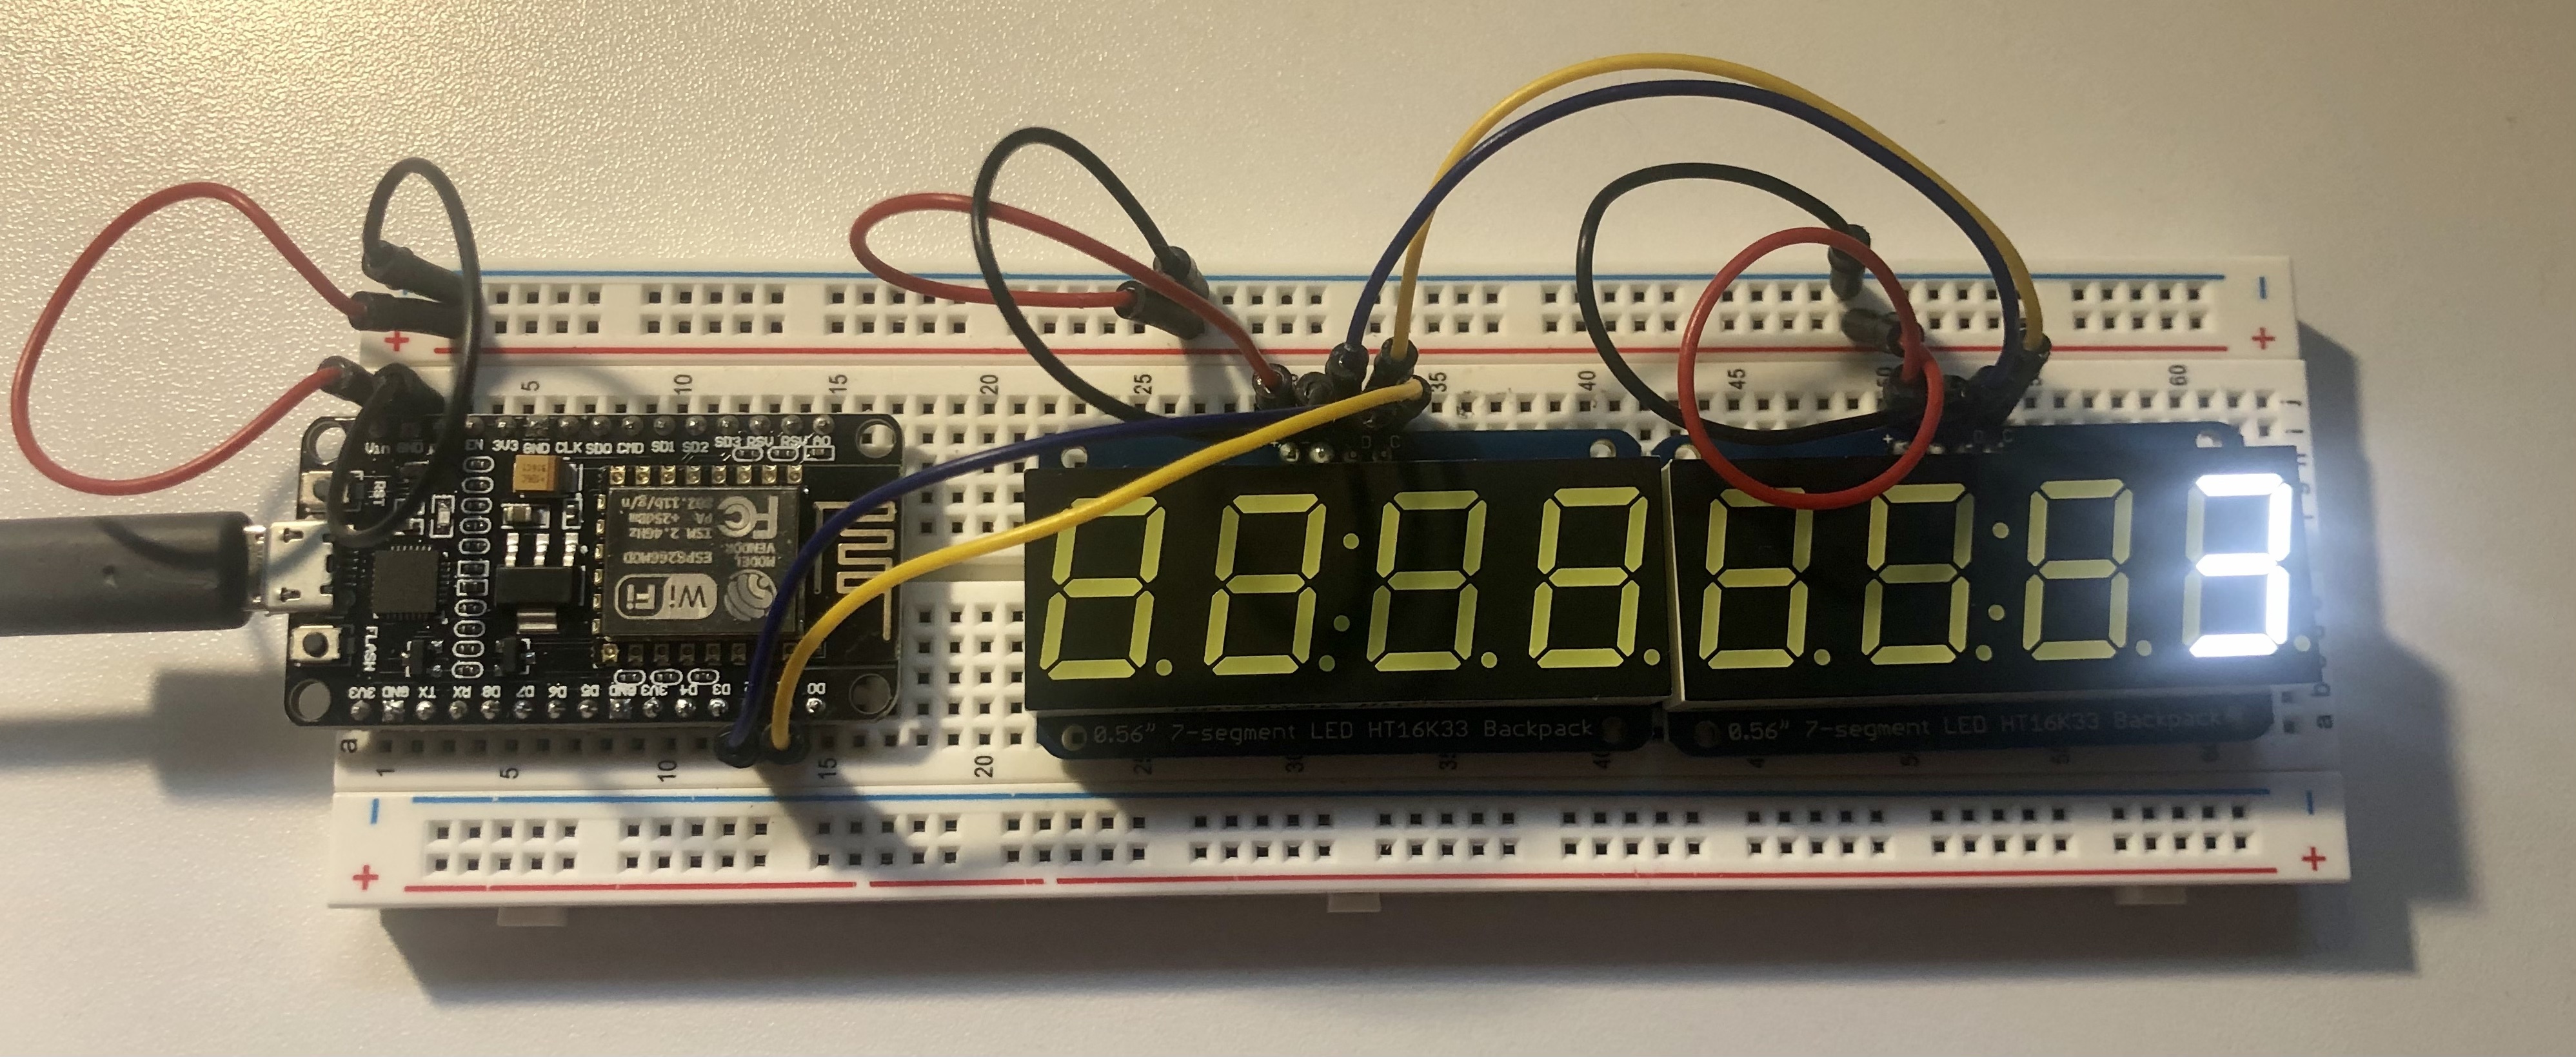
}Upload the program, and you should see the user count on the displays:
Add authentication to user count API
It’s great that the user counter project is working properly, but let’s say you want to ensure that only your Auth0 rule and NodeMCU board can interact with the user count API. You can protect the API in just a few steps.
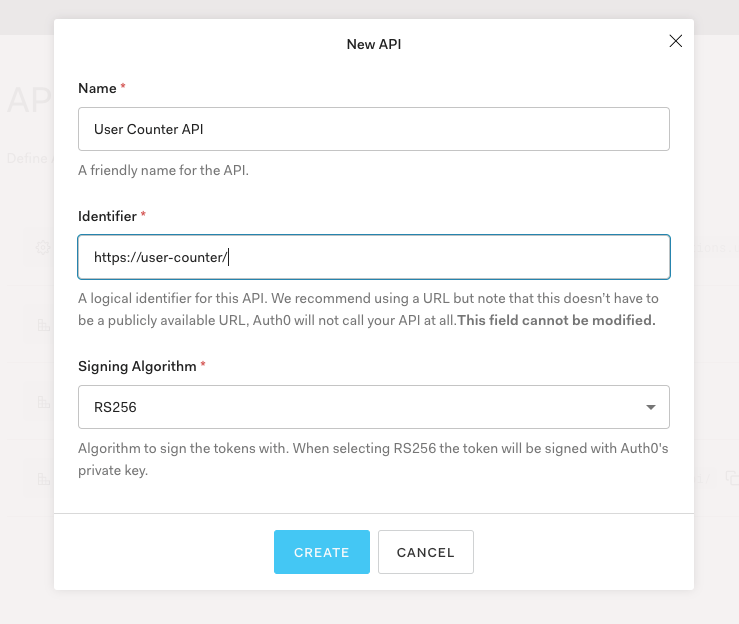
First, register the API with Auth0. Log in to the Auth0 dashboard, go to APIs and click the + CREATE API button. Give the API a name and use https://user-count-api/ for the identifier, then click CREATE:
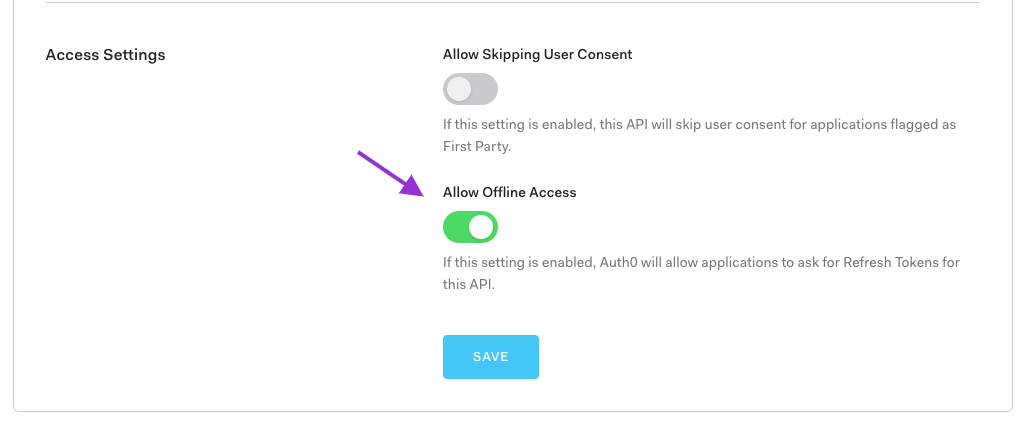
Click on the Settings tab, and enable the Allow Offline Access setting. This will make it possible for the NodeMCU to retrieve new access tokens for the user count API without re-authentication. Keep this page open so that you can use its information in the next step.
Now that the API is registered, you can now protect the user count endpoints. Install the packages required for JWT validation:
npm install jwks-rsa express-jwtNext, add a .env file. On macOS and Linux, do this with the following command:
touch .envOn Windows, use this command:
bash
call > .env
Add the API identifier (Audience) and your tenant domain to the .env file. You can find the API identifier and domain in the API settings.
AUTH0_AUDIENCE=https://user-count-api/
AUTH0_DOMAIN=YOUR_DOMAIN
Update the server.js code to protect each endpoint:
const express = require('express');
const storage = require('node-persist');
const jwt = require('express-jwt');
const jwksRsa = require('jwks-rsa');
require('dotenv').config();

const app = express();
const port = process.env.PORT || 8000;

app.use((error, req, res, next) => {
 return res.status(500).json({ error: error.toString() });
});

const checkJwt = jwt({
 // Dynamically provide a signing key based on the [Key ID](https://tools.ietf.org/html/rfc7515#section-4.1.4) header parameter ("kid") and the signing keys provided by the JWKS endpoint.
 secret: jwksRsa.expressJwtSecret({
   cache: true,
   rateLimit: true,
   jwksRequestsPerMinute: 5,
   jwksUri: `https://${process.env.AUTH0_DOMAIN}/.well-known/jwks.json`
 }),

 // Validate the audience and the issuer.
 audience: process.env.AUTH0_AUDIENCE,
 issuer: `https://${process.env.AUTH0_DOMAIN}/`,
 algorithms: ['RS256']
});

app.get('/', checkJwt, async (req, res) => {
 try {
   await storage.init();
   const userCount = await storage.getItem('userCount');
   res.send({userCount: userCount});
 } catch (error) {
   next(error);
 }
});

app.post('/', checkJwt, async (req, res) => {
 try {
   await storage.init();
   let oldUserCount = await storage.getItem('userCount');
   oldUserCount++;
   const newUserCount = await storage.setItem('userCount', oldUserCount);
   const userCount = newUserCount.content.value;
   res.send({userCount});
 } catch (error) {
   next(error);
 }
});

app.listen(port, () => console.log(`Listening on port ${port}`));
With the checkJwt middleware object added to both endpoints, the API is now secure. If you try to call the endpoint without an access token, you’ll receive a 401 Unauthorized response. The checkJwt middleware validates access tokens to ensure Auth0 has issued them and that they have not been tampered with.
Next, commit and deploy the changes to Heroku:
git commit . -m 'Require Access Tokens for user count endpoints'
git push heroku main
That’s it! The API is secure.
Register client applications
...But what about the rule and the NodeMCU? How will they obtain access tokens so that they can interact with the user count API?
To authorize the rule and the NodeMCU to use the user count API, you’ll need to create the following applications in your Auth0 tenant:
- A Machine-to-Machine application for the rule, and
- A Native application for the NodeMCU.
You will need to implement OAuth 2.0's Client Credentials Flow for the rule and the Device Authorization Flow for the NodeMCU.
Configure machine-to-machine application for rule
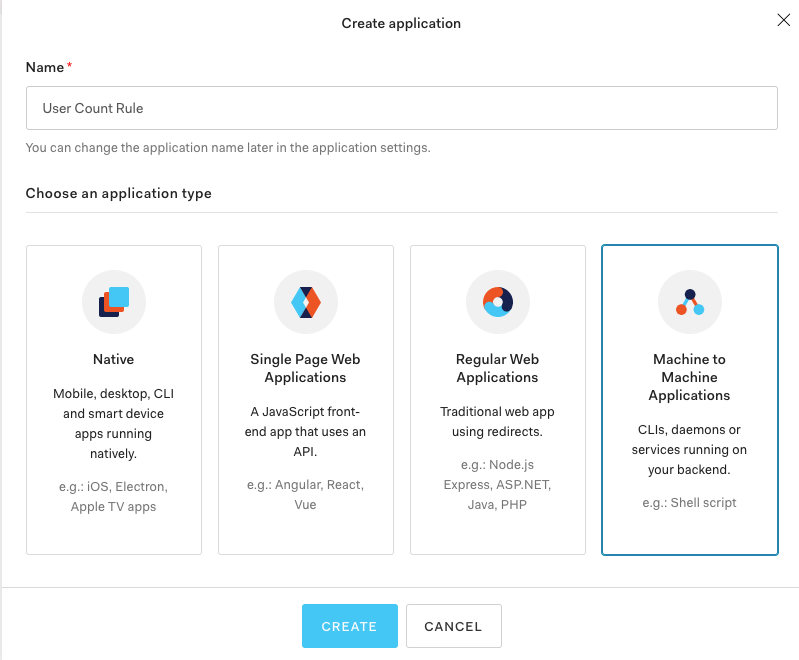
You’ll set up the rule's machine-to-machine application first. select Applications, then click + CREATE APPLICATION.
Give the application a name, select Machine to Machine Applications, then click CREATE:
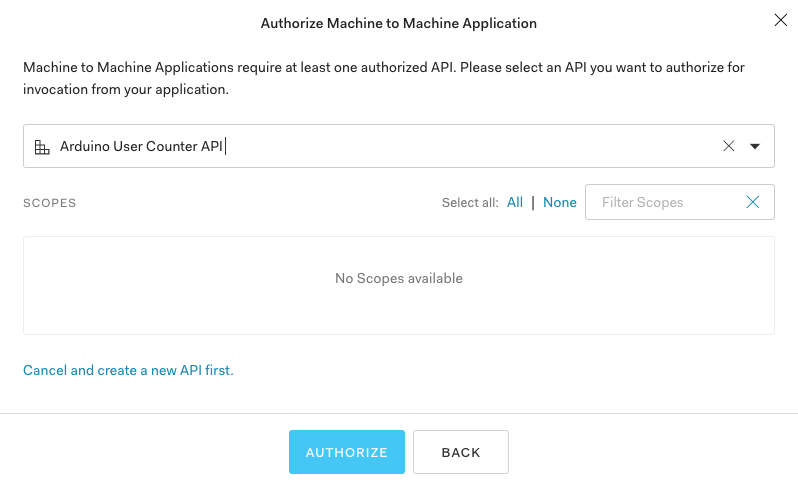
Next, authorize the application to use the user count API. Click AUTHORIZE:
The machine-to-machine application is now configured for the rule. However, you still need to update the rule to retrieve an access token before calling the user count API.
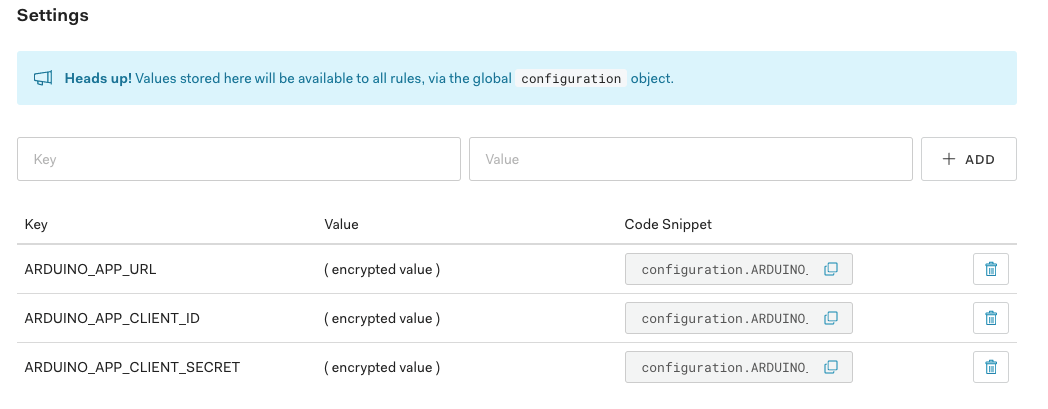
Open the Rules settings in a new tab. Scroll down to the bottom and add the following configurations:
* ARDUINO_APP_URL - The Heroku URL for the API
* ARDUINO_APP_CLIENT_ID - The Client ID of the machine-to-machine application you just created for the rule
* ARDUINO_APP_CLIENT_SECRET - The Client Secret of the machine-to-machine application
Finally, update the rule to retrieve an access token for the API and then use it as a bearer token when incrementing the user count:
async function (user, context, callback) {
  const axios = require('axios@0.19.2');
  const count = context.stats && context.stats.loginsCount ? context.stats.loginsCount : 0;
  if (count > 1) {
    return callback(null, user, context);
  }
  const tokenOptions = {
    method: 'POST',
    url: `https://${auth0.domain}/oauth/token`,
    headers: {
      'content-type': 'application/json'
    },
    data: {
      "client_id": configuration.ARDUINO_APP_CLIENT_ID,
      "client_secret": configuration.ARDUINO_APP_CLIENT_SECRET,
      "audience":"https://user-counter-api/",
      "grant_type":"client_credentials"
    }
  };

  try {
    const tokenResponse = await axios(tokenOptions);
    const accessToken = tokenResponse.data.access_token;
    const counterAPIOptions = {
      method: 'POST',
      url: configuration.ARDUINO_APP_URL,
      headers: { Authorization: `Bearer ${accessToken}` }
    };
    await axios(counterAPIOptions);
    return callback(null, user, context);
  } catch (err) {
    console.error(err);
    return callback(null, user, context);
  }
}
The rule is now ready to increment the user count.
Configure native application for NodeMCU
Next, the NodeMCU must be able to acquire an access token to retrieve the user count from the API. You will need to update the Arduino sketch so that an end-user can authenticate with Auth0 via OAuth 2.0's Device Authorization Flow. This flow requires a native application.
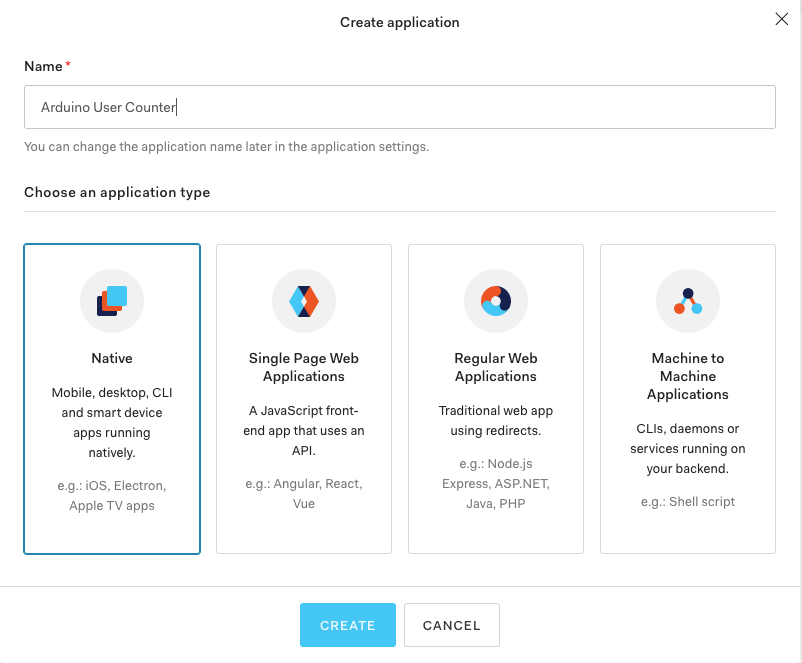
Create a new application in your Auth0 tenant once again, but this time select Native:
From the Settings tab, scroll to the bottom and click Show Advanced Settings. Select Grant Types and enable Device Code:
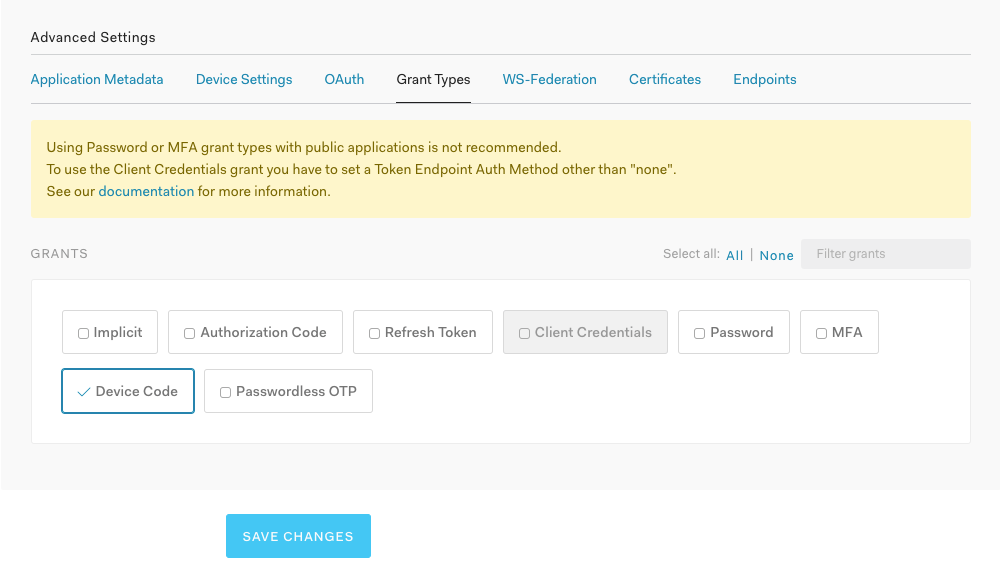
Be sure to save the changes before moving on by selecting SAVE CHANGES. Keep the settings page open for the next step.
Implement Device Authorization Flow
The native application is created and now the final step is updating the Arduino sketch to follow the Device Authorization Flow. You can read more about this flow in the documentation, but here is a brief breakdown:
*Step 1) Get codes: The device requests a device code and user code from Auth0.
*Step 2) Prompt user & poll for tokens: The device prompts the user to activate the device by navigating to a URL, authenticating with the Auth0 tenant, and submitting the user code. Meanwhile, the device uses the device code to make several requests to Auth0 for an access token and refresh token. These requests will fail until the user activates the device.
*Step 3) Use the tokens: Once the user activates the device, Auth0 will return an access token and refresh token to the device. The device can now use the access token as a bearer token when making requests to the API. When the access token expires, the device can use the `refresh token to retrieve a new access token.
You can clone a completed implementation in this Github repositiory. Don't forget to create an arduino_secrets.h file following the provided example file (arduino_secrets.example.h). Alternatively, you can write the sketch by following along below.
First, open the Arduino IDE and create a new file (File > New File). Save the file and name it user-counter-with-auth. Create a new tab and call it arduino_secrets.h. The arduino_screts.h file will need the following variables:
#define SECRET_SSID "YOUR_WIFI_NETWORK_NAME"
#define SECRET_PASS "YOUR_WIFI_NETWORK_PASSWORD"

#define SECRET_CLIENT_ID "YOUR_AUTH0_NATIVE_APP_CLIENT_ID"
#define SECRET_CLIENT_SECRET "YOUR_AUTH0_NATIVE_APP_CLIENT_SECRET"
#define SECRET_DOMAIN "YOUR_AUTH0_TENANT_DOMAIN"
#define SECRET_AUDIENCE "YOUR_API_IDENTIFIER"
#define SECRET_API_DOMAIN "YOUR_API_DOMAIN"

#define SECRET_AUTH_FINGERPRINT "YOUR_AUTH0_TENANT_SHA1_FINGERPRINT"
#define SECRET_API_FINGERPRINT "YOUR_API_SHA1_FINGERPRINT"SECRET_SSIDandSECRET_PASSare your Wi-Fi network name and password.SECRET_CLIENT_ID,SECRET_CLIENT_SECRET, andSECRET_DOMAINcan be found in settings tab of the the native application that you created for the NodeMCU.SECRET_AUDIENCEis the API identifier of the user count API.SECRET_API_DOMAINis the domain of the API that you deployed to Heroku.
The ESP8266 microchip requires a TLS fingerprint to make a secure HTTP request. You will need to get the fingerprint for your Auth0 domain and the API so that the ESP8266 Wi-Fi library is able to verify the fingerprint and make a secure request. When the TLS certificate expires, this value will need to be updated. You can explore other options for managing this such as the ESP8266 IoT Framework as described in Maakbaas' article.
To get the project up and running, you can get the fingerprint manually by using Chrome's developer tools. Navigate to a page that uses your Auth0 domain such as universal login and open dev tools. Select the Security tab and click View certificate:
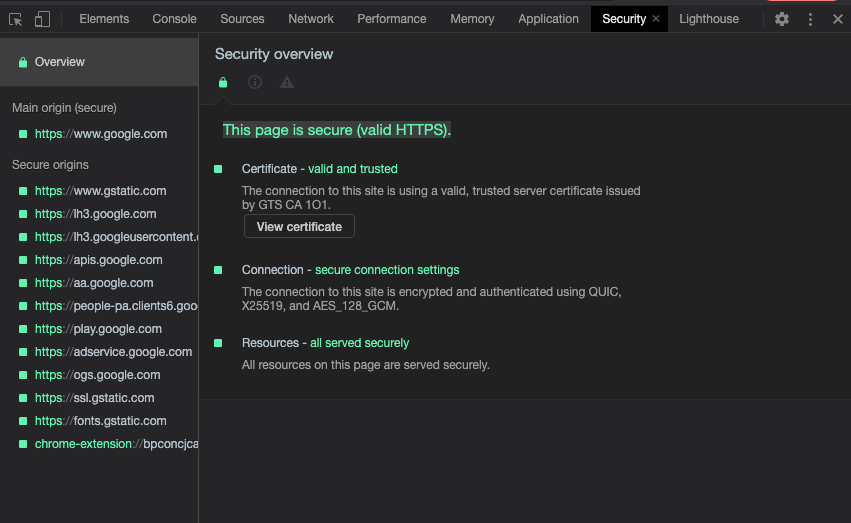
Click Details and scroll down to Fingerprints. Copy the SHA-1 fingerprint. Use this value for SECRET_AUTH_FINGERPRINT. Repeat for SECRET_API_FINGERPRINT and find tha SHA-1 TLS fingerprint for your API by navigating to your API that was deployed to Heroku in Chrome.
Next, open the user-counter-with-auth tab in your sketch and import the following libraries and your secrets at the top of the file:
#include <Adafruit_GFX.h>
#include "Adafruit_LEDBackpack.h"
#include <ArduinoJson.h>
#include <ESP8266WiFi.h>
#include <WiFiClientSecure.h>

#include "arduino_secrets.h"
The setup() function is much like the non-secure version of the user counter sketch. You will still need to initialize the Serial Monitor, the Wi-Fi connection, and the displays, but this time, split the Wi-Fi and display initialization into their own function for better readability:
// WiFi Setup
char ssid[] = SECRET_SSID;
char pass[] = SECRET_PASS;

// Declare 7-seg displays and user count
Adafruit_7segment highDigitDisplay = Adafruit_7segment(); // left-hand display - displays digits greater than 9,999
Adafruit_7segment lowDigitDisplay = Adafruit_7segment(); // right-hand display - displays digits less than 10,000
int userCount;

// Set up Wi-Fi connection
void setupWifi() {
  Serial.print("Connecting to WiFi");
  WiFi.mode(WIFI_STA);
  WiFi.begin(ssid, pass);
  while (WiFi.status() != WL_CONNECTED) {
    delay(500);
    Serial.print(".");
  }

  Serial.println();
  Serial.print("WiFi connected. "); Serial.print("IP address: "); Serial.println(WiFi.localIP());
  Serial.println();
}

// Initialize 7-segment displays
void initDisplays() {
  highDigitDisplay.begin(0x71);
  lowDigitDisplay.begin(0x70);
}

void setup() {
  Serial.begin(115200); Serial.println();
  initDisplays();
  setupWifi();
}
To keep track of the device flow, update the Arduino sketch to include the following state variables. Add the states above the setup() function:
// Declare states as global variables
static const int ERROR_STATE = -1;
static const int AUTH_REQUIRED = 0;
static const int POLL_FOR_TOKEN = 1;
static const int GET_USER_COUNT = 2;
static const int REFRESH_TOKEN = 3;

// Set global variable attributes.
static int CURRENT_STATE = AUTH_REQUIRED;
These states will determine which requests should be made in the loop() function.
AUTH_REQUIRED
When the state is AUTH_REQUIRED, the NodeMCU has not yet received the device code nor the user code. At this point, a request to the /oauth/device/code is necessary to obtain these codes. Once the response is received from Auth0, the verification URI with the user code will be printed to the Serial Monitor so that you can activate the device.
POLL_FOR_TOKEN
When the state is POLL_FOR_TOKEN, the NodeMCU must make requests to the /oauth/token endpoint repeatedly until the user (you) activate the device. Once the device is activated and tokens are received, the access token and refresh token will be stored as global variables.
GET_USER_COUNT
Once the NodeMCU has the tokens saved to variables, it can finally get the user count and display it on the 7-segment displays. It will continue to use the access token until a 401 Unauthorized response is received which most likely means that the access token has expired.
REFRESH_TOKEN
Finally, when the access token has expired, another request to the /oauth/token endpoint will be made to get a new access token by sending the refresh token.
ERROR_STATE
Something has gone wrong!
Add a switch to the loop() function using the states:
void loop() {
  switch (CURRENT_STATE) {
    case AUTH_REQUIRED:
      // Send POST to /oauth/device/code and print the returned `user code` to the Serial Monitor and set value for device_code
      break;
    case POLL_FOR_TOKEN:
      // Send POST to /oauth/token using the device code. If an access token is returned, the user has activated the device
      break;
    case GET_USER_COUNT:
      // Use access token to get the user count and display it
      break;
    case REFRESH_TOKEN:
      // Use refresh token to get a new access token
      break;
    default:
      Serial.println("ERROR");
      break;
  }
  delay(3000);
}
You'll need to write functions to handle each of these states, but first, your sketch will need more information to make any of these requests. Add the following to the global variables declared above the setup() function:
// SSL Setup
const int httpsPort = 443;

const char* authHost = SECRET_DOMAIN;
char auth_fingerprint[] PROGMEM = SECRET_AUTH_FINGERPRINT;

const char* apiHost = SECRET_API_DOMAIN;
char api_fingerprint[] PROGMEM = SECRET_API_FINGERPRINT;

// Auth0 Application Settings
String client_id = SECRET_CLIENT_ID;
String client_secret = SECRET_CLIENT_SECRET;
String audience = SECRET_AUDIENCE;
String scope = "offline_access";

// Device flow
String device_grant_type = "urn:ietf:params:oauth:grant-type:device_code";
String refresh_grant_type = "refresh_token";
String code_endpoint = "/oauth/device/code";
String token_endpoint = "/oauth/token";
String verification_uri;
String device_code;

// Tokens
String access_token = "";
String refresh_token = "";
Now that you have added all of the necessary information to carry out the Device Authorization Flow, you can begin setting up the requests. Add a function to handle secure requests. All of the state handler functions you'll add will call this function to send requests. Add this function right below the global variables:
// Send a secure request
String request(const char* server, char* fingerprint, String header, String data = "") {
  String response = "";

  // Use WiFiClientSecure class to create TLS connection
  WiFiClientSecure client;

  client.setFingerprint(fingerprint);
  client.setTimeout(15000);
  delay(1000);

  if (client.connect(server, httpsPort)) {
    String request = (data == "") ? header : header + data;
    client.print(request);

    while (client.connected()) {
      if(client.find("HTTP/1.1 ")) {
        String status_code = client.readStringUntil('\r');
        if (status_code != "200 OK") {
          #ifdef DEBUG
            Serial.println("There was an error");
          #endif
          response = status_code;
          break;
        } else {
          String line = client.readStringUntil('\r');
          response += line;
        }
      }
    }
  } else {
    Serial.println("Error: Could not connect");
    CURRENT_STATE = ERROR_STATE;
  }

  return response;
}
This function will connect the provided host, send a secure request, and parse and return the returned data. This function will technically work, but it would be difficult to see what is happening with the requests without printing output to the Serial Monitor. Define a debug variable at the top of the global variables. Comment out this line once the sketch is working properly to reduce noise, but if you need to see more information, leave the variable defined.
#define DEBUG true
...
// other global variables
...

// Send a secure request
String request(const char* server, char* fingerprint, String header, String data = "") {
  String response = "";

  // Use WiFiClientSecure class to create TLS connection
  WiFiClientSecure client;

  client.setFingerprint(fingerprint);
  client.setTimeout(15000);
  delay(1000);

  #ifdef DEBUG
    Serial.print("Connecting to: "); Serial.println(server);
    Serial.println();
  #endif

  if (client.connect(server, httpsPort)) {
    String request = (data == "") ? header : header + data;
    client.print(request);

    while (client.connected()) {
      if(client.find("HTTP/1.1 ")) {
        String status_code = client.readStringUntil('\r');
        #ifdef DEBUG
          Serial.print("Status code: "); Serial.println(status_code);
        #endif
        if (status_code != "200 OK") {
          #ifdef DEBUG
            Serial.println("There was an error");
          #endif
          response = status_code;
          break;
        } else {
          if (client.find("\r\n\r\n")) {
            #ifdef DEBUG
              Serial.println("Data:");
            #endif
          }
          String line = client.readStringUntil('\r');
          #ifdef DEBUG
            Serial.println(line);
          #endif
          response += line;
        }
      }
    }
  } else {
    Serial.println("Error: Could not connect");
    CURRENT_STATE = ERROR_STATE;
  }

  return response;
}
Next, use the request() function in the first state handler function requestCodes():
// Send POST to /oauth/device/code to get the device code and prompt user to activate device
void requestCodes() {
  String postData = "";
  postData += "&client_id=" + client_id;
  postData += "&audience=" + audience;
  postData += "&scope=" + scope;
  postData += "&grant_type=" + device_grant_type;
  String postHeader = "";
  postHeader += ("POST " + code_endpoint + " HTTP/1.0\r\n");
  postHeader += ("Host: " + String(authHost) + ":" + String(httpsPort) + "\r\n");
  postHeader += ("Connection: close\r\n");
  postHeader += ("Content-Type: application/x-www-form-urlencoded\r\n");
  postHeader += ("Content-Length: ");
  postHeader += (postData.length());
  postHeader += ("\r\n\r\n");
  String response = request(authHost, auth_fingerprint, postHeader, postData);
  DynamicJsonDocument doc(1024);
  deserializeJson(doc, response);
  device_code = doc["device_code"].as<String>();
  verification_uri = doc["verification_uri_complete"].as<String>();
  if (device_code == "null") {
    CURRENT_STATE = ERROR_STATE;
    return;
  }
  Serial.println("Please activate this device: " + verification_uri);
  Serial.println();
  CURRENT_STATE = POLL_FOR_TOKEN;
}
Call requestCodes() in the switch statement under AUTH_REQUIRED:
void loop() {
  switch (CURRENT_STATE) {
    case AUTH_REQUIRED:
      // Send POST to /oauth/device/code and print the returned `user code` to the Serial Monitor and set value for device_code
      requestCodes();
      break;
    case POLL_FOR_TOKEN:
      // Send POST to /oauth/token using the device code. If an access token is returned, the user has activated the device
      break;
    case GET_USER_COUNT:
      // Use access token to get the user count and display it
      break;
    case REFRESH_TOKEN:
      // Use refresh token to get a new access token
      break;
    default:
      Serial.println("ERROR");
      break;
  }
  delay(3000);
}
Next, write a function that will make a request to the token endpoint. It will need to be able to send a request to get the initial access token as well as refresh the access token after it has expired:
// Send POST to /oauth/token to get the access token.
// When `refresh` is true, use refresh token to get a new access token
void requestToken(bool refresh = false) {
  String postData = "";
  if (refresh) {
    postData += "&client_id=" + client_id;
    postData += "&client_secret=" + client_secret;
    postData += "&refresh_token=" + refresh_token;
    postData += "&grant_type=" + refresh_grant_type;
  } else {
    postData += "&client_id=" + client_id;
    postData += "&device_code=" + device_code;
    postData += "&grant_type=" + device_grant_type;
  }

  String postHeader = "";
  postHeader += ("POST " + token_endpoint + " HTTP/1.0\r\n");
  postHeader += ("Host: " + String(authHost) + ":" + String(httpsPort) + "\r\n");
  postHeader += ("Connection: close\r\n");
  postHeader += ("Content-Type: application/x-www-form-urlencoded\r\n");
  postHeader += ("Content-Length: ");
  postHeader += (postData.length());
  postHeader += ("\r\n\r\n");
  String response = request(authHost, auth_fingerprint, postHeader, postData);
  #ifdef DEBUG
    Serial.println(response);
  #endif
  DynamicJsonDocument doc(1024);
  deserializeJson(doc, response);

  if (doc["refresh_token"]) {
    refresh_token = doc["refresh_token"].as<String>();
  }
  if (doc["access_token"]) {
    access_token = doc["access_token"].as<String>();
    CURRENT_STATE = GET_USER_COUNT;
  }
}
Update the switch statement to call this function under POLL_FOR_TOKEN and REFRESH_TOKEN, passing true for refresh under REFRESH_TOKEN:
void loop() {
  switch (CURRENT_STATE) {
    case AUTH_REQUIRED:
      // Send POST to /oauth/device/code and print the returned `user code` to the Serial Monitor and set value for device_code
      requestCodes();
      break;
    case POLL_FOR_TOKEN:
      // Send POST to /oauth/token using the device code. If an access token is returned, the user has activated the device
      requestToken();
      break;
    case GET_USER_COUNT:
      // Use access token to get the user count and display it
      break;
    case REFRESH_TOKEN:
      // Use refresh token to get a new access token
      requestToken();
      break;
    default:
      Serial.println("ERROR");
      break;
  }
  delay(3000);
}
Finally, add a function for requesting the user count and displaying it on the 7-segment displays. Seperate the responsibility of displaying the data into its own functions:
void showUserCount() {
  uint16_t highDigits = userCount / 10000; // Value on left (high digits) display
  uint16_t lowDigits = userCount % 10000; // Value on right (low digits) display

  highDigitDisplay.print(highDigits, DEC);
  lowDigitDisplay.print(lowDigits, DEC);

  // Place zeroes in front of the lowDigit value if userCount is greater than 10,000
  if (highDigits) {
    if (lowDigits < 1000) {
      lowDigitDisplay.writeDigitNum(0, 0);
    }
    if (lowDigits < 100) {
      lowDigitDisplay.writeDigitNum(1, 0);
    }
    if (lowDigits < 10) {
      lowDigitDisplay.writeDigitNum(3, 0);
    }
  } else {
    highDigitDisplay.clear();
  }

  highDigitDisplay.writeDisplay();
  lowDigitDisplay.writeDisplay();
}

// Send GET to User Count API
void getUserCount() {
  String getHeader = "";
  getHeader += ("GET / HTTP/1.0\r\n");
  getHeader += ("Host: " + String(apiHost) + ":" + String(httpsPort) + "\r\n");
  getHeader += ("Connection: close\r\n");
  getHeader += ("Authorization: Bearer " + access_token + "\r\n");
  getHeader += ("Content-Type: application/json; charset=UTF-8\r\n");
  getHeader += ("\r\n\r\n");
  String response = request(apiHost, api_fingerprint, getHeader);
  if (response == "401 Unauthorized") {
    CURRENT_STATE = REFRESH_TOKEN;
    return;
  }
  #ifdef DEBUG
    Serial.println(response);
  #endif
  DynamicJsonDocument doc(1024);
  deserializeJson(doc, response);
  userCount = doc["userCount"];
  showUserCount();
}
Update the loop() function once more:
void loop() {
  switch (CURRENT_STATE) {
    case AUTH_REQUIRED:
      // Send POST to /oauth/device/code and print the returned `user code` to the Serial Monitor and set value for device_code
      requestCodes();
      break;
    case POLL_FOR_TOKEN:
      // Send POST to /oauth/token using the device code. If an access token is returned, the user has activated the device
      requestToken();
      break;
    case GET_USER_COUNT:
      // Use access token to get the user count and display it
      getUserCount();
      break;
    case REFRESH_TOKEN:
      // Use refresh token to get a new access token
      requestToken();
      break;
    default:
      Serial.println("ERROR");
      break;
  }
  delay(3000);
}
The finished sketch should look something like this:
#include <Adafruit_GFX.h>
#include "Adafruit_LEDBackpack.h"
#include <ArduinoJson.h>
#include <ESP8266WiFi.h>
#include <WiFiClientSecure.h>

#include "arduino_secrets.h"

// #define DEBUG true

// WiFi Setup
char ssid[] = SECRET_SSID;
char pass[] = SECRET_PASS;

// Declare 7-seg displays and user count
Adafruit_7segment highDigitDisplay = Adafruit_7segment(); // left-hand display - displays digits greater than 9,999
Adafruit_7segment lowDigitDisplay = Adafruit_7segment(); // right-hand display - displays digits less than 10,000
int userCount;

// Auth0 Application Settings
String client_id = SECRET_CLIENT_ID;
String client_secret = SECRET_CLIENT_SECRET;
String audience = SECRET_AUDIENCE;
String scope = "offline_access";

// Tokens
String access_token = "";
String refresh_token = "";

// SSL Setup
const int httpsPort = 443;

const char* authHost = SECRET_DOMAIN;
char auth_fingerprint[] PROGMEM = SECRET_AUTH_FINGERPRINT;

const char* apiHost = SECRET_API_DOMAIN;
char api_fingerprint[] PROGMEM = SECRET_API_FINGERPRINT;

// Device flow
String device_grant_type = "urn:ietf:params:oauth:grant-type:device_code";
String refresh_grant_type = "refresh_token";
String code_endpoint = "/oauth/device/code";
String token_endpoint = "/oauth/token";
String verification_uri;
String device_code;

// Declare states as global variables
static const int ERROR_STATE = -1;
static const int AUTH_REQUIRED = 0;
static const int POLL_FOR_TOKEN = 1;
static const int GET_USER_COUNT = 2;
static const int REFRESH_TOKEN = 3;

// Set global variable attributes.
static int CURRENT_STATE = AUTH_REQUIRED;

// Send a secure request
String request(const char* server, char* fingerprint, String header, String data = "") {
  String response = "";

  // Use WiFiClientSecure class to create TLS connection
  WiFiClientSecure client;

  client.setFingerprint(fingerprint);
  client.setTimeout(15000);
  delay(1000);

  #ifdef DEBUG
    Serial.print("Connecting to: "); Serial.println(server);
    Serial.println();
  #endif

  if (client.connect(server, httpsPort)) {
    String request = (data == "") ? header : header + data;
    client.print(request);

    while (client.connected()) {
      if(client.find("HTTP/1.1 ")) {
        String status_code = client.readStringUntil('\r');
        #ifdef DEBUG
          Serial.print("Status code: "); Serial.println(status_code);
        #endif
        if (status_code != "200 OK") {
          #ifdef DEBUG
            Serial.println("There was an error");
          #endif
          response = status_code;
          break;
        } else {
          if (client.find("\r\n\r\n")) {
            #ifdef DEBUG
              Serial.println("Data:");
            #endif
          }
          String line = client.readStringUntil('\r');
          #ifdef DEBUG
            Serial.println(line);
          #endif
          response += line;
        }
      }
    }
  } else {
    Serial.println("Error: Could not connect");
    CURRENT_STATE = ERROR_STATE;
  }

  return response;
}

// Send POST to /oauth/device/code to get the device code and prompt user to activate device
void requestCodes() {
  String postData = "";
  postData += "&client_id=" + client_id;
  postData += "&audience=" + audience;
  postData += "&scope=" + scope;
  postData += "&grant_type=" + device_grant_type;
  String postHeader = "";
  postHeader += ("POST " + code_endpoint + " HTTP/1.0\r\n");
  postHeader += ("Host: " + String(authHost) + ":" + String(httpsPort) + "\r\n");
  postHeader += ("Connection: close\r\n");
  postHeader += ("Content-Type: application/x-www-form-urlencoded\r\n");
  postHeader += ("Content-Length: ");
  postHeader += (postData.length());
  postHeader += ("\r\n\r\n");
  String response = request(authHost, auth_fingerprint, postHeader, postData);
  DynamicJsonDocument doc(1024);
  deserializeJson(doc, response);
  device_code = doc["device_code"].as<String>();
  verification_uri = doc["verification_uri_complete"].as<String>();
  if (device_code == "null") {
    CURRENT_STATE = ERROR_STATE;
    return;
  }
  Serial.println("Please activate this device: " + verification_uri);
  Serial.println();
  CURRENT_STATE = POLL_FOR_TOKEN;
}

// Send POST to /oauth/token to get the access token.
// When `refresh` is true, use Refresh Token to get a new access token
void requestToken(bool refresh = false) {
  String postData = "";
  if (refresh) {
    postData += "&client_id=" + client_id;
    postData += "&client_secret=" + client_secret;
    postData += "&refresh_token=" + refresh_token;
    postData += "&grant_type=" + refresh_grant_type;
  } else {
    postData += "&client_id=" + client_id;
    postData += "&device_code=" + device_code;
    postData += "&grant_type=" + device_grant_type;
  }

  String postHeader = "";
  postHeader += ("POST " + token_endpoint + " HTTP/1.0\r\n");
  postHeader += ("Host: " + String(authHost) + ":" + String(httpsPort) + "\r\n");
  postHeader += ("Connection: close\r\n");
  postHeader += ("Content-Type: application/x-www-form-urlencoded\r\n");
  postHeader += ("Content-Length: ");
  postHeader += (postData.length());
  postHeader += ("\r\n\r\n");
  String response = request(authHost, auth_fingerprint, postHeader, postData);
  #ifdef DEBUG
    Serial.println(response);
  #endif
  DynamicJsonDocument doc(1024);
  deserializeJson(doc, response);

  if (doc["refresh_token"]) {
    refresh_token = doc["refresh_token"].as<String>();
  }
  if (doc["access_token"]) {
    access_token = doc["access_token"].as<String>();
    CURRENT_STATE = GET_USER_COUNT;
  }
}

void showUserCount() {
  uint16_t highDigits = userCount / 10000; // Value on left (high digits) display
  uint16_t lowDigits = userCount % 10000; // Value on right (low digits) display

  highDigitDisplay.print(highDigits, DEC);
  lowDigitDisplay.print(lowDigits, DEC);

  // Place zeroes in front of the lowDigit value if userCount is greater than 10,000
  if (highDigits) {
    if (lowDigits < 1000) {
      lowDigitDisplay.writeDigitNum(0, 0);
    }
    if (lowDigits < 100) {
      lowDigitDisplay.writeDigitNum(1, 0);
    }
    if (lowDigits < 10) {
      lowDigitDisplay.writeDigitNum(3, 0);
    }
  } else {
    highDigitDisplay.clear();
  }

  highDigitDisplay.writeDisplay();
  lowDigitDisplay.writeDisplay();
}

// Send GET to User Count API
void getUserCount() {
  String getHeader = "";
  getHeader += ("GET / HTTP/1.0\r\n");
  getHeader += ("Host: " + String(apiHost) + ":" + String(httpsPort) + "\r\n");
  getHeader += ("Connection: close\r\n");
  getHeader += ("Authorization: Bearer " + access_token + "\r\n");
  getHeader += ("Content-Type: application/json; charset=UTF-8\r\n");
  getHeader += ("\r\n\r\n");
  String response = request(apiHost, api_fingerprint, getHeader);
  if (response == "401 Unauthorized") {
    CURRENT_STATE = REFRESH_TOKEN;
    return;
  }
  #ifdef DEBUG
    Serial.println(response);
  #endif
  DynamicJsonDocument doc(1024);
  deserializeJson(doc, response);
  userCount = doc["userCount"];
  showUserCount();
}

// Set up Wi-Fi connection
void setupWifi() {
  Serial.print("Connecting to WiFi");
  WiFi.mode(WIFI_STA);
  WiFi.begin(ssid, pass);
  while (WiFi.status() != WL_CONNECTED) {
    delay(500);
    Serial.print(".");
  }

  Serial.println();
  Serial.print("WiFi connected. "); Serial.print("IP address: "); Serial.println(WiFi.localIP());
  Serial.println();
}

// Initialize 7-segment displays
void initDisplays() {
  highDigitDisplay.begin(0x71);
  lowDigitDisplay.begin(0x70);
}

void setup() {
  Serial.begin(115200); Serial.println();
  initDisplays();
  setupWifi();
}

void loop() {
  switch (CURRENT_STATE) {
    case AUTH_REQUIRED:
      // Send POST to /oauth/device/code and print the returned `user code` to the Serial Monitor and set value for device_code
      requestCodes();
      break;
    case POLL_FOR_TOKEN:
      // Send POST to /oauth/token using the device code. If an access token is returned, the user has activated the device
      requestToken();
      break;
    case GET_USER_COUNT:
      // Use access token to get the user count and display it
      getUserCount();
      break;
    case REFRESH_TOKEN:
      // Use refresh token to get a new access token
      requestToken(true);
      break;
    default:
      Serial.println("ERROR");
      break;
  }
  delay(3000);
}
Upload the program and open up the Serial Monitor. Visit the verification URI when prompted to activate the device. The user count will show up on the 7-segment displays.
Conclusion
In this tutorial, you built and deployed a user count API, created a rule for incrementing the user count, added authentication to your API, and implemented Client Credentials Flow for your rule and Device Authorization Flow for your Arduino sketch.


