---
title: "Building An Audio Player App with Ionic, Angular, RxJS, and NgRx"
description: "Learn how to develop modern mobile apps with Angular, Ionic, RxJS and NgRx. Follow this tutorial to create a mobile audio player app."
authors:
- name: "Indermohan Singh"
url: "https://auth0.com/blog/authors/indermohan-singh/"
date: "Jul 12, 2018"
category: "Developers,Tutorial,Angular"
tags: ["ionic", "angular", "rxjs", "ngrx", "mobile", "auth0", "hybrid"]
url: "https://auth0.com/blog/building-an-audio-player-app-with-ionic-angular-rxjs-and-ngrx/"
---
# Building An Audio Player App with Ionic, Angular, RxJS, and NgRx
**TL;DR:** In this article, you will learn how to develop a mobile audio player app using [**Ionic framework**](https://ionicframework.com/) and [**Angular**](https://angular.io). You will handle audio operations using [_RxJS_](https://github.com/ReactiveX/rxjs) and _Observables_, and you will also explore how you can manage application's state with [**NgRx**](https://github.com/ngrx/platform). To secure your application, you will use [**Auth0**](https://auth0.com). If needed, [you can find the final code on this GitHub repository](https://github.com/auth0-blog/ionic-audio-player).
## Introduction
Creating an audio player is always an intimidating task. Specially if you think about managing media's _state_, reacting to media _events_, and reflecting these changes correctly on the UI (User Interface). So, in this article, you will use Angular and Ionic (with some other libraries) to easily solve these issues.
To handle media playback in a reactive way, you will adapt [JavaScript's `Audio` object](https://www.w3schools.com/jsref/dom_obj_audio.asp) with a **RxJS** _Observable_ and you will use the **NgRx** store to manage the state of your audio player.
Besides that, you will also use [Auth0](https://auth0.com) to secure your mobile app and, in a subsequent article, you will learn how to create a secure backend to provide the list of music files to your app (for now, you will use a mock service with static data).
## Prerequisites for Ionic Development
Since you are going to make a mobile application, you will need to have the required SDKs for building the app. In this article, you will use [Cordova](https://cordova.apache.org/) to package your Ionic app into native mobile packages.
The following sections show the steps you will need to follow before starting the development of your application.
### Install Native SDKs for iOS
For the iOS platform, you will need a Mac OS X environment and [Xcode](https://developer.apple.com/xcode/) installed on it. [For more information about configuring native SDKs in a Mac OS X environment, check this reference](https://cordova.apache.org/docs/en/latest/guide/platforms/ios/#installing-the-requirements). After installing Xcode, you will also need some command-line tools and the `ios-deploy` tool to run a simulator.
To install these tools, proceed as follows:
* From the command line, run `xcode-select --install` to install the Xcode command-line tool.
* Then, run `npm install -g ios-deploy` to install the `ios-deploy` tool.
[If you don't have Node.js and NPM installed in your machine, please, check the instruction on this reference](https://nodejs.org/en/download/).
### Install Native SDKs for Android
For Android applications, you will need to have Android SDKs and some tools. The steps below briefly explain how to install these SDKs and tools in your environment. However, if you need more information, [you can check this link for a more thorough explanation on how to install everything](https://cordova.apache.org/docs/en/latest/guide/platforms/android/index.html#installing-the-requirements):
* JDK: [You will need to have a JDK installed](http://www.oracle.com/technetwork/java/javase/downloads/index.html) and the `JAVA_HOME` environment variable pointing to your JDK installation.
* Gradle: You will also need to install [Gradle](https://gradle.org/) and add it to the `PATH` variable in your environment variables.
* Android SDK: Most importantly, you will need Android SDKs to generate `apk` files for your app. So, install [the Android Studio IDE](https://developer.android.com/studio/) and, using the `sdkmanager`, install these:
1. Android Platform SDK;
2. build-tools for that SDK version;
3. and Android Support Repository.
After these, you will need to set the `ANDROID_HOME` environment variable to your Android SDK location. It's also recommended to add Android SDK's `tools`, `tools/bin`, and `platform-tools` directories to `PATH` variable.
### Install Node.js and Tools
As already mentioned, you will need to install Node.js in your development machine. So, if you haven't done so yet, go to [the download page of Node.js](https://nodejs.org/en/download/) and follow the instructions there.
After installing it, you will need to install Cordova CLI and Ionic CLI via `npm`:
```bash
npm install -g ionic cordova
```
## Scaffolding the Ionic App
After installing all the environment dependencies, you can focus on scaffolding your Ionic app. To do this, issue the following command on a terminal:
```bash
ionic start audio-player blank
```
This command will ask you two questions:
1. _Would you like to integrate your new app with Cordova to target native iOS and Android? (y/N):_ You can input `y` (yes) as you are going to build the app for mobile devices.
2. _Install the free Ionic Pro SDK and connect your app? (Y/n):_ Press `n` because you won't really need to use any Ionic Pro feature in this tutorial.
### Running the Application
Before continuing, make sure you can start your application on some mobile device or emulator.
For example, if you are on a Mac OS X environment and you want to use an emulator to test your application, you can simply run:
```bash
# for the iOS app
ionic cordova run ios -lc
```
> **Note**: `-lc` above means that you want Ionic to _spin up a server to live-reload www files_ (the `l`) and to _print out console logs to terminal_ (the `c`).
For reference, these are the other commands that you can use when aiming your current development machine (i.e. a browser on it) or Android:
```bash
# serve locally
ionic serve
# for the android app
ionic cordova run android
```
### Installing Project Dependencies
Having confirmed that you can run the basic app in some mobile device, you can start by installing the dependencies. To build your mobile audio player, you will use the following NPM libraries:
* [`@angular/animations`](https://www.npmjs.com/package/@angular/animations): a package to improve your app UX by adding some animations;
* [`@ngrx/store`](https://github.com/ngrx/store): a library built to integrate RxJS and Angular applications to help you manage the state of your apps;
* [`moment.js`](https://momentjs.com/): a library that helps manipulating dates and times in JavaScript;
* [`auth0-js`](https://www.npmjs.com/package/auth0-js): the official Auth0 library for JavaScript apps;
* [`@auth0/cordova`](https://github.com/auth0/auth0-cordova): the official Auth0 library for Cordova apps;
* [`rxjs`](https://github.com/ReactiveX/rxjs): a reactive programming library for JavaScript;
* [`rxjs-compat`](https://github.com/ReactiveX/rxjs/tree/master/compat): a package to get backward compatibility with RxJS previous to version 6;
To install these libraries, you can use the following commands:
```bash
# make sure you are in the project root
cd audio-player
# install all libs
npm install --save @angular/animations @ngrx/store moment auth0-js @types/auth0-js @auth0/cordova rxjs@6.2.1 rxjs-compat@6.2.1
```
> **Note**: In the command above, you installed both `rxjs@6.2.1` and `rxjs-compat@6.2.1` because Ionic (at least, at the time of writing) ships with Angular 5 and because Angular 5 uses RxJS 5 APIs.
## Creating an Ionic Service to Manage the Playback
After installing your app's dependencies, you can start working on the playback feature.
### Creating an RxJS Observable
The Observable that you are going to create is the central piece of your application. RxJS comes with a helper function named `create` to help you create custom observables. It takes `subscribe` function as an input.
```typescript
Observable.create(subscribe): Observable;
```
This `subscribe` function takes an `observer` object and returns a function. Observer objects provide three methods: `next`, `error`, and `complete`.
1. To emit a value, you can call the `observer.next` method with the desired value.
2. In case of an error, you can use the `observer.error` function to throw the error and make the observable stop.
3. If you no longer need the observer and there are no more values to emit, you can call the `observer.complete` method.
Also, calling `Observable.create` will return an `Observable` to which you can subscribe via the `subscribe` method. This method returns a function that you can call when you want to unsubscribe from the observable.
> Don't be confused with `Observable.create(subscribe)` and `Observable.subscribe()`. Former `subscribe` function is an input to `Observable.create`, which is sort of like blueprint of an observable, and latter is the one which invokes the execution of an observable.
In your audio player app, you are going to create an observable to get notifications about media events like `playing`, `pause`, `timeupdate`, and so on. So, basically, you will listen to the media event's of `Audio()` inside the observable and then notify the rest of the app via the `observer.next` method.
Now that you understand why do you need an observable, you can start by creating a service in your Ionic app:
```bash
ionic generate provider audio
```
This will generate a service in a file called `audio.ts` under `./src/providers/audio/` and this service will be added to `NgModule` in `app.module.ts`. Replace the contents of the `audio.ts` file with:
```typescript
import {Injectable} from '@angular/core';
import {Observable, Subject} from 'rxjs';
import {takeUntil} from 'rxjs/operators';
import * as moment from 'moment';
@Injectable()
export class AudioProvider {
private stop$ = new Subject();
private audioObj = new Audio();
constructor() { }
private streamObservable(url) {
let events = [
'ended', 'error', 'play', 'playing', 'pause', 'timeupdate', 'canplay', 'loadedmetadata', 'loadstart'
];
const addEvents = function(obj, events, handler) {
events.forEach(event => {
obj.addEventListener(event, handler);
});
};
const removeEvents = function(obj, events, handler) {
events.forEach(event => {
obj.removeEventListener(event, handler);
});
};
return Observable.create(observer => {
// Play audio
this.audioObj.src = url;
this.audioObj.load();
this.audioObj.play();
// Media Events
const handler = (event) => observer.next(event);
addEvents(this.audioObj, events, handler);
return () => {
// Stop Playing
this.audioObj.pause();
this.audioObj.currentTime = 0;
// Remove EventListeners
removeEvents(this.audioObj, events, handler);
};
});
}
}
```
Now, whenever you want to play a new audio file, you will create this observable and listen to all these media events. You will do this via a new method called `playStream()` that you are going to add to the `AudioProvider` class:
```typescript
// ... import statements ...
export class AudioProvider {
// ... constructors and other methods ...
playStream(url) {
return this.streamObservable(url).pipe(takeUntil(this.stop$));
}
}
```
It's important to notice that you are automatically unsubscribing from this observable if `this.stop$` emits any value.
### Wrapping Up the AudioProvider Service
Now that you have the basis of the `AudioProvider` service, you can develop the rest of its methods: `play`, `pause`, `stop`, `seekTo`, and `formatTime`. As their implementation is self-explanatory, you can simply add these five methods to the `AudioProvider` service as shown below:
```typescript
// ... import statements ...
export class AudioProvider {
// ... constructors and other methods ...
play() {
this.audioObj.play();
}
pause() {
this.audioObj.pause();
}
stop() {
this.stop$.next();
}
seekTo(seconds) {
this.audioObj.currentTime = seconds;
}
formatTime(time, format) {
return moment.utc(time).format(format);
}
}
```
## Reading the Music Files
After creating the audio service for the playback features, you will need to create a service to get a list of files. To do so, you can create a cloud service using Ionic:
```bash
ionic generate provider cloud
```
This command will generate a service in a file called `cloud.ts` under `./src/providers/cloud`. Now, replace the contents of this file with:
```typescript
import { Injectable } from '@angular/core';
import { of } from 'rxjs';
@Injectable()
export class CloudProvider {
files:any = [
{ url: 'https://ia801504.us.archive.org/3/items/EdSheeranPerfectOfficialMusicVideoListenVid.com/Ed_Sheeran_-_Perfect_Official_Music_Video%5BListenVid.com%5D.mp3',
name: 'Perfect by Ed Sheeran'
},
{
url: 'https://ia801609.us.archive.org/16/items/nusratcollection_20170414_0953/Man%20Atkiya%20Beparwah%20De%20Naal%20Nusrat%20Fateh%20Ali%20Khan.mp3',
name: 'Man Atkeya Beparwah by Nusrat Fateh Ali Khan'
},
{ url: 'https://ia801503.us.archive.org/15/items/TheBeatlesPennyLane_201805/The%20Beatles%20-%20Penny%20Lane.mp3',
name: 'Penny Lane by The Beatles'
}
];
getFiles() {
return of(this.files);
}
}
```
The `getFiles` method above basically mocks an HTTP request by returning an `Observable` with a static `files` object.
## Managing Ionic App's State with NgRx Store
To help you manage the state of your application, you will take advantage of [the NgRx Store library](https://github.com/ngrx/store). This store is based on Redux, which is very famous in the React world for managing state, and integrates Redux concepts with RxJS.
If you don't know what Redux is (or how it works), here it goes a brief explanation around it:
> In Redux, the state is managed in a central place. What this means is that you have just one object which stores the current state of your whole application. If at any point, you want to update this state, you need to `dispatch` an `action` to a function known as `reducer`. This `reducer` is responsible for understanding the `action` and generating a new state based on the action `type` and `data`.
### Creating a Reducer with NgRx Store
By default, the NgRx `Action` interface exposes only one property: the `type`. As you will need to send some information along with the type of your actions, you are going to extend the NgRx `Action` interface to suit your needs.
So, to define this interface extension, you will create a file named `store.ts` inside a new directory called `store` (under `./src/providers/`) and add the following code to it:
```typescript
import {Action} from '@ngrx/store';
export interface MediaAction extends Action {
type: string;
payload?: any;
}
```
Then, you will create different actions for the different media events (like `canplay`, `playing`, and so on). As such, update the `store.ts` file as follows:
```typescript
// ... import statement and MediaAction interface ...
export const CANPLAY = 'CANPLAY';
export const LOADEDMETADATA = 'LOADEDMETADATA';
export const PLAYING = 'PLAYING';
export const TIMEUPDATE = 'TIMEUPDATE';
export const LOADSTART = 'LOADSTART';
export const RESET = 'RESET';
```
After that, you will be able to implement the reducer function that receives and treats instances of `MediaAction`:
```typescript
// ... import, MediaAction, and consts ...
export function mediaStateReducer(state: any, action: MediaAction) {
let payload = action.payload;
switch (action.type) {
case CANPLAY:
state = Object.assign({}, state);
state.media.canplay = payload.value;
return state;
case LOADEDMETADATA:
state = Object.assign({}, state);
state.media.loadedmetadata = payload.value;
state.media.duration = payload.data.time;
state.media.durationSec = payload.data.timeSec;
state.media.mediaType = payload.data.mediaType;
return state;
case PLAYING:
state = Object.assign({}, state);
state.media.playing = payload.value;
return state;
case TIMEUPDATE:
state = Object.assign({}, state);
state.media.time = payload.time;
state.media.timeSec = payload.timeSec;
return state;
case LOADSTART:
state.media.loadstart = payload.value;
return Object.assign({}, state);
case RESET:
state = Object.assign({}, state);
state.media = {};
return state;
default:
state = {};
state.media = {};
return state;
}
}
```
Within each `case` statement in the code above, you are generating a new `state` to your app. It's important to note that, as NgRx works with `immutable` objects, you need to create a new state object instead of updating the existing one. In this case, you are using `Object.assign` to create the new `state` object based on the current one.
Now, to register your reducer in your Ionic app, open the `app.module.ts` file and update it as follows:
```typescript
// ... other import statements ...
import { StoreModule } from '@ngrx/store';
import { mediaStateReducer } from '../providers/store/store';
@NgModule({
// ... declarations ...
imports: [
// ... other imported modules ...
StoreModule.forRoot({
appState: mediaStateReducer
}),
IonicModule.forRoot(MyApp)
],
// ... bootstrap, entryComponents, and providers ...
})
export class AppModule {}
```
Now, you will be able to access the current state using the `appState` key anywhere in your Ionic application.
## Authentication on Ionic Apps
To develop a secure app, you are going to rely on Auth0 to handle the authentication of your users. As such, you can sign up for a free Auth0 account here. Then, you will need to set up an Auth0 Application to represent your mobile app.
### Installing Dependencies
To secure your Ionic app with Auth0, you will have to install some Cordova plugins:
```bash
# replace {YOUR_PACKAGE_ID} with your app identifier and
# replace YOUR_AUTH0_DOMAIN with your Auth0 Domain
ionic cordova plugin add cordova-plugin-customurlscheme --variable URL_SCHEME={YOUR_PACKAGE_ID} --variable ANDROID_SCHEME={YOUR_PACKAGE_ID} --variable ANDROID_HOST={YOUR_AUTH0_DOMAIN} --variable ANDROID_PATHPREFIX=/cordova/{YOUR_PACKAGE_ID}/callback
ionic cordova plugin add cordova-plugin-safariviewcontroller
```
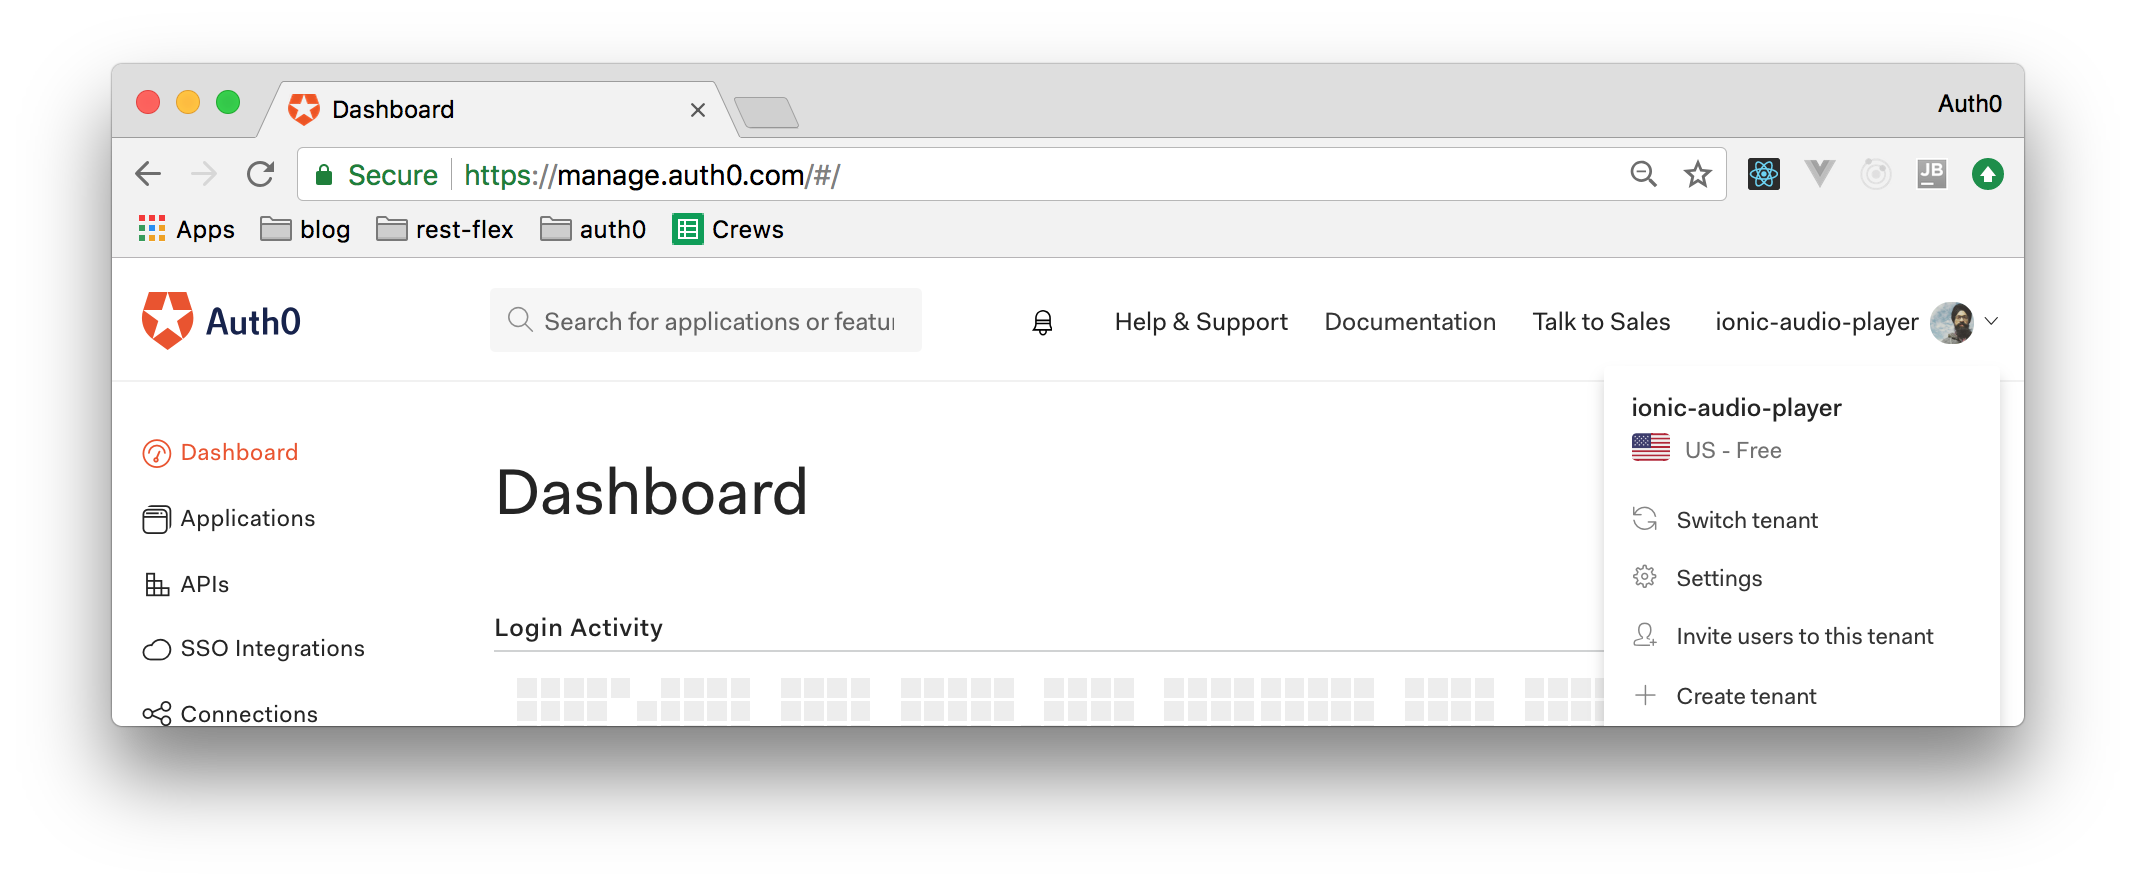
> **Note:** You will have to replace `{YOUR_PACKAGE_ID}` above with the package id of your Ionic app. You can find this information in the `config.xml` file. There, you will see something like ` **Note:** Besides that, you will also need to replace `{YOUR_AUTH0_DOMAIN}` with your Auth0 domain. When creating your Auth0 account, you chose a subdomain like `ionic-audio-player`, or `your-name`, etc. In that case, your Auth0 domain would be `ionic-audio-player.auth0.com`. You can also find your subdomain on the upper right corner of your Auth0 dashboard, as shown in this screenshot:
### Set Up an Auth0 Application
1. Go to your [**Auth0 Dashboard**](https://manage.auth0.com/#/) and click the "[create a new application](https://manage.auth0.com/#/applications/create)" button.
2. Name your new app (e.g. "Ionic Audio Player"), select "Native App" as its type, and click the "Create" button.
3. In the **Settings** tab of your new Auth0 app, add `file://*, http://localhost:8080` in the **Allowed Origins (CORS)** box.
4. Still in the **Settings** tab, add `YOUR_PACKAGE_ID://YOUR_AUTH_DOMAIN/cordova/YOUR_PACKAGE_ID/callback`, to the **Allowed Callback URLs**.
5. Add `http://localhost:8080` to the **Allowed Logout URLs**.
6. Click the "Save Changes" button.
> **Note:** If running your app with the live reload feature, you might need to add an URL different than `http://localhost:8080` to the **Allowed Origins (CORS)** box. When running your app, check the `allow-navigation` property of the `config.xml` file to find out the correct URL. For example: `http://192.168.0.14:8100`.
> **Note:** On step 4, you will need to replace `YOUR_PACKAGE_ID` and `YOUR_AUTH_DOMAIN` with your own data (the same as used while installing your project dependencies: e.g. `io.ionic.starter` and `ionic-audio-player.auth0.com`).
### Configuring Auth0 on Ionic
Now, you will need to create a file called `auth.config.ts` in a new directory: `./src/providers/auth0/`. Inside that file, you can add the following code:
```typescript
export const AUTH_CONFIG = {
clientID: 'YOUR_CLIENT_ID',// Needed for Auth0 (capitalization: ID)
clientId: 'YOUR_CLIENT_ID', // needed for Auth0Cordova (capitalization: Id)
domain: 'YOUR_AUTH_DOMAIN',
packageIdentifier: 'your.app.id' // found on config.xml widget ID (e.g., com.auth0.ionic)
};
```
This list explains what these values mean:
* `clientID` and `clientId`: They are the _Client Id_ property available in your Auth0 Application (the one created above).
* `domain`: It's your Auth0 Domain.
* `packageIdentifier`: It's the widget ID of your Ionic application. You have this in the `config.xml` file of your application, as described before.
Before continuing, make sure to replace `YOUR_CLIENT_ID`, `YOUR_AUTH_DOMAIN`, and `your.app.id` with your own data.
### Auth Service
After creating your Auth0 account and defining the `auth.config.ts` file, you will need to define an authentication service in your Ionic app. As such, create a new file called `auth.service.ts` in the same `./src/providers/auth0/` directory and add the following content to it:
```typescript
import {Injectable, NgZone} from '@angular/core';
import {Storage} from '@ionic/storage';
import {Subject} from 'rxjs';
// Import AUTH_CONFIG, Auth0Cordova, and auth0.js
import {AUTH_CONFIG} from './auth.config';
import Auth0Cordova from '@auth0/cordova';
import * as auth0 from 'auth0-js';
@Injectable()
export class AuthService {
Auth0 = new auth0.WebAuth(AUTH_CONFIG);
Client = new Auth0Cordova(AUTH_CONFIG);
accessToken: string;
user: any;
loggedIn: boolean;
loading = true;
isLoggedIn$ = new Subject();
constructor(public zone: NgZone, private storage: Storage) {
this.storage.get('profile').then(user => (this.user = user));
this.storage.get('access_token').then(token => (this.accessToken = token));
this.storage.get('expires_at').then(exp => {
this.loggedIn = Date.now() < JSON.parse(exp);
this.loading = false;
this.isLoggedIn$.next(this.loggedIn);
});
}
login() {
return new Promise((resolve, reject) => {
this.loading = true;
const options = {
scope: 'openid profile offline_access',
};
// Authorize login request with Auth0: open login page and get auth results
this.Client.authorize(options, (err, authResult) => {
if (err) {
this.loading = false;
reject(err);
} else {
// Set access token & id token
this.storage.set('id_token', authResult.idToken);
this.storage.set('access_token', authResult.accessToken)
.then(() => {
// Set logged in
this.loading = false;
this.loggedIn = true;
this.isLoggedIn$.next(this.loggedIn);
resolve();
});
this.accessToken = authResult.accessToken;
// Set access token expiration
const expiresAt = JSON.stringify(
authResult.expiresIn * 1000 + new Date().getTime()
);
this.storage.set('expires_at', expiresAt);
// Fetch user's profile info
this.Auth0.client.userInfo(this.accessToken, (err, profile) => {
if (err) {
throw err;
}
this.storage
.set('profile', profile)
.then(val => this.zone.run(() => (this.user = profile)));
});
}
});
});
}
logout() {
this.storage.remove('profile');
this.storage.remove('access_token');
this.storage.remove('expires_at');
this.storage.remove('id_token');
this.accessToken = null;
this.user = {};
this.loggedIn = false;
this.isLoggedIn$.next(this.loggedIn);
}
}
```
To better understand how the code above works, take a look into the following explanation:
* `accessToken`: This is the JWT Token that your users will get from Auth0. These tokens are used to identify the user.
* `user`: This property holds the user data like `email`, `firstname`, `lastname`, and so on.
* `loggedIn`: This boolean holds the authentication state of the user.
* `isLoggedIn$`: This is a RxJS Subject. Think of this as the reactive version of the `loggedIn` property. You will use it in your Angular Component to get user's authentication state.
Now, take a look at the methods of the service above:
* `constructor()`: In the constructor, you check if the user is previously authenticated or not. Based on it, you set the value of the `this.user`, `this.accessToken`, and `this.loggedIn` properties.
* `login()`: In login method, you authorize the user and, if the user is successfully authenticated, you fetch their profile information. You save this information in the permanent storage via `@ionic/store` and also set the appropriate properties of the service to reflect the authentication state.
* `logout()`: In logout method, you remove all the user information from permanent storage and set the properties of service to reflect the logout state.
### Auth Callback
To handle the redirection from Auth0 after authentication, you will have to update the `app.component.ts` file, as shown here:
```typescript
import { Component } from '@angular/core';
import { Platform } from 'ionic-angular';
import { StatusBar } from '@ionic-native/status-bar';
import { SplashScreen } from '@ionic-native/splash-screen';
import Auth0Cordova from '@auth0/cordova';
import { HomePage } from '../pages/home/home';
@Component({
templateUrl: 'app.html'
})
export class MyApp {
rootPage:any = HomePage;
constructor(platform: Platform, statusBar: StatusBar, splashScreen: SplashScreen) {
platform.ready().then(() => {
statusBar.styleDefault();
splashScreen.hide();
// Redirect back to app after authenticating
(window as any).handleOpenURL = (url: string) => {
Auth0Cordova.onRedirectUri(url);
};
});
}
}
```
## Developing the Audio Player UI on Ionic
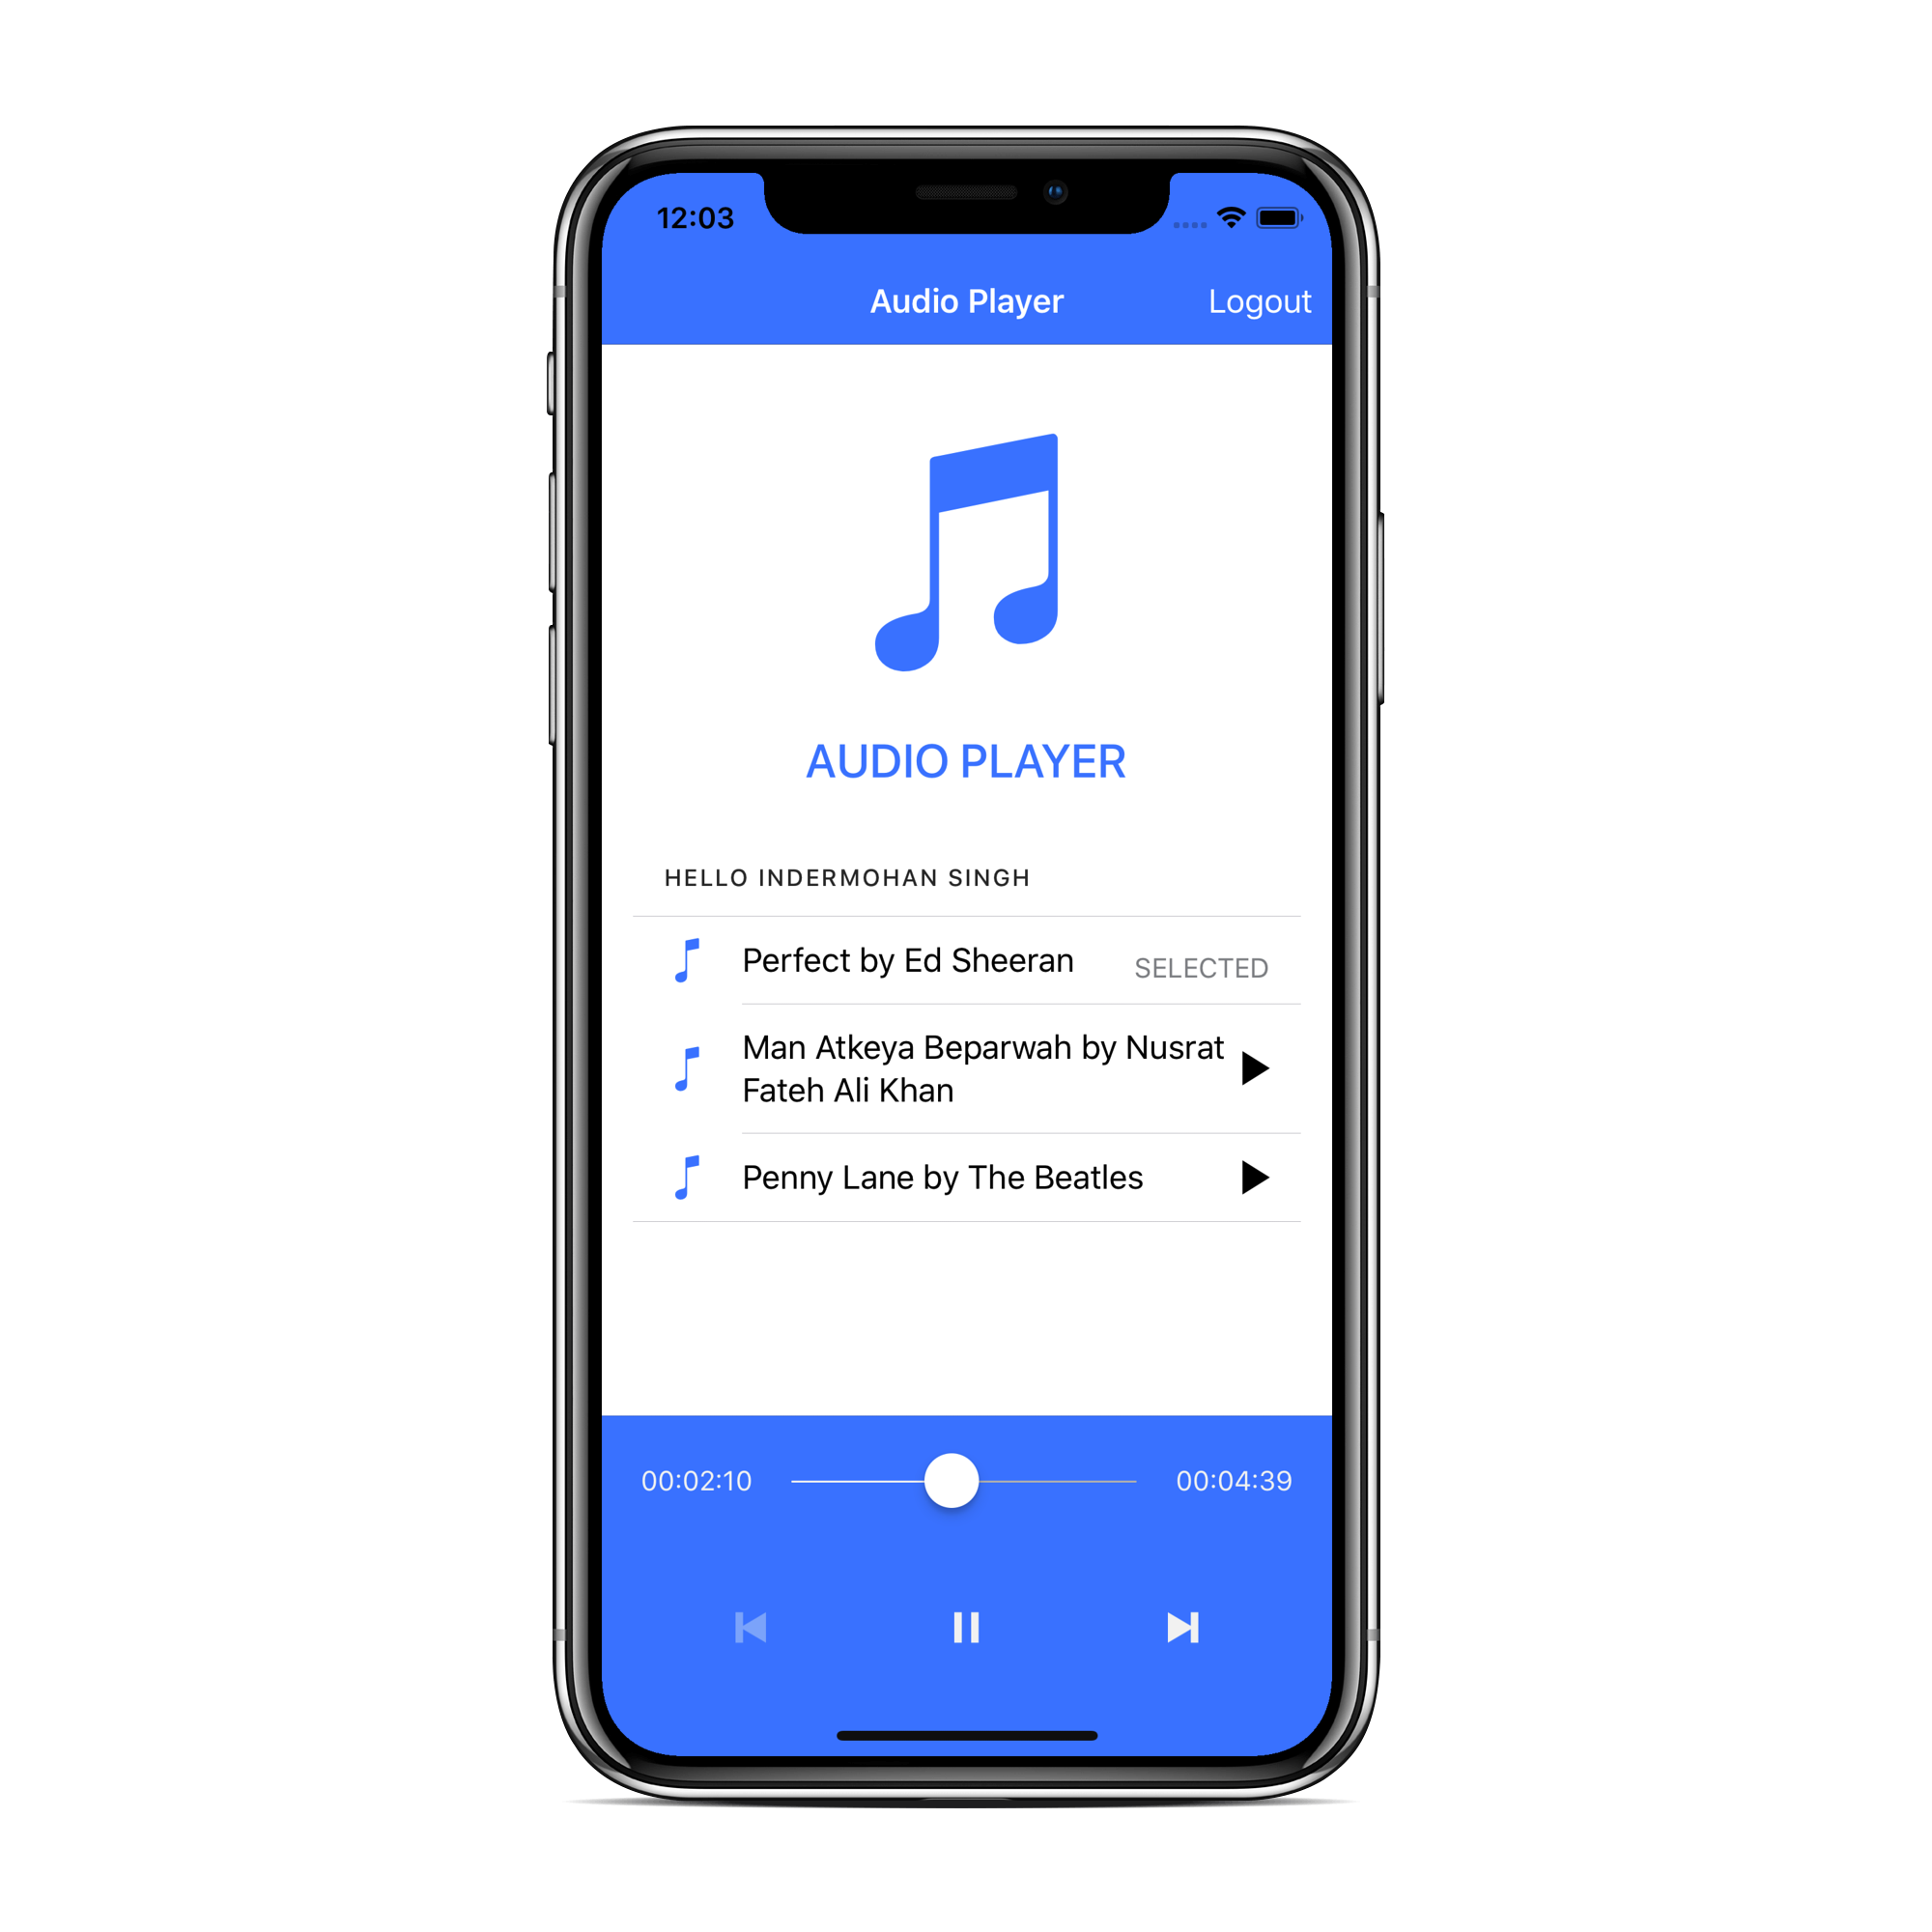
So far, you have written code that is not related to the front-end and user interface (UI) of your application. In this section, you will design the UI and its behavior. In the end, your application will look like this:
### The Audio Player HTML
Inside the `./src/pages/home/` directory, you will find the `home.html` file. In this file, you will add some HTML to define your player. As you will see, on the top, you will have a navigation bar which contains the name of the application and a log out button. This button will be shown if the user is logged in.
Besides the header, you will have the `ion-content` with a login button, your app's logo, and the list of media files:
``` html
Audio Player
Loading...
Audio Player
Hello {{auth.user?.name}}{{ file.name }}
SELECTED
```
In the footer of your Ionic application, you will have two `ion-toolbar`.
In the first `ion-toolbar`, you will have a `seekbar` created with `ion-range`. This item allows users to change the current time of the audio file being played. Here it is HTML for that:
``` html
{{ state.time }}{{ state.duration }}
```
In the second `ion-toolbar`, you will have the rest of the playback controls, as follows:
``` html
```
[You can find the final version of this file here](https://github.com/auth0-blog/ionic-audio-player/blob/master/src/pages/home/home.html).
### Styling the Audio Player
Just to improve the look and feel of your app, you will do some minor styling in the `home.scss` file (you can find it under `./src/pages/home/`), as shown below:
```scss
page-home {
#app-section {
#app-title {
color: color($colors, 'primary');
text-transform: uppercase;
}
ion-icon {
font-size: 15rem;
}
}
#media-controls {
button {
ion-icon {
font-size: 2.5rem;
}
}
}
}
```
### The Audio Player UI Controller
To help you control your audio player user interface, you will implement a controller responsible for the following things:
1. When the app is opened, it will check if the user is authenticated or not.
2. If the user is not authenticated, it will show the authentication UI.
3. After the authentication process, it will fetch the media file from your mock service and show in the audio player.
4. Then, it will enable your users to perform media actions like play, pause, or switch media file. It will also enable users to log in and log out.
5. If the user logs out, it will clear the authentication state from the storage and show the login UI.
As you are using the default `HomePage` to implement your audio player, you will implement most of the logic inside the `HomePage` class. So, throughout the following sections, you will implement the following methods:
- `constructor`: this method will create an instance of `HomePage` and subscribe to the `isLoggedIn` subject;
- `login`: this method will enable users to log in;
- `getDocuments`: this method will load the music files;
- `presentLoading`: this method will present a nice loading screen;
- `ionViewWillLoad`: this method will add listeners to media events to update the screen;
- `openFile`: this method will fetch the music URL and pass it to `playStream`.
- `resetState`: this method will reset the state of the current music;
- `playStream`: this method will subscribe to `audioProvider.playStream` so it can dispatch actions to the reducer;
- `pause`: this method will allow users to pause the playback;
- `play`: this method will allow users to start the playback again;
- `stop`: this method will allow users to stop the playback;
- `next`: this method will allow users to move to the next music;
- `previous`: this method will allow users to the previous music;
- `isFirstPlaying`: this method will be used to block the previous button;
- `isLastPlaying`: this method will be used to block the next button;
- `onSeekStart` and `onSeekEnd`: these methods will be used while using the seek feature;
- `logout`: this method will allow users to log out;
- `reset`: this method will reset the state of the Ionic app;
However, before focusing on the implementation of these methods, you can add some cool animations to enhance the UX of your app. These animations will appear when the audio player switch between the `inactive` and `active` states. This basically means that, when a user starts playing the audio file, your app will show music controls to the user.
To do this, open the `./src/pages/home/home.ts` file and replace its code with this:
```typescript
import {Component, ViewChild} from '@angular/core';
import {trigger, state, style, animate, transition } from '@angular/animations';
import {NavController, NavParams, Navbar, Content, LoadingController} from 'ionic-angular';
import {AudioProvider} from '../../providers/audio/audio';
import {FormControl} from '@angular/forms';
import {CANPLAY, LOADEDMETADATA, PLAYING, TIMEUPDATE, LOADSTART, RESET} from '../../providers/store/store';
import {Store} from '@ngrx/store';
import {CloudProvider} from '../../providers/cloud/cloud';
import {AuthService} from '../../providers/auth0/auth.service';
import {pluck, filter, map, distinctUntilChanged} from 'rxjs/operators';
@Component({
selector: 'page-home',
templateUrl: 'home.html',
animations: [
trigger('showHide', [
state(
'active',
style({
opacity: 1
})
),
state(
'inactive',
style({
opacity: 0
})
),
transition('inactive => active', animate('250ms ease-in')),
transition('active => inactive', animate('250ms ease-out'))
])
]
})
export class HomePage { }
```
> Don't mind all these unused imports, you will need them really soon.
### The `constructor`
Now, you will do three things:
1. You will define the properties that will help you control the audio player.
2. You will inject all components that your audio player will use to read music, manage authentication, etc.
3. And you will `subscribe` to the `isLoggedIn$` subject.
Therefore, update the definition of the `HomePage` class as follows:
```typescript
// ... imports statements ...
@Component({
// ... selector, templateUrl, etc ...
})
export class HomePage {
files: any = [];
seekbar: FormControl = new FormControl("seekbar");
state: any = {};
onSeekState: boolean;
currentFile: any = {};
displayFooter: string = "inactive";
loggedIn: Boolean;
@ViewChild(Navbar) navBar: Navbar;
@ViewChild(Content) content: Content;
constructor(
public navCtrl: NavController,
public navParams: NavParams,
public audioProvider: AudioProvider,
public loadingCtrl: LoadingController,
public cloudProvider: CloudProvider,
private store: Store,
public auth: AuthService
) {
this.auth.isLoggedIn$.subscribe((isLoggedIn: any) => {
this.loggedIn = isLoggedIn;
if (isLoggedIn) {
this.getDocuments();
}
});
}
}
```
> Don't worry about the `getDocuments` method. You will implement it in no time.
### The `login` Method
Then, to enable users to log in, you will add the following method to `HomePage`:
```typescript
// ... import statements and @Component declaration ...
export class HomePage {
// ... constructor ...
login() {
this.auth.login()
.then(() => { console.log('Successful Login'); })
.catch(error => { console.log(error); });
}
}
```
### The `getDocuments` Method
Now, you will implement the `getDocuments` method with a nice loader on the screen (by using the `presentLoading` method) and fetch files via the `cloudProvider`'s `getFiles` method, as shown below:
```typescript
// ... import statements and @Component declaration ...
export class HomePage {
// ...constructor and other methods ...
getDocuments() {
let loader = this.presentLoading();
this.cloudProvider.getFiles().subscribe(files => {
this.files = files;
loader.dismiss();
});
}
presentLoading() {
let loading = this.loadingCtrl.create({
content: 'Loading Content. Please Wait...'
});
loading.present();
return loading;
}
}
```
### The `ionViewWillLoad` Method
As you may know, in Ionic, just like in Angular, you have lifecycle hooks. One of these lifecycle hooks is the `ionViewWillLoad` one. You will use this hook to add listeners to media state changes. So, when changes are detected, you can update your screen.
The listening process will be achieved by using NgRx store inside this lifecycle hook method:
```typescript
// ... import statements and @Component declaration ...
export class HomePage {
// ...constructor and other methods ...
ionViewWillLoad() {
this.store.select('appState').subscribe((value: any) => {
this.state = value.media;
});
// Resize the Content Screen so that Ionic is aware of the footer
this.store
.select('appState')
.pipe(pluck('media', 'canplay'), filter(value => value === true))
.subscribe(() => {
this.displayFooter = 'active';
this.content.resize();
});
// Updating the Seekbar based on currentTime
this.store
.select('appState')
.pipe(
pluck('media', 'timeSec'),
filter(value => value !== undefined),
map((value: any) => Number.parseInt(value)),
distinctUntilChanged()
)
.subscribe((value: any) => {
this.seekbar.setValue(value);
});
}
}
```
### The `openFile` Method
Whenever the user clicks on a media file, the `openFile` method will be fired. Then, this method will fire the `playStream` method with the `url` of the `file` chosen.
In this article, this data will come from the mock service that you implemented before. On a subsequent article, you will refactor this class to fetch information from a backend API.
```typescript
// ... import statements and @Component declaration ...
export class HomePage {
// ...constructor and other methods ...
openFile(file, index) {
this.currentFile = { index, file };
this.playStream(file.url);
}
}
```
### The `resetState` Method
The `playStream` method that you will implement, first need to reset the current media state via the `resetState` method. So, you can implement it as follows:
```typescript
// ... import statements and @Component declaration ...
export class HomePage {
// ...constructor and other methods ...
resetState() {
this.audioProvider.stop();
this.store.dispatch({ type: RESET });
}
}
```
To do this, the `resetState` method stops the currently running media file and dispatch the `RESET` action to reset the media state.
### The `playStream` Method
Then, the `playstream` method can fire the `playStream` method of your `AudioProvider`. This method on the provider returns an observable that you will use to subscribe and start listening to media events like `canplay`, `playing`, etc.
Based on each particular event, you will dispatch a store action with the appropriate payload. Basically, these actions will store media information like current time and duration of the media.
```typescript
// ... import statements and @Component declaration ...
export class HomePage {
// ...constructor and other methods ...
playStream(url) {
this.resetState();
this.audioProvider.playStream(url).subscribe(event => {
const audioObj = event.target;
switch (event.type) {
case 'canplay':
return this.store.dispatch({ type: CANPLAY, payload: { value: true } });
case 'loadedmetadata':
return this.store.dispatch({
type: LOADEDMETADATA,
payload: {
value: true,
data: {
time: this.audioProvider.formatTime(
audioObj.duration * 1000,
'HH:mm:ss'
),
timeSec: audioObj.duration,
mediaType: 'mp3'
}
}
});
case 'playing':
return this.store.dispatch({ type: PLAYING, payload: { value: true } });
case 'pause':
return this.store.dispatch({ type: PLAYING, payload: { value: false } });
case 'timeupdate':
return this.store.dispatch({
type: TIMEUPDATE,
payload: {
timeSec: audioObj.currentTime,
time: this.audioProvider.formatTime(
audioObj.currentTime * 1000,
'HH:mm:ss'
)
}
});
case 'loadstart':
return this.store.dispatch({ type: LOADSTART, payload: { value: true } });
}
});
}
}
```
### The `pause` Method
Once `playStream` method is fired, the media playback is initiated. As such, your users might want to pause the playback. For that, you will implement the `pause` method as follows:
```typescript
// ... import statements and @Component declaration ...
export class HomePage {
// ...constructor and other methods ...
pause() {
this.audioProvider.pause();
}
}
```
### The `play` Method
It's also true that users might want to start playing the media again. For that, you will add the following:
```typescript
// ... import statements and @Component declaration ...
export class HomePage {
// ...constructor and other methods ...
play() {
this.audioProvider.play();
}
}
```
### The `stop` Method
Then, to stop the media, you will add the following method:
```typescript
// ... import statements and @Component declaration ...
export class HomePage {
// ...constructor and other methods ...
stop() {
this.audioProvider.stop();
}
}
```
### The `next` Method
Also, to let your users move to the next music, you will define the following method:
```typescript
// ... import statements and @Component declaration ...
export class HomePage {
// ...constructor and other methods ...
next() {
let index = this.currentFile.index + 1;
let file = this.files[index];
this.openFile(file, index);
}
}
```
### The `previous` Method
Similarly, you will need to provide a method to play the previous track:
```typescript
// ... import statements and @Component declaration ...
export class HomePage {
// ...constructor and other methods ...
previous() {
let index = this.currentFile.index - 1;
let file = this.files[index];
this.openFile(file, index);
}
}
```
### The `isFirstPlaying` and `isLastPlaying` Methods
Then, you will need two helper methods to check if the music being played is the first or the last track from the playlist. You use these methods to disable and enable the UI buttons:
```typescript
// ... import statements and @Component declaration ...
export class HomePage {
// ...constructor and other methods ...
isFirstPlaying() {
return this.currentFile.index === 0;
}
isLastPlaying() {
return this.currentFile.index === this.files.length - 1;
}
}
```
### The `onSeekStart` and `onSeekEnd` Methods
Also, you will want to enable your users to do seek operations. So, when the user initiates the seek operation, it will fire the `onSeekStart` method. In it, it will check if the file is currently being played or not and save that information. Then, it will pause the audio file.
When the seek operation ends, it will fire the `onSeekEnd` method and, in it, you can fetch the time selected by the user. If a file was being played before seeking, you resume the playback:
```typescript
// ... import statements and @Component declaration ...
export class HomePage {
// ...constructor and other methods ...
onSeekStart() {
this.onSeekState = this.state.playing;
if (this.onSeekState) {
this.pause();
}
}
onSeekEnd(event) {
if (this.onSeekState) {
this.audioProvider.seekTo(event.value);
this.play();
} else {
this.audioProvider.seekTo(event.value);
}
}
}
```
### The `logout` and `reset` Methods
Finally, you will also allow users to log out via the `logout` method. Along with that, you will have a `reset` method to reset whole application:
```typescript
// ... import statements and @Component declaration ...
export class HomePage {
// ...constructor and other methods ...
logout() {
this.reset();
this.auth.logout();
}
reset() {
this.resetState();
this.currentFile = {};
this.displayFooter = "inactive";
}
}
```
### Updating the `AppModule` Class
The final steps, before being able to use your app for the first time, starts with importing all the required libraries inside the `app.module.ts` file:
```typescript
import { BrowserModule } from '@angular/platform-browser';
import { BrowserAnimationsModule } from '@angular/platform-browser/animations';
import { ErrorHandler, NgModule } from '@angular/core';
import { HttpClientModule } from '@angular/common/http';
import { StoreModule } from '@ngrx/store';
import { IonicApp, IonicErrorHandler, IonicModule } from 'ionic-angular';
import { SplashScreen } from '@ionic-native/splash-screen';
import { StatusBar } from '@ionic-native/status-bar';
import { mediaStateReducer } from '../providers/store/store';
import { AudioProvider } from '../providers/audio/audio';
import { CloudProvider } from '../providers/cloud/cloud';
import { MyApp } from './app.component';
import { HomePage } from '../pages/home/home';
import { AuthService } from '../providers/auth0/auth.service';
import { IonicStorageModule } from '@ionic/storage';
```
Then, ends with you having to define all the required `declarations`, `imports`, `providers` in the `NgModule`, as shown here:
```typescript
// ... import statements and jwtOptionsFactory function ...
@NgModule({
declarations: [MyApp, HomePage],
imports: [
BrowserModule,
BrowserAnimationsModule,
HttpClientModule,
IonicStorageModule.forRoot(),
StoreModule.forRoot({
appState: mediaStateReducer
}),
IonicModule.forRoot(MyApp)
],
bootstrap: [IonicApp],
entryComponents: [MyApp, HomePage],
providers: [
StatusBar,
SplashScreen,
AudioProvider,
CloudProvider,
AuthService,
{ provide: ErrorHandler, useClass: IonicErrorHandler }
]
})
export class AppModule {}
```
## Building and Running the Ionic Audio Player
After implementing your whole app, you can directly run it via following `ionic` commands:
```bash
# for the iOS app
ionic cordova run ios
# for the android app
ionic cordova run android
```
## Conclusion and Next Steps
In this article, you created a mobile audio player app with Ionic. You used RxJS to develop audio playback features. Along with that, you used NgRx to manage the state of the application. Besides that, you also used Auth0 to handle user authentication in your mobile app. With this, you have finished developing the first version of the application with static audio content.
In an upcoming, follow-up article, you will create a backend using Node.js and Google Cloud to serve dynamic audio content to your audio player. To avoid spending too much time around configuring servers to host your backend, you will take advantage of [Webtask](https://webtask.io), a serverless solution for Node.js apps.
I hope you enjoyed this article. Stay tuned for the next part!