---
title: "Building GraphQL APIs with Kotlin, Spring Boot, and MongoDB"
description: "Learn how to build modern APIs with Kotlin, the flexible programming language that can run on JVMs."
authors:
- name: "Idorenyin Obong"
url: "https://auth0.com/blog/authors/idorenyin-obong/"
date: "Mar 27, 2019"
category: "Developers,Tutorial,Kotlin"
tags: ["kotlin", "graphql", "java", "jvm", "api", "web", "restful"]
url: "https://auth0.com/blog/building-graphql-apis-with-kotlin-spring-boot-and-mongodb/"
---
# Building GraphQL APIs with Kotlin, Spring Boot, and MongoDB
**TL;DR:** In this article, you will learn how to build GraphQL APIs with Kotlin, Spring Boot, and MongoDB. Also, as you wouldn't want to publish insecure APIs, you will learn how to integrate Auth0 in your stack. You can find the final code developed throughout the article in [this GitHub repository](https://github.com/auth0-blog/kotlin-graphql).
## Prerequisites
Before proceeding, there are some tools you need to ensure you have on your machine to be able to follow the article seamlessly. They include:
- JDK: This is the Java Platform, Standard Edition Development Kit. Normally, this environment is used for developing Java applications but, since Kotlin runs on the JVM (just like Java), you need it. You can download JDK [from here](https://www.oracle.com/technetwork/java/javase/downloads/jdk11-downloads-5066655.html).
- IntelliJ IDEA: This is an IDE (Integrated Development Environment) built by [JetBrains](https://www.jetbrains.com) and used for developing Java and Kotlin applications. They have both the paid version and the free (community) version. You can download the IDE [right here](https://www.jetbrains.com/idea/download).
- MongoDB: A document-oriented database that stores data in a [Binary JSON (BSON)](http://bsonspec.org/) format. One of the advantages of this database is that you don't need a predefined schema (as such, you have maximum flexibility when it comes to change this schema over time). If you don’t have it, you can follow [this manual](https://docs.mongodb.com/manual/installation/) to install MongoDB.
> **Note:** If you use Eclipse or NetBeans, _apparently_, you are covered. JetBrains (the creator of Kotlin and of IntelliJ IDEA) maintains plugins for both these IDEs ([here](https://github.com/JetBrains/kotlin-eclipse) and [here](https://github.com/JetBrains/kotlin-netbeans)). However, we haven't tested these plugins and can't guarantee they will work as expected.
## What You Will Build
In this article, you will build a GraphQL API that performs some basic CRUD (Create, Retrieve, Update, and Delete) operations. The API will focus on _snacks_ and _reviews_. Users (or client applications) will be able to use your API to list snacks and their reviews. However, beyond querying the API, they will also be able to update these snacks by issuing GraphQL _mutations_ to create, update, and delete records in your database.
## Scaffolding Your Kotlin and Spring Boot Project
Spring Boot has an initializer tool that helps you bootstrap (or scaffold) your applications faster. So, open [the initializer](https://start.spring.io/) and fill in the options to put your project together:
- _Project_: Gradle Project
- _Language_: Kotlin
- _Spring Boot_: `2.1.3`
- _Group_: `com.auth0`
- _Artifact_: `kotlin-graphql`
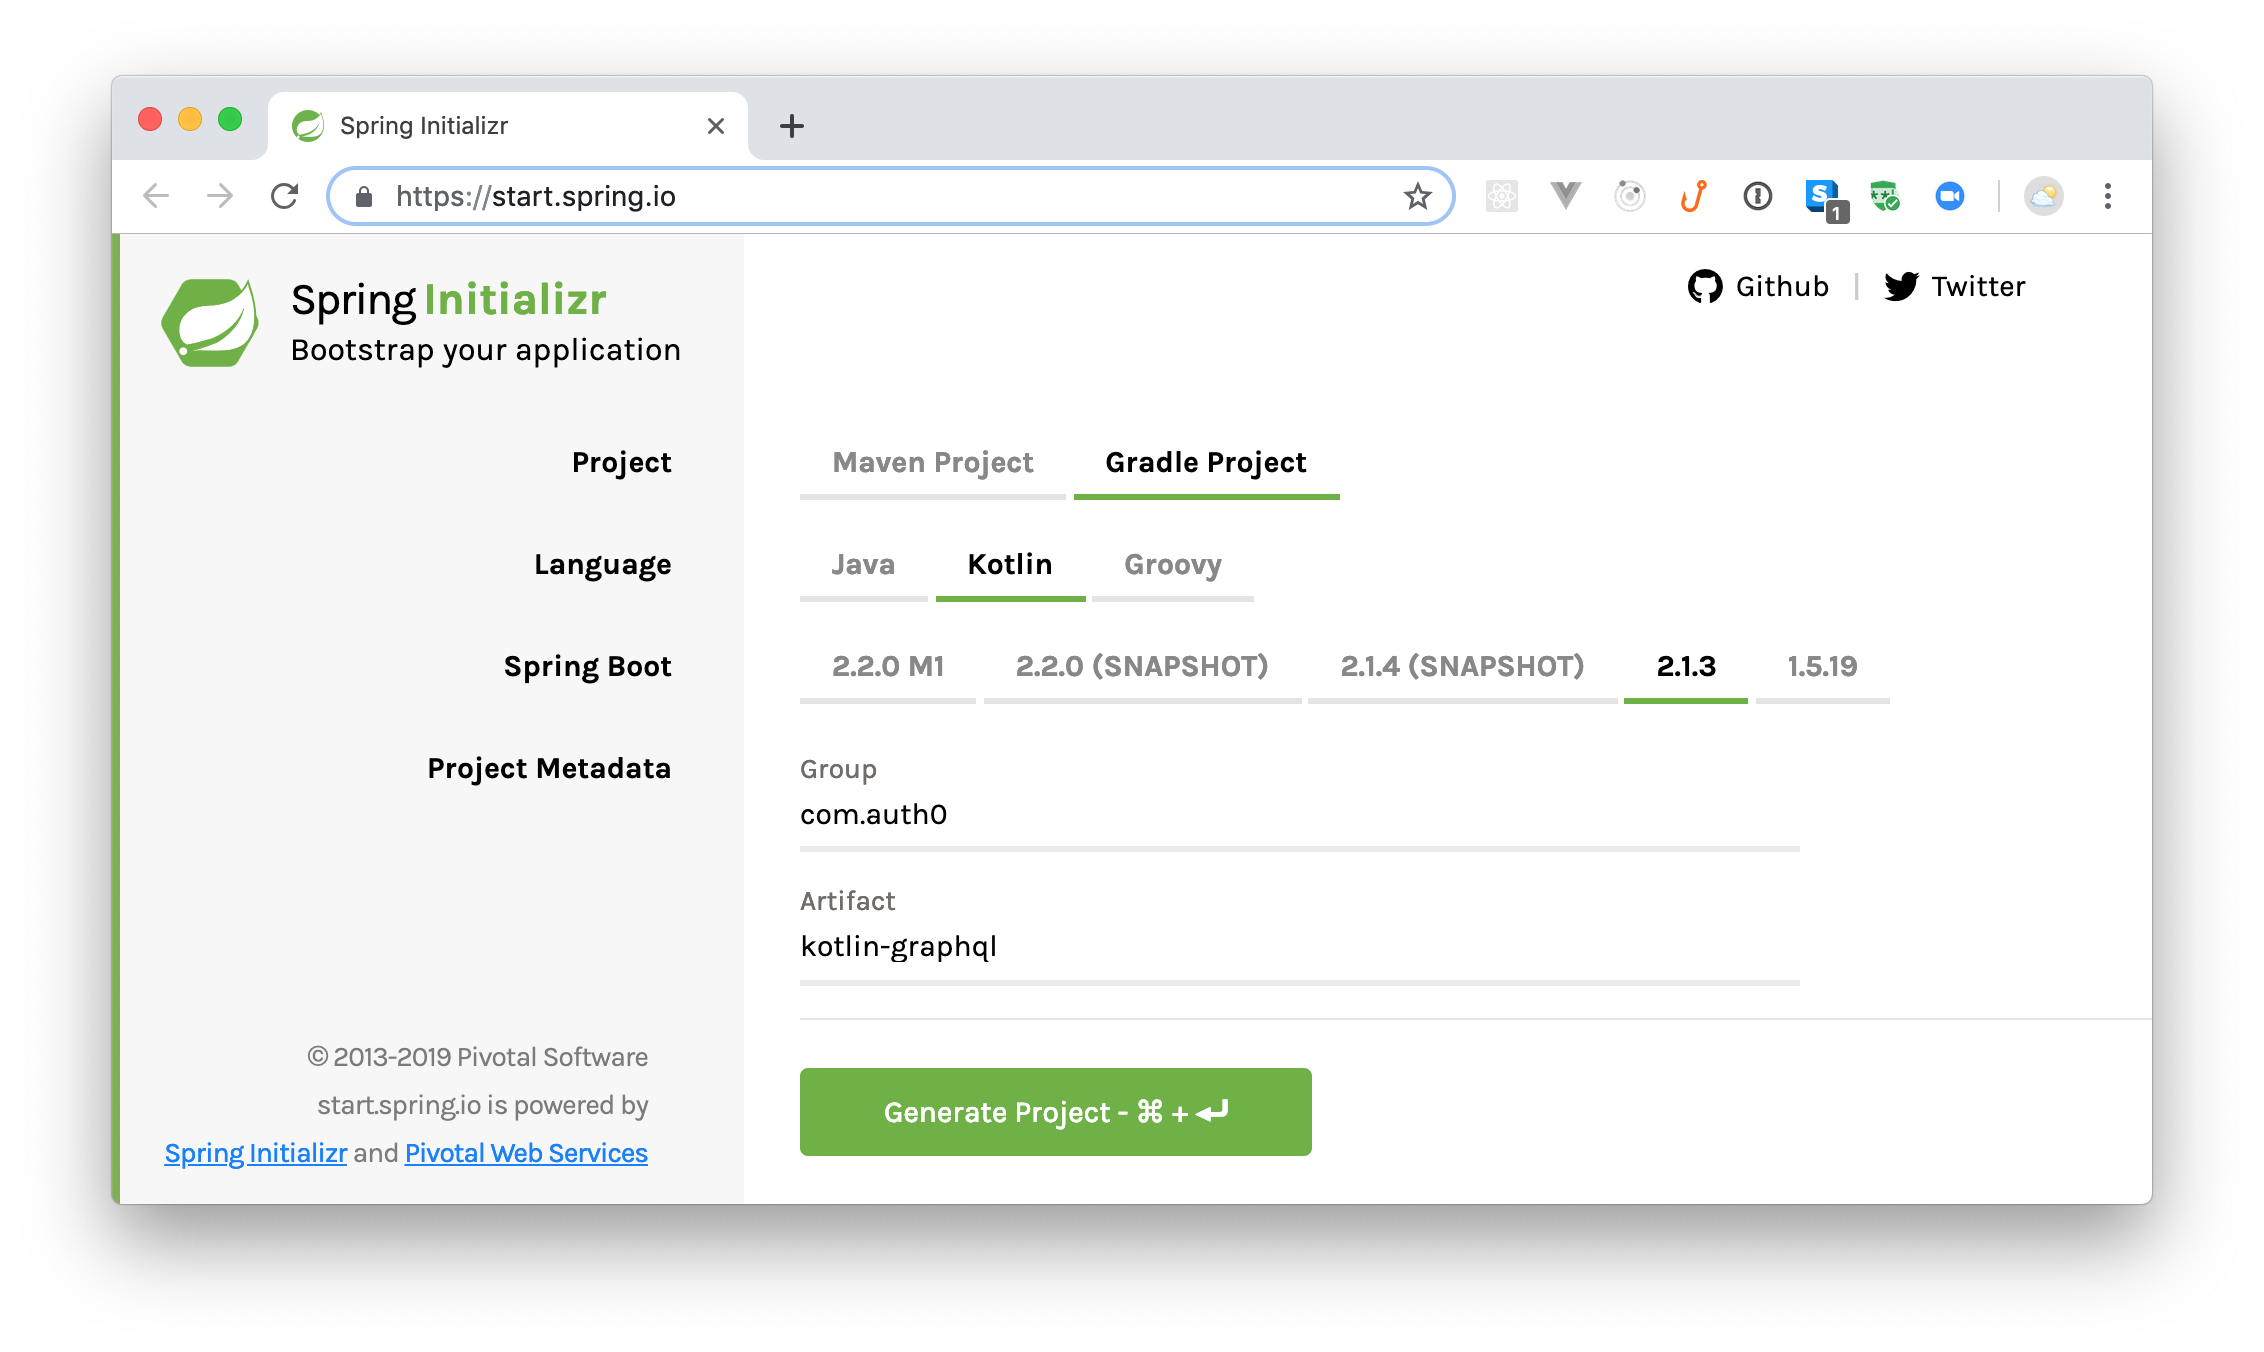
Here, you are generating a Gradle project with Kotlin and Spring Boot `2.1.3`. The group name for the app (or the main package, if you prefer) is `com.auth0` while the artifact name is `kotlin-graphql`. After filling in these options, use the "search dependencies to add" field to include `Web` and `MongoDB`.
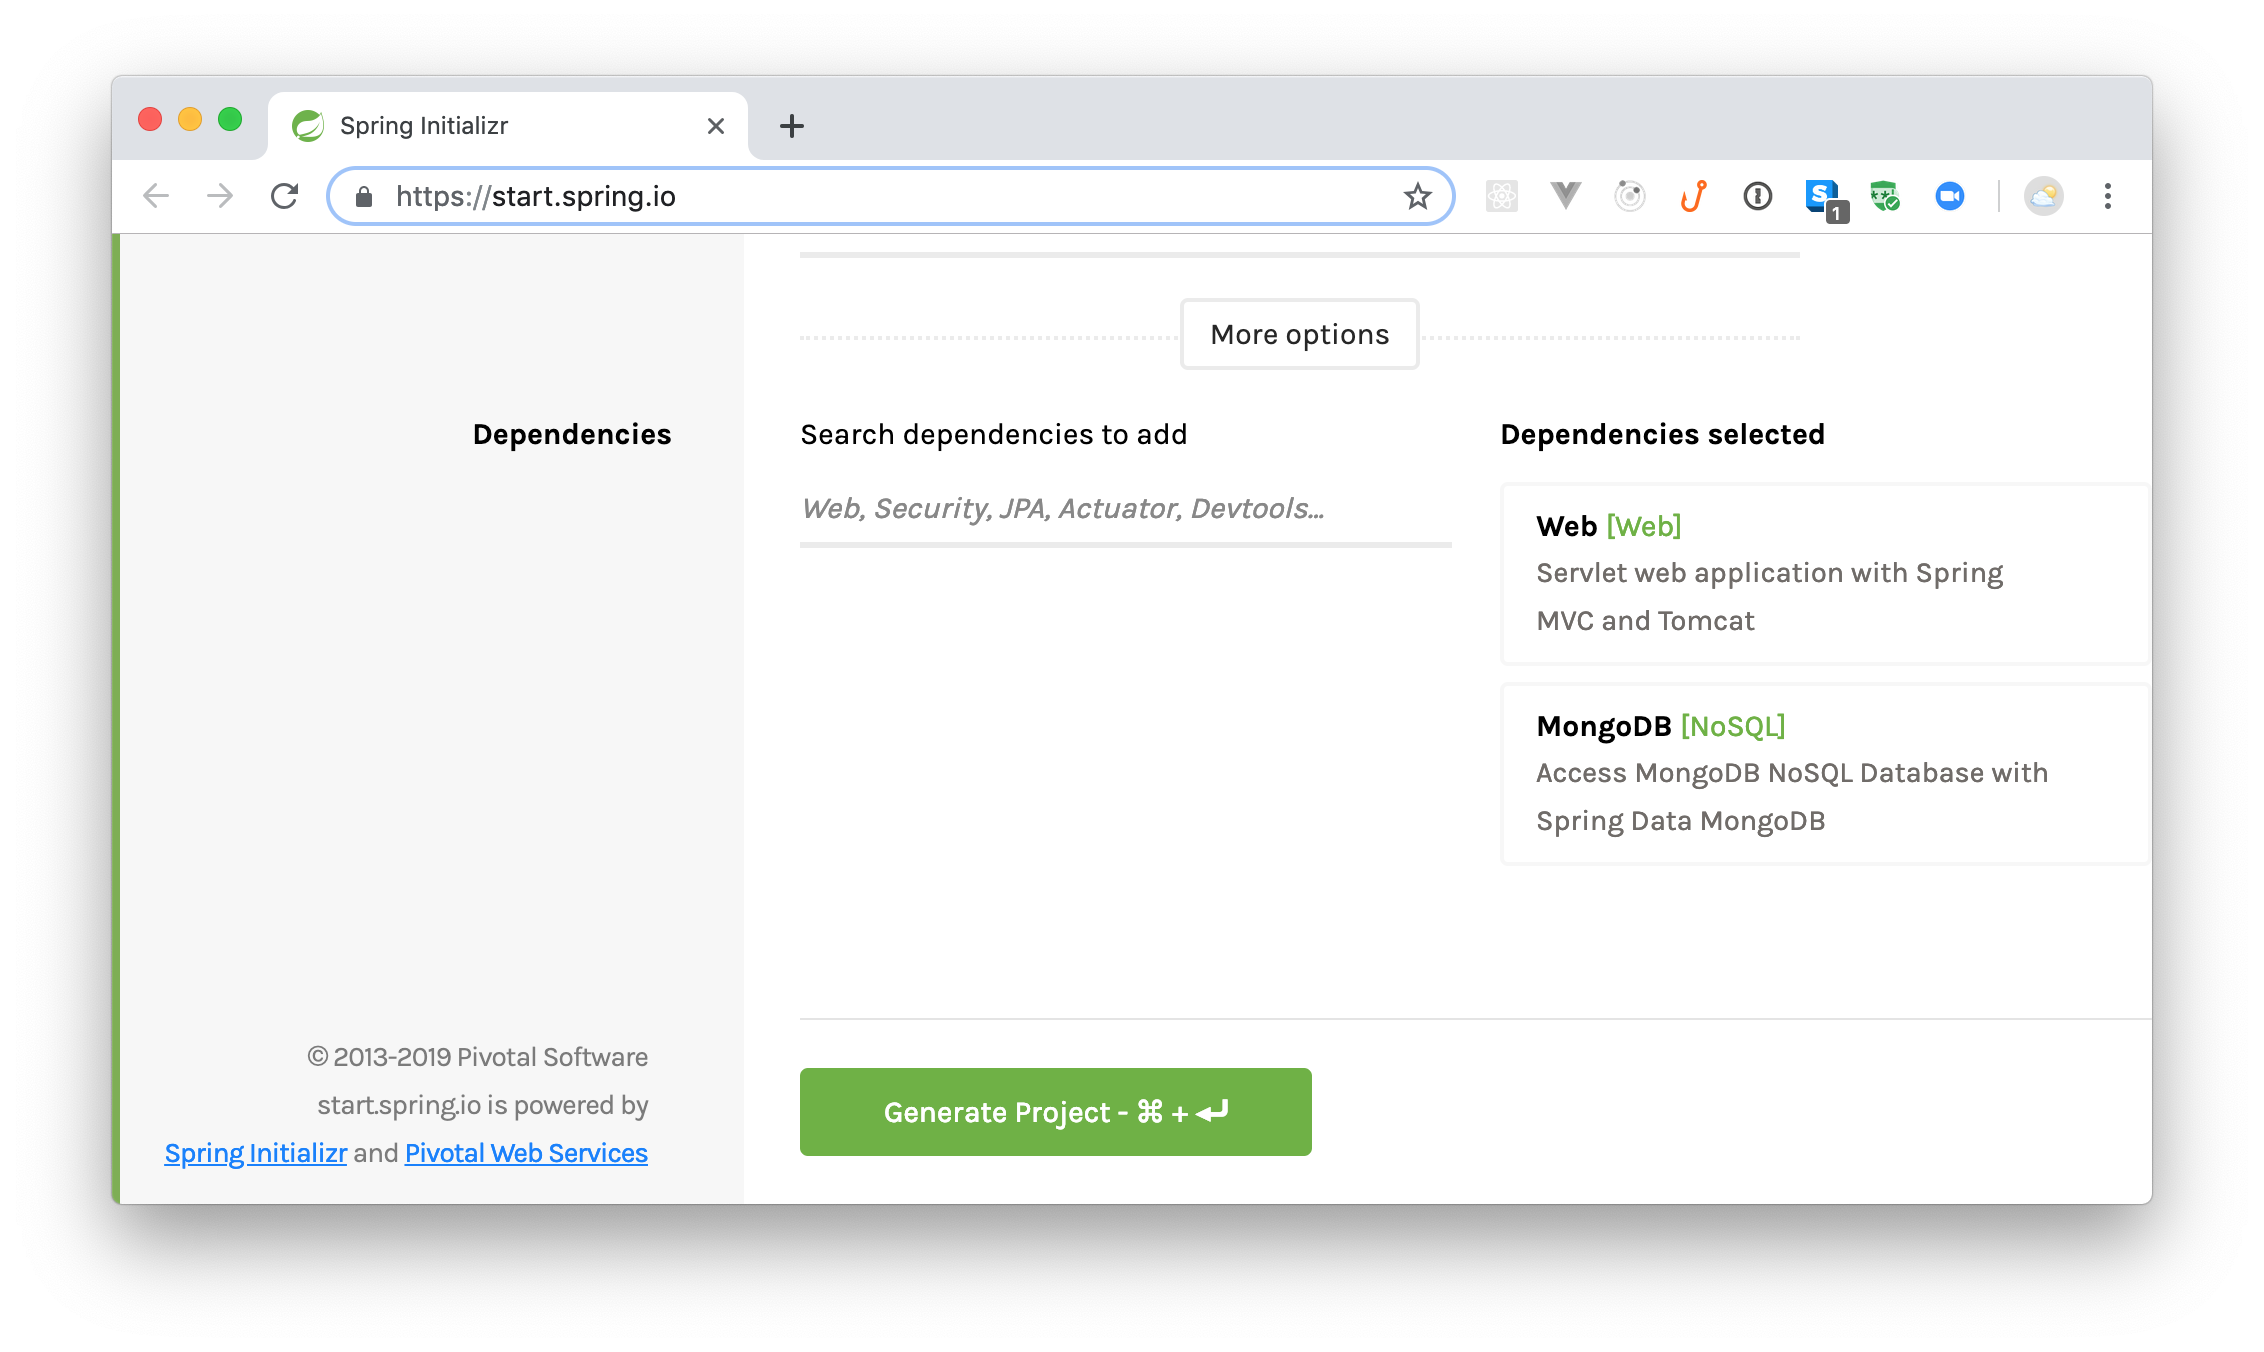
The `Web` dependency is a starter dependency for building web applications while `MongoDB` is a dependency to aid your database operations.
After adding these dependencies, click on the *Generate Project* button. This will download a zipped file that contains your project. Extract the project from this file, and use IntelliJ (or your preferred IDE) to open it.
> **Note:** If you are using an old IntelliJ version (prior to 15), you may need to install the Kotlin plugin on it. [Follow the instructions here](https://kotlinlang.org/docs/tutorials/getting-started.html#setting-up-the-environment), if this is the case.
Next, you will have to include some dependencies to help you add a GraphQL API in your Spring Boot and Kotlin application. To add these dependencies, open your `build.gradle` file and update it as follows:
```gradle
// ./build.gradle
// ...
dependencies {
// ...
implementation 'com.graphql-java:graphql-spring-boot-starter:5.0.2'
implementation 'com.graphql-java:graphiql-spring-boot-starter:5.0.2'
implementation 'com.graphql-java:graphql-java-tools:5.2.4'
}
// ...
```
> **Note:** After adding these dependencies, your IDE will probably ask you to import them. Make sure you do this.
After that, open the `application.properties` file located in the `./src/main/resources/` directory and add the following properties:
```properties
server.port=9000
spring.data.mongodb.database=kotlin-graphql
spring.data.mongodb.port=27017
```
Here, you are defining which port your API will use to listen to requests (`9000` in this case), and you are defining some MongoDB connection properties (you might need to add some more, [depending on your MongoDB installation](https://springframework.guru/configuring-spring-boot-for-mongo/)). With that in place, you are ready to start developing your application.
## Creating Entities to Persist on MongoDB
An entity is a term often associated with a model class that is persisted on databases. Since you are dealing with APIs to perform CRUD operations, you will need to persist data that will be consumed later. In this section, you will define entities that you’ll use in the course of building your API.
First, create a new package called `entity` inside the `com.auth0.kotlingraphql` one. You will keep all the entities you need here in this package. Next, create a new class called `Snack` inside this package and add the following code to it:
```kotlin
// ./src/main/kotlin/com/auth0/kotlingraphql/entity/Snack.kt
package com.auth0.kotlingraphql.entity;
import org.springframework.data.annotation.Id
import org.springframework.data.mongodb.core.mapping.Document
@Document(collection = "snack")
data class Snack(
var name: String,
var amount: Float
) {
@Id
var id: String = ""
@Transient
var reviews: List = ArrayList()
}
```
> In Kotlin, `data` classes derive getters, setters, and other utility functions for you by default!
This class is a model of a single `Snack` that you will store in your database. Each snack has a `name`, an `amount`, an `id` (a unique identifier), and `reviews`. The `reviews` variable will hold all the reviews associated with a particular snack.
You will use this model when storing snacks to the database, hence the use of the `@Document` annotation. The name of the collection is specified using the `collection` variable in the annotation. If you do not specify this property, Spring Boot will automatically use the class name.
The `id` variable is annotated with `@Id` to tell MongoDB that this variable will hold the unique identifier for the entity. The `@Transient` annotation, on `reviews`, means this variable will not be persisted to the database (you will make the `Review` class persist the association).
Next, create another class called `Review` (still under the `entity` package) and add this snippet:
```kotlin
// ./src/main/kotlin/com/auth0/kotlingraphql/entity/Review.kt
package com.auth0.kotlingraphql.entity
import org.springframework.data.mongodb.core.mapping.Document
@Document(collection = "reviews")
data class Review(
var snackId: String,
var rating: Int,
var text: String
)
```
The approach used here is similar to the one used to create `Snack`. In this case, you are defining a class that represents a single review.
## Creating Mongo Repositories
According to the official Spring documentation:
> "A repository is a mechanism for encapsulating storage, retrieval, and search behaviour which emulates a collection of objects" - [(Evans, 2003)](https://docs.spring.io/spring-framework/docs/current/javadoc-api/org/springframework/stereotype/Repository.html)
In other others, a repository is a class responsible for some form of data storage, retrieval, and manipulation. In this section, you will create repositories to match the two entities you created earlier.
First, create a new package called `repository` (again inside the `com.auth0.kotlingraphql` one) and, inside this package, create a Kotlin interface called `SnackRepository`. To this interface, add the following code:
```kotlin
// ./src/main/kotlin/com/auth0/kotlingraphql/repository/SnackRepository.kt
package com.auth0.kotlingraphql.repository
import com.auth0.kotlingraphql.entity.Snack
import org.springframework.data.mongodb.repository.MongoRepository
import org.springframework.stereotype.Repository
@Repository
interface SnackRepository : MongoRepository
```
The interface you have just created extends `MongoRepository` to take advantages of its predefined methods. Some of these methods include: `findAll`, `saveAll`, and `findById`.
The `MongoRepository` interface takes in two parameter types, `Snack` and `String`. The first parameter (`Snack`) is the data type that will be managed by the repository while the second parameter (`String`) is the data type of the `id` property. As you can imagine, you need `String` here since this is the data type for the `id` variable in the `Snack` entity.
The `@Repository` annotation is used to indicate that the class is a repository. Although creating the `SnackRepository` without the `@Repository` annotation still works as expected, the annotation has the following benefits:
- It helps clarify the role of the interface/class in the application.
- It helps you to catch specific native exceptions. These exceptions depend on the technology used. For instance, if you use Hibernate, you can encounter an error like `HibernateException`, so the annotation intercepts it and applies an appropriate translation on the exception.
Next, you will create another Kotlin interface named `ReviewRepository` (still in the `repository` package) and add this:
```kotlin
// ./src/main/kotlin/com/auth0/kotlingraphql/repository/ReviewRepository.kt
package com.auth0.kotlingraphql.repository
import com.auth0.kotlingraphql.entity.Review
import org.springframework.data.mongodb.repository.MongoRepository
import org.springframework.stereotype.Repository
@Repository
interface ReviewRepository : MongoRepository
```
This is very similar to the first repository created. The difference is that you will manage instances of `Review` with this new repository (hence ``).
## Defining Your GraphQL Schema
Unlike REST APIs, where you have to declare endpoints based on the resources they return, in GraphQL, you need to define a schema. This schema is used to:
- Declare the types available and their relationships.
- Declare how data can be mutated or queried.
While you have `POST`, `GET`, `PUT`, and others as request methods in a REST API, for GraphQL, you have just `Query` (equivalent of `GET` in REST) and `Mutation` (equivalent of `PUT`, `POST`, `PATCH` and `DELETE` in REST). In this section, you will now learn how to define a GraphQL schema for your Spring Boot and Kotlin application.
> "A schema is like a contract between the client and the server. Anything the client tries to do with the server that is outside the schema will not work." - [GraphQL Core Concepts](https://www.howtographql.com/basics/2-core-concepts/)
For starters, create a new file called `snack.graphqls` in the `./src/main/resources/` directory and add this code to it:
```graphqls
type Query {
snacks: [Snack]
}
type Snack {
id: ID!
name: String
amount: Float
reviews: [Review]
}
type Mutation {
newSnack(name: String!, amount: Float!) : Snack!
deleteSnack(id: ID!) : Boolean
updateSnack(id:ID!, amount: Float!) : Snack!
}
```
In this file, you declared three types with their respective fields. The `Query` type is a standard type used by a client to request data. This type has a field called `snacks` that returns a `Snack` list. The `Snack` type here mimics the snack entity you created earlier. The `Mutation` type is another standard type that a client application will use to add, update, or delete data.
Now, still in the `./src/main/resources/` directory, create another file called `review.graphqls` and add this code to it:
```graphqls
extend type Query {
reviews(snackId: ID!): [Review]
}
type Review {
snackId: ID!
rating: Int
text: String!
}
extend type Mutation {
newReview(snackId: ID!, rating: Int, text:String!) : Review!
}
```
In this file, the keyword `extend` is attached to the `Query` and `Mutation` to extend the types declared in the other file. Everything else is similar to the other schema you defined.
## Defining Your GraphQL Resolvers
A resolver is a function that provides a value for a field or a type declared in your schema. In other words, a GraphQL resolver is responsible for translating your data into the schema you are using. As such, now, you have to create corresponding Kotlin functions for the fields you declared in the last section: `snacks`, `newSnack`, `deleteSnack`, `updateSnack`, `reviews`, `newReview`.
So, the first thing you will do is to create a package called `resolvers` inside the main package (i.e., inside `com.auth0.kotlingraphql`). Then, you will create a class called `SnackQueryResolver` inside this new package. After creating this class, add the following code to it:
```kotlin
// .src/main/kotlin/com/auth0/kotlingraphql/resolvers/SnackQueryResolver.kt
package com.auth0.kotlingraphql.resolvers
import com.auth0.kotlingraphql.entity.Review
import com.auth0.kotlingraphql.entity.Snack
import com.auth0.kotlingraphql.repository.SnackRepository
import com.coxautodev.graphql.tools.GraphQLQueryResolver
import org.springframework.data.mongodb.core.MongoOperations
import org.springframework.data.mongodb.core.query.Criteria
import org.springframework.data.mongodb.core.query.Query
import org.springframework.stereotype.Component
@Component
class SnackQueryResolver(val snackRepository: SnackRepository,
private val mongoOperations: MongoOperations) : GraphQLQueryResolver {
fun snacks(): List {
val list = snackRepository.findAll()
for (item in list) {
item.reviews = getReviews(snackId = item.id)
}
return list
}
private fun getReviews(snackId: String): List {
val query = Query()
query.addCriteria(Criteria.where("snackId").`is`(snackId))
return mongoOperations.find(query, Review::class.java)
}
}
```
You are creating this class to support the queries defined in the `snack.graphqls` file, hence the name `SnackQueryResolver`. The class implements an interface (`GraphQLQueryResolver`) provided by the GraphQL dependency you added earlier to your project. The class is also annotated with `@Component` to configure it as a Spring component (meaning that Spring will automatically detect this class for dependency injection).
Remember that the query type in the `snack.graphqls` looks like this:
```graphqls
type Query {
snacks: [Snack]
}
```
As such, the `SnackQueryResolver` class contains one public function named `snacks` which returns a list of snacks. Notice that the field name corresponds to the function name. This is important because, otherwise, Spring wouldn't know that you want this function to resolve the `snacks` query.
In the `snacks` function, the `snackRepository` is used to `findAll()` the snacks from the database. Then, for each snack, all the reviews are fetched alongside.
The next class you should create is called `SnackMutationResolver`. Create it inside the `resolvers` package then add the following code to it:
```kotlin
// .src/main/kotlin/com/auth0/kotlingraphql/resolvers/SnackMutationResolver.kt
package com.auth0.kotlingraphql.resolvers
import com.auth0.kotlingraphql.entity.Snack
import com.auth0.kotlingraphql.repository.SnackRepository
import com.coxautodev.graphql.tools.GraphQLMutationResolver
import org.springframework.stereotype.Component
import java.util.*
@Component
class SnackMutationResolver (private val snackRepository: SnackRepository): GraphQLMutationResolver {
fun newSnack(name: String, amount: Float): Snack {
val snack = Snack(name, amount)
snack.id = UUID.randomUUID().toString()
snackRepository.save(snack)
return snack
}
fun deleteSnack(id:String): Boolean {
snackRepository.deleteById(id)
return true
}
fun updateSnack(id:String, amount:Float): Snack {
val snack = snackRepository.findById(id)
snack.ifPresent {
it.amount = amount
snackRepository.save(it)
}
return snack.get()
}
}
```
You are creating this class to resolve the mutations defined in the `snack.graphqls` file. As such, you have the following functions in this class:
- `newSnack` - This function takes the name and amount of the snack and creates a new snack in the database. Before saving the snack to the database, a unique random id is generated for that snack. This function returns the new snack created.
- `deleteSnack` - This function removes a snack from the database based on an `id`. The return of this operation is a boolean value indicating whether the operation was successful or not.
- `updateSnack` - This function updates a snack based on an `id` and returns the updated version of the snack.
Next, you will create resolvers for the `review.graphqls` schema. So, create another class inside the `resolvers` package named `ReviewQueryResolver` and add this code to it:
```kotlin
// .src/main/kotlin/com/auth0/kotlingraphql/resolvers/ReviewQueryResolver.kt
package com.auth0.kotlingraphql.resolvers
import com.auth0.kotlingraphql.entity.Review
import com.coxautodev.graphql.tools.GraphQLQueryResolver
import org.springframework.data.mongodb.core.MongoOperations
import org.springframework.data.mongodb.core.query.Criteria
import org.springframework.data.mongodb.core.query.Query
import org.springframework.stereotype.Component
@Component
class ReviewQueryResolver(val mongoOperations: MongoOperations) : GraphQLQueryResolver {
fun reviews(snackId: String): List {
val query = Query()
query.addCriteria(Criteria.where("snackId").`is`(snackId))
return mongoOperations.find(query, Review::class.java)
}
}
```
The `ReviewQueryResolver` class handles the reviews property defined in the `review.graphqls` file. As such, this class contains only one function, `reviews`, which returns a list of reviews from the database depending on the `snackId` passed in.
Finally, you will create the last class in this section (still in the `resolvers` package). You will call it `ReviewMutationResolver` and add this code to it:
```kotlin
// .src/main/kotlin/com/auth0/kotlingraphql/resolvers/ReviewMutationResolver.kt
package com.auth0.kotlingraphql.resolvers
import com.coxautodev.graphql.tools.GraphQLMutationResolver
import com.auth0.kotlingraphql.entity.Review
import com.auth0.kotlingraphql.repository.ReviewRepository
import org.springframework.stereotype.Component
@Component
class ReviewMutationResolver (private val reviewRepository: ReviewRepository): GraphQLMutationResolver {
fun newReview(snackId: String, rating: Int, text:String): Review {
val review = Review(snackId, rating, text)
reviewRepository.save(review)
return review
}
}
```
The resolver here is for the mutation field in the `review.graphqls` file. In this function, a new review is added to the database using a snack `id`, `rating` value and `text`.
## Running Your App
With the resolvers you’ve just created, anytime a client application constructs a query, your functions will be able to provide the results for the requested fields. As such, you are ready to take your app for a spin. To run your Spring Boot and Kotlin application, you have two alternatives. You can either use the _play_ button that is (most likely) available in your IDE, or you can use a terminal to issue the following command from project root:
```bash
./gradlew bootRun
```
> **Note:** You will know your app is running when you see this message: "Started KotlinGraphqlApplicationKt in X seconds". What is interesting is that, for whatever reason, Spring Boot shows `80% EXECUTING` even when it is ready to start processing requests.
After your application is up and running, open [http://localhost:9000/graphiql](http://localhost:9000/graphiql) on your browser. There, you will see a _GraphiQL_ client app that you can use to test your API.
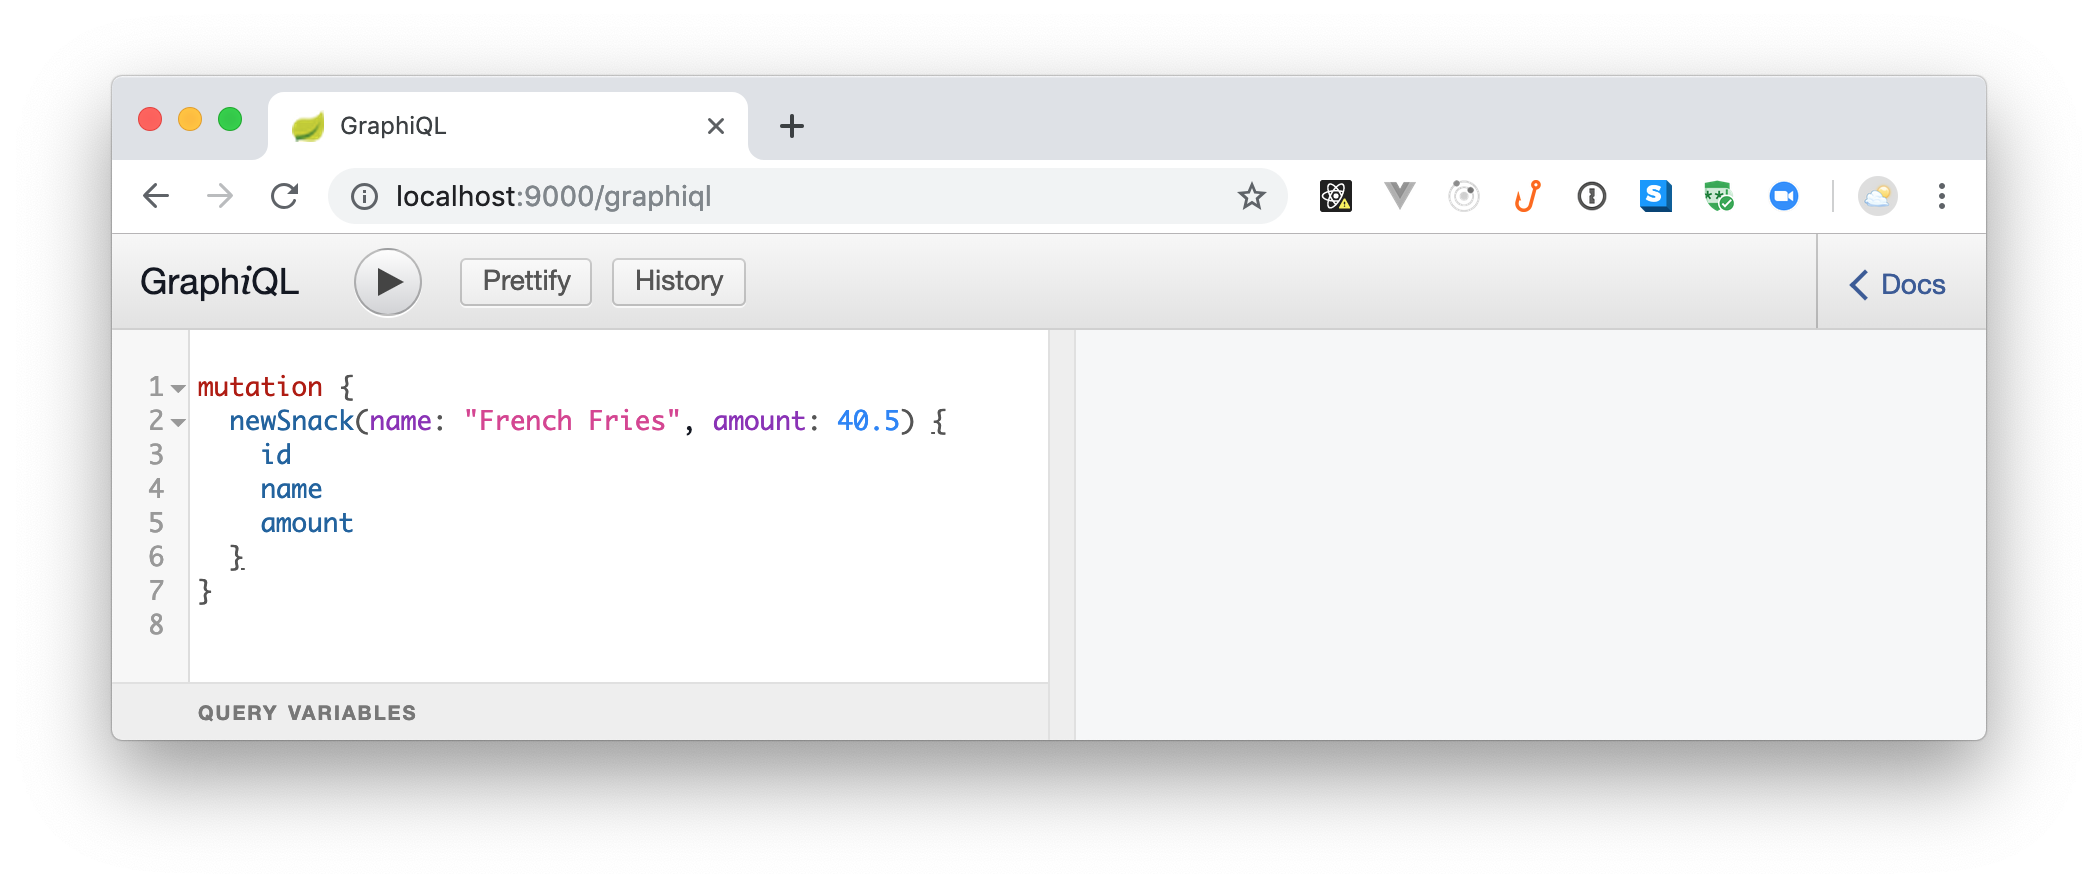
On that application, you can use a _mutation_ to add a `newSnack`. To see this in action, copy and paste the following code into the left-hand side panel and click on the play button (or hit `Ctrl` + `Enter` in your keyboard):
```graphql
mutation {
newSnack(name: "French Fries", amount: 40.5) {
id
name
amount
}
}
```
If everything runs as expected, you will get the following result back:
```json
{
"data": {
"newSnack": {
"id": "da84885b-b160-4c09-a5ea-3484bac4d5f9",
"name": "French Fries",
"amount": 40.5
}
}
}
```
You just created a new snack. Awesome, right? Now, you can create a review for this snack:
```graphql
mutation {
newReview(snackId:"SNACK_ID",
text: "Awesome snack!", rating:5
){
snackId, text, rating
}
}
```
> **Note:** You will have to replace `SNACK_ID` with the `id` returned for your new snack on the previous command.
Running this command will result in the following response:
```json
{
"data": {
"newReview": {
"snackId": "da84885b-b160-4c09-a5ea-3484bac4d5f9",
"text": "Awesome snack!",
"rating": 5
}
}
}
```
Now, to fetch the snacks and reviews persisted in your database, you can issue the following `query`:
```graphql
query {
snacks {
name,
reviews {
text, rating
}
}
}
```
Running this `query` will get you back a response similar to this:
```json
{
"data": {
"snacks": [
{
"name": "French Fries",
"reviews": [
{
"text": "Awesome snack!",
"rating": 5
}
]
}
]
}
}
```
This is the beauty of GraphQL. With just one `query` you can decide what is the _exact_ format you need for the result.
## Securing Spring Boot, Kotlin, and GraphQL APIs with Auth0
As expected, your GraphQL API is working perfectly. However, you need to add a little more spice to it. For example, you probably don't want to allow unauthenticated users to consume your API, right? One easy way to fix this is to integrate your app with Auth0.
So, if you don't have an Auth0 account yet, now is a good time to create a free one. Then, after signing up (or signing in), head to [the APIs section of your Auth0 dashboard](https://manage.auth0.com/#/apis) and click on the _Create API_ button. Then, fill in the form that Auth0 shows as follows:
- _Name_: This property is not very important as it is just an internal label for your API. As such, you can use something like "Kotlin and GraphQL API".
- _Identifier_: Here, you will define a logical identifier for this API. Auth0 recommends using a URL but note that this doesn’t have to be a publicly available URL. Auth0 will not call this URL at all. So, in this field you can use something like `https://kotlin-graphql-api`.
- _Signing Algorithm_: Leave this field as `RS256`.
Then, click on the create button to finish the process and head back to your project. There, open your `build.gradle` file and add the Spring OAuth2 dependency:
```gradle
// ...
dependencies {
// ...
implementation 'org.springframework.security.oauth.boot:spring-security-oauth2-autoconfigure:2.1.3.RELEASE'
}
// ...
```
Next, open the `application.properties` file (located in the `kotlingraphql/src/main/resources/` directory) and add these two properties:
```properties
# ...
security.oauth2.resource.id=
security.oauth2.resource.jwk.keySetUri=https:///.well-known/jwks.json
```
> **Note:** You will have to replace the `` placeholder with the domain you chose while signing up (e.g., `blog-samples.auth0.com`). Also, you will need to replace `` with the API identifier you chose (e.g., `https://kotlin-graphql-api`).
Now, create a new class called `SecurityConfig` inside the `com.auth0.kotlingraphql` package and add the following code to it:
```kotlin
// .src/main/kotlin/com/auth0/kotlingraphql/SecurityConfig.kt
import org.springframework.beans.factory.annotation.Value
import org.springframework.context.annotation.Configuration
import org.springframework.security.config.annotation.web.builders.HttpSecurity
import org.springframework.security.oauth2.config.annotation.web.configuration.EnableResourceServer
import org.springframework.security.oauth2.config.annotation.web.configuration.ResourceServerConfigurerAdapter
import org.springframework.security.oauth2.config.annotation.web.configurers.ResourceServerSecurityConfigurer
@Configuration
@EnableResourceServer
class SecurityConfig : ResourceServerConfigurerAdapter() {
@Value("\${security.oauth2.resource.id}")
private lateinit var resourceId: String
@Throws(Exception::class)
override fun configure(http: HttpSecurity) {
http.authorizeRequests()
.mvcMatchers("/graphql").authenticated()
.anyRequest().permitAll()
}
@Throws(Exception::class)
override fun configure(resources: ResourceServerSecurityConfigurer) {
resources.resourceId(resourceId)
}
}
```
Spring Boot will automatically detect this class and configure the integration with Auth0 for you (by using the properties you defined above). Also, as you can see in the code, this class will ensure that any request to `/graphql` is `authenticated()` and that other requests (like to the GraphiQL client app) are permitted (`permitAll()`).
> **Note:** The GraphiQL client tool runs on [`http://localhost:9000/graphiql`](http://localhost:9000/graphiql) and the GraphQL API runs on [`http://localhost:9000/graphql`](http://localhost:9000/graphql). If you take a close look, these are different URLs.
With that in place, stop the running instance of your app (which is still insecure) then rerun it (remember, you can also use your IDE to run it):
```bash
./gradlew bootRun
```
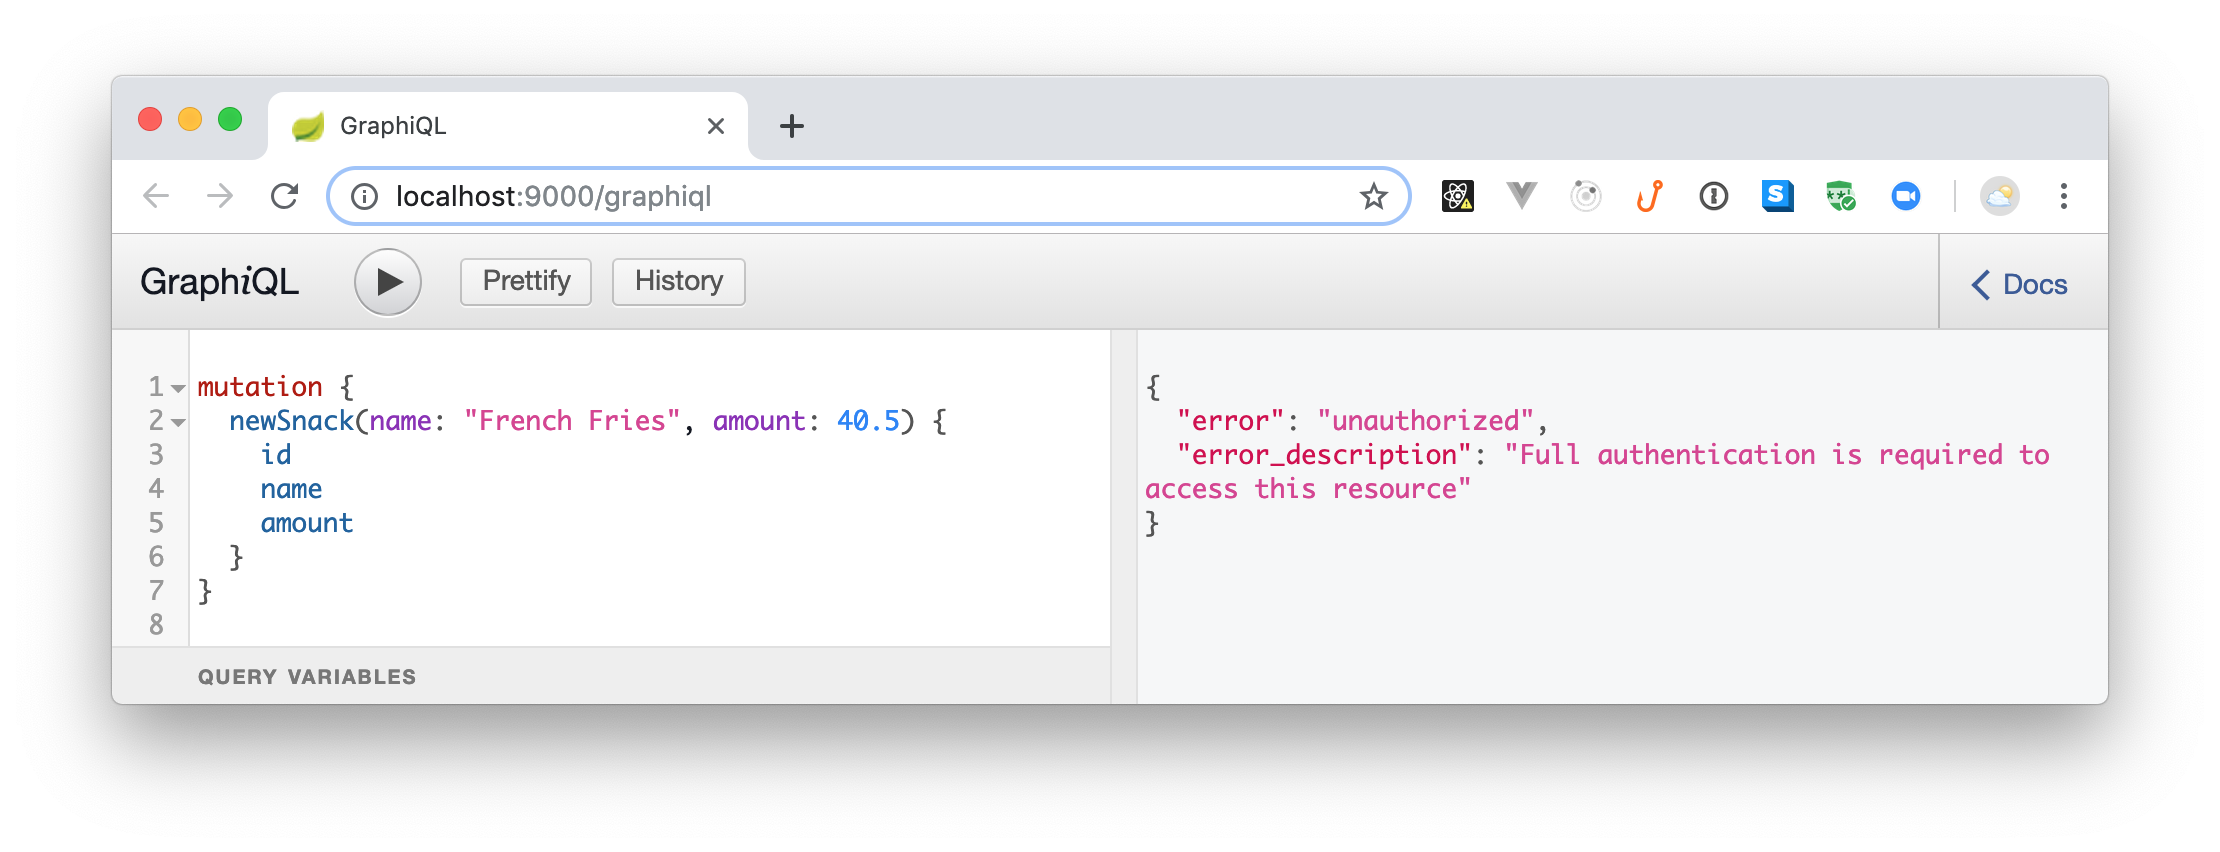
After running your API, open [the GraphiQL client tool](http://localhost:9000/graphiql), and you will see that you get an error instantaneously. This happens because this tool issues a query (without authentication) right after loading and because your API is secured now.
To be able to issue requests again to your API, you will need [an access token](https://auth0.com/docs/tokens/overview-access-tokens). The process of getting a token will depend on [what type of client you are dealing with](https://auth0.com/docs/api-auth/which-oauth-flow-to-use). This is out of scope here but, if you are dealing with a SPA application (like those created with React, Angular, and Vue.js), you can use [the `auth0-js` NPM library](https://auth0.com/docs/libraries/auth0js/v9). If you are dealing with some other type of client (e.g., regular web application or native application), check [the Auth0's docs](https://auth0.com/docs/) for more info.
Nevertheless, to see the whole thing in action, you can head back to your Auth0 Dashboard, open the API you created before, and move to the _Test_ section. On this section, you will see a button called _Copy Token_ that will provide you a temporary token that you can use to test your API.

After clicking on this button, Auth0 will move the token to your clipboard, and you will be able to use it to issue requests. However, as the GraphiQL tool does not have a place to configure the access token on the request, you will need another client. For example, you can use [Postman](https://www.getpostman.com/) (a popular HTTP graphical client) or you can use `curl` (a command-line program) to issue requests with headers.
No matter what HTTP client you choose, you will have to configure it to use a header called `Authorization` with a value that looks like `Bearer `. Note that you will have to replace `` with the token you copied from the Auth0 dashboard.
For example, if you are using `curl`, you can issue a query request to your GraphQL API as follows:
```bash
# set a local variable with the token
TOKEN=
# issue the query request
curl -X POST -H 'Authorization: Bearer '$TOKEN -H 'Content-Type: application/json' -d '{
"query": "{ snacks { name } }"
}' http://localhost:9000/graphql
```
Done! You have just finished securing your Kotlin and GraphQL API with Auth0. How cool was that?
## Troubleshooting
If you encounter an [OAuth2 Spring error creating a bean with name `springSecurityFilterChain` error](https://stackoverflow.com/questions/47866963/oauth2-spring-error-creating-bean-with-name-springsecurityfilterchain), you will have to add these dependencies to your `build.gradle` file:
```gradle
// ./build.gradle
// ...
dependencies {
// ...
implementation 'javax.xml.bind:jaxb-api:2.3.0'
implementation 'com.sun.xml.bind:jaxb-core:2.3.0'
implementation 'com.sun.xml.bind:jaxb-impl:2.3.0'
implementation 'javax.activation:activation:1.1.1'
}
// ...
```
After adding these new dependencies, sync your Gradle files and try running your app again. If you still have trouble, ping us on the comments box below.