---
title: "Building Secure APIs with Rails 6 and Auth0"
description: "Learn how to easily integrate Auth0 with Rails 6 to build secure APIs."
authors:
- name: "John Brennan"
url: "https://auth0.com/blog/authors/john-brennan/"
date: "Nov 4, 2021"
category: "Developers,Tutorial,Ruby On Rails"
tags: ["ruby", "rails", "ruby-on-rails", "secure-api", "api", "jwt"]
url: "https://auth0.com/blog/building-secure-apis-with-rails-6-and-auth0/"
---
# Building Secure APIs with Rails 6 and Auth0
**TL;DR:** In this tutorial, you'll learn how to use Rails 6 and Auth0 to build an API with both authorized and open endpoints.
The ecosystem for building backend services feels more crowded than ever before. With a multitude of choices for building APIs and backend services — from Node.js frameworks and web applications to lightweight serverless functions — it's sometimes easy to overlook longstanding, tried-and-true frameworks like Ruby on Rails, which (as of 2020) is now 15 years old!
Rails sometimes gets a bad rap for not being the newest or shiniest framework out there. But Rails continues to provide sensible defaults, the ability to quickly generate scaffolding for your web apps and APIs, and constant iterative progress of new features. With Rails 6, that includes easy management of multi-environment credentials, the new Zeitwork autoloader, and [many other features beyond the scope of this tutorial](https://edgeguides.rubyonrails.org/6_0_release_notes.html).
In this tutorial, you'll see how straightforward it is to spin up a new Rails API, add JSON Web Token (JWT) support to make authorized requests and secure your endpoints, and leverage Auth0 as your authentication system to verify users and access tokens. The API you'll build is a simple one: you'll create an endpoint for reading, creating, and deleting short messages called Chirps — think of it as your own private Twitter API.
You can find all code from this tutorial in [this GitHub repository](https://github.com/auth0-blog/auth0_rails_api).
Read on to get started!
## Prerequisites
- **Rails** and prerequisites. You'll need to install Rails itself before you can use the Rails CLI. If you already have Ruby installed, you can install Rails like so: `gem install rails`. You'll also need Rails' prerequisites: Ruby and SQLite3. You can find full instructions on installing Rails [on the Ruby on Rails guide site](https://guides.rubyonrails.org/getting_started.html#creating-a-new-rails-project-installing-rails)
- An **Auth0 account**. If you don't have one, you can sign up for a free Auth0 account here.
## Create a New Auth0 API
Before you jump into code, you'll need to create a new Auth0 API. Head to the [API section of your Auth0 dashboard](https://manage.auth0.com/#/apis) and click the orange "Create API" button. Fill out the form with the following values:
* **Name**: Rails Secure API
* **Identifier**: https://rails-secure-api
* **Signing Algorithm**: RS256 (this should be the default selection)

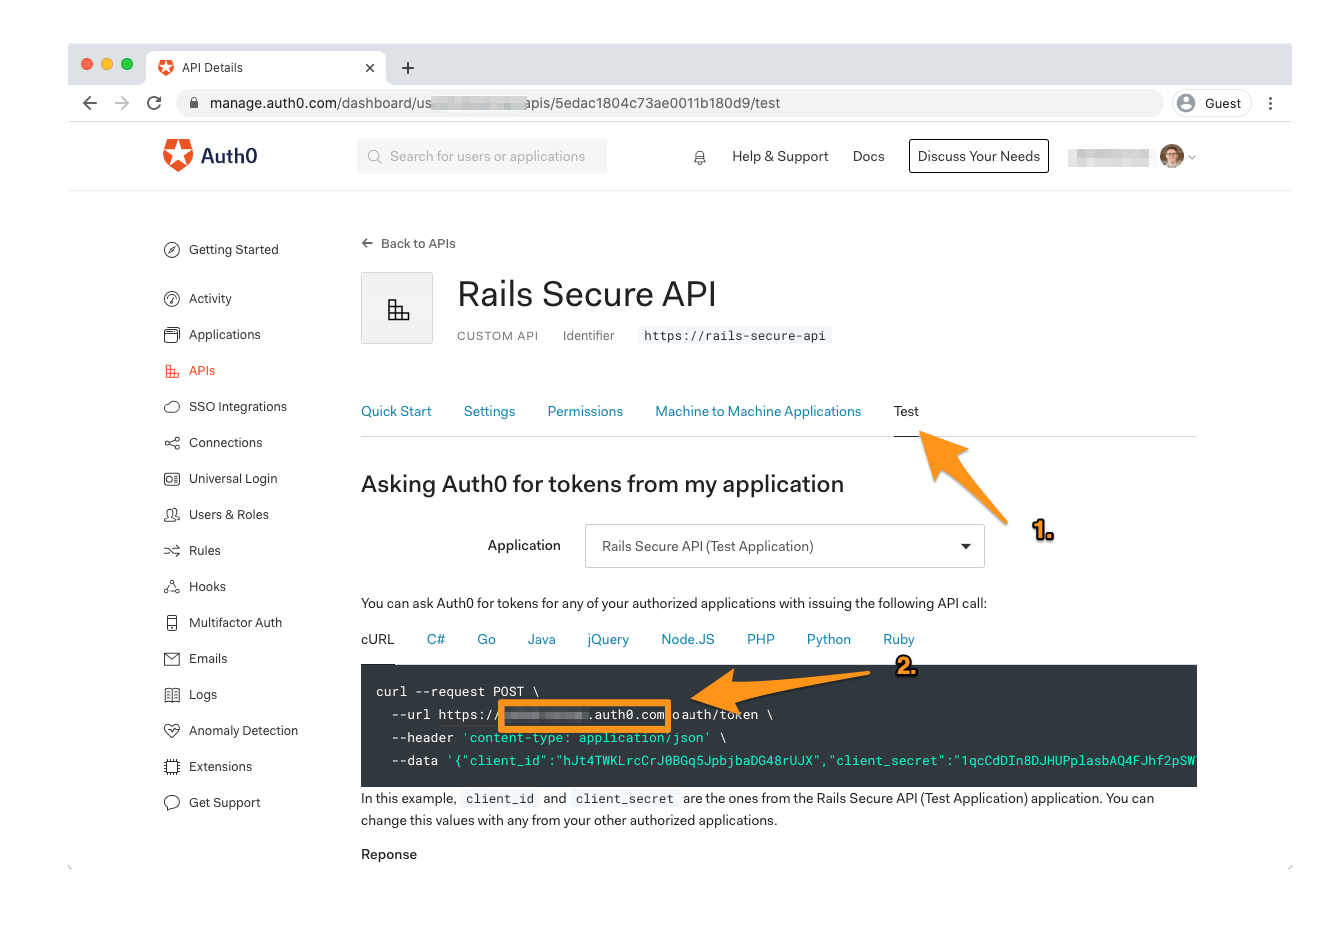
Copy the `identifier` value (`https://rails-secure-api`) — you'll need it when setting up your Rails app. You'll also need to grab your **Auth0 Domain**. Unless you're using a custom domain, this value will be `[TENANT_NAME].auth0.com`. If you're unsure what this value is, open the "Test" tab in your API's settings and look at the `url` argument in the code sample under "Asking Auth0 for tokens from my application":
Once you've finished creating your API, you can head to the command line and start building your Rails application!
## Scaffolding
The most straightforward way to generate a new Rails app is by using the CLI. Run the following command in your terminal:
```bash
$ rails new auth0_rails_api --api
```
Once the Rails CLI finishes, you'll have a fully operational Rails application ready to go. To ensure this, run the following in your command line:
```bash
$ cd auth0_rails_api
$ bundle exec rails s
```
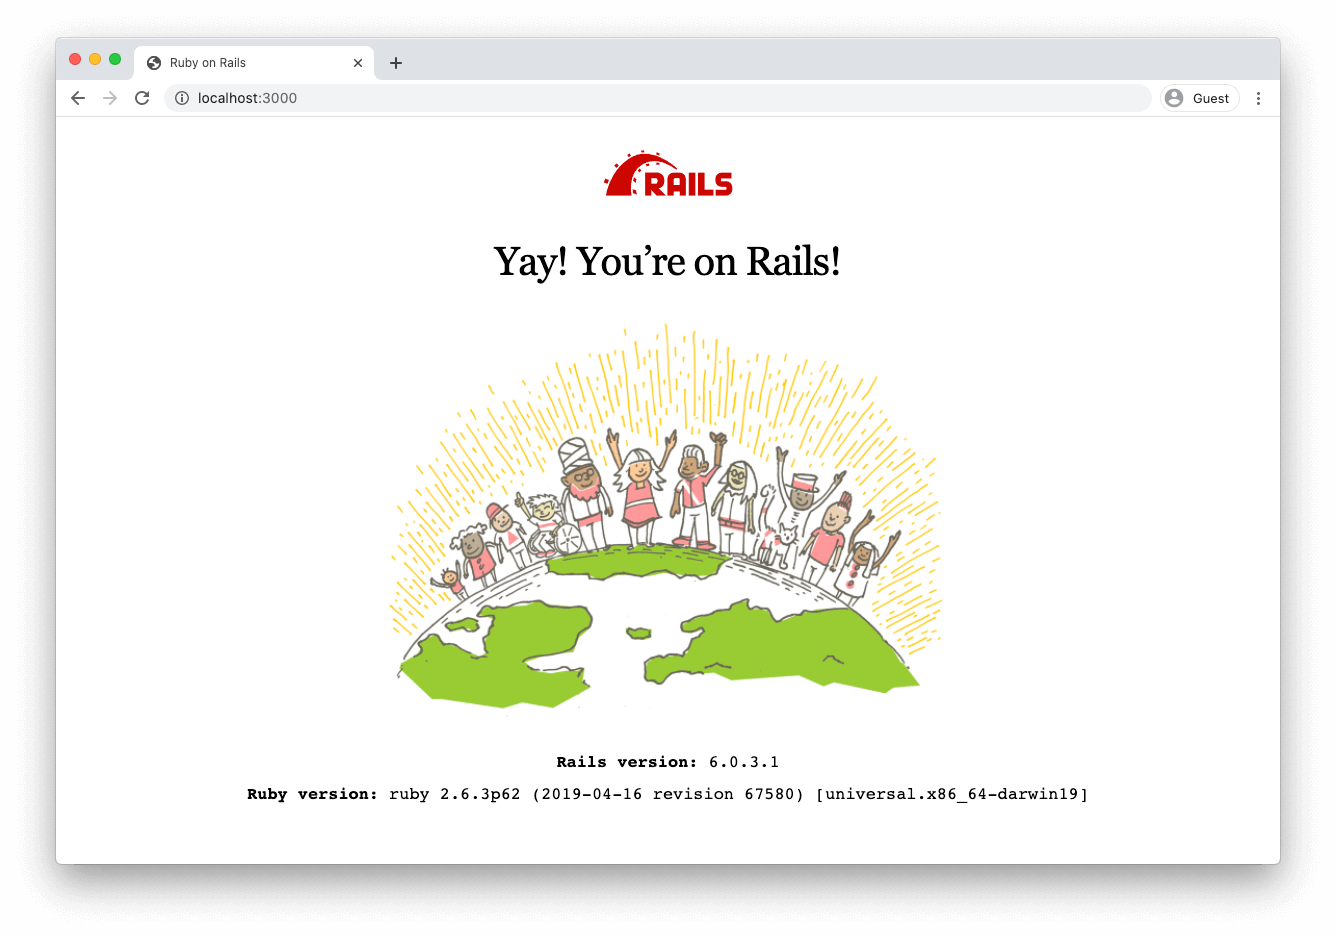
Navigate to [http://localhost:3000](http://localhost:3000) in your browser; you should see a standard "greeting" screen indicating that the Rails app is successfully running:
Now that you're up and running, it's time to start building your API. Stop the running Rails process (`ctrl + c`) and read on!
## Create Authorization Handlers
In this section, you'll build a class for handling JSON Web Token (JWT) verification, plus a service that uses the JWT class to perform authorization when new requests are sent to your API.
First, you'll need to add the `jwt` gem to your application. Open `Gemfile` in your project's root directory and add the following line to the file:
```
gem 'jwt'
```
Run `bundle install` from the command line to install the gem.
Next, you need to add the API identifier and domain values from your Auth0 configuration into your Rails environment.
In your command line, run the following:
```bash
$ bundle exec rails credentials:edit --environment development
```
> Tip: If you don't have a default text editor set up in your command line, you may need to pass an `EDITOR` argument with the command, e.g., `EDITOR="vim" bundle exec rails credentials:edit --environment development`
If you've used Rails 5, you're probably familiar with [the introduction of encrypted credentials in Rails 5.2](https://blog.engineyard.com/rails-encrypted-credentials-on-rails-5.2). The reason you're passing `--environment development` into the argument is a Rails 6 development — [credentials now support multiple environments!](https://blog.saeloun.com/2019/10/10/rails-6-adds-support-for-multi-environment-credentials.html)
When the credentials file opens, delete any existing contents and add the code snippet below. Be sure to replace `{AUTH0_DOMAIN}` with the **Auth0 Domain** value you copied down in the "Create a New Auth0 API" section. If you used a custom `identifier` value in that section, you'll also need to replace the `api_identifier` value.
```yaml
auth0:
api_identifier: https://rails-secure-api
domain: {AUTH0_DOMAIN}
```
After you've saved the credentials file, open your project directory in your code editor of choice. Create a directory under `app` called `lib` and create a new file called `json_web_token.rb`.
> Tip: The reason you're creating the new class in `app/lib` rather than `lib` is that subdirectories under `app` are autoloaded by default. If you're not familiar with Rails 6 autoloading with the Zeitwork engine, the [Rails guide to autoloading](https://guides.rubyonrails.org/autoloading_and_reloading_constants.html) or [this article on understanding Zeitwork in Rails 6](https://medium.com/cedarcode/understanding-zeitwerk-in-rails-6-f168a9f09a1f) can provide more information.
Add the following to `json_web_token.rb`:
```ruby
# app/lib/json_web_token.rb
require 'net/http'
require 'uri'
class JsonWebToken
def self.verify(token)
JWT.decode(token, nil,
true, # Verify the signature of this token
algorithm: 'RS256',
iss: "https://#{Rails.application.credentials.auth0[:domain]}/",
verify_iss: true,
aud: Rails.application.credentials.auth0[:api_identifier],
verify_aud: true) do |header|
jwks_hash[header['kid']]
end
end
def self.jwks_hash
jwks_raw = Net::HTTP.get URI("https://#{Rails.application.credentials.auth0[:domain]}/.well-known/jwks.json")
jwks_keys = Array(JSON.parse(jwks_raw)['keys'])
Hash[
jwks_keys
.map do |k|
[
k['kid'],
OpenSSL::X509::Certificate.new(
Base64.decode64(k['x5c'].first)
).public_key
]
end
]
end
end
```
This class is taken pretty much verbatim from the [Auth0 Rails API QuickStart](https://auth0.com/docs/quickstart/backend/rails). It performs the actual verification of the JWT-formatted access token that API requests will provide.
Next, create a subdirectory under `app` called `services`. Create a new file called `authorization_service.rb` and add the following to it:
```ruby
class AuthorizationService
def initialize(headers = {})
@headers = headers
end
def authenticate_request!
verify_token
end
private
def http_token
if @headers['Authorization'].present?
@headers['Authorization'].split(' ').last
end
end
def verify_token
JsonWebToken.verify(http_token)
end
end
```
By extracting the authorization logic to a service, you're separating the concerns of *verifying the authenticity* of a JWT versus *authorizing an HTTP request*. The `AuthorizationService` grabs the access token in the `Authorization` HTTP Header and passes it to the `JsonWebToken` for verification.
With this separation of responsibility, you can limit any possible future changes to the JWT verification process to the `JsonWebToken` class. With your `AuthorizationService` in place, you can now easily add an authorization check to your controllers — and you'll do just that in the next section!
## Securing an API Endpoint
### Build a base SecuredController
At this point, you could start creating controllers and adding an authorization check to each controller individually. However, if you're planning to secure your entire API, it's easier to create a base controller from which your secured controllers can inherit the authorization check.
Create a new file called `secured_controller.rb` in `apps/controllers` and add the following to it:
```ruby
class SecuredController < ApplicationController
before_action :authorize_request
private
def authorize_request
AuthorizationService.new(request.headers).authenticate_request!
rescue JWT::VerificationError, JWT::DecodeError
render json: { errors: ['Not Authenticated'] }, status: :unauthorized
end
end
```
The `SecuredController` inherits from `ApplicationController` and adds a `before_action` call, ensuring that every request will pass through the `AuthorizationService` before running any additional handlers. `SecuredController` also handles returning a `401 Unauthorized` response if the request doesn't pass muster.
One more thing: you'll want to disable [Parameter Wrapping](https://api.rubyonrails.org/v6.0.3.1/classes/ActionController/ParamsWrapper.html) in our API, for simplicity's sake. Open `config/initializers/wrap_parameters.rb` and change the uncommented code to read as follows:
```ruby
# ...
ActiveSupport.on_load(:action_controller) do
wrap_parameters format: []
end
```
And with that, your scaffolding is complete, and you're ready to create a real live secured API endpoint!
### Build an API endpoint
The Rails CLI can be used to create the various moving pieces you need for an API endpoint. Head to your command line again and run the following:
```bash
$ bundle exec rails generate resource chirp body:text published:boolean
$ bundle exec rails db:migrate
```
The `resource` generator is a quick way to create a model, controller, and route (plus unit tests) for your new `Chirp` data type. Running `rails db:migrate` afterward creates the necessary tables in your database.
With your scaffolding complete, it's time to write the code to handle your endpoint!
First, open up `app/models/chirp.rb` and add the following to the model class:
```ruby
class Chirp < ApplicationRecord
# 👇 Add this line 👇
validates_presence_of :body, :published
end
```
This line will validate the `body` and `published` fields when a new Chirp is created and automatically return a `422` response code when a `POST` request without those fields is received.
Next, open `app/controllers/chirps_controller.rb` and replace the contents with the following:
```ruby
class ChirpsController < SecuredController
def index
chirps = Chirp.all
render json: chirps
end
def show
chirp = Chirp.find(params[:id])
render json: chirp
rescue ActiveRecord::RecordNotFound
head :not_found
end
def create
chirp = Chirp.create!(chirp_params)
render json: chirp, status: :created
end
def destroy
chirp = Chirp.find(params[:id])
chirp.delete
head :no_content
end
private
def chirp_params
params.permit(:body, :published)
end
end
```
If you've worked with Rails before, this should look pretty straightforward. The controller supports `GET` requests (both of specific Chirps and all Chirps), `POST`s to create new Chirps, and `DELETE`s to destroy specific Chirps.
It's important to note that the code sample changes the controller's inheritance chain. The generated controller inherits from `ApplicationController`, whereas the above code inherits from `SecuredController`, so all requests must include an access token.
### Allowing unauthenticated requests
Your API endpoint should now be working, but there's one issue: much like Twitter, you might want your Chirps to be publicly viewable! For that to work, unauthenticated `GET` requests need to be allowed, but `POST` and `DELETE` requests should still require an access token.
Luckily, allowing this is straightforward. Add the following line to the top of your `ChirpsController` class:
```ruby
class ChirpsController < SecuredController
skip_before_action :authorize_request, only: [:index, :show]
# 👆 New Code 👆
# 👇 Existing Code 👇
```
With `skip_before_action`, individual controllers like `ChirpsController` can easily override the default `SecuredController` behavior as needed.
And with that, your API is ready to go!
### Test it out
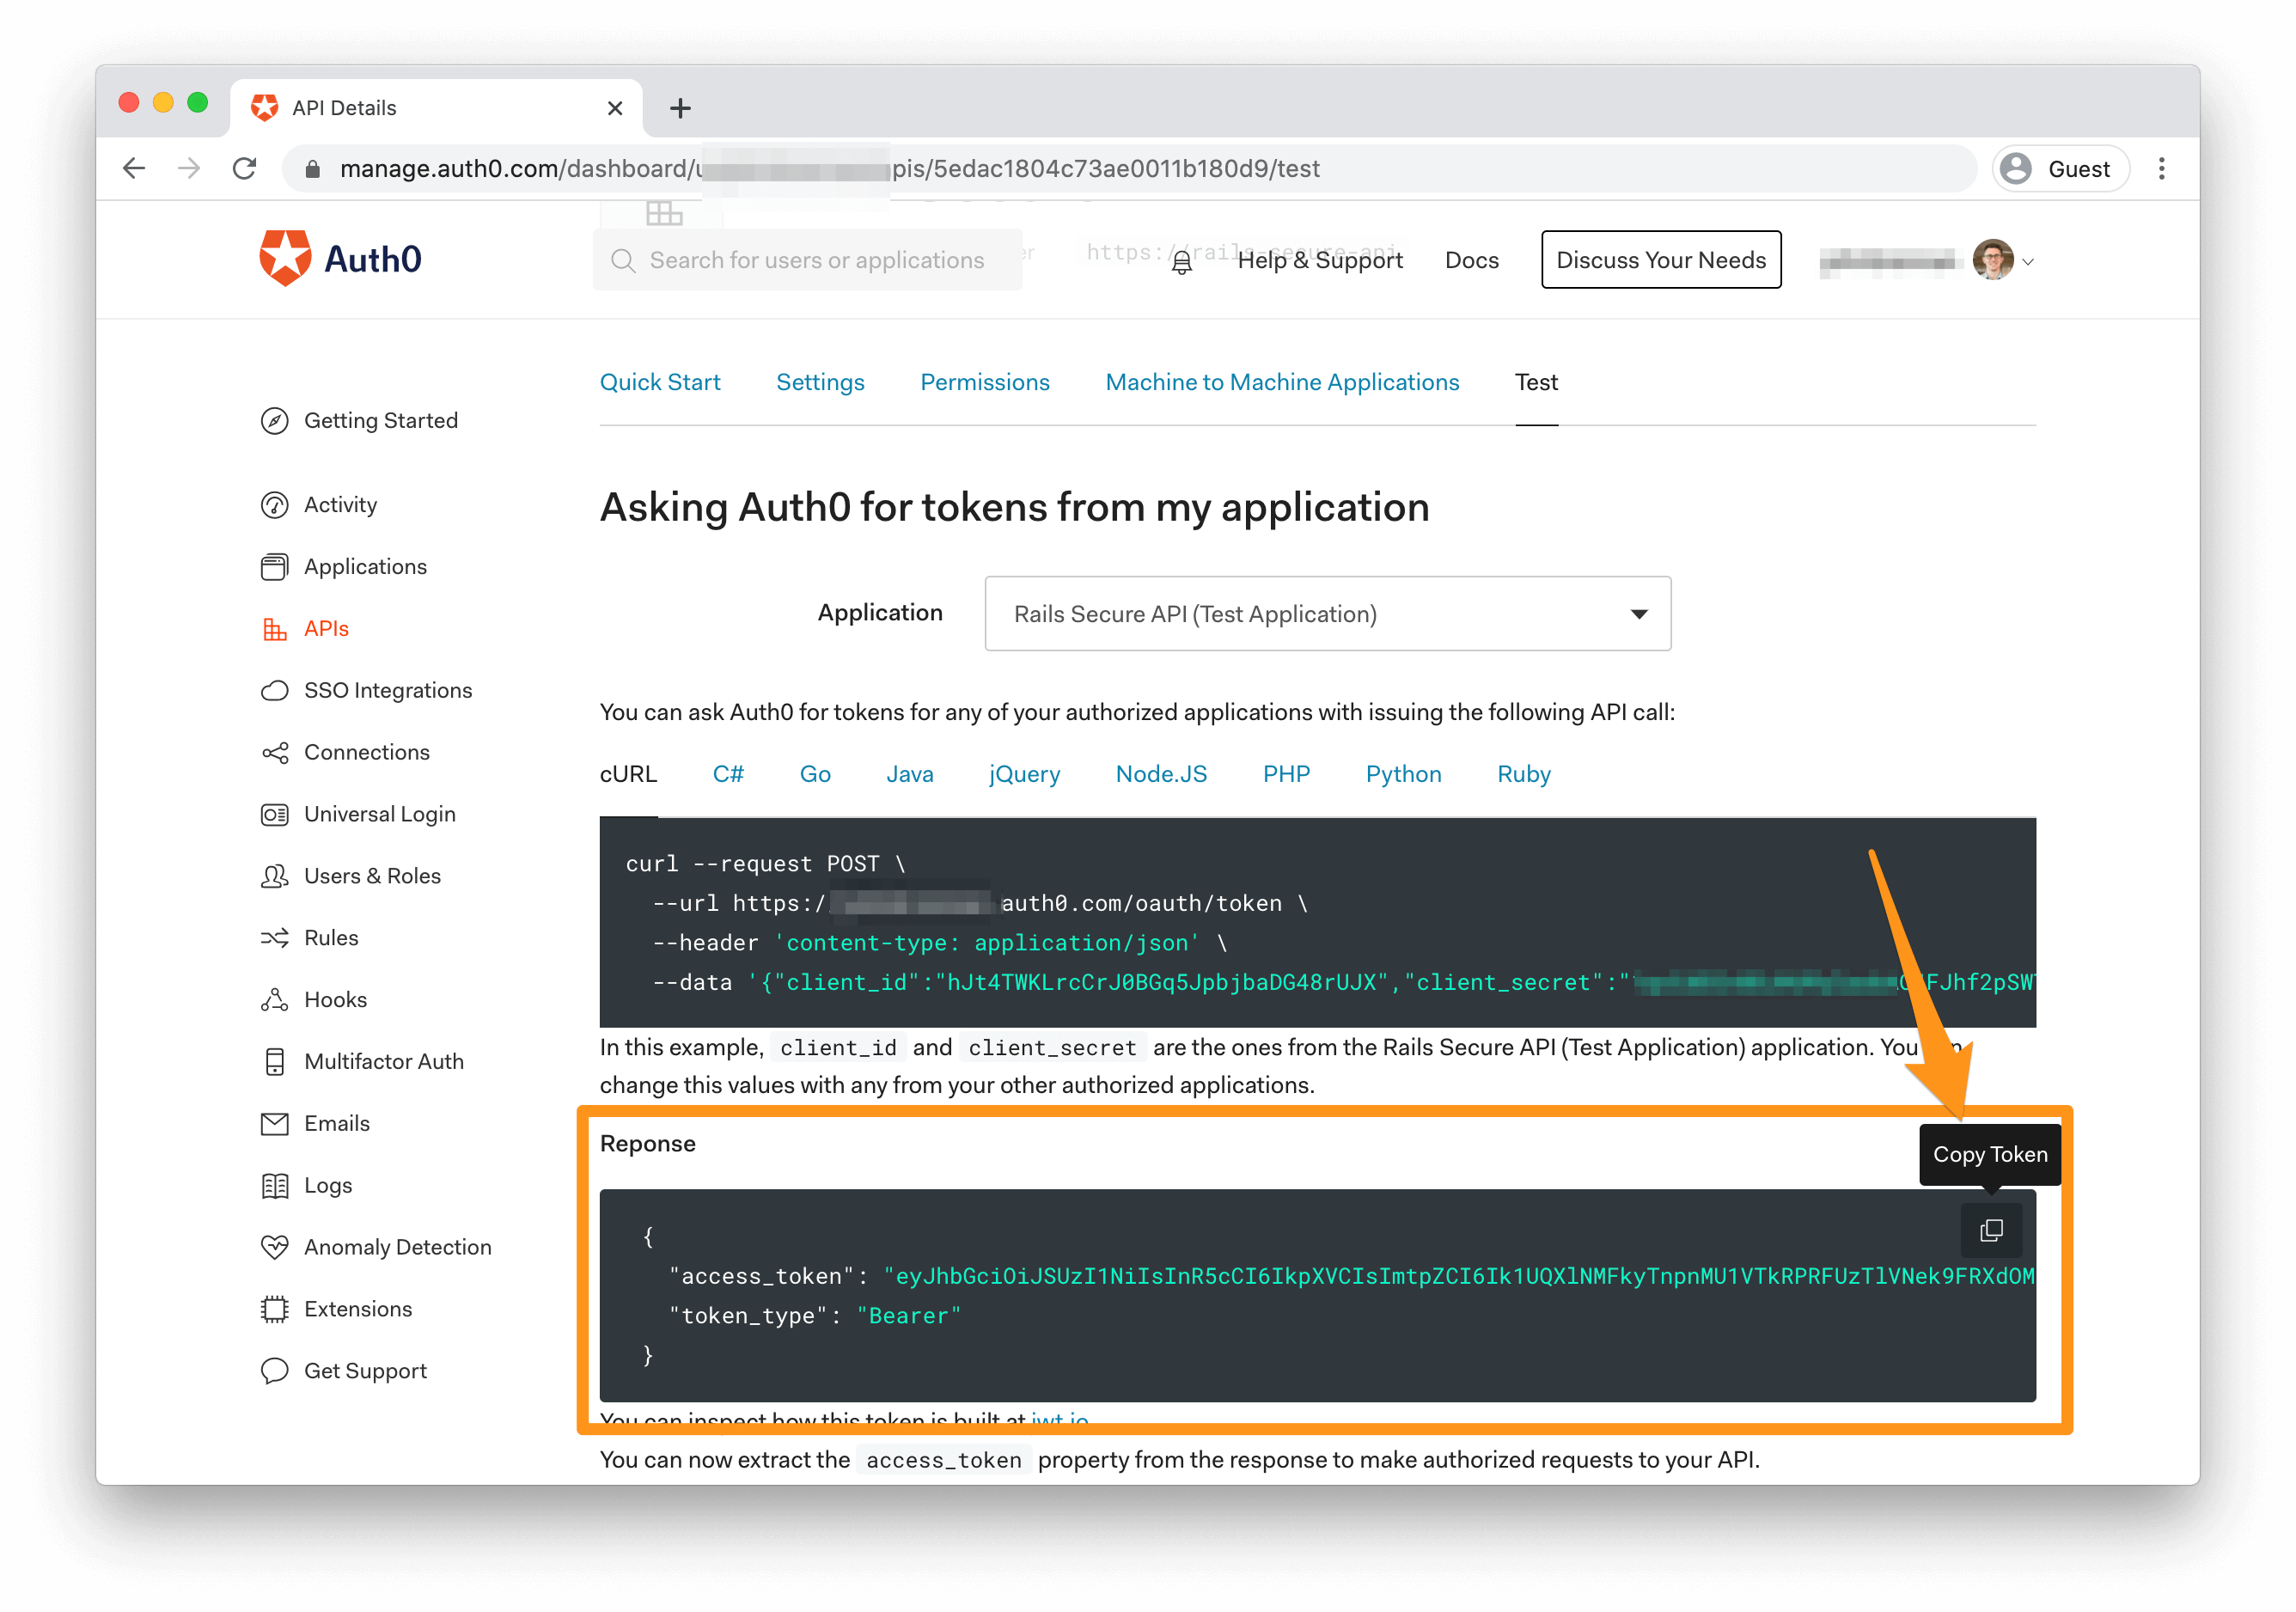
To test your API, head back to the [API page of your Auth0 Dashboard](https://manage.auth0.com/#/apis) and click on "Rails Secure API" to view the API details. Click the "Test" tab and scroll down to the "Asking Auth0 for tokens from my application" section. Under the "Response" heading, you can copy a test access token to use in requests to your API.
Access token in metaphorical hand, it's time to make a request. In your command line, start the Rails server:
```bash
$ bundle exec rails server
```
(The request examples here use cURL, but Postman or any number of other tools for crafting HTTP requests will work.)
First, request the `chirps` endpoint without your access token to ensure unauthenticated GET requests work:
```bash
$ curl http://localhost:3000/chirps
```
You should see the following response:
```
[]
```
Your request is working, but since no Chirps exist in the database, an empty array comes back.
Next, make an unauthenticated `POST` request to ensure your `SecuredController` implementation is correct:
```bash
$ curl -H "Content-Type: application/json" -d '{"body":"this is my first chirp!", "published":true}' -X POST http://localhost:3000/chirps
```
You should see the following response:
```
{"errors":["Not Authenticated"]}
```
Success! Without an access token, you can't create a chirp.
Let's successfully create a Chirp; To do so, you'll need to add the `Authorization` header to your request. Replace `[ACCESS_TOKEN]` with the token from your Auth0 dashboard and run the following command:
```bash
$ curl -H "Content-Type: application/json" -H "Authorization: bearer [ACCESS_TOKEN]" -d '{"body":"this is my first chirp!", "published":true}' -X POST http://localhost:3000/chirps
```
And the response:
```
{"id":1,"body":"this is my first chirp!","published":true,"created_at":"2020-06-08T21:13:03.949Z","updated_at":"2020-06-08T21:13:03.949Z"}
```
(Timestamps may vary, obviously!)
You've successfully made a secure request to your API and created your first Chirp!
You can now request that record without needing an access token:
```bash
$ curl http://localhost:3000/chirps/1
```
To delete the record, you'll need to provide the access token once again:
```bash
$ curl -i -H "Authorization: bearer [ACCESS_TOKEN]" -X DELETE http://localhost:3000/chirps/1
```
The `-i` argument is provided to view the full HTTP response, including headers. You should see a response similar to the following:
```
HTTP/1.1 204 No Content
X-Frame-Options: SAMEORIGIN
X-XSS-Protection: 1; mode=block
X-Content-Type-Options: nosniff
X-Download-Options: noopen
X-Permitted-Cross-Domain-Policies: none
Referrer-Policy: strict-origin-when-cross-origin
Cache-Control: no-cache
X-Request-Id: c44a6a80-74d5-40ab-a03a-883714f41d32
X-Runtime: 0.125480
```
A `204` response is what you specified in the controller on a successful delete, which means it worked. Your API is now fully operational, and you're on your way to creating your own miniature Twitter!
## Conclusion
Rails is an excellent choice for spinning up APIs and using the many tools it provides to build and secure your endpoints. While well-known gems like [devise](https://github.com/heartcombo/devise) exist to build your own token authentication solution, it adds complexity and overhead to building and maintaining your API. Using Auth0 for authentication and credential handling, social login, and features like [role-based access control](https://auth0.com/docs/authorization/concepts/rbac) and [custom user metadata](https://auth0.com/docs/users/concepts/overview-user-metadata), you can keep the complexity of user management separated from your authorization and business logic in your codebase.
Some next steps to take could be to continue building the functionality of your API or start exploring Auth0's [QuickStarts for JavaScript single-page apps](https://auth0.com/docs/quickstart/spa) to create a front-end for your API. Front-end apps can perform the initial authentication with Auth0, providing you with the access token you need to communicate with your API.
The repository for the complete application described in this tutorial can be found [on GitHub](https://github.com/auth0-blog/auth0_rails_api).
Happy building!