/tmp/acme-connection.json
```
Then create the connection:
```bash
auth0 api post connections --data "$(cat /tmp/acme-connection.json)" \
| jq '{id, name, strategy, connected_accounts}'
```
You should see:
```json
{
"id": "con_xxxxxxxxxxxxxxxx",
"name": "acme-helpdesk",
"strategy": "oauth2",
"connected_accounts": { "active": true }
}
```
That one call covers both the connection creation and the "Connected Accounts for Token Vault" toggle, thanks to `connected_accounts.active: true` in the payload.
The connection name (`acme-helpdesk`) is the slug you will use with `auth0-tv connect` later. Pick a connection name to match your own service when you do this for real.
**Note**: Connection names can only contain letters, digits, and dashes.
### Checkpoint
At this point, you should be able to:
- Run `auth0 api get "connections?name=acme-helpdesk" | jq '.[0].connected_accounts'` and see `{"active": true}`
The connection exists on your tenant but is not yet enabled on the `auth0-tv` application. `auth0-tv init` takes care of that in the next section.
### Alternative: configure via the Auth0 Dashboard
Prefer the UI? The sample repo's [README has the full Dashboard walkthrough](https://github.com/deepu105/acme-helpdesk-oauth2-sample#register-via-the-auth0-dashboard): three click-throughs in **Authentication → Social** to create the connection, flip the Connected Accounts for Token Vault toggle, and (optionally) enable the connection on your `auth0-tv` app.
The Auth0 side is done. Everything from here will be in the terminal.
## Wiring `auth0-tv` to the New Connection
`auth0-tv` is a small open-source CLI that wraps Auth0's Token Vault flows (`login`, per-service `connect`, and authenticated `fetch`) for use by humans and AI agents. Install it globally:
```bash
bun add -g auth0-token-vault-cli # or npm install -g auth0-token-vault-cli
```
bunx auth0-token-vault-cli works for humans but not for agents running the [Agent Skill](https://auth0.com/blog/what-ai-tools-mcp-servers-and-skills-actually-do/) shipped with the CLI.
Run the interactive `auth0-tv init` wizard. It bootstraps the Auth0 side (tenant configuration, Token Vault grant type, MRRT, callback URLs) and registers your connections:
```bash
auth0-tv init
```
Follow the prompts. When `init` asks how to configure the application, pick **[Create a new application](https://auth0.com/docs/get-started/auth0-overview/create-applications)** (or **Use an existing application** if you already have one set up for Token Vault). When it asks which connections to enable, make sure `acme-helpdesk` is selected.
This opens a browser, signs you in using the new Auth0 app that was just created, and returns control to the terminal. You can either create a new account with an email and password using the **Sign up** link when prompted to sign in, or sign in using the **Continue with Acme-helpdesk** button and its seeded users like `carol@acme.test` with password `demo1234`.
Now connect the new custom OAuth2 connection, using the `acme-helpdesk` slug you chose earlier:
```bash
auth0-tv connect acme-helpdesk \
--scopes "openid,profile,read:tickets,write:tickets" \
--allowed-domains "$ACME_HOST"
```
What happens:
1. `auth0-tv` redirects you through Auth0's Connected Accounts flow.
2. Auth0 redirects you to our sample app's `/authorize` endpoint.
3. You sign in as one of the demo users (for example, `alice@acme.test` / `demo1234`) and click **Allow** on the consent screen.
4. Auth0 stores the resulting access + refresh tokens in Token Vault, under your Auth0 user profile.
Back in the terminal, confirm the connection:
```bash
auth0-tv connections
```
You should see `acme-helpdesk` listed with the scopes you requested.
Now make your first authenticated call:
```bash
auth0-tv fetch acme-helpdesk https://$ACME_HOST/tickets
```
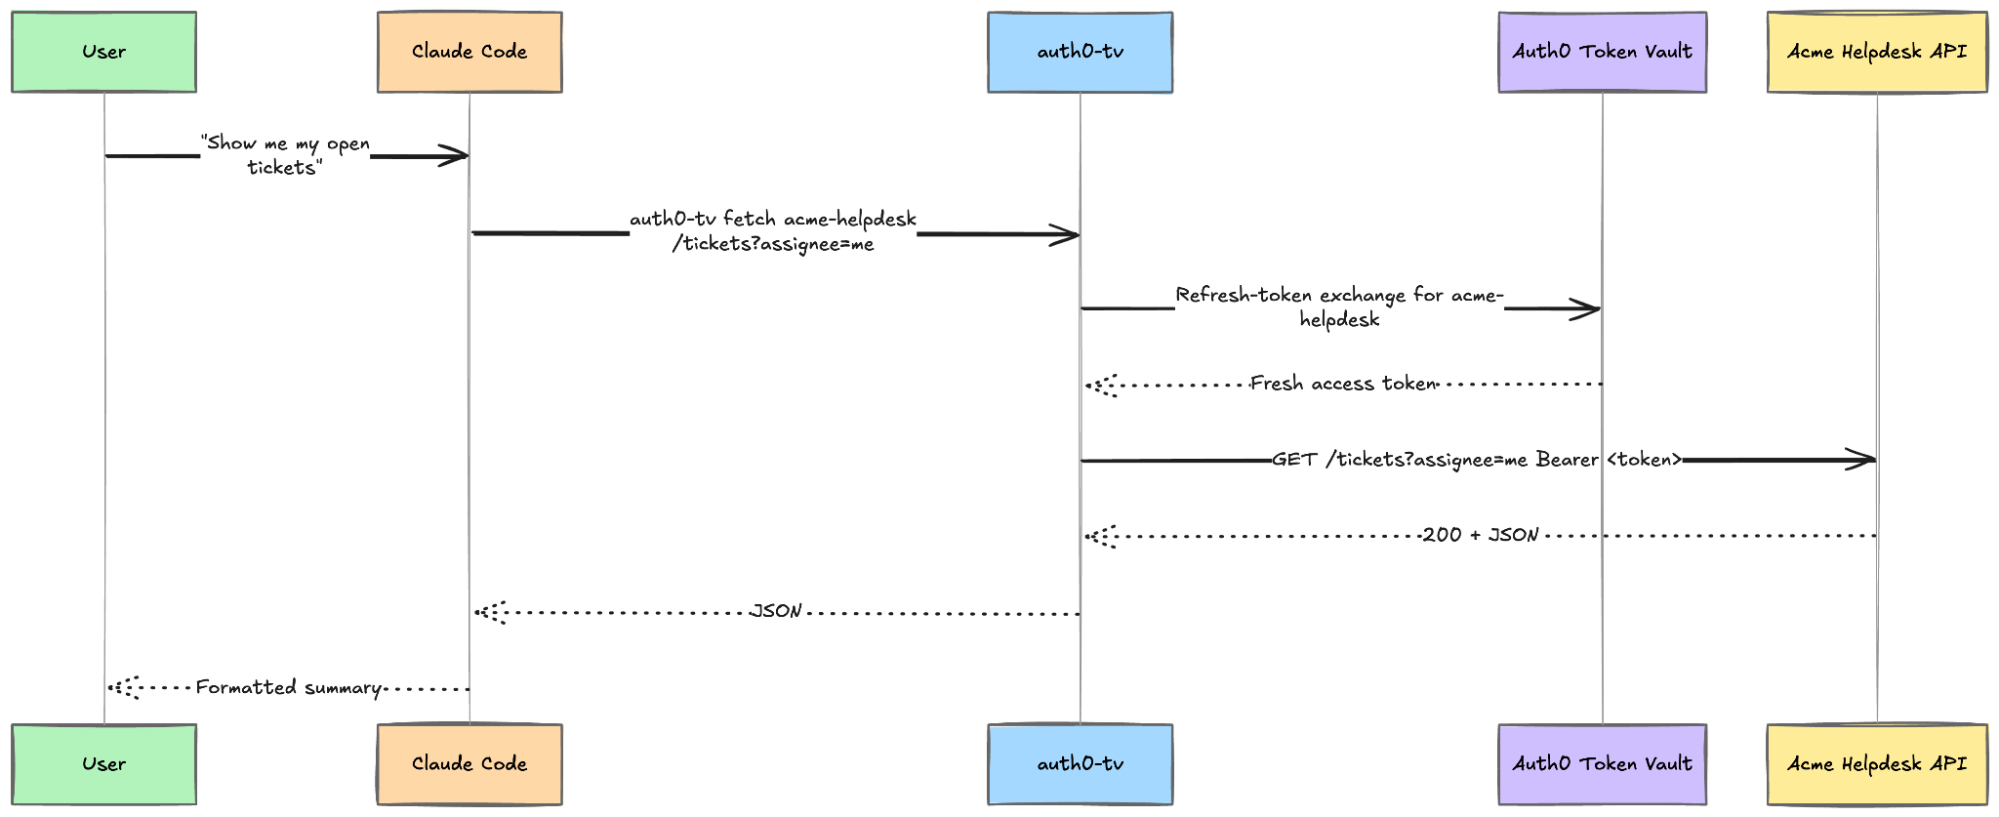
The CLI pulls a fresh access token from Token Vault (exchanging your refresh token under the hood), calls the URL with `Authorization: Bearer ...` injected, and prints the JSON response. Neither you nor the agent ever saw a token in plaintext.
That is it. You have set up a custom OAuth2 connection for Token Vault.
### Checkpoint
At this point, you should be able to:
- See `acme-helpdesk` under `auth0-tv connections`
- List tickets via `auth0-tv fetch acme-helpdesk https://$ACME_HOST/tickets`
## Using It from Claude Code
This is the part that turns a clever CLI into something an agent can use.
`auth0-token-vault-cli` ships an [Agent Skill](https://agentskills.io/) that teaches supported agents how to call `auth0-tv` correctly: which scopes map to which services, how to interpret errors, and how to re-run `connect` when a scope is missing. The skill is available through the Claude Code plugin marketplace.
Install it:
```bash
/plugin marketplace add deepu105/auth0-token-vault-cli
/plugin install auth0-token-vault@auth0-token-vault
/reload-plugins
```
Now, try asking the assistant:
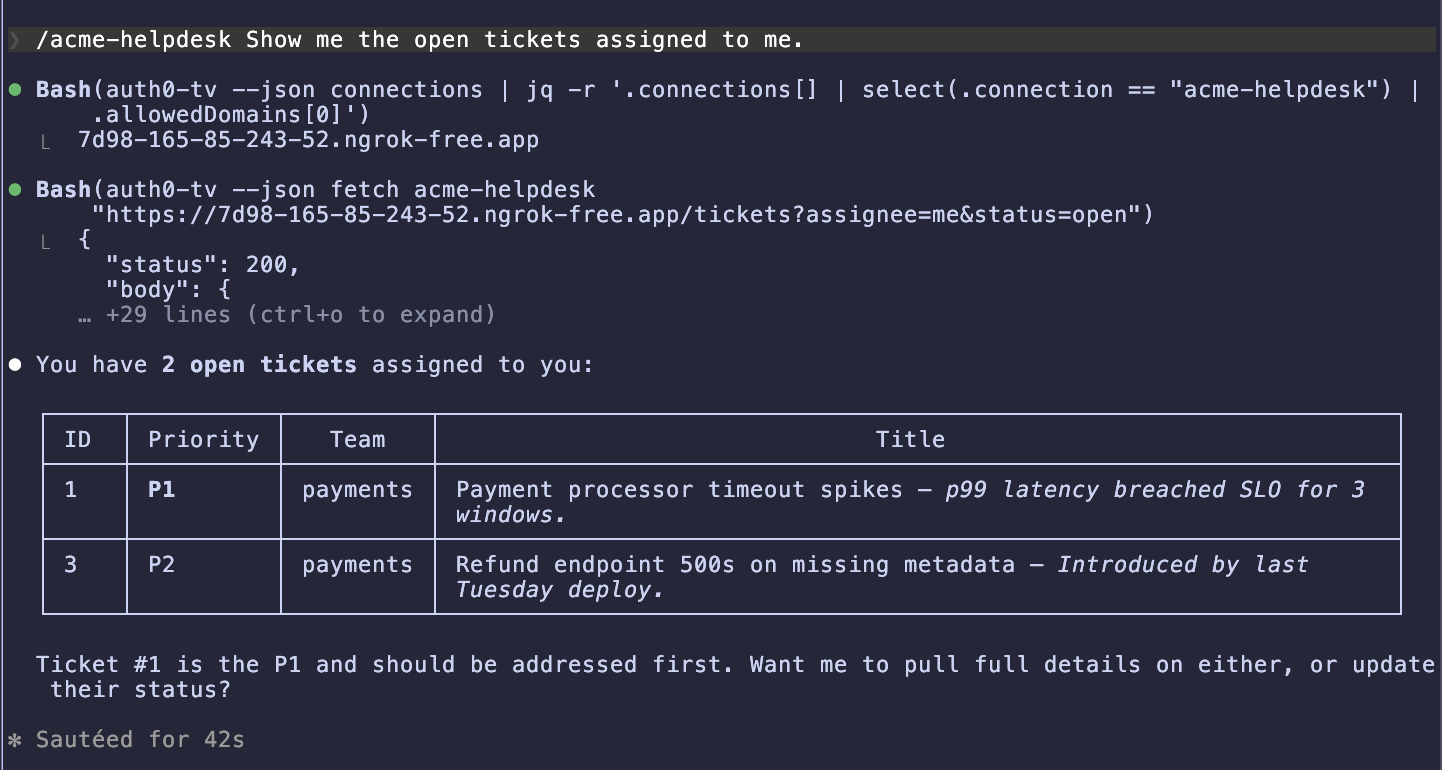
**You:** "/auth0-token-vault Show me the open tickets assigned to me in acme-helpdesk."
Claude Code picks up the `auth0-token-vault` skill and resolves that `acme-helpdesk` is a connected service. You will get the ticket list back, but you might notice the agent spends a few back-and-forth calls figuring out the API shape first: a GET on `/tickets/me`, then `/api/tickets`, then `/tickets?user=me`, before landing on `/tickets?assignee=me&status=open`. The `auth0-token-vault` skill knows how to talk to Token Vault but has no idea what endpoints `acme-helpdesk` exposes.
The fix is a second skill sitting on top: a small `acme-helpdesk` skill that documents the API so the agent does not have to guess. The sample repo ships one at [`skills/acme-helpdesk/SKILL.md`](https://github.com/deepu105/acme-helpdesk-oauth2-sample/blob/main/skills/acme-helpdesk/SKILL.md). It is ~70 lines of markdown: a short API reference (endpoints, filters, value constraints), a couple of example commands, and a note about `auth0-tv`'s `--json` response envelope. No code.
Drop it into your Claude Code user skills directory:
```bash
# Point this at your local clone of the sample repo
export ACME_SAMPLE_DIR=~/path/to/acme-helpdesk-oauth2-sample
mkdir -p ~/.claude/skills/acme-helpdesk
cp "$ACME_SAMPLE_DIR/skills/acme-helpdesk/SKILL.md" \
~/.claude/skills/acme-helpdesk/SKILL.md
```
Reload plugins (`/reload-plugins`), then try the same prompt again:
**You:** "/acme-helpdesk Show me the open tickets assigned to me."
This time, Claude goes straight to `auth0-tv --json fetch acme-helpdesk "https://$ACME_HOST/tickets?assignee=me&status=open"` and returns the list on the first try, no trial and error.
 A few more prompts worth trying:
**You:** "/acme-helpdesk Open a new P1 incident titled 'Checkout 500s spiking' in the payments team."
The agent should call `POST /tickets` with the right body and report back with the new ticket ID.
**You:** "/acme-helpdesk List all in-progress tickets on the platform team."
Filters combine cleanly. The agent picks the right query string.
**You:** "/acme-helpdesk Mark ticket 42 as resolved."
A `PATCH /tickets/42` with `{"status":"resolved"}`. The agent will echo the updated record.
Great! Your coding assistant can now drive an API it has never seen before, using the same credentials flow as a human user, with no agent-level token handling.
### Using it from OpenClaw
[OpenClaw](https://openclaw.ai) users get the same skill through [ClawHub](https://clawhub.ai):
```bash
npx clawhub@latest install auth0-token-vault
```
Restart OpenClaw, and the same prompts work. The skill manifest is shared, so the behavior is identical. You can also add the same `acme-helpdesk` skill to OpenClaw by dropping it into the user skills directory:
```bash
mkdir -p ~/.openclaw/skills/acme-helpdesk
cp ~/path/to/acme-helpdesk-oauth2-sample/skills/acme-helpdesk/SKILL.md \
~/.openclaw/skills/acme-helpdesk/SKILL.md
```
Restart OpenClaw once more, and the agent gets the same one-shot behavior: no endpoint guessing, direct `auth0-tv --json fetch` on the right URL.
## What You Have Accomplished
- Ran a small OAuth2-compliant API locally and made it publicly accessible for Auth0.
- Registered the API as an **Auth0 custom OAuth2 social connection** with **Connected Accounts for Token Vault** enabled.
- Connected to it from the terminal via `auth0-tv connect acme-helpdesk`, and called it with `auth0-tv fetch`.
- Gave **Claude Code** (and, optionally, OpenClaw) the same capability via an Agent Skill, without your agent ever handling a token.
### Extending further
- **Swap the helpdesk for your own service.** The steps are identical. Change the authorization/token URLs, point the fetch-user-profile script at your `/userinfo` endpoint, pick your own scopes, and you are in.
- **Add more scopes.** `auth0-tv connect --scopes ...` accepts any scope string your service understands. Connecting again with a broader scope prompts a re-consent.
- **Mix with built-in connections.** The same [Connected Accounts](https://auth0.com/docs/secure/tokens/token-vault/connected-accounts-for-token-vault) machinery links a user profile to Google, GitHub, Slack, _and_ your internal helpdesk simultaneously. The agent sees them all through one CLI.
## Learn More About Auth0 Token Vault
[Auth0 Token Vault](https://auth0.com/ai/docs/intro/token-vault) lets your AI agent call external APIs on a user's behalf without ever seeing the user's credentials, whether those APIs come from a built-in integration like Google or Slack, or a first-party internal service wired in through a custom OAuth2 connection like we did here. That combination, a single agent-visible surface over both the public SaaS world and your own APIs, is what [Auth0 for AI Agents](https://a0.to/ai-content) is built for.
Sign up for [Auth0 for AI Agents](https://a0.to/ai-content).
A few more prompts worth trying:
**You:** "/acme-helpdesk Open a new P1 incident titled 'Checkout 500s spiking' in the payments team."
The agent should call `POST /tickets` with the right body and report back with the new ticket ID.
**You:** "/acme-helpdesk List all in-progress tickets on the platform team."
Filters combine cleanly. The agent picks the right query string.
**You:** "/acme-helpdesk Mark ticket 42 as resolved."
A `PATCH /tickets/42` with `{"status":"resolved"}`. The agent will echo the updated record.
Great! Your coding assistant can now drive an API it has never seen before, using the same credentials flow as a human user, with no agent-level token handling.
### Using it from OpenClaw
[OpenClaw](https://openclaw.ai) users get the same skill through [ClawHub](https://clawhub.ai):
```bash
npx clawhub@latest install auth0-token-vault
```
Restart OpenClaw, and the same prompts work. The skill manifest is shared, so the behavior is identical. You can also add the same `acme-helpdesk` skill to OpenClaw by dropping it into the user skills directory:
```bash
mkdir -p ~/.openclaw/skills/acme-helpdesk
cp ~/path/to/acme-helpdesk-oauth2-sample/skills/acme-helpdesk/SKILL.md \
~/.openclaw/skills/acme-helpdesk/SKILL.md
```
Restart OpenClaw once more, and the agent gets the same one-shot behavior: no endpoint guessing, direct `auth0-tv --json fetch` on the right URL.
## What You Have Accomplished
- Ran a small OAuth2-compliant API locally and made it publicly accessible for Auth0.
- Registered the API as an **Auth0 custom OAuth2 social connection** with **Connected Accounts for Token Vault** enabled.
- Connected to it from the terminal via `auth0-tv connect acme-helpdesk`, and called it with `auth0-tv fetch`.
- Gave **Claude Code** (and, optionally, OpenClaw) the same capability via an Agent Skill, without your agent ever handling a token.
### Extending further
- **Swap the helpdesk for your own service.** The steps are identical. Change the authorization/token URLs, point the fetch-user-profile script at your `/userinfo` endpoint, pick your own scopes, and you are in.
- **Add more scopes.** `auth0-tv connect --scopes ...` accepts any scope string your service understands. Connecting again with a broader scope prompts a re-consent.
- **Mix with built-in connections.** The same [Connected Accounts](https://auth0.com/docs/secure/tokens/token-vault/connected-accounts-for-token-vault) machinery links a user profile to Google, GitHub, Slack, _and_ your internal helpdesk simultaneously. The agent sees them all through one CLI.
## Learn More About Auth0 Token Vault
[Auth0 Token Vault](https://auth0.com/ai/docs/intro/token-vault) lets your AI agent call external APIs on a user's behalf without ever seeing the user's credentials, whether those APIs come from a built-in integration like Google or Slack, or a first-party internal service wired in through a custom OAuth2 connection like we did here. That combination, a single agent-visible surface over both the public SaaS world and your own APIs, is what [Auth0 for AI Agents](https://a0.to/ai-content) is built for.
Sign up for [Auth0 for AI Agents](https://a0.to/ai-content).