---
title: "Node.js and Express Authentication Using Passport"
description: "Learn how to use Passport.js to add user authentication to a web app built with Node.js and Express."
authors:
- name: "Dan Arias"
url: "https://auth0.com/blog/authors/dan-arias/"
date: "Oct 7, 2021"
category: "Developers,Tutorial,Node"
tags: ["node", "express", "pug", "server-side-rendering", "server-side", "ssr", "web-app", "css", "node-js"]
url: "https://auth0.com/blog/create-a-simple-and-secure-node-express-app/"
---
# Node.js and Express Authentication Using Passport
In this tutorial, you'll learn how to secure **Node.js** web application built with the **Express** framework. You'll use **Passport.js with Auth0** to manage user authentication and protect routes of a client that consumes an API. The client is server-side rendered using **Pug** templates styled with **CSS**.

> Look for the 🛠️️ emoji if you'd like to skim through the content while focusing on the build steps.
Are you starting from this chapter?
If you are starting from this chapter, follow these steps to set up a simple web app built with Express and Pug, which is the basis for this chapter's security exercises:
🛠️️ Clone the project repository:
``` bash
git clone -b starter git@github.com:auth0-blog/wab-portal-express.git
```
> To quickly copy commands, **triple-click them** to select them fully.
🛠️️ Make `wab-portal-express` the current working directory:
``` bash
cd wab-portal-express
```
🛠️️ Install the project dependencies:
``` bash
npm i
```
🛠️️ Run the server using `nodemon` under the hood:
``` bash
npm run dev
```
🛠️️ In a separate terminal window, serve the client from a static server using Browsersync under the hood:
``` bash
npm run ui
```
> Browsersync proxies the server running on port `8000` with `nodemon`. Check out the npm script commands present in `package.json` for more details.
🛠️️ To see the app in action, visit [`http://localhost:3000`](http://localhost:3000) on your browser.
## What You Will Build
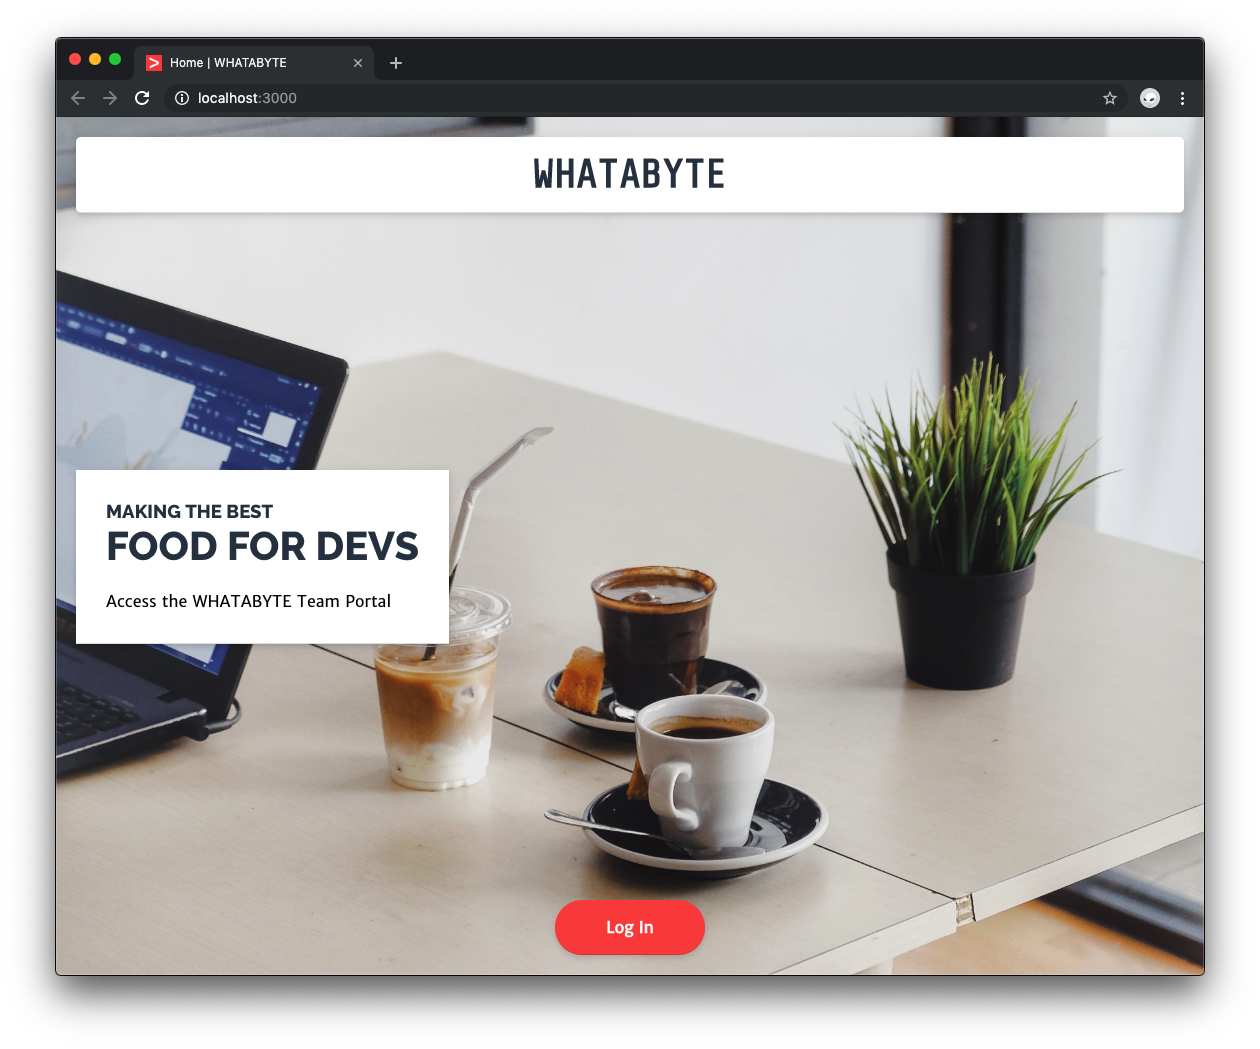
You'll secure the login portal for a restaurant named WHATABYTE using Passport.js with Auth0:
We tested this tutorial using Node.js `v12.16.0` and npm `v6.13.4`. If you need to install Node.js and npm, use any of the [official Node.js installers](https://nodejs.org/en/download/) provided for your operating system.
## Set Up Real-World Authentication for Node.js
This tutorial's core objective is to teach you how to set up real-world authentication in a Node.js Express app. For that reason, you'll start by setting up Auth0 to interact with a real authentication server throughout the tutorial. Otherwise, Passport.js gives you a ton of error messages in the terminal, and the app won't run.
Auth0 is a global leader in [Identity-as-a-Service (IDaaS)](https://www.webopedia.com/TERM/I/idaas-identity-as-a-service.html). Its extensible platform seamlessly authenticates and secures more than 2.5 billion logins per month, making it loved by developers and trusted by global enterprises.
The best part of the Auth0 platform is how streamlined it is to get started by following these three easy steps.
### Step 1: Sign up and create an Auth0 application
🛠️️ If you are new to Auth0, sign up for a free Auth0 account here. A free account offers you:
- 7,000 free active users and unlimited logins.
- [Universal Login](https://auth0.com/universal-login) for Web, iOS, and Android.
- Up to 2 [social identity providers](https://auth0.com/learn/social-login/) like Facebook, Github, and Twitter.
- Unlimited [serverless extensibility](https://auth0.com/docs/rules/current).
🛠️️ During the sign-up process, you'll create something called a **Tenant**, representing the product or service to which you are adding authentication — more on this in a moment.
🛠️️ Once you are signed in, you are welcomed into the Auth0 Dashboard. In the left sidebar menu, click on ["Applications"](https://manage.auth0.com/#/applications).
**What's the relationship between Auth0 Tenants and Auth0 Applications?**
Let's say that you have a photo-sharing React app called "Noddit". You then would create an **Auth0 tenant** called `noddit`.
Now, say that Noddit is available on **three platforms**: **web** as a single-page application and as a native mobile app for **Android** and **iOS**. If each platform needs authentication, you need to create **three Auth0 applications** to provide the product with everything it needs to authenticate users through that platform.
🛠️️ Next, click on the **Create Application** button present in the "Applications" view. A modal titled "Create Application" opens up. You can provide a **Name** for the application and choose its **type**:
**Name**: WHATABYTE Express Portal
**Application type**: Regular Web Applications
🛠️️ Click on **Create**.
The **Quick Start** tab of your application page loads up, where Auth0 provides different guides to get you up and running with setting up a project. If you are curious, check out the Node.js quickstart; otherwise, keep on reading.
### Step 2: Create a communication bridge between Express and Auth0
To reduce the overhead of adding and managing authentication, Auth0 offers the [Universal Login](https://auth0.com/docs/hosted-pages/login) page, which is the most secure way to easily authenticate users for web applications without having to worry about login forms.
**How does [Universal Login work](https://auth0.com/docs/hosted-pages/login#how-does-universal-login-work)?**
Calling the `GET /login` endpoint from your application takes your users to an Auth0 login page.
Once they log in, Auth0 redirects them back to your application. With security in mind, for this to happen, you need to configure your Auth0 application with URLs that it can use to redirect users once it authenticates them.
**Watch a video on how Auth0 Universal Login works.**
🛠️️ To configure your Auth0 application, click on the **Settings** tab. Once there, populate the following fields like so:
- 🛠️️ **Allowed Callback URLs**:
``` bash
http://localhost:3000/callback, http://localhost:8000/callback
```
- 🛠️️ **Allowed Logout URLs**:
``` bash
http://localhost:3000/, http://localhost:8000/
```
If you take a look at `package.json`, you'll see that you can run two npm scripts in this project:
- `dev` runs your Node.js application using `nodemon` on port `8000`.
- `ui` creates a static server to serve the client on port `3000`.
To ensure that Auth0 can connect with any of these two environments, you enter URLs that use both port numbers.
🛠️️ Save these settings by scrolling down and clicking on **Save Changes**.
### Step 3: Add Auth0 configuration variables to Node.js
🛠️️ Under the project directory, create a hidden file called `.env` to store configuration variables and secrets that your app needs.
``` bash
touch .env
```
**Make sure to add this file to `.gitignore` so that it isn't committed to version control**.
🛠️️ Add the following to `.env`:
``` bash
AUTH0_CLIENT_ID=
AUTH0_DOMAIN=
AUTH0_CLIENT_SECRET=
```
🛠️️ Head back to your Auth0 application **Settings** tab and populate each property of the `.env` hidden file with its corresponding Auth0 application value:
- 🛠️️ `AUTH0_DOMAIN` is your **Domain** value
When you created a new account with Auth0, you picked a name for your tenant. This name is used as a subdomain of `auth0.com` and becomes your unique Auth0 application domain. It's the base URL you use to access the Auth0 API and the URL where your application redirects users for Auth0 to authenticate them.
> You can also use [custom domains](https://auth0.com/docs/getting-started/the-basics#custom-domains) to let Auth0 do the authentication heavy lifting for you without compromising on branding experience.
- 🛠️️ `AUTH0_CLIENT_ID` is your **Client ID**
Auth0 assigns to each application a [Client ID](https://auth0.com/docs/getting-started/the-basics#application) upon creation, which is an alphanumeric string that acts as a unique identifier for your application (such as `q8fij2iug0CmgPLfTfG1tZGdTQyGaTUA`). It cannot be modified, and it's used by your application when making Auth0 API calls.
- 🛠️️ `AUTH0_CLIENT_SECRET` is your **Client Secret**
The Auth0 Client Secret is a critical value as it protects your resources by only granting authentication-related credentials in the form of **tokens** to requestors if they're authorized. Think of it as your application's password, which **must be kept confidential at all times**. If anyone gains access to your **Client Secret**, they can impersonate your application and access protected resources.
Together, these variables let your application identify itself as an authorized party to interact with the Auth0 authentication server.
## Add User Authentication to an Express App
With a real authentication server now set up, you are ready to learn how to add user authentication to an Express app using Passport.
🛠️️ To start, you need to create a `GET /login` endpoint in your API to manage everything related to user authentication, which means verifying a user's identity.
Saying that implementing authentication is challenging is not an understatement. The authentication process itself is relatively straightforward; however, it is complicated to correctly and securely implement each step of the process and follow [best practices as suggested by the Open Web Application Security Project (OWASP)](https://github.com/OWASP/CheatSheetSeries/blob/master/cheatsheets/Authentication_Cheat_Sheet.md), which include:
- Implementing proper password strength controls such as password length, complexity, and topology.
- Implementing secure password recovery mechanisms.
- Storing passwords securely, which includes [hashing passwords with a salt](https://auth0.com/blog/adding-salt-to-hashing-a-better-way-to-store-passwords/).
- Transmitting passwords only over TLS or other strong transport.
- Correctly implementing authentication and error messages that mitigate user ID and password enumeration.
- Preventing brute-force attacks.
These authentication best practices address different attack vectors and mitigate vulnerabilities in the authentication process that could compromise your users' identity. Technically, your team can implement all of these authentication steps, but that's a risky undertaking as you've learned so far. Instead, you can offload the risk and responsibility of strong authentication to [an identity platform such as Auth0](https://auth0.com/), so that you can focus on building features without worrying about security details.
🛠️️ To connect your app with Auth0, you'll use the Node.js SDKs. Then, any time a user tries to authenticate, the Auth0 authentication server will verify their identity and send the required information back to your app.
### Use middleware for authentication
As explained in the ["Using middleware" section of the Express docs](https://expressjs.com/en/guide/using-middleware.html), an Express application is essentially a series of middleware function calls that execute during the request-response cycle. Each function can modify the request and response objects as needed and then either pass control to the next middleware function or end the request-response cycle.
When creating protected routes in Express, you need to know the user's authentication status before executing the logic of route controllers. Thus, authentication in Express is a step in the request-response cycle, which you can implement as middleware.
To make the implementation of authentication easier, instead of writing all the code needed to structure the authentication middleware, you'll use [Passport.js](http://www.passportjs.org/), a simple and unobtrusive authentication middleware for Node.js created by [Jared Hanson](https://auth0.com/blog/authors/jared-hanson/), a former Principal Architect at Auth0.
## Set up Passport.js with Node and Express
As explained in the [Passport.js "Overview" document](http://www.passportjs.org/docs/), authentication takes a variety of forms: users may log in by providing a username and password or single sign-on using an OAuth provider such as Facebook or Twitter.
Passport.js offers different authentication mechanisms, known as _strategies_, to cater to the unique authentication requirements each application has. Passport.js packages strategies as individual modules, and you can choose which strategies to employ, without creating unnecessary dependencies.
🛠️️ You are going to use the Auth0 authentication strategy with Passport.js so that you don't have to worry about creating and managing user credentials yourself. To start, install the following packages:
``` bash
npm i passport passport-auth0 express-session dotenv
```
Here's a breakdown of each package you are installing:
- [`passport`](https://www.npmjs.com/package/passport): As discussed, Passport.js is Express-compatible authentication middleware for Node.js.
- [`passport-auth0`](https://www.npmjs.com/package/passport-auth0): This is the Auth0 authentication strategy for Passport.js.
- [`express-session`](https://www.npmjs.com/package/express-session): This is a module to create and manage session middleware.
- [`dotenv`](https://www.npmjs.com/package/dotenv): This is a zero-dependency module that loads environment variables from a `.env` file into `process.env`.
### Configure `express-session`
🛠️️ Next, open `index.js` and add the following under the `Required External Modules` section:
``` javascript
// index.js
/**
* Required External Modules
*/
const express = require("express");
const path = require("path");
const expressSession = require("express-session");
const passport = require("passport");
const Auth0Strategy = require("passport-auth0");
require("dotenv").config();
```
You are adding imports for `express-session`, `passport`, and `passport-auth0`, which you'll configure in the next sections. You also use `dotenv` to load the environmental variables that you are storing in `.env`.
🛠️️ Between the `App Variables` and `App Configuration` sections, create two new sections, `Session Configuration` and `Passport Configuration`:
``` javascript
// index.js
/**
* App Variables
*/
const app = express();
const port = process.env.PORT || "8000";
/**
* Session Configuration (New!)
*/
/**
* Passport Configuration (New!)
*/
/**
* App Configuration
*/
// Rest of code...
```
Order matters in Express. Please ensure that you add the sections in the right order.
🛠️️ Under `Session Configuration`, configure `expressSession` as follows:
``` javascript
// index.js
/**
* Session Configuration
*/
const session = {
secret: process.env.SESSION_SECRET,
cookie: {},
resave: false,
saveUninitialized: false
};
if (app.get("env") === "production") {
// Serve secure cookies, requires HTTPS
session.cookie.secure = true;
}
```
`expressSession` takes a configuration object, `session`, that defines what options to enable in a session. Here, you are configuring the following options:
- [`secret`](https://www.npmjs.com/package/express-session#secret): This is the secret used to sign the session ID cookie, which can be either a string for a single secret or an array of multiple secrets. You'll create the `SESSION_SECRET` environmental variable shortly.
- [`cookie`](https://www.npmjs.com/package/express-session#cookie): This is the settings object for the session ID cookie. The default value is `{ path: '/', httpOnly: true, secure: false, maxAge: null }`. You are setting this to be an empty object.
- [`resave`](https://www.npmjs.com/package/express-session#resave): This option forces the session to be saved back to the session store, even if the application doesn't modify the session during the request. For the Auth0 Passport.js strategy, you need this to be `false`.
- [`saveUninitialized`](https://www.npmjs.com/package/express-session#saveuninitialized): This forces a session that is new, but not modified, _uninitialized_, to be saved to the store. Passport.js handles the modification of the session so you can set it to `false`. If set to `true`, when your web page gets crawled by bots, it creates a session for them in addition to users who only visit your front page but don't log in, which uses up more sessions and memory.
> For more details, read this comment by [Gabe de Luca, pointing out the downsides of savings uninitialized sessions](https://github.com/expressjs/session/issues/273#issuecomment-184740339).
You now need to create the session secret for the app.
🛠️ Open `.env` and add a `SESSION_SECRET` and `AUTH0_CALLBACK_URL` variable below `AUTH0_CLIENT_SECRET`:
``` bash
AUTH0_CLIENT_ID="..."
AUTH0_DOMAIN="..."
AUTH0_CLIENT_SECRET="..."
SESSION_SECRET=
AUTH0_CALLBACK_URL=http://localhost:3000/callback
```
🛠️ Execute the following command to generate a suitable string for the session secret:
``` bash
node -e "console.log(crypto.randomBytes(32).toString('hex'))"
```
🛠️ Copy and paste the output of the command above as the value for `SESSION_SECRET` in `.env`.
You'll learn what `AUTH0_CALLBACK_URL` does for your application once you configure Passport.js in the next section.
🛠️ Restart the server running on port `8000` so that Express can recognize these new variables. Then, refresh the page where the user interface is running.
Additionally, when your app is running as a production instance, you'll only send cookies over HTTPS:
``` javascript
if (app.get("env") === "production") {
// Serve secure cookies, requires HTTPS
session.cookie.secure = true;
}
```
With [`session.cookie.secure`](https://github.com/expressjs/session#cookiesecure) set to `true`, compliant clients won't send cookies back to the server if the browser doesn't have an HTTPS connection. Thus, using secure cookies requires an HTTPS-enabled website.
🛠️️ Next, under the `App Configuration` section, tell your Express app to use `expressSession` with the `session` object you just created:
``` javascript
// index.js
/**
* App Configuration
*/
app.set("views", path.join(__dirname, "views"));
app.set("view engine", "pug");
app.use(express.static(path.join(__dirname, "public")));
app.use(expressSession(session));
```
🛠️️ With the session middleware configured, you are ready to add and configure Passport.js in your application.
### Configure Passport with the application settings
In this section, you'll focus on wiring up Passport.js with your Express app.
🛠️️ With `Auth0Strategy` already imported, proceed to define this strategy under the `Passport Configuration` section in `index.js`:
``` javascript
// index.js
/**
* Passport Configuration
*/
const strategy = new Auth0Strategy(
{
domain: process.env.AUTH0_DOMAIN,
clientID: process.env.AUTH0_CLIENT_ID,
clientSecret: process.env.AUTH0_CLIENT_SECRET,
callbackURL: process.env.AUTH0_CALLBACK_URL
},
function(accessToken, refreshToken, extraParams, profile, done) {
/**
* Access tokens are used to authorize users to an API
* (resource server)
* accessToken is the token to call the Auth0 API
* or a secured third-party API
* extraParams.id_token has the JSON Web Token
* profile has all the information from the user
*/
return done(null, profile);
}
);
```
Here, the `Auth0Strategy` method takes your Auth0 credentials and initializes the strategy. It's essential to understand what the `Auth0Strategy` is doing for you:
1. The callback function passed to the `Auth0Strategy` method is known as the _verify callback_, which has the purpose of finding the user that possesses a set of credentials.
2. When Passport.js authenticates a request, it parses the credentials or any other authentication information contained in the request.
3. It then invokes the verify callback with the authentication data as arguments, in this case, `accessToken`, `refreshToken`, `extraParams`, and `profile`.
4. Since Passport.js is a middleware function, the verify callback also receives `done` as an argument to pass control to the next middleware function.
5. As Auth0 does all the credential validation for you, the verify callback invokes `done` to supply Passport with the user that authenticated through the `profile` object.
🛠️️ Once the `strategy` is defined, you need to have Passport.js use it. In Express applications, you are also required to initialize Passport and modify the persistent login session using Passport and the `app.use()` method from Express. To achieve these tasks, update the `App Configuration` section in `index.js` as follows:
``` javascript
/**
* App Configuration
*/
app.set("views", path.join(__dirname, "views"));
app.set("view engine", "pug");
app.use(express.static(path.join(__dirname, "public")));
app.use(expressSession(session));
passport.use(strategy);
app.use(passport.initialize());
app.use(passport.session());
```
You must ensure that `passport.initialize()` and `passport.session()` are added after binding the `express-session` middleware, `expressSession(session)`, to the application-level middleware.
### Store and retrieve user data from the session
🛠️️ The last step in setting up Passport.js is to support login sessions by serializing and deserializing user instances to and from the session. To integrate this functionality, once again, update the `App Configuration` section as follows:
``` javascript
// index.js
/**
* App Configuration
*/
app.set("views", path.join(__dirname, "views"));
app.set("view engine", "pug");
app.use(express.static(path.join(__dirname, "public")));
app.use(expressSession(session));
passport.use(strategy);
app.use(passport.initialize());
app.use(passport.session());
passport.serializeUser((user, done) => {
done(null, user);
});
passport.deserializeUser((user, done) => {
done(null, user);
});
```
It's essential to keep the amount of data stored within the session small to ensure good performance and fast user lookup. The application only serializes the user object into the session. When the server receives subsequent requests, this stored object is used to locate the user and reassign it to `req.user`.
Now that you have configured Passport.js, the next step is to add authentication endpoints to your API to handle user login and logout and provide an endpoint for the Auth0 authentication server to communicate with your app.
## Create Express Authentication Endpoints
🛠️️ In this section, you will create three endpoints that handle the application's authentication flow:
``` bash
GET /login
GET /logout
GET /callback
```
To manage these endpoints better, you will create them within an authentication module and export them through an Express router so that your Express application can use them.
🛠️️ To start, create an `auth.js` file under the project directory.
``` bash
touch auth.js
```
Populate it with this template to define its structure:
``` javascript
// auth.js
/**
* Required External Modules
*/
/**
* Routes Definitions
*/
/**
* Module Exports
*/
```
🛠️️ Next, add the following under the `Required External Modules` section to import packages that are needed and load your environmental variables:
``` javascript
// auth.js
/**
* Required External Modules
*/
const express = require("express");
const router = express.Router();
const passport = require("passport");
const querystring = require("querystring");
require("dotenv").config();
```
Here's an overview of the new modules you are using:
- [`router`](https://expressjs.com/en/api.html#router): A router object is an isolated instance of middleware and routes. It is capable only of performing middleware and routing functions. Every Express application has a built-in app router.
- [`util`](https://nodejs.org/api/util.html): This module is designed to support the needs of Node.js internal APIs by providing useful utility functions to perform tasks like formatting and encoding strings.
- [`url`](https://nodejs.org/api/url.html): This module provides utilities for URL resolution and parsing.
- [`querystring`](https://nodejs.org/api/querystring.html): This module provides utilities for parsing and formatting URL query strings.
You'll soon see how these modules streamline your route controller logic.
🛠️️ The first endpoint you'll create is the `GET /login` one. Update the `Routes Definitions` section of your `auth.js` file as follows:
``` javascript
// auth.js
/**
* Routes Definitions
*/
router.get(
"/login",
passport.authenticate("auth0", {
scope: "openid email profile"
}),
(req, res) => {
res.redirect("/");
}
);
```
🛠️️ `GET /login` performs the user login. This endpoint demonstrates how an Express route can take multiple callbacks after defining the route `path` (first argument). Here, you pass two callback functions:
- The `passport.authenticate()` method, which gets the Passport.js strategy and an `options` object that defines the application `scopes` as arguments.
- A custom callback is called after `passport.authenticate()` finishes. This callback handles authentication success or failure and issues a response to the client.
🛠️️ After the authentication server identifies and validates the user, it calls the `GET /callback` endpoint from your API to pass all the required authentication data. Implement that endpoint by appending the following `GET /callback` definition to the `Routes Definitions` section:
``` javascript
// auth.js
/**
* Routes Definitions
*/
router.get("/login", ... );
router.get("/callback", (req, res, next) => {
passport.authenticate("auth0", (err, user, info) => {
if (err) {
return next(err);
}
if (!user) {
return res.redirect("/login");
}
req.logIn(user, (err) => {
if (err) {
return next(err);
}
const returnTo = req.session.returnTo;
delete req.session.returnTo;
res.redirect(returnTo || "/");
});
})(req, res, next);
});
```
`GET /callback` performs the final stage of authentication and redirects to the previously requested URL or `/` if that URL doesn't exist. Within the custom callback function, you check for the presence of an error, `err`, and if the `user` object is defined. If there's an error, you pass control to the next middleware function along with the error object. If authentication has failed, `user` is false, and you redirect the user back to the `/login` page.
Since you call the `passport.authenticate()` method within the route controller, it has access to the request, `req`, and response, `res`, objects through a closure. If authentication is successful, you call `req.LogIn()` to establish a login session. `req.logIn()` is a function exposed by Passport.js on the `req` object. When the login operation completes, the `req` object gets a `user` property added, containing all the user information.
After establishing a login session, you can improve your app's user experience by redirecting your users to the page they were visiting before the authentication request took place. The route of such a page is the value of `req.session.returnTo`, which you assign to the `returnTo` variable before deleting it. If `returnTo` is defined, you redirect the user to that route; otherwise, you take them to a `/user` page that should, ideally, present the user with their information.
> You can redirect to any other routes.
As you can see, `GET /callback` acts as the bridge between your application and the Auth0 authentication server. Using Passport.js, you can streamline the process of creating a login session and an active user in your app.
🛠️️ You are almost done. The last authentication endpoint to implement is `GET /logout`, and it's the most complex one. Append the following `GET /logout` definition to the `Routes Definitions` section:
``` javascript
// auth.js
/**
* Routes Definitions
*/
router.get("/login", ... );
router.get("/callback", ... );
router.get("/logout", (req, res) => {
req.logOut();
let returnTo = req.protocol + "://" + req.hostname;
const port = req.connection.localPort;
if (port !== undefined && port !== 80 && port !== 443) {
returnTo =
process.env.NODE_ENV === "production"
? `${returnTo}/`
: `${returnTo}:${port}/`;
}
const logoutURL = new URL(
`https://${process.env.AUTH0_DOMAIN}/v2/logout`
);
const searchString = querystring.stringify({
client_id: process.env.AUTH0_CLIENT_ID,
returnTo: returnTo
});
logoutURL.search = searchString;
res.redirect(logoutURL);
});
```
This route performs a session logout and redirects the user to the homepage.
Passport.js also exposes a `logOut()` function on the request object, `req`, which you can call from any route controller that needs to terminate a login session. Calling `req.logOut()` removes the `req.user` property and clears the existing login session. After that, you build the URL that users are redirected to once the logout is complete as follows:
- Start the URL string with the protocol and hostname:
``` javascript
let returnTo = req.protocol + "://" + req.hostname;
```
- Determine if you are using a local port. If the port is neither `undefined`, the default port number for web servers using HTTP (`80`), nor the default port for web servers using HTTPS (`443`), you append this port to the `returnTo` URL string if the current Node environment is `development`:
``` javascript
const port = req.connection.localPort;
if (port !== undefined && port !== 80 && port !== 443) {
returnTo =
process.env.NODE_ENV === "production"
? `${returnTo}/`
: `${returnTo}:${port}/`;
}
```
- Use the [Node.js `URL()`](https://nodejs.org/api/url.html#url_constructor_new_url_input_base) constructor along with the [`util.format()`](https://nodejs.org/api/util.html#util_util_format_format_args) to return a formatted string by replacing format specifiers (characters preceded by the percentage sign, `%`) with a corresponding argument. In this case, the string specifier, `%s`, gets replaced with the value of `process.env.AUTH0_DOMAIN`. You will set the Auth0 variables in the next section.
``` javascript
const logoutURL = new URL(
`https://${process.env.AUTH0_DOMAIN}/v2/logout`
);
```
- Using [`querystring.stringify`](https://nodejs.org/api/querystring.html#querystring_querystring_stringify_obj_sep_eq_options), create a URL query string from an object that contains the Auth0 client ID and the `returnTo` URL:
``` javascript
const searchString = querystring.stringify({
client_id: process.env.AUTH0_CLIENT_ID,
returnTo: returnTo
});
```
- Using [`url.search`](https://nodejs.org/api/url.html#url_url_search), get and set the serialized query portions of `logoutURL`:
``` javascript
logoutURL.search = searchString;
```
- Finally, redirect the user to `logoutURL`:
``` javascript
res.redirect(logoutURL);
```
The `GET /logout` endpoint isn't too long, but it's quite complex. It leverages different Node APIs to dynamically build a logout path depending on the active Node environment, the port that the server uses, and the configuration variables.
🛠️️ All the authentication API endpoints are now complete. You now need to export the router and use it with your Express app. First, add this line under the `Module Exports` section of `auth.js`:
``` javascript
// auth.js
/**
* Module Exports
*/
module.exports = router;
```
🛠️️ Then, open `index.js` and import the authentication router in the `Required External Modules` section:
``` javascript
// index.js
/**
* Required External Modules
*/
const express = require("express");
const path = require("path");
const expressSession = require("express-session");
const passport = require("passport");
const Auth0Strategy = require("passport-auth0");
require("dotenv").config();
const authRouter = require("./auth");
```
🛠️️ Now, mount `authRouter` on the root path, `/`, of your Express app by updating the `App Configuration` section as follows:
``` javascript
// index.js
/**
* App Configuration
*/
app.set("views", path.join(__dirname, "views"));
app.set("view engine", "pug");
app.use(express.static(path.join(__dirname, "public")));
app.use(expressSession(session));
passport.use(strategy);
app.use(passport.initialize());
app.use(passport.session());
passport.serializeUser( ... );
passport.deserializeUser( ... );
// Router mounting
app.use("/", authRouter);
```
🛠️️ You have a `GET /login` endpoint, but you don't have a login button. Update `views/index.pug` to include it:
``` pug
extends layout
block layout-content
div.View.WelcomeView
h1.Banner WHATABYTE
div.Message
div.Title
h3 Making the Best
h1 Food For Devs
span.Details Access the WHATABYTE Team Portal
div.NavButtons
if isAuthenticated
a(href="/user")
div.NavButton Just dive in!
else
a(href="/login")
div.NavButton Log in
```
Now, when you click on the login button on the index page, the `GET /login` endpoint gets called. As mentioned before, the `/login` endpoint presents the user with a login page, but where's that page? When using Auth0 as your identity platform, you don't need to create a login page, Auth0 provides one for you with a proper form and secure authentication error messages and prompts.
🛠️️ The last thing that you need to do is to mount a middleware function at the application level to define the value of the `isAuthenticated` variable used in the `index.pug` template.
### Create custom middleware with Express
🛠️️ In `index.js`, update the `App Configuration` section to enhance the response object, `res`, with data from the authentication server. Do this right above the mounting of the authentication router:
``` javascript
// index.js
/**
* App Configuration
*/
app.set("views", path.join(__dirname, "views"));
app.set("view engine", "pug");
app.use(express.static(path.join(__dirname, "public")));
app.use(expressSession(session));
passport.use(strategy);
app.use(passport.initialize());
app.use(passport.session());
passport.serializeUser( ... );
passport.deserializeUser( ... );
// Creating custom middleware with Express
app.use((req, res, next) => {
res.locals.isAuthenticated = req.isAuthenticated();
next();
});
app.use("/", authRouter);
```
[`res.locals`](https://expressjs.com/en/api.html#res.locals) is a property used to expose request-level information, such as the authenticated user and user settings. This information is then available to the views rendered during that request-response cycle, such as the templates that use the `isAuthenticated` variable.
Now, the button present on the index page can change its content based on whether the user is logged in with Auth0 or not.
``` pug
// views/index.pug
// ...
div.NavButtons
if isAuthenticated
a(href="/user")
div.NavButton Just dive in!
else
a(href="/login")
div.NavButton Log in
```
### Log into a Node.js Express app
🛠️️ Head to the browser tab where your application is running and click the login button to test that it is communicating correctly with Auth0 and that you can get authenticated.
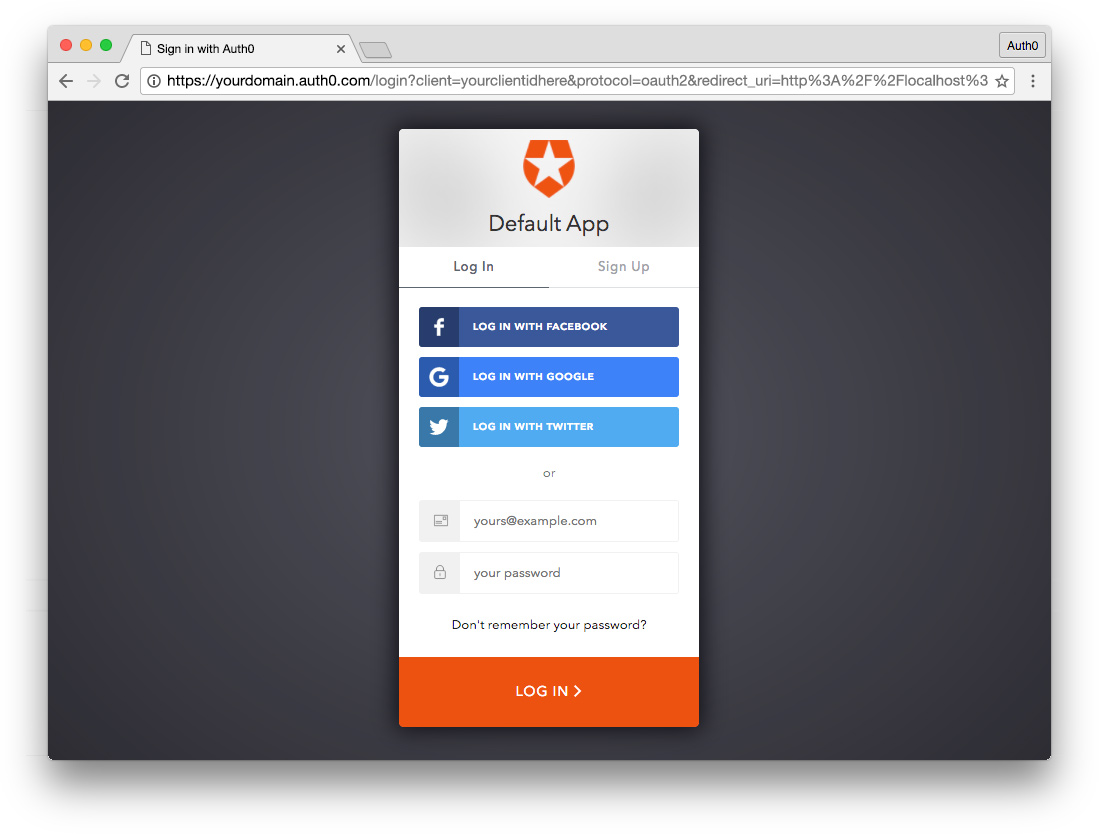
🛠️️ If you've set up everything correctly, the application redirects you to the [Universal Login page](https://auth0.com/docs/hosted-pages/login).

As explained earlier, this login page is provided by Auth0 with batteries included. It powers not only the login but also the sign-up of new users into your application. If you already have an existing user account, go ahead and log in; otherwise, sign up as a new user.
> 🛠️️ Alternatively, you may sign up and log in with Google as it is turned on by default as a social provider.
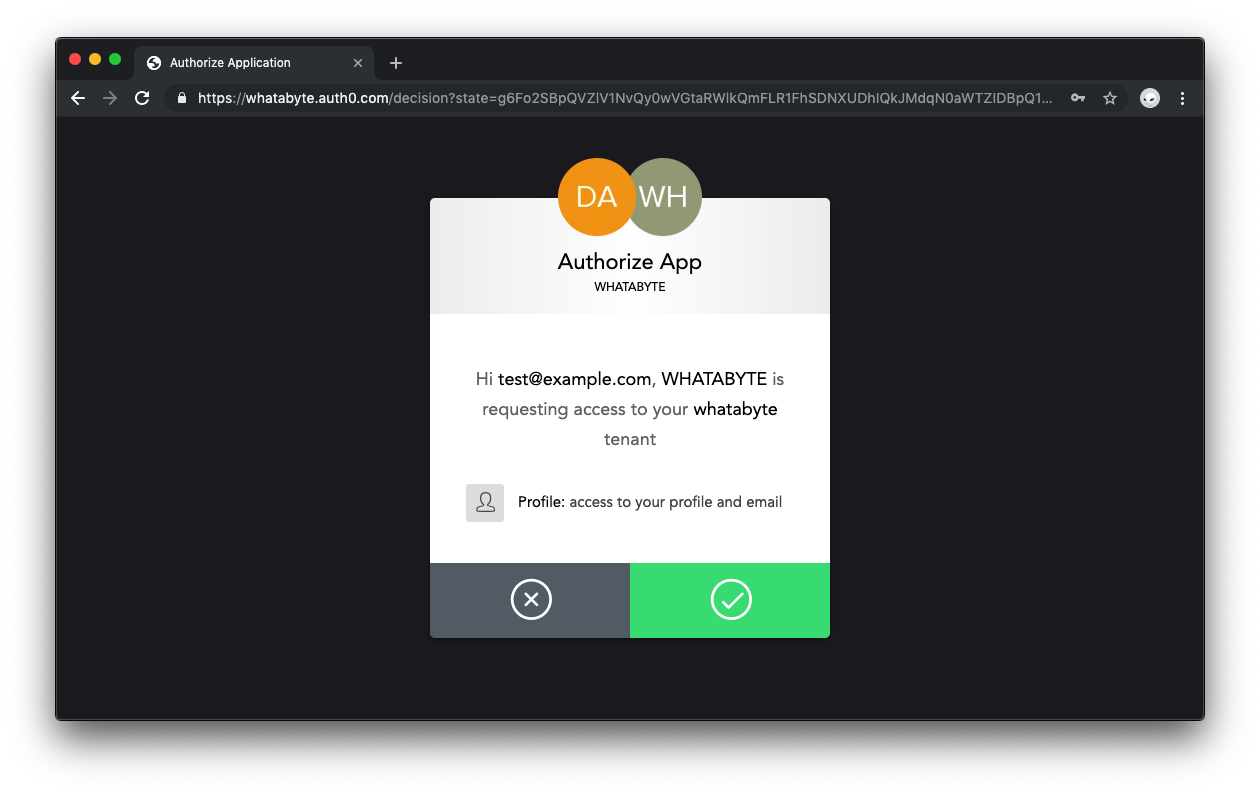
🛠️️ If you are signing into an application using Auth0 for the first time, you'll see a dialog asking you to authorize your application to access user profile data. Go ahead and click the green arrow button to authorize access.
An advantage of the Universal Login page is that it is part of the Auth0 domain. It lets you delegate user authentication, including registration, to Auth0, which makes it both convenient and secure.
Unless you signed up with Google, if you created a new user through the sign-up process, you will receive an email asking you to verify your email address. There are tons of settings that you can tweak to customize the sign-up and login experience of your users, such as [requiring a username for registration](https://auth0.com/docs/connections/database/require-username). Feel free to check out the different options presented to you by Auth0 within the Dashboard and the [Auth0 documentation](https://auth0.com/docs).
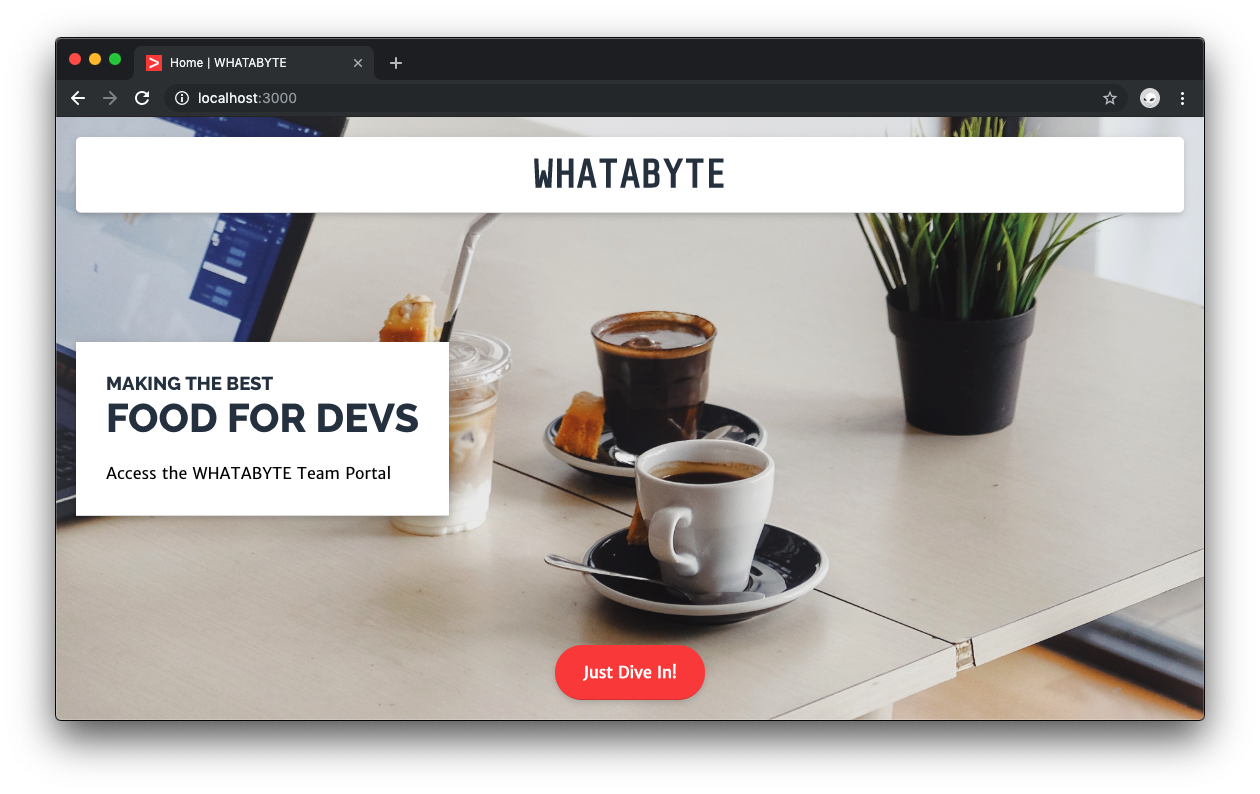
🛠️️ Once you are signed up or logged in, Auth0 takes you back to the home page of your Express app.
Notice that the label of the button on the home page changed from `Login` to `Just Dive in!`, which means that the application has successfully authenticated you.
## Access Guarded Routes
In your application, you protect the `GET /user` endpoint using Passport.js middleware to prevent navigation to it if the application has not authenticated the user. Since you have logged in, when you click on the **Just Dive In!** button that points to `/user`, you are successfully taken to that view. In case that you were logged out, you should be taken to the Auth0 login screen when trying to access the `/user` route.
🛠️️ To start, create a middleware function named `secure` to protect your `/user` route and ensure it is only accessible if the user is logged in. Under the `Routes Definitions` section of `index.js`, add the following `secured` middleware function:
``` javascript
// index.js
/**
* Routes Definitions
*/
const secured = (req, res, next) => {
if (req.user) {
return next();
}
req.session.returnTo = req.originalUrl;
res.redirect("/login");
};
// Defined routes
app.get("/", ... );
app.get("/user", ... );
```
🛠️️ Then, still under the `Routes Definitions` section, refactor the `GET /user` controller so that it uses that middleware function as follows:
``` javascript
// index.js
/**
* Routes Definitions
*/
const secured = (req, res, next) => { ... };
app.get("/", ... );
app.get("/user", secured, (req, res, next) => {
const { _raw, _json, ...userProfile } = req.user;
res.render("user", {
title: "Profile",
userProfile: userProfile
});
});
```
You use [Javascript object destructuring](https://developer.mozilla.org/en-US/docs/Web/JavaScript/Reference/Operators/Destructuring_assignment#Object_destructuring) to unpack values from the `req.user` object into distinct variables. Using the optional object argument of the `res.render()` method, you pass the `userProfile` variable to the user view template along with the page title.
🛠️️ Visit [`http://localhost:3000/user`](http://localhost:3000/user) on the browser, if you are logged in, you now see your nickname in the greeting banner and the `userProfile` object shown formatted as JSON within the content container.
🛠️️ If you click on the **Log Out** button, the application takes you to the index page. Visit [`http://localhost:3000/user`](http://localhost:3000/user) again, and it takes you to the login page provided by Auth0. Log in again, and you'll be back to the user page.
## Authentication Integration Completed
That's it! In this tutorial, you learned how Passport.js works, how to configure it, and how to integrate it with Node.js and Auth0 to add authentication to web applications. You also learned about security and identity best practices and how an identity platform such as Auth0 lets you delegate to a team of experts the giant responsibility of keeping logins secure.
All that is left is for you to continue building this application as you may like. Feel free to dive deeper into the [Auth0 Documentation](https://auth0.com/docs/getting-started) to learn more about how Auth0 helps you save time on implementing and managing identity. Use the comments below this blog post to ask questions or join the [Auth0 Community](https://community.auth0.com/) to connect with other developers like yourself.
Thank you for your time!