

In almost every real mobile application, we are probably going to need a backend side where our business logic will be handled. In most cases, there will be two different teams, one for mobile and one for the backend side of the project. But, what if we, as iOS developers, could write our own backend in our preferred language? Let's explore in this article how we can achieve this using Swift AWS Lambda Runtime together with AWS Lambda.
What is AWS Lambda?
In simple terms, it is a service provider by AWS in which we can run our code without the need to configure and manage a server. We just upload our code as a zip file, and AWS automatically does all the configurations needed in the server to make our software available.
One of the main differences between this approach and having a dedicated server, in addition to simpler administration, is that if at some point we need to increase our processing power to scale up our application, AWS Lambda does that automatically for us if we design the application correctly.
You can check out more at this link.
Swift AWS Lambda Runtime
A custom AWS Lambda runtime is basically a library that is in charge of managing and executing the Lambda function's code when it is called. With Swift AWS Lambda Runtime, we can now write serverless code in Swift and make it ready for use with AWS Lambda service.
Creating Our HTTP API
For this tutorial, we will create a simple HTTP API in Swift and expose it through API Gateway, which is another service available in AWS suite that allows us to expose our Lambda function as HTTP endpoints.
Prerequisites
- Have XCode installed
- Have an AWS account.
- Have an Auth0 account.
- Have Docker installed in your machine to compile the code that we will upload to AWS.
Step 1: Defining the API
We're going to create a simple API to handle a simple todo list with three operations:
POST /todoitemCreate a new todo item.GET /todoitemsReturn all the items in the list.GET /todoitems/:idReturn a specific item in the list.
Just to simplify things, our TodoItem will only have an id and a description.
struct ToDoItem {
    var id: Int
    let description: String
}
Step 2: Setup the project
The next thing we need to do is create our project. In this case, we need to create a new Swift Package. To do this, we can open Xcode and go to File → New → Swift Package option and name it ToDoList-API. We can also create it from the console by running the following command: $ swift package init --type executable.
Once that we have our project created, let's open and modify our Package.swift file with all the information needed.
// swift-tools-version:5.3
// The swift-tools-version declares the minimum version of Swift required to build this package.

import PackageDescription

let package = Package(
    name: "ToDoList-API",
    platforms: [
        .macOS(.v10_15)
    ],
    products: [
        .executable(name: "ToDoList-API", targets: ["ToDoList-API"]),
    ],
    dependencies: [
        .package(url: "https://github.com/swift-server/swift-aws-lambda-runtime.git", .upToNextMajor(from:"0.3.0")),
    ],
    targets: [
        .target(
            name: "ToDoList-API",
            dependencies: [
                .product(name: "AWSLambdaRuntime", package: "swift-aws-lambda-runtime"),
                .product(name: "AWSLambdaEvents", package: "swift-aws-lambda-runtime"),
            ],
            resources: [
                .process("Config.plist")
            ]
        ),
    ]
)
Once you save the file, Xcode will start downloading all the needed resources and dependencies. For this example, we're going to use two dependencies:
- AWSLambdaRuntime to handle the communications with AWS Lambda runtime API.
- AWSLambdaEvents to handle the events with API Gateway in our code.
Step 3: Create our first Lambda function
We now have to develop our Lambda function. To do so, we must create a new file inside the /Source directory and name it main.swift. Inside this file, we'll use the Swift Lambda Runtime by calling Lambda.run function. This function takes an input and a callback as parameters. We can use the callback to return whatever we want if the operation is successful or an error otherwise.
For every invocation that Lambada receives, our Runtime will execute whatever we put inside the Lambda.run function. In this case, we are going to take just a string as input and return a greeting message.
import AWSLambdaRuntime
struct Input: Codable {
let name: String
}
struct Output: Codable {
let greeting: String
}
Lambda.run { (context, input: Input, callback: @escaping (Result<Output, Error>) -> Void) in
callback(.success(Output(greeting: "Hello \(input.name)")))
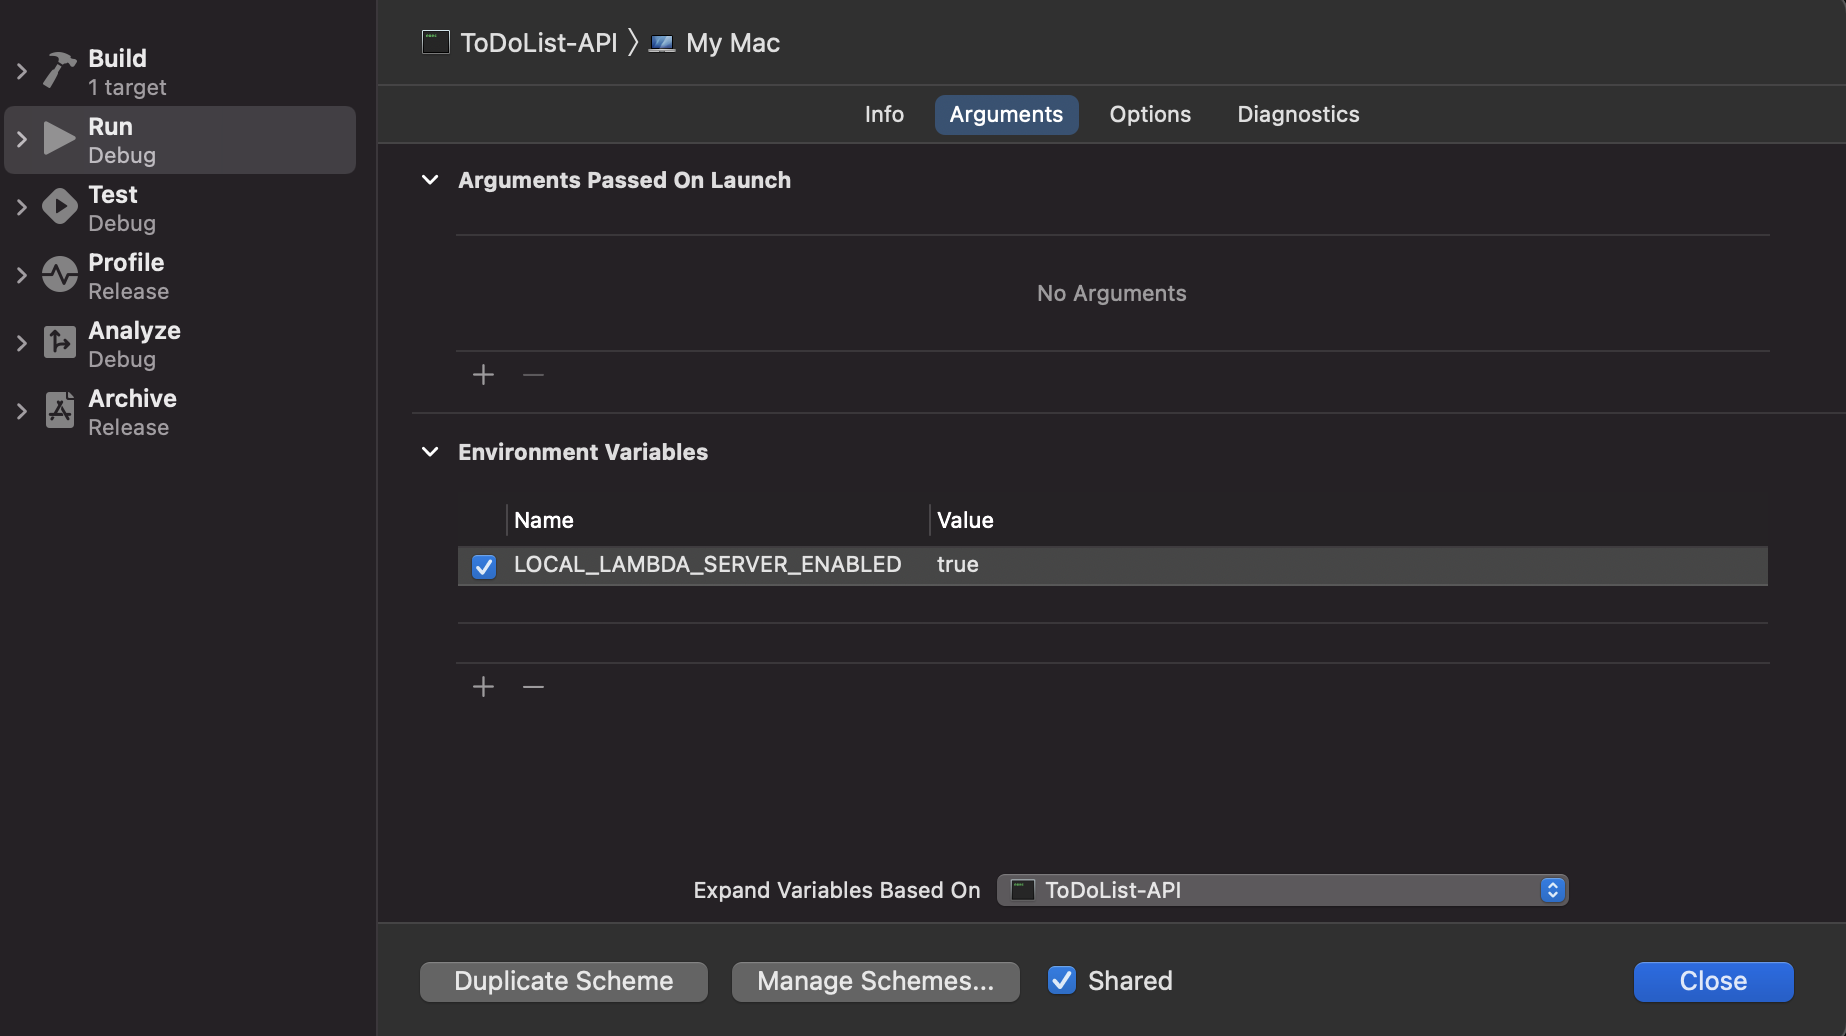
}In order to run our lambda in our machine, we need to add a custom environment variable (LOCAL_LAMBDA_SERVER_ENABLED=true) to our scheme's run settings. This will simulate the Lambda server in our local environment.
Now, if we run the target, we will get something like this in the console:
2021-08-14T23:36:50-0300 info LocalLambdaServer : LocalLambdaServer started and listening on 127.0.0.1:7000, receiving events on /invoke
2021-08-14T23:36:50-0300 info Lambda : lambda lifecycle starting with Configuration
  General(logLevel: info))
  Lifecycle(id: 9908899204653, maxTimes: 0, stopSignal: TERM)
  RuntimeEngine(ip: 127.0.0.1, port: 7000, requestTimeout: nil
This means that our Lambda function is running on port http://localhost:700/invoke. So let's go ahead and make our first request to the function.
$ curl \
    --header "Content-Type: application/json" \
  --request POST \
  --data '{"name": "Bruno"}' \
  http://localhost:7000/invoke
If we are getting something like this: $ {"greeting":"Hello Bruno"}, it means that we did everything right so far!.
We have our first function up and running, so we are in a pretty good spot to move on and create our HTTP API.
Step 4: Create HTTP API
Let's start by creating the model that we are going to deal with. Since we're going to return static data, we'll create some helpers functions as well. Go ahead and create a new file TodoItem.swift inside Sources/ToDoList-API.
struct ToDoItem: Codable {
    let id: Int
    let description: String
}

// MARK: - Static helpers

extension ToDoItem {
    static func getToDoList() -> [ToDoItem] {
        var list = [ToDoItem]()
        list.append(.init(id: 1, description: "Pay credit card"))
        list.append(.init(id: 2, description: "Clean apartment"))
        list.append(.init(id: 3, description: "Call John"))

        return list
    }

    static func getItem(with id: Int) -> ToDoItem? {
        return getToDoList().filter{ $0.id == id }.first
    }
}
The next thing we need to do is adjust our Lambda function to interact with APIGateway. For this, we are going to use two types included in AWSLambdaEvents for our function's input and output:
- APIGateway.V2.Request
- APIGateway.V2.Response
Make the following changes inside our main.swift file.
typealias In = APIGateway.V2.Request
typealias Out = APIGateway.V2.Response

Lambda.run { (context,
              request: In,
              callback: @escaping (Result<Out, Error>) -> Void) in
    // Implementation...
}
So we receive an APIGateway.V2.Request type as an input, and we must return an APIGateway.V2.Response type as an output. However, we want to obtain a ToDoItem type when we receive a POST, and we want to return a TodoItem type if we receive a GET.
Both types, APIGateway.V2.Request and APIGateway.V2.Response, have a body property in which we will receive and send the payload from our endpoints. This property is a String type, so we must do some transformation using an encoder (or decoder in the case we want to return something) in order to use our Swift type before sending it back or before start processing it.
The only missing part in our code design is how we distinguish between different routes and methods. We can access the endpoint path from our request type. In our example, we are only going to have one path: /todoitems. If we get another path, we should return a 404 error.
Let's put all the pieces together and modify our lambda function.
import Foundation
import AWSLambdaRuntime
import AWSLambdaEvents
typealias In = APIGateway.V2.Request
typealias Out = APIGateway.V2.Response
Lambda.run { (context,
request: In,
callback: @escaping (Result<Out, Error>) -> Void) in
let routeKey = request.routeKey
switch routeKey {
case "GET /todoitems":
let items = ToDoItem.getToDoList()
let bodyOutput = try! JSONEncoder().encodeAsString(items)
let output = Out(statusCode: .ok, headers: ["content-type": "application/json"], body: bodyOutput)
callback(.success(output))
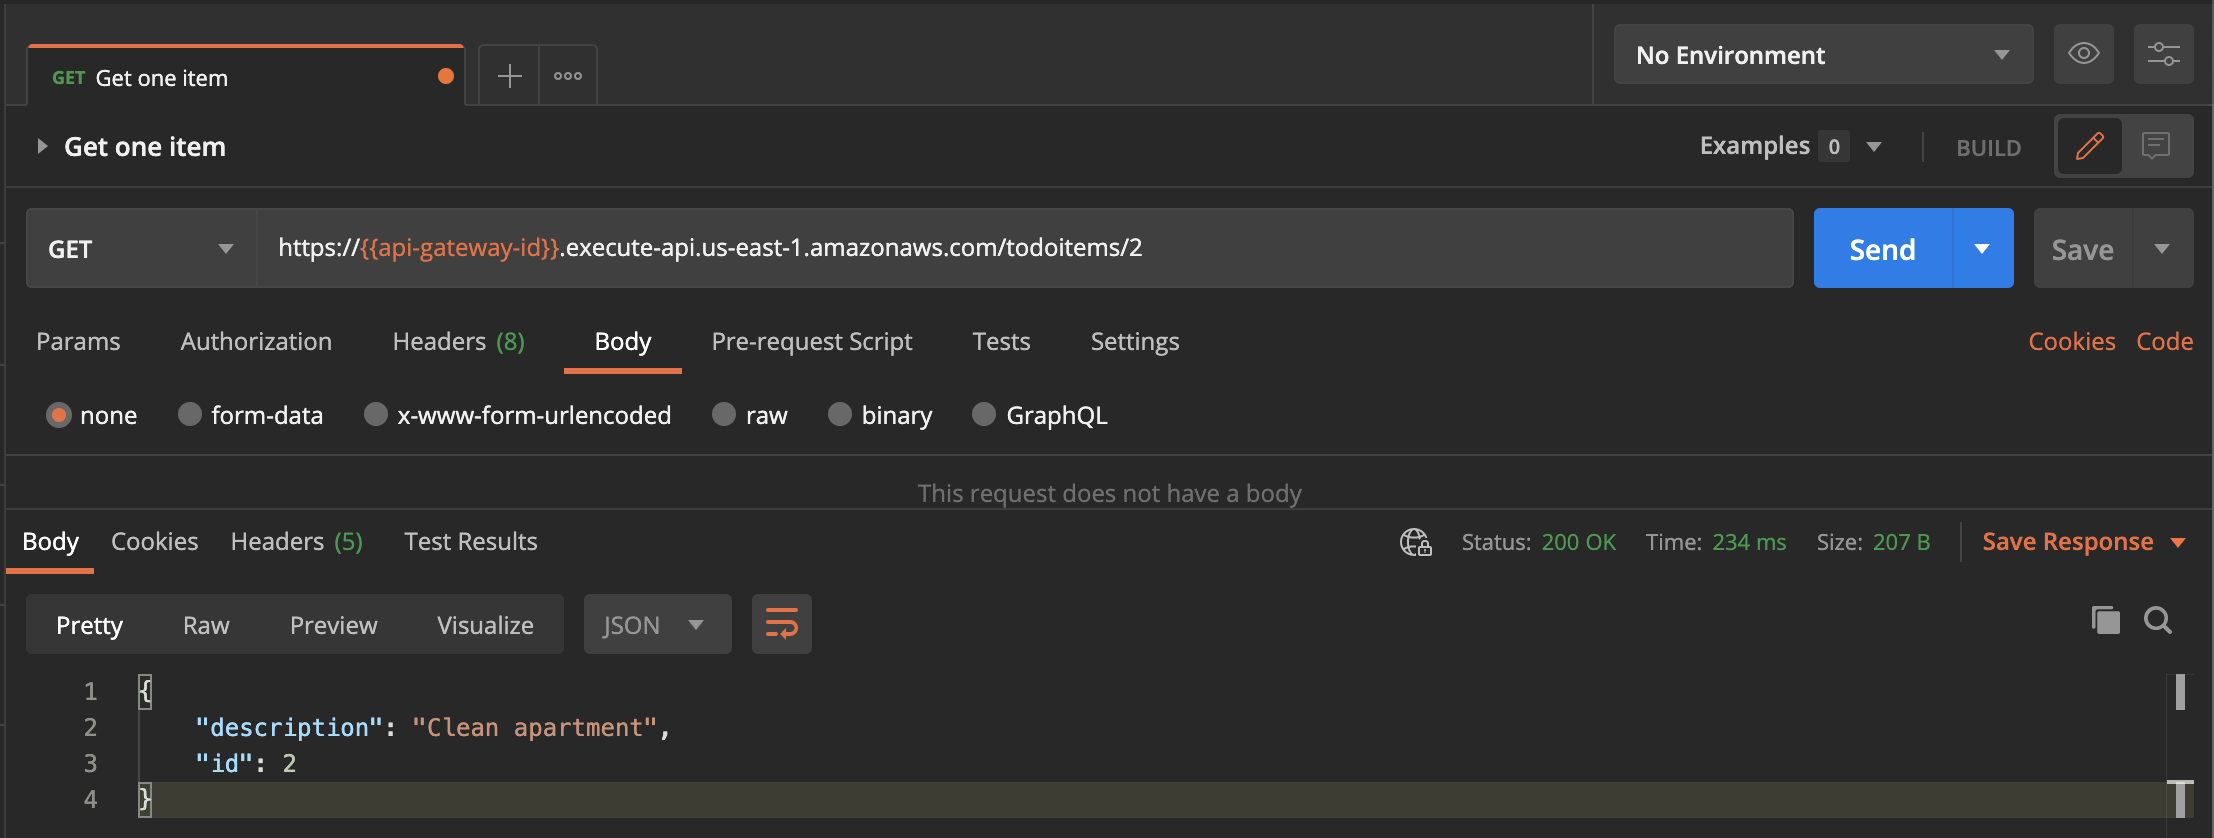
case "GET /todoitems/{id}":
if let idString = request.pathParameters?["id"], let id = Int(idString),
let item = ToDoItem.getItem(with: id) {
let bodyOutput = try! JSONEncoder().encodeAsString(item)
let output = Out(statusCode: .ok, headers: ["content-type": "application/json"], body: bodyOutput)
callback(.success(output))
} else {
callback(.success(Out(statusCode: .notFound)))
}
case "POST /todoitems":
do {
let input = try JSONDecoder().decode(ToDoItem.self, from: request.body ?? "")
let bodyOutput = try JSONEncoder().encodeAsString(input)
let output = Out(statusCode: .ok, headers: ["content-type": "application/json"], body: bodyOutput)
callback(.success(output))
} catch {
callback(.success(Out(statusCode: .badRequest)))
}
default:
callback(.success(Out(statusCode: .notFound)))
}
}
// ---------------
extension JSONEncoder {
func encodeAsString<T: Encodable>(_ value: T) throws -> String {
try String(decoding: self.encode(value), as: Unicode.UTF8.self)
}
}
extension JSONDecoder {
func decode<T: Decodable>(_ type: T.Type, from string: String) throws -> T {
try self.decode(type, from: Data(string.utf8))
}
}Test the API Locally
We now have everything in place to start testing our API before deploying it to AWS. Let's try to get all the items.
$ curl \
    --header "Content-Type: application/json" \
  --request GET \
  http://localhost:7000/invoke/todoitems
We will get a 404 - Not found error, which is weird because we have configured that endpoint in the right way inside our Lambda function. Well, this is because our local Runtime is only listening for requests at http://localhost:7000/invoke.
In addition, we are using Amazon API Gateway to expose our Lambda function as an HTTP API. This means that all incoming HTTP requests will get transformed into JSON data by the API Gateway and provide the Lambda function with that payload already transformed. Then, our function will process that JSON payload and respond with another JSON payload itself, which the API Gateway will transform back into an HTTP response.
So, if we want to simulate this interaction, we must provide an HTTP request (in JSON format) in which we need to include all the relevant information like the method we want to call, the route path, the body, and so on.
This is a standard HTTP request after the API Gateway makes its transformations:
{
    "routeKey":"GET /todoitems",
    "version":"2.0",
    "rawPath":"/todoitems",
    "requestContext":{
        "accountId":"",
        "apiId":"",
        "domainName":"",
        "domainPrefix":"",
        "stage": "",
        "requestId": "",
        "http":{
            "path":"/todoitems",
            "method":"GET",
            "protocol":"HTTP/1.1",
            "sourceIp":"",
            "userAgent":""
        },
        "time": "",
        "timeEpoch":0
    },
    "isBase64Encoded":false,
    "rawQueryString":"",
    "headers":{}
}
We don't have to provide all the values, but all the keys must be present. Otherwise, we'll get a decoding error from the Lambda function.
With this in mind, let's make a request again. We can do it using the terminal like before or an API client tool like Postman.
$ curl --header "Content-Type: application/json" \
  --request POST \
  --data '{
    "routeKey":"GET /todoitems",
    "version":"2.0",
    "rawPath":"/todoitems",
    "requestContext":{
        "accountId":"",
        "apiId":"",
        "domainName":"",
        "domainPrefix":"",
        "stage": "",
        "requestId": "",
        "http":{
            "path":"/todoitems",
            "method":"GET",
            "protocol":"HTTP/1.1",
            "sourceIp":"",
            "userAgent":""
        },
        "time": "",
        "timeEpoch":0
    },
    "isBase64Encoded":false,
    "rawQueryString":"",
    "headers":{}
}' \
http://localhost:7000/invoke
If we want to retrieve only one item, we need to add an entry into our data JSON.
"pathParameters": {"id": "1"}Last, if we want to test the POST method, we must add the following entry to our data JSON.
"body": "{\"id\":1, \"description\": \"Test\"}"And, other than that, we also need to modify the routeKey to GET /todoitems/{id} and the http.method property to POST instead of GET.
Deploy to AWS
Compile & Package
We will execute our Lambda function on Amazon Linux 2 OS, so we need to compile our function for this particular OS. For convenience, we'll use Docker to do this. Create a new folder named Scripts in your root project folder. Inside this folder, create a new build.sh file with the following code
docker run \
    --rm \
    --volume "$(pwd)/:/src" \
    --workdir "/src/" \
    swift:5.3.1-amazonlinux2 \
    swift build --product ToDoList-API -c release -Xswiftc -static-stdlib
Understanding Docker commands is beyond the scope of this article, but what this code does is compiles our code for a container. If you'd like to learn more about using Docker and its available commands, check out the oficial documentation.
Now go ahead and create another file inside the Scripts folder: package.sh
#!/bin/bash

set -eu

executable=$1

target=.build/lambda/$executable
rm -rf "$target"
mkdir -p "$target"
cp ".build/release/$executable" "$target/"
cd "$target"
ln -s "$executable" "bootstrap"
zip --symlinks lambda.zip *
This will create a new zip file with the right structure ready for us to upload to AWS.
We only need to follow these simple steps to build and package our code:
$ sh ./Scripts/build.sh$ sh ./Scripts/package.sh ToDoList-API
In many environments, we may get privilege errors upon executing these scripts. If that happens, we just need to mark the file as executable by running the following commands:
$ chmod +x Scripts/build.sh
$ chmod +x Scripts/package.sh
Upload Lambda file
The next step is to create our Lambda function and upload the zip file that we've just generated. Login into your AWS account, go to AWS Lambda, and click on Create function.
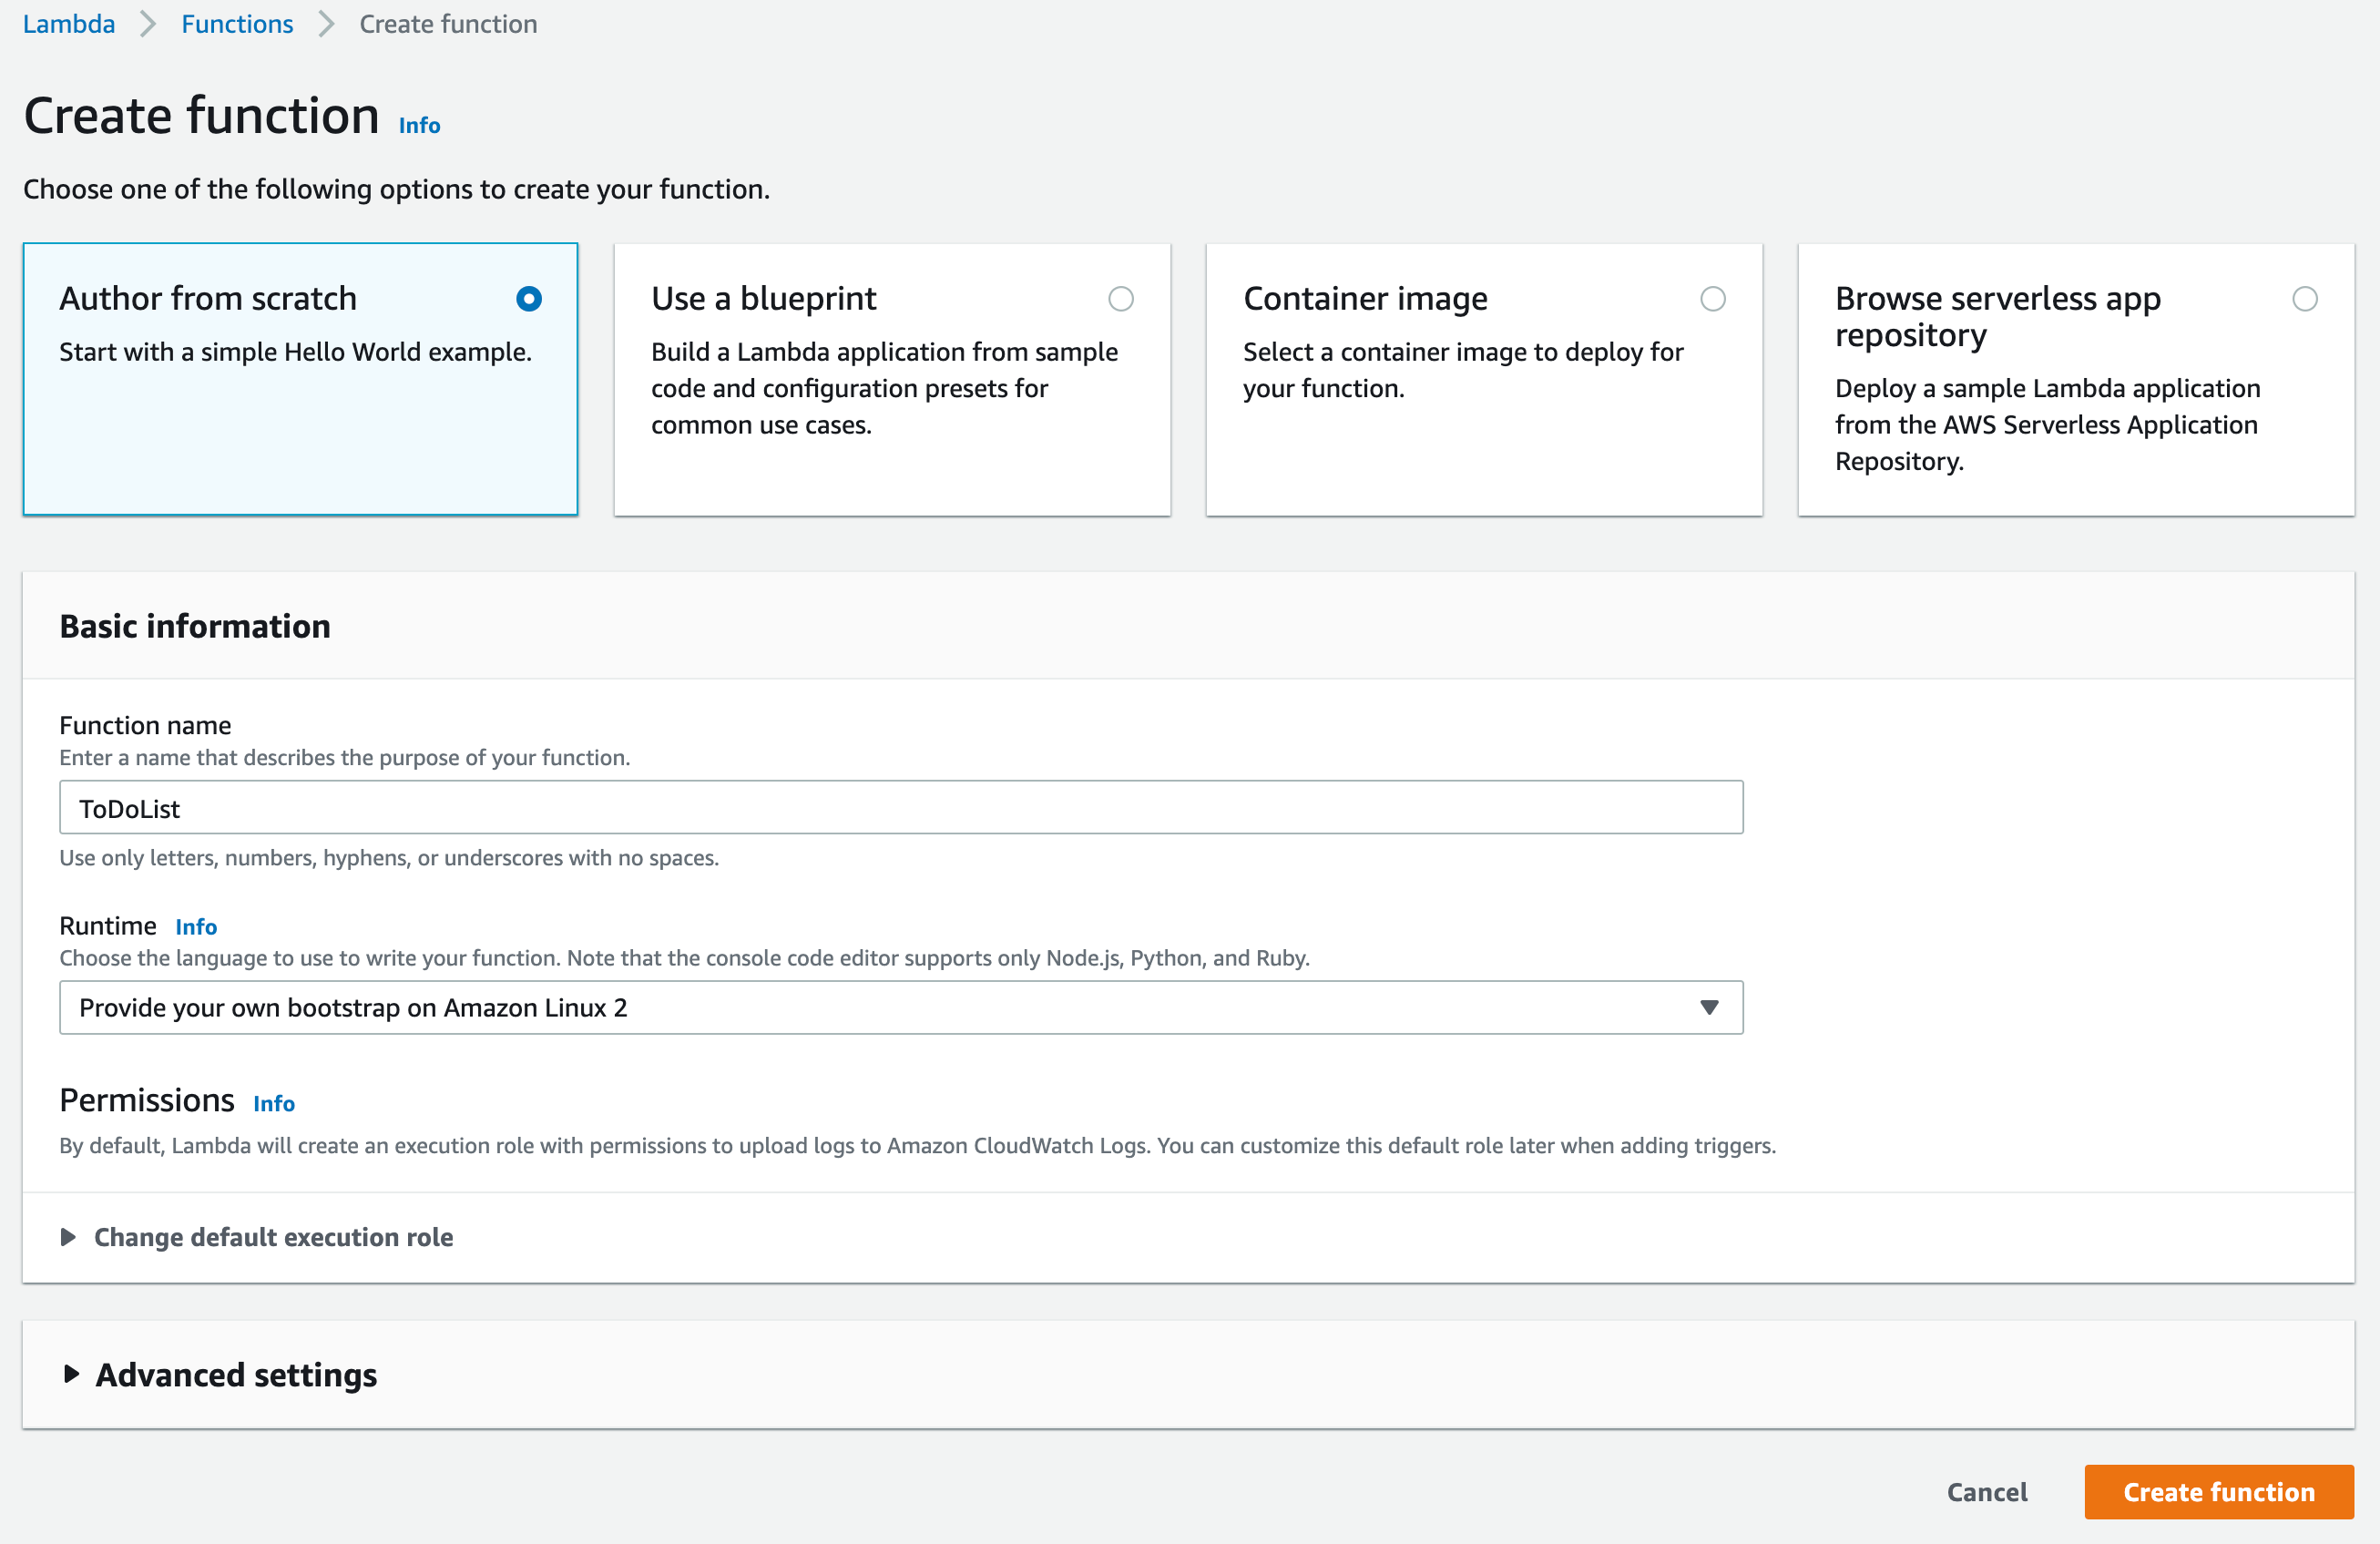
Click on the Create function button after entering a function name and the runtime option. You will be redirected to the next screen to upload the file.
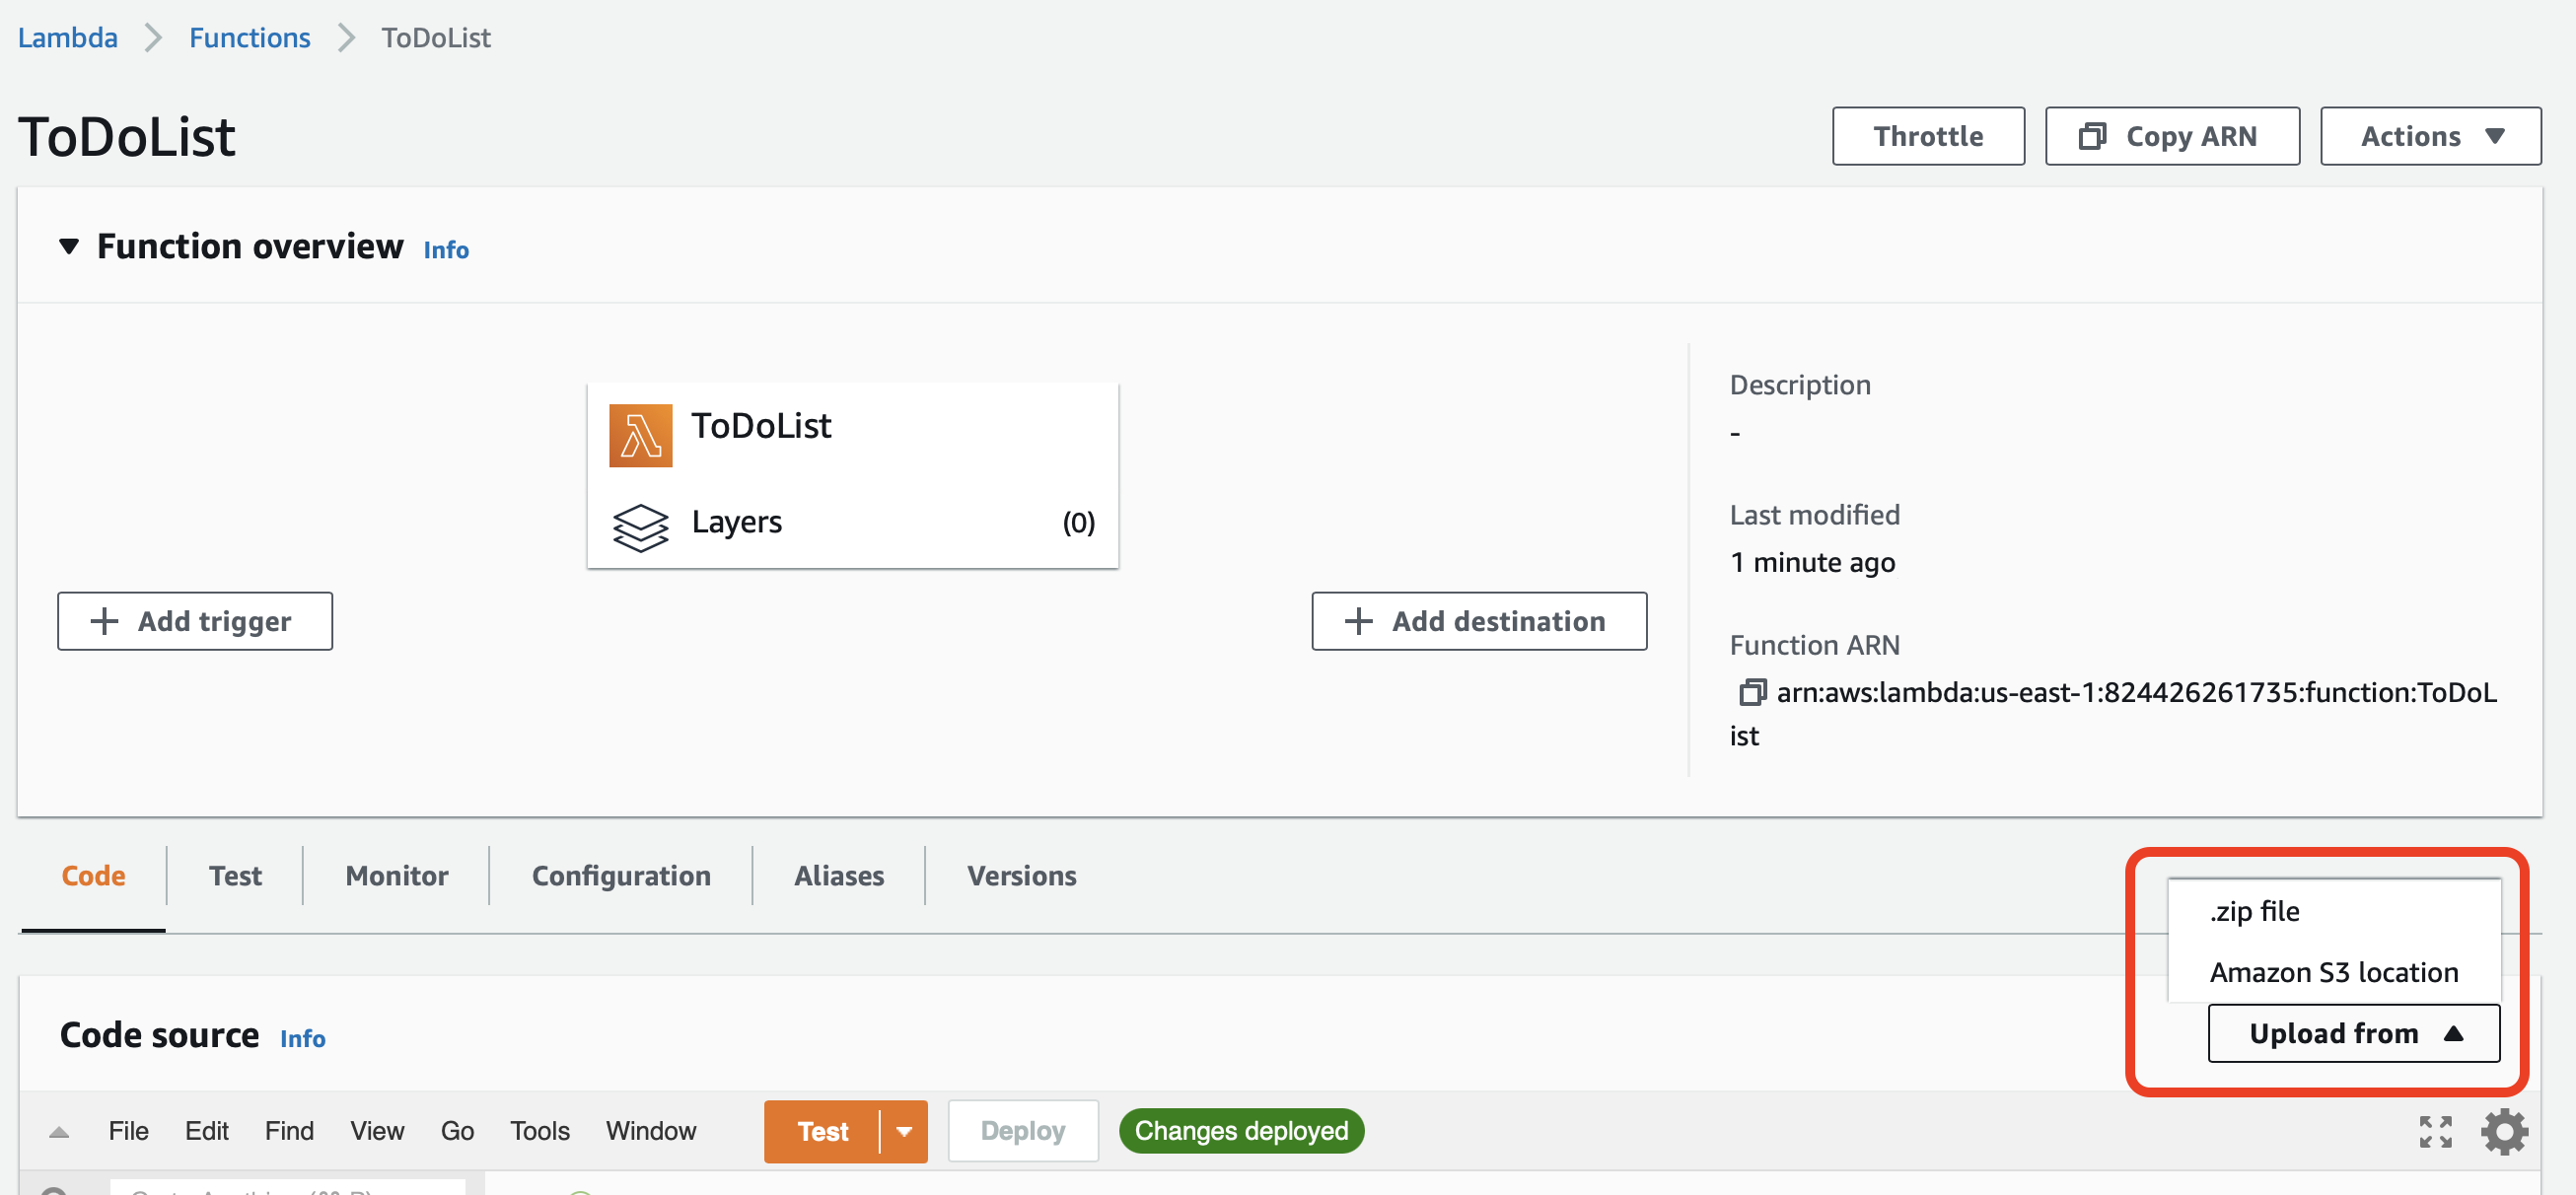
Click on the .zip file and locate your lambda.zip file on your computer. It should be available on $ your-project-path/.build/lambda/ToDoList-API/lambda.zip
Connect the API Gateway
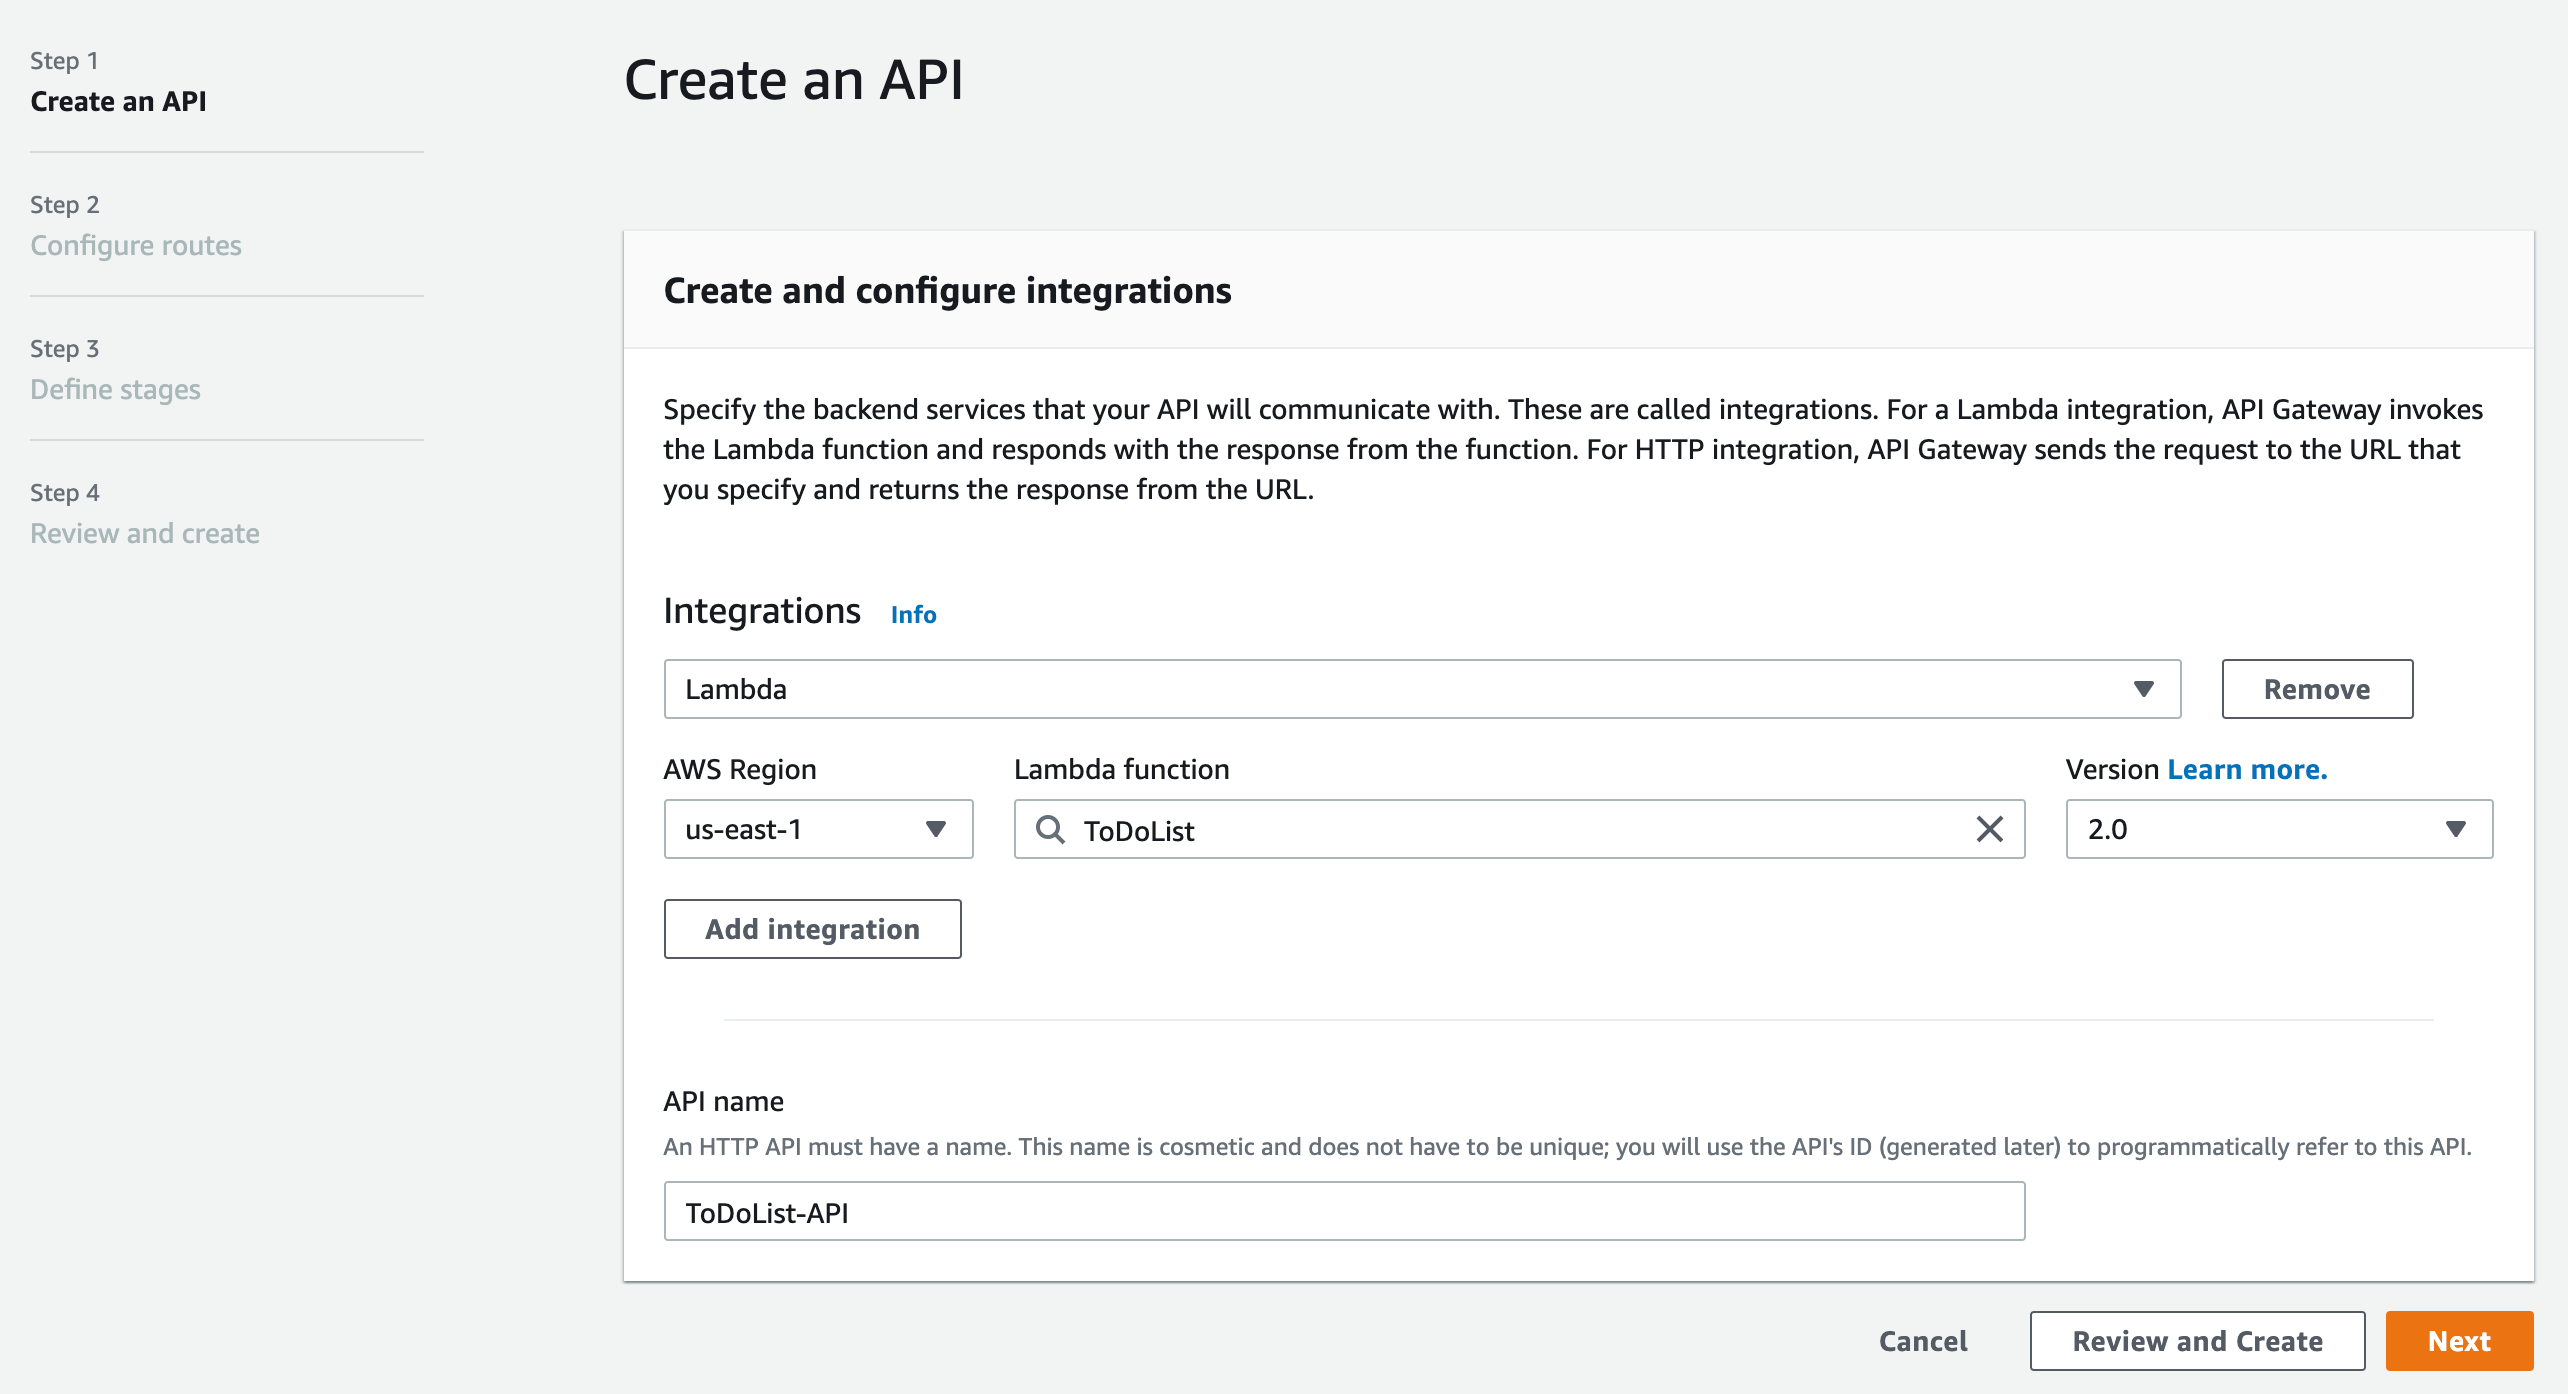
The last thing we need to do is connect our function to the API Gateway. Go to the API Gateway dashboard from your AWS console and click on Create API. Then choose the HTTP API option by clicking on the Build button.
Step 1
- Click on Add Integration and select the Lambda option
- Search for the Lambda function we just created in the previous section.
- Make sure that the version is 2.0
- Chose a name for the API.
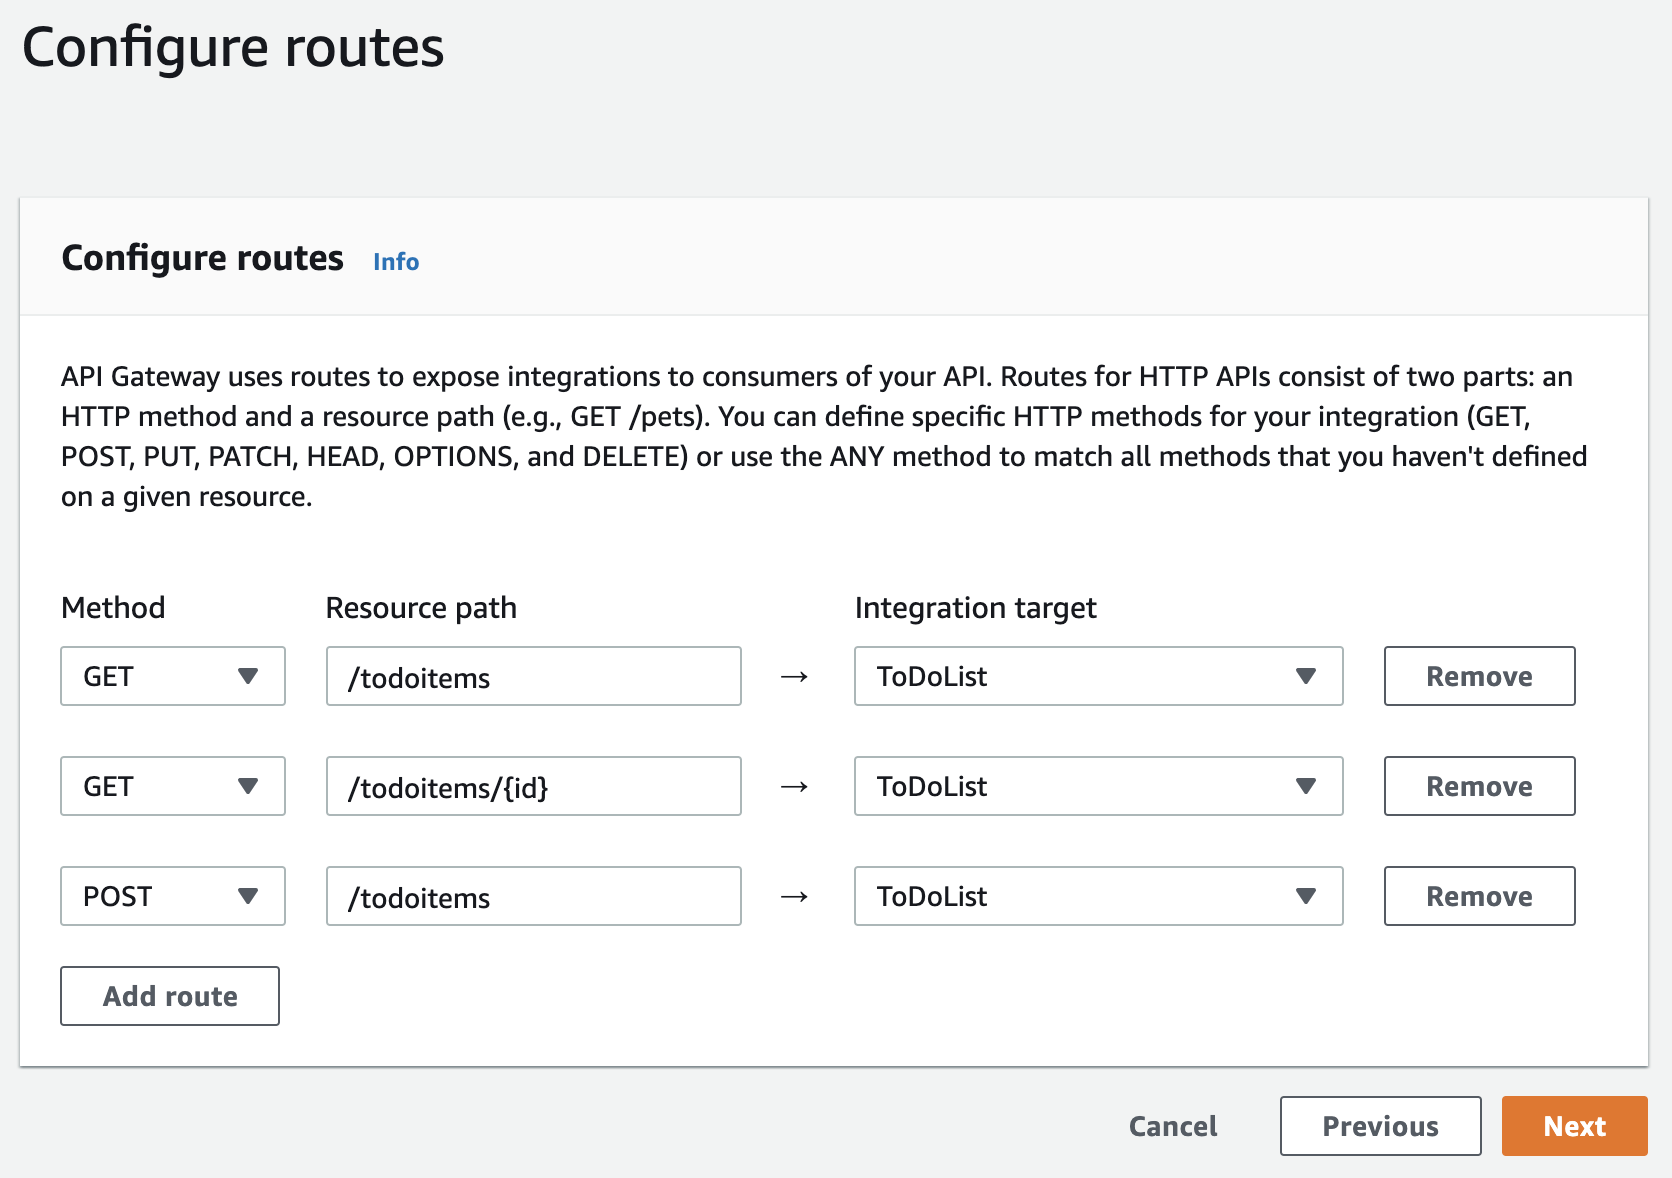
Step 2
Here we must configure our routes. If we don't want to restrict the routing, we can use $default in the Resource path field. This will map all the requests to our Lambda.
For this tutorial, we're going to set the three endpoints that we defined at the beginning.
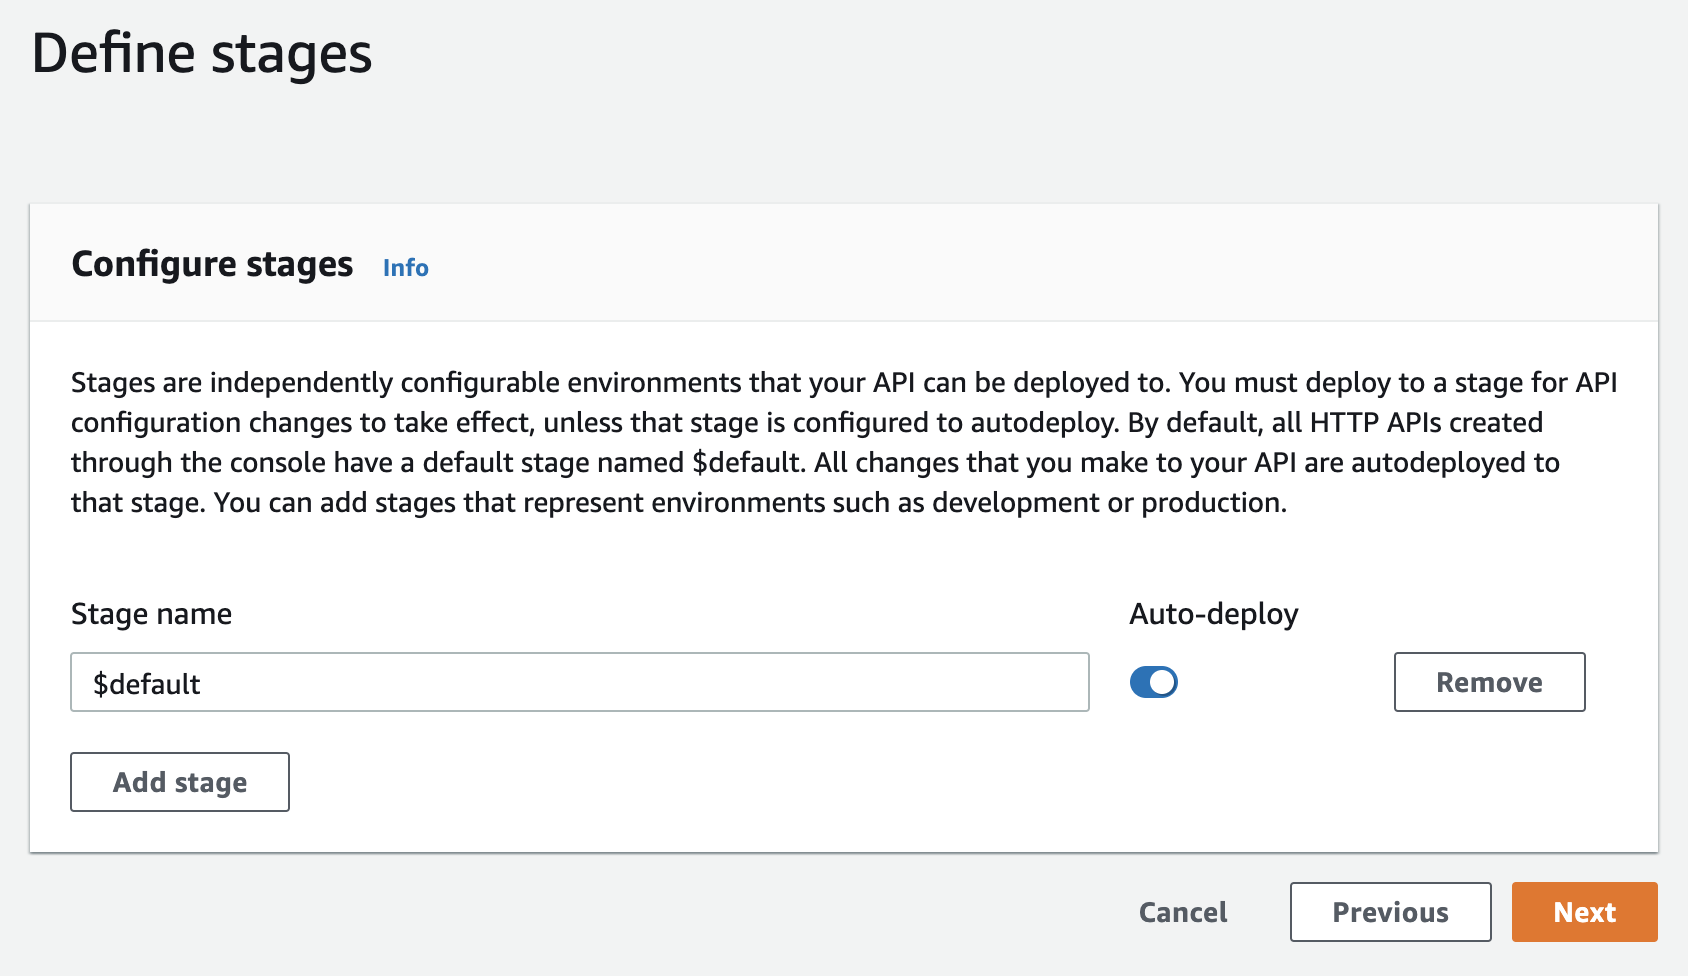
Step 3
In this step, we can configure different environments for our API, like development and production. In our case, we can leave $default.
Step 4
Review all the information and click on Create.
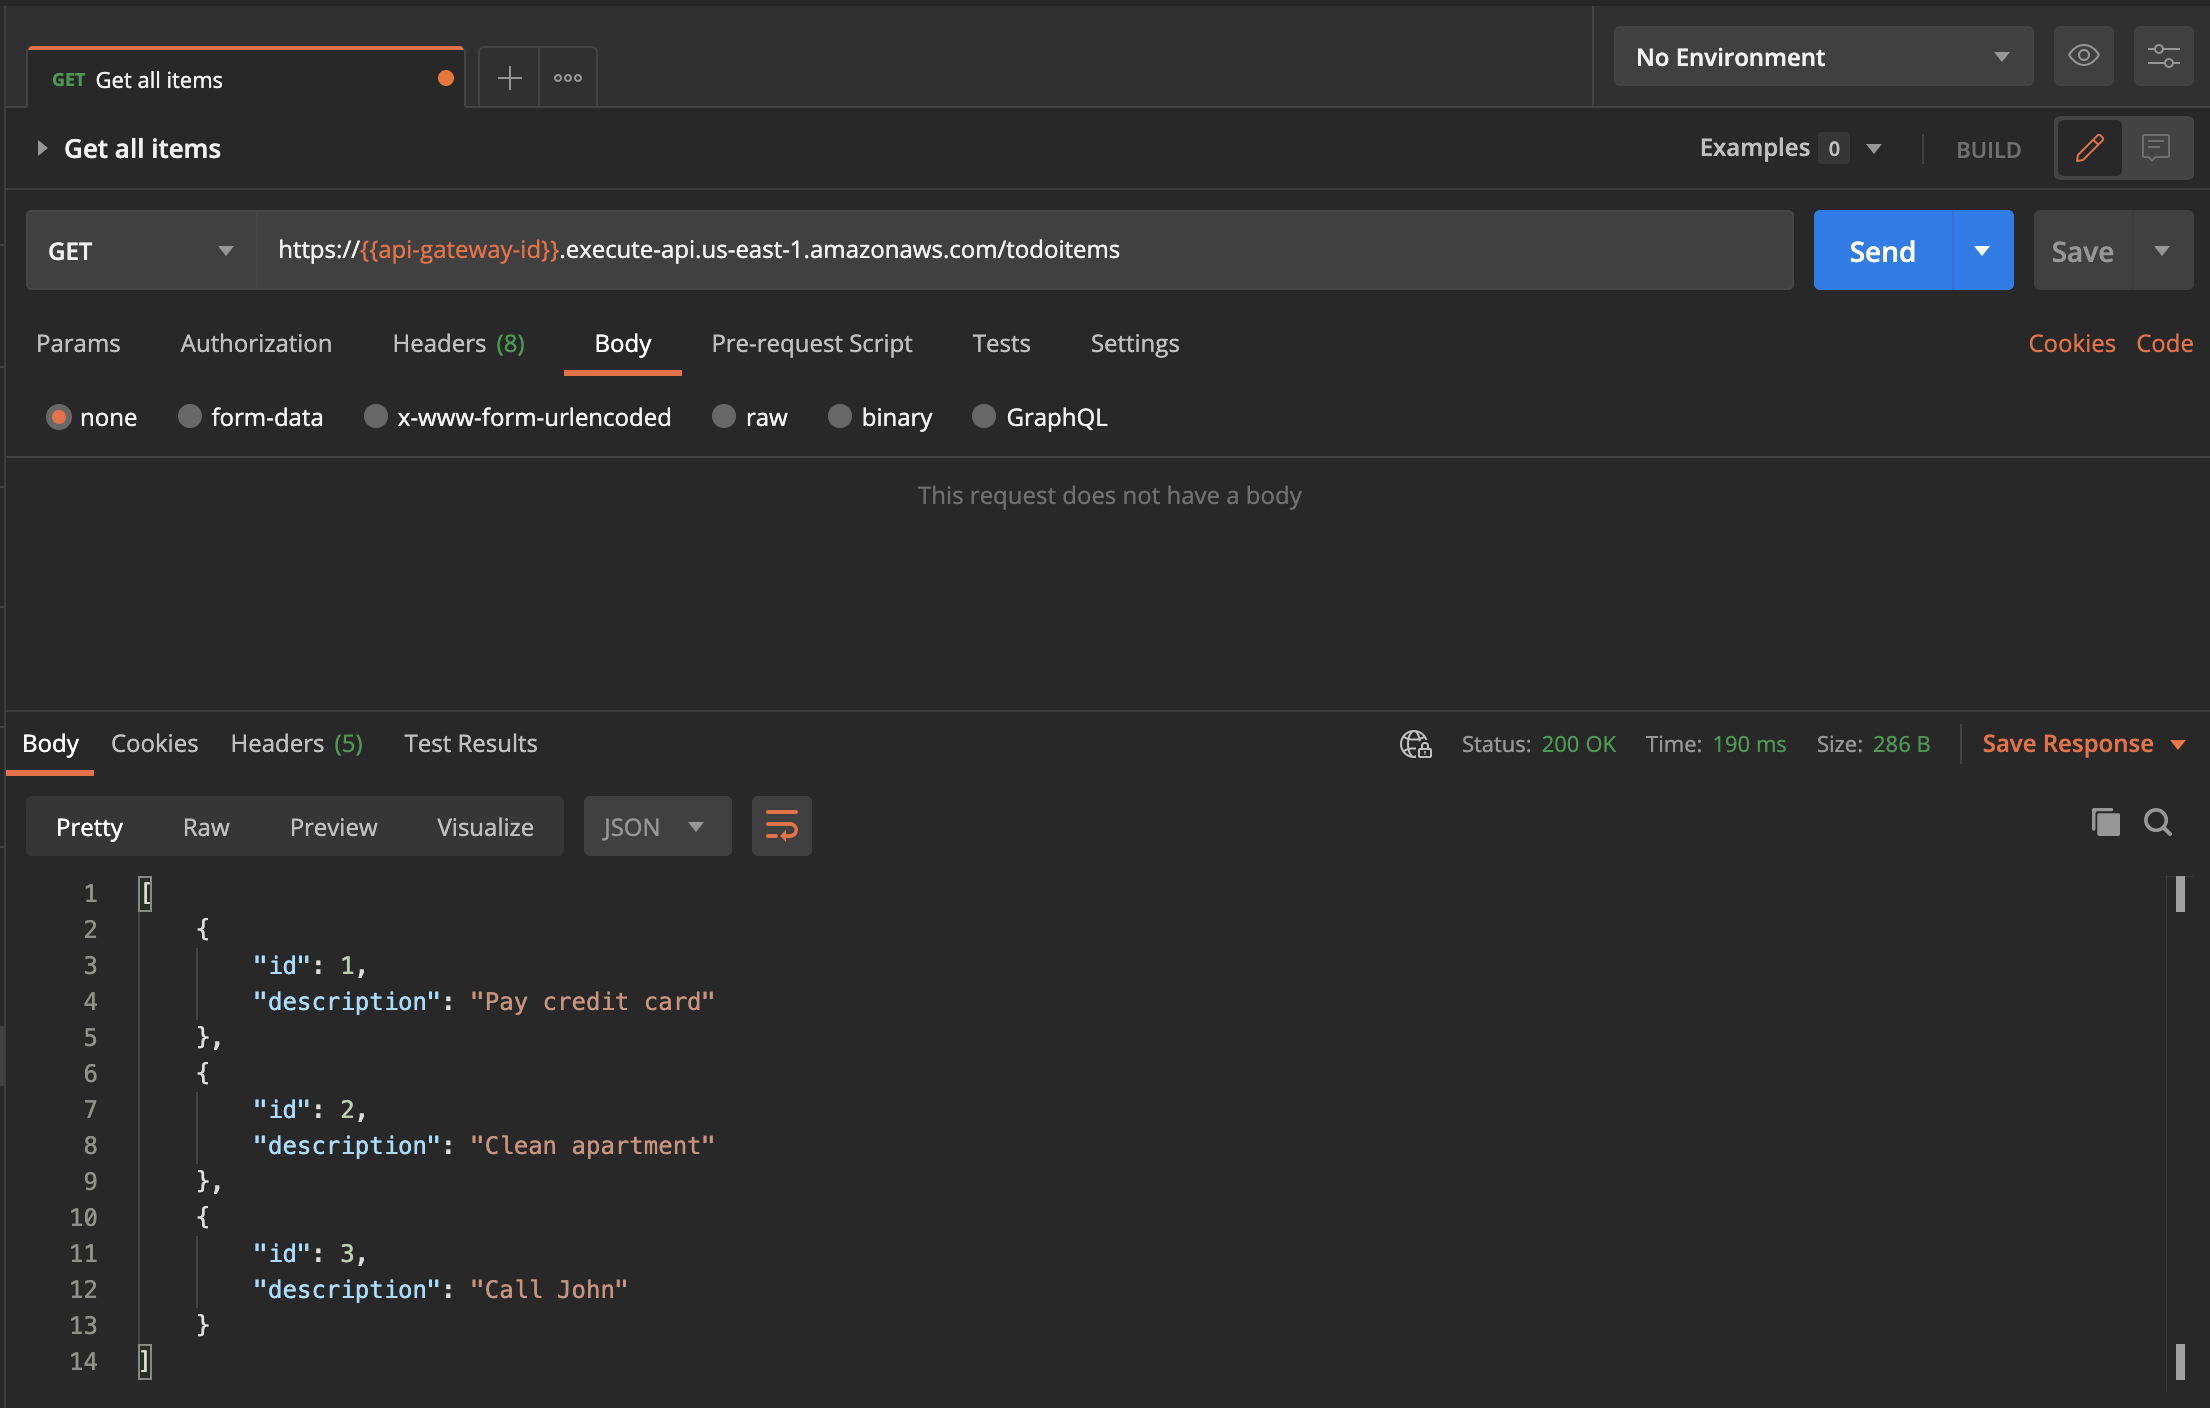
And that's it! We now have our API deployed to AWS. The invoke url should be something like this: https://{your-gateway-id}.execute-api.us-east-1.amazonaws.com
Test it!
We're using Postman for this part, but you can use whatever other tool you want.
Get all items
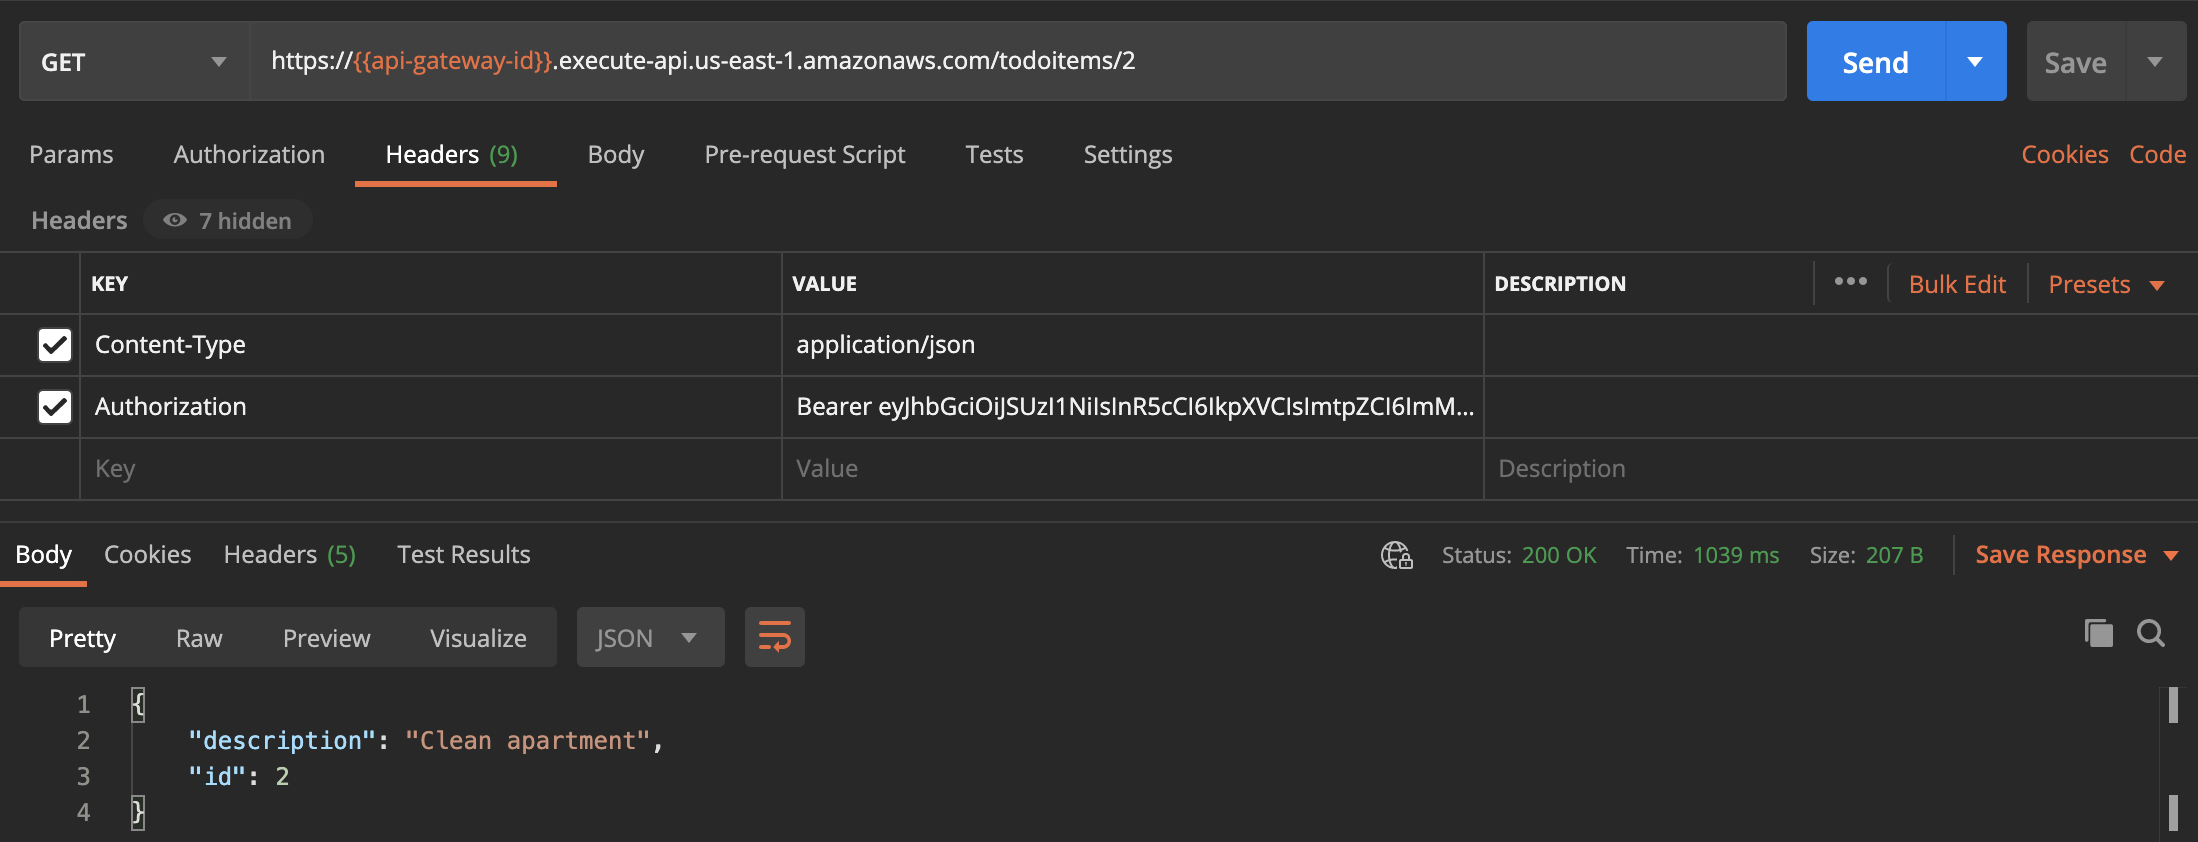
Get one item
Create new item
Secure the API Using Auth0
Of course, you'd never want to leave an unauthenticated API up - you'll be responsible for paying for every call made to it!. To demonstrate how we can secure our endpoints, let's make the GET /todoitems/{id} endpoint only be accessible by authenticated users (in a real application, we'd protect all of these endpoints).
To accomplish this, we are going to create a custom JSON Web Tokens (JWTs) authorizer with Auth0 and attach it to our API Gateway endpoint.
Create a new Auth0 API
First thing first, login into your Auth0 account and go to Applications → APIs in the left menu, and click on + Create API button.
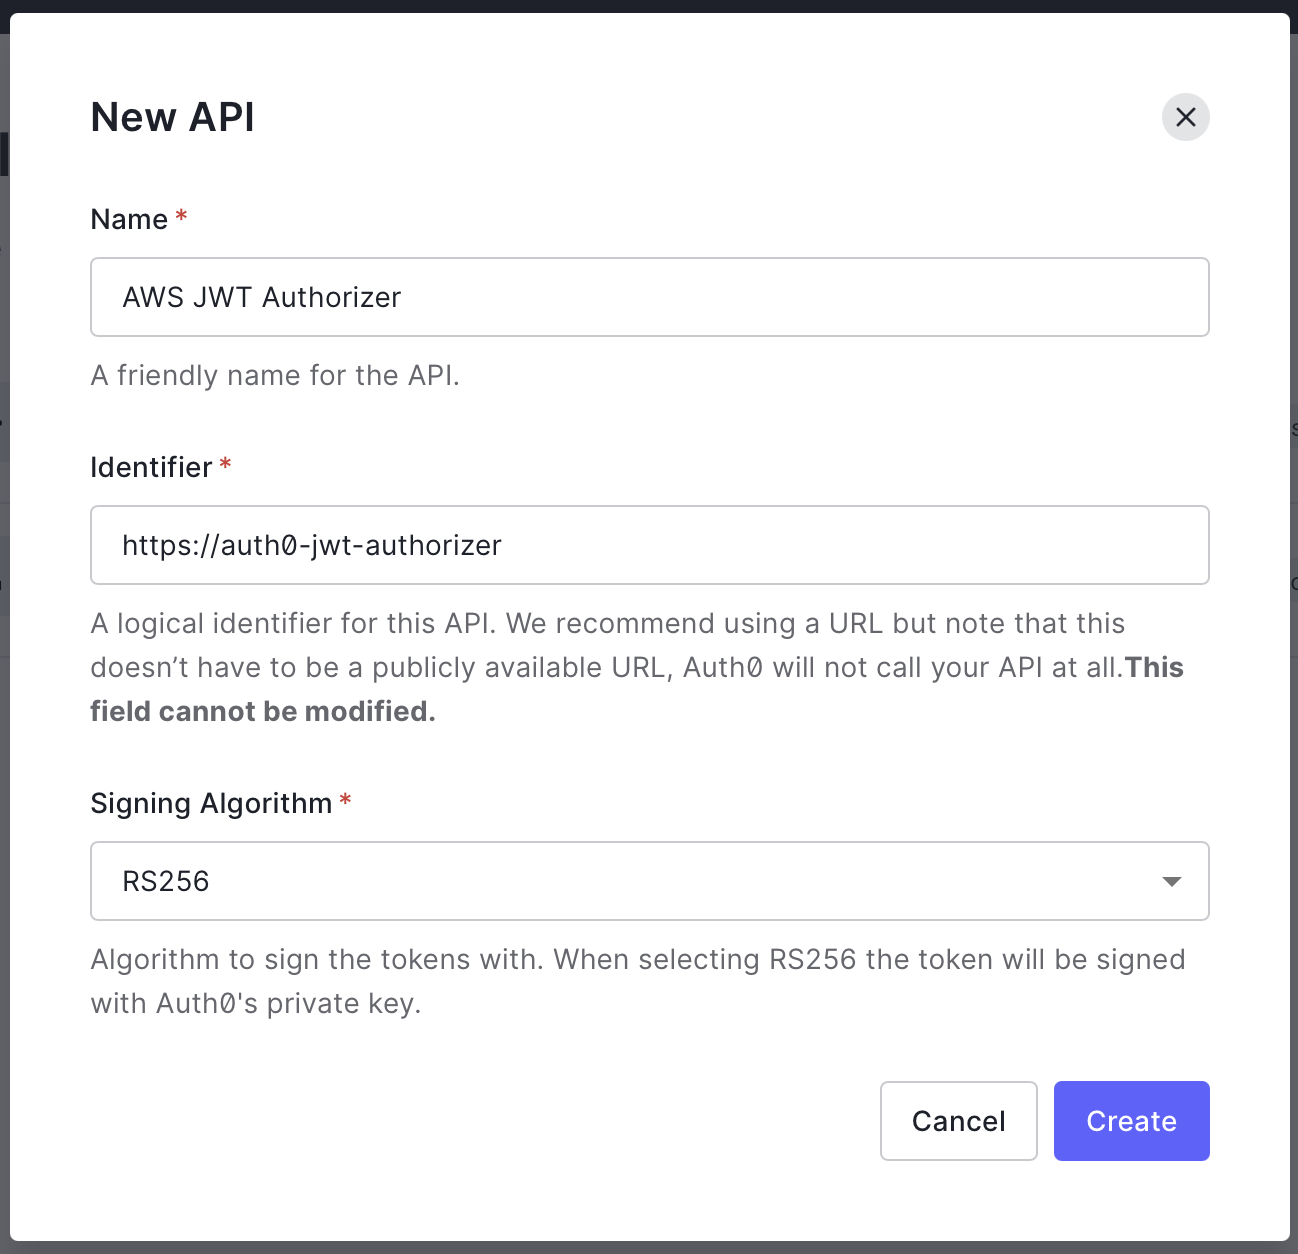
- Name: This will be the internal name for the API
- Identifier: https://auth0-jwt-authorizer
- Signing Algorithm: Just leave the default here
Attach new Authorizer
Go back to your API Gateway Dashboard and click the Authorization option on the left panel below the Develop section.
Select the endpoints that you want to restrict access to; in our case, it will be GET /todoitems/{id}, and click on Create and attach an authorizer
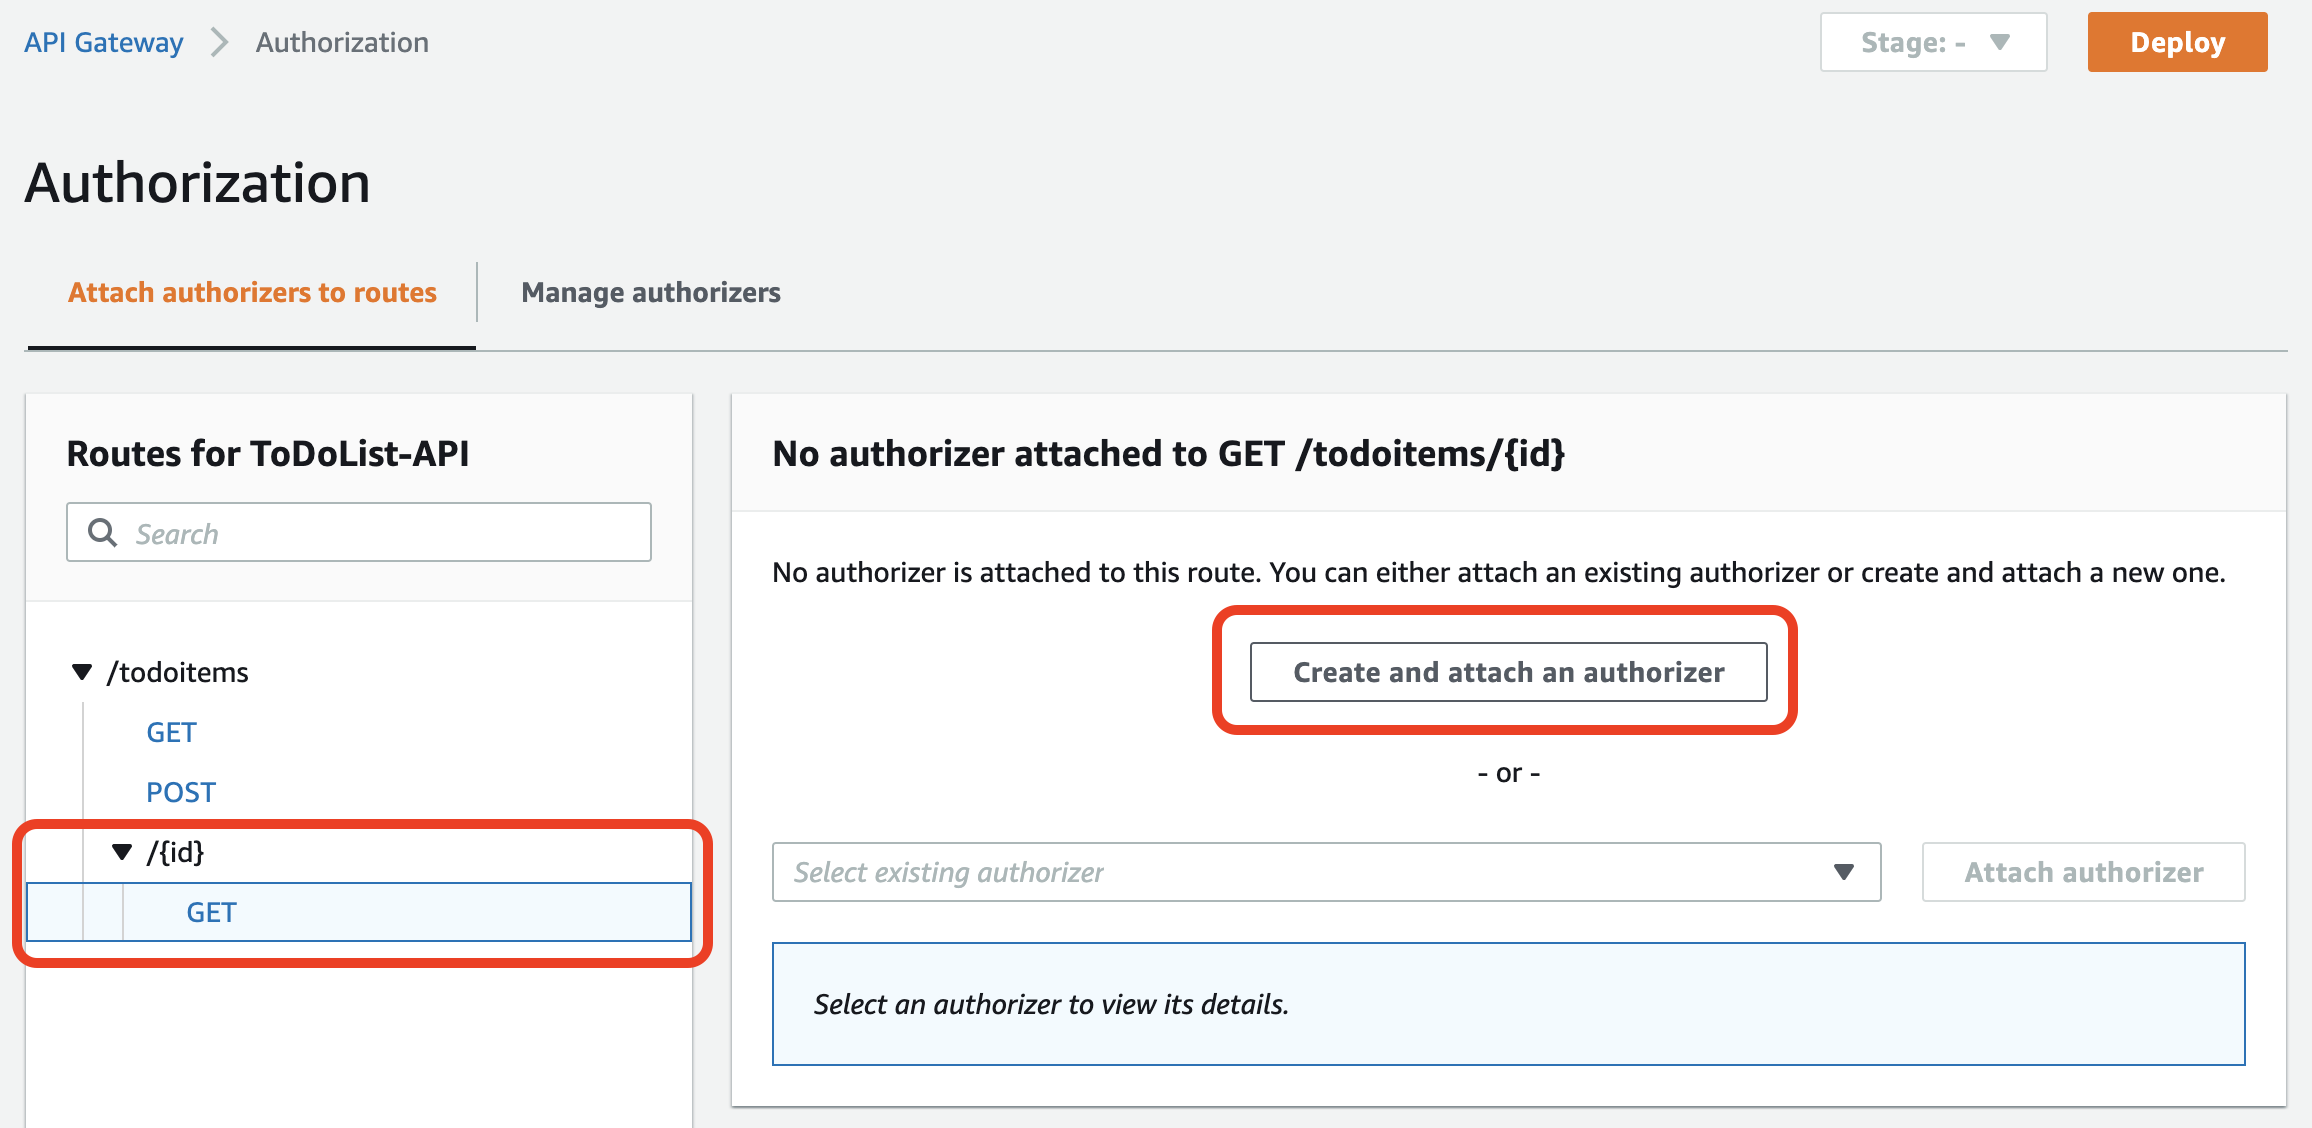
Select JWT type and fill in the required information:
- Name: The name that you want to call the authorizer
- Identity source:
$request.header.AuthorizationThis means that the authorizer can access the access token in the Authorization header. - Issuer URL:
https://{tenant-name}.auth0.com. The authorizer uses this to validate the iss field inside the JWT. You can find your Auth0 tenant-name in Applications → Default App → Domain. - Audience:
https://auth0-jwt-authorizer. This will be used by the authorizer to validate the aud field inside the JWT. This needs to match with the identifier that we configured our Auth0 API before.

Test it Again
If we now try to call GET /todoitems/{id}, we will get an unauthorized error.
{
    "message": "Unauthorized"
}
This is because if we want to use this endpoint, we must provide an authentication header. In a real app, we will return a valid token after the user was authenticated by our app, but just for testing purposes, we can get a token from Auth0.
Go again to your Auth0 dashboard, and on the left panel, click on Applications → APIs → AWS JWT Authorizer → Test. Find the response section and copy the bearer token provided.

Now go back to Postman, add an Authorization header with this token, and send the request.
Because our request has an authentication token, we get a response!
Conclusion
With this type of solution, we, as iOS developers, are in a position to start shifting to a mobile full-stack role, where we don't need a separate team for the backend side. Of course, every team and project is different. However, for small projects or proof of concepts, this solution should work like a charm. Understanding backend technologies will increase your understanding of software and make you more of an asset to any iOS team.
The Swift AWS Lambda Runtime has room for improvement (like everything in the tech industry), but it gives us a start point to write backend code without the need of learning a new development language.
If you want a more detailed example with a database (DynamoDB) connection, you can check the full project here.


