


TL;DR: Let's face it, Artificial Intelligence (AI) is taking over applications. In the not-so-far future, most software will have AI systems embedded in it and applications without it will slowly fade away. The ability for software applications to understand data generated by users and use it for valuable predictions is fast becoming a must-have in every application. The big names in tech are not unaware of this as we see tech giants like Google, Microsoft e.t.c. launching AI and Machine learning APIs and SDKs to enable developers to easily embed these capabilities in their applications. In this article, you would make use of Google's Vision API to build a simple emoji prediction game.
What You Will Build
The application you will be building is a simple emoji game that displays a random emoji to the user, the user then has to scan a physical object around them that matches the emoji using the webcam. Google's Vision API will predict the scanned image and return results that will be compared to the emoji to see if it matches. To see the finished code, please check out this GitHub repo.
The game would operate as follows:
- User has to sign in to play
- The user would select a camera feed from a dropdown that displays all available camera feeds on the system. For example, the computer's built-in webcam
- User clicks Play to start a new game, and an emoji will be displayed to the user to scan a matching object
- The user scans object and clicks on Predict for Google's Vision API to return results to check for a match
- Users must scan an object before the 60 seconds timer runs out
- The user gets 10 points for a correct match and loses 5 points for a wrong one
- Users can skip an emoji for another one to be displayed within the 60 seconds window
- If the 60 seconds run out before the user gets a correct prediction, it's Game Over!
"In the not-so-far future, most software will have AI systems embedded in it and applications without it will slowly fade away."
Tweet This

Prerequisites
To follow along with this article, a few things are required:
- Basic knowledge of Vuejs
- Nodejs installed on your system
- Vue CLI installed on your system
- A Google account
Creating the Google API Project
Creating the project
The first thing you need to have set up is a Google Cloud Platform (GCP) project. To do that, simply go to the GCP Console, this would require you to sign in with your Google account if you aren't already signed in.
Once signed in, you would see the GCP dashboard. To create a new project, click on the project dropdown at the left-hand side of the blue top toolbar.
This pops up a modal with a list of all your projects. If you have not created a project yet, this modal will be empty.
On the modal, click on the New Project button at the top right-hand corner.
This automatically redirects you to the project creation page where you can create a new Google Cloud Platform project.
After entering your project name, leave the Location as No Organization and click the Create button.
The system automatically sets up the project and notifies you when it's done. It also selects the project as the current project in the project dropdown on the top blue toolbar. If your new project is not automatically selected, you can click the project dropdown and select the project in the project list displayed in the modal.
"Let's face it, Artificial Intelligence (AI) is taking over applications."
Tweet This
Enabling the Cloud Vision API
To be able to use GCP's Vision API, you need to enable the API for your project. With your project selected on the project dropdown, click Dashboard on the side menu. Then just below the top blue toolbar, click on the Enable APIs and Services button, this will then redirect you to the API library page which shows a list of all available APIs.
In the search box, type in Vision API to filter the list. You should now see the Cloud Vision API filtered out of the list.
Click on it to select it. You will now be redirected to the Cloud Vision API page that gives an overview of what the API is all about.
Click on the blue Enable button to enable this API for your project.
Getting an API key
When calling the Google Cloud Vision API from your application, you need to authenticate your requests using an API key.
To get an API key, simply navigate to the Credentials page. Do ensure that your project is selected on the project dropdown at the top.
Click on the Create credentials dropdown and select API Key from the list of options. The system automatically generates an API key for you and displays it in a dialog. Copy this key and close the dialog box. You will be needing this key later in the project.
Please Note: Google requires that you have a billing account set up for your GCP account to continue using the API once your free limit is exceeded. You can set up a billing account here. You can find out more about Pricing and Quotas on the GCP website.
Creating the Auth0 Application
Next up, you will be creating your Auth0 application to handle authentication in your Vue application, so head to Auth0's website and click the Log in button to sign in to the console.
Once logged in, click on Applications on the left-hand side menu. On the Applications page, click on the big orange CREATE APPLICATION button.
Once the Create Application dialog that pops up, enter an appropriate name for your application and select Single Page Web Applications from the options below the application name field.
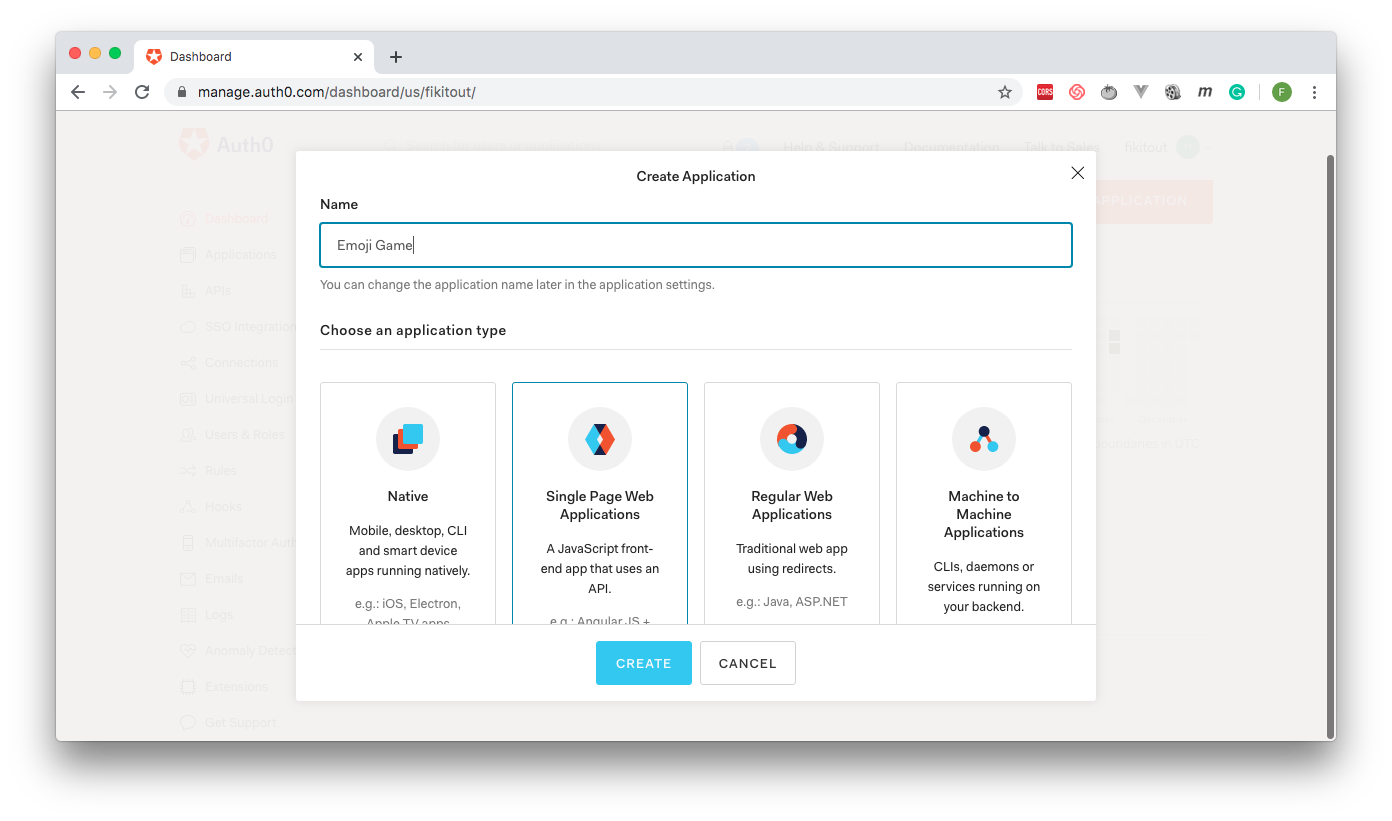
Now click the Create button to complete the process.
After the successful creation of the application, go to the Settings section of your newly created app. In the Allowed Callback URLs, Allowed Web Origins, Allowed Logout URLs and Allowed Origins (CORS) fields, enter http://localhost:8080. This address is the default address of the Vue application you will be creating later on.
Once you're done entering these values, scroll down and hit the SAVE CHANGES button.
Scaffolding the Vue Project
Create a new Vue application by running the following command in the folder where you want your application to be located.
vue create my-emoji-game
When the Please pick a preset? prompt comes up in the interactive CLI, select default.
After your selection, the Vue CLI begins scaffolding your new Vue application.
Setting up Authentication with Auth0
You are going to set up authentication with Auth0 in your Vue application based on the instructions from Auth0's documentation.
The Authentication Service
The first thing you need to do is to write an authentication service. For this, you first need to install the @auth0/auth0-spa-js. So, at the root of your Vue application, run the following command:
npm install @auth0/auth0-spa-js
Once the installation is complete, the next thing you are to do is to create the authentication service. Within the authentication service, you will need your Auth0 domain and application id. To separate these details from your service code, create a new file named auth_config.json at the root of your project and paste the following snippet inside:
// auth_config.json

{
  "domain": "YOUR_AUTH0_DOMAIN",
  "clientId": "YOUR_APP_ID"
}
Ensure to replace the placeholders YOUR_AUTH0_DOMAIN and YOUR_APP_ID with the appropriate values. You can find your client id on your application page and your Auth0 domain is in the form [YOUR_USERNAME].auth0.com e.g. user1.auth0.com.
Make sure you ignore this file in your .gitignore file to ensure that your sensitive credentials are not pushed to a public repository.
Now to create the authentication service, inside the src folder, created a folder named auth and inside this folder create a file named index.js and paste the code below:
// src/auth/index.js

import Vue from "vue";
import createAuth0Client from "@auth0/auth0-spa-js";
/** Define a default action to perform after authentication */
const DEFAULT_REDIRECT_CALLBACK = () =>
  window.history.replaceState({}, document.title, window.location.pathname);
let instance;
/** Returns the current instance of the SDK */
export const getInstance = () => instance;
/** Creates an instance of the Auth0 SDK. If one has already been created, it returns that instance */
export const useAuth0 = ({
  onRedirectCallback = DEFAULT_REDIRECT_CALLBACK,
  redirectUri = window.location.origin,
  ...options
}) => {
  if (instance) return instance;
  // The 'instance' is simply a Vue object
  instance = new Vue({
    data() {
      return {
        loading: true,
        isAuthenticated: false,
        user: {},
        auth0Client: null,
        popupOpen: false,
        error: null
      };
    },
    methods: {
      /** Authenticates the user using a popup window */
      async loginWithPopup(o) {
        this.popupOpen = true;
        try {
          await this.auth0Client.loginWithPopup(o);
        } catch (e) {
          // eslint-disable-next-line
          console.error(e);
        } finally {
          this.popupOpen = false;
        }
        this.user = await this.auth0Client.getUser();
        this.isAuthenticated = true;
      },
      /** Handles the callback when logging in using a redirect */
      async handleRedirectCallback() {
        this.loading = true;
        try {
          await this.auth0Client.handleRedirectCallback();
          this.user = await this.auth0Client.getUser();
          this.isAuthenticated = true;
        } catch (e) {
          this.error = e;
        } finally {
          this.loading = false;
        }
      },
      /** Authenticates the user using the redirect method */
      loginWithRedirect(o) {
        return this.auth0Client.loginWithRedirect(o);
      },
      /** Returns all the claims present in the ID token */
      getIdTokenClaims(o) {
        return this.auth0Client.getIdTokenClaims(o);
      },
      /** Returns the access token. If the token is invalid or missing, a new one is retrieved */
      getTokenSilently(o) {
        return this.auth0Client.getTokenSilently(o);
      },
      /** Gets the access token using a popup window */
      getTokenWithPopup(o) {
        return this.auth0Client.getTokenWithPopup(o);
      },
      /** Logs the user out and removes their session on the authorization server */
      logout(o) {
        return this.auth0Client.logout(o);
      }
    },
    /** Use this lifecycle method to instantiate the SDK client */
    async created() {
      // Create a new instance of the SDK client using members of the given options object
      this.auth0Client = await createAuth0Client({
        domain: options.domain,
        client_id: options.clientId,
        audience: options.audience,
        redirect_uri: redirectUri
      });
      try {
        // If the user is returning to the app after authentication
        if (
          window.location.search.includes("code=") &&
          window.location.search.includes("state=")
        ) {
          // handle the redirect and retrieve tokens
          const { appState } = await this.auth0Client.handleRedirectCallback();
          // Notify subscribers that the redirect callback has happened, passing the appState
          // (useful for retrieving any pre-authentication state)
          onRedirectCallback(appState);
        }
      } catch (e) {
        this.error = e;
      } finally {
        // Initialize our internal authentication state
        this.isAuthenticated = await this.auth0Client.isAuthenticated();
        this.user = await this.auth0Client.getUser();
        this.loading = false;
      }
    }
  });
  return instance;
};
// Create a simple Vue plugin to expose the wrapper object throughout the application
export const Auth0Plugin = {
  install(Vue, options) {
    Vue.prototype.$auth = useAuth0(options);
  }
};
This service creates a wrapper object around the Auth0 SDK and implements a Vue plugin that exposes this wrapper object to the rest of the application. This wrapper API consists of user authentication methods like loginWithPopup, logout etc. that you can call within your application.
Adding a router
To manage redirection during Auth0's authentication process, you need to add a router to the project. For this, you will need to install the vue-router package by running the following command in the root of your project.
npm install vue-router
After successful installation of the package, create a file named router.js in your src folder and paste in the following code:
// src/router.js

import Vue from "vue";
import VueRouter from "vue-router";
import App from "./App";
Vue.use(VueRouter);
const routes = [{ path: "/", component: App }];
const router = new VueRouter({
  routes
});
export default router;
This simply sets up the router for use in the application and exports an instance of the Vue router which has been supplied an array of routes.
Now go into the file main.js in the src folder and replace its contents with the following code:
// src/main.js

import Vue from "vue";
import App from "./App.vue";
import router from "./router";
// Import the Auth0 configuration
import { domain, clientId } from "../auth_config.json";
// Import the plugin here
import { Auth0Plugin } from "./auth";
// Install the authentication plugin here
Vue.use(Auth0Plugin, {
  domain,
  clientId,
  onRedirectCallback: appState => {
    router.push(
      appState && appState.targetUrl
        ? appState.targetUrl
        : window.location.pathname
    );
  }
});
Vue.config.productionTip = false;
new Vue({
  router,
  render: h => h(App)
}).$mount("#app");
This file loads in the Auth0 configuration, the router and authentication service plugin. The plugin is set up for use within the application using Vue.use with the required parameters, the router is also loaded into the root instance of the application.
Note: If you run this project at this point (or at any other point in the course of this article) and you run into errors relating to core-js, simply run npm install core-js to fix the issue.
Building the Emoji Game
Now to the main action, this is where you tie everything together. You will be writing code to do the following:
- Load and display in a select list the camera input options available on the system
- Display the feed of the selected camera input
- A Play button to initiate a new game
- A Skip Emoji button to move to a different emoji is the player can't predict the current one
- Display an object Emoji (no smileys as we don't want to include the prediction of facial expressions)
- Create a countdown timer
- Make a request with the captured image to Google's Vision API
- Display the current score
- Display the User's details
- Display pop dialogs for notifications
Phew! That's a handful, isn't it? But don't worry, you will be done in no time.
Installing required packages
The first step to building the game is to install the packages that will be required. You need to install the following packages:
- axios: To make API requests to the Google Vision API
- bootstrap: Basic styling
- emoji.json: Emojis Library
Go ahead and install these by running the following command:
npm install axios bootstrap emoji.json
The modal component
Before proceeding to build the game page, a modal component is required to display notifications on the game page. Go into the src/components folder and delete the HelloWorld.vue file that is comes by default with the scaffolded project and create a new file named modal.vue pasting the following code in it:
// src/components/modal.vue

<template>
  <transition name="modal">
    <div class="modal-mask">
      <div class="modal-wrapper">
        <div class="modal-container">
          <div class="modal-header">{{header}}</div>
          <div class="modal-body">{{content}}</div>
          <div class="modal-footer">
            <button class="modal-default-button" @click="$emit('close')">OK</button>
          </div>
        </div>
      </div>
    </div>
  </transition>
</template>
<script>
export default {
  props: ["header", "content"]
};
</script>
<style scoped>
.modal-mask {
  position: fixed;
  z-index: 9998;
  top: 0;
  left: 0;
  width: 100%;
  height: 100%;
  background-color: rgba(0, 0, 0, 0.5);
  display: table;
  transition: opacity 0.3s ease;
}
.modal-wrapper {
  display: table-cell;
  vertical-align: middle;
}
.modal-container {
  width: 600px;
  margin: 0px auto;
  padding: 20px 30px;
  background-color: #fff;
  border-radius: 2px;
  box-shadow: 0 2px 8px rgba(0, 0, 0, 0.33);
  transition: all 0.3s ease;
  font-family: Helvetica, Arial, sans-serif;
}
.modal-header h3 {
  margin-top: 0;
  color: #42b983;
}
.modal-body {
  margin: 20px 0;
}
.modal-default-button {
  float: right;
}
.modal-enter {
  opacity: 0;
}
.modal-leave-active {
  opacity: 0;
}
.modal-enter .modal-container,
.modal-leave-active .modal-container {
  -webkit-transform: scale(1.1);
  transform: scale(1.1);
}
</style>
This file exports a simple modal component that takes in the modal title (header) and modal body (content) as props.
Building the game page
Now to the main action. Using the full power of Google's machine learning API for vision, you will now tie everything together for the game!.
Go into the src folder and replace everything in the App.vue file with the code below:
// src/App.vue
<template>
<div id="app" v-if="!$auth.loading">
<nav class="navbar navbar-expand-lg navbar-dark bg-dark">
<a class="navbar-brand" href="#">The Emoji Game</a>
<button
class="navbar-toggler"
type="button"
data-toggle="collapse"
data-target="#navbarText"
aria-controls="navbarText"
aria-expanded="false"
aria-label="Toggle navigation"
>
<span class="navbar-toggler-icon"></span>
</button>
<div class="collapse navbar-collapse" id="navbarText">
<div class="navbar-nav mr-auto user-details">
<span v-if="$auth.isAuthenticated">{{ $auth.user.name }} ({{ $auth.user.email }})</span>
<span v-else> </span>
</div>
<span class="navbar-text">
<ul class="navbar-nav float-right">
<li class="nav-item" v-if="!$auth.isAuthenticated">
<a class="nav-link" href="#" @click="login()">Log In</a>
</li>
<li class="nav-item" v-if="$auth.isAuthenticated">
<a class="nav-link" href="#" @click="logout()">Log Out</a>
</li>
</ul>
</span>
</div>
</nav>
<div class="container mt-5" v-if="!$auth.isAuthenticated">
<div class="row">
<div class="col-md-8 offset-md-2">
<div class="jumbotron">
<h1 class="display-4">Play the Emoji Game!</h1>
<p class="lead">Instructions</p>
<ul>
<li>Login to play</li>
<li>Select a camera feed of your choice from the drop down</li>
<li>Click “Play” to start a new round</li>
<li>Capture the correct image that matches the emoji displayed</li>
<li>You can skip an emoji during a round if you can’t find the corresponding object around you to capture</li>
<li>Click ‘Predict Image’ to compare your captured image against the emoji</li>
<li>You gain 10 points for a correct prediction and loose 5 points for a wrong prediction</li>
<li>If the clock runs out, its Game Over!</li>
</ul>
<a
class="btn btn-primary btn-lg mr-auto ml-auto"
href="#"
role="button"
@click="login()"
>Log In to Play</a>
</div>
</div>
</div>
</div>
<!-- The emoji game -->
<div class="container mt-5" v-else>
<div class="row">
<div class="col-md-4">
<select class="form-control" v-model="selectedSource" @change="getStream()">
<option
v-for="source in videoSources"
:key="source.id"
:value="source.id"
>{{source.text}}</option>
</select>
</div>
<div class="col-md-8">
<div class="row">
<div class="col-md-4">Countdown : {{timerStart}}</div>
<div class="col-md-4">Total Score: {{totalScore}}</div>
</div>
</div>
</div>
<div class="row mt-5" v-if="gameOver">
<button class="btn btn-primary" @click="startNewGame()">Start New Game</button>
</div>
<div class="row mt-5" v-else>
<div class="col-md-6">
<button class="btn btn-success" :disabled="inPlay" @click="playGame()">Play</button>
<button
class="btn btn-warning"
:disabled="!inPlay"
@click="skipEmoji()"
>Skip Emoji</button>
</div>
</div>
<!-- row -->
<div class="row mt-5">
<div class="col-md-6">
<div>
<video autoplay id="video1" ref="video1"></video>
<canvas style="display:none;" id="canvas1" ref="canvas1"></canvas>
</div>
<div>
<button class="btn btn-primary" @click="captureImage()">Capture Image</button>
</div>
</div>
<div class="col-md-6">
<div class="row">
<div class="col-md-6">
<img
id="usercapture"
ref="usercapture"
src="http://via.placeholder.com/150x150"
width="200"
height="200"
/>
<div class="mt-2">
<button
class="btn btn-success"
@click="predictImage()"
:disabled="predictingImage"
>{{predictingImage? 'Please Wait...' : 'Predict Image'}}</button>
</div>
</div>
<div class="col-md-6">
<p class="currentEmoji">{{currentEmoji.char}}</p>
</div>
</div>
</div>
</div>
<!-- Modal -->
<modal
v-if="modal.show"
@close="modal.show = false"
:header="modal.header"
:content="modal.content"
></modal>
</div>
</div>
</template>
<script>
import "bootstrap/dist/css/bootstrap.css";
import axios from "axios";
import emojis from "emoji.json";
import modal from "./components/modal";
export default {
name: "app",
data() {
    return {
      videoSources: [],
      selectedSource: null,
      totalScore: 0,
      currentEmoji: {},
      imageURL: null,
      predictingImage: false,
      gCloudVisionUrl:
        "https://vision.googleapis.com/v1/images:annotate?key=YOUR_GOOGLE_PROJECT_API_KEY",
      timerHandle: null,
      timerStart: 60,
      pointsIncrement: 10,
      pointsDecrement: 5,
      inPlay: false,
      gameOver: false,
      modal: {
        show: false,
        header: "My header",
        content: "My Content"
      }
    };
  },
components: {
modal
},
mounted() {
    navigator.mediaDevices
      .enumerateDevices()
      .then(this.gotDevices)
      .catch(this.handleError);
},
computed: {
gameEmojis() {
  return emojis.filter(emoji => {
    return (
      emoji.category.includes("Objects") &&
      emoji.char.charCodeAt(0) != 55358
    );
  });
}
},
methods: {
// Log the user in
login() {
this.$auth.loginWithRedirect();
},
// Log the user out
logout() {
this.$auth.logout({
returnTo: window.location.origin
});
},
gotDevices(deviceInfos) {
for (var i = 0; i !== deviceInfos.length; ++i) {
var deviceInfo = deviceInfos[i];
if (deviceInfo.kind === "videoinput") {
let option = {};
option.id = deviceInfo.deviceId;
option.text = deviceInfo.label || "camera " + (i - 1);
this.videoSources.push(option);
}
}
},
getStream() {
if (window.stream) {
window.stream.getTracks().forEach(function(track) {
track.stop();
});
}
var constraints = {
video: {
deviceId: { exact: this.selectedSource }
}
};
navigator.mediaDevices
.getUserMedia(constraints)
.then(this.gotStream)
.catch(this.handleError);
},
gotStream(stream) {
this.$refs.video1.srcObject = stream;
},
handleError(error) {
this.showModal(
"Error",
error.message
);
},
playGame() {
//Get Random Emoji
this.switchEmoji();
this.inPlay = true;
//Start timer countdown
this.setTimer();
},
skipEmoji() {
this.switchEmoji();
this.imageURL = null;
},
captureImage() {
let canvas = this.$refs.canvas1;
let videoElement = this.$refs.video1;
canvas.width = videoElement.videoWidth;
canvas.height = videoElement.videoHeight;
canvas.getContext("2d").drawImage(videoElement, 0, 0);
let imgElement = this.$refs.usercapture;
// Get image
let image = canvas.toDataURL("image/png");
//Trim signature to get pure image data
this.imageURL = image.replace(/^data:image\/(png|jpg);base64,/, "");
//Set the image element to the data url
imgElement.src = image;
},
async predictImage() {
if (this.imageURL) {
let requestBody = {
requests: [
{
image: {
content: this.imageURL
},
features: [
{
type: "LABEL_DETECTION",
maxResults: 10
}
]
}
]
};
try {
this.predictingImage = true;
let predictionResults = await axios.post(
this.gCloudVisionUrl,
requestBody
);
let predictionResponse = predictionResults.data.responses[0];
let annotations = predictionResponse.labelAnnotations;
let allLabelDescriptions = annotations.map(annotation =>
annotation.description.toLowerCase()
);
//Check if any of the prediction labels match the current emoji
let match = false;
allLabelDescriptions.forEach(description => {
if (this.currentEmoji.name.includes(description)) {
match = true;
}
});
if (match == true) {
this.totalScore += this.pointsIncrement;
this.resetTimer();
this.showModal(
"Correct Answer",
`Congratulations, you have gained ${this.pointsIncrement} points, your total is now ${this.totalScore}`
);
} else {
this.totalScore -= this.pointsDecrement;
this.showModal(
"Wrong Answer",
`The answer you gave was incorrect, Your captured image suggested the following (${allLabelDescriptions}). You have lost ${this.pointsDecrement} points, your total is now ${this.totalScore}`
);
}
this.predictingImage = false;
} catch (error) {
this.handleError(error);
}
} else {
this.showModal("Error", `You are yet to capture an image`);
}
},
switchEmoji() {
let emojiIndex = this.getRandomInt(0, this.gameEmojis.length);
this.currentEmoji = this.gameEmojis[emojiIndex];
},
setTimer() {
this.resetTimer();
this.timerHandle = setInterval(() => {
if (this.timerStart > 0) {
this.timerStart -= 1;
} else {
//Game Over
this.endGame();
}
}, 1000);
},
resetTimer() {
//Stop the Clock
clearInterval(this.timerHandle);
this.timerStart = 60;
},
endGame() {
clearInterval(this.timerHandle);
this.inPlay = false;
this.gameOver = true;
this.showModal(
"Game Over",
`You could not complete the task before the time ran out. Your total score is ${this.totalScore}`
);
},
startNewGame() {
this.imageURL = null;
this.totalScore = 0;
this.gameOver = false;
this.currentEmoji = {};
},
showModal(title, body) {
this.modal = {
show: true,
header: title,
content: body
};
},
getRandomInt(min, max) {
min = Math.ceil(min);
max = Math.floor(max);
return Math.floor(Math.random() * (max - min + 1)) + min;
}
}
};
</script>
<style scoped>
#video1 {
width: 500px;
height: 400px;
background-color: grey;
}
.currentEmoji {
font-size: 120px;
}
.user-details {
color: white;
}
</style>That was a lot of code! Let's break it down starting with the Vue instance.
The data object is defined with the necessary variables to be used in the application.
data() {
return {
videoSources: [],
selectedSource: null,
totalScore: 0,
currentEmoji: {},
imageURL: null,
predictingImage: false,
gCloudVisionUrl:
"https://vision.googleapis.com/v1/images:annotate?key=YOUR_GOOGLE_PROJECT_API_KEY",
timerHandle: null,
timerStart: 60,
pointsIncrement: 10,
pointsDecrement: 5,
inPlay: false,
gameOver: false,
modal: {
show: false,
header: "My header",
content: "My Content"
}
};
},Note the line:
gCloudVisionUrl: "https://vision.googleapis.com/v1/images:annotate?key=YOUR_GOOGLE_PROJECT_API_KEY",
Replace YOUR_GOOGLE_PROJECT_API_KEY with the API key generated from the Google project created earlier.
Next, in the mounted lifecycle hook, the navigator object is used to get all media device inputs in the system.
mounted() {
navigator.mediaDevices
.enumerateDevices()
.then(this.gotDevices)
.catch(this.handleError);
}To use only object emojis (emojis representing objects and not smileys), a computed property gameEmojis is created.
gameEmojis() {
return emojis.filter(emoji => {
return (
emoji.category.includes("Objects") &&
emoji.char.charCodeAt(0) != 55358
);
});
}Now onto the methods!
login and logout
The login and logout methods make use of the authentication service created earlier to log the user in and out of the application respectively.
login() {
  this.$auth.loginWithRedirect();
},
logout() {
  this.$auth.logout({
    returnTo: window.location.origin
  });
},
The media stream functions
The gotDevices, getStream and gotStream functions are responsible for handling the collation of video sources and display of the selected video source feed in an HTML video tag for the user to capture.
gotDevices(deviceInfos) {
  for (var i = 0; i !== deviceInfos.length; ++i) {
    var deviceInfo = deviceInfos[i];
    if (deviceInfo.kind === "videoinput") {
      let option = {};
      option.id = deviceInfo.deviceId;
      option.text = deviceInfo.label || "camera " + (i - 1);
      this.videoSources.push(option);
    }
  }
},
getStream() {
  if (window.stream) {
    window.stream.getTracks().forEach(function(track) {
      track.stop();
    });
  }
  var constraints = {
    video: {
      deviceId: { exact: this.selectedSource }
    }
  };
  navigator.mediaDevices
    .getUserMedia(constraints)
    .then(this.gotStream)
    .catch(this.handleError);
},
gotStream(stream) {
  this.$refs.video1.srcObject = stream;
}
The Game Play Functions
These are the functions responsible for handing the game playing activities.
playGame: Resets the game for a user to start a new gameskipEmoji: Skips the currently displayed emoji and shows a new one to predictcaptureImage: Draws the current frame in the video element into a canvas element and converts the canvas image to a data URL that is then loaded to the screen using an image tagpredictImage: Makes a request to the Google Vision API with the captured image to return prediction results, then tries to find a match between the predicted values and the emoji label If a match exists, the user scores points, if not, the user loses pointsswitchEmoji: Changes the emoji currently displayedsetTimer: Starts the timer countdown for a game roundresetTimer: Resets the timer back to zeroendGame: Ends the gamestartNewGame: Start/Restarts the gameshowModal: Displays the notifications modal
The game page template
In the game page template, a top navigation bar displays the login/logout buttons based on the authentication state.
Next, there are two sections, one for the non-authenticated state and the other for the authenticated state. These two sections are displayed conditionally based on the authenticated state.
The non-authenticated section consists of the game homepage listing the game instructions and login button.
The authenticated section consists of the actual game. A select list of video input sources, a button to start a new game and another button to skip an emoji while in play. Also, there is a video display of the feed of the video source selected, a capture button, the button that triggers the prediction, the emoji, score, and timer displays.
Running the Application
Now it's time to put all the work that has been done so far to test. Run the app by running the following command:
npm run serve
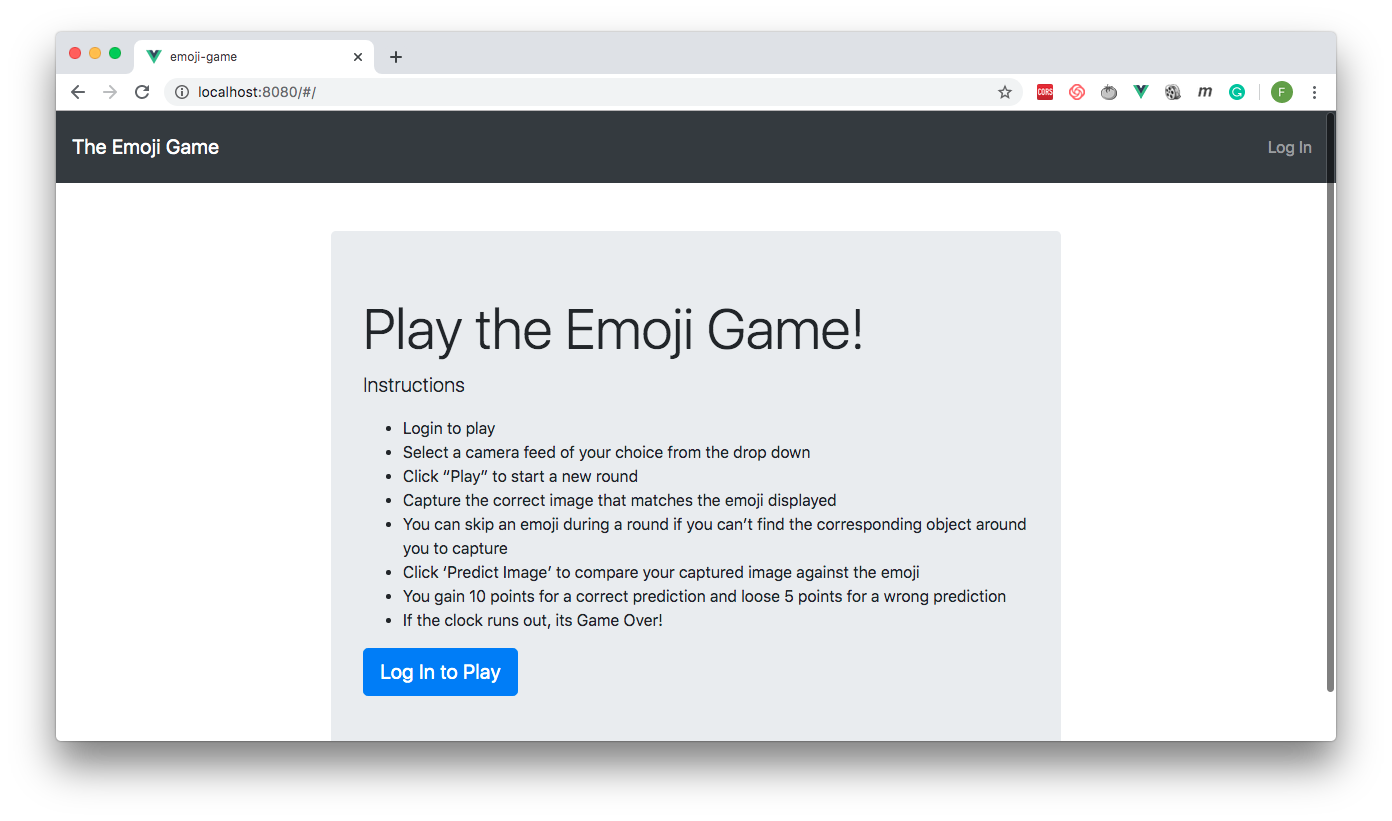
If all goes smoothly, you should see the login screen as shown below:
Now click the login button. You will see the Auth0 login prompt where you can log in with your email or Gmail/Facebook account.
Once the login process is complete, you will be redirected back to the app where the game page is then displayed. Select a camera source and hit the Play button. You should see a page similar to the one below:

And there you have it, a simple emoji prediction game using Auth0, Vue, and the Google Cloud Vision API.
Conclusion
This is surely not a production-ready application (do not deploy to app stores :)) as it could still use a lot more engineering to make it full-fledged. However, it demonstrates how you can build intelligence into your applications using readily available machine learning APIs.
About Auth0
Auth0 by Okta takes a modern approach to customer identity and enables organizations to provide secure access to any application, for any user. Auth0 is a highly customizable platform that is as simple as development teams want, and as flexible as they need. Safeguarding billions of login transactions each month, Auth0 delivers convenience, privacy, and security so customers can focus on innovation. For more information, visit https://auth0.com.


