---
title: "Demystifying OAuth Security: State vs. Nonce vs. PKCE"
description: "Learn the critical differences between OAuth State, Nonce, and PKCE. Discover how these parameters prevent CSRF, replay attacks, and code interception."
authors:
- name: "Andrea Chiarelli"
url: "https://auth0.com/blog/authors/andrea-chiarelli/"
date: "Mar 13, 2026"
category: "Developers,Tutorial,OAuth"
tags: ["oauth", "state", "nonce", "pkce", "security"]
url: "https://auth0.com/blog/demystifying-oauth-security-state-vs-nonce-vs-pkce/"
---
# Demystifying OAuth Security: State vs. Nonce vs. PKCE
When building secure authentication and authorization flows, the [OAuth 2.0](https://datatracker.ietf.org/doc/html/rfc6749) and [OpenID Connect](https://openid.net/specs/openid-connect-core-1_0.html) (OIDC) specifications are the industry standard. But as developers, we quickly encounter a few cryptic parameters that can be a major source of confusion: `state`, `nonce`, `code_challenge`, and `code_verifier`. The last two are tied to a security mechanism known as [Proof Key for Code Exchange](https://datatracker.ietf.org/doc/html/rfc7636) (PKCE).
All these parameters appear to be random secret strings passed around during the login flow. This leads to common and sometimes dangerous questions: Are they interchangeable? Does PKCE replace the need for `state`? If I'm using `state`, do I still need `nonce`?
The short and emphatic answer is: **No, they are not interchangeable.**
Think of them as three distinct security specialists, each guarding a different door at a different stage of the authentication process. Using one does not and cannot do the job of the others. They work together to create a layered defense that protects your application and your users from a variety of attacks.
To better understand them, let’s analyze them one by one, looking at the specific problem each one was designed to solve.
## The State Parameter: Preventing OAuth CSRF
Let's begin with the `state` parameter. It exists to answer a simple question for your application: **"Is this the incoming login response I actually requested?"**.
Its entire purpose is to prevent a class of attacks known as [**Cross-Site Request Forgery (CSRF)**](https://auth0.com/blog/cross-site-request-forgery-csrf/).
### The Attack: Cross-Site Request Forgery (CSRF)
Imagine a user who is logged in to their online bank. In another browser tab, they visit a malicious website. That website might have a hidden link or form that crafts a fake OAuth authorization response and sends it to the callback URL of the user’s online bank, as shown below:
```shell
https://online-bank.com/callback?code=FAKE_CODE_FROM_ATTACKER
```
This is a "forged request." The attacker is *tricking* the user’s browser into sending a request to their bank application that the user *did not initiate*. Without a `state` parameter, your application's callback endpoint might receive this fake code. If the attacker is clever, they could potentially use this vector to trick the bank application into associating the user's session with the *attacker's* account, a "login CSRF" attack.
### The Solution: Add the State Parameter
The `state` parameter solves this by acting as a "claim check." It's an opaque, random, and unguessable string that your application generates **before** the authentication flow even begins.
The flow becomes a secure, verifiable loop. First, your client application generates this unique `state` value. It then *saves* this value, typically in the user's session or a secure short-lived `HttpOnly` cookie. This value is now tied to *this specific user's browser session*.
Next, your application redirects the user to the authorization server's login page and includes the `state` value as a query parameter in the URL. The authorization server knows nothing about this value; its only job is to hold onto it and **echo it back, unmodified**, when it redirects the user back to your application.
When the user returns to your `redirect_uri` (or "callback URL"), the *very first thing* your application must do is compare the `state` value in the incoming request with the `state` value it stored in the user's session.
If they match, this is a legitimate response. Your application can confidently say, "I recognize this. This is the response to the request I sent out just moments ago for *this specific user*". You can now proceed to the next step: exchanging the authorization code.
If they do not match (or if the `state` is missing), this is a red alert. This request is unsolicited. It did not originate from your application, or it's being sent to the wrong user. Your application **must** reject the request immediately, log the attempt, and show an error.
The `state` parameter is your application's way of maintaining context across the HTTP redirects and ensuring the response it's processing is not a forgery.
## The Nonce Parameter: Preventing ID Token Replay
Next, we have `nonce`. This parameter is specific to OpenID Connect (OIDC), which is the authentication layer built on top of OAuth 2.0. If you are *only* using OAuth for *authorization* (getting an access token for an API), you won't use a `nonce`. But if you are using OIDC to *log a user in* and get an [ID token](https://auth0.com/blog/id-token-access-token-what-is-the-difference/), the `nonce` parameter is critical.
The `nonce` (a "number used once") exists to answer a different question: **"Is this ID token I just received *actually* for the login I just initiated?"**.
Its primary job is to prevent **ID token replay attacks**.
### The Attack: ID Token Replay
An ID token is a signed [JSON Web Token (JWT)](https://www.jwt.io/introduction). It's a digital identity card that proves *who* the user is and *when* they authenticated. But what if an attacker somehow intercepts a valid ID token from a previous legitimate login?
The attacker could try to "replay" this token to your application. They could try to trick your application into starting a new login flow and then, at the right moment, substitute their *stolen* (but still validly signed) ID Token. Without a `nonce`, your application might accept this token. It would check the signature, see it's valid, and log the attacker in *as the user from the stolen token*.
### The Solution: Add the Nonce Parameter
The `nonce` parameter solves this attack by cryptographically binding the ID token to the *specific client session that requested it*.
The flow is similar to `state` but has a crucial difference in *where* it's verified. Just like `state`, your client application generates a unique unguessable `nonce` value **before** the redirect and stores it in the user's session. It sends this `nonce` value in the [authorization request](https://auth0.com/blog/anatomy-of-an-oauth2-authorization-request/) alongside the `state`.
The authorization server, upon authenticating the user, takes the `nonce` value you sent and **embeds it as a claim inside the ID token's JWT payload**, as in the following example:
```json
{
"iis": "https://your-domain.auth0.com",
"sub": "1234567890",
"name": "John Doe",
"nonce": "q-385k-2Pc7",
"iat": 1516239022,
"exp": 1516240022
}
```
When your application receives the ID token (typically after exchanging the authorization code), its verification process is now twofold. It must, of course, validate the token's signature. But it *also* must:
1. Decode the ID token.
2. Extract the nonce claim from inside the token.
3. Compare this `nonce` claim against the `nonce` value it stored in the user's session.
If they match, the application knows this ID token was *just* minted and was created specifically for *this* login request. If they do not match, this is a replay attack. The token is either old or was intended for a different session. Your application **must** reject it.
This ensures that even a validly signed ID token cannot be reused to impersonate a user in a new login flow.
## PKCE: Securing the Authorization Code
Finally, we come to PKCE. This is a more recent extension to OAuth 2.0, initially meant for [public clients](https://auth0.com/docs/get-started/applications/confidential-and-public-applications), but it is now considered a mandatory best practice for *all* client types.
PKCE answers a question for the *authorization server*: **"Is the client exchanging this authorization code for a token the *same client* that originally requested the code?"**.
It was designed to prevent **authorization code interception attacks**.
### The Attack: Authorization Code Interception
This vulnerability is most dangerous for public clients, like mobile apps and browser-based Single Page Applications (SPAs). These clients cannot securely store a client secret because any code bundled in an app or running in a browser can be reverse-engineered.
In the standard [Authorization Code flow](https://auth0.com/docs/get-started/authentication-and-authorization-flow/authorization-code-flow), the authorization server sends an authorization code back to the client's `redirect_uri`. On a mobile device, this might involve a custom URL scheme (for example, `my-app://callback?code=...`). A malicious app on the same device could register itself to handle the *same* URL scheme, intercept this callback, and *steal the authorization code*.
The attacker, having stolen the code, could send it to the token endpoint. And since the token endpoint for a public client didn't require a client secret, the server had no way to know this *wasn't* the legitimate app. It would happily trade the stolen code for a valid access token, giving the attacker full access to the user's account.
### The Solution: Use PKCE
PKCE prevents this attack by requiring the client to prove it's the same one that started the flow. It's a cryptographic extension that works like a two-part secret handshake.
The flow now involves two new values. First, **before the redirect**, your client application generates a unique, random, high-entropy string called the `code_verifier`. This is the *secret*.
Second, your client transforms the `code_verifier` (usually using a SHA-256 hash and then Base64-URL-encoding it) to create a `code_challenge`. This is the *public* part of the secret.
Your application saves the secret `code_verifier` in its local storage. It then sends the public `code_challenge` (and the hashing method) to the authorization server in the initial authorization request (along with `state` and `nonce`). The authorization server stores this `code_challenge`, associating it with the authorization code it's about to generate.
When the user returns, the client receives the authorization code (which an attacker might still intercept). Now, the crucial step: when the client goes to the `/token` endpoint to exchange the code, it includes the authorization code *and* the original, secret `code_verifier` it had saved.
The authorization server receives this request and performs its check:
1. It takes the `code_verifier` from the request.
2. It hashes it using the same method the client said it would use.
3. It compares the result to the `code_challenge` it stored earlier.
If they match, the authorization server knows the client on the other end of this request is the *exact same client* that initiated the flow. It's safe to issue the tokens.
If they do not match, this is an imposter. The attacker only had the code, not the original `code_verifier` secret. The authorization server **must** reject the request.
PKCE effectively creates a dynamic one-time secret for every login flow, protecting the code from theft and misuse, even for clients that live in insecure environments.
## Why You Need All Three
It should now be clear that these three parameters are not redundant. They are a perfect example of layered security, protecting different assets at different stages of the process, as the following diagram shows:
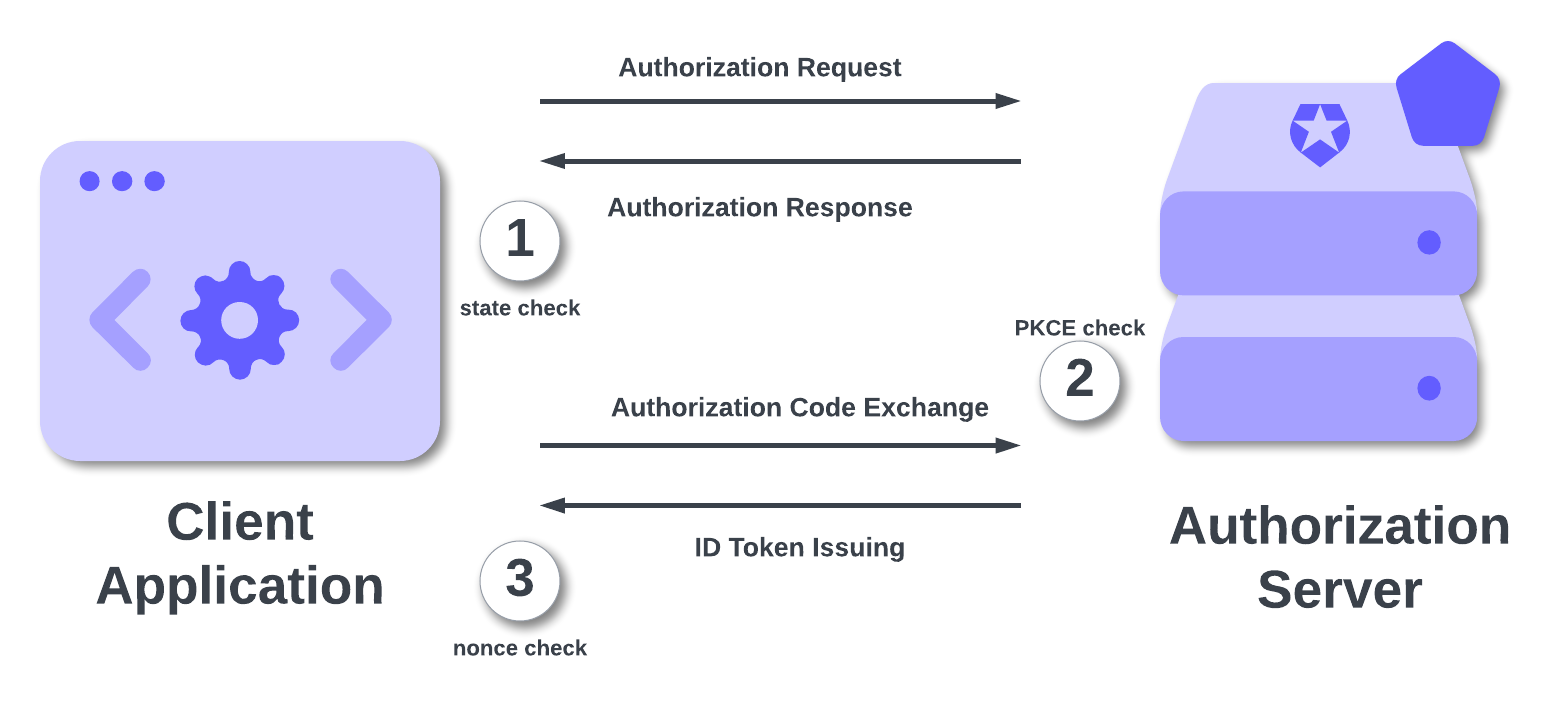
Following the numbered steps, let's visualize an attacker's very bad day trying to break into a *properly secured* OIDC flow:
1. **CSRF Attack.** The attacker crafts a malicious link with a fake auth code and sends it to a logged-in user.
The user's browser sends the request to the client's `redirect_uri`. The client checks for a `state` parameter in the URL, compares it to the one in the user's session, finds it's missing or mismatched, and rejects the request.
The `state` parameter protected the **authorization request step**.
2. **Code Interception Attack.** The attacker is on the user's mobile device and successfully intercepts the *real* authorization code from a legitimate login.
The attacker sends the stolen code to the token endpoint. The authorization server, which is expecting a PKCE flow, asks for the `code_verifier`. The attacker doesn't have it.
PKCE protected the **code exchange step**.
3. **Token Replay Attack.** The attacker somehow bypassed all this and got their hands on a *valid ID token* from a previous session. They initiate a new login and try to send this stolen token to the client.
The client, which just initiated a *new* login, has a *new* `nonce` stored in its session. It decodes the attacker's stolen ID Token, looks at the `nonce` claim inside, and sees it doesn't match the one in the session.
The `nonce` parameter protected the **token issuing/validation step**.
You are not "choosing" between `state`, `nonce`, and PKCE. You are leveraging all three to build a fortress around your authentication flow.
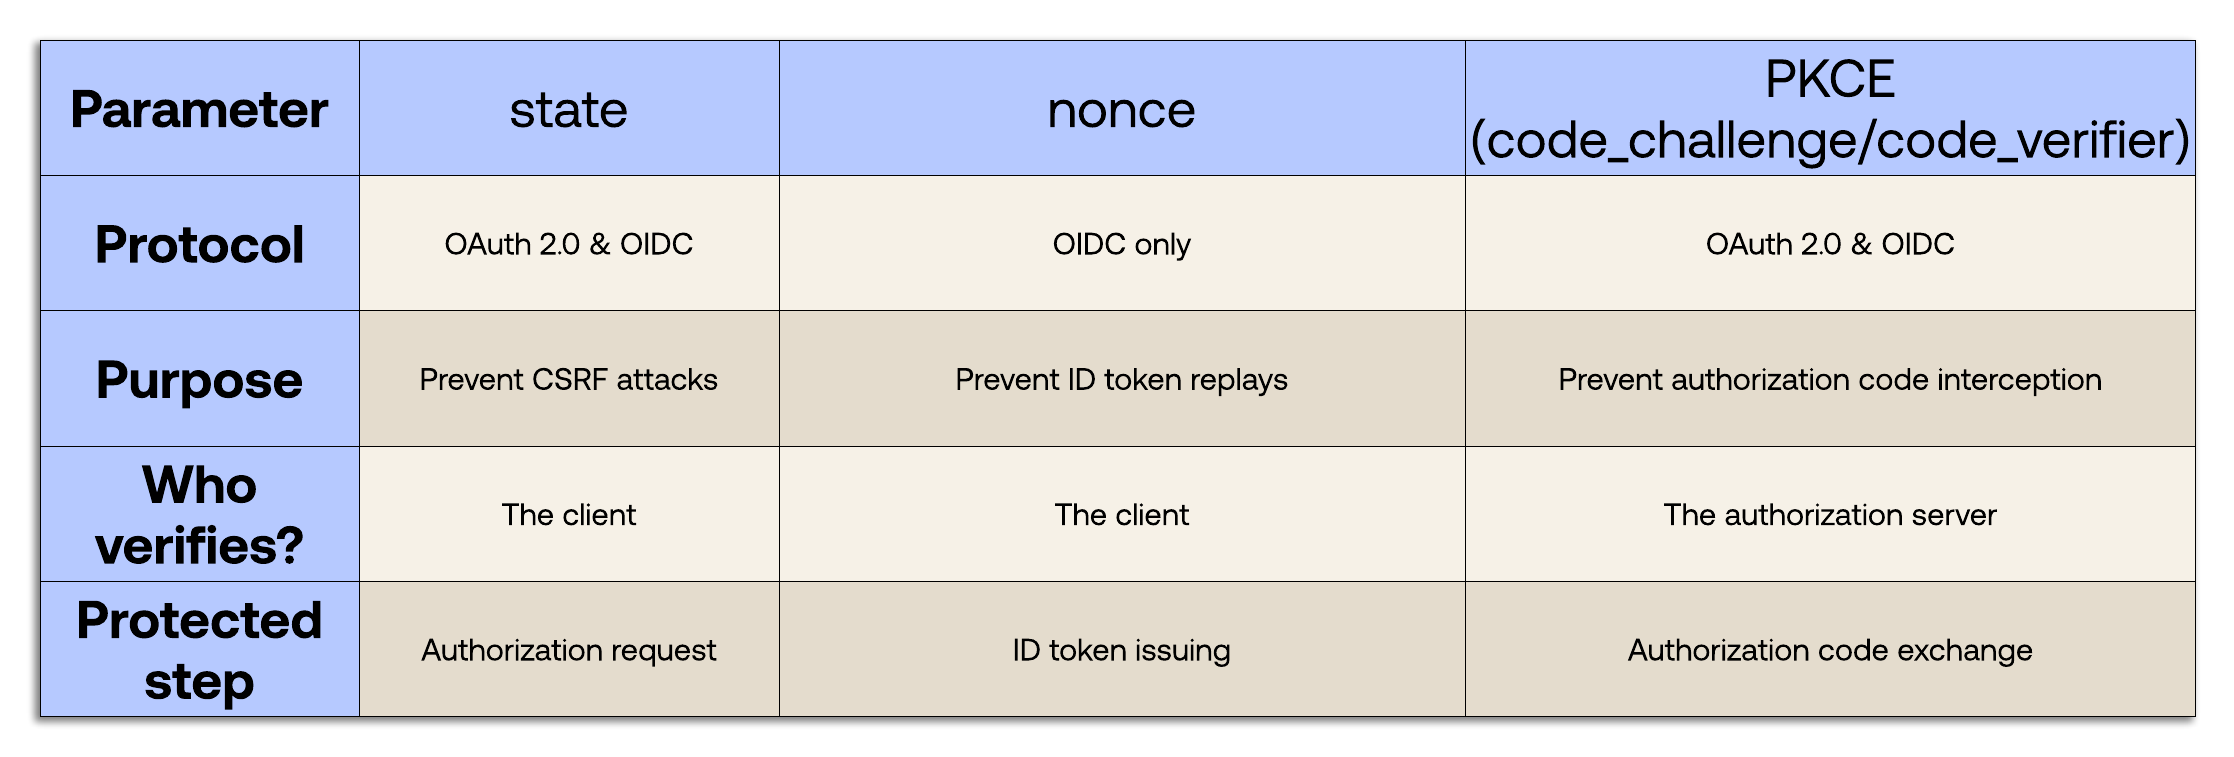
## Comparison Summary
Now you have a clear understanding of `state`, `nonce`, and PKCE. Keep these concepts handy with the following summary table: