---
title: "Build Apps with GraphQL, React, and Apollo"
description: "Learn how to develop and secure modern applications with GraphQL, React, Apollo, and Auth0."
authors:
- name: "Prosper Otemuyiwa"
url: "https://auth0.com/blog/authors/prosper-otemuyiwa/"
date: "Oct 3, 2018"
category: "Developers,Tutorial,React"
tags: ["graphql", "auth", "react", "apollo", "authentication", "javascript", "modern-apps", "api"]
url: "https://auth0.com/blog/develop-modern-apps-with-react-graphql-apollo-and-add-authentication/"
---
# Build Apps with GraphQL, React, and Apollo
Modern applications are increasingly data driven, which leads to a lot of time spent fetching, filtering, and aggregating data. When implemented with the [Apollo platform](https://www.apollographql.com/docs/fundamentals/platform.html), GraphQL reduces the complexity associated with data fetching and enables developers to take advantage of incredible tooling for crafting flexible APIs. In this tutorial, we'll explore how to build a production-ready application with GraphQL, React and Apollo. Finally, we'll wrap it up by learning how to add authentication with Auth0. The [completed code is available on GitHub](https://github.com/auth0-blog/book-app).
## What We'll Build
We'll build an application called **CoolReads**. **CoolReads** is a popular web application where users can actually review the books that they have read over time. These reviews help new users determine whether to embark on reading a book or not.
**CoolReads** is an application that displays a list of books with the appropriate book cover image, title, and average user ratings. Everyone should be able to see the ratings of these books, but only an authenticated user can add a new book with ratings. We'll assume there is a poll of user votes where the authenticated users just get the ratings and add to the platform.
We'll make use of GraphQL to build the API for the application. GraphQL’s strongly typed query language enables developers to take advantage of incredible tooling for exploring GraphQL APIs. Developers can query a GraphQL schema for information about what queries and types it supports because of the built-in introspection system.
## Prerequisites
Before building the GraphQL API, make sure you have the following installed :
* **Node.js and npm**: At least [Node.js v8.0 and npm v5](https://nodejs.org/en/download).
* **nodemon**: Ensure that you have [nodemon](https://www.npmjs.com/package/nodemon) installed globally.
After that, create a directory and run `npm init --y` to create a `package.json` file. Then install the [esm](https://www.npmjs.com/package/esm) package. This package allows us to use ES6 style imports and exports at will.
## Building CoolReads GraphQL API
### Schema First Development
Schema first development is a recommended approach for building applications with GraphQL that involves the frontend and backend teams agreeing on a schema first, which serves as a contract between the UI and the backend before any API development commences. GraphQL schemas are at their best when they are designed around the needs of client applications. We'll take this approach in designing a schema for our API.
### Building CoolReads Schema
At the core of any GraphQL server is a schema. The schema defines types and their relationships. It also specifies which queries can be made against the server. Let's build out the schema for **CoolReads**.
Create an `src/server.js`file in the _api_ directory. Our schema will live here.
The Schema for our application will look like this:
```bash
const typeDefs = gql`
type Author {
id: Int!
first_name: String!
last_name: String!
books: [Book]!
}
type Book {
id: Int!
title: String!
cover_image_url: String!
average_rating: Float!
author: Author!
}
type Query {
books: [Book!]!,
book(id: Int!): Book!
}
type Mutation {
addBook(title: String!, cover_image_url: String!, average_rating: Float!, authorId: Int!): Book!
}
`;
```
The `typeDefs` string defines our schema in the [GraphQL Schema Definition Language](https://www.apollographql.com/docs/apollo-server/v2/essentials/schema.html#sdl).
We have the `Author`, `Book`, `Query` and `Mutation` type. The `Query` type informs the server about the queries. that users are allowed to make. The `gql` tag is a JavaScript template literal tag that enables syntax highlighting for our schema.
The users of our app should be able to see all the books available at once. This is where the `books` query becomes useful. If we want to retrieve all books, we'll write a query like this:
```bash
query {
books {
id
title
cover_image_url
author {
first_name
last_name
}
}
}
```
This query will return a GraphQL response like this:
```bash
{
"data": {
"books": [
{
"id": 1,
"title": "The trials of Brother Jero",
"cover_image_url": "https://pmcvariety.files.wordpress.com/2017/03/baywatch-reboot.jpg",
"author": {
"first_name": "Wole",
"last_name": "Soyinka"
}
},
{
"id": 2,
"title": "Half of a Yellow Sun",
"cover_image_url": "https://resizing.flixster.com/PTWb8cveEQtMkpDSq3ypCZBuGoU=/300x300/v1.bjsxNTE4NzE4O2o7MTczODc7MTIwMDszMDAwOzIwMDA",
"author": {
"first_name": "Chimamanda",
"last_name": "Adichie"
}
},
{
"id": 3,
"title": "Americanah",
"cover_image_url": "http://t1.gstatic.com/images?q=tbn:ANd9GcQcCAOmt-FsRsR8GebIzI67qSvdQ2JLYDRLxeAcbH-541fzqq1H",
"author": {
"first_name": "Chimamanda",
"last_name": "Adichie"
}
},
{
"id": 4,
"title": "King Baabu ",
"cover_image_url": "http://t1.gstatic.com/images?q=tbn:ANd9GcQcCAOmt-FsRsR8GebIzI67qSvdQ2JLYDRLxeAcbH-541fzqq1H",
"author": {
"first_name": "Wole",
"last_name": "Soyinka"
}
}
]
}
}
```
For the query to return this response, a couple of things such as resolvers, a form of data source (database or external API), and a GraphQL server to execute the schema need to be available.
Resolvers provide the instructions for turning a GraphQL operation into data. They are organized into a one to one mapping to the fields in a GraphQL schema. Without further ado, let's add an in-app memory data source!
```bash
const books = [
{ id: 1, title: 'The Trials of Brother Jero', cover_image_url: 'ssdsds', average_rating: 8, authorId: 1 },
{ id: 2, title: 'Half of a Yellow Sun', cover_image_url: 'dsdsds', average_rating: 9, authorId: 3 },
{ id: 3, title: 'Americanah', cover_image_url: 'dsdsds', average_rating: 9, authorId: 3 },
{ id: 4, title: 'King Baabu', cover_image_url: 'sdsds', average_rating: 7, authorId: 1 },
{ id: 5, title: 'Children of Blood and Bone', cover_image_url: 'sdsds', average_rating: 7, authorId: 2 },
];
const authors = [
{ id: 1, first_name: 'Wole', last_name: 'Soyinka' },
{ id: 2, first_name: 'Tomi', last_name: 'Adeyemi' },
{ id: 3, first_name: 'Chimamanda', last_name: 'Adichie' },
];
const typeDefs = gql`
type Author {
id: Int!
first_name: String!
last_name: String!
books: [Book]!
}
type Book {
id: Int!
title: String!
cover_image_url: String!
average_rating: Float!
author: Author!
}
type Query {
books: [Book!]!,
book: Book!
author(id: Int!): Author!
}
type Mutation {
addBook(title: String!, cover_image_url: String!, average_rating: Float!, authorId: Int!): Book!
}
`;
```
In the code above, we have the `books` and `authors` data source. We'll go ahead to write the resolvers that fetch data from the data source above before progressing to hooking up our GraphQL API with a proper database.
### Writing the Resolvers
Resolvers are functions that connect schema fields and types to various backends. As I mentioned earlier, they provide the instructions for turning a GraphQL operation into data. They can retrieve or write data from anywhere, including a SQL, a No-SQL, graph database, a micro-service or a REST API. Resolvers can also return strings, ints, null, and other primitives.
```js
const { find, filter } = require('lodash');
...
...
let book_id = 5;
let author_id = 3;
const resolvers = {
Query: {
books: () => books,
book: (_, { id }) => find(books, { id: id }),
author: (_, { id }) => find(authors, { id: id }),
},
Mutation: {
addBook: (_, {title, cover_image_url, average_rating, authorId }) => {
book_id++;
const newBook = {
id: book_id,
title,
cover_image_url,
average_rating,
author_id
};
books.push(newBook);
return newBook;
}
},
Author: {
books: (author) => filter(books, { authorId: author.id }),
},
Book: {
author: (book) => find(authors, { id: book.authorId }),
},
};
```
At this stage, I'm sure you are yearning to see it work. Before shedding more light on each of the resolver functions, go ahead and install `apollo-server`, `graphql`, and `lodash`.
```bash
npm install apollo-server graphql lodash --save
```
> [Apollo Server](https://www.apollographql.com/docs/apollo-server) is a library that helps you quickly build and deploy a GraphQL API. It also has variants, such as apollo-server-express, apollo-server-hapi, apollo-server-koa, and others to support serverless deployment with AWS Lambda. Apollo Server has built-in support for GraphQL subscriptions, powerful error handling tools, schema stitching, file uploads, mocking, schema directives, and easy monitoring integration.
The full `server.js` should look like this now:
```js
const { ApolloServer, gql } = require('apollo-server');
const { find, filter } = require('lodash');
const books = [
{ id: 1, title: 'The Trials of Brother Jero', cover_image_url: 'ssdsds', average_rating: 8, authorId: 1 },
{ id: 2, title: 'Half of a Yellow Sun', cover_image_url: 'dsdsds', average_rating: 9, authorId: 3 },
{ id: 3, title: 'Americanah', cover_image_url: 'dsdsds', average_rating: 9, authorId: 3 },
{ id: 4, title: 'King Baabu', cover_image_url: 'sdsds', average_rating: 7, authorId: 1 },
{ id: 5, title: 'Children of Blood and Bone', cover_image_url: 'sdsds', average_rating: 7, authorId: 2 },
];
const authors = [
{ id: 1, first_name: 'Wole', last_name: 'Soyinka' },
{ id: 2, first_name: 'Tomi', last_name: 'Adeyemi' },
{ id: 3, first_name: 'Chimamanda', last_name: 'Adichie' },
];
const typeDefs = gql`
type Author {
id: Int!
first_name: String!
last_name: String!
books: [Book]!
}
type Book {
id: Int!
title: String!
cover_image_url: String!
average_rating: Float!
author: Author!
}
type Query {
books: [Book!]!,
book(id: Int!): Book!
author(id: Int!): Author!
}
type Mutation {
addBook(title: String!, cover_image_url: String!, average_rating: Float!, authorId: Int!): Book!
}
`;
let book_id = 5;
let author_id = 3;
const resolvers = {
Query: {
books: () => books,
book: (_, { id }) => find(books, { id: id }),
author: (_, { id }) => find(authors, { id: id }),
},
Mutation: {
addBook: (_, {title, cover_image_url, average_rating, authorId }) => {
book_id++;
const newBook = {
id: book_id,
title,
cover_image_url,
average_rating,
author_id
};
books.push(newBook);
return newBook;
}
},
Author: {
books: (author) => filter(books, { authorId: author.id }),
},
Book: {
author: (book) => find(authors, { id: book.authorId }),
},
};
const server = new ApolloServer({
typeDefs,
resolvers
});
server.listen().then(({ url }) => {
console.log(`🚀 Server ready at ${url}`);
});
```
Run `nodemon -r esm src/server.js` and check out the URL in your browser, `http://localhost:4000/`. You can run several queries to test your API in the GraphQL Playground, just like you can test your REST API endpoints with Postman.
Back to the resolver functions! We have resolver functions for all the fields in the `Query` and `Mutation` type. If you're following the tutorial step by step, you might have noticed this is a one-to-many relationship. One Author has many books, and many books belong to one author. Resolving the field in `Author`, and `Book` type enables us to get the right data when we have nested queries such as this:
```bash
{
author(id: 3) {
first_name
last_name
books {
title
cover_image_url
average_rating
}
}
book(id: 2) {
title
author {
id
first_name
last_name
}
}
}
```
Experiment with the queries in the browser and play around with the resolvers to get a clearer picture. Check out [this excellent article on how GraphQL turns a query into a response](https://blog.apollographql.com/graphql-explained-5844742f195e).
### Connect to a Database
Let's swap out the arrays for a proper database. In this tutorial, we'll make use of SQLite and Sequelize. Go ahead and install them via npm:
```
npm install sequelize sqlite --save
```
Create a `store.js` file within the `src` directory and a `coolreads.sqlite` file within the root directory. The `sqlite` file is our database store.
Add code to `store.js` like so:
```js
const Sequelize = require('sequelize');
const casual = require('casual');
import _ from 'lodash';
const db = new Sequelize('coolreads', null, null, {
dialect: 'sqlite',
storage: './coolreads.sqlite',
});
const AuthorModel = db.define('author', {
first_name: { type: Sequelize.STRING },
last_name: { type: Sequelize.STRING },
});
const BookModel = db.define('book', {
title: { type: Sequelize.STRING },
cover_image_url: { type: Sequelize.STRING },
average_rating: { type: Sequelize.STRING },
});
AuthorModel.hasMany(BookModel);
BookModel.belongsTo(AuthorModel);
// create mock data with a seed, so we always get the same
casual.seed(123);
db.sync({ force: true }).then(() => {
_.times(10, () => {
return AuthorModel.create({
first_name: casual.first_name,
last_name: casual.last_name,
}).then((author) => {
return author.createBook({
title: casual.title,
cover_image_url: casual.url,
average_rating: casual.integer(-10, 10),
});
});
});
});
const Author = db.models.author;
const Book = db.models.book;
export { Author, Book };
```
In the code above, we initialized our database, created the `Author` and `Book` models, established the relationship, and built a seeder for provisioning the database with initial data! What do we do next? Go ahead and install `casual`:
```
npm install casual
```
**Note:** `casual` is a package that generates random fake data.
Run `nodemon -r esm src/store.js`. From the terminal, you should see data been added to the database. However, you can't view the data in the _sqlite_ file unless you use an SQLite browser.
Go ahead and install the [SQLite browser](https://github.com/sqlitebrowser/sqlitebrowser). It will prove very useful!
Open the _sqlite_ file via the SQLite browser. You'll see all the data in it. Now, go ahead and replace that data with the initial data we started with, `books` and `authors` array.

_SQLite: Coolreads database, Books table_
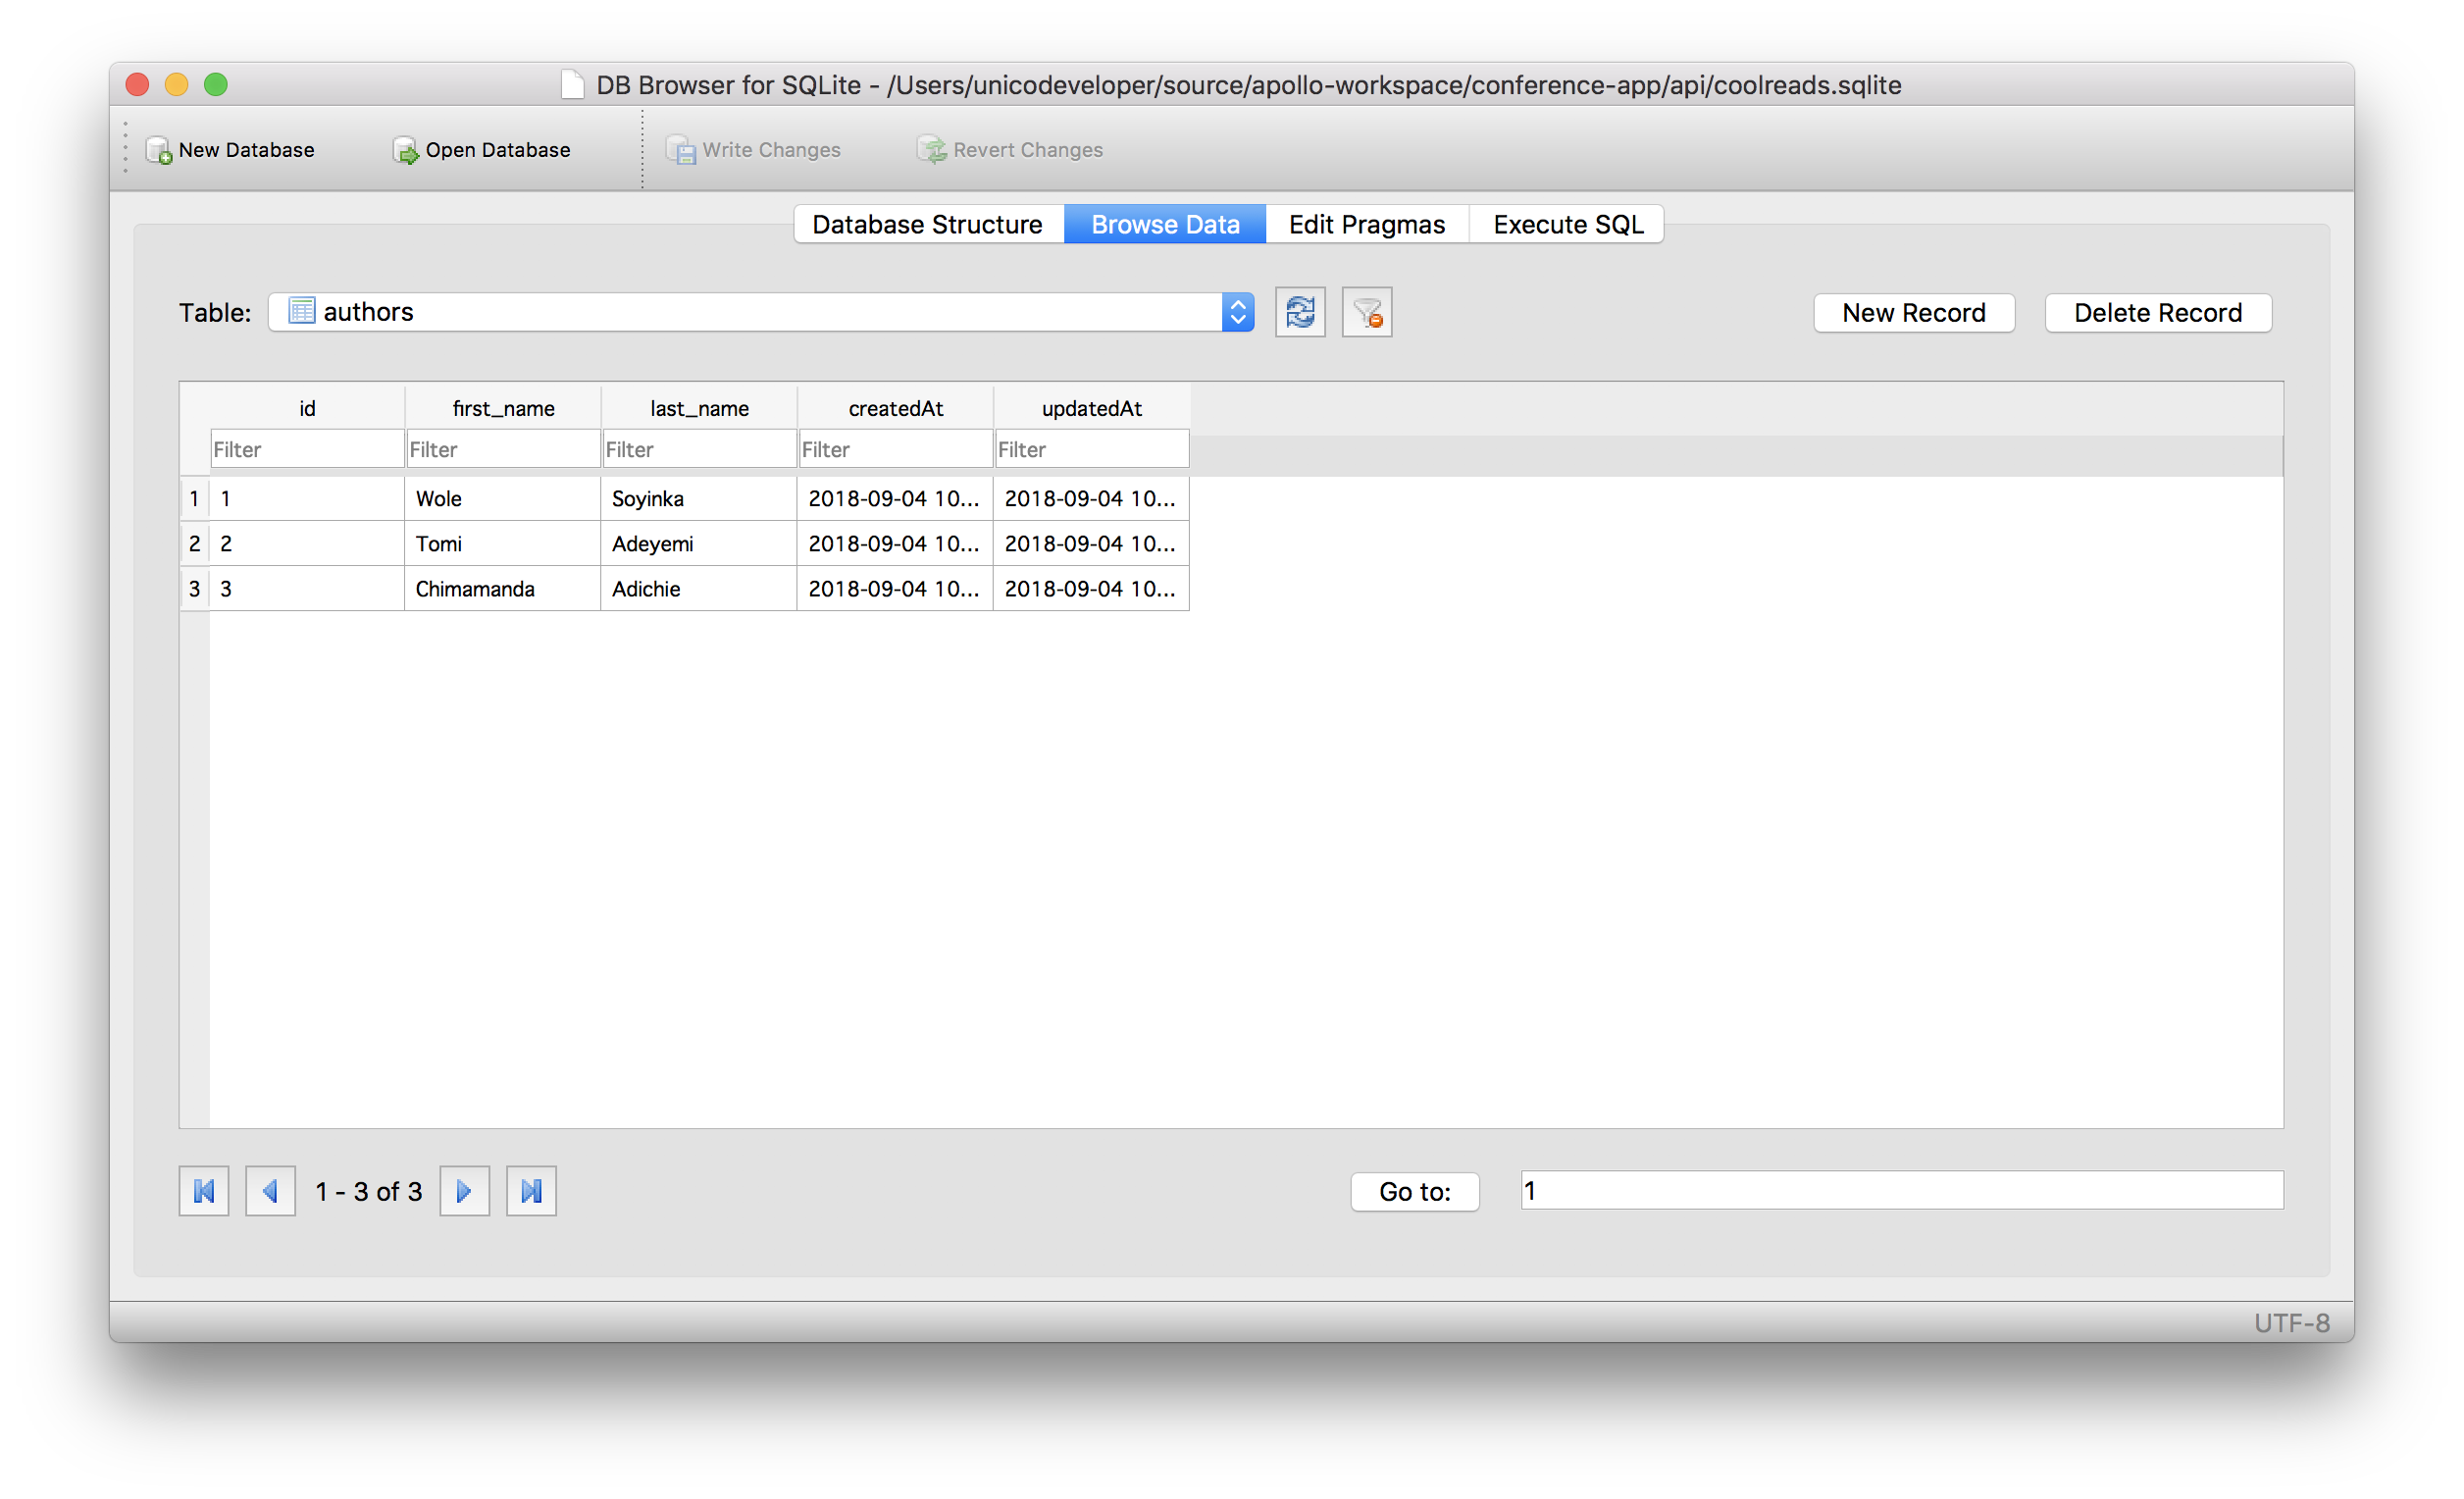
_SQLite: Coolreads database, Authors table_
### Rewrite the Resolvers
Open up `src/server.js` file. Import the models from the store:
```js
...
import { Author, Book } from './store';
```
Rewrite the resolvers to use the database model methods in fetching data from the SQLite database:
```js
...
Query: {
books: () => Book.findAll(),
book: (_, args ) => Book.find({ where: args }),
author: (_, args) => Author.find({ where: args })
},
Author: {
books: (author) => author.getBooks(),
},
Book: {
author: (book) => book.getAuthor(),
},
Mutation: {
addBook: (_, {title, cover_image_url, average_rating, authorId }) => {
return Book.create({
title: title,
cover_image_url: cover_image_url,
average_rating: average_rating,
authorId: authorId
}).then(book => {
return book;
});
}
}
```
* `Book.findAll` - Fetches all the books from the `books` table.
* `Book.find` - Fetches the book that has a certain `id`. `args` is an object in the [resolver signature](https://www.apollographql.com/docs/graphql-tools/resolvers#Resolver-function-signature) that contains arguments passed to the book field as declared in the schema. In this case, `args` is `{ id }`.
* `Author.find` - Fetches the author with a certain `id`.
* `author.getBooks` - Selects and returns the books that belong to a particular author.
* `book.getAuthor` - Fetches the author that wrote a certain book.
* `Book.create` - Creates a new book, writes it to the database and returns the details of the new book that was just created.
### Build The Frontend
We'll use ReactJS library to build the frontend. Create a new app like so:
After installing globally, go ahead and scaffold a new **ReactJS** app like so:
```bash
create-react-app coolreads
```
**Note:** If you don't have the [CRA tool](https://github.com/facebookincubator/create-react-app), go ahead and install it globally, `npm install -g create-react-app`.
After scaffolding, go ahead and run the app like so:
```
npm start
```
Then open [`http://localhost:3000`](http://localhost:3000) to see your app.
**Note:** `create-react-app` automatically invokes Yarn for installation. If you don't have Yarn installed, it falls back to use npm.
Before we start fleshing out new components, we'll set up `Apollo Client` in our React app. The simplest way to get started with Apollo Client is by using Apollo Boost, a starter kit that configures your client for you with our recommended settings. Apollo Boost includes packages that we think are essential for building an Apollo app, like our in-memory cache, local state management, and error handling. It’s also flexible enough to handle features like authentication.
Install the following packages:
```bash
npm install apollo-boost react-apollo graphql --save
```
* **apollo-boost:** Package containing everything you need to set up Apollo Client.
* **react-apollo:** View layer integration for React.
* **graphql:** Also parses your GraphQL queries.
We'll need to do some routing and styling in this app. Go ahead and install the following:
```bash
npm install tachyons react-router react-router-dom --save
```
* **tachyons:** is a CSS toolkit for styling applications
* **react-router-dom:** is a router library for react
## Set Up Apollo Client and Routing
Open up `index.js` and rewrite the code to be this:
```js
import React from 'react';
import ReactDOM from 'react-dom';
import App from "./App";
import { BrowserRouter } from 'react-router-dom';
import ApolloClient from "apollo-boost";
import { ApolloProvider } from "react-apollo";
import 'tachyons';
import './index.css';
import registerServiceWorker from './registerServiceWorker';
const client = new ApolloClient({
uri: "http://localhost:4000/graphql"
});
ReactDOM.render(
,
document.getElementById('root')
);
registerServiceWorker();
```
To connect Apollo Client to React, you will need to use the `ApolloProvider` component exported from `react-apollo` like we did in the code above. The `ApolloProvider` is similar to React’s `context` provider. It wraps your React app and places the client on the context, which allows you to access it from anywhere in your component tree.
In the code above, we also configured routing by using the `BrowserRoute` component to wrap the `ApolloProvider ` component in the render method.
Open up `App.js` and rewrite the code to be this:
```js
import React, { Component } from 'react';
import {Route, withRouter} from 'react-router-dom';
import Nav from './components/Nav';
import ListBook from './components/ListBook';
import CreateBook from './components/CreateBook';
import './App.css';
class App extends Component {
render() {
return (
);
}
}
export default withRouter(App);
```
Next, let's start building our components. We need to build 4 major components:
* **CreateBook:** This component will be for uploading a reviewed book.
* **ListBook:** This component will be for listing all the reviewed books.
* **Nav:** This component will be strictly for navigation.
* **Callback:** This special component is for handling authentication while retrieving tokens from the Auth0 server. You'll understand why this component later in the tutorial.
These components will reside in an `src/components` directory. Go ahead and create that directory.
## Build the Nav Component
Create a `Nav.js` file in the `src/components` directory. This will house the Nav component. Go ahead and add code to it like so:
```js
import React, { Component } from 'react';
import { Link, withRouter } from 'react-router-dom';
import '../App.css';
class Nav extends Component {
render() {
return (
);
}
}
export default withRouter(Nav);
```
**Note:** The `withRouter` is a HOC that allows a component to have access to the history object's properties. It will pass the updated `match`, `location`, and `history` props to the wrapped component whenever it renders. Once we add authentication to this app, you'll understand why it's useful. For now, don't think too much about it, just flow with the tutorial.
## Build the ListBook and CreateBook Component
The `ListBook` component will be responsible for displaying the details of each book. Create a `components/ListBook.js` file and add the following code:
```js
import React from 'react';
import { Query } from "react-apollo";
import { gql } from "apollo-boost";
import '../App.css';
const LIST_BOOKS = gql`
query AllBooks {
books {
id
title
cover_image_url
average_rating
}
}
`
export default () => (
{({ loading, error, data }) => {
if (loading) return
Loading...
;
if (error) return
Error...
;
return (
{!loading &&
data.books.map(book => (
{ book.title }
Average Rating: { book.average_rating } / 10
))}
);
}}
);
```
Let's analyze the code above carefully:
* **Query**: The `Query` component from `react-apollo` is a React component that uses the _render prop_ pattern to share GraphQL data with your UI.
* **gql**: The `gql` function is a JavaScript template tag that parses GraphQL queries into an abstract syntax tree (AST).
Then the query, _LIST_BOOKS_, is for querying the GraphQL API for the list of books available:
```js
const LIST_BOOKS = gql`
query AllBooks {
books {
id
title
cover_image_url
average_rating
}
}
`
```
**Note:** The query operation name, `AllBooks`, is very useful for logging and debugging when something goes wrong in a GraphQL server.
In the function below the query, we passed the GraphQL query to the `query` prop on the `Query` component. Then, we provided a function to the Query component’s children prop to determine what to render, which Query will call with an object containing `loading`, `error`, and `data` properties. Apollo Client tracks error and loading state for you, which will be reflected in the loading and error properties. Once the result of your query comes back, it will be attached to the `data` property.
Now, let's create the `CreateBook` component! Create a `components/CreateBook.js` file and add the following code to it:
```js
import React from 'react';
import { Mutation } from "react-apollo";
import { gql } from "apollo-boost";
const ADD_BOOK = gql`
mutation addBook($title: String!, $cover_image_url: String!, $average_rating: Float!, $authorId: Int!){
addBook(title: $title, cover_image_url: $cover_image_url, average_rating: $average_rating, authorId: $authorId){
id
title
cover_image_url
average_rating
}
}
`
export default () => (
window.location.href="/" }>
{(addBook, { data, loading, error }) => (
)}
);
```
Let's analyze the code above carefully:
* **Mutation**: The `Mutation` component from `react-apollo` is a React component that uses the _render prop_ pattern to trigger mutations from your UI. React will call the _render prop_ function you provide with a `mutate` function and an object with your mutation result containing `loading`, `error`, and `data` properties
Then the `Mutation` query, _ADD_BOOK_, is for mutating the GraphQL API:
```js
const ADD_BOOK = gql`
mutation addBook($title: String!, $cover_image_url: String!, $average_rating: Float!, $authorId: Int!){
addBook(title: $title, cover_image_url: $cover_image_url, average_rating: $average_rating, authorId: $authorId){
id
title
cover_image_url
average_rating
}
}
`
```
In the function below the `Mutation`, we passed the mutation query to the `mutation` prop on the `Mutation` component.
The mutate function optionally takes `variables`, `optimisticResponse`, `refetchQueries`, and `update`; however, you can also pass in those values as props to the `Mutation` component. In the form, the mutate function, `addBook`, is used to submit the form with variables from the form itself.
The second argument to the render prop function is an object with your mutation result on the `data` property, as well as booleans for loading and if the mutate function was called, in addition to error. If you’d like to ignore the result of the mutation, pass ignoreResults as a prop to the mutation component.
In the code above, we passed an `onCompleted` prop to the `Mutation` component. The function passed to this prop is invoked when the mutation has finished execution. And in our app, it simply redirects to the root route once the mutation completes.
## Styling
We need to reference bootstrap for styling. Add the link to bootstrap in `public/index.html` file.
```bash
...
...
```
Modify the `src/App.css` file to contain the code [here](https://github.com/auth0-blog/book-app/blob/master/client/src/App.css).
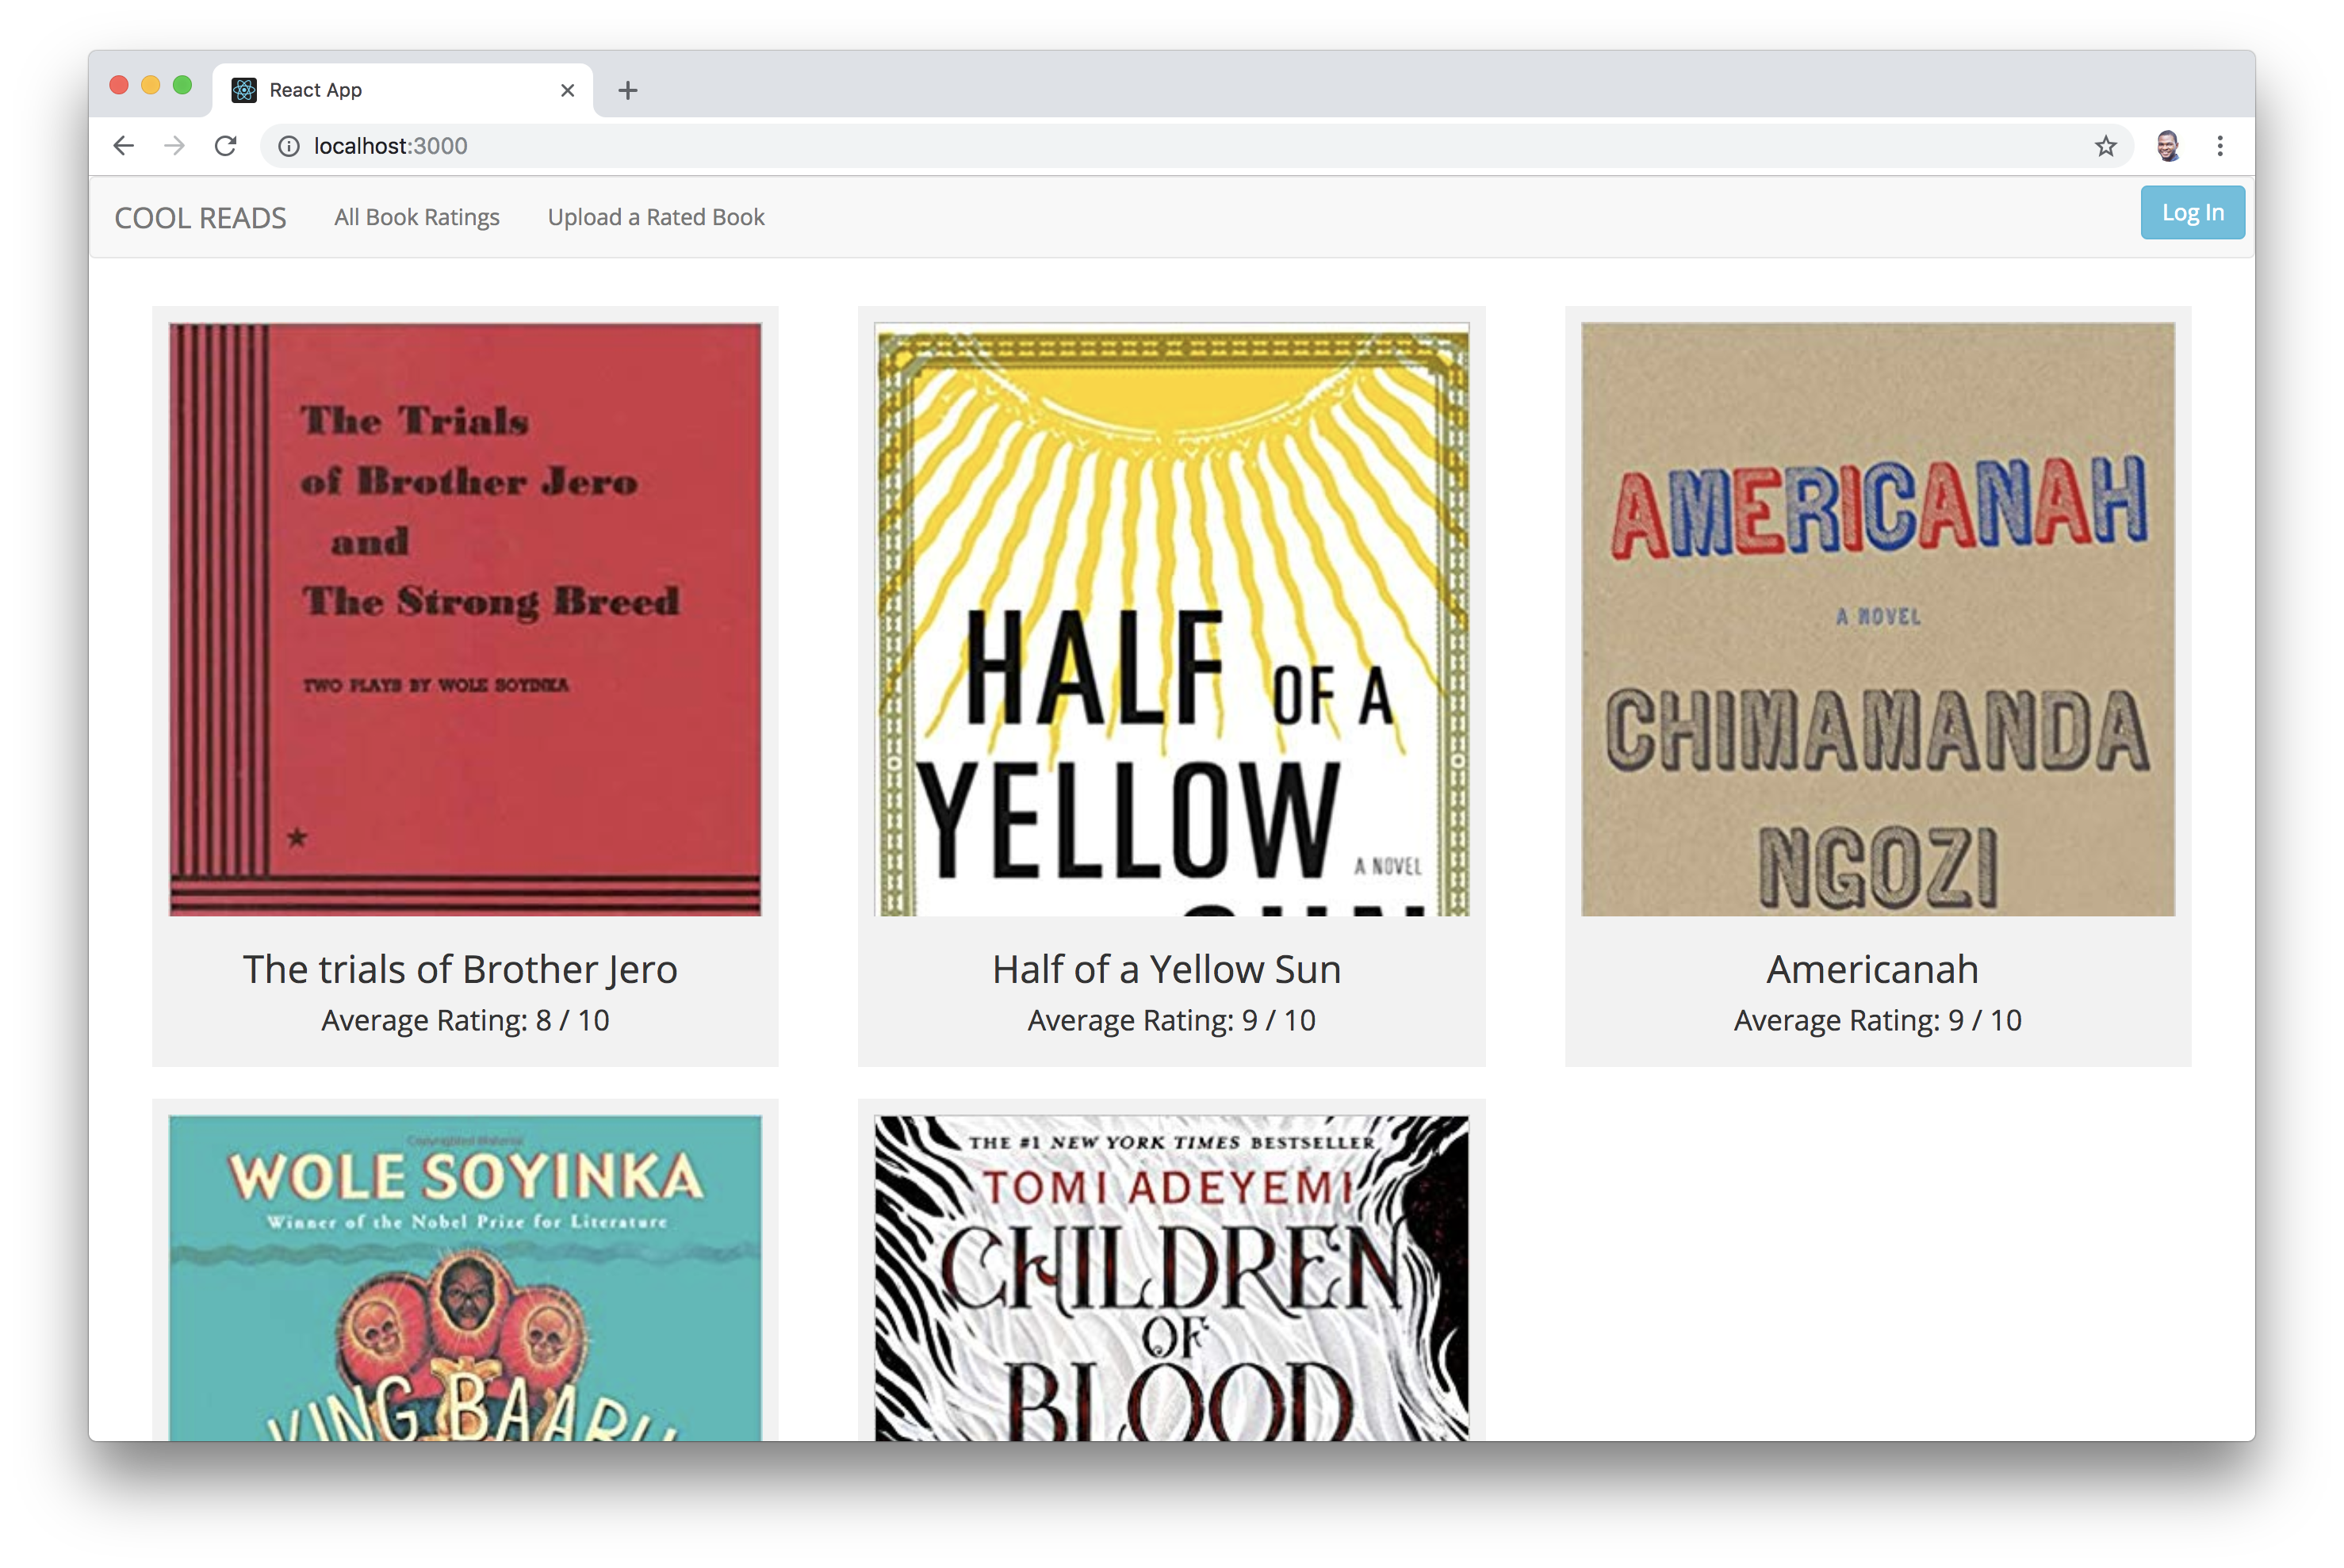
Now, run your app. There should be a list of books on the landing page. The existing data from our backend is fetched and rendered on our client app.
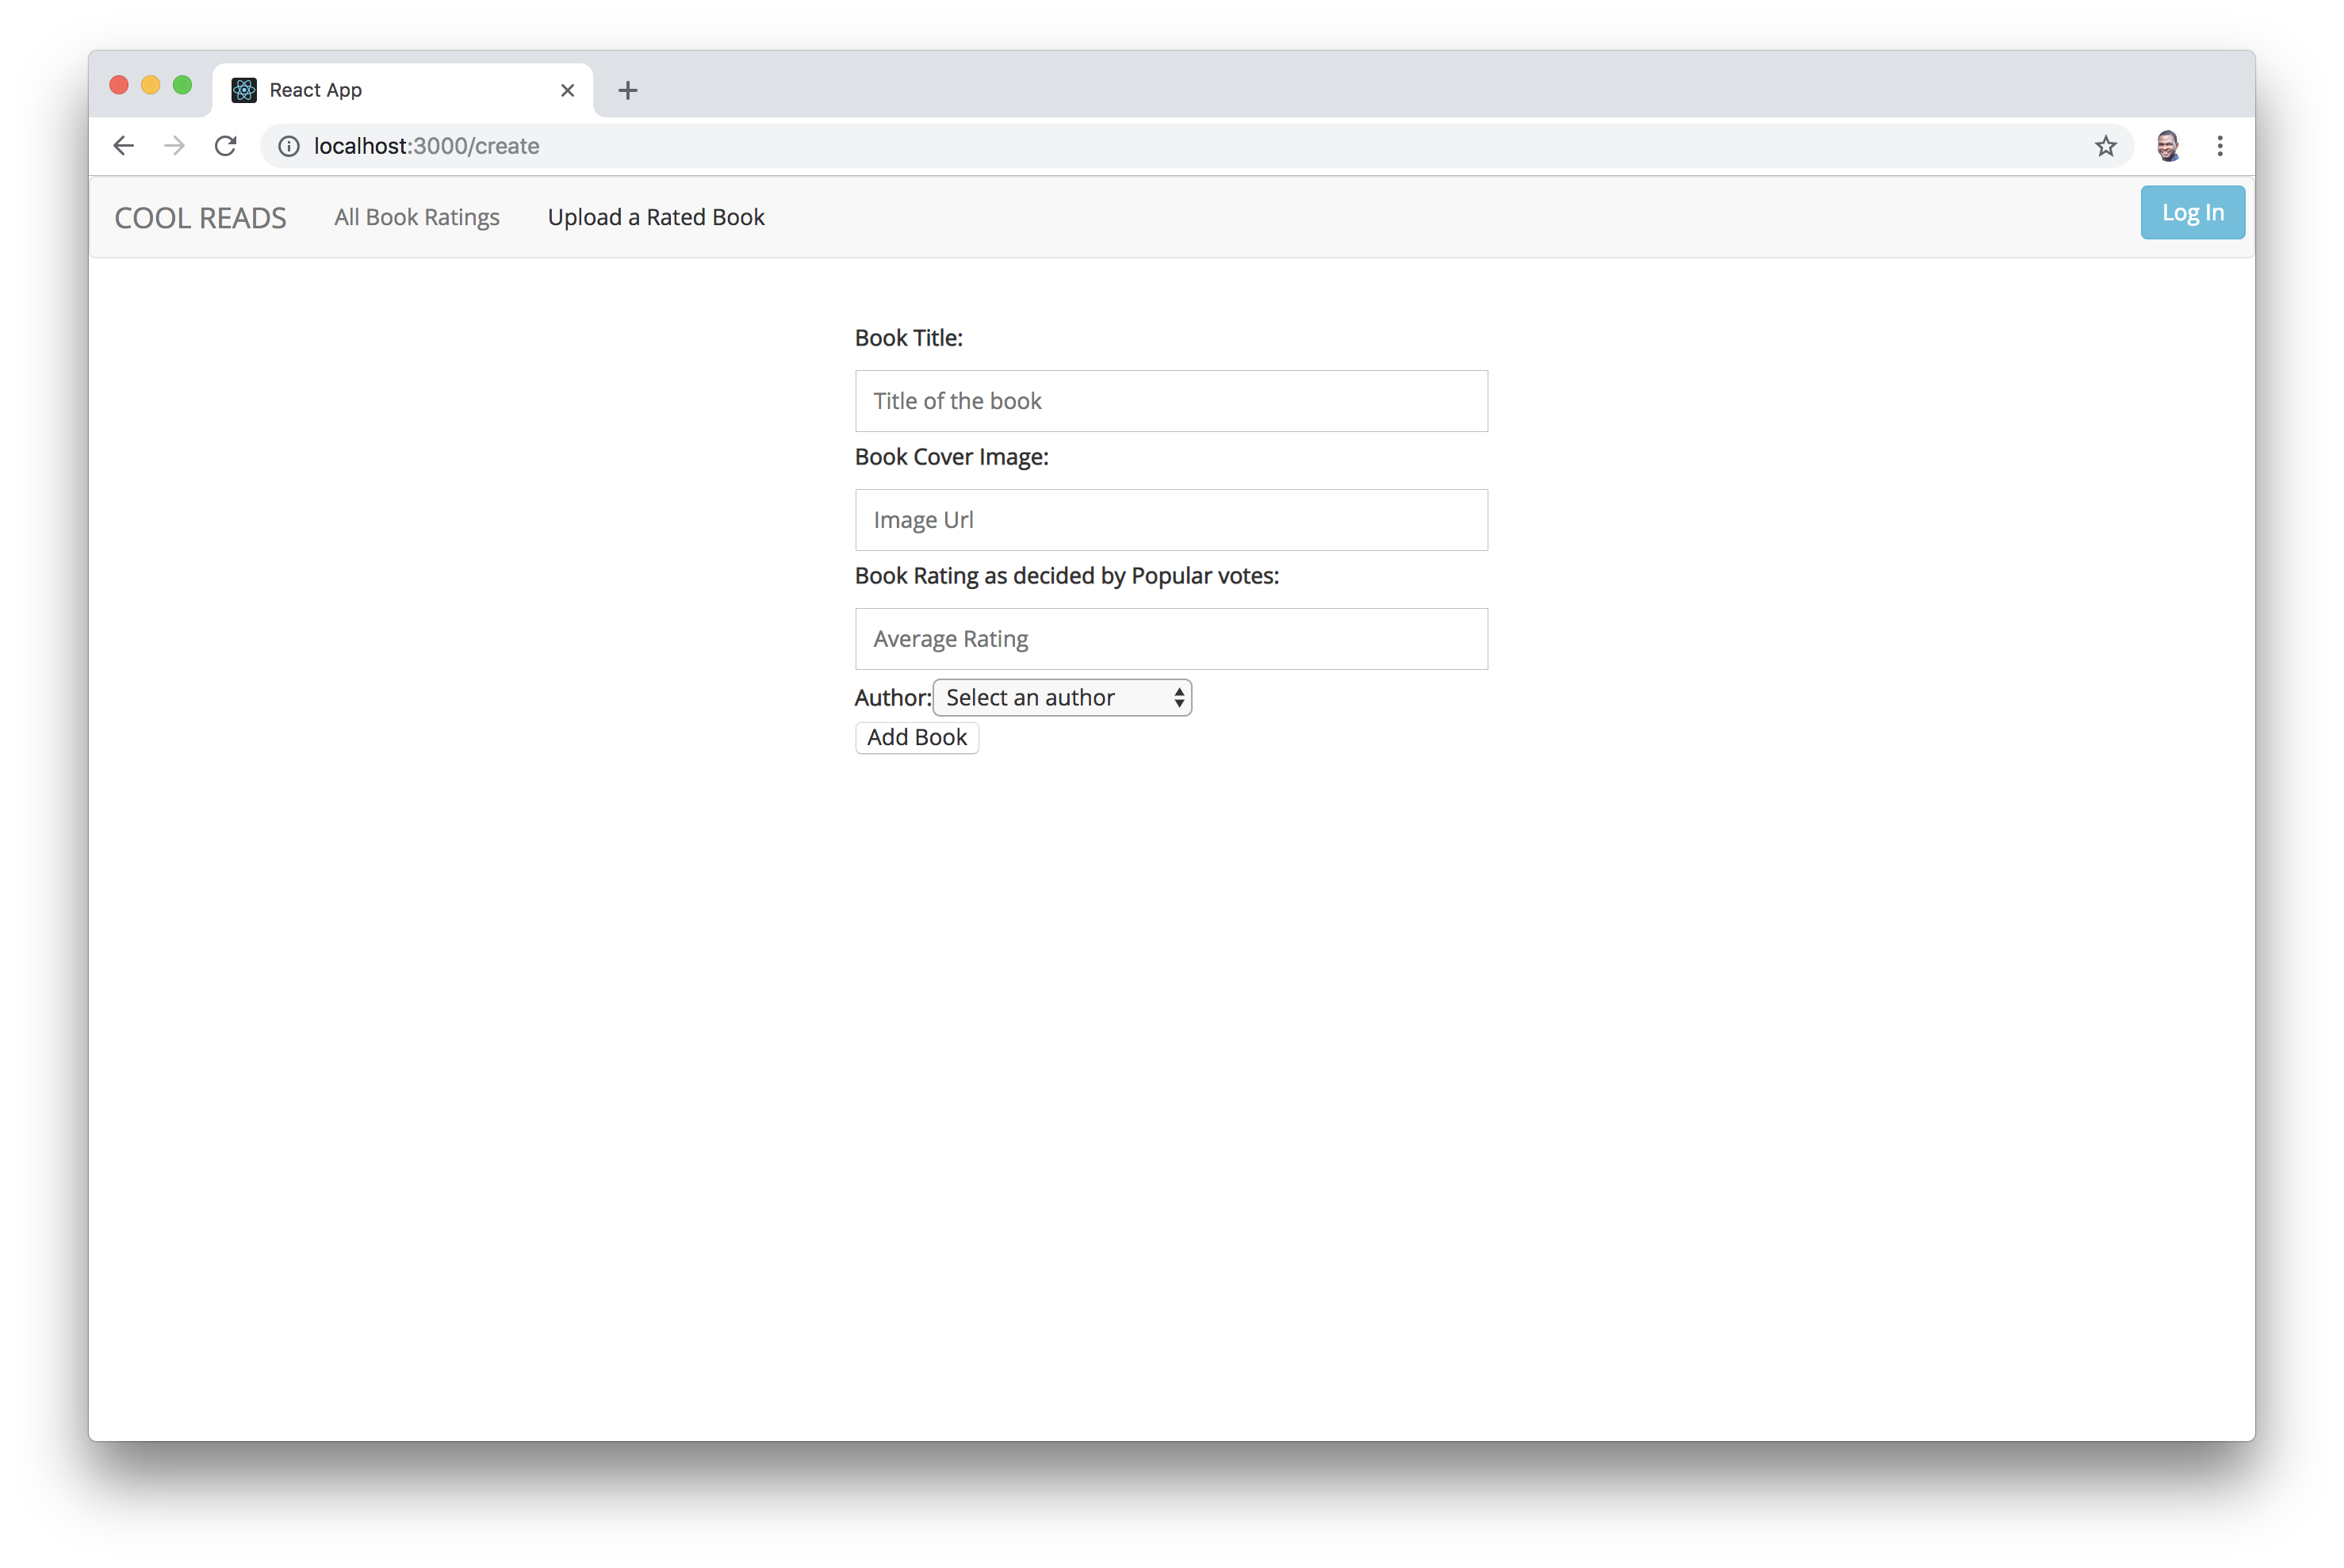
Try, to add a book by going to the `/create` route and using the form:
Awesome! Right now, you can create books. Next, let's make sure only authenticated users can add books.