---
title: "Easy Authentication in Xamarin Apps with Auth0"
description: "Learn how to add authentication to iOS and Android apps with Xamarin and Auth0."
authors:
  - name: "Daniel Krzyczkowski"
    url: "https://auth0.com/blog/authors/daniel-krzyczkowski/"
date: "Feb 4, 2020"
category: "Developers,Tutorial,Xamarin"
tags: ["xamarin", "authentication", "mobile", "dotnet", ".net", "csharp", "ios", "android"]
url: "https://auth0.com/blog/easy-authentication-xamarin-auth0/"
---

# Easy Authentication in Xamarin Apps with Auth0


**TL;DR:**  With Xamarin, developers can build native cross-platform mobile applications using C# on .NET. Also, authentication and authorization are a significant part of application architecture since they allow users to access specific functionalities and resources selectively. In this tutorial, we will learn how to use Xamarin together with [the Auth0 OpenID Connect (OIDC) Client for .NET library](https://github.com/auth0/auth0-oidc-client-net) to enable authentication in our iOS and Android mobile applications.

## Authentication Challenges in Mobile Applications

User authentication is a part of almost every application. Before accessing a specific functionality, a user has to register and log in. Implementing an authentication mechanism can be complicated and time-consuming and requires facing some important challenges, such as:


- Storing user credentials in a secured storage
- Generating access tokens
- Managing account restore
- Sending verification e-mails
- Managing user permissions
- Integration of login mechanism for social media accounts such as Facebook or Google

These are only some examples, but there are even more challenges. With [Auth0](https://auth0.com/), it is much easier to implement authentication in Xamarin mobile apps. In this article, we will learn how to leverage the OIDC .NET library from Auth0 to integrate authentication with Xamarin Android and Xamarin iOS applications.


## Xamarin for Creating Native Mobile Applications

Mobile developers have a few different options to choose from to build their mobile apps. We can use different frameworks to support the three main development approaches - *responsive web*, *hybrid*, or *native*. It gives developers a lot of flexibility. Of course, all three approaches have pros and cons. Let's look at some of them.

### Responsive web apps

**Pros**

- Lower cost: When developing a responsive web design, we do not have to implement different mobile apps; a website is available and responsive on all devices.
- Maintenance: There is one codebase. We do not have to maintain separate source code for each mobile apps' platform.
- Quick updates to the user interface without having to redeploy the application to mobile app stores.

**Cons**

- Loading time can sometimes be slow, which can disrupt the user experience.
- More time spent on the layout adjustment to make the user interface looks good on all devices.
- Limited access to mobile device-specific functionality, such as location services.


### Hybrid apps

**Pros**

- Access to mobile device-specific functionalities: some plugins allow access to device features such as the camera or contacts list.
- Maintenance: there is one codebase. We do not have to maintain separate source code for each mobile apps' platform.
- Lower cost: when developing a responsive web design, we do not have to implement different mobile apps; a web UI is available and responsive on all devices.

**Cons**

- Loading time can sometimes be slow, which can disrupt the user experience.
- Access to some device-native functionality can be limited.
- The scope of graphic and visual representation is limited, so creating responsive UI can be a challenge.


### Native apps

**Pros**

- One of the biggest pros is performance, since apps are developed specifically for a specific operating system.
- Ability to craft the user experience to perfection: developers can adjust the user interface to mobile platform based characteristics.
- Enhanced security because mobile apps have to be verified before they are officially available in mobile app stores.

**Cons**

- Longer development time, as there are different source codebases for each mobile platform.
- Native mobile app development can be expensive.
- Full application support on each mobile device platform as users can use different versions of the app on different devices.

### The Xamarin approach

Before creating a mobile application, it is very important to choose the right approach. Each one has its pros and cons. In this article, we will focus on the Xamarin platform, which enables the creation of native, cross-platform mobile applications.
With Xamarin, it is possible to implement native iOS, Android, Windows, and Mac applications in C# on .NET using Visual Studio or Visual Studio for Mac. Xamarin (officially acquired by Microsoft in 2016) is a great option to choose for companies that already work with Microsoft's stack and have developers with extensive C# and .NET knowledge. It is worth pointing out that applications created with Xamarin are fully native, which means the entire application will be written in C# and then compiled to its native binary. With the Xamarin Native approach, we have access to native controls and designers (native UI technology), so it is much easier to start, especially for native iOS and Android developers. The C# codebase is shared in each scenario, so we, as developers, do not have to write code twice.

If you would like to start learning Xamarin, I encourage you to visit the official [Get started with Xamarin page](https://docs.microsoft.com/en-us/xamarin/cross-platform/get-started/), where you will find a lot of great content related to mobile app development with Xamarin. It is possible to develop either with Visual Studio 2019 on Windows machines or use Visual Studio for Mac on Apple computers.

<include src="TweetQuote" quoteText="Applications created with Xamarin are fully native."/>


### Xamarin.iOS and Xamarin.Android development

Xamarin.iOS exposes the complete iOS SDK for .NET developers the same as Xamarin.Android exposes the complete Android SDK. It means that we have access to all native system APIs. This is powerful because we can create beautiful user interfaces with a shared codebase written in C#. Great official documentation for [Xamarin.Android](https://docs.microsoft.com/en-us/xamarin/android/) and [Xamarin.iOS](https://docs.microsoft.com/en-us/xamarin/ios/) is available. In the end, we get a fully native mobile application after compilation, so performance is comparable with the performance of apps created using traditional methods.
In this article, we will focus on Xamarin.iOS and Xamarin.Android applications and see how to integrate them with the Auth0 authentication library.

## Xamarin.iOS and Xamarin.Android Projects Setup 

Xamarin development is possible using either Visual Studio on Windows or Visual Studio for Mac computers. In this article, we will use Visual Studio for Mac. If we do not already have Xamarin in Visual Studio for Mac, [there is excellent documentation available, with step-by-step setup instructions](https://docs.microsoft.com/en-us/visualstudio/mac/installation?view=vsmac-2019).

### Creating the Xamarin.iOS project

We will start by creating a new Xamarin.iOS project. Let's open Visual Studio for Mac and select the _+New_ button:

![Visual Studio starting page](https://images.ctfassets.net/23aumh6u8s0i/2ppwzxCD7fWJqyTGl634mv/6eb65d1b7e7f2abb96f9ace9c37e53e9/visual-studio-starting-page)


There, from the templates, we have to find the _iOS Single View App_ template, as shown in the following picture:

![New Xamarin.iOS project setup](https://images.ctfassets.net/23aumh6u8s0i/2WeuXBhlHxtGciPVHafd82/40537da1906d9596198f2a8bcf9b84bd/xamarin-ios-project-setup)

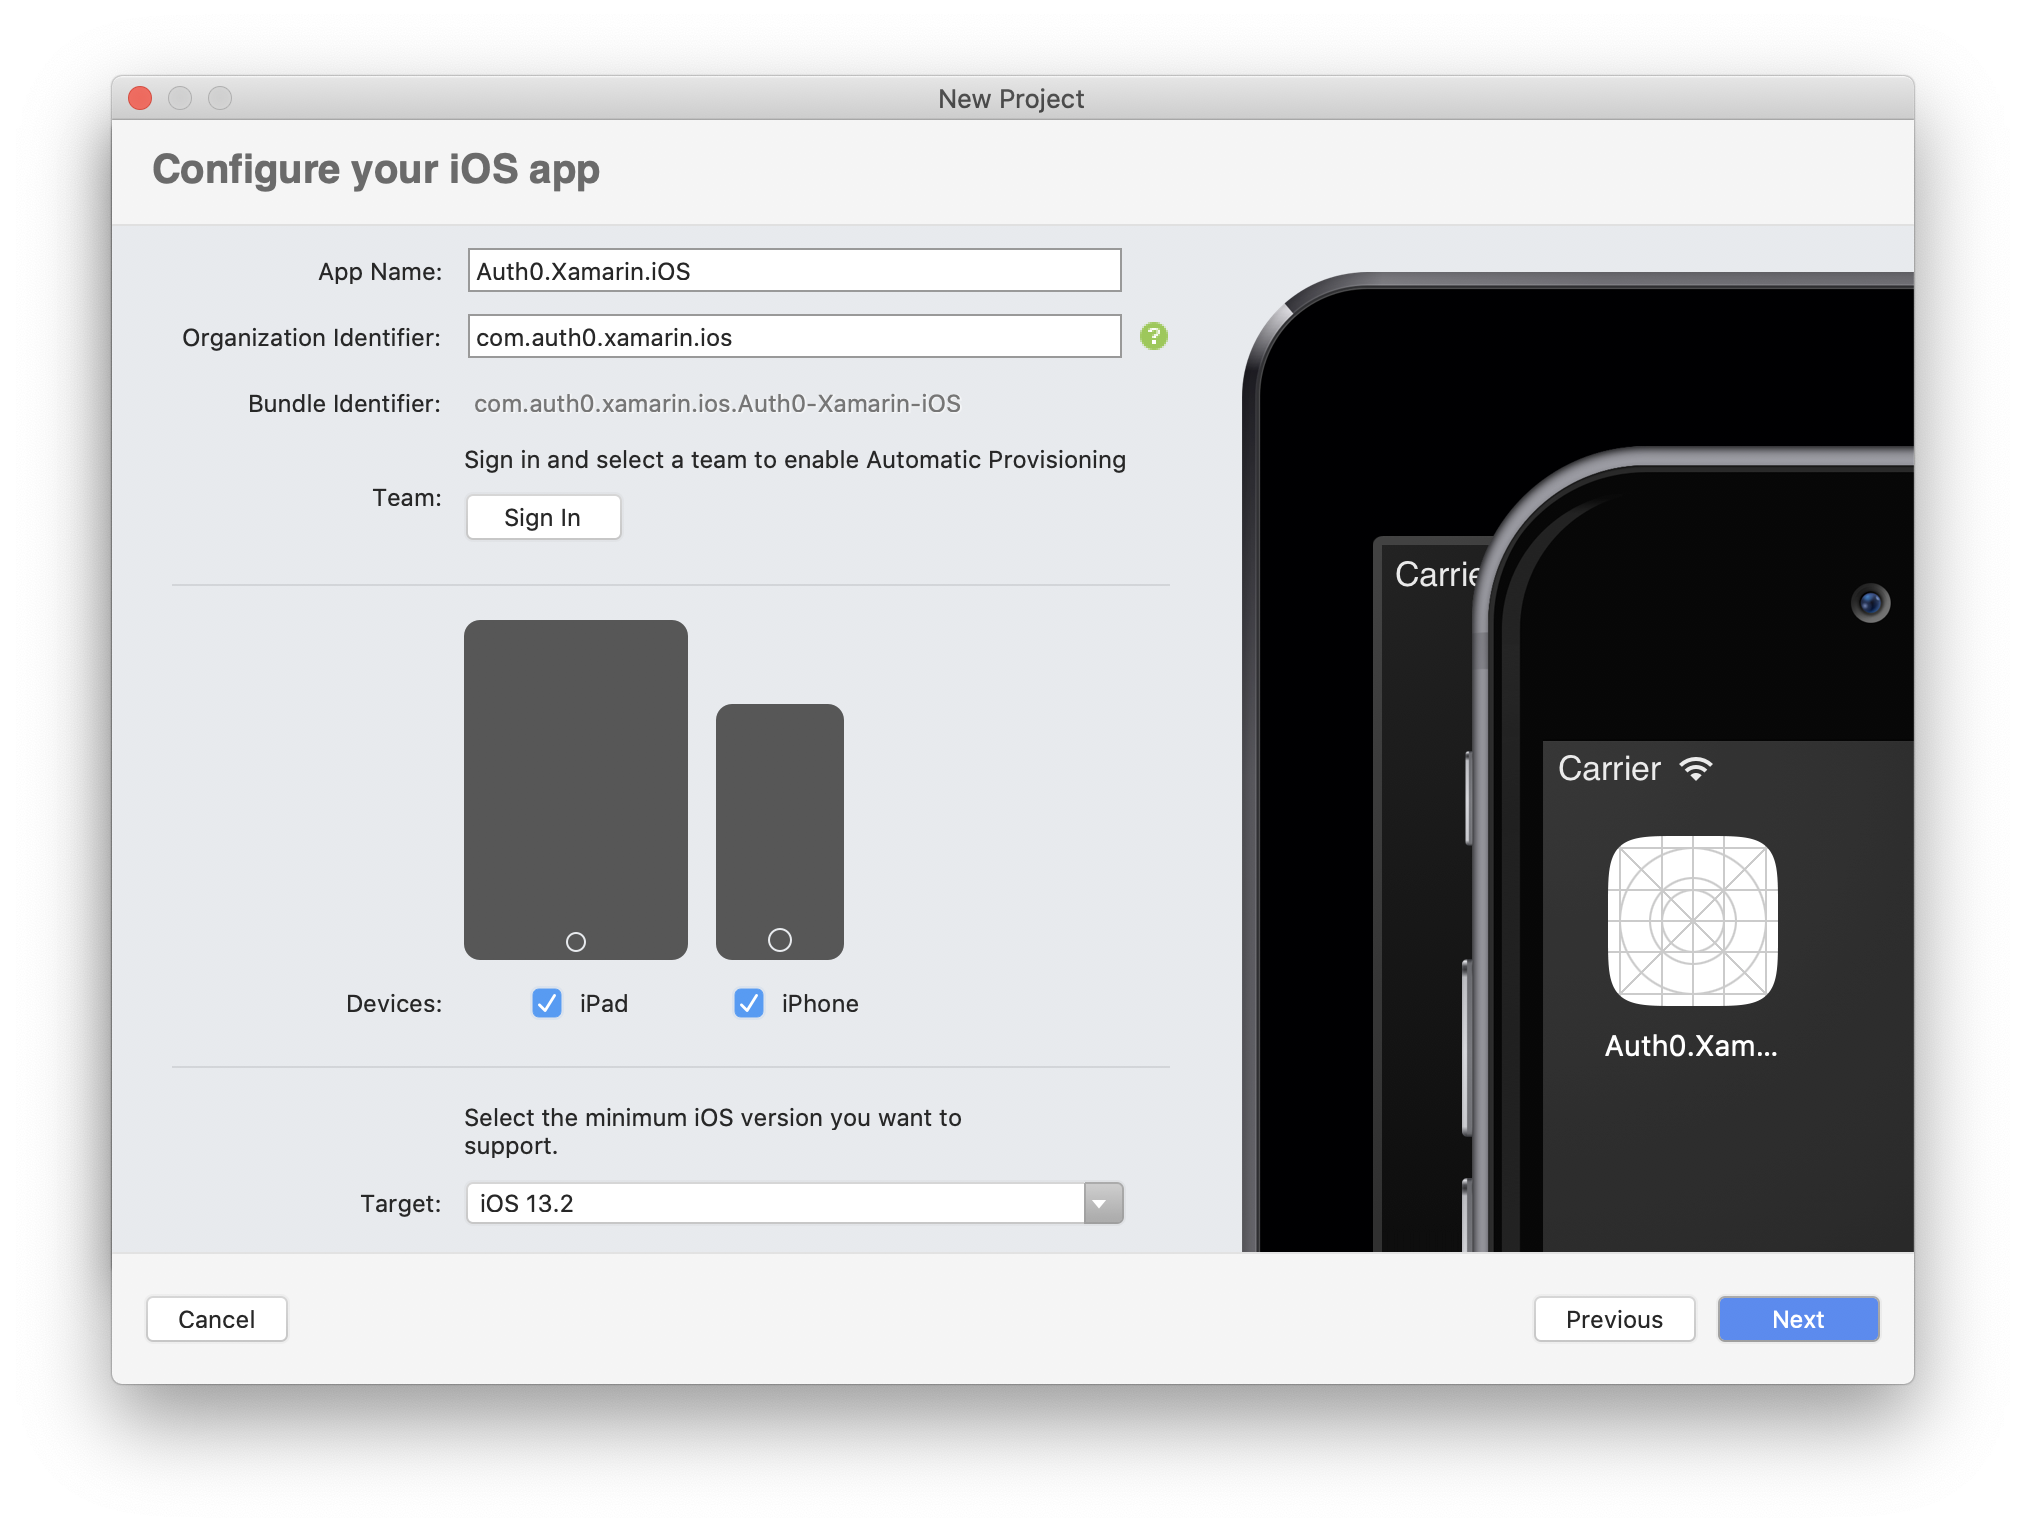
In the next screen, let's type _Auth0.Xamarin.iOS_ as the *App Name* and _com.auth0.xamarin.ios_ as the _Organization Identifier_, as show below:

![New Xamarin.iOS project configuration](https://images.ctfassets.net/23aumh6u8s0i/4kQNptQb0hLomdb4hDuXg/f047e6a237384ac6e66ebe8b160680bf/xamarin-ios-project-configuration)

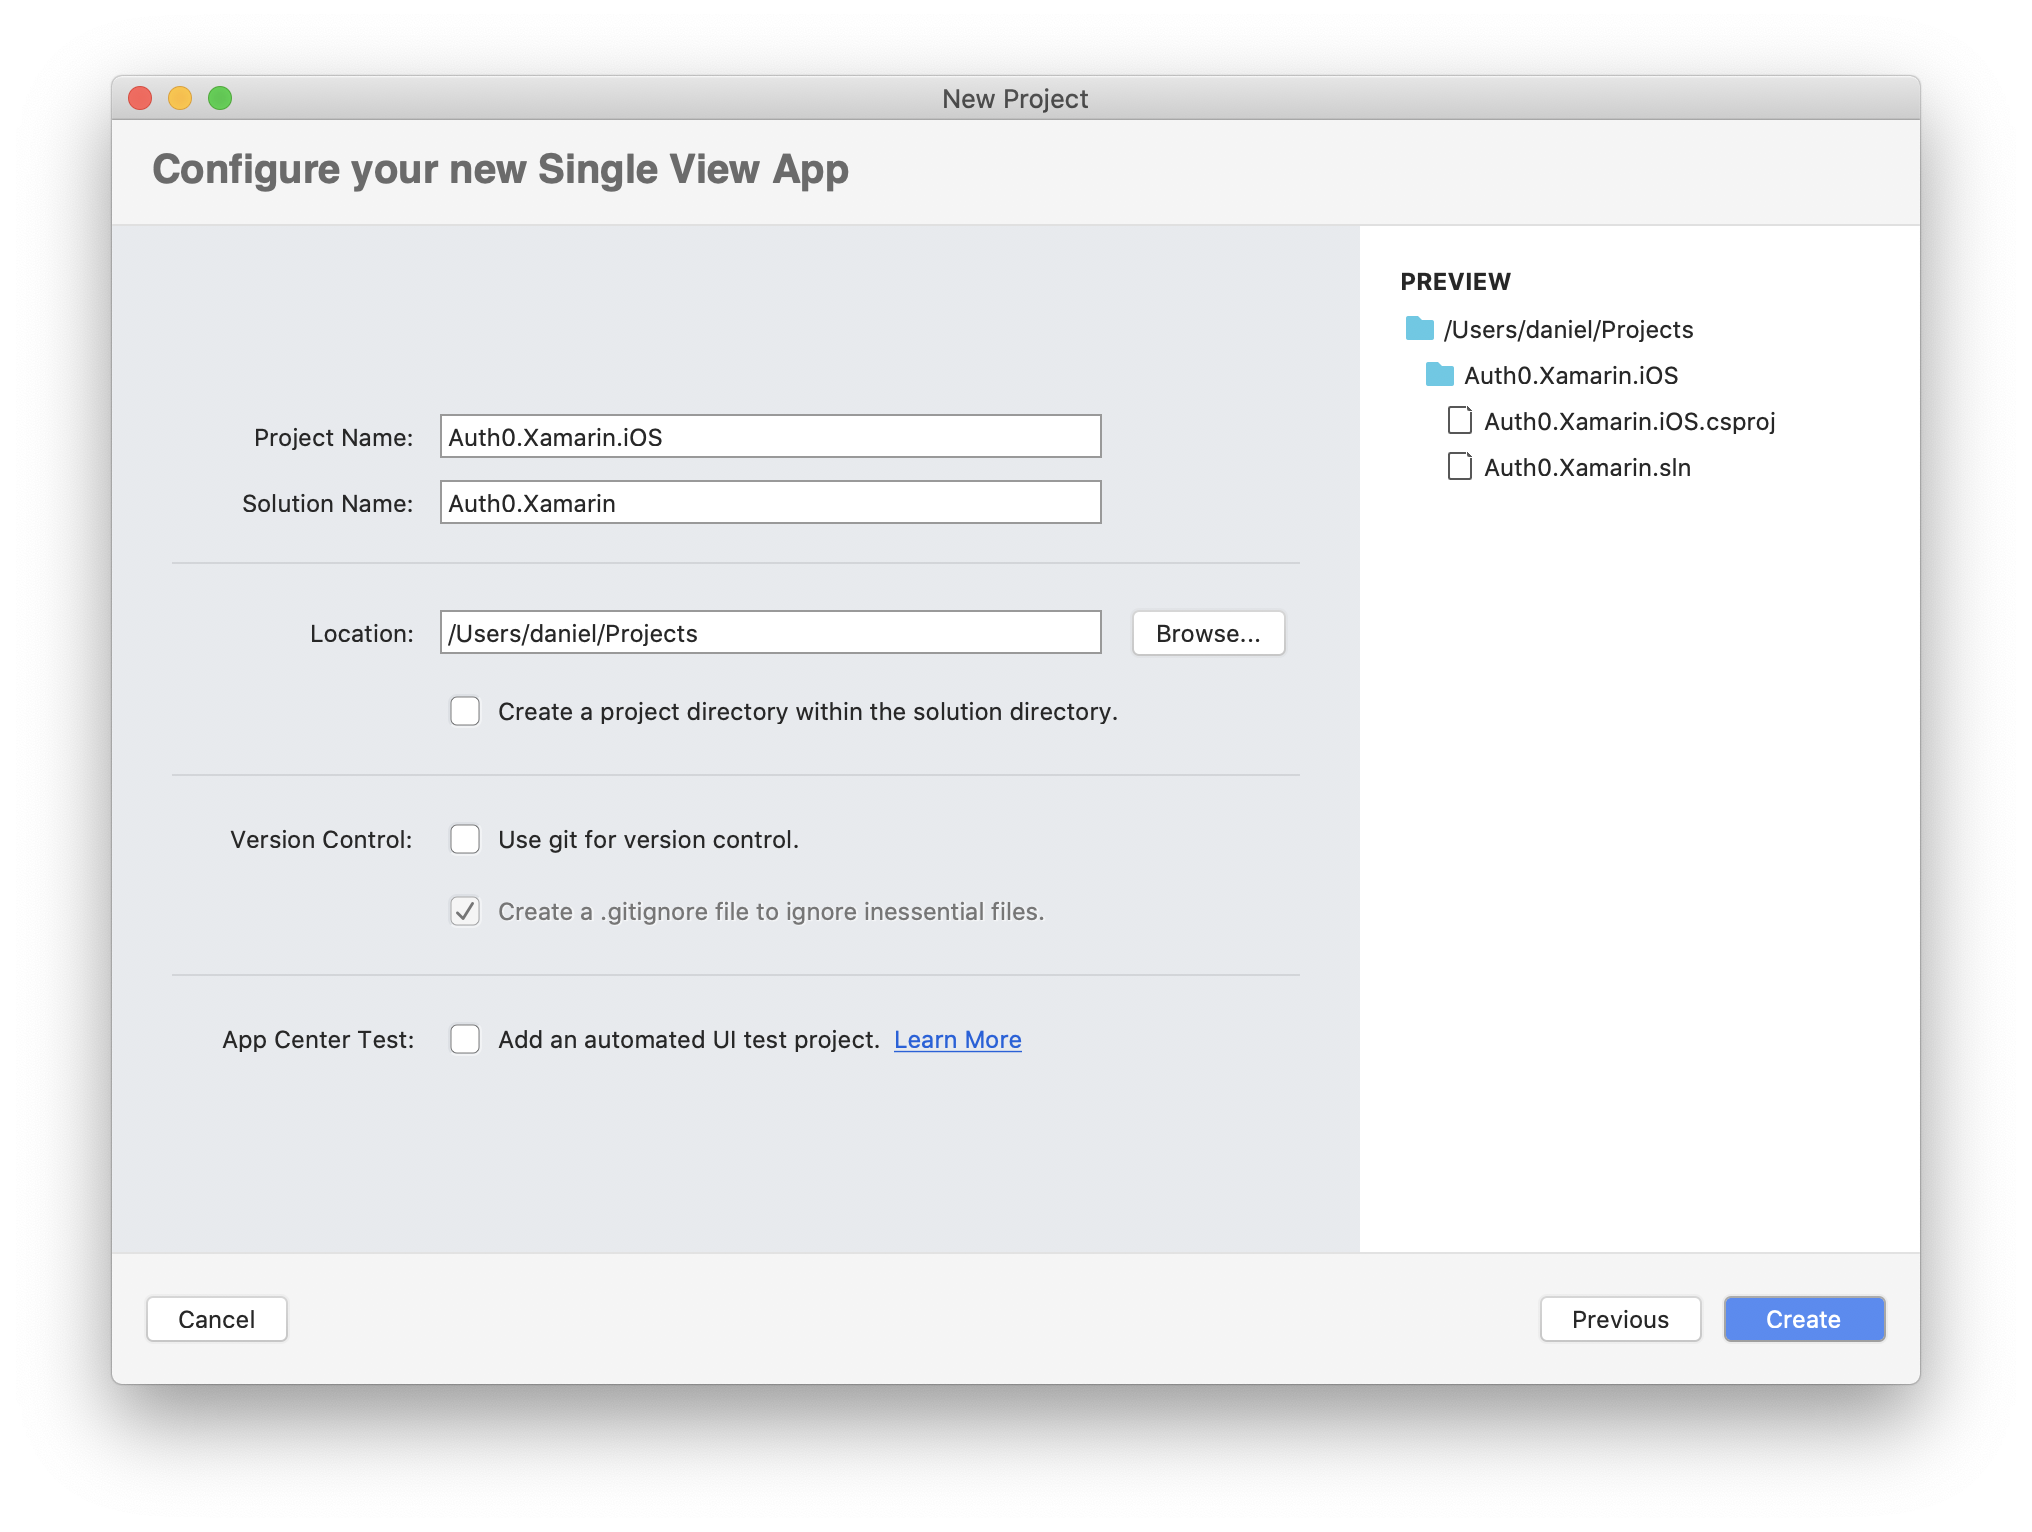
In the next section, let's type *Auth0.Xamarin.iOS* as the *Project Name* and *Auth0.Xamarin* as the *Solution Name*. Then, let's provide the physical location where project files will be located:

![New Xamarin.iOS project location](https://images.ctfassets.net/23aumh6u8s0i/5rO4RP304Q172yKyvUv4H0/650475e3ffd23e5db39b0e33eece0a88/xamarin-ios-project-location)

Once we click the _Create_ button, a new project is created.

Please, note that a `ViewController.cs` file is automatically added. It is related to the user interface file called `Main.storyboard`. This is the place where we will define the _Login_ button that will enable authentication.

We also add the main logo image that will be displayed on the login view. Among the files and folders of the project shown in Visual Studio, we double-click on the `Assets.xcassets` folder. In the tab that opens, we click the _+_ button at the bottom and select the _New Image Set_ menu item. Now, we can change the name of the newly created image set by clicking on it. Let's name it _MainLogo_. There we can add [this image](https://github.com/auth0-blog/auth0-xamarin/blob/master/src/Auth0.Xamarin.Droid/Resources/drawable/ic_main_app_logo.png) in the _Universal_ section at _1x_ size.

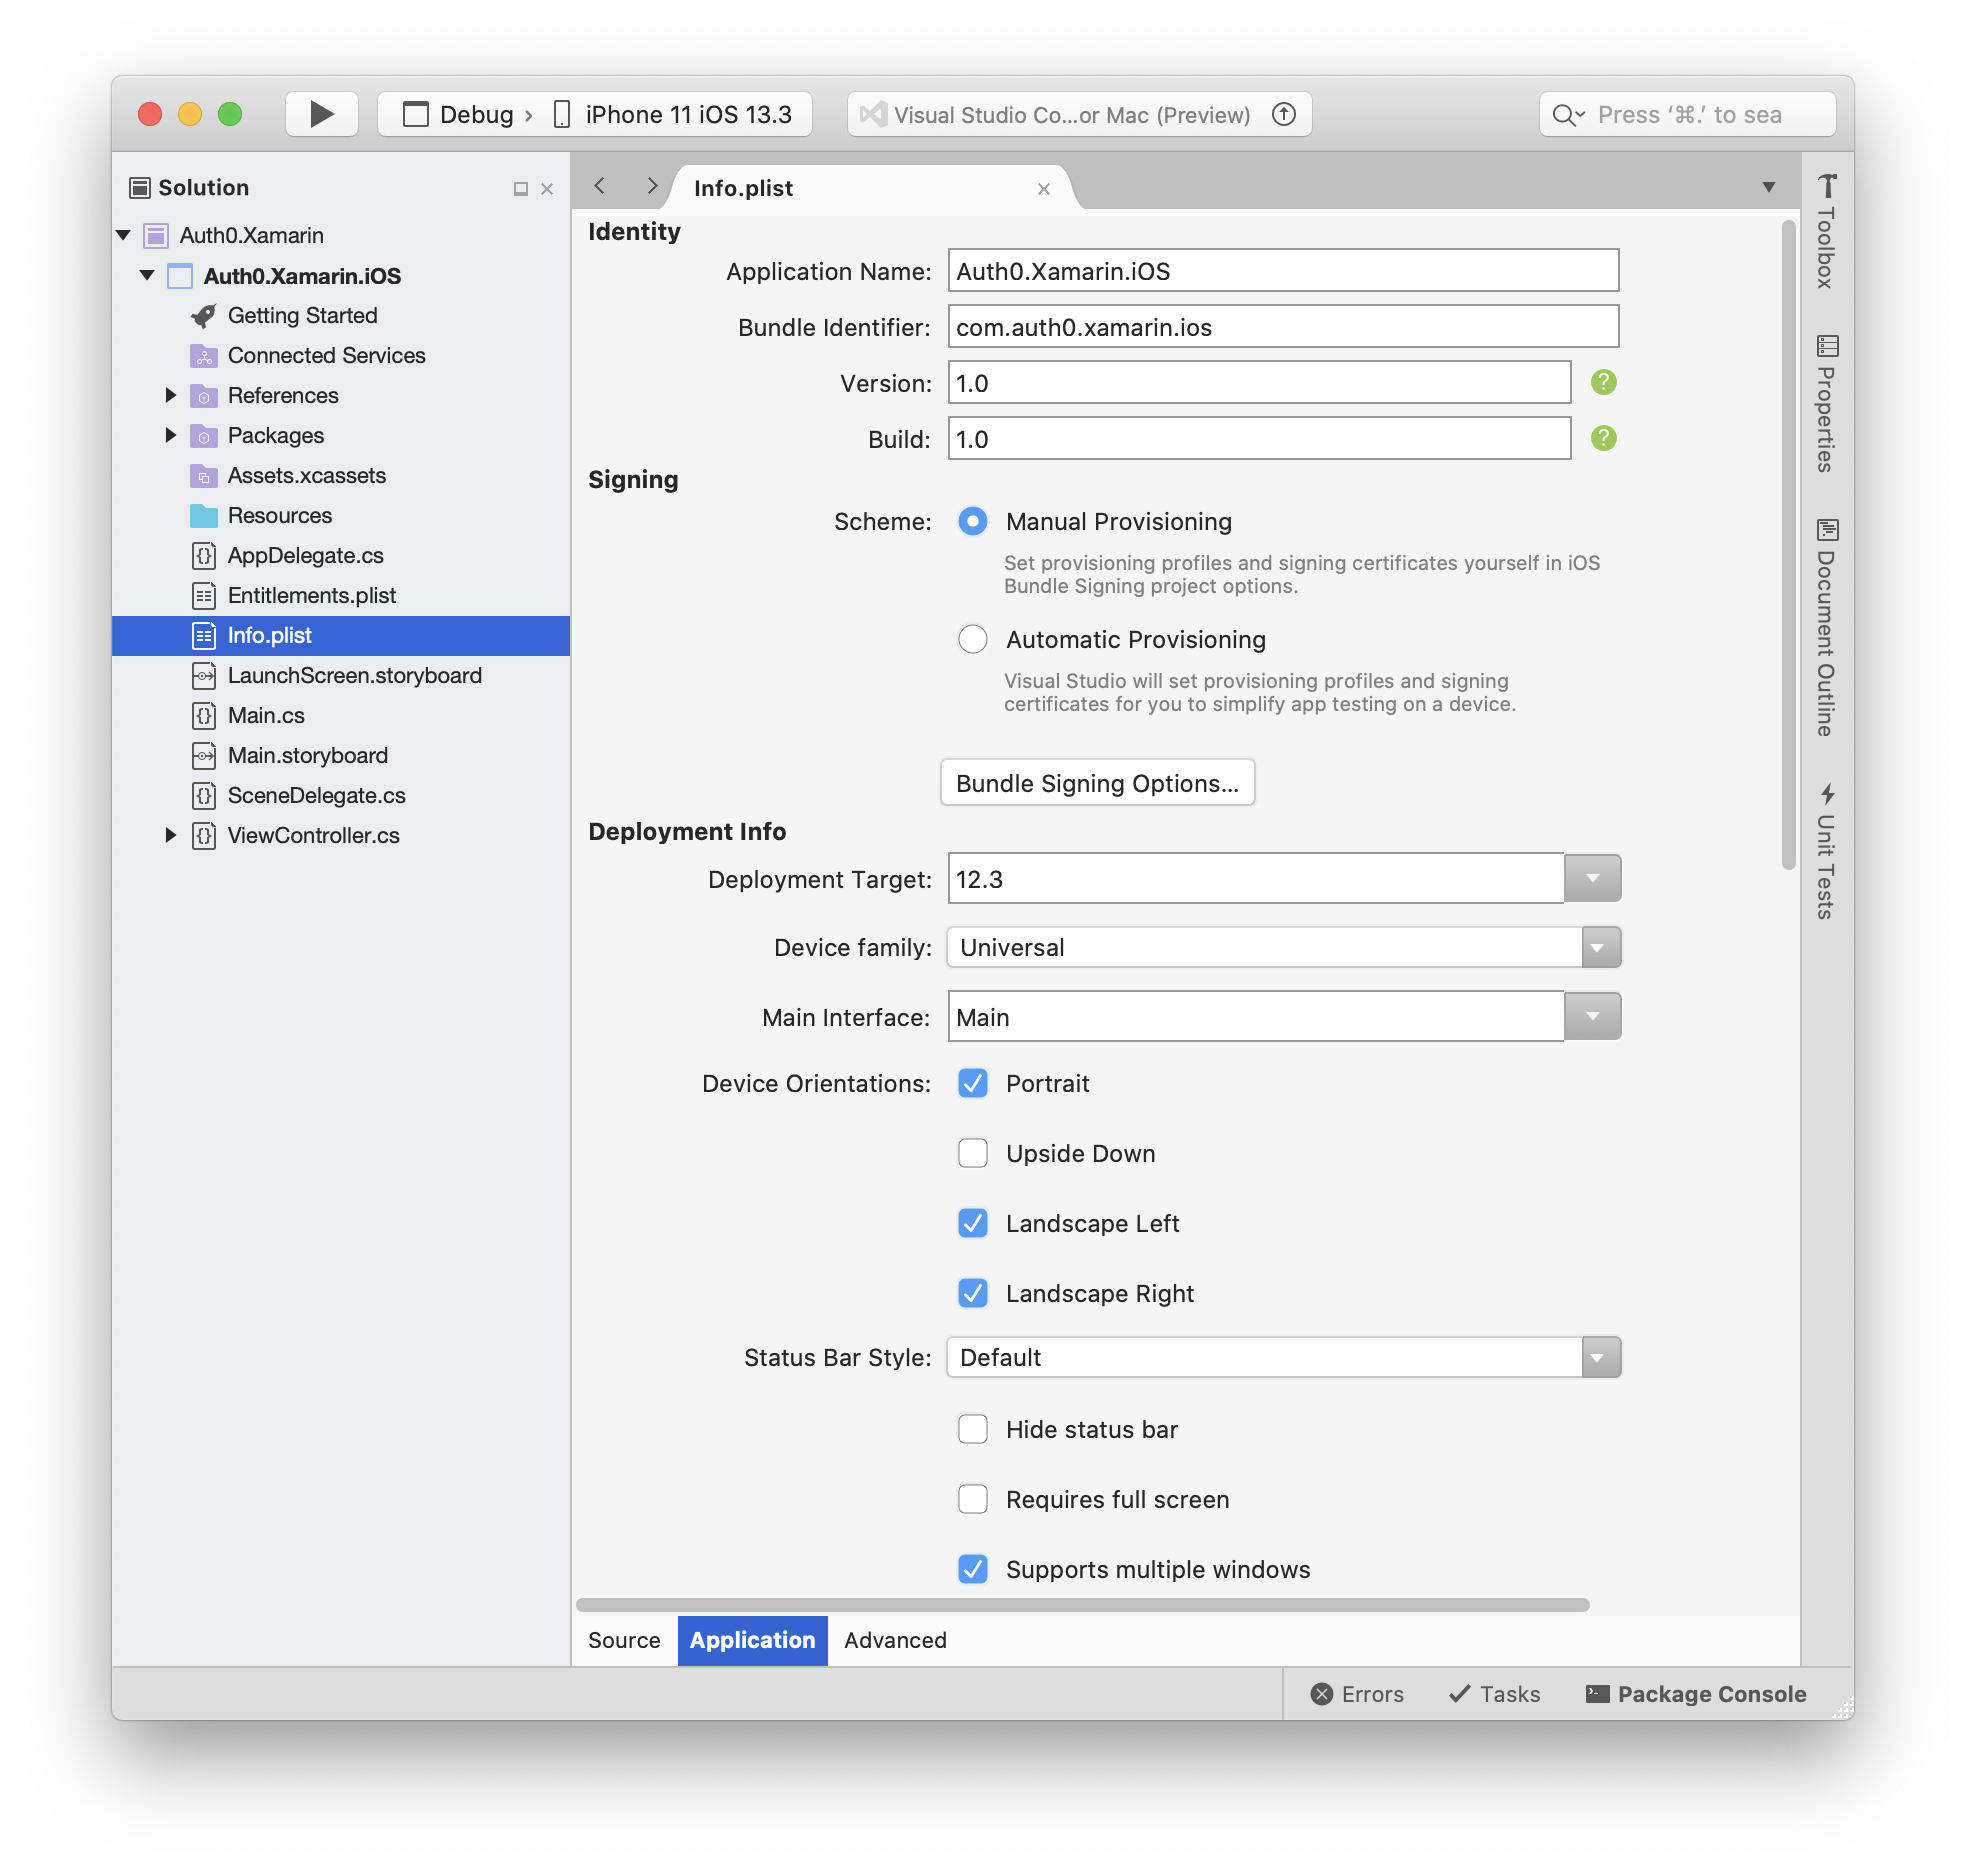
The last step is related to the application configuration. We have to set the _Deployment Target_ to make sure that our application works on specific iOS devices. We double-click on the `Info.plist` file, and in the _Deployment Info_ section, we have to set _Deployment Target_ to _12.3_. We have also to make sure that the _Bundle Identifier_ in the *Identity* section is set to _com.auth0.xamarin.ios_:

![Xamarin.iOS Info.plist configuration](https://images.ctfassets.net/23aumh6u8s0i/tQiGcrbaqyAIfmz39cJL8/3f283a78e684be5d3e18f9de231171ea/xamarin-ios-info-plist-configuration)

Once the above steps are completed, we rebuild the project to ensure that the project's code is fine. So, we click the _Build_ button at the top of the Visual Studio for Mac and select _Build All_.


### Creating the Xamarin.Android project

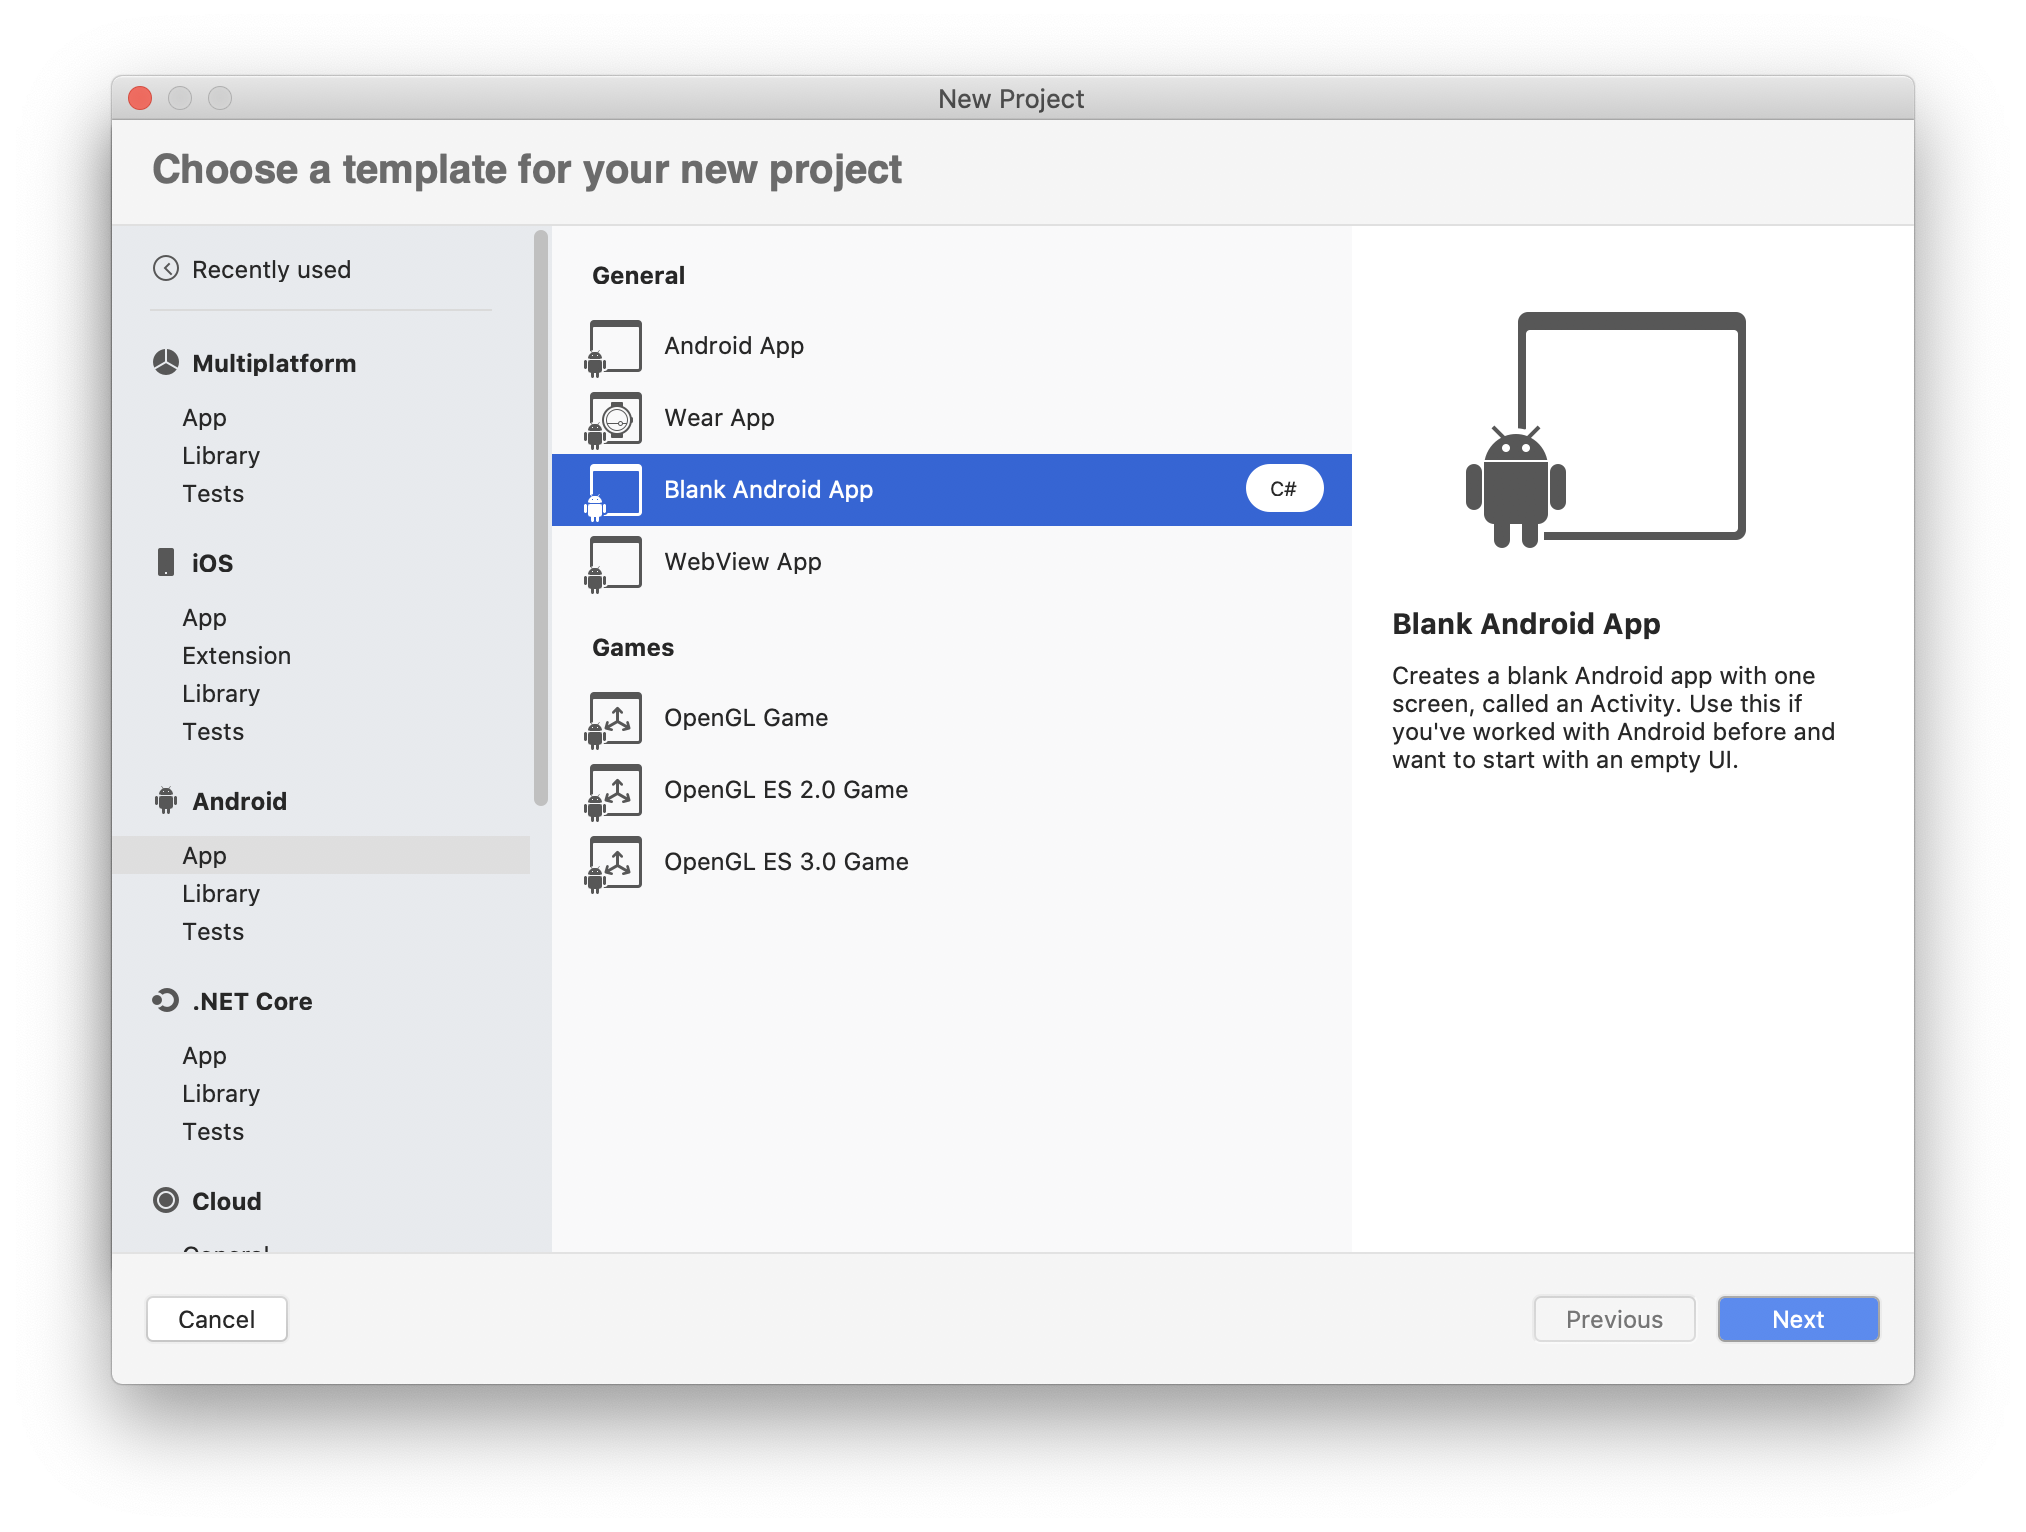
We will create a new *Xamarin.Android* project in the same solution we created above. So, we right-click on the _Auth0.Xamarin_ solution, select the _Add_ menu item, then the _New Project..._ item. In the window that opens, select the _Blank Android App_ project template, as shown in the following picture:

![New Xamarin.Android project setup](https://images.ctfassets.net/23aumh6u8s0i/6gMN1gE6EoIKyT7n7AiiV/cf44de1f072fb4f1929b8159f3d6e592/xamarin-android-project-setup)

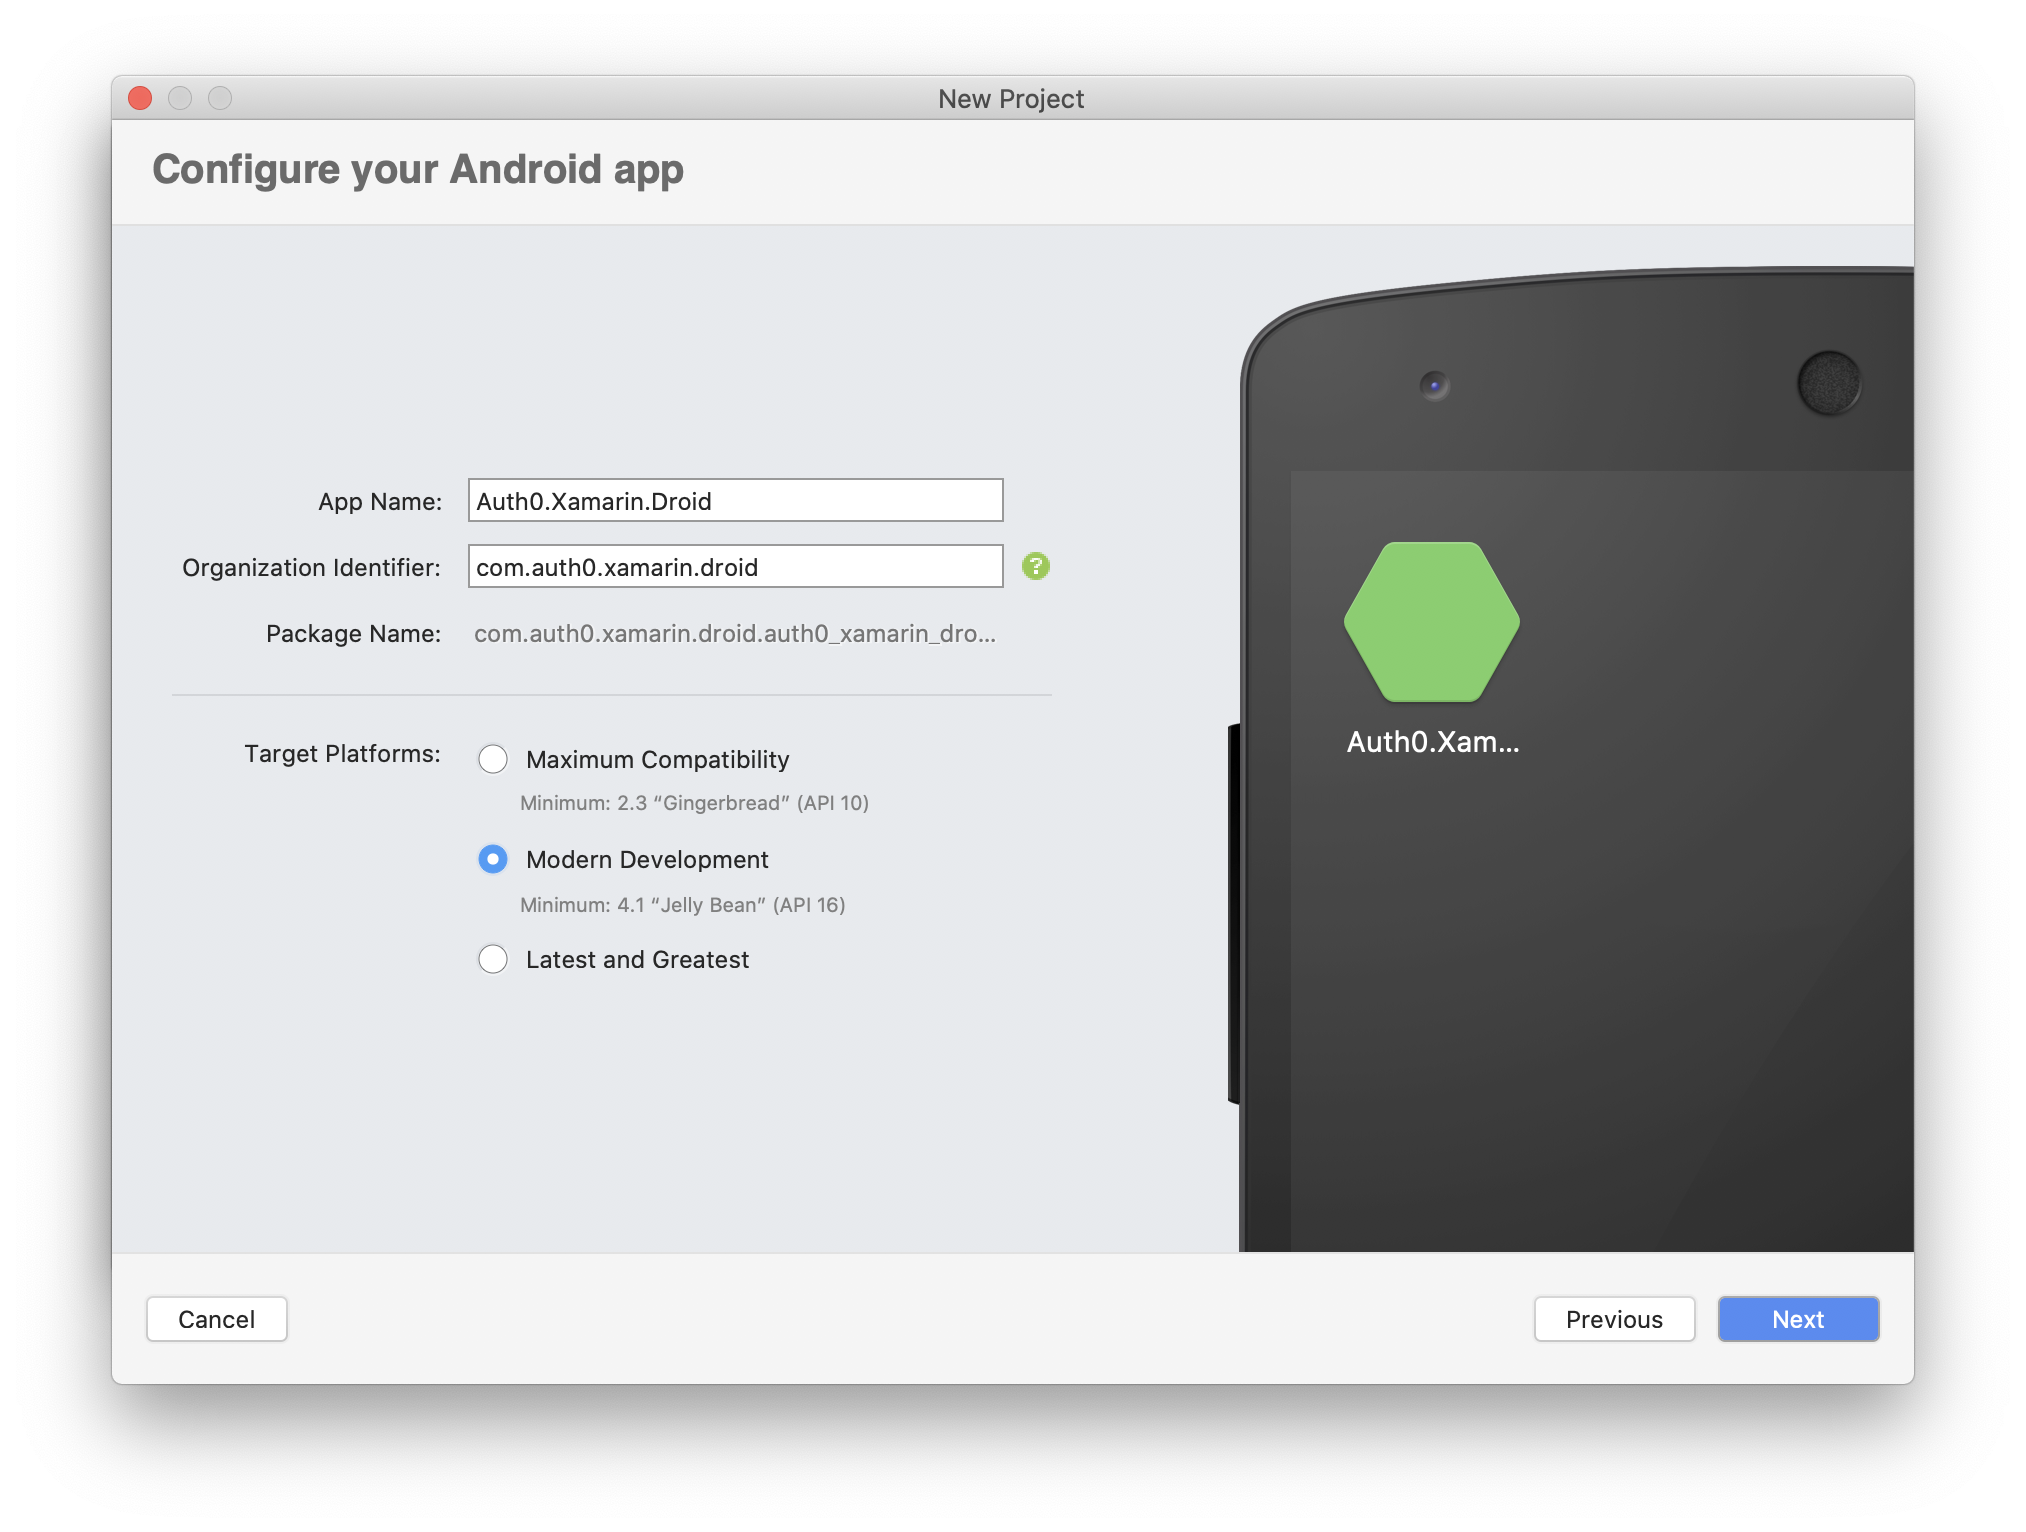
We will call this app _Auth0.Xamarin.Droid_. We will set the _Organization Identifier_ to _com.auth0.xamarin.droid_ and the _Target Platforms_ to _Modern Development_, as shown in the following picture:

![New Xamarin.Android project configuration](https://images.ctfassets.net/23aumh6u8s0i/2dPy32b4W6FEmcu8i1M0zA/dc9a57b3cc277418b770263631d7b270/xamarin-android-project-configuration)

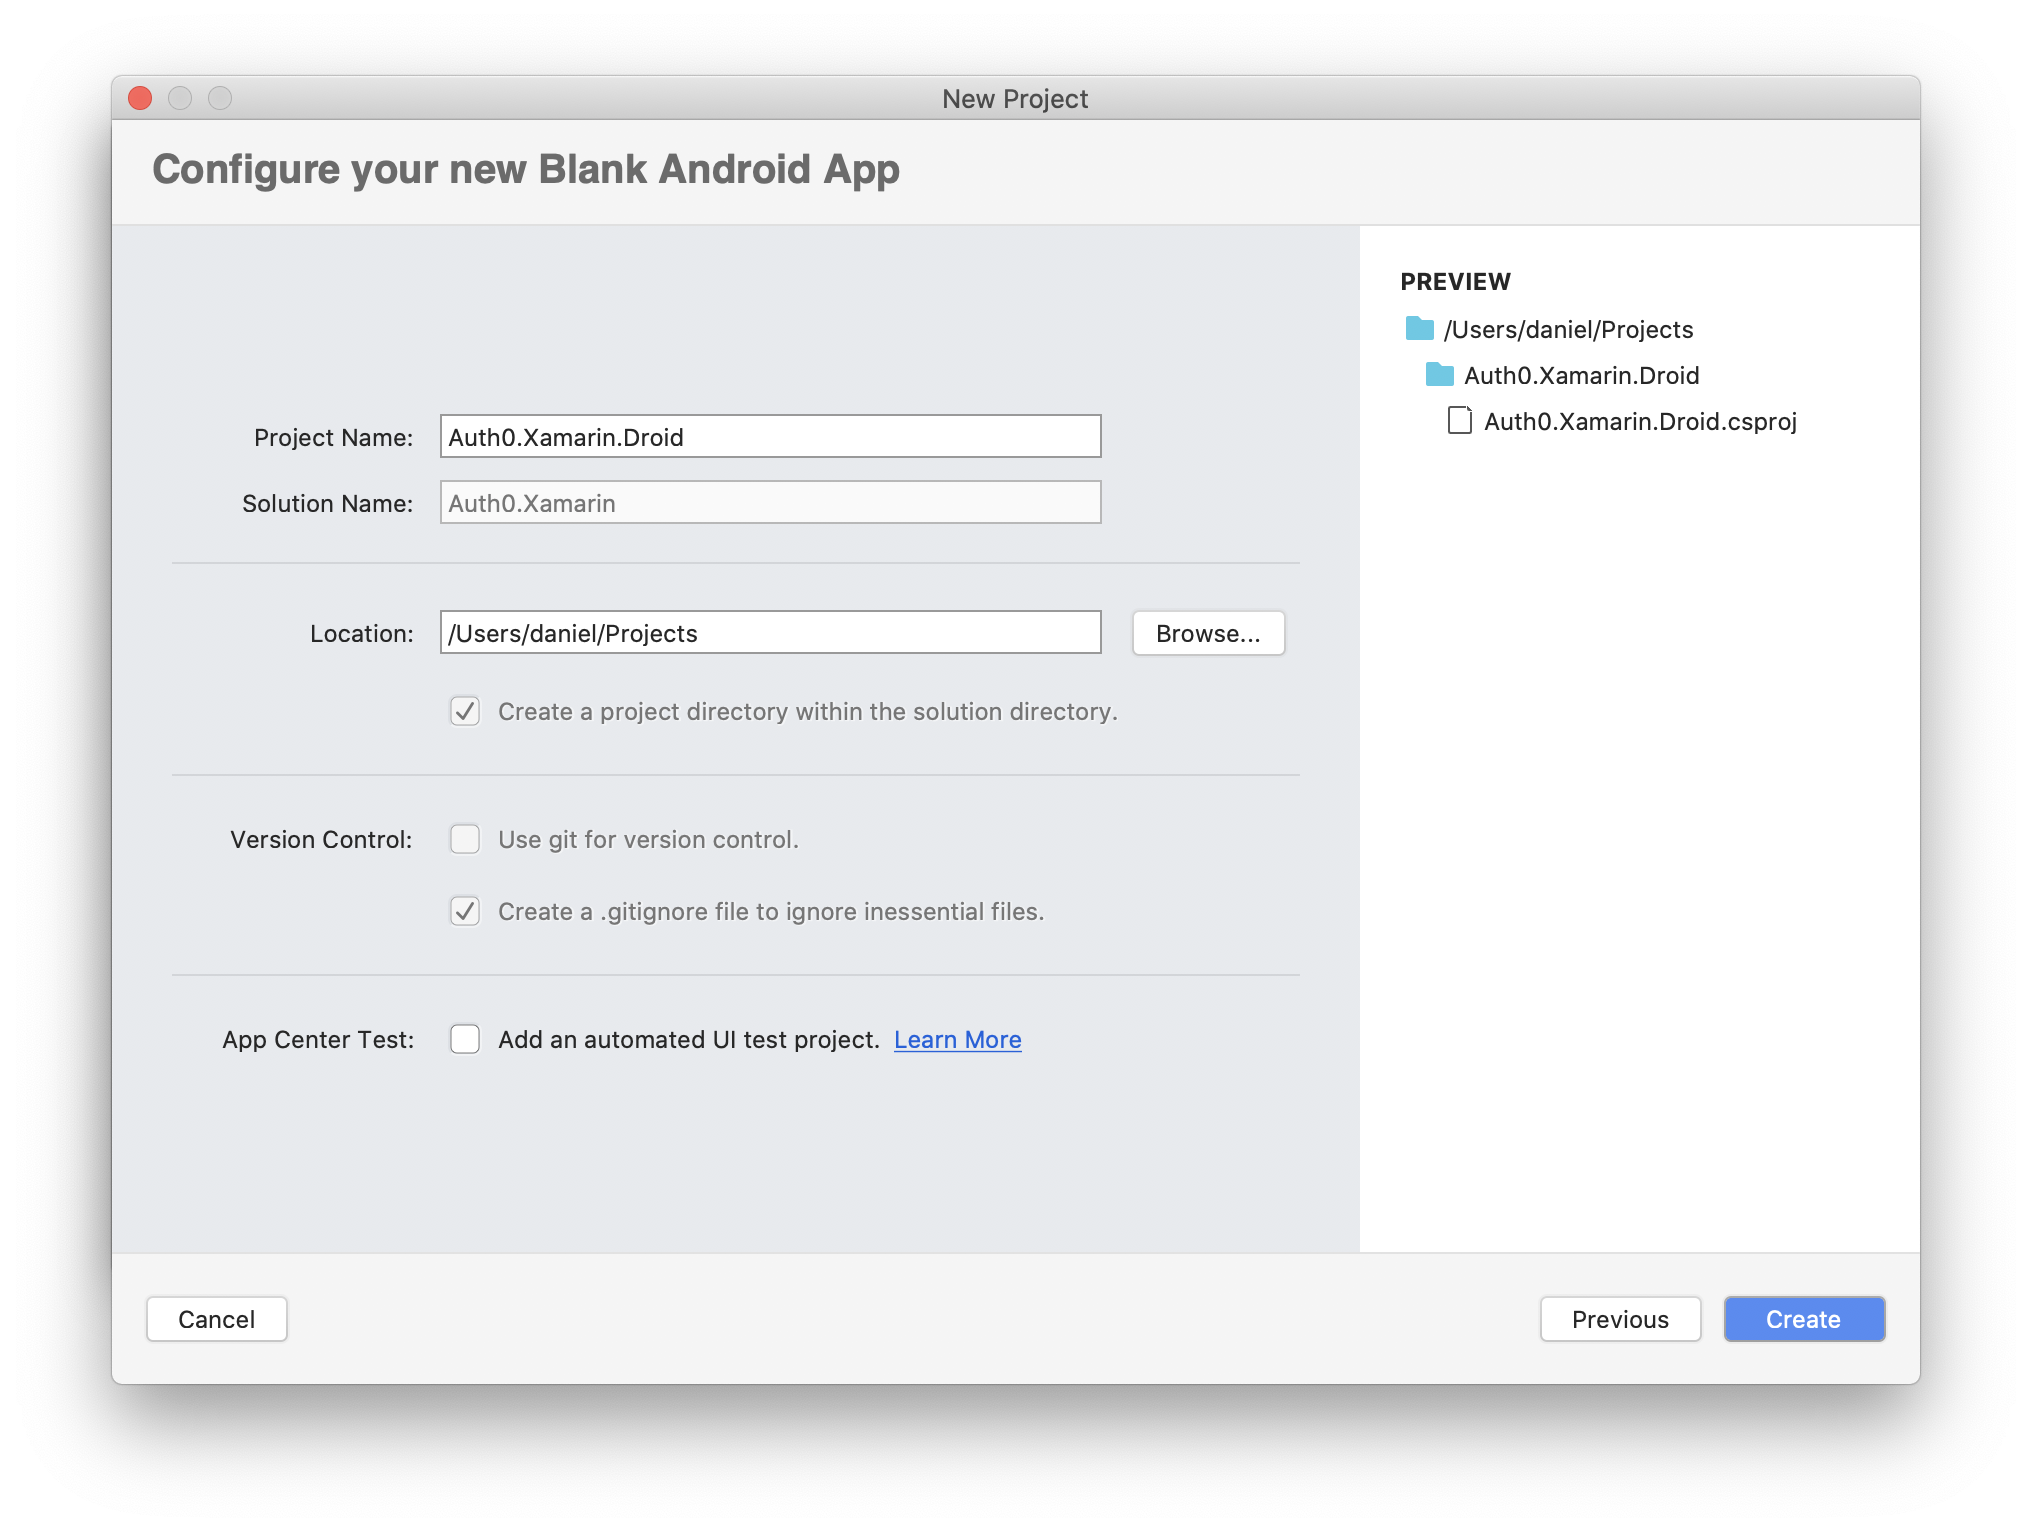
In the next step, we have to provide the name of the project. Let's name it _Auth0.Xamarin.Droid_. Let's also provide the location for the project, then we can click the _Create_ button:

![New Xamarin.Android project location](https://images.ctfassets.net/23aumh6u8s0i/2fZ13bEC0TxWwAPCdcjt8f/d02f33298955fe8f045e6b7f19a2fe84/xamarin-android-project-location)

Note that the `MainActivity.cs` file that was automatically generated is related to the user interface file called `activity_main.axml`. In the latter, we will define the _Login_ button, as per the iOS application.

During this step, we also add the main logo image that will be displayed on the login view. It is available for download [under this link](https://github.com/auth0-blog/auth0-xamarin/blob/master/src/Auth0.Xamarin.Droid/Resources/drawable/ic_main_app_logo.png). Once the image is downloaded, we have to open the `Resources/drawable` folder and right-click on it. So, we select the *Add* menu item and then the _Existing Files..._ menu item. Once we choose the image from our file system, let's choose the _Copy the file to the directory_ option from the displayed dialog and click _OK_.

The last step is related to the application configuration. We have to set the _Minimum Android version_ and the _Target Android version_ to make sure that our application works on specific Android devices. So, let's right-click on the _Auth0.Xamarin.Droid_ project and select _Options_ from the contextual menu. From the left section of the dialog window, we have to select _Android Application_. For this sample, we will set _Minimum Android version_ to _Android 8.0 (API level 26)_ and _Target Android version_ to _Android 9.0 (API level 28)_. We have also to make sure that the _Package name_ is set to _com.auth0.xamarin.droid_. The resulting dialog should look like the following:

![Xamarin.Android application configuration](https://images.ctfassets.net/23aumh6u8s0i/3kaYg5baBA9VUObnyjLCyc/6a29ed94bdd31d5a09d26e6ca94b30e4/xamarin-android-application-configuration)

To prevent issues when building or deploying the project, we have to check if the _Android SDKs_ are correctly installed. To do this, we click on the _Tools_ menu at the top of Visual Studio and select _SDK Manager_. We have to make sure that _Android 8.1 - Oreo / Android SDK Platform 27_ is selected. If not, select and install it.

Once the above steps are completed, we can rebuild the project to ensure that the basic project is ready. So, we click the _Build_ menu at the top of the Visual Studio for Mac and select the _Build All_ menu item.

> There might be an issue with resolving the `Xamarin.Essentials` namespace in the `MainActivity` class defined in the `MainActivity.cs` file. If this happens, we have to add `using Xamarin.Essentials` directive to the `using` section of the `MainActivity.cs` file. Then, we remove the `Xamarin.Essentials` prefix that was added in the initial source code. The resulting code of the file will be as follows:
>
> ```csharp
> //Auth0.Xamarin.Droid/MainActivity.cs
> 
> using Android.App;
> using Android.OS;
> using Android.Support.V7.App;
> using Android.Runtime;
> using Android.Widget;
> using Xamarin.Essentials;
> 
> namespace Auth0.Xamarin.Droid
> {
>     [Activity(Label = "@string/app_name", Theme = "@style/AppTheme", MainLauncher = true)]
>     public class MainActivity : AppCompatActivity
>     {
>         protected override void OnCreate(Bundle savedInstanceState)
>         {
>             base.OnCreate(savedInstanceState);
>             Platform.Init(this, savedInstanceState);
>             // Set our view from the "main" layout resource
>             SetContentView(Resource.Layout.activity_main);
>         }
>         public override void OnRequestPermissionsResult(int requestCode, string[] permissions, [GeneratedEnum] Android.Content.PM.Permission[] grantResults)
>         {
>             Platform.OnRequestPermissionsResult(requestCode, permissions, grantResults);
> 
>             base.OnRequestPermissionsResult(requestCode, permissions, grantResults);
>         }
>     }
> }
> ```
>
> Then, we expand the `Packages` folder in the Android project, right-click the `Xamarin.Essentials` package, and select the _Update_ menu item. The latest version of the package should be downloaded and installed. At this point, we can retry to build the application.
>


Both Xamarin.iOS and Xamarin.Android projects are ready.

## Configuring the Applications in the Auth0 Dashboard

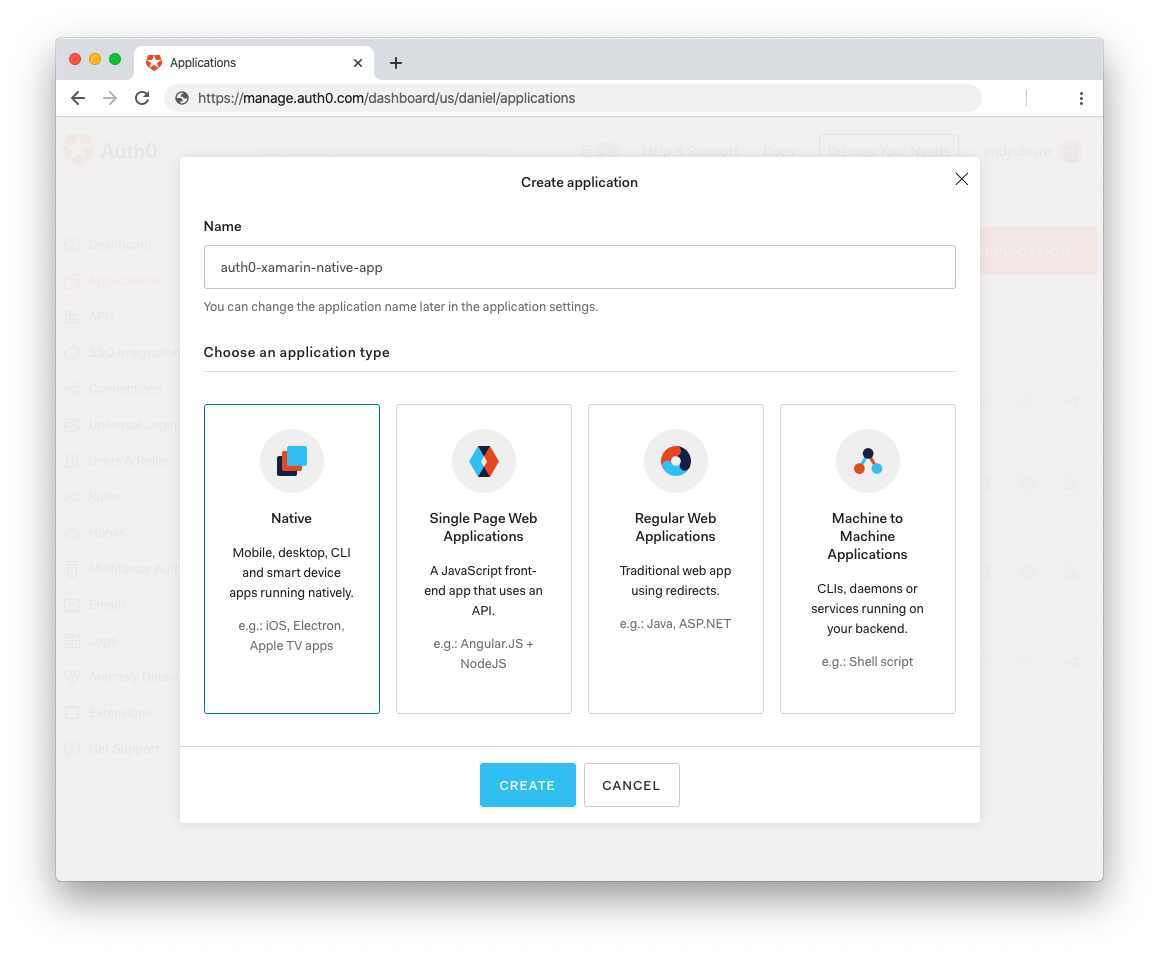
Integrating Auth0 with Xamarin applications is straightforward. First of all, we have to register a new application in the [Auth0 dashboard](https://manage.auth0.com/dashboard). If we do not have an account yet, we can <a href="https://auth0.com/signup" data-amp-replace="CLIENT_ID" data-amp-addparams="anonId=CLIENT_ID(cid-scope-cookie-fallback-name)">create one for free now</a>. After successfully logging in, we can register a new application using the _Applications_ section in the left navigation menu. We have to click the _Create Application_ button first, then provide the application name and select _Native_ as the application type. Finally, click the _Create_ button:

![Register new native application in Auth0 dashboard](https://images.ctfassets.net/23aumh6u8s0i/4mWdcXyNkcI7WG1ve81aoW/3960c5c653eb91f04302f5ba7d6fab77/new-auth0-native-application)

In the next step, we select _Xamarin_ as the native SDK. After this step, we land in the _Quick Start_ tab showing a great tutorial demonstrating how to add user login to a Xamarin application using Auth0. We can download the sample app to see how integration with the Auth0 OIDC library looks. It is also available [on GitHub](https://github.com/auth0-community/auth0-xamarin-oidc-samples/tree/master/Quickstart/01-Login). We are going to explain it step by step below.

### Setting up the Allowed Callback URLs

Once the application is created in the dashboard, we have to configure callback URLs for the Xamarin.Android and Xamarin.iOS applications. To do it, we have to open the _Settings_ tab. Here, we should take note of the domain and the client ID associated with our Auth0 application. We will need these values later on.

In the same tab, we need to provide a callback URL for each platform, Android and iOS in our case, separated by a comma.

For the Android application, the callback URL has the following format:

`YOUR_ANDROID_PACKAGE_NAME://YOUR_DOMAIN/android/YOUR_ANDROID_PACKAGE_NAME/callback`

YOUR_ANDROID_PACKAGE_NAME is the *Package Name* for the application in the form of `com.samplecompany.myapplication`. In our application, it should be set like this:

`com.auth0.xamarin.droid://YOUR_DOMAIN/android/com.auth0.xamarin.droid/callback`


Similarly, for the iOS application, the callback URL has the following format:

`YOUR_BUNDLE_IDENTIFIER://YOUR_DOMAIN/ios/YOUR_BUNDLE_IDENTIFIER/callback`

YOUR_BUNDLE_IDENTIFIER is the bundle identifier for the application in the form of `com.samplecompany.myapplication`. In our application, it should be set like this:

`com.auth0.xamarin.ios://YOUR_DOMAIN/ios/com.auth0.xamarin.ios/callback`

Click the *Save changes* button to confirm your changes.


### Enable login with Google as an identity provider

To enable us to log in with a Google account, we have to set up a few more things. First, we have to open the _Connections_ tab and check if _google-oauth2_ is enabled in the _Social_ section:

![Enable Google login in Auth0 dashboard](https://images.ctfassets.net/23aumh6u8s0i/5WyW6NsMze9oGOIvUiPca5/7f14eedf85583b52142166771e105c09/enabling-google-login-in-auth0)

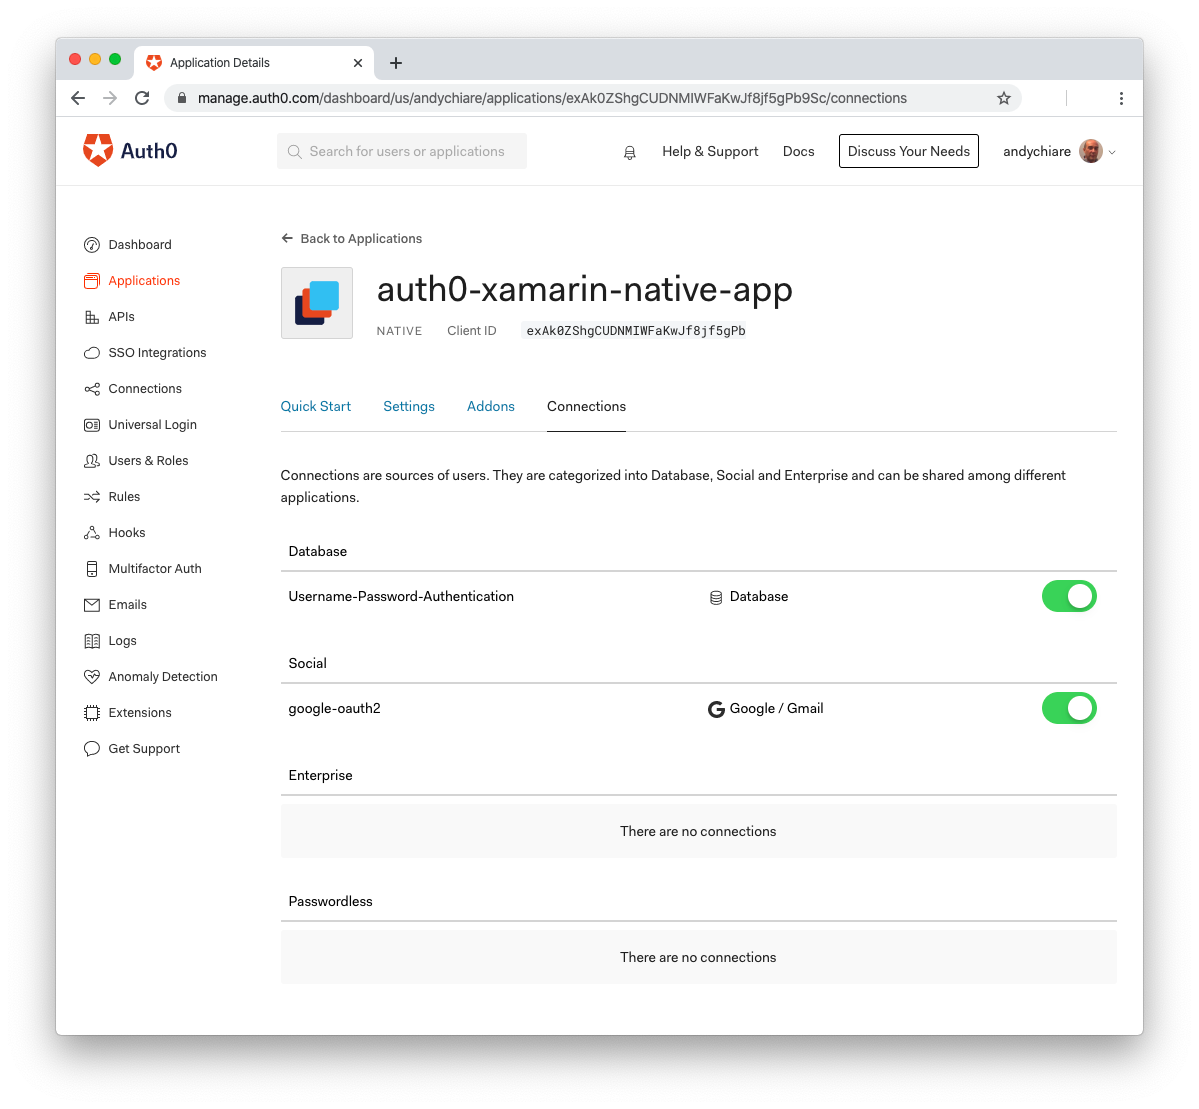
Now, let's open the _Social_ section under _Connections_ in the left navigation menu. Note that _Google_ is enabled there. There is also a message warning that Auth0 development keys are used and that those keys are only intended for use in development and testing. To get started with Google login, it is enough for test purposes, but we can read more about the [production configuration of connections](https://auth0.com/docs/identityproviders). There is also a great explanation of the [limitations of developer keys](https://auth0.com/docs/connections/social/devkeys).

<include src="TweetQuote" quoteText="Learn how to enable authentication in Xamarin apps."/>


## Integrating the Auth0 OIDC Library in Xamarin Apps 

To enable login with Auth0, we have to integrate the [Auth0 OIDC .NET Client library](https://github.com/auth0/auth0-oidc-client-net), so that authentication and registration flows are much easier to implement.
The library supports the following platforms:

* Universal Windows Platform (UWP 10.0.16299)
* Windows Presentation Foundation (.NET 4.6.2 and higher)
* Windows Forms (.NET 4.6.2 and higher)
* iOS (Xamarin.iOS)
* Android (Xamarin.Android)

We will see in the next steps how to integrate it with the Xamarin.Android and Xamarin.iOS applications. There is also great [documentation available](https://auth0.github.io/auth0-oidc-client-net/documentation/intro.html).


### Integrating the Auth0 OIDC library in Xamarin.Android app

We are going to integrate the library into the *Xamarin.Android* application's source code to enable standard login with a username and password and with a Google account.

#### Adding the library to the project

First of all, we have to add the [Auth0.OidcClient.Android](https://www.nuget.org/packages/Auth0.OidcClient.Android/) NuGet package to our *Xamarin.Android* project. We right-click on the _Auth0.Xamarin.Droid_ project and select _Manage NuGet Packages..._ from the contextual menu. In the search textbox of the dialog window, let's type _Auth0.OidcClient.Android_. Once we find it, let's select and add the package by clicking on the _Add package_ button.


Once the package is added, we can start the integration in the source code.

#### Preparing views to enable login and display data

In the `Resources/layout` folder, let's edit the `activity_main.axml` file to define the view with the logo and the login button. So, we replace the existing code with the code below:

``` html  


<!-- Auth0.Xamarin.Droid/Resources/layout/activity_main.axml -->
<?xml version="1.0" encoding="utf-8"?>
<RelativeLayout
    xmlns:android="http://schemas.android.com/apk/res/android"
    xmlns:app="http://schemas.android.com/apk/res-auto"
    xmlns:tools="http://schemas.android.com/tools"
    android:layout_width="match_parent"
    android:layout_height="match_parent">
    <LinearLayout
        android:layout_width="match_parent"
        android:layout_height="match_parent"
        android:orientation="vertical" >
        <ImageView
            android:layout_gravity="center"
            android:minWidth="25px"
            android:minHeight="25px"
            android:layout_width="200dp"
            android:layout_height="200dp"
            android:id="@+id/mainImage"
            android:src="@drawable/ic_main_app_logo" />
        <Button
            android:layout_gravity="center"
            android:layout_width="match_parent"
            android:layout_height="wrap_content"
            android:text="LOGIN"
            android:layout_marginTop="26dp"
             android:layout_marginLeft="36dp"
             android:layout_marginRight="36dp"
            android:background="#fc6203"
            android:id="@+id/loginButton"/>
    </LinearLayout>
</RelativeLayout>

```

Still in the `Resources/layout` folder, let's add a new view to display a user's profile data, such as name, e-mail, and photo. So, we right-click on the `layout` folder and select the *Add* menu item and then _New File..._. In the resulting dialog window, we select _Android_ on the left and *Layout* from the displayed list. Let's name the new file `activity_user_profile.axml` and click the *New* button. Once the file is created, we can replace its content with the following code:

``` html  


<!-- Auth0.Xamarin.Droid/Resources/layout/activity_user_profile.axml -->
<?xml version="1.0" encoding="utf-8"?>
<RelativeLayout
    xmlns:android="http://schemas.android.com/apk/res/android"
    xmlns:app="http://schemas.android.com/apk/res-auto"
    xmlns:tools="http://schemas.android.com/tools"
    android:layout_width="match_parent"
    android:layout_height="match_parent">
    <LinearLayout
        android:layout_width="match_parent"
        android:layout_height="match_parent"
        android:orientation="vertical" >
        <ImageView
            android:layout_gravity="center"
            android:layout_marginTop="26dp"
            android:minWidth="25px"
            android:minHeight="25px"
            android:layout_width="wrap_content"
            android:layout_height="wrap_content"
            android:id="@+id/userProfileImageView"
            android:src="@drawable/ic_main_app_logo" />
        <TextView
            android:layout_gravity="center"
            android:layout_width="match_parent"
            android:layout_height="wrap_content"
            android:text="Hello!"
            android:textStyle="bold"
            android:layout_marginTop="26dp"
            android:gravity="center"
            android:layout_marginLeft="16dp"
            android:layout_marginRight="16dp"
            android:id="@+id/userProfileTextView"/>
        <TextView
            android:layout_gravity="center"
            android:gravity="center"
            android:layout_width="match_parent"
            android:layout_height="wrap_content"
            android:textStyle="bold"
            android:text="Username..."
            android:layout_marginTop="26dp"
            android:layout_marginLeft="16dp"
            android:layout_marginRight="16dp"
            android:id="@+id/userProfileNameTextView"/>
         <TextView
            android:layout_gravity="center"
            android:gravity="center"
            android:layout_width="match_parent"
            android:layout_height="wrap_content"
            android:textStyle="bold"
            android:text="Email..."
            android:layout_marginTop="26dp"
            android:layout_marginLeft="16dp"
            android:layout_marginRight="16dp"
            android:id="@+id/userProfileEmailTextView"/>
    </LinearLayout>
</RelativeLayout>

```


#### Integrating the Auth0 OIDC library in the source code

Integration with the library in the source code is easy. First, we have to create a `Model` folder in the root of the _Auth0.Xamarin.Droid_ project. In this folder, let's create the `UserProfile.cs` class file with the following content:

```csharp
// Auth0.Xamarin.Droid/Model/UserProfile.cs

namespace Auth0.Xamarin.Droid.Model
{
    public class UserProfile
    {
        public string Name { get; set; }
        public string Email { get; set; }
        public string ProfilePictureUrl { get; set; }
    }
}
```

Now, let's replace the default source code of the `MainActivity.cs` file with the code presented below. We will describe what is happening there in a moment:

```csharp
// Auth0.Xamarin.Droid/MainActivity.cs

using Android.App;
using Android.OS;
using Android.Widget;
using Xamarin.Essentials;
using Auth0.OidcClient;
using Android.Content.PM;
using Android.Content;
using Newtonsoft.Json;
using System.Threading.Tasks;
using Auth0.Xamarin.Droid.Model;
using System;
using IdentityModel.OidcClient.Browser;

namespace Auth0.Xamarin.Droid
{
    [Activity(Label = "@string/app_name", MainLauncher = true,
    LaunchMode = LaunchMode.SingleTask)]
    [IntentFilter(
    new[] { Intent.ActionView },
    Categories = new[] { Intent.CategoryDefault, Intent.CategoryBrowsable },
    DataScheme = "YOUR_ANDROID_PACKAGE_NAME",
    DataHost = "YOUR_DOMAIN",
    DataPathPrefix = "/android/YOUR_ANDROID_PACKAGE_NAME/callback")]
    public class MainActivity : Auth0ClientActivity
    {
        private Auth0Client _auth0Client;

        protected override void OnCreate(Bundle savedInstanceState)
        {
            base.OnCreate(savedInstanceState);
            Platform.Init(this, savedInstanceState);

            _auth0Client = new Auth0Client(new Auth0ClientOptions
            {
                Domain = "YOUR_DOMAIN",
                ClientId = "YOUR_CLIENTID"
            });

            SetContentView(Resource.Layout.activity_main);
            var loginButton = FindViewById<Button>(Resource.Id.loginButton);
            loginButton.Click += LoginButton_Click;
        }

        private async void LoginButton_Click(object sender, System.EventArgs e)
        {
            await LoginAsync();
        }

        private async Task LoginAsync()
        {
            var loginResult = await _auth0Client.LoginAsync();

            if (!loginResult.IsError)
            {
                var name = loginResult.User.FindFirst(c => c.Type == "name")?.Value;
                var email = loginResult.User.FindFirst(c => c.Type == "email")?.Value;
                var image = loginResult.User.FindFirst(c => c.Type == "picture")?.Value;

                var userProfile = new UserProfile
                {
                    Email = email,
                    Name = name,
                    ProfilePictureUrl = image
                };

                var intent = new Intent(this, typeof(UserProfileActivity));
                var serializedLoginResponse = JsonConvert.SerializeObject(userProfile);
                intent.PutExtra("LoginResult", serializedLoginResponse);
                StartActivity(intent);
            }
            else
            {
                Console.WriteLine($"An error occurred during login: {loginResult.Error}");
            }
        }

        private async Task<BrowserResultType> LogoutAsync()
        {
            return await _auth0Client.LogoutAsync();
        }
    }
}
```

To integrate the Auth0 login, we have to create an instance of the `Auth0Client` class. In the code above, we declared the `_auth0Client` variable. It is instantiated in the `OnCreate` method. We need to replace the YOUR_DOMAIN and YOUR_CLIENTID placeholders with the actual domain and client ID we can find in the Auth0 dashboard.

> As a best practice, the domain and client ID values should be taken from the application configuration file. To simplify this example, we will fill these values directly.

We also referenced the _Login_ button from the `main_activity.axml` file. We attached an event handler to the _Login_ button to invoke the `LoginAsync` method when it is clicked, as you can see below:

```csharp
         private Auth0Client _auth0Client;

        protected override void OnCreate(Bundle savedInstanceState)
        {
            base.OnCreate(savedInstanceState);
            Platform.Init(this, savedInstanceState);

           _auth0Client = new Auth0Client(new Auth0ClientOptions
            {
                Domain = "YOUR_DOMAIN",
                ClientId = "YOUR_CLIENTID"
            });

            SetContentView(Resource.Layout.activity_main);
            var loginButton = FindViewById<Button>(Resource.Id.loginButton);
            loginButton.Click += LoginButton_Click;
        }

        private async void LoginButton_Click(object sender, System.EventArgs e)
        {
            await LoginAsync();
        }
```

Once we successfully sign in, a new `UserProfile` instance is created and it is passed to the next _Activity_ called `UserProfileActivity`. It is done in the `LoginAsync` method of the `MainActivity` class:

```csharp
        private async Task LoginAsync()
        {
            var loginResult = await _auth0Client.LoginAsync();

            if (!loginResult.IsError)
            {
                var name = loginResult.User.FindFirst(c => c.Type == "name")?.Value;
                var email = loginResult.User.FindFirst(c => c.Type == "email")?.Value;
                var image = loginResult.User.FindFirst(c => c.Type == "picture")?.Value;

                var userProfile = new UserProfile
                {
                    Email = email,
                    Name = name,
                    ProfilePictureUrl = image
                };

                var intent = new Intent(this, typeof(UserProfileActivity));
                var serializedLoginResponse = JsonConvert.SerializeObject(userProfile);
                intent.PutExtra("LoginResult", serializedLoginResponse);
                StartActivity(intent);
            }
            else
            {
                Console.WriteLine($"An error occurred during login: {loginResult.Error}");
            }
        }
```

As we can see, if there is an error during authentication, we can easily access it to investigate what happened. Of course, we could also implement some custom dialog that would be displayed to the user when authentication fails. In our case, we simply show a message in the Visual Studio's console.

Calling the `_auth0Client.LoginAsync` method will redirect the user to the web browser on the mobile device where the Auth0 login screen will be displayed. It is very important to handle the callback URL. We set it in the Auth0 dashboard earlier. After a successful login, the user will be redirected back to the application at the callback URL.

To do this, we have to register an intent that will handle this callback URL:

```csharp
[Activity(Label = "@string/app_name", MainLauncher = true,
    LaunchMode = LaunchMode.SingleTask)]
    [IntentFilter(
    new[] { Intent.ActionView },
    Categories = new[] { Intent.CategoryDefault, Intent.CategoryBrowsable },
    DataScheme = "YOUR_ANDROID_PACKAGE_NAME",
    DataHost = "YOUR_DOMAIN",
    DataPathPrefix = "/android/YOUR_ANDROID_PACKAGE_NAME/callback")]
public class MainActivity : Auth0ClientActivity
{
    // Code of the activity
}
```

> As a best practice, the `DataScheme`, `DataHost`, and `DataPathPrefix` values should be taken from the application configuration file. To simplify this example, we will fill these values directly.


In the end, it is worth to mention that we can also implement sign-out. To achieve it, we can use the `LogoutAsync` method from the `Auth0Client ` class, as shown in the following:

```csharp
private async Task<BrowserResultType> LogoutAsync()
{
    return await _auth0Client.LogoutAsync();
}
```

We could place it in the event handler for the logout, but it is not included in our sample application.

Now, after a successful login, we can display user profile data in a new _Activity_. To create it, we right-click on the project and select _Add_, then _New File..._. In the resulting dialog, we select the _Android_ section on the left and the _Activity_ item on the right. Let's call this activity `UserProfileActivity` and click on the *New* button. Finally, let's replace the generated code with the one presented below:

```csharp
// Auth0.Xamarin.Droid/UserProfileActivity.cs

using System.Net;
using Android.App;
using Android.Content;
using Android.Graphics;
using Android.OS;
using Android.Widget;
using Auth0.Xamarin.Droid.Model;
using Newtonsoft.Json;

namespace Auth0.Xamarin.Droid
{
    [Activity(Label = "UserProfileActivity")]
    public class UserProfileActivity : Activity
    {
        private UserProfile _userProfile;

        protected override void OnCreate(Bundle savedInstanceState)
        {
            base.OnCreate(savedInstanceState);

            SetContentView(Resource.Layout.activity_user_profile);

            GetLoginResult(savedInstanceState);

            DisplayProfileInfo();
        }

        private void GetLoginResult(Bundle savedInstanceState)
        {
            string loginResultAsJson = Intent.GetStringExtra("LoginResult") ?? string.Empty;
            _userProfile = JsonConvert.DeserializeObject<UserProfile>(loginResultAsJson);
        }

        private void DisplayProfileInfo()
        {
                FindViewById<TextView>(Resource.Id.userProfileNameTextView).Text = _userProfile.Name;
                FindViewById<TextView>(Resource.Id.userProfileEmailTextView).Text = _userProfile.Email;

                var imageBitmap = GetImageBitmapFromUrl(_userProfile.ProfilePictureUrl);
                FindViewById<ImageView>(Resource.Id.userProfileImageView).SetImageBitmap(imageBitmap);
        }

        private Bitmap GetImageBitmapFromUrl(string url)
        {
            Bitmap imageBitmap = null;

            using (var webClient = new WebClient())
            {
                var imageBytes = webClient.DownloadData(url);
                if (imageBytes != null && imageBytes.Length > 0)
                {
                    imageBitmap = BitmapFactory.DecodeByteArray(imageBytes, 0, imageBytes.Length);
                }
            }

            return imageBitmap;
        }
    }
}
```

In the `GetLoginResult` method, we deserialized the `UserProfile` class instance sent by the `LoginAsync` method of the `MainActivity` class. In the `DisplayProfileInfo` method, we display the user profile information on the user interface. The `GetImageBitmapFromUrl` method is responsible for creating a `Bitmap` instance of the user profile picture.


#### Testing the Android application

For this article, I used the Android device emulator. To start, we have to set _Auth0.Xamarin.Droid_ project as the startup project. So, we right-click on the _Auth0.Xamarin.Droid_ project and click _Set As Startup Project_. Then, we can start the application on the emulator using the *Run* button at the top of Visual Studio. Here is how the login screen looks:

![Auth0 login screen on Android](https://images.ctfassets.net/23aumh6u8s0i/2Zd7xUcI6Ryzb17xkpUnc8/92f8f6d0b7c1451fa3af0e5cccc9a146/android-auth0-login-screen)

We can also sign in with a Google account:

![Auth0 login screen with Google on Android](https://images.ctfassets.net/23aumh6u8s0i/4MfSkA0cUtzcQu3iQ0I4Tn/8f878ded33714d40c5890818881a6fd6/android-google-login-screen)

After a successful login, this is the user profile view:

![User profile screen on Android](https://images.ctfassets.net/23aumh6u8s0i/3XFQm4jaVGZOeDmim7Kcb1/f6d631b0117bc1fa3f79a4f777d13b07/user-profile-android)

Great! Now we will look at how to set up the *Xamarin.iOS* project.

<include src="TweetQuote" quoteText="Xamarin allows you to build iOS and Android apps with one codebase."/>


### Integrating the Auth0 OIDC library in Xamarin.iOS app

In this section, we are going to integrate the Auth0 OIDC library into the Xamarin.iOS application source code. We are going to enable the login with a standard username and password and also with a Google account.

#### Adding the library to the project

First of all, we have to add the [Auth0.OidcClient.iOS](https://www.nuget.org/packages/Auth0.OidcClient.iOS/) NuGet package to our *Xamarin.iOS* project. We right-click on the _Auth0.Xamarin.iOS_ project and select _Manage NuGet Packages..._ from the resulting contextual menu. In the search textbox of the dialog window, let's type _Auth0.OidcClient.iOS_. Once we find it, let's select it and add the package by clicking on the _Add package_ button.


Once the package is added, we can start the actual integration in the source code.

#### Preparing views to enable login and display data

In the `Main.storyboard` file, we have to declare two view controllers:

- _ViewController_ - this will be the initial view with the logos and the login button
- _UserProfileViewController_ - this view will display the user picture at the top and their name and e-mail address below it

Please note that the _ViewController_ is automatically created with the project. We should modify it and create the _UserProfileViewController_ from scratch. Alternatively, we can download the [Main.storyboard file](https://github.com/auth0-blog/auth0-xamarin/blob/master/src/Auth0.Xamarin.iOS/Main.storyboard) from the associated GitHub repository and replace it in the project. The final result should look like the following in Visual Studio:

![Xamarin.iOS Main.storyboard in Visual Studio](https://images.ctfassets.net/23aumh6u8s0i/6BMK2t9hSlznxfjUk0WvkK/d2068dec0be99feeba90b7d4e2c0dd96/xamarin-ios-main-storyboard)


#### Integrating the Auth0 OIDC library in the source code

Similarly to the Android app, to integrate the Auth0 login process, we have to create an instance of the `Auth0Client` class, but first we create a `Model` folder in the project and add the `UserProfile.cs` class file to it. Its content will be as follows:

```csharp
// Auth0.Xamarin.iOS/Model/UserProfile.cs

namespace Auth0.Xamarin.iOS.Model
{
    public class UserProfile
    {
        public string Name { get; set; }
        public string Email { get; set; }
        public string ProfilePictureUrl { get; set; }
    }
}
```

For Xamarin.iOS applications, we have to register the URL scheme for the callback URL in the `Info.plist` file. Once opened, we go to the *Advanced* tab in Visual Studio. In the _URL Types_ section, we have to add a new URL type. So, let's click the _Add URL Type_ button and set *Auth0* as the _Identifier_ value and _com.auth0.xamarin.ios_ as the _URL Schemes_ value. Let's leave *None* as the _Role_ value. The following picture summarizes the resulting settings:

![Xamarin iOS URL types configuration](https://images.ctfassets.net/23aumh6u8s0i/Rg6CEsfPQERw9zn2QY7Iv/1b5433a1ba5a4a1a86e9ba2727f60562/xamarin-ios-url-types-configuration)

To handle the callback URL, we need to edit the `AppDelegate.cs` class file and add the `OpenUrl` event. The final content of the class file will be the following:

```csharp
// Auth0.Xamarin.iOS/AppDelegate.cs

using Auth0.OidcClient;
using Foundation;
using UIKit;

namespace Auth0.Xamarin.iOS
{
    // The UIApplicationDelegate for the application. This class is responsible for launching the
    // User Interface of the application, as well as listening (and optionally responding) to application events from iOS.
    [Register("AppDelegate")]
    public class AppDelegate : UIResponder, IUIApplicationDelegate
    {

        [Export("window")]
        public UIWindow Window { get; set; }

        [Export("application:didFinishLaunchingWithOptions:")]
        public bool FinishedLaunching(UIApplication application, NSDictionary launchOptions)
        {
            // Override point for customization after application launch.
            // If not required for your application you can safely delete this method
            return true;
        }

        // UISceneSession Lifecycle

        [Export("application:configurationForConnectingSceneSession:options:")]
        public UISceneConfiguration GetConfiguration(UIApplication application, UISceneSession connectingSceneSession, UISceneConnectionOptions options)
        {
            // Called when a new scene session is being created.
            // Use this method to select a configuration to create the new scene with.
            return UISceneConfiguration.Create("Default Configuration", connectingSceneSession.Role);
        }

        [Export("application:didDiscardSceneSessions:")]
        public void DidDiscardSceneSessions(UIApplication application, NSSet<UISceneSession> sceneSessions)
        {
            // Called when the user discards a scene session.
            // If any sessions were discarded while the application was not running, this will be called shortly after `FinishedLaunching`.
            // Use this method to release any resources that were specific to the discarded scenes, as they will not return.
        }

        [Export("application:openURL:sourceApplication:annotation:")]
        public bool OpenUrl(UIApplication application, NSUrl url, string sourceApplication, NSObject annotation)
        {
            ActivityMediator.Instance.Send(url.AbsoluteString);
            return true;
        }
    }
}
```

Now, let's replace the content of the `ViewController.cs` file with the following code:

```csharp
// Auth0.Xamarin.iOS/ViewController.cs

﻿using Auth0.OidcClient;
using Auth0.Xamarin.iOS.Model;
using IdentityModel.OidcClient.Browser;
using System;
using System.Threading.Tasks;
using UIKit;

namespace Auth0.Xamarin.iOS
{
    public partial class ViewController : UIViewController
    {
        private Auth0Client _auth0Client;

        public ViewController(IntPtr handle) : base(handle)
        {
        }

        public override void ViewDidLoad()
        {
            base.ViewDidLoad();
            // Perform any additional setup after loading the view, typically from a nib.

            LoginButton.BackgroundColor = UIColor.FromRGB(245, 126, 66);

            _auth0Client = new Auth0Client(new Auth0ClientOptions
            {
                Domain = "YOUR_DOMAIN",
                ClientId = "YOUR_CLIENTID"
            });
        }

        public override void DidReceiveMemoryWarning()
        {
            base.DidReceiveMemoryWarning();
            // Release any cached data, images, etc that aren't in use.
        }

        async partial void LoginButton_TouchUpInside(UIButton sender)
        {
            await LoginAsync();
        }

        private async Task LoginAsync()
        {
            var loginResult = await _auth0Client.LoginAsync();

            if (!loginResult.IsError)
            {
                var name = loginResult.User.FindFirst(c => c.Type == "name")?.Value;
                var email = loginResult.User.FindFirst(c => c.Type == "email")?.Value;
                var image = loginResult.User.FindFirst(c => c.Type == "picture")?.Value;

                var userProfile = new UserProfile
                {
                    Email = email,
                    Name = name,
                    ProfilePictureUrl = image
                };

                UIStoryboard board = UIStoryboard.FromName("Main", null);
                UserProfileViewController userProfileViewController = (UserProfileViewController)board.InstantiateViewController("UserProfileViewController");

                userProfileViewController.UserProfile = userProfile;
                this.PresentViewController(userProfileViewController, true, null);
            }
            else
            {
                Console.WriteLine($"An error occurred during login: {loginResult.Error}");
            }
        }

        private async Task<BrowserResultType> LogoutAsync()
        {
            return await _auth0Client.LogoutAsync();
        }
    }
}
```

In the code above, we declared the `_auth0Client` variable. It is instantiated in the `ViewDidLoad` method. In the `Auth0Client` constructor, we need to replace the YOUR_DOMAIN and YOUR_CLIENTID placeholders with the actual domain and client ID, which we can find in the Auth0 dashboard.

> As a best practice, the domain and client ID values should be taken from the application configuration file. To simplify this example, we will fill these values directly.

We also added the `LoginButton_TouchUpInside` event handler for the _Login_ button from the `Main.Storyboard` file. Once it is clicked, it triggers authentication by calling the `LoginAsync` method. In the `LoginAsync` method, we use the `Auth0Client` class instance to handle the user login. After a successful login, we create a `UserProfile` class instance and pass it to the `UserProfileViewController` instance using its `UserProfile` property.

If there is an error during authentication, we can easily access it to investigate what happened. It is placed in the `LoginAsync` method presented above. Of course, we could implement some custom dialog that would be displayed to the user when authentication fails. In our application sample, we are showing the error details in the Visual Studio's console.

Now, let's add the missing `UserProfileViewController.cs` file by right-clicking on the project and selecting _Add_ and then _New File..._ in the contextual menu. From the resulting dialog, select the _iOS_ section on the left and the _View Controller (C#)_ item on the right. Then assign `UserProfileViewController` as the file name and click the *New* button.

Finally, let's replace the newly created controller's content with the following code:

```csharp
// Auth0.Xamarin.iOS/UserProfileViewController.cs

using System;
using Auth0.Xamarin.iOS.Model;
using Foundation;
using UIKit;

namespace Auth0.Xamarin.iOS
{
    public partial class UserProfileViewController : UIViewController
    {
        public UserProfile UserProfile { get; set; }

        public UserProfileViewController() : base("UserProfileViewController", null)
        {
        }

        public UserProfileViewController(IntPtr handle) : base(handle)
        {
        }

        public override void ViewDidLoad()
        {
            base.ViewDidLoad();
            // Perform any additional setup after loading the view, typically from a nib.

            DisplayProfileInfo();
        }

        public override void DidReceiveMemoryWarning()
        {
            base.DidReceiveMemoryWarning();
            // Release any cached data, images, etc that aren't in use.
        }

        private void DisplayProfileInfo()
        {
                UsernameLabel.Text = UserProfile.Name;
                UserEmailLabel.Text = UserProfile.Email;

                using (var url = new NSUrl(UserProfile.ProfilePictureUrl))
                {
                   var data = NSData.FromUrl(url);
                    UserImageView.Image = UIImage.LoadFromData(data);
                }
        }
    }
}
```

 This code is responsible for displaying the user name, e-mail, and picture. The `DisplayProfileInfo` method is called by the `ViewDidLoad` method once the view is displayed to the user.


#### Testing the iOS application

For this article, I used an iOS device simulator. To start, we have to set the _Auth0.Xamarin.iOS_ project as the startup project. So, let's right-click on the _Auth0.Xamarin.iOS_ project and select _Set As Startup Project_ from the contextual menu. Now, click the *Run* button in the Visual Studio toolbar.

After a few seconds, we should get the following screen:

![Auth0 login screen on iOS](https://images.ctfassets.net/23aumh6u8s0i/5d0PsoJnEa0my6GkXrutUI/e21118cb8a32f462c3c607c5c5442861/ios-auth0-login-screen)

After a successful login, we should see the user profile:

![User profile screen on iOS](https://images.ctfassets.net/23aumh6u8s0i/6RqkbMiuoa4F9UY9P9EHsK/ba5de331f3766e6165cb7aad6f96b67b/ios-user-profile)


## Summary

It is time to summarize what we have covered. We learned that applications created with Xamarin are fully native, and one of its most significant advantages is the common codebase written in C#. We also covered a step-by-step integration of the Auth0 OIDC library in the Xamarin. Android and Xamarin.iOS applications to simplify user authentication. We saw how to authenticate with a standard username and password approach but also how to sign in with a Google account. In addition, it should now be clear how to access the user profile data. If you would like to use the application sample we discussed in this article, check [this GitHub repository](https://github.com/auth0-blog/auth0-xamarin) and let's get in touch through the comments section down below.
