


TL;DR: In this article you will learn to validate and sanitize data in your Express.js
applications using a set of middleware called express-validator. You will do so by completing a demo application that takes in user input and validates/sanitizes it using
this library. If you want to see the complete application developed throughout this article, take a look at this GitHub repository.
Prerequisites
Software you need to install to follow this tutorial:
- Node.js and NPM (Node Package Manager). While writing this article, the author used Node.js
v8.13.0. - Any text editor or IDE of your choice (VS Code, WebStorm, Atom, Sublime, etc.).
What Is Express Validator?
According to the official website, Express Validator is a set of Express.js middleware that wraps validator.js, a library that provides validator and sanitizer functions. Simply said, Express Validator is an Express middleware library that you can incorporate in your apps for server-side data validation.
Why Server-Side Validation?
Mainly speaking, you must care about server-side validation because data coming from other clients (single-page apps, regular web apps, mobile applications, etc.) cannot be trusted. For example, your servers have no means to know if a malicious user (or virus) disabled front-end validation (e.g., JavaScript) to allow the app to submit bogus data to your server. That is, client-side validation is not enough.
Set Up Your Playground For Express Validator
To start playing with Express Validator, you will clone a simple Express server to use as a playground. To do so, open your terminal in a preferred directory and clone the starter project with the following command:
# clone repository
git clone https://github.com/auth0-blog/expressjs-validator.git

# move into your clone repository
cd expressjs-validator
Then, install all the project dependencies by running the following command in the project root:
npm installThis simple Express application contains just enough for you to get started and focus on learning about the express-validator library. For example, if you check the views/layout.pug file, you will see that it contains some basic HTML elements to define how the app should look like.
Note: If you are not familiar with Pug, the template engine, you might find the syntax of this file a bit different. Don't worry, you don't need to be acquainted with Pug to follow this article along. Also, if you take a close look to the source code, you will probably understand what is going on. For example, you will see a line starting with
linkthat contains thehrefkeyword pointing to a BootStrap file. This is just the code telling the browser to import an external CSS file, quite similar to what you would do in HTML.
Besides the views/layout.pug file, these are other important files that you must know about:
./routes/index.js: This file is responsible for rendering the homepage of your app. Theres.render('index')line will make Express and Pug work together to render theviews/index.pugfile../routes/users.js: For now, this file adds an endpoint to your app that doesn't do anything. Soon, you will start using this file to learn about theexpress-validatorlibrary../public/javascripts/script.js: This is the file that will be in charge of sending user data to your backend. The requests will be some AJAX calls to the endpoint defined on theroutes/users.jsfile../app.js: This is the file responsible for bootstrapping the backend. This file sets up Pug as the template engine and tells Express.js where to find the other JavaScript files.
With that, you now know how the app is structured, but don't run the project yet! You still need to define the home page of your app.
Build Homepage For User Input
After learning about the structure of the playground, you will need to add the following code to the views/index.pug file:
extends layout

block content
  .container
    .alert(class="alert-danger", role="alert", id="error-group", style="display: none")
      ul(id="errors")
    .row
      .col-sm.col-md-8.offset-md-2.col-lg-6.offset-lg-3
        h3 Welcome To Express Validator!
        form
          .form-group
            input.form-control(type="text", id="name", placeholder="Name")
          .form-group
            input.form-control(type="text", id="classYear", placeholder="Class Year")
          .form-group
            input.form-control(type="text", id="weekday", placeholder="Available Weekday")
          .form-group
            input.form-control(type="email", id="email", placeholder="Email")
          .form-group
            input.form-control(type="password", id="password", placeholder="Password")
          .form-group
            input.form-control(type="password", id="confirmPassword", placeholder="Confirm Password")
          .form-group
            button.form-control(type="button", class="btn btn-primary", id="signup-btn") Submit
What you are doing here is to add a bunch of input elements to the homepage that will receive user input to be sent to the backend. With that covered, you have everything in place to have a sneak peek at the app. Go to the project root directory
and run the following command to get the app started.
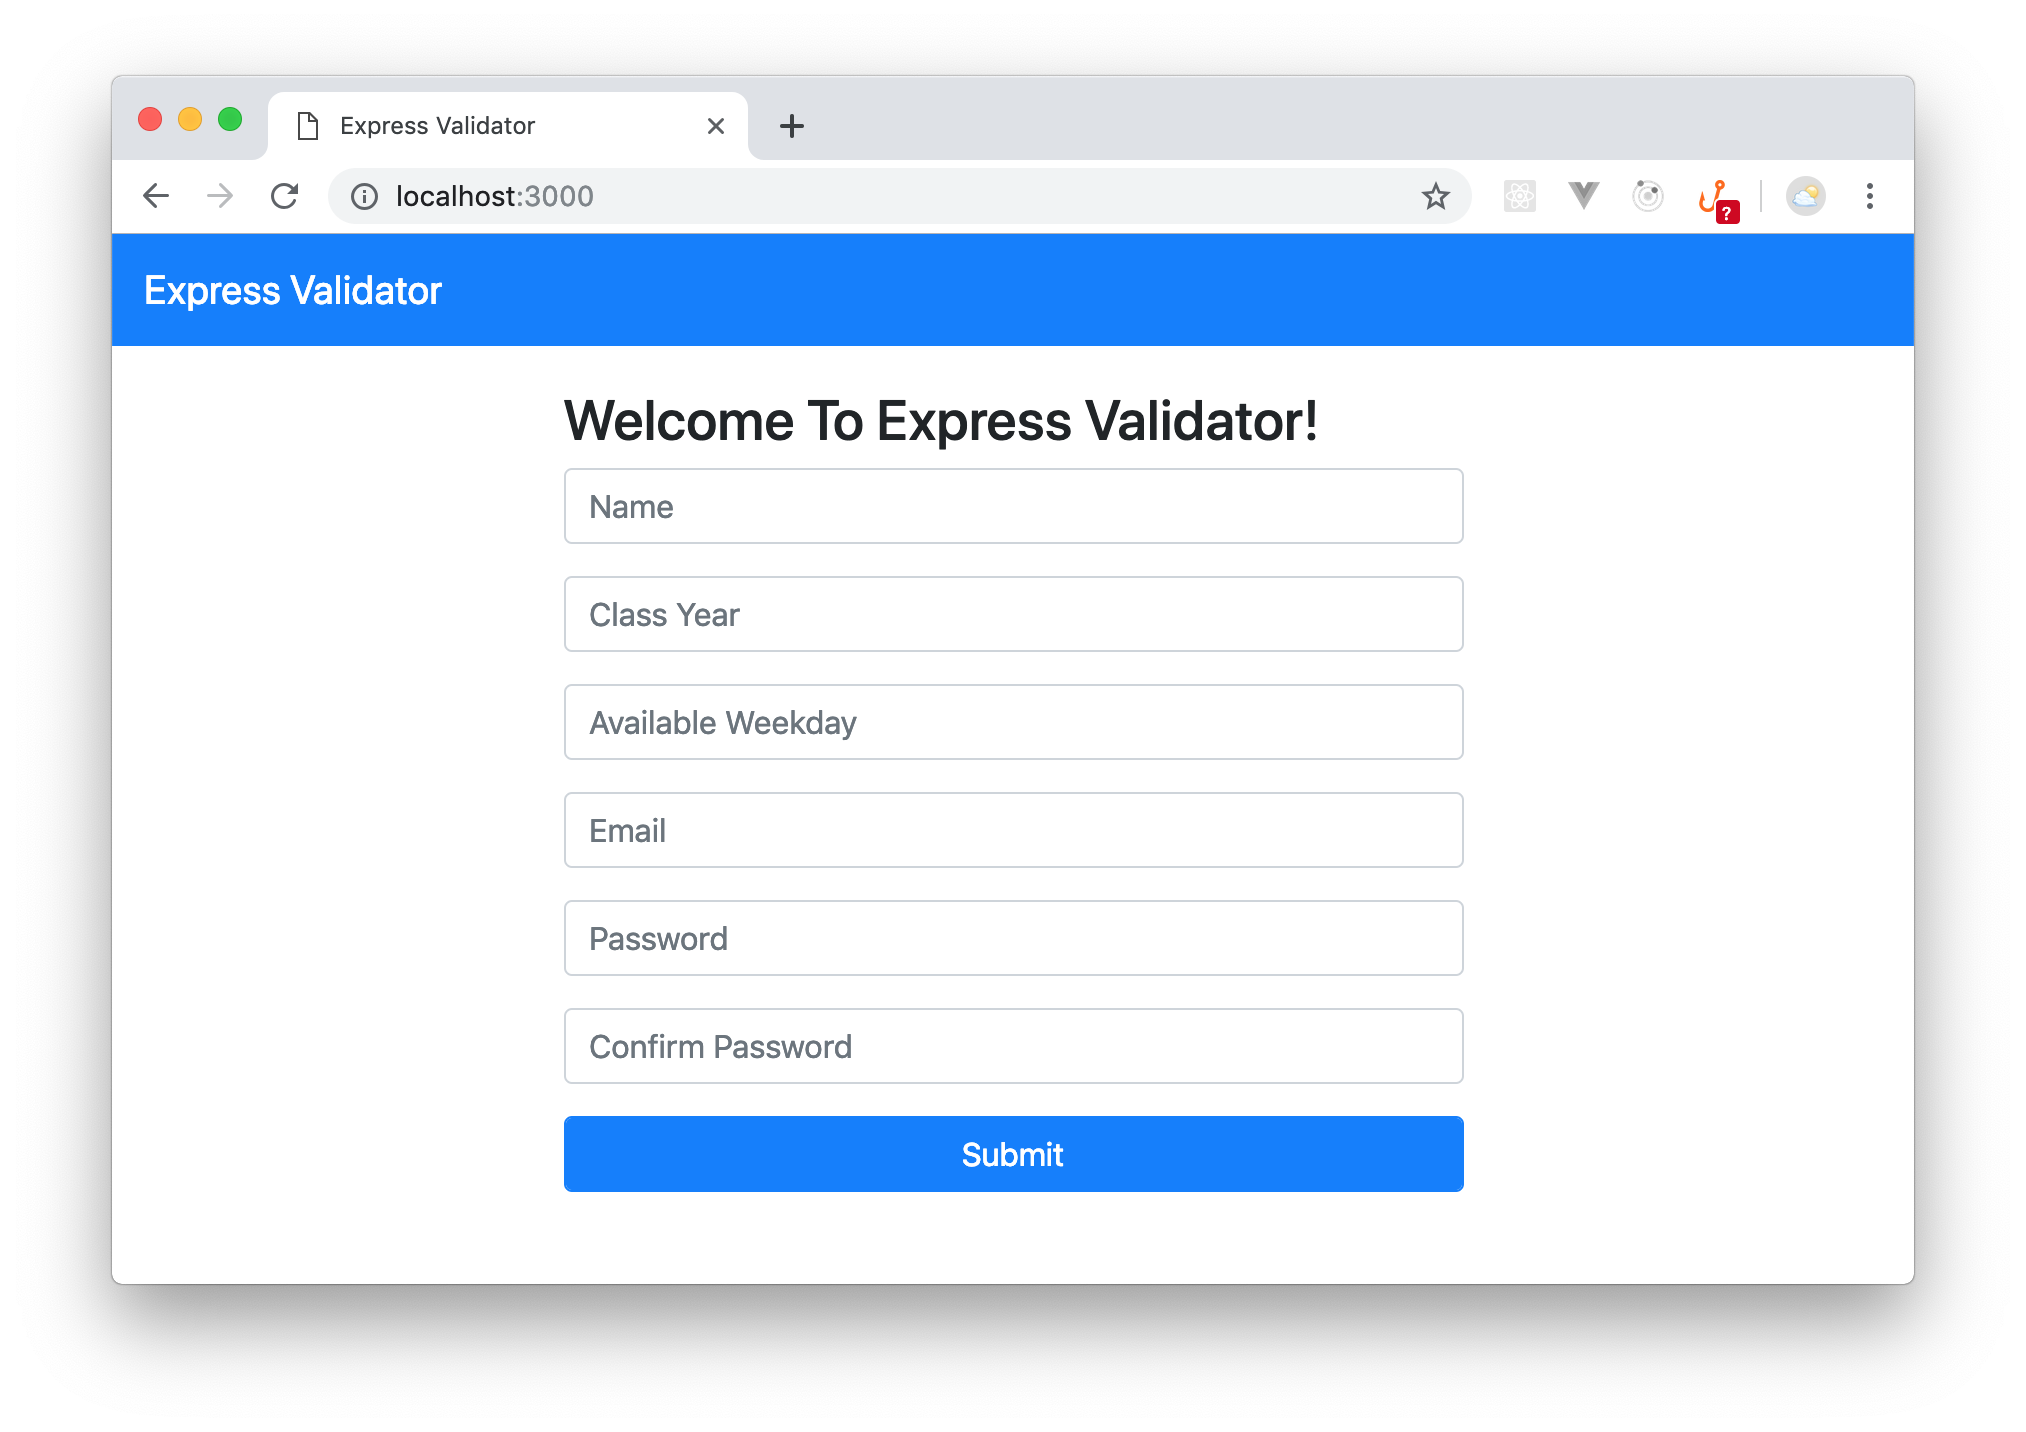
node app.jsNow, if you visit http://localhost:3000/ in your favorite browser, you should see the following page:
Note: You can stop the server now, but whenever you add a new feature/functionality, you will need to restart the server if it is already running or just start it.
Once the user enters data on your homepage and clicks the Submit button, you will need to handle the on submit event and make an AJAX request to your Express back-end. To do that, add the following code to your ./public/javascripts/script.js file:
$('#signup-btn').click(function () {
  $.ajax({
    url: '/users',
    type: 'POST',
    cache: false,
    data: {
      name: $('#name').val(),
      classYear: $('#classYear').val(),
      weekday: $('#weekday').val(),
      email: $('#email').val(),
      phoneNumber: $('#phoneNumber').val(),
      password: $('#password').val(),
      confirmPassword: $('#confirmPassword').val()
    },
    success: function () {
      $('#error-group').css('display', 'none');
      alert('Your submission was successful');
    },
    error: function (data) {
      $('#error-group').css('display', 'block');
      var errors = JSON.parse(data.responseText);
      var errorsContainer = $('#errors');
      errorsContainer.innerHTML = '';
      var errorsList = '';

      for (var i = 0; i < errors.length; i++) {
        errorsList += '<li>' + errors[i].msg + '</li>';
      }
      errorsContainer.html(errorsList);
    }
  });
});
From the code above, on form submission, a POST request is made to the http://localhost:3000/users endpoint with the data entered by users on the HTML fields defined before. If there is an error during validation, this code will make sure to display the error messages inside a div marked with the alert class. If no errors are found, a successful validation will trigger an alert with this message: "Your submission was successful".
Server-Side Validation With Express Validator
Now that you have your front-end set up, you will start learning about express-validator. To do that, the first thing you will need to do is to install the library:
npm install express-validator --saveAfter installing express-validator, open the routes/users.js file and import the check API to use its validation functions:
// ... call to require('express') ...
const {check, validationResult} = require('express-validator/check');

// ... leave the rest untouched ...
Making sure fields are not empty
Now, to validate your form input, you need to pass an array in which you specify the fields that you want to validate as a second argument to your route handler for /users POST requests. To do that, add the following code after the GET route handling code in routes/user.js:
// ... require statements ...

// ... router.get ...

router.post('/', [
    check('name').not().isEmpty().withMessage('Name must have more than 5 characters'),
    check('classYear', 'Class Year should be a number').not().isEmpty(),
    check('weekday', 'Choose a weekday').optional(),
    check('email', 'Your email is not valid').not().isEmpty(),
    check('password', 'Your password must be at least 5 characters').not().isEmpty(),
  ],
  function (req, res) {
    const errors = validationResult(req);
    console.log(req.body);

    if (!errors.isEmpty()) {
      return res.status(422).jsonp(errors.array());
    } else {
      res.send({});
    }
  });

module.exports = router;
The string passed as an argument to the check function specifies which data field you want to validate (e.g., classYear). The not().isEmpty() function chain makes the library validate that this field is not empty. The string argument added to withMessage() specifies a custom error message which will be send back to your users if this particular field violates a validation requirement.
Note: You can also provide a custom error message by passing it as a second argument to the
check()function.
By calling the optional() function on it, you have made the weekday field optional. So far, you have only specified how you want your fields to be validated. You might be wondering where Express.js actually does the validation. Validation happens in the request handler when it calls the validationResult() function. To test this, run your application and submit an empty form to the server and you should see the following error displayed in red.
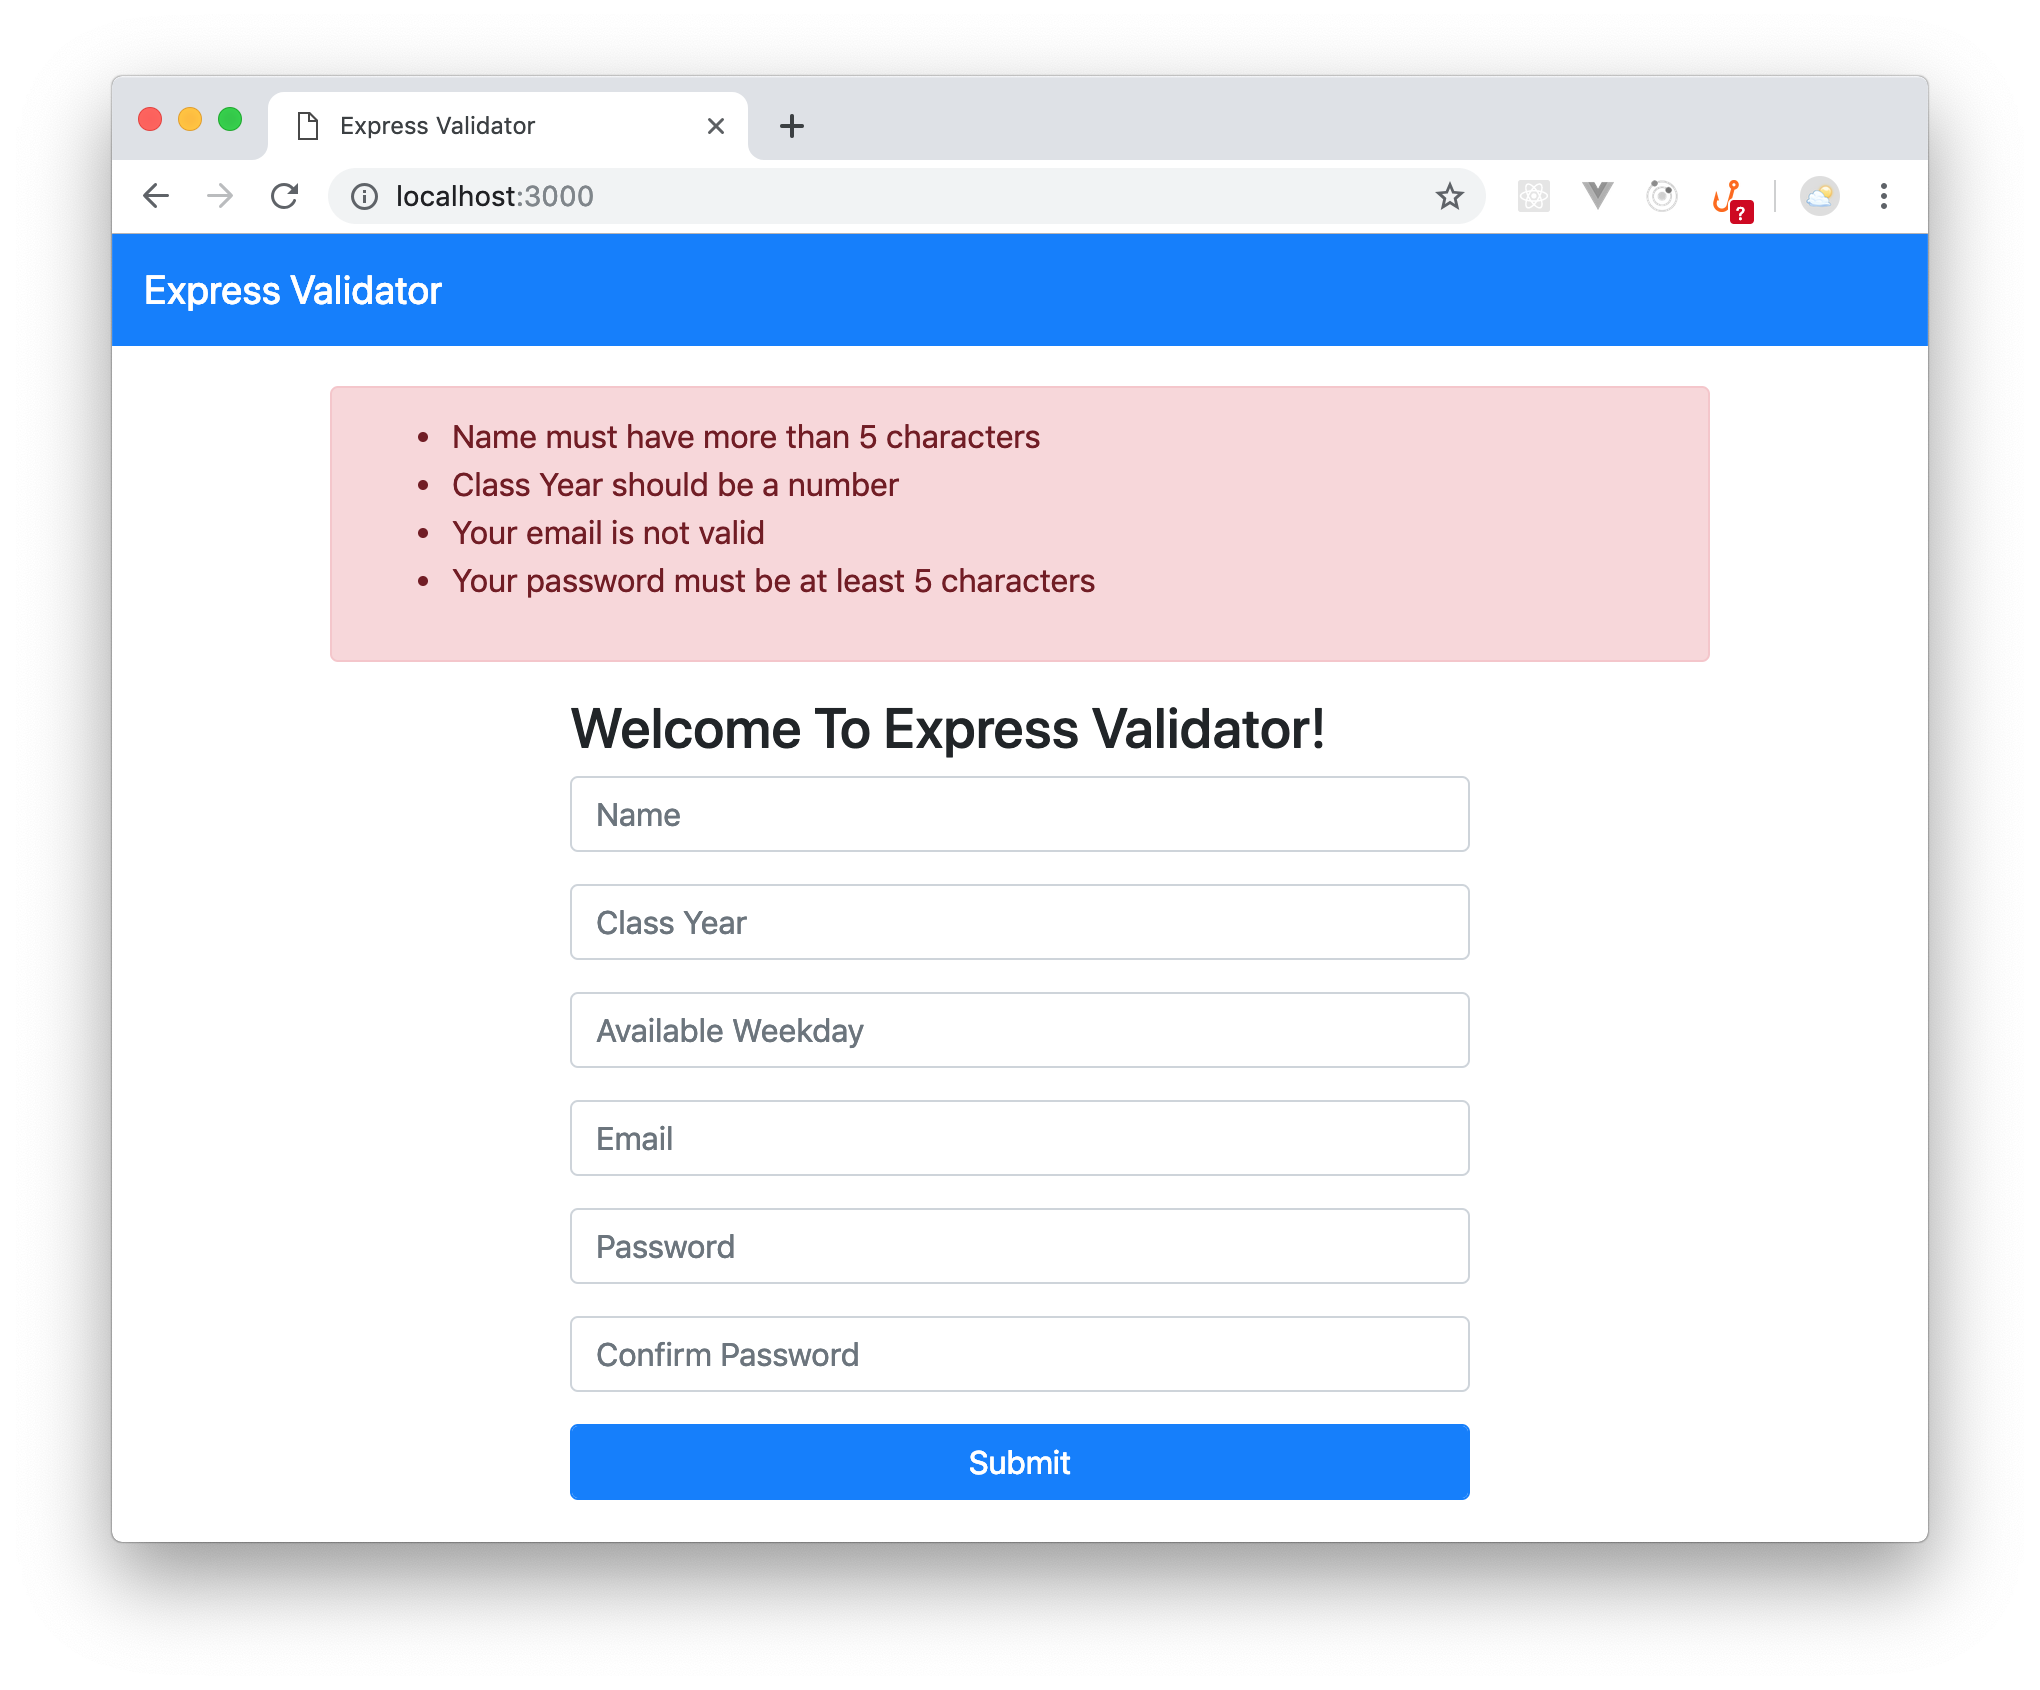
Remark how there is no error for the weekday field, this is because you made the field optional during validation. Pretty cool, huh?
Validating fields' length
You can also check if a data field meets a certain character length requirement by using the isLength() function. This function takes in an object in which you specify the minimum and/or the maximum number of characters in that field. To see this in action, update the validation requirements for the name and password field as follows:
[
  // ... leave other validations untouched ...
  check('name').not().isEmpty().isLength({min: 5}).withMessage('Name must have more than 5 characters'),
  check('password', 'Your password must be at least 5 characters').not().isEmpty().isLength({min: 5}),
]
Now, restart the app and try to enter a name and password less than five characters long. You should see the app complaining about the field length.
Validating fields' type
Apart from validating the character length of a field, you can also validate its type or validate it against a list. For example, you can specify that your classYear field needs to be an integer. You can also specify that weekday should not be Saturday or Sunday. To do that, update your validation requirements as follows:
[
  // ... leave other validations untouched ...
  check('classYear', 'Class Year should be a number').not().isEmpty().isInt(),
  check('weekday', 'Choose a weekday').optional().not().isIn(['Sunday', 'Saturday']),
]
Now, after restarting the app, if you try to enter a value which is not an integer in the class year field, you will see an error message. Also, if you enter "Saturday" or "Sunday" in the weekday field, you will see the backend complaining.
Validating and sanitizing emails
Express Validator also validates emails with the isEmail() function. Besides that, you can also make this library normalize emails with the normalizeEmail() function. In case you are wondering what it means to normalize an email, you can read about it in this Stack Overflow post.
In order to validate the email field, refactor the check('email' call in your code:
[
// ... leave other validations untouched ...
check('email', 'Your email is not valid').not().isEmpty().isEmail().normalizeEmail(),
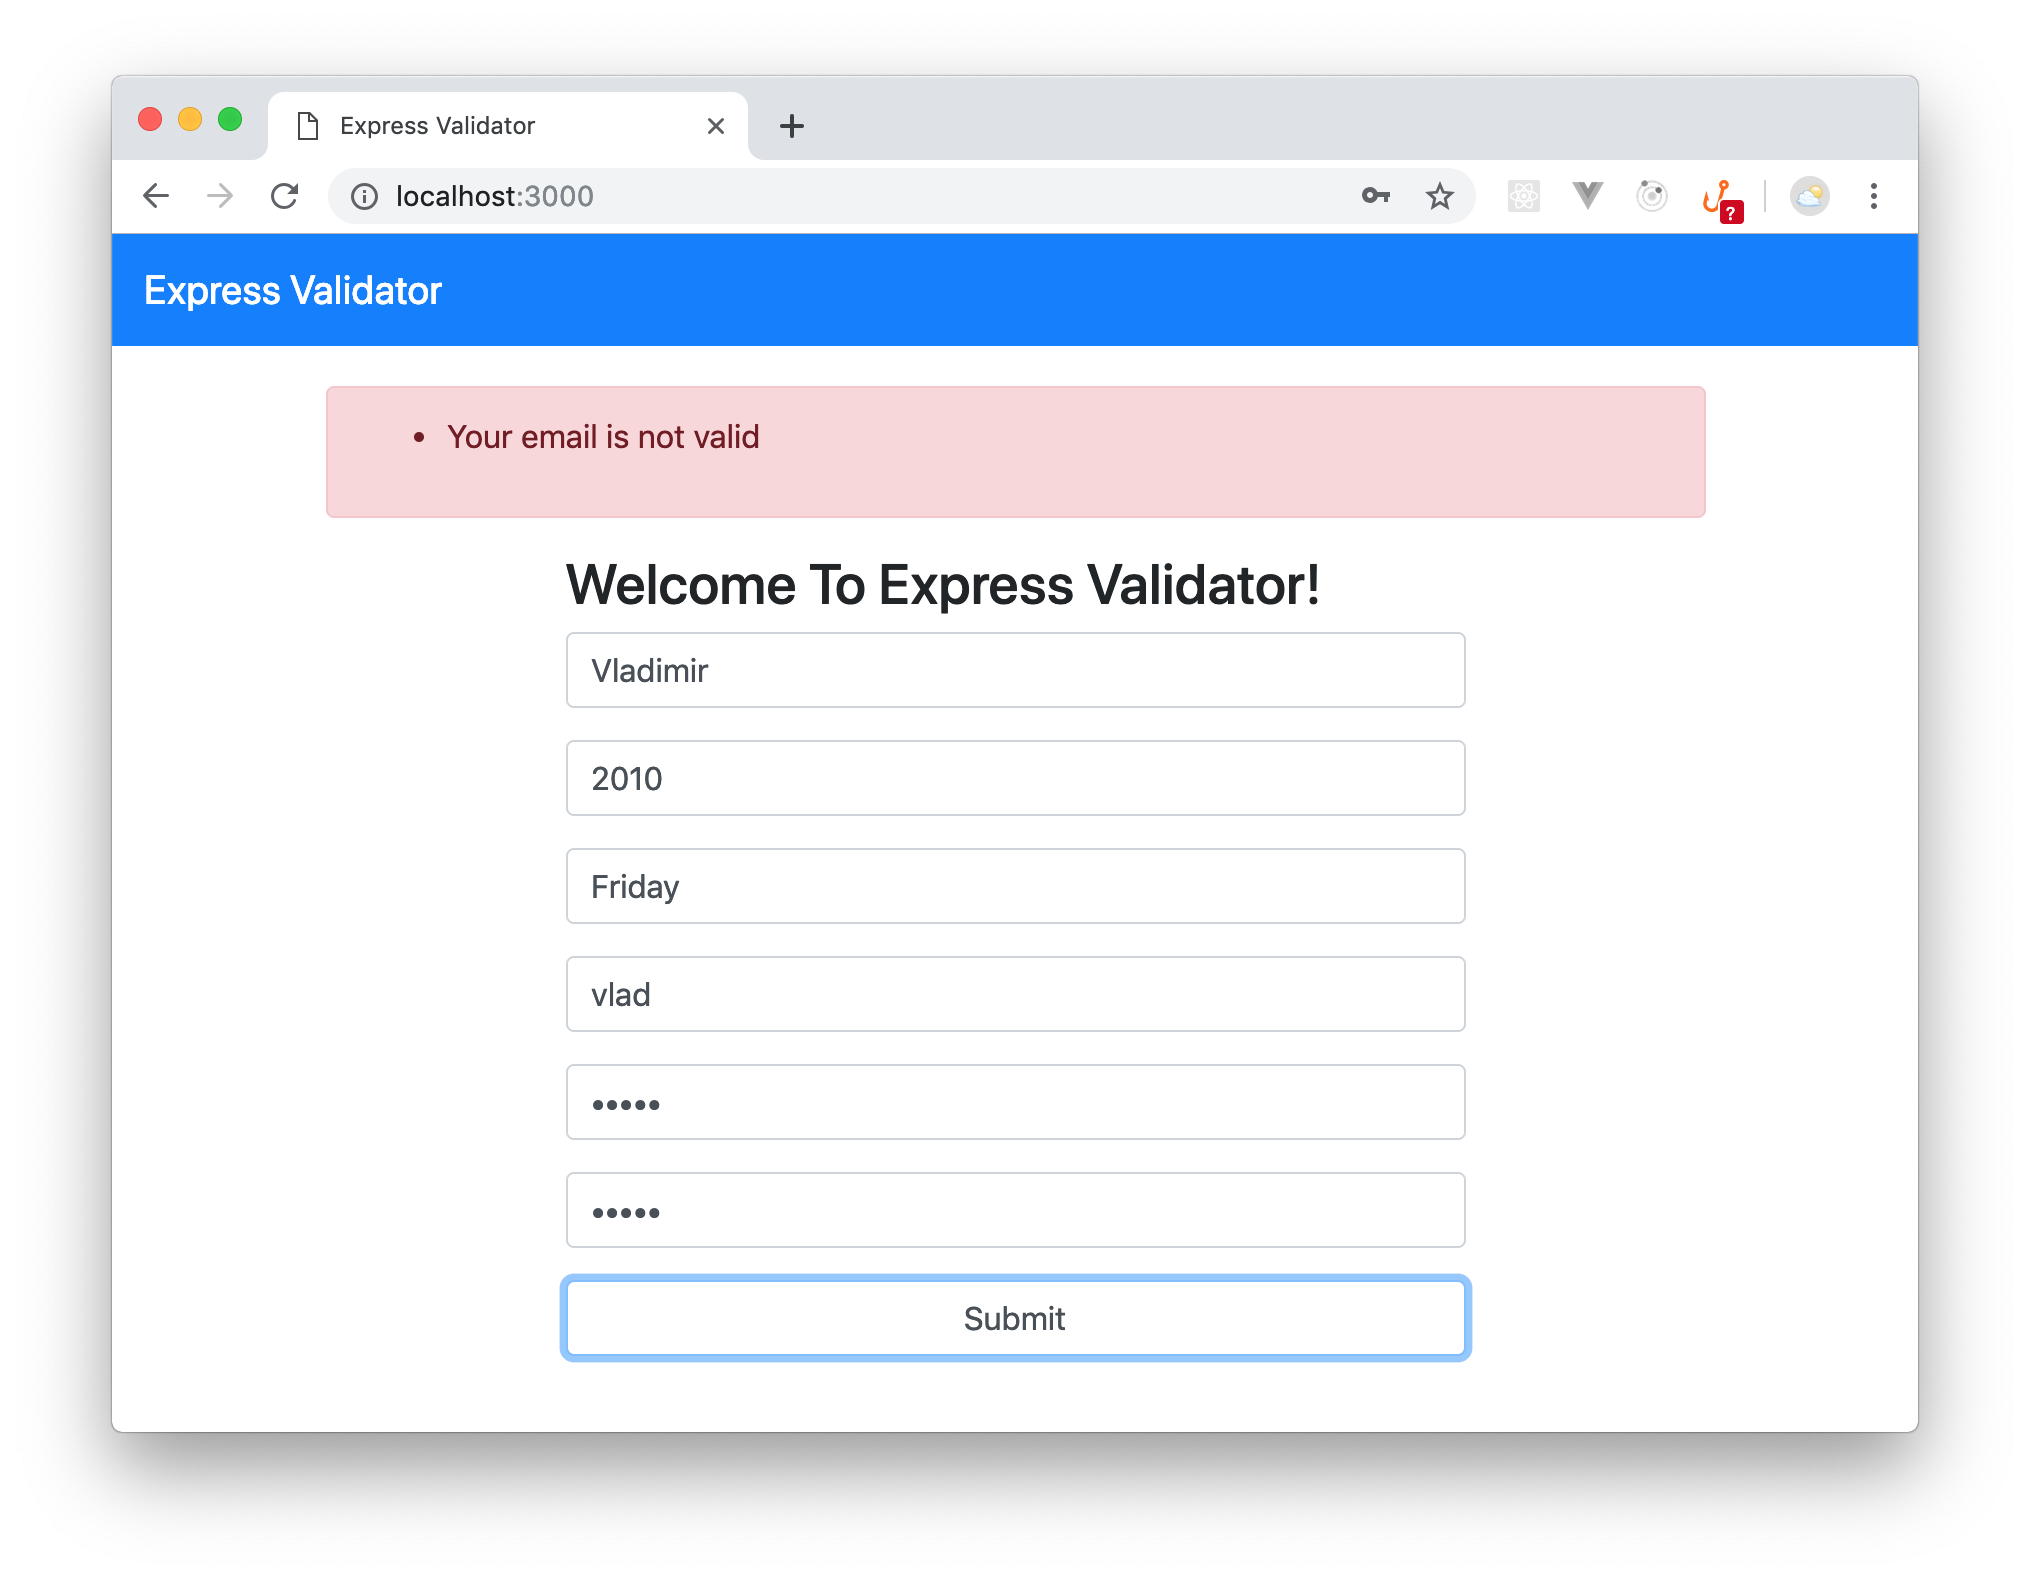
]Then, after restarting the app, if you enter an invalid email on your homepage you will get an error message:
Sanitizing fields with trim and escape
With Express Validator, you can also trim away spaces from your data and escape special characters using the trim() and escape() functions. The escape() function can really come in handy when protecting yourself from cross-site scripting attacks. To add this feature to your app, refactor the call to check('name') as follows:
[
  // ... leave other validations untouched ...

  check('name').exists().isLength({min: 5}).trim().escape().withMessage('Name must have more than 5 characters'),
]
To test this, the starter project came with code that prints every request body to the console after validation. So, imagine a malicious user types the following JavaScript code in your name field: <script> alert("hello, there");</script>. By using escape you will have no problem, as the name that you will get in your backend will look like:
<script> alert("hello, there");</script>That is, Express Validator transformed the malicious code into special HTML characters. Amazing, right?
Validating with custom validators
Although Express Validator offers a bunch of solutions out of the box for you, chances are you will need to implement some custom validation. For example, imagine you need to make sure that the password field matches the confirmPassword field. To do that, you can use the custom() validation function as follows:
[
  // ... leave other validations untouched ...

  check('confirmPassword', 'Passwords do not match').custom((value, {req}) => (value === req.body.password)),
]
The custom function takes in a function (an arrow function in this case) as an argument and checks if the value of the confirmPassword is the same as the value of the req.body.password field. To see this in action, restart your app, then enter a different password and you should get the message saying that "passwords do not match".
Conclusion
In this article, you learned how to use the Express Validator middleware to validate and sanitize user data in an Express application. Guess what? You only scratched the surface of what is possible with Express Validator. Aside from learning more validation and sanitization functions, you can learn how to add wildcards to your validations, do schema validation and whole body validation from Express Validator's documentation. I will love to see what you build with Express Validator.
About Auth0
Auth0 by Okta takes a modern approach to customer identity and enables organizations to provide secure access to any application, for any user. Auth0 is a highly customizable platform that is as simple as development teams want, and as flexible as they need. Safeguarding billions of login transactions each month, Auth0 delivers convenience, privacy, and security so customers can focus on innovation. For more information, visit https://auth0.com.


