---
title: "Full Stack Java with React, Spring Boot, and JHipster"
description: "This tutorial shows you how to create a slick-looking, full-stack, secure application using React, Spring Boot, and JHipster."
authors:
  - name: "Matt Raible"
    url: "https://auth0.com/blog/authors/matt-raible/"
date: "Jan 27, 2022"
category: "Developers,Tutorial,Java"
tags: ["reactjs", "react", "spring", "java", "jhipster"]
url: "https://auth0.com/blog/full-stack-java-with-react-spring-boot-and-jhipster/"
---

# Full Stack Java with React, Spring Boot, and JHipster

If you search for "Full Stack Java" on the internet, you'll likely find a lot of recruiting, courses, and jobs. Being a full-stack developer can be exciting because you can create the backend and frontend of an app all by yourself. There is business logic and algorithms as well as like styling, making things look good, and securing everything. It also pays pretty well. Today, I'm going to show you how you can be a full-stack Java developer with Spring Boot, React, and JHipster.

**Prerequisites:**

- [Node.js 14+](https://nodejs.org/)
- [Java 11+](https://sdkman.io)
- [Docker Compose](https://docs.docker.com/compose/install/)

If you're on Windows, you may need to install the [Windows Subsystem for Linux](https://docs.microsoft.com/en-us/windows/wsl/about) for some commands to work.

I recommend using SDKMAN to manage your OpenJDK installations. Just run `sdk install java 11.0.2-open` to install Java 11 and `sdk install java 17-open` for Java 17.

This tutorial won't provide the nitty-gritty details on how to write code in Java, React, or Spring Boot. That's because JHipster will write most of the code for you! However, if you're brand new to programming with these technologies, I recommend the following resources:

* [Oracle's Learn Java Tutorials](https://dev.java/learn/)
* [Spring Guides](https://spring.io/guides)
* [Tutorial: Intro to React](https://reactjs.org/tutorial/tutorial.html)

You can skip around between sections of this tutorial using the table of contents below. 

You can also clone [the completed example](https://github.com/oktadev/auth0-full-stack-java-example) and follow along that way.

```
git clone https://github.com/oktadev/auth0-full-stack-java-example
```

If you're more of a visual learner, you can watch the screencast below from the [OktaDev YouTube channel](https://youtu.be/PECnQs5bVbQ).

<AmpContent>
<amp-youtube
    data-videoid="PECnQs5bVbQ"
    layout="responsive"
    width="480" height="270">
</amp-youtube>
</AmpContent>

<NonAmpContent>
<div class='embed-container' style="position: relative; padding-bottom: 56.25%; height: 0; overflow: hidden; max-width: 100%;margin-bottom:40px;"><iframe style="position: absolute; top: 0; left: 0; width: 100%; height: 100%;" src='https://www.youtube.com/embed/PECnQs5bVbQ' frameborder='0' allowfullscreen></iframe></div>
</NonAmpContent>

## Full Stack Development with React and Spring Boot

One of the easiest ways to get started with React is by using [Create React App](https://create-react-app.dev/) (CRA). You install it locally, then run `create-react-app <project>` to generate a React application with minimal dependencies. It uses webpack under-the-covers to build the project, launch a web server, and run its tests.

Spring Boot has a similar tool called [Spring Initializr](https://start.spring.io/). Spring Initializer is a bit different than CRA because it's a website (and API) that you can create applications with.

Today, I'll show you how to build a Flickr clone with React and Spring Boot. However, I'm going to cheat. Rather than building everything using the aforementioned tools, I'm going to use JHipster. JHipster is an application generator that initially only supported Angular and Spring Boot. Now it supports Angular, React, and Vue for the frontend. JHipster also has support for [Kotlin, Micronaut, Quarkus, .NET, and Node.js](https://www.jhipster.tech/modules/official-blueprints/) on the backend.

In this tutorial, we'll use React since it seems to be [the most popular](https://trends.google.com/trends/explore?q=angular,react,vuejs) frontend framework nowadays. 

## Get Started with JHipster 7

If you haven't heard of [JHipster](https://www.jhipster.tech), boy do I have a treat for you! JHipster started as a Yeoman application generator back in 2013 and has grown to become a development platform. It allows you to quickly generate, develop, and deploy modern web apps and microservice architectures. Today, I'll show you how to build a Flickr clone with JHipster and lock it down with OAuth and OpenID Connect (OIDC).

To get started with JHipster, you'll need a fast internet connection and Node.js installed. The project recommends you use the latest LTS (Long Term Support) version, which is 14.7.6 at the time of this writing. To run the app, you'll need to have Java 11 installed. If you have Git installed, JHipster will auto-commit your project after creating it. This will allow you to upgrade between versions.

Run the following command to install JHipster:

```shell
npm i -g generator-jhipster@7
```

To create a full-stack app with JHipster, create a directory, and run `jhipster` in it:

```shell
mkdir full-stack-java
cd full-stack-java
jhipster
```

JHipster will prompt you for the type of application to create and what technologies you'd like to include. For this tutorial, make the following choices:

| Question | Answer |
|---|---|
| Type of application? | `Monolithic application` |
| Name? | `flickr2` |
| Spring WebFlux? | `No` |
| Java package name? | `com.auth0.flickr2`  |
| Type of authentication? | `OAuth 2.0 / OIDC` |
| Type of database? | `SQL` |
| Production database? | `PostgreSQL` |
| Development database? | `H2 with disk-based persistence` |
| Which cache? | `Ehcache` |
| Use Hibernate 2nd level cache? | `Yes` |
| Maven or Gradle? | `Maven` |
| Use the JHipster Registry? | `No` |
| Other technologies? | `<blank>` |
| Client framework? | `React` |
| Admin UI? | `Yes` |
| Bootswatch theme? | `United` > `Dark` |
| Enable i18n? | `Yes` |
| Native language of application? | `English` |
| Additional languages? | Your choice! |
| Additional testing frameworks? | `Cypress` |
| Install other generators? | `No` |

<br \>
Press **Enter**, and JHipster will create your app in the current directory and run `npm install` to install all the dependencies specified in `package.json`.

### Verify Everything Works with Cypress and Keycloak

When you choose OAuth 2.0 and OIDC for authentication, the users are stored outside of the application rather than in it. You need to configure an identity provider (IdP) to store your users and allow your app to retrieve information about them. By default, JHipster ships with a Keycloak file for Docker Compose. A default set of users and groups is imported at startup, and it has a client registered for your JHipster app.

Here's what the `keycloak.yml` looks like in your app's `src/main/docker` directory:

```yaml
# This configuration is intended for development purpose; it's **your** responsibility
# to harden it for production
version: '3.8'
services:
  keycloak:
    image: jboss/keycloak:15.0.2
    command:
      [
          '-b',
          '0.0.0.0',
          '-Dkeycloak.migration.action=import',
          '-Dkeycloak.migration.provider=dir',
          '-Dkeycloak.migration.dir=/opt/jboss/keycloak/realm-config',
          '-Dkeycloak.migration.strategy=OVERWRITE_EXISTING',
          '-Djboss.socket.binding.port-offset=1000',
          '-Dkeycloak.profile.feature.upload_scripts=enabled',
      ]
    volumes:
      - ./realm-config:/opt/jboss/keycloak/realm-config
    environment:
      - KEYCLOAK_USER=admin
      - KEYCLOAK_PASSWORD=admin
      - DB_VENDOR=h2
    # If you want to expose these ports outside your dev PC,
    # remove the "127.0.0.1:" prefix
    ports:
      - 127.0.0.1:9080:9080
      - 127.0.0.1:9443:9443
      - 127.0.0.1:10990:10990
```

Start Keycloak with the following command in your project's root directory.

```shell
docker-compose -f src/main/docker/keycloak.yml up -d
```

You can verify everything works by starting your app with Maven:

```shell
./mvnw
```

Open another terminal to run your new app's Cypress tests:

```shell
npm run e2e
```

You should see output like the following:

```shell
  (Run Finished)

       Spec                                              Tests  Passing  Failing  Pending  Skipped
  ┌────────────────────────────────────────────────────────────────────────────────────────────────┐
  │ ✔  administration/administration.spec.      00:12        5        5        -        -        - │
  │    ts                                                                                          │
  └────────────────────────────────────────────────────────────────────────────────────────────────┘
    ✔  All specs passed!                        00:12        5        5        -        -        -
```

## Change Your Identity Provider to Auth0

JHipster uses Spring Security's OAuth 2.0 and OIDC support to configure which IdP it uses. When using Spring Security with Spring Boot, you can configure most settings in a properties file. You can even override properties with environment variables.

To switch from Keycloak to Auth0, you only need to override the default properties (for Spring Security OAuth). You don't even need to write any code!

To see how it works, create a `.auth0.env` file in the root of your project, and fill it with the code below to override the default OIDC settings:

```shell
export SPRING_SECURITY_OAUTH2_CLIENT_PROVIDER_OIDC_ISSUER_URI=https://<your-auth0-domain>/
export SPRING_SECURITY_OAUTH2_CLIENT_REGISTRATION_OIDC_CLIENT_ID=<your-client-id>
export SPRING_SECURITY_OAUTH2_CLIENT_REGISTRATION_OIDC_CLIENT_SECRET=<your-client-secret>
export JHIPSTER_SECURITY_OAUTH2_AUDIENCE=https://<your-auth0-domain>/api/v2/
```

⚠️ **WARNING:** Modify your existing `.gitignore` file to have `*.env` so you don't accidentally check in your secrets!

You'll need to create a new web application in Auth0 and fill in the `<...>` placeholders before this works. 

### Create an OpenID Connect App on Auth0

Log in to your Auth0 account (or [sign up](https://a0.to/blog_signup) if you don't have an account). You should have a unique domain like `dev-xxx.eu.auth0.com`. 

Press the **Create Application** button in [Applications section](https://manage.auth0.com/#/applications). Use a name like `JHipster Baby!`, select `Regular Web Applications`, and click **Create**.

Switch to the **Settings** tab and configure your application settings:

- Allowed Callback URLs: `http://localhost:8080/login/oauth2/code/oidc`
- Allowed Logout URLs: `http://localhost:8080/`

Scroll to the bottom and click **Save Changes**.

In the [roles](https://manage.auth0.com/#/roles) section, create new roles named `ROLE_ADMIN` and `ROLE_USER`.

Create a new user account in the [users](https://manage.auth0.com/#/users) section. Click on the **Role** tab to assign the roles you just created to the new account. 

_Make sure your new user's email is verified before attempting to log in!_

Next, head to **Auth Pipeline** > **Rules** > **Create**. Select the `Empty rule` template. Provide a meaningful name like `Group claims` and replace the Script content with the following.

```js
function(user, context, callback) {
  user.preferred_username = user.email;
  const roles = (context.authorization || {}).roles;

  function prepareCustomClaimKey(claim) {
    return `https://www.jhipster.tech/${claim}`;
  }

  const rolesClaim = prepareCustomClaimKey('roles');

  if (context.idToken) {
    context.idToken[rolesClaim] = roles;
  }

  if (context.accessToken) {
    context.accessToken[rolesClaim] = roles;
  }

  callback(null, user, context);
}
```

This code is adding the user's roles to a custom claim (prefixed with `https://www.jhipster.tech/roles`). This claim is mapped to Spring Security authorities in `SecurityUtils.java`.

```java
public static List<GrantedAuthority> extractAuthorityFromClaims(Map<String, Object> claims) {
    return mapRolesToGrantedAuthorities(getRolesFromClaims(claims));
}

@SuppressWarnings("unchecked")
private static Collection<String> getRolesFromClaims(Map<String, Object> claims) {
    return (Collection<String>) claims.getOrDefault(
        "groups",
        claims.getOrDefault("roles", claims.getOrDefault(CLAIMS_NAMESPACE + "roles", new ArrayList<>()))
    );
}

private static List<GrantedAuthority> mapRolesToGrantedAuthorities(Collection<String> roles) {
    return roles.stream().filter(role -> role.startsWith("ROLE_")).map(SimpleGrantedAuthority::new).collect(Collectors.toList());
}
```

The `SecurityConfiguration.java` class has a bean that calls this method to configure a user's roles from their OIDC data.

```java
@Bean
public GrantedAuthoritiesMapper userAuthoritiesMapper() {
    return authorities -> {
        Set<GrantedAuthority> mappedAuthorities = new HashSet<>();

        authorities.forEach(authority -> {
            // Check for OidcUserAuthority because Spring Security 5.2 returns
            // each scope as a GrantedAuthority, which we don't care about.
            if (authority instanceof OidcUserAuthority) {
                OidcUserAuthority oidcUserAuthority = (OidcUserAuthority) authority;
                mappedAuthorities.addAll(SecurityUtils.extractAuthorityFromClaims(oidcUserAuthority.getUserInfo().getClaims()));
            }
        });
        return mappedAuthorities;
    };
}
```

Click **Save changes** to continue.

ℹ️ **NOTE**: Want to have all these steps automated for you? Vote for [this issue](https://github.com/auth0/auth0-cli/issues/351) in the Auth0 CLI project.

### Run Your JHipster App with Auth0

Stop your JHipster app using **Ctrl+C**, set your Auth0 properties in `.auth0.env`, and start your app again.

```shell
source .auth0.env
./mvnw
```

_Voilà_ - your full-stack app is now using Auth0! Open your favorite browser to `http://localhost:8080`. 

![JHipster default homepage](https://images.ctfassets.net/23aumh6u8s0i/1Zma6iIU9n6P4CguG8CcQh/e7faa31be47593107329d0128d947b0a/04_jhipster-homepage.png)

You should see your app's homepage with a link to sign in. Click **sign in**, and you'll be redirected to Auth0 to log in.

![Auth0 Login](https://images.ctfassets.net/23aumh6u8s0i/M4rpafdRgJwaqkvm7gaZl/578bd56bd6c85bbdc180aeb7537d3a63/02_auth0-login.png)

After entering your credentials, you'll be redirected back to your app. 

![Authenticated](https://images.ctfassets.net/23aumh6u8s0i/7CBL7VFB4PSkcazRLSIyEG/6da5d9f23d170ba3c9b1e5c492220af7/05_jhipster-logged-in.png)

## Test Your Full Stack Java App with Cypress

JHipster has Auth0 support built-in, so you can specify your credentials for Cypress tests and automate your UI testing!

To do this, open a new terminal window, specify the credentials for the Auth0 user you just created, and run `npm run e2e`.

```shell
export CYPRESS_E2E_USERNAME=<new-username>
export CYPRESS_E2E_PASSWORD=<new-password>
npm run e2e
```

**TIP:** If you want to use a `.env` file for your environment variables, you can use [cypress-dotenv](https://www.npmjs.com/package/cypress-dotenv). You can also put these values in `cypress.json`, but since this file will be in source control, it's a bad practice to put your secrets in it.

Everything should pass in around a minute.

```shell
       Spec                                              Tests  Passing  Failing  Pending  Skipped
  ┌────────────────────────────────────────────────────────────────────────────────────────────────┐
  │ ✔  administration/administration.spec.      00:31        5        5        -        -        - │
  │    ts                                                                                          │
  └────────────────────────────────────────────────────────────────────────────────────────────────┘
    ✔  All specs passed!                        00:31        5        5        -        -        -

Execution time: 44 s.
```

Shut down the process running your JHipster app - it's time to create some data handling for your Flickr clone!

## Create Entities to allow CRUD on Photos

I've talked a lot about how to secure your application, but we haven't done anything with photos! JHipster has a JDL (JHipster Domain Language) feature that allows you to model the data in your app and generate entities from it. You can use the [JDL Studio](https://start.jhipster.tech/jdl-studio/) to do this online and save it locally once you've finished.

My data model for this app has `Album`, `Photo`, and `Tag` entities and sets up relationships between them. Below is a screenshot of what it looks like in JDL Studio.

![JDL Studio](https://images.ctfassets.net/23aumh6u8s0i/73z2OABdygvcVuMzVCzjIP/7d9a84eb719ecac66290b367ecaa3682/03_jdl-studio.png)

Copy the JDL below and save it in a `flickr2.jdl` file in the root directory of your project.

```
entity Album {
  title String required
  description TextBlob
  created Instant
}

entity Photo {
  title String required
  description TextBlob
  image ImageBlob required
  height Integer
  width Integer
  taken Instant
  uploaded Instant
}

entity Tag {
  name String required minlength(2)
}

relationship ManyToOne {
  Album{user(login)} to User
  Photo{album(title)} to Album
}

relationship ManyToMany {
  Photo{tag(name)} to Tag{photo}
}

paginate Album with pagination
paginate Photo, Tag with infinite-scroll
```

You can generate entities and [CRUD](https://en.wikipedia.org/wiki/Create,_read,_update_and_delete) code (Java for Spring Boot; TypeScript and JSX for React) by using the following command:

```shell
jhipster jdl flickr2.jdl
```

When prompted, type `a` to allow overwriting of existing files.

This process will create Liquibase changelog files (to create your database tables), entities, repositories, Spring MVC controllers, and all the React code necessary to create, read, update, and delete your entities. It'll even generate JUnit unit tests, Jest unit tests, and Cypress end-to-end tests!

After the process completes, you can restart your app, log in, and browse through the **Entities** menu. Try adding some data to confirm everything works.

By now, you can see that JHipster is pretty powerful. It recognized that you had an image property of `ImageBlob` type and created the logic necessary to upload and store images in your database! _Booyah!_

## Add Image EXIF Processing in Your Spring Boot API

The `Photo` entity has a few properties that can be calculated by reading the uploaded photo's [EXIF](https://yourphotoadvisor.com/understanding-exif-data-what-it-is-and-what-to-do-with-it/) (Exchangeable Image File Format) data. You might ask, how do you do that in Java?

Thankfully, Drew Noakes created a [metadata-extractor](https://github.com/drewnoakes/metadata-extractor) library to do just that. Add a dependency on Drew's library to your `pom.xml`:

```xml
<dependency>
    <groupId>com.drewnoakes</groupId>
    <artifactId>metadata-extractor</artifactId>
    <version>2.16.0</version>
</dependency>
```

Then modify the `PhotoResource#createPhoto()` method to set the metadata when an image is uploaded.

```java
import com.drew.imaging.ImageMetadataReader;
import com.drew.imaging.ImageProcessingException;
import com.drew.metadata.Metadata;
import com.drew.metadata.MetadataException;
import com.drew.metadata.exif.ExifSubIFDDirectory;
import com.drew.metadata.jpeg.JpegDirectory;

import javax.xml.bind.DatatypeConverter;
import java.io.BufferedInputStream;
import java.io.ByteArrayInputStream;
import java.io.IOException;
import java.io.InputStream;

import java.time.Instant;
import java.util.Date;

public class PhotoResource {
    ...

    public ResponseEntity<Photo> createPhoto(@Valid @RequestBody Photo photo) throws Exception {
        log.debug("REST request to save Photo : {}", photo);
        if (photo.getId() != null) {
            throw new BadRequestAlertException("A new photo cannot already have an ID", ENTITY_NAME, "idexists");
        }

        try {
            photo = setMetadata(photo);
        } catch (ImageProcessingException ipe) {
            log.error(ipe.getMessage());
        }

        Photo result = photoRepository.save(photo);
        return ResponseEntity
            .created(new URI("/api/photos/" + result.getId()))
            .headers(HeaderUtil.createEntityCreationAlert(applicationName, true, ENTITY_NAME, result.getId().toString()))
            .body(result);
    }

    private Photo setMetadata(Photo photo) throws ImageProcessingException, IOException, MetadataException {
        String str = DatatypeConverter.printBase64Binary(photo.getImage());
        byte[] data2 = DatatypeConverter.parseBase64Binary(str);
        InputStream inputStream = new ByteArrayInputStream(data2);
        BufferedInputStream bis = new BufferedInputStream(inputStream);
        Metadata metadata = ImageMetadataReader.readMetadata(bis);
        ExifSubIFDDirectory directory = metadata.getFirstDirectoryOfType(ExifSubIFDDirectory.class);

        if (directory != null) {
            Date date = directory.getDateDigitized();
            if (date != null) {
                photo.setTaken(date.toInstant());
            }
        }

        if (photo.getTaken() == null) {
            log.debug("Photo EXIF date digitized not available, setting taken on date to now...");
            photo.setTaken(Instant.now());
        }

        photo.setUploaded(Instant.now());

        JpegDirectory jpgDirectory = metadata.getFirstDirectoryOfType(JpegDirectory.class);
        if (jpgDirectory != null) {
            photo.setHeight(jpgDirectory.getImageHeight());
            photo.setWidth(jpgDirectory.getImageWidth());
        }

        return photo;
    }
    ...
}
```

Since you're extracting the information, you can remove the fields from the UI and tests so the user cannot set these values.

In `src/main/webapp/app/entities/photo/photo-update.tsx`, hide the metadata so users can't edit it. Rather than displaying the `height`, `width`, `taken`, and `uploaded` values, hide them. You can do this by searching for `photo-height`, grabbing the elements (and its following three elements), and adding them to a `metadata` constant just after `defaultValues()` lambda function.

```tsx
const defaultValues = () =>
  ...

const metadata = (
  <div>
    <ValidatedField label={translate('flickr2App.photo.height')} id="photo-height" name="height" data-cy="height" type="text" />
    <ValidatedField label={translate('flickr2App.photo.width')} id="photo-width" name="width" data-cy="width" type="text" />
    <ValidatedField
      label={translate('flickr2App.photo.taken')}
      id="photo-taken"
      name="taken"
      data-cy="taken"
      type="datetime-local"
      placeholder="YYYY-MM-DD HH:mm"
    />
    <ValidatedField
      label={translate('flickr2App.photo.uploaded')}
      id="photo-uploaded"
      name="uploaded"
      data-cy="uploaded"
      type="datetime-local"
      placeholder="YYYY-MM-DD HH:mm"
    />
  </div>
);
const metadataRows = isNew ? '' : metadata;

return ( ... );
```

Then, in the `return` block, remove the JSX between the `image` property and `album` property and replace it with `{metadataRows}`.


```tsx
<ValidatedBlobField
  label={translate('flickr2App.photo.image')}
  id="photo-image"
  name="image"
  data-cy="image"
  isImage
  accept="image/*"
  validate={{
    required: { value: true, message: translate('entity.validation.required') },
  }}
/>
{metadataRows}
<ValidatedField id="photo-album" name="albumId" data-cy="album" label={translate('flickr2App.photo.album')} type="select">
  <option value="" key="0" />
  {albums
    ? albums.map(otherEntity => (
      <option value={otherEntity.id} key={otherEntity.id}>
        {otherEntity.title}
      </option>
    ))
    : null}
</ValidatedField>
```


In `src/test/javascript/cypress/integration/entity/photo.spec.ts`, remove the code that sets the data in these fields:

```ts
cy.get(`[data-cy="height"]`).type('99459').should('have.value', '99459');
cy.get(`[data-cy="width"]`).type('61514').should('have.value', '61514');
cy.get(`[data-cy="taken"]`).type('2021-10-11T16:46').should('have.value', '2021-10-11T16:46');
cy.get(`[data-cy="uploaded"]`).type('2021-10-11T15:23').should('have.value', '2021-10-11T15:23'););
```

Stop your Maven process, run `source .auth0.env`, then `./mvnw` again. Open a new terminal window, set your Auth0 credentials, and run `npm run e2e` to make sure everything still works. 

```shell
export CYPRESS_E2E_USERNAME=<auth0-username>
export CYPRESS_E2E_PASSWORD=<auth0-password>
npm run e2e
```

ℹ️ **NOTE**: If you experience authentication errors in your Cypress tests, it's likely because you've violated Auth0's [Rate Limit Policy](https://auth0.com/docs/support/policies/rate-limit-policy). As a workaround, I recommend you use Keycloak for Cypress tests. You can do this by opening a new terminal window and starting your app there using `./mvnw`. Then, open a second terminal window and run `npm run e2e`.  

If you upload an image you took with your smartphone, the height, width, and taken values should all be populated. If they're not, chances are your image doesn't have the data in it.

> Need some sample photos with EXIF data? You can download pictures of my 1966 VW Bus from [an album on Flickr](https://www.flickr.com/photos/mraible/albums/72157689027458320).

## Add a React Photo Gallery

You've added metadata extraction to your backend, but your photos still display in a list rather than in a grid (like Flickr). To fix that, you can use the [React Photo Gallery](https://github.com/neptunian/react-photo-gallery) component. Install it using npm:

```bash
npm i react-photo-gallery@8 --force
```

In `src/main/webapp/app/entities/photo/photo.tsx`, add an import for `Gallery`:

```ts
import Gallery from 'react-photo-gallery';
```

Then add the following just after `const { match } = props;`. This adds the photos to a set with source, height, and width information.

```ts
const photoSet = photoList.map(photo => ({
  src: `data:${photo.imageContentType};base64,${photo.image}`,
  width: photo.height > photo.width ? 3 : photo.height === photo.width ? 1 : 4,
  height: photo.height > photo.width ? 4 : photo.height === photo.width ? 1 : 3
}));
```

Next, add a `<Gallery>` component right after the closing `</h2>`.

```tsx
return (
  <div>
    <h2 id="photo-heading" data-cy="PhotoHeading">
      ...
    </h2>
    <Gallery photos={photoSet} />
    ...
);
```

Save all your changes and restart your app.

```shell
source .auth0.env
./mvnw
```

Log in and navigate to **Entities** > **Photo** in the top nav bar. You will see a plethora of photos loaded by [Liquibase](https://www.liquibase.org/) and [faker.js](https://marak.github.io/faker.js/). To make a clean screenshot without this data, I modified `src/main/resources/config/application-dev.yml` to remove the "faker" context for Liquibase.

```yaml
liquibase:
  # Append ', faker' to the line below if you want sample data to be loaded automatically
  contexts: dev
```

Stop your Spring Boot backend and run `rm -r target/h2db` to clear out your database (or just delete the `target/h2db` directory). Restart your backend.

Now you should be able to upload photos and see the results in a nice grid at the top of the list.

![Gallery with Photos](https://images.ctfassets.net/23aumh6u8s0i/6RIASq72N4JN9b3ya5UVra/c0530addbbf28020d1a42f6b18ea0bae/08_photo-gallery.jpg)

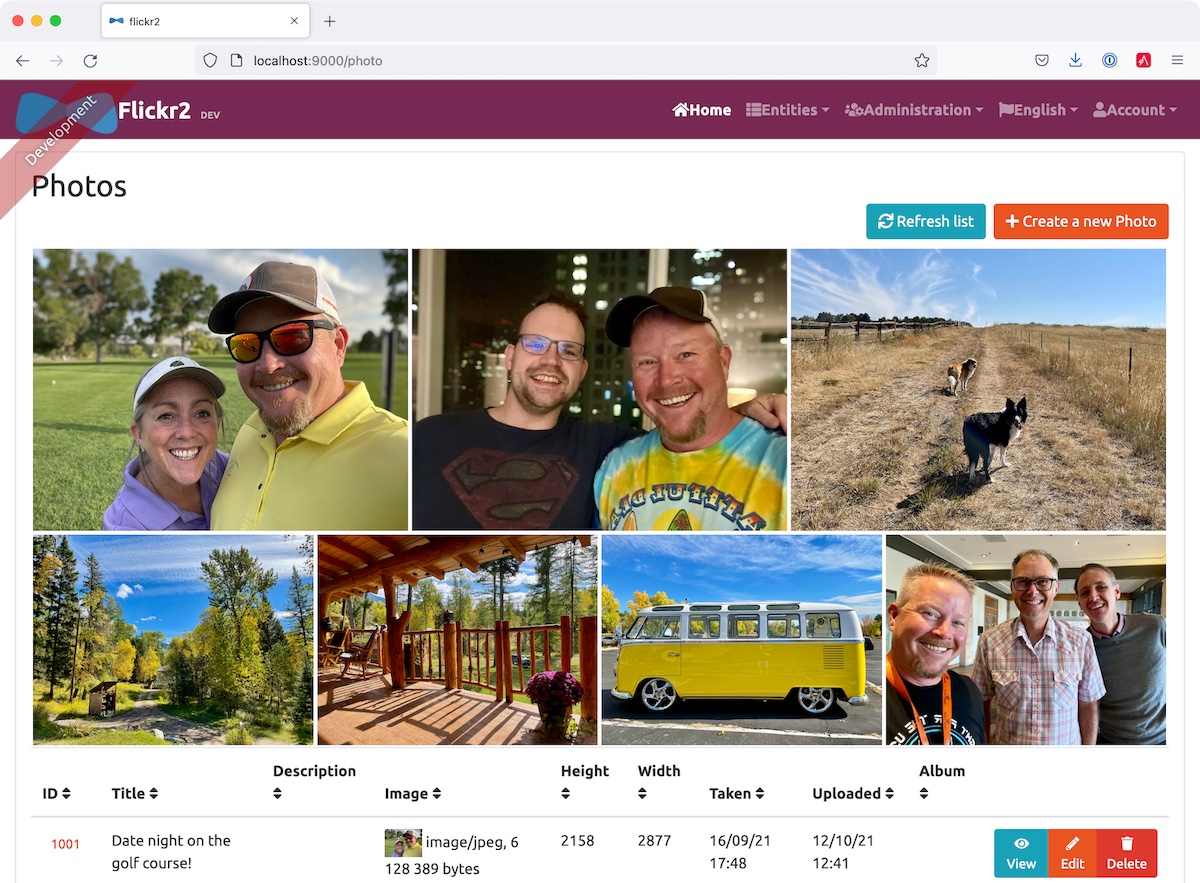
You can also add a "lightbox" feature to the grid so you can click on photos and zoom in. The [React Photo Gallery docs](https://neptunian.github.io/react-photo-gallery/) shows how to do this. I've integrated it into the example for this post, but I won't show the code here for the sake of brevity. You can see the [final `photo.tsx` with Lightbox added on GitHub](https://github.com/oktadev/auth0-full-stack-java-example/blob/main/src/main/webapp/app/entities/photo/photo.tsx) or a [diff of the necessary changes](https://github.com/oktadev/auth0-full-stack-java-example/commit/76dcf711816cb2f3455ba4b46264bf48002487f7).

## Make Your Full Stack Java App Into a PWA

Progressive Web Apps, aka PWAs, are the best way for developers to make their webapps load faster and more performant. In a nutshell, PWAs are websites that use recent web standards to allow for installation on a user's computer or device and deliver an app-like experience to those users. To make a web app into a PWA:

1. Your app must be served over HTTPS
2. Your app must register a service worker so it can cache requests and work offline
3. Your app must have a webapp manifest with installation information and icons

For HTTPS, you can [set up a certificate for localhost](https://letsencrypt.org/docs/certificates-for-localhost/) or (even better), deploy it to production! Cloud providers like Heroku will provide you with HTTPS out-of-the-box, but they won't _force_ HTTPS. To force HTTPS, open `src/main/java/com/auth0/flickr2/config/SecurityConfiguration.java` and add a rule to force a secure channel when an `X-Forwarded-Proto` header is sent.

```java
@Override
protected void configure(HttpSecurity http) throws Exception {
    http
        ...
    .and()
        .frameOptions()
        .deny()
    .and()
        .requiresChannel()
        .requestMatchers(r -> r.getHeader("X-Forwarded-Proto") != null)
        .requiresSecure()
    .and()
        .authorizeRequests()
        ...
}
```

The [workbox-webpack-plugin](https://developers.google.com/web/tools/workbox/modules/workbox-webpack-plugin) is configured already for generating a service worker, but it only works when running your app with a production profile. This is nice because it means your data isn't cached in the browser when you're developing.

To register a service worker, open `src/main/webapp/index.html` and uncomment the following block of code.

```html
<script>
  if ('serviceWorker' in navigator) {
    window.addEventListener('load', function () {
      navigator.serviceWorker.register('/service-worker.js').then(function () {
        console.log('Service Worker Registered');
      });
    });
  }
</script>
```

The final feature &mdash; a webapp manifest &mdash; is included at `src/main/webapp/manifest.webapp`. It defines an app name, colors, and icons. You might want to adjust these to fit your app.

## Deploy Your React + Spring Boot App to Heroku

To deploy your app to Heroku, you'll first need to install the [Heroku CLI](https://devcenter.heroku.com/articles/heroku-cli). You can confirm it's installed by running `heroku --version`.

> If you don't have a Heroku account, go to [heroku.com](https://www.heroku.com/) and sign up. Don't worry, it's free, and chances are you'll love the experience.

Run `heroku login` to log in to your account, then start the deployment process with JHipster:

```
jhipster heroku
```

This will start the [Heroku sub-generator](https://www.jhipster.tech/heroku/) that asks you a couple of questions about your app: what you want to name it and whether you want to deploy it to a US region or EU. Then it'll prompt you to choose between building locally or with Git on Heroku's servers. Choose Git, so you don't have to upload a fat JAR. When prompted to use Okta for OIDC, select `No`. Then, the deployment process will begin.

You'll be prompted to overwrite `pom.xml`—type `a` to allow overwriting all files.

If you have a stable and fast internet connection, your app should be live on the internet in around six minutes!

```
remote: -----> Compressing...
remote:        Done: 120.9M
remote: -----> Launching...
remote:        Released v7
remote:        https://flickr-2.herokuapp.com/ deployed to Heroku
remote:
remote: Verifying deploy... done.

To https://git.heroku.com/flickr-2.git
 * [new branch]      HEAD -> main

Your app should now be live. To view it, run
	heroku open
And you can view the logs with this command
	heroku logs --tail
After application modification, redeploy it with
	jhipster heroku
Congratulations, JHipster execution, is complete!
Sponsored with ❤️ by @oktadev.
Execution time: 6 min. 19 s.
```

### Configure for Auth0 and Analyze Your PWA Score with Lighthouse

To configure your app to work with Auth0 on Heroku, run the following command to set your Auth0 variables on Heroku.

```bash
heroku config:set \
  SPRING_SECURITY_OAUTH2_CLIENT_PROVIDER_OIDC_ISSUER_URI="https://<your-auth0-domain>/" \
  SPRING_SECURITY_OAUTH2_CLIENT_REGISTRATION_OIDC_CLIENT_ID="<your-client-id>" \
  SPRING_SECURITY_OAUTH2_CLIENT_REGISTRATION_OIDC_CLIENT_SECRET="<your-client-secret>" \
  JHIPSTER_SECURITY_OAUTH2_AUDIENCE="https://<your-auth0-domain>/api/v2/"
```

Then, log in to your Auth0 account, navigate to your app, and add your Heroku URLs as valid redirect URIs:

- Allowed Callback URLs: `https://flickr-2.herokuapp.com/login/oauth2/code/oidc`
- Allowed Logout URLs: `https://flickr-2.herokuapp.com`

After Heroku restarts your app, open it with `heroku open` and log in.

![Running on Heroku!](https://images.ctfassets.net/23aumh6u8s0i/3MDBfwDhZiuKW8uzrlm291/2c574c89ca11c7b853bf01d850f06ee9/09_app-on-heroku.png)

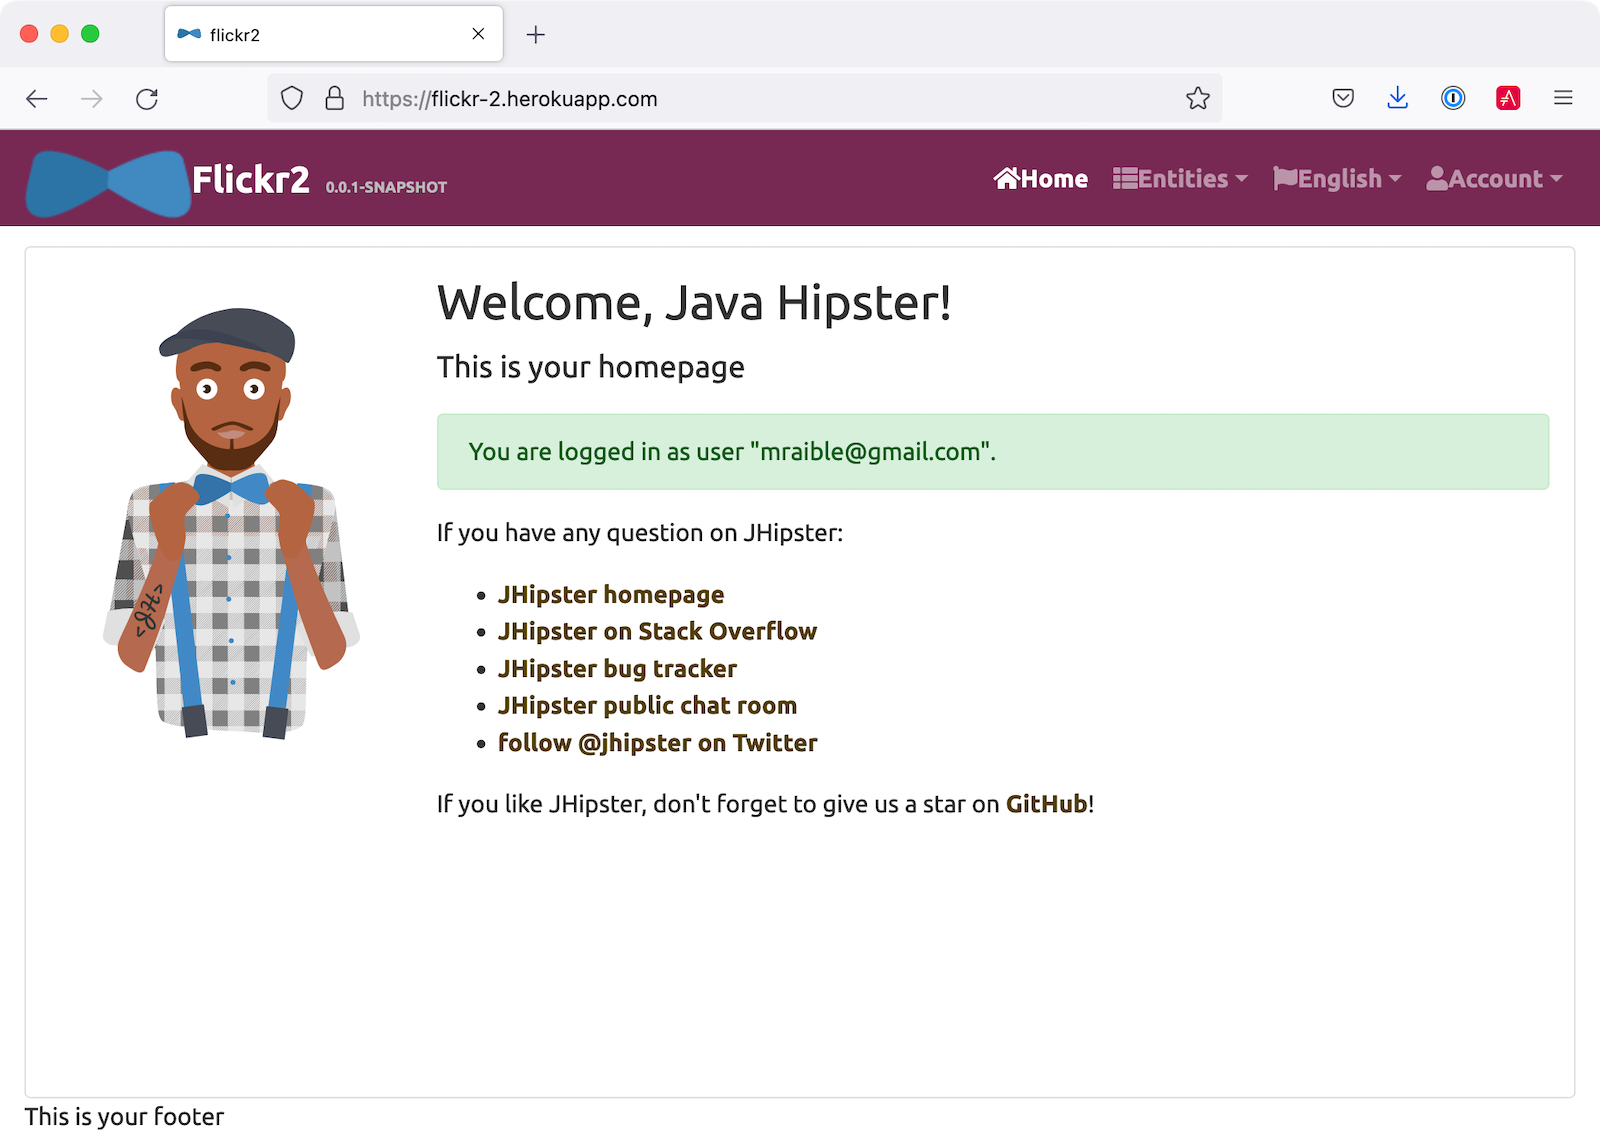
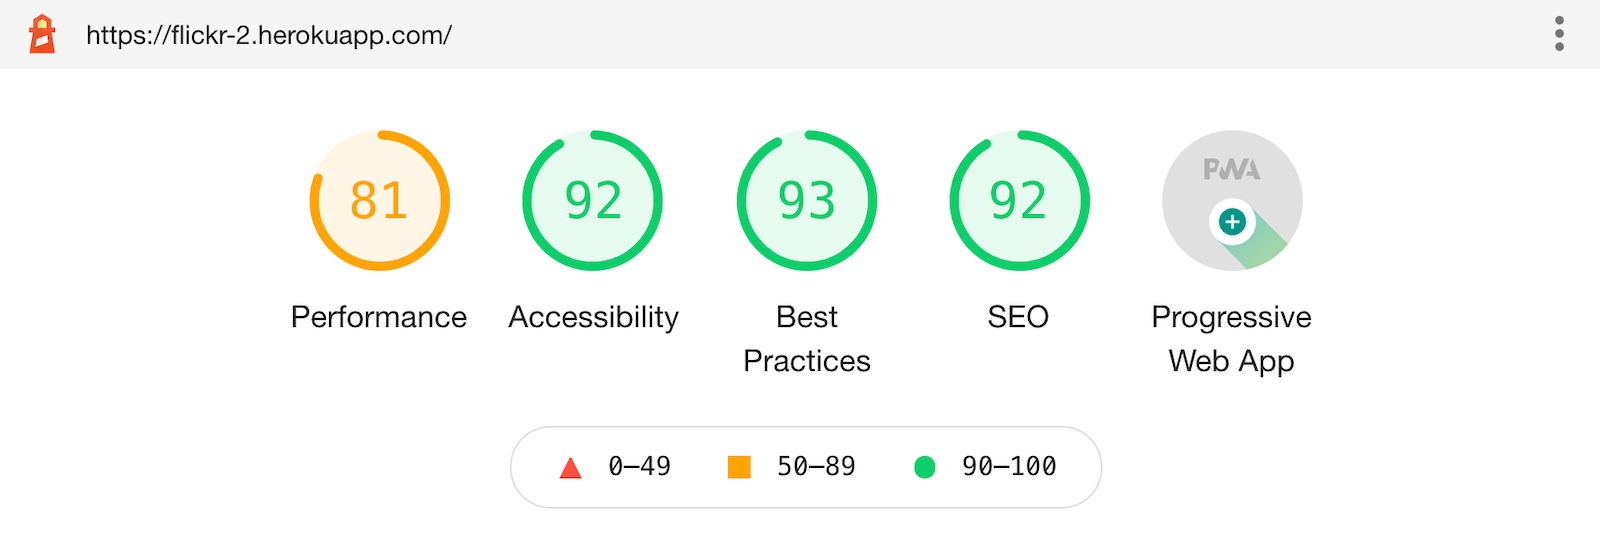
Then, test it with [Lighthouse](https://developers.google.com/web/tools/lighthouse/) (using the Lighthouse tab in Chrome developer tools). Looks pretty good, eh?! 💯

![Lighthouse Score 💯](https://images.ctfassets.net/23aumh6u8s0i/2udHZaYwD4vfVtTf9SrpzB/c6888183a1364142f5edca732a0ad02c/06_lighthouse-score.png)

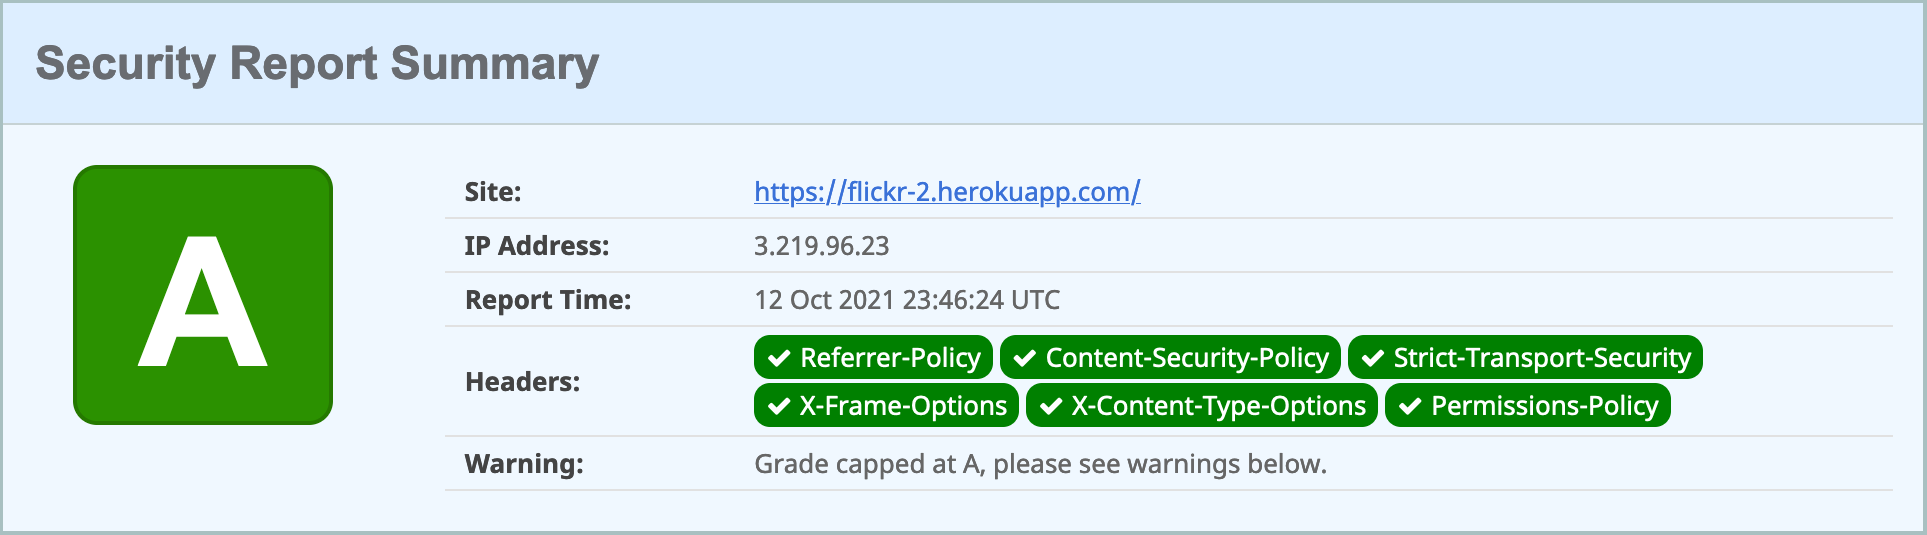
It's pretty darn secure too, at least according to [securityheaders.com](https://securityheaders.com).

![Security Headers on Heroku](https://images.ctfassets.net/23aumh6u8s0i/Y1O0MLjbMSojaSH1UOnuN/48d36a1abdb9007c0dfa2a45bd61057e/09_security-headers.png)

## Learn More About Full Stack Java Development

This tutorial shows you how to streamline full-stack Java development with JHipster. You developed a working application with a React frontend and a Spring Boot backend. You can find the app created in this tutorial on GitHub, in the [auth0-full-stack-java-example](https://github.com/oktadev/auth0-full-stack-java-example) repository.

You might also enjoy these related blog posts:

- [Learning Java as a First Language](/blog/2018/12/11/learning-java-first-language)
- [Reactive Java Microservices with Spring Boot and JHipster](/blog/2021/01/20/reactive-java-microservices)
- [Build and Secure an API with Spring Boot and Kotlin](https://auth0.com/blog/build-and-secure-an-api-with-spring-boot/)
- [The Complete Guide to React User Authentication with Auth0](https://auth0.com/blog/complete-guide-to-react-user-authentication/)

To see when we publish more developer topics on Auth0 and the Okta developer blog, follow [Auth0](https://twitter.com/auth0) and [OktaDev](https://twitter.com/oktadev) on Twitter.