


TL;DR: In this article, we're going to be creating a couple of very simple Node applications and hosting them on a DigitalOcean droplet using Dokku, an open-source PaaS. We'll also be looking at how to optimize the deployment using Docker.
Prerequisites
You do not strictly need any software other than Git and a text editor to follow along with this article, as most of the work is done on the Dokku server. As long as you have cloned the sample application, you can perform most of the steps in this tutorial.
However, installing Node and Docker is highly recommended as we're going to be doing some local testing before deployment to make sure that everything is working as it should.
If you would like to follow along, you should have the latest version of Node installed.
You should also install Docker for Developers for your operating system. Docker is a container platform that allows us to package up applications and services, distribute them and run them in a consistent environment. We're going to be using it in conjunction with Dokku to package up a Vue.js application and run it on a remote server.
As the process of deploying applications to a Dokku server revolves around Git, make sure you have Git installed on your system before you start.
"Learn how to easily set up a Dokku server and deploy applications to it using Git"
Tweet This

Introduction to Dokku
Dokku — The smallest PaaS implementation you've ever seen — is a piece of open-source software that "helps you build and manage the lifecycle of applications". It uses Docker under the hood to create and run applications inside containers. Dokku supports Ubuntu 14.04/16.04, Debian 8.2 and CentOS 7 platforms, and has a very small team of core maintainers. They have a variety of ways you can get in touch if you need help, including IRC and Slack.
They also have complete documentation available online.
How it works
In essence, it allows you as a developer to push applications to it using Git where it will build those applications for you, package them into a Docker container, and then manage the lifetime of that container on your behalf. It will also automatically configure Nginx so that your application can be reached, with its virtual hostname support.
When you push an application, it builds the app using the official Heroku Buildpacks, and so if your app already works on Heroku, it's probably going to work here.
If the buildpacks don't cater to your needs, you can customize the build process by providing your own Dockerfile, and Dokku will use that instead.
We're going to see both of these approaches to working with Dokku in this article.
Why use Dokku
Dokku provides a nice balance between cost (Dokku itself is open-source and free), features and control. With Dokku, you get a generously-featured platform on which to install your apps that supports Git deployment and lifetime management out-of-the-box. All of the configuration that enables those two things to work is taken care of for you. Dokku can be hosted on a $5 DigitalOcean droplet, and so the more apps you can host on this box, the more cost-effective it will be when compared to hosting them on other big-brand platforms.
To highlight some of the core features:
- Git deployment
- Customize the deployment with Dockerfiles
- Tarball deployment support
- Custom domain name support
- Configurable zero-downtime checks
- Rich command-line interface
- Customizable proxy management and Nginx config
- Nice abstraction over the Docker CLI
- Rich set of plugins that add much more capability to the platform, including Let's Encrypt, Slack, and for various database platforms such as MongoDB and PostgreSQL
Bear in mind that you do not have to use DigitalOcean to host your Dokku server — if you have an existing compatible Linux server that's not doing much, you could put it to good use by installing Dokku on it!
Gotchas
For Dokku, there is no official web interface for managing through a browser - it's command-line only. For some people, that may be a turn-off. Community attempts have been made to establish a web front-end for Dokku but none have really broken through as being the application to use. That being said, the Dokku CLI is very simple to learn.
Also, the plugin system heavily uses Bash which may or may not be your cup of tea. For authoring plugins, it would be much nicer if they could be written in a more friendly scripting language.
But don't let those things put you off — let's get started!
Setting Up a DigitalOcean Droplet
Now that we have our app, let's create our platform. If you already have a DigitalOcean account, log in now. Otherwise, register for a free DigitalOcean account now. By registering using this link, you automatically get $10 worth of credit added to your account, meaning that you won't have to pay to complete this tutorial.
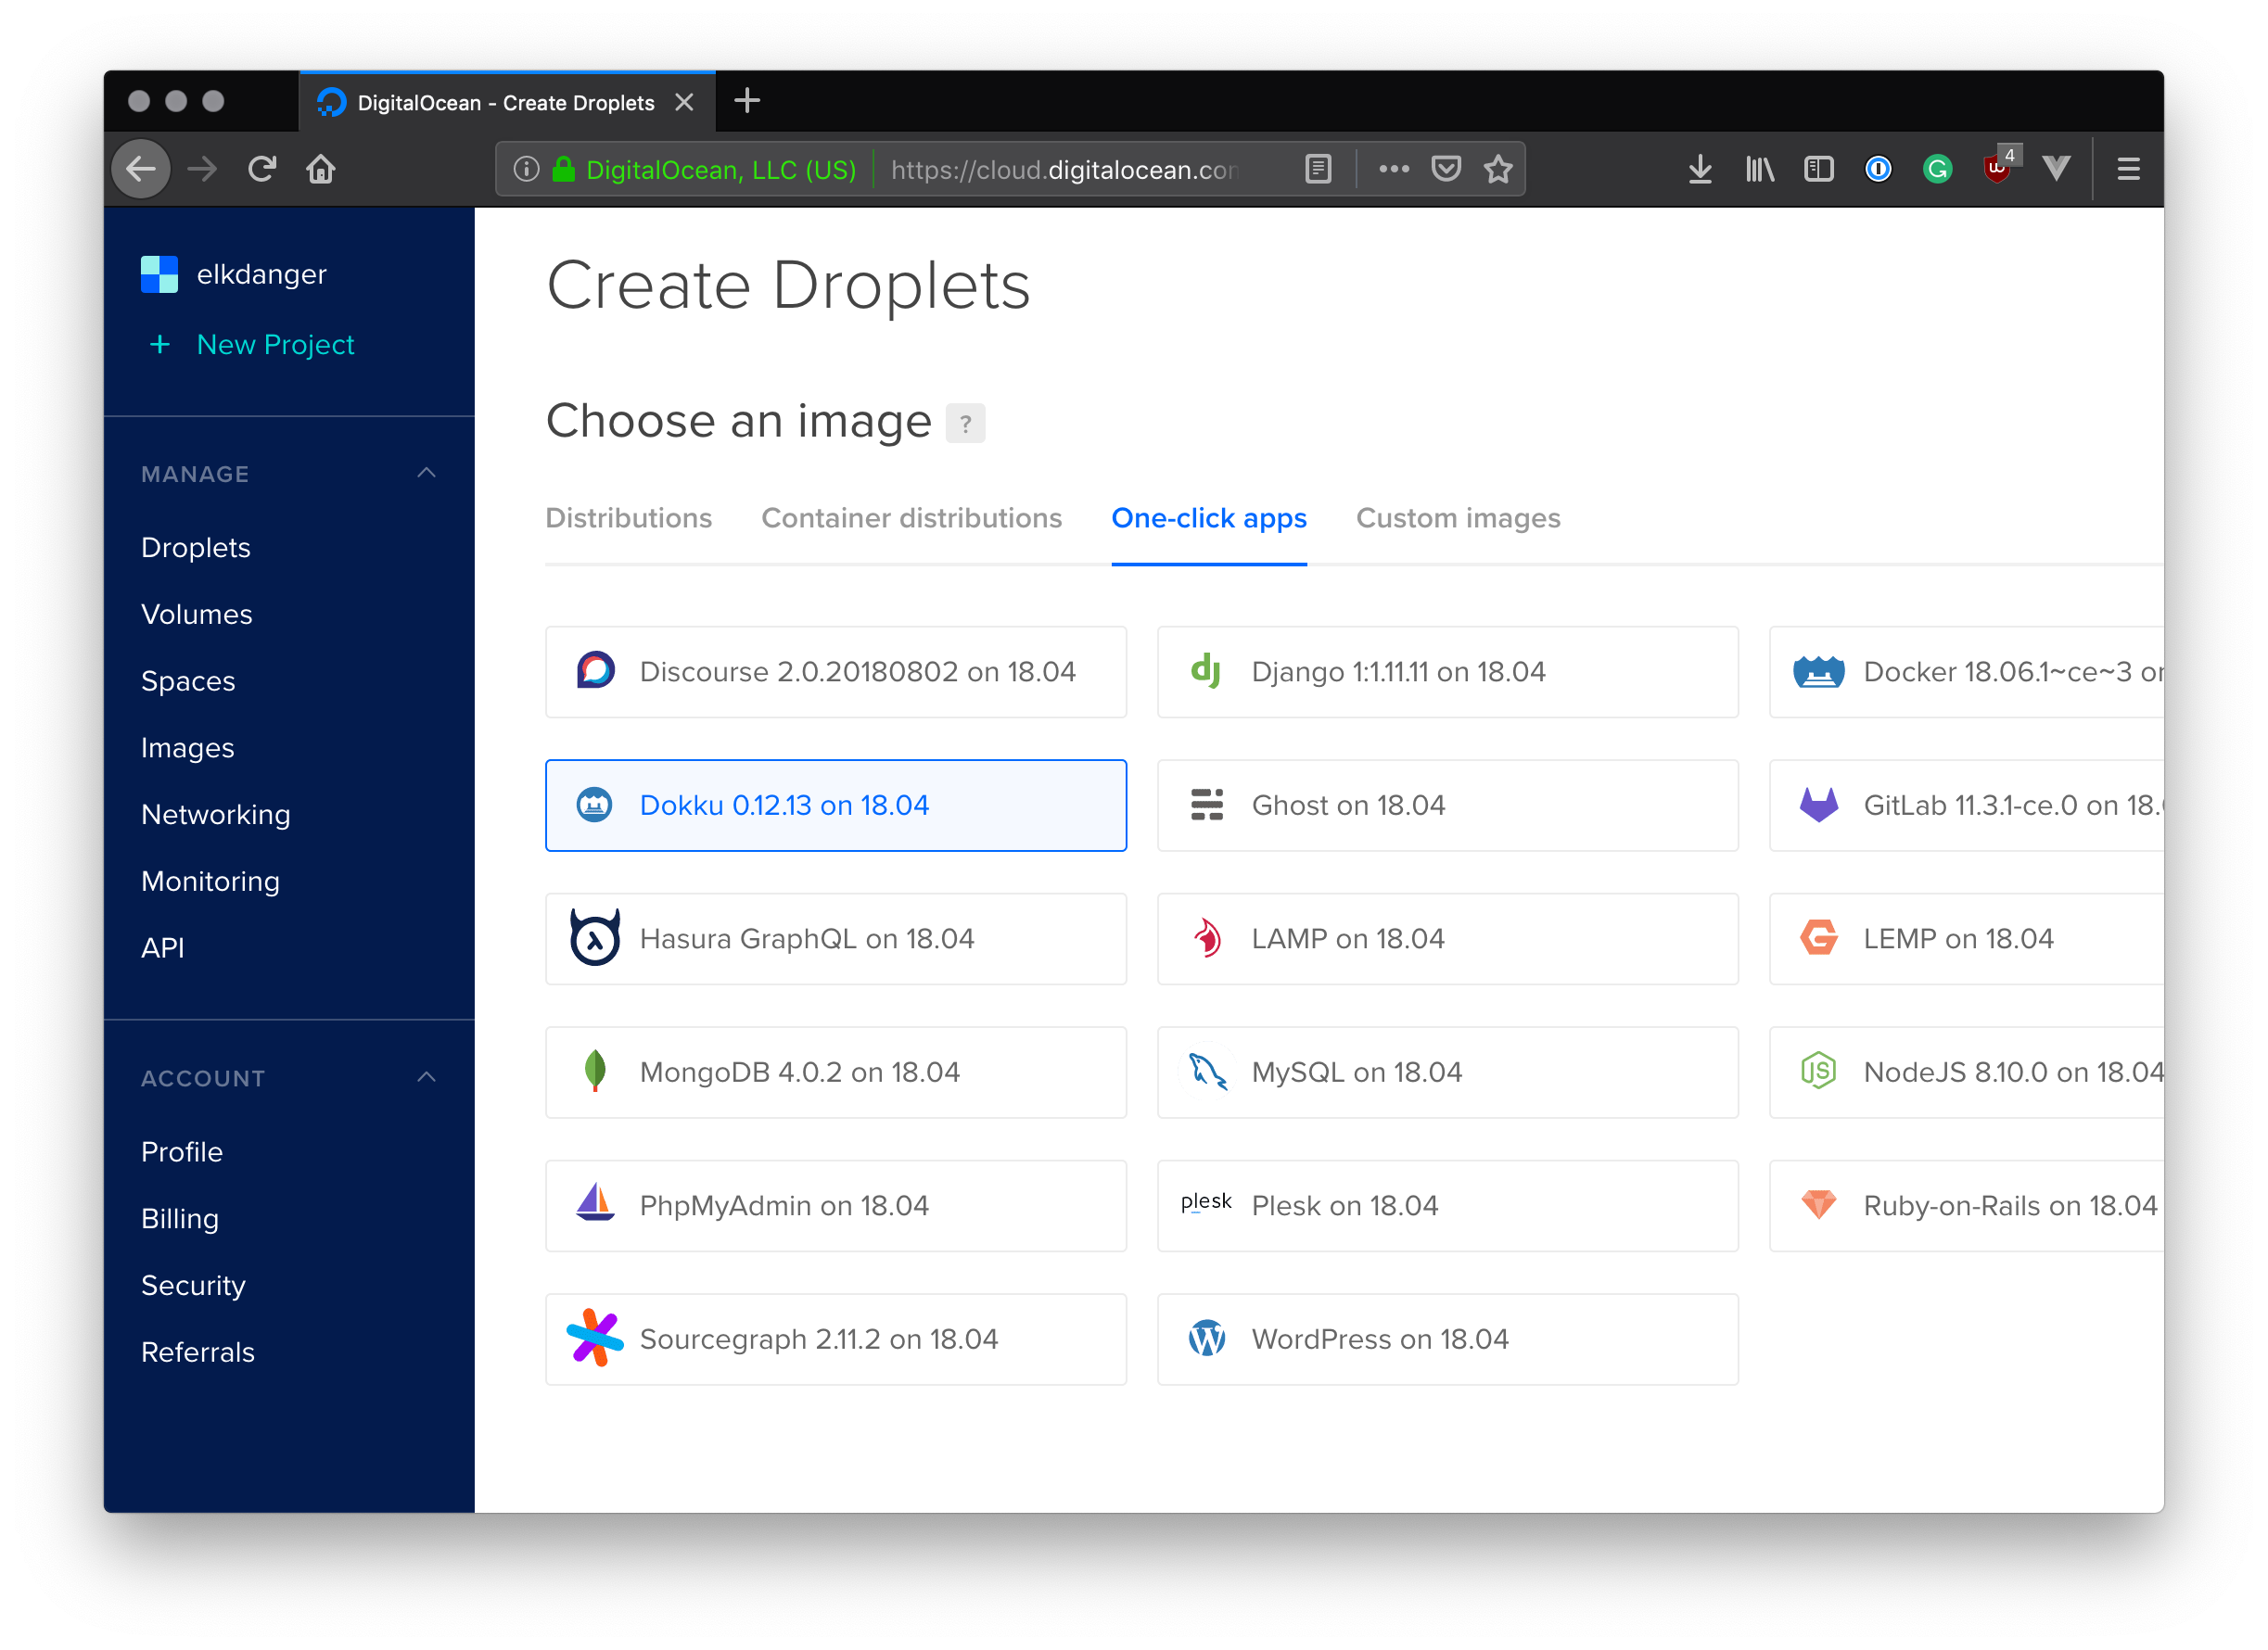
Once you are into your control panel, click the 'Create' button at the top of the screen and choose 'Droplets'.
On this screen, we need to select "One-click apps" and choose "Dokku 0.12.13 on 18.04" (the actual version numbers may vary).
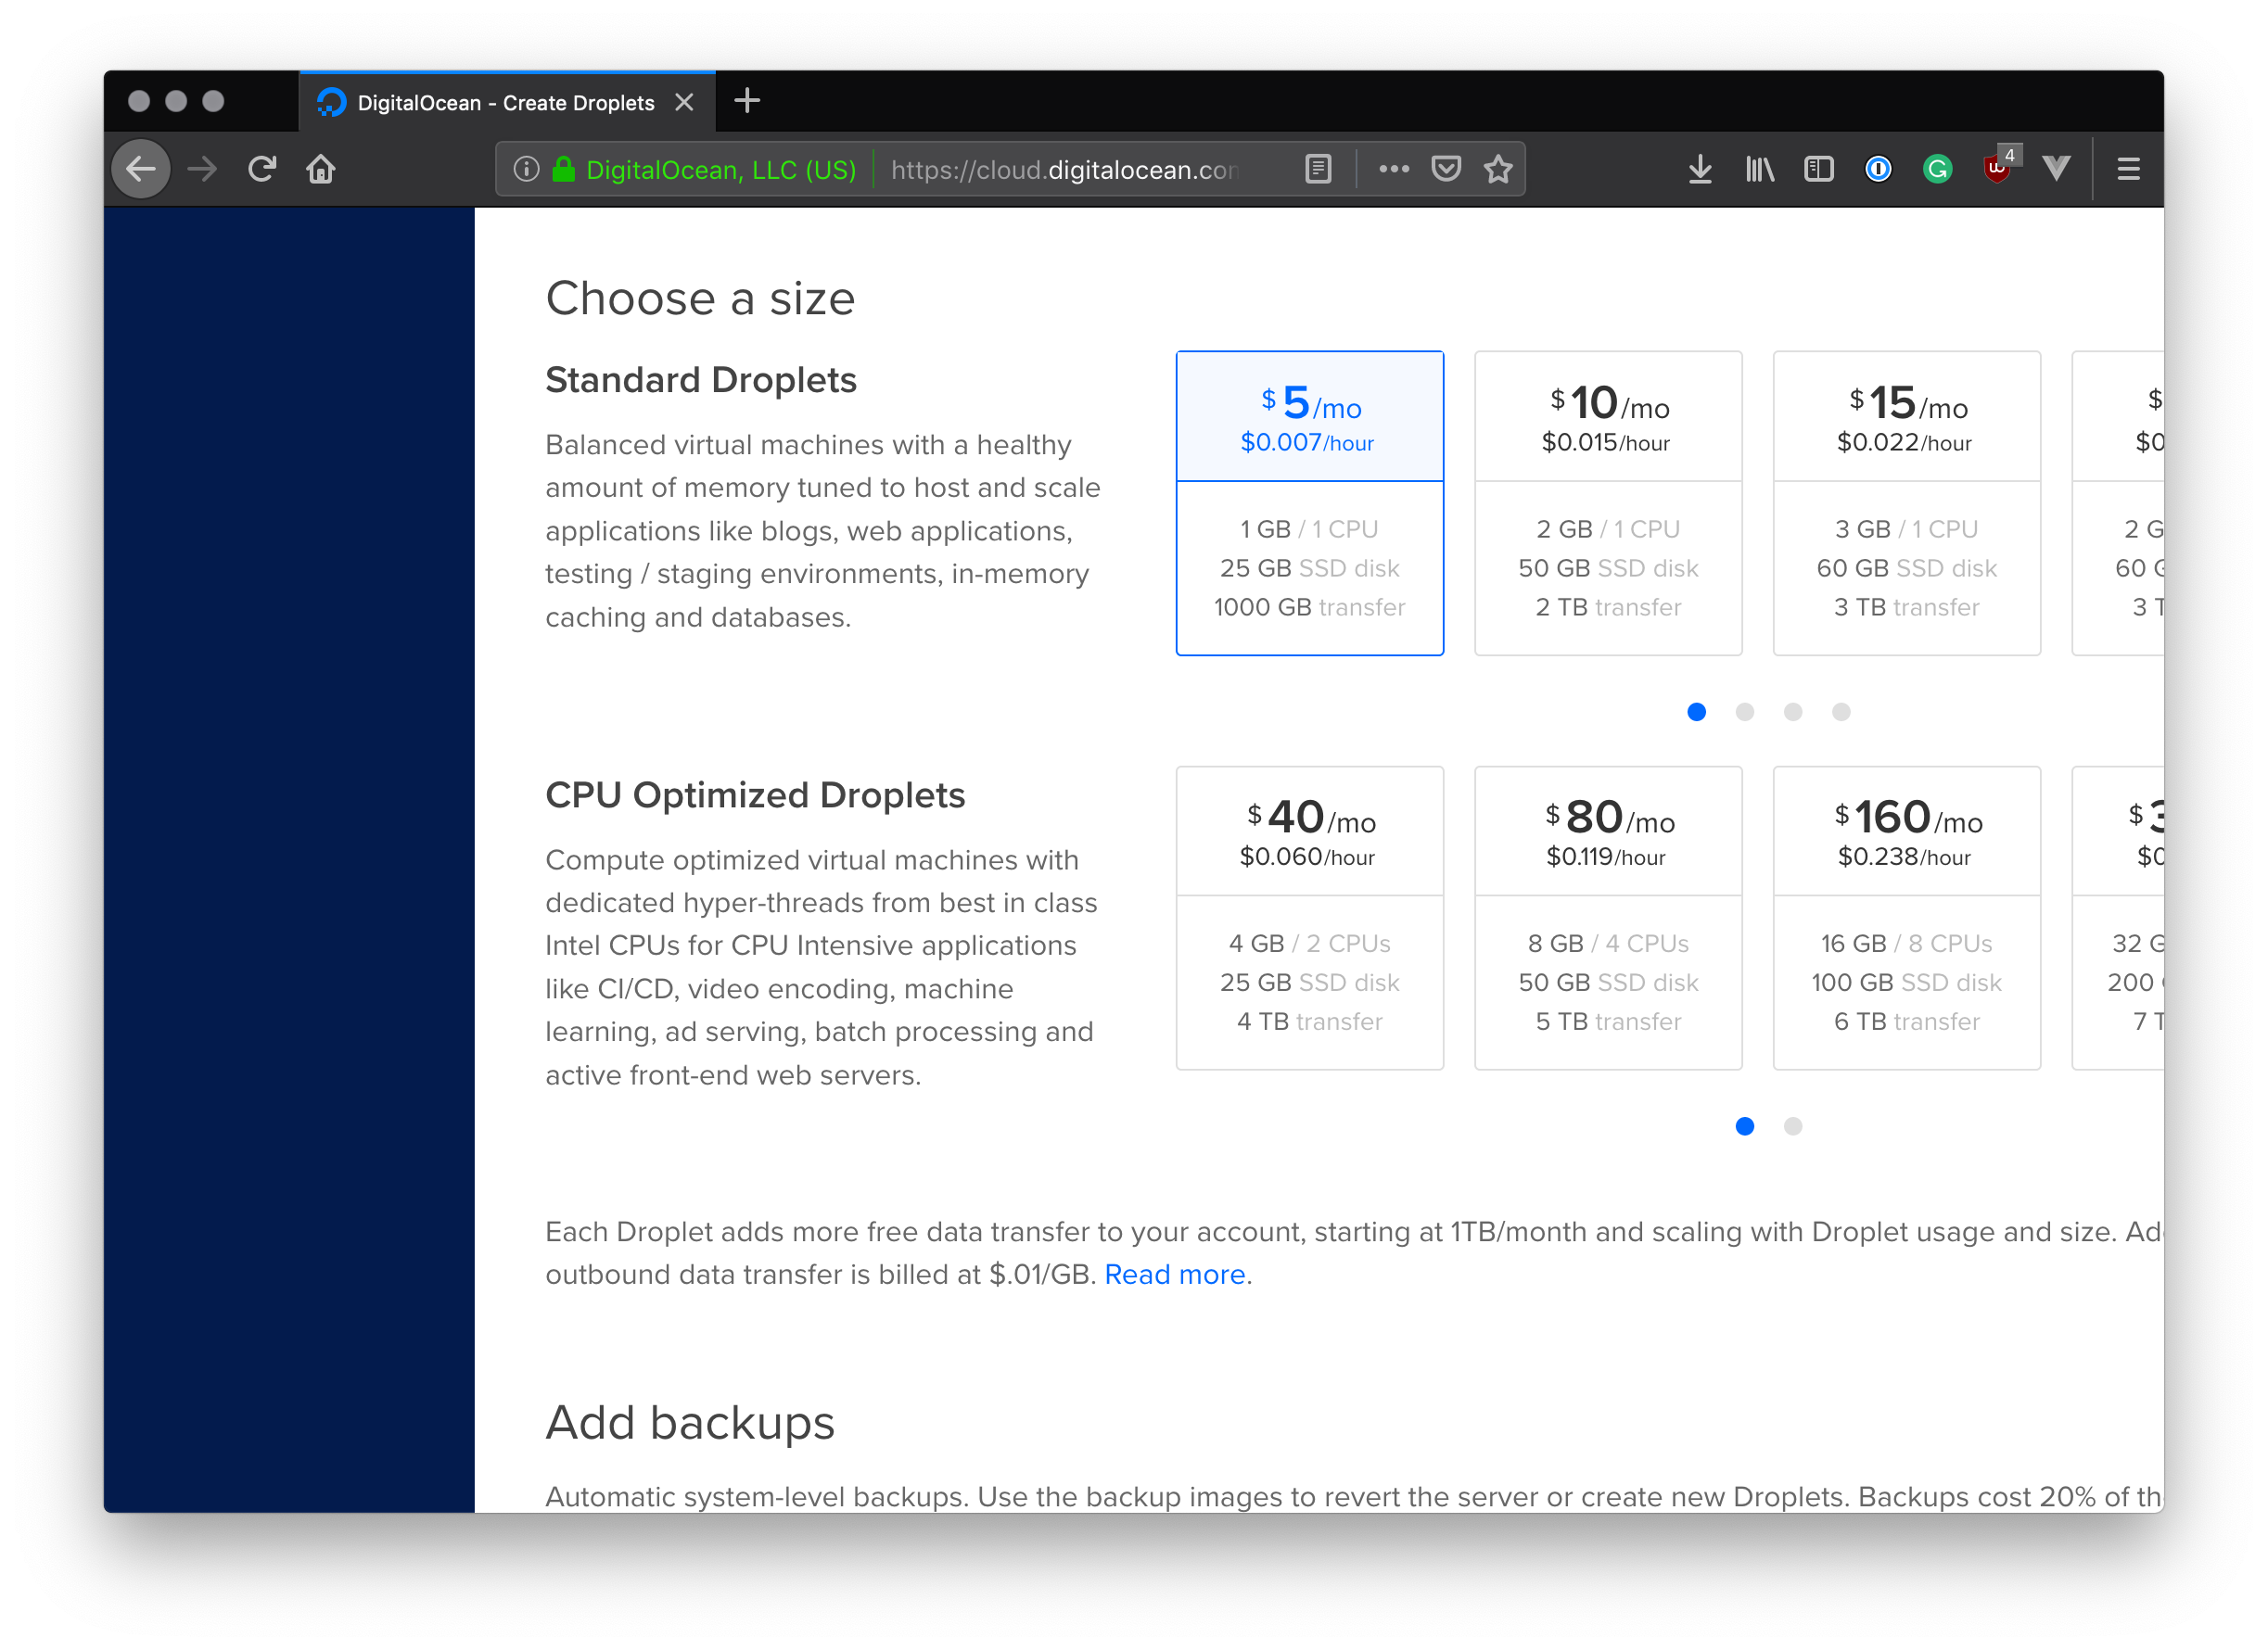
Next, scroll down a bit to the next section which asks for the size. A small, $5 per month instance is fine for this example. Later, if you decide to host more apps, you may need to increase the size of a droplet to accommodate them
Note: You may need to scroll to the left to see the $5 option. With this option, we get a machine that has a 1GB of memory and a 25GB SSD hard-drive, which is enough to host a few small apps. To put that into context, after deploying the basic Express application below, I still had 621MB of RAM and 21GB of disk space available. After deploying the Vue.js application, the available RAM reduced to 586MB, while the available disk space only reduced by a small amount. The amount of applications you can fit on a $5 DigitalOcean droplet will vary depending on the size and complexity of the applications you want to host. Fortunatly, in most cases you can upgrade a Droplet at any time should you need more resources!
The next thing you'll be asked when you scroll down is what region you want your droplet to be in. Select any region that makes sense for you.
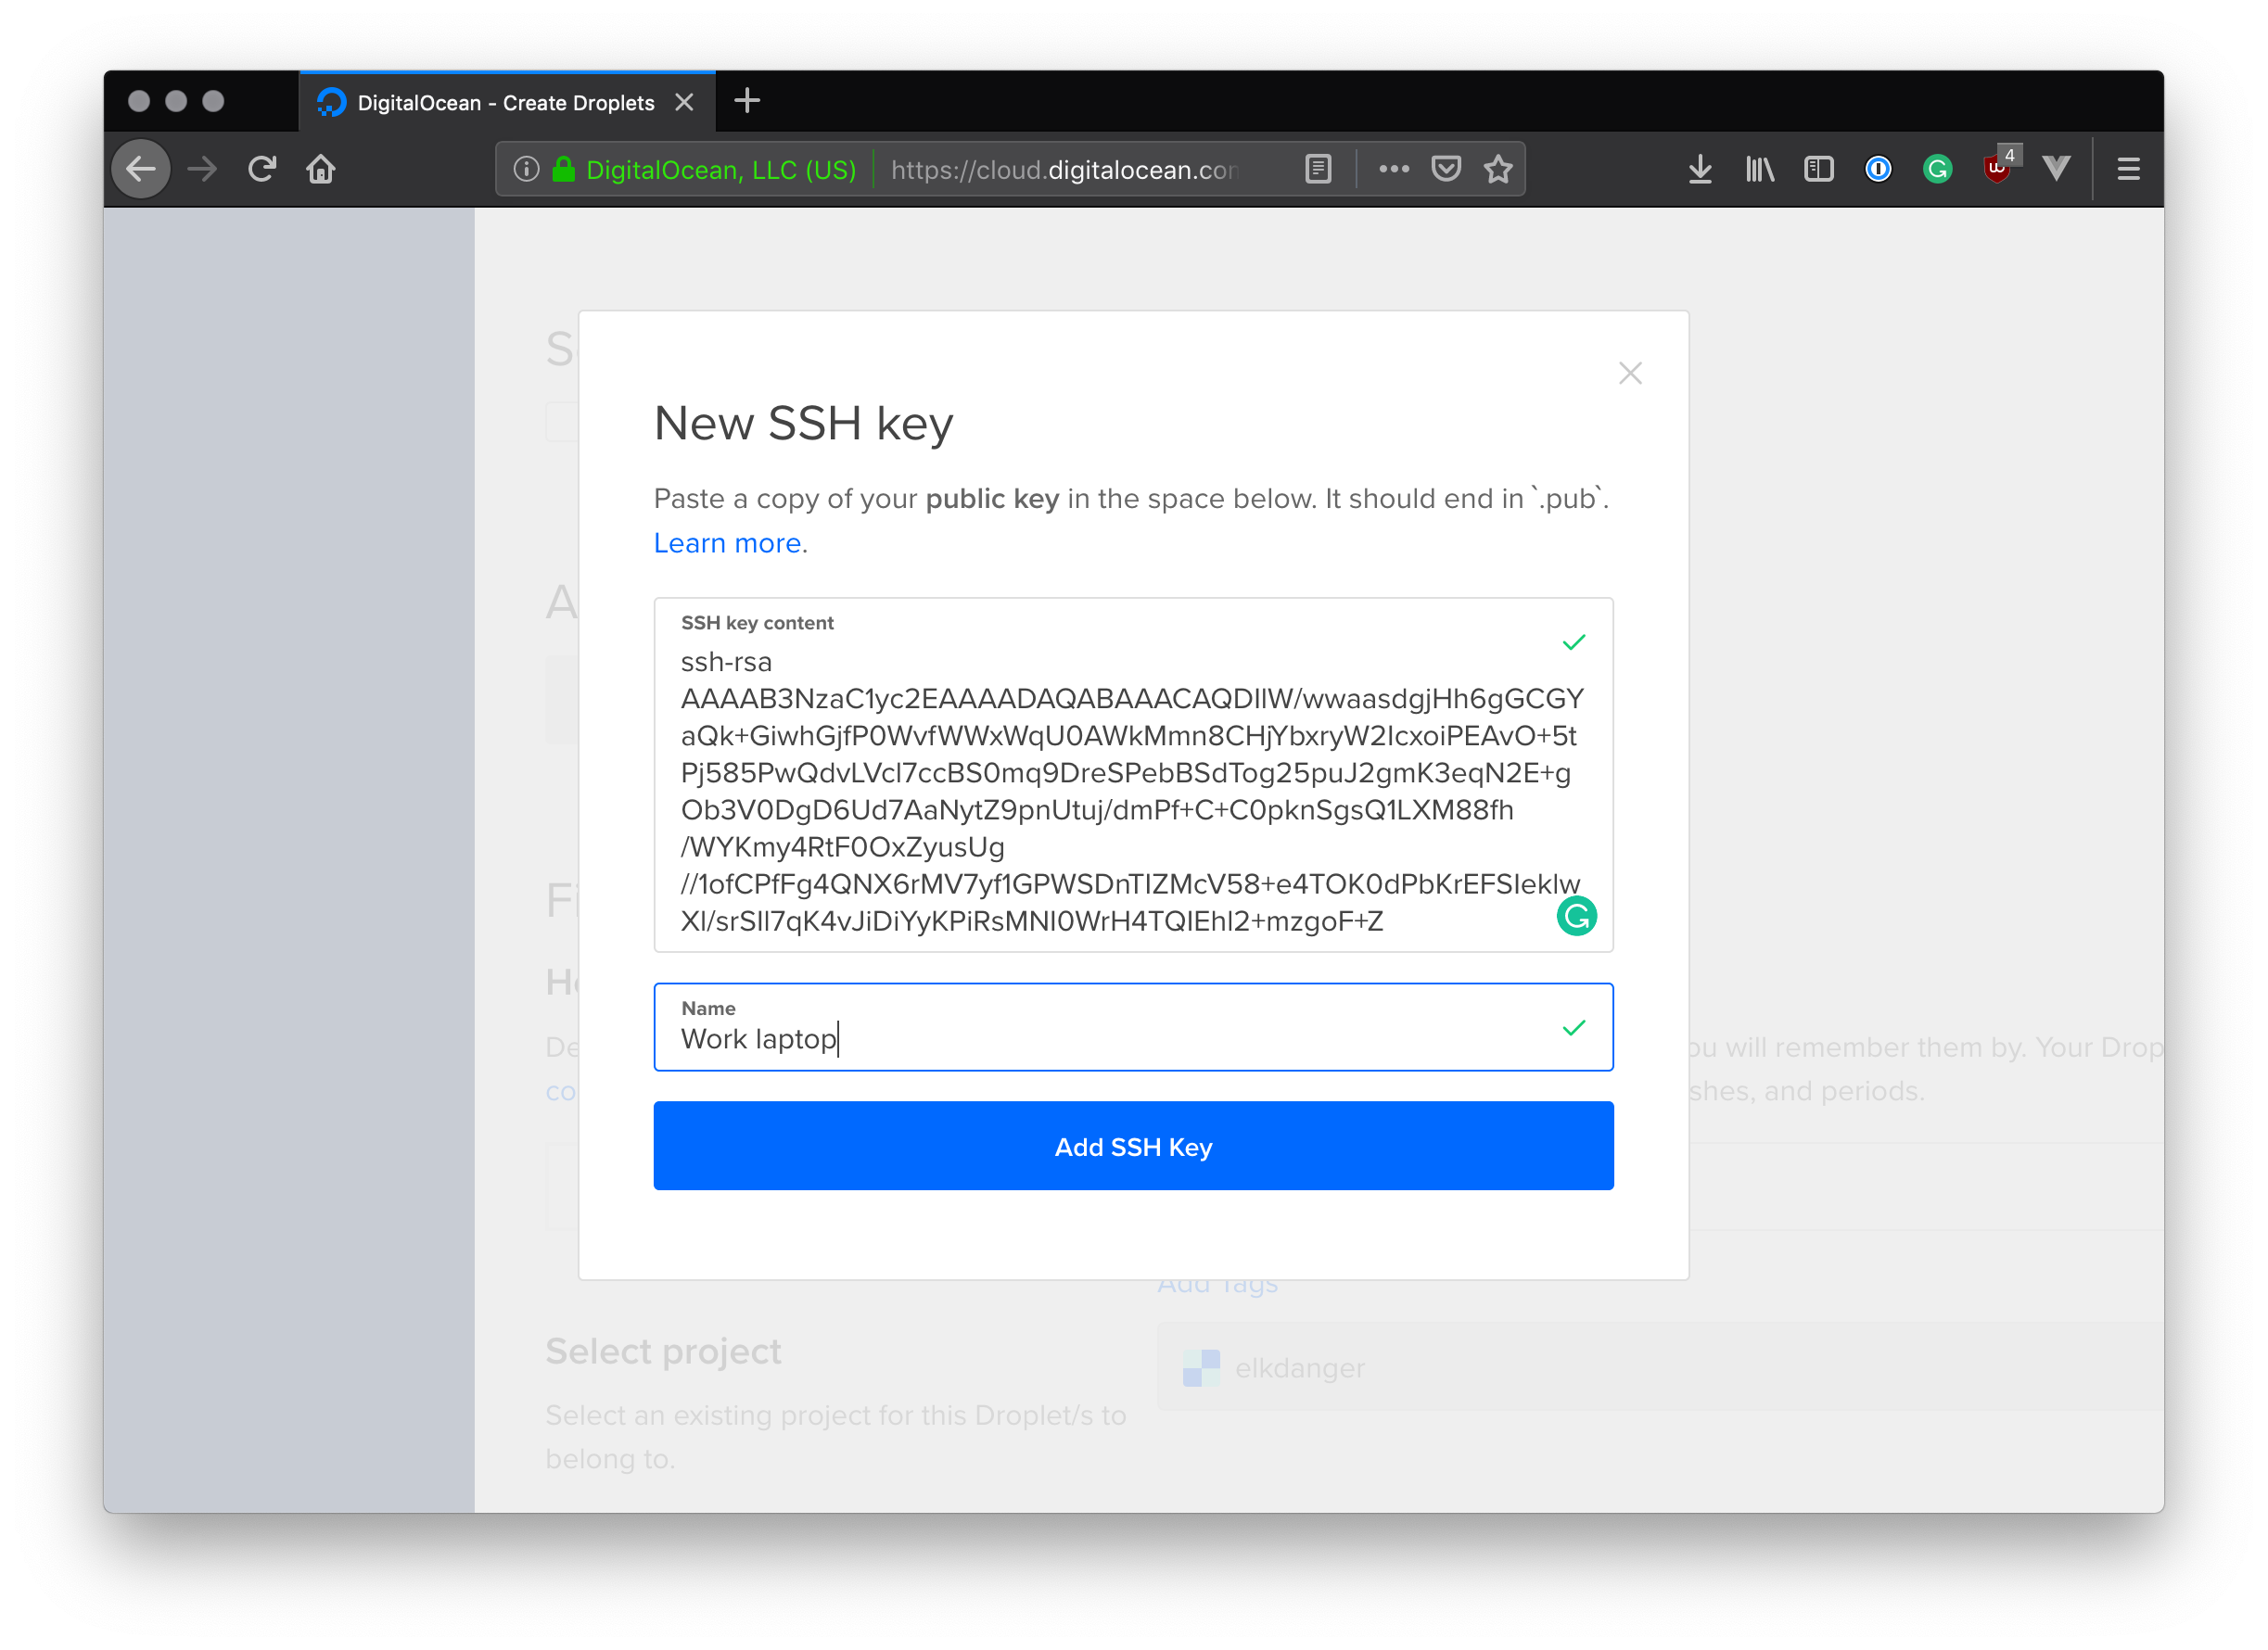
Finally, we need to add an SSH key so that we can log in to the server. Scroll to "Add your SSH keys" and click the "New SSH key" button. Copy and paste your machine's public key into this box, give it a name and press "Add SSH key" to finish.
Note: Your public SSH key is usually available in the
.sshfolder inside your home directory. On Linux and MacOS, this is usually~/.ssh/id_rsa.pub. On Windows, tryC:\Users\<username>\.ssh\id_rsa.pub. If you have not previously generated an SSH key pair, follow the instructions on GitHub.com to generate a new SSH key and add it to the ssh-agent. Once the public key has been created, try the previous step again.
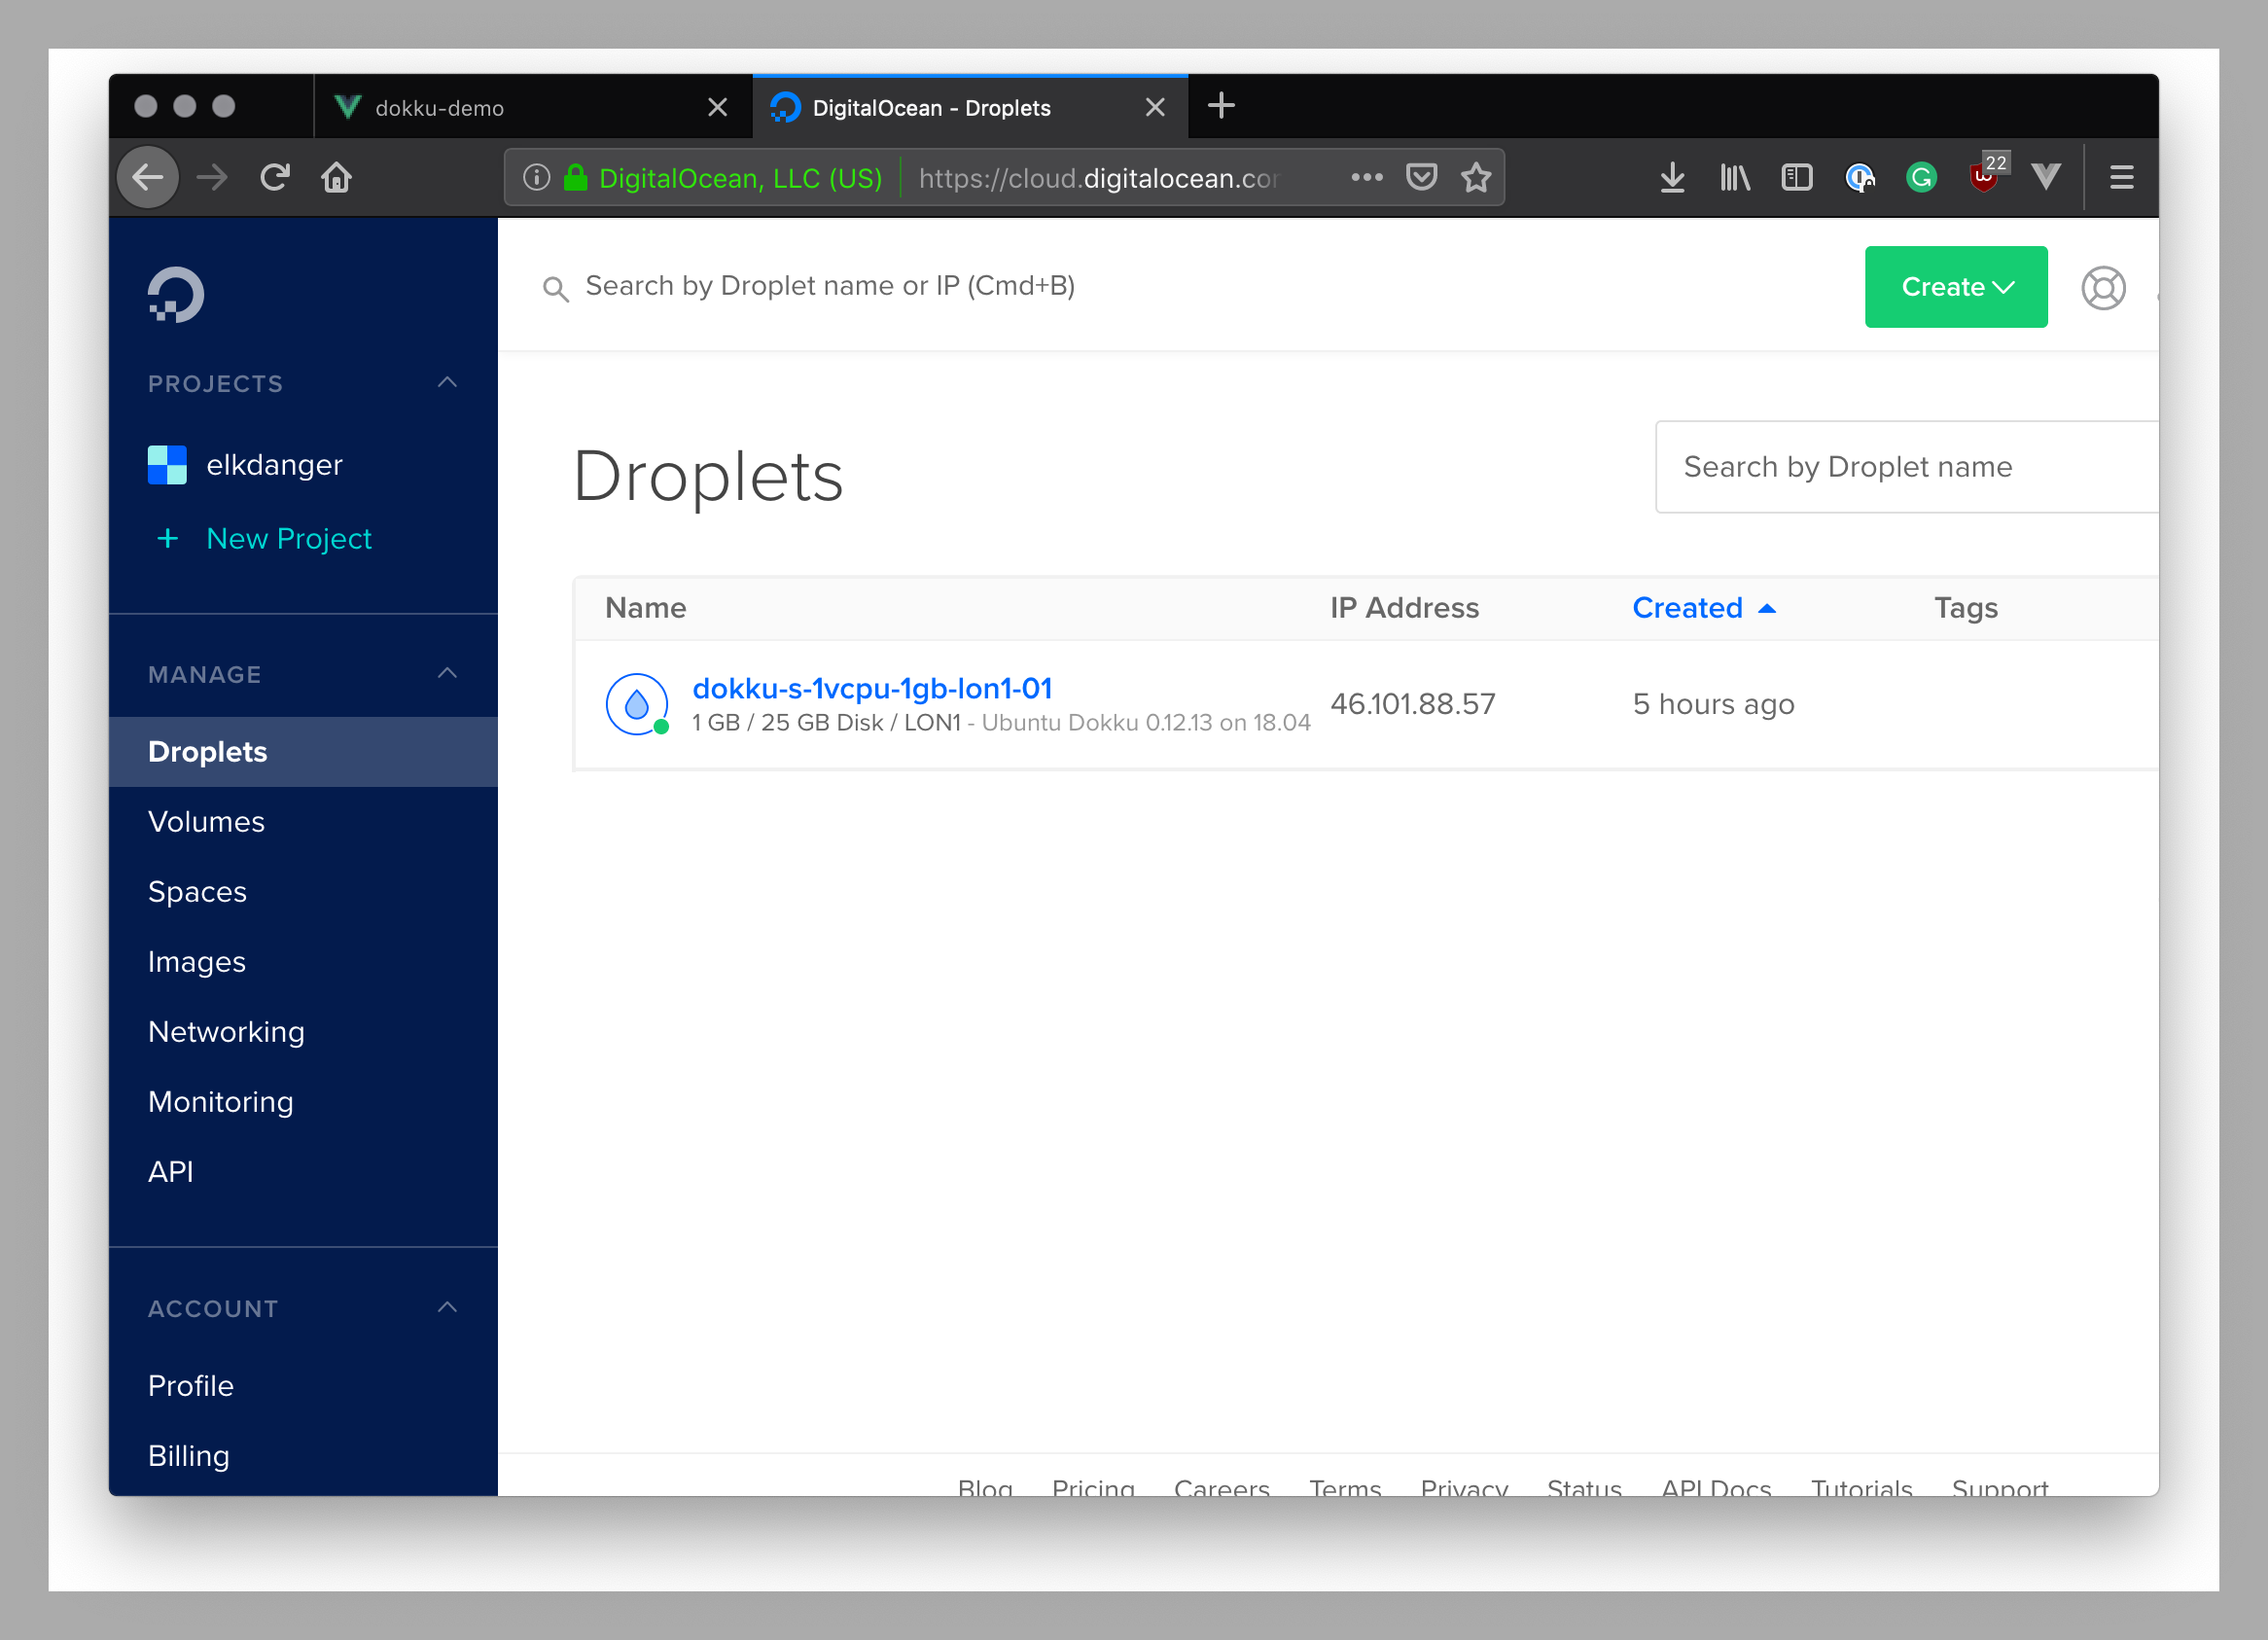
Finally, press the "Create" button at the bottom to create the droplet. It will take a few minutes for it to be available.
Logging in and setting up
Once the Droplet has been created, it will have an IP address. Copy the IP address into your clipboard, and open a terminal. We're going to use SSH to connect to our Droplet.
Inside the terminal:
ssh root@46.101.88.57Note: Your IP address will be different to mine, so make sure you use the one that you copied from the DigitalOcean Droplets panel.
If the login is successful, you should see some output similar to this as part of Ubuntu's Message of the Day:
Welcome to DigitalOcean's One-Click Dokku Droplet.
To keep this Droplet secure, the UFW firewall is enabled.
All ports are BLOCKED except 22 (SSH), 80 (HTTP), 443 (HTTPS),
2375 (Docker) and 2376 (Docker).

In a web browser, you can view:
 * The Dokku One-Click Quickstart guide: http://do.co/dokku1804#start
 * Your Dokku setup page: http://46.101.88.57

For help and more information, visit http://do.co/dokku1804
Note: You may find that your SSH connection will drop with the message "Please wait while we get your droplet ready...". If that's the case, your Droplet may still be performing some initialization steps, even though the Droplets panel said it was ready. Just try again in a few minutes.
As instructed in the terminal, in order to complete the setup we need to access the Dokku setup page. Open a web browser and access your server using the http://<ip address>:
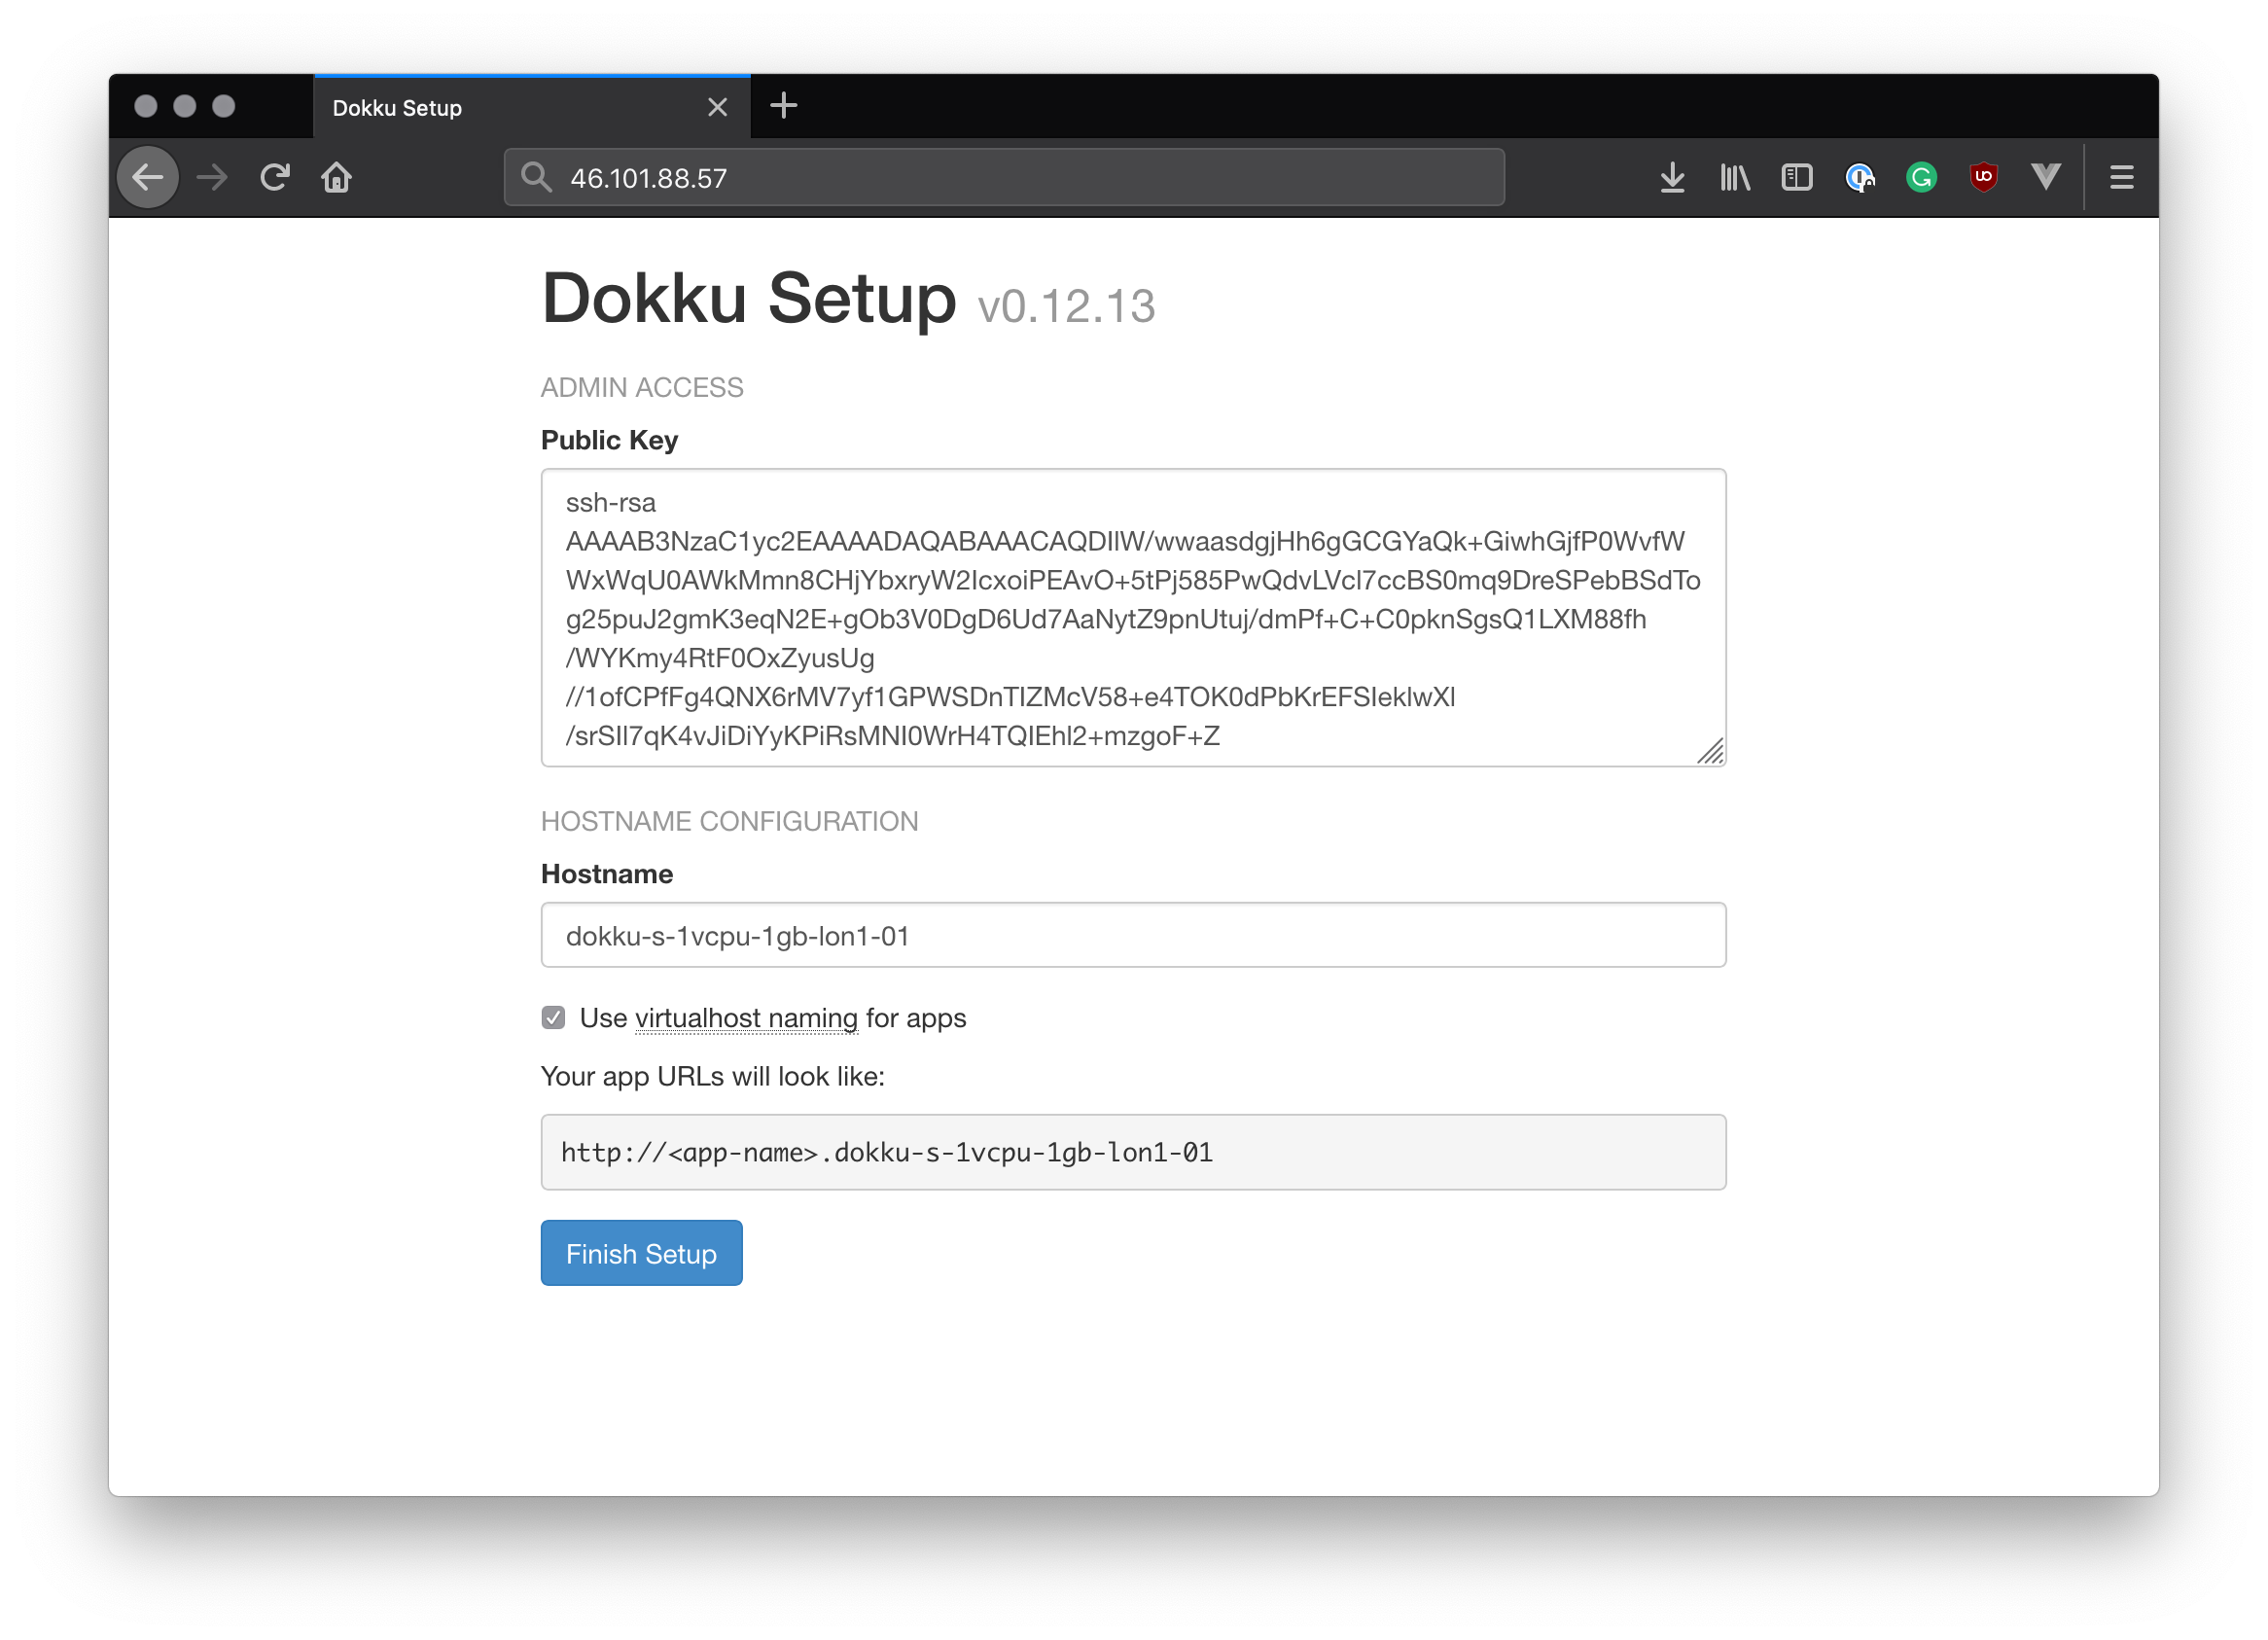
Here you are asked to provide your SSH key. Since we have already provided it in a previous step when we initially set up the droplet, this should be pre-filled.
The next thing you need to do is decide whether or not to use virtualhost naming for your apps.
- If you have a domain that you want to use with this box (e.g.
example.com), then you can turn on virtualhost naming so that your apps are accessed as subdomains. For example, creating an app called "Demo" will mean that you will be to access your application athttp://demo.example.com - If you do not have a domain that you wish to use for your Dokku server, then you should leave this box unticked. This will mean that your apps would become available on a specific port number, e.g.
http://46.101.88.57:3000. You will need to configure the firewall to open specific application ports
I have a domain I'm going to use for this example, so I will tick the box.
Note: For this to work, you must configure your domain's DNS with an A record that points to your Dokku server. In my example, I'm using a domain
simplicode.co.ukwith an A record of*that points to my server at46.101.88.57. This means that any traffic that goes to a subdomain e.g.http://my-app.simplicode.co.ukwill be routed to my Dokku server and Nginx will route it to the correct place. Also, note that changing your DNS settings may require a bit of time for the changes to fully take effect.
With that done, click "Finish Setup" to proceed. Your Dokku server is now ready to go!
Deploying an Application
Let's try deploying a simple Express application and see if we can reach it on the internet.
To create this application, you can follow the steps below, or you can clone the demo repository to get a head start.
Creating a simple Express app
Using the terminal, find a location on your hard-drive to place a new project, and create a new folder. Then cd into it:
# Create a new folder for our app
mkdir express-dokku

# Move into it
cd express-dokku
Next, initialize the Node project using npm and initialize git:
# Initialize as a new Git repository
git init

# Initialize the npm project
npm init -y
Then, we want to exclude the node_modules folder so that we don't commit it along with the rest of our files. We can do this by creating a .gitignore file in the root of the project:
echo node_modules/ > .gitignoreNow install express as a dependency:
npm install expressCreate a new file called server.js and populate it with the following content:
const express = require('express');
const app = express();

app.get('/', (req, res) => {
  res.send('Hello, Dokku!');
});

// Port 5000 is the default Dokku application port
app.listen(5000, () => console.log('Listening on port 5000'));
Finally, modify package.json so that it includes a start script that runs our server:
{
  "name": "express-dokku-sample",
  "version": "1.0.0",
  "description": "",
  "main": "index.js",
  "scripts": {
    "start": "node server.js"
  },
  "repository": {
    "type": "git",
    "url": "git+https://github.com/auth0-blog/express-dokku-sample.git"
  },
  "dependencies": {
    "express": "^4.16.4"
  }
}
To test it, run npm start from the terminal. Then, browse to http://localhost:3000 in the browser, and you should see the words "Hello, Dokku!" on the screen.
Using Git deployment
Now that we have our simple application, we'll create a new Git commit so that it can be pushed up to the Dokku server. Since Dokku uses Git to deploy applications, every change you make that you want to deploy to the server must exist in Git at some stage. Otherwise, the changes won't be pushed.
git add . && git commit -am "Initial commit"The last thing we need to do is add a Git remote that points to our Dokku instance. You can do this with the following command in the terminal:
# With a domain name (replace example.com with your domain)
git remote add dokku dokku@example.com:express-demo

# Without a domain name (replace the IP address with that of your server)
git remote add dokku dokku@123.456.789.012:express-demo
The remote URL dokku@example.com:express-demo contains the application name we want to use (the express-demo) part. If you are using virtualhost naming, this name will form the subdomain part of the URL that you use to access the application. i.e. http://express-demo.example.com.
Finally, use git push to push your application to the server. This will kick off the build process using the Node buildpack and — if all goes well — deploy it!
git push dokku masterYou will start to see a lot of logging information spill out into the terminal, telling you how the build process is going. After a couple of minutes, the build should finish and your site should be available. To test this, try to access the application in your browser. If you are using virtualhost naming and a domain, you should be able to reach it at http://express-demo.<your domain name>, or http://<your IP address> if not using a domain.
There are some useful Dokku commands we can use now that we have an application up and running. Log into your server using ssh:
ssh root@<your domain or IP address>Once you're logged in, use the dokku command to show the available commands that Dokku has to offer.
For example, use the following to get a report of the application we've just deployed:
dokku apps:report express-demo

# Output
=====> demo app information
       App dir:                       /home/dokku/express-demo
       Git sha:                       205bd10
       Deploy source:                 git
       Locked:                        false
Or to see the port mapping for the Docker container:
dokku proxy:ports express-demo

# Output
-----> Port mappings for express-demo
-----> scheme             host port                 container port
http                      80                        5000
Or even run commands against the running container:
dokku run express-demo ls

# Output
Procfile  node_modules  package-lock.json  package.json  server.js
Using dokku enter express-demo, you can step into the running container and run commands that way too — give it a try!
Using Dockerfile deployment
What we did in the previous step was to deploy an application to the server using Git, which uses the Heroku Node buildpack to build our application using established Node conventions. This works great for a simple Node app like the one we created in the previous section, but what about a more complex application?
Vue.js applications created using Vue CLI 3 pose a couple of special problems:
- There is no
npm startscript available out-of-the-box, so the buildpack doesn't know how to run it - Most of the dependencies live in the
devDependenciesnode insidepackage.json. This means that when the buildpack tries to install the dependencies usingnpm install --production, it misses out on the important ones we need to run the application - We would have to have some configuration to disable Webpack Dev Server's host check once the application has been deployed. This is a good measure to help prevent DNS rebinding attacks but doesn't work for us if we want to deploy the application
- Last but not least, if we just deployed the Vue.js app as-is, we'd be packaging up all the source files and node modules that we don't really need to, which will bloat the size of the Docker image with unnecessary files
To get around these issues, let's use a Dockerfile to customize our own build steps and cast aside the Heroku buildpack entirely!
Again, you can either follow the following steps to create the Vue.js application and add the Dockerfile, or you can clone the example repository with all of this stuff in it.
Creating the Vue.js application
First of all, find a new place on your hard-drive to create a new project. Next, run the following command to create a new boilerplate Vue.js project. When it asks you questions about how the project is to be created, just accept all the defaults:
# Create the project
npx @vue/cli create vue-demo

# Move into the project folder
cd vue-demo
Adding the Dockerfile script
Then, add a new file in the root of the project called Dockerfile and populate it with the following content:
# Use Node 10
FROM node:10-slim AS build

# Create a folder for our app
RUN mkdir /app

# Set up the working directory
WORKDIR /app

# Copy our package.json file first, then run `npm install`.
# This is an optimization we can make, as this layer will be
# cached, meaning that if we don't change the package.json file,
# this step doesn't need to be performed again
COPY package.json .

# Note that we're installing all dependencies, unlike the buildpack
RUN npm install

# Copy the rest of the application
COPY . .

# Build the Vue.js application. It will output static files
# Into the /dist folder
RUN npm run build

# ---------------

# Create a second-stage which copies the /dist folder
# and uses http-server to host the application
FROM node:10-slim

# Create an app folder
RUN mkdir /app

# Set /app as the working directory
WORKDIR /app

# Initialize a new node app and
# install http-server
RUN npm init -y && \
  npm install http-server

# Copy the built artifacts from the build stage
COPY --from=build /app/dist /app

# Expose port
EXPOSE 8080

# Set the startup command
CMD ["./node_modules/.bin/http-server"]
This is basically the "script" that Docker will use in order to build our application image. This particular Dockerfile is based on the Node 10 (Slim) image and already contains the tools we need to build Node apps. It first builds the Node application using npm run build, which creates the HTML, JavaScript and CSS files, and puts them into the /dist folder.
The Dockerfile contains a second stage which takes these static assets and copied them into a new container. The app is then served using http-server, which is a Node application that can serve static assets from a folder using sensible defaults. The reason we use these two stages is so that the resulting Docker image is much smaller and efficient. There's no point in including all of the source files and Node packages in the image when they're not going to be used!
We should also add a .dockerignore file so that it doesn't try to copy in the node_modules folder when the whole application is copied. For this simple example, it probably won't matter too much, but it's a good habit to get into:
echo node_modules/ > .dockerignoreNote:
.dockerignorefiles work in a very similar fashion to.gitignorefiles. Docker ignores files that match items in this file when performing COPY operations.
Finally — as long as you have Docker installed — you can test the build locally using the following terminal command:
docker build -t vue-demo .This will create a new Docker image from the Dockerfile in the current directory. Docker will execute all the steps inside the Dockerfile, including downloading the Node 10 image, copying the files and running npm install. Do not forget the period on the end, as that is a pointer to the current directory.
Once the image has been built, we can ask Docker to create a new container from this image and run your application, using the following command. Note that this can be done from any directory where the docker command is available:
docker run -p 8080:8080 vue-demoNote: The
-pswitch specifies the port mapping. Even though the application starts up on port 8080, it can be mapped to another port when the container is started. Without this though, the application won't be visible in the browser, as Docker will not forward the port.
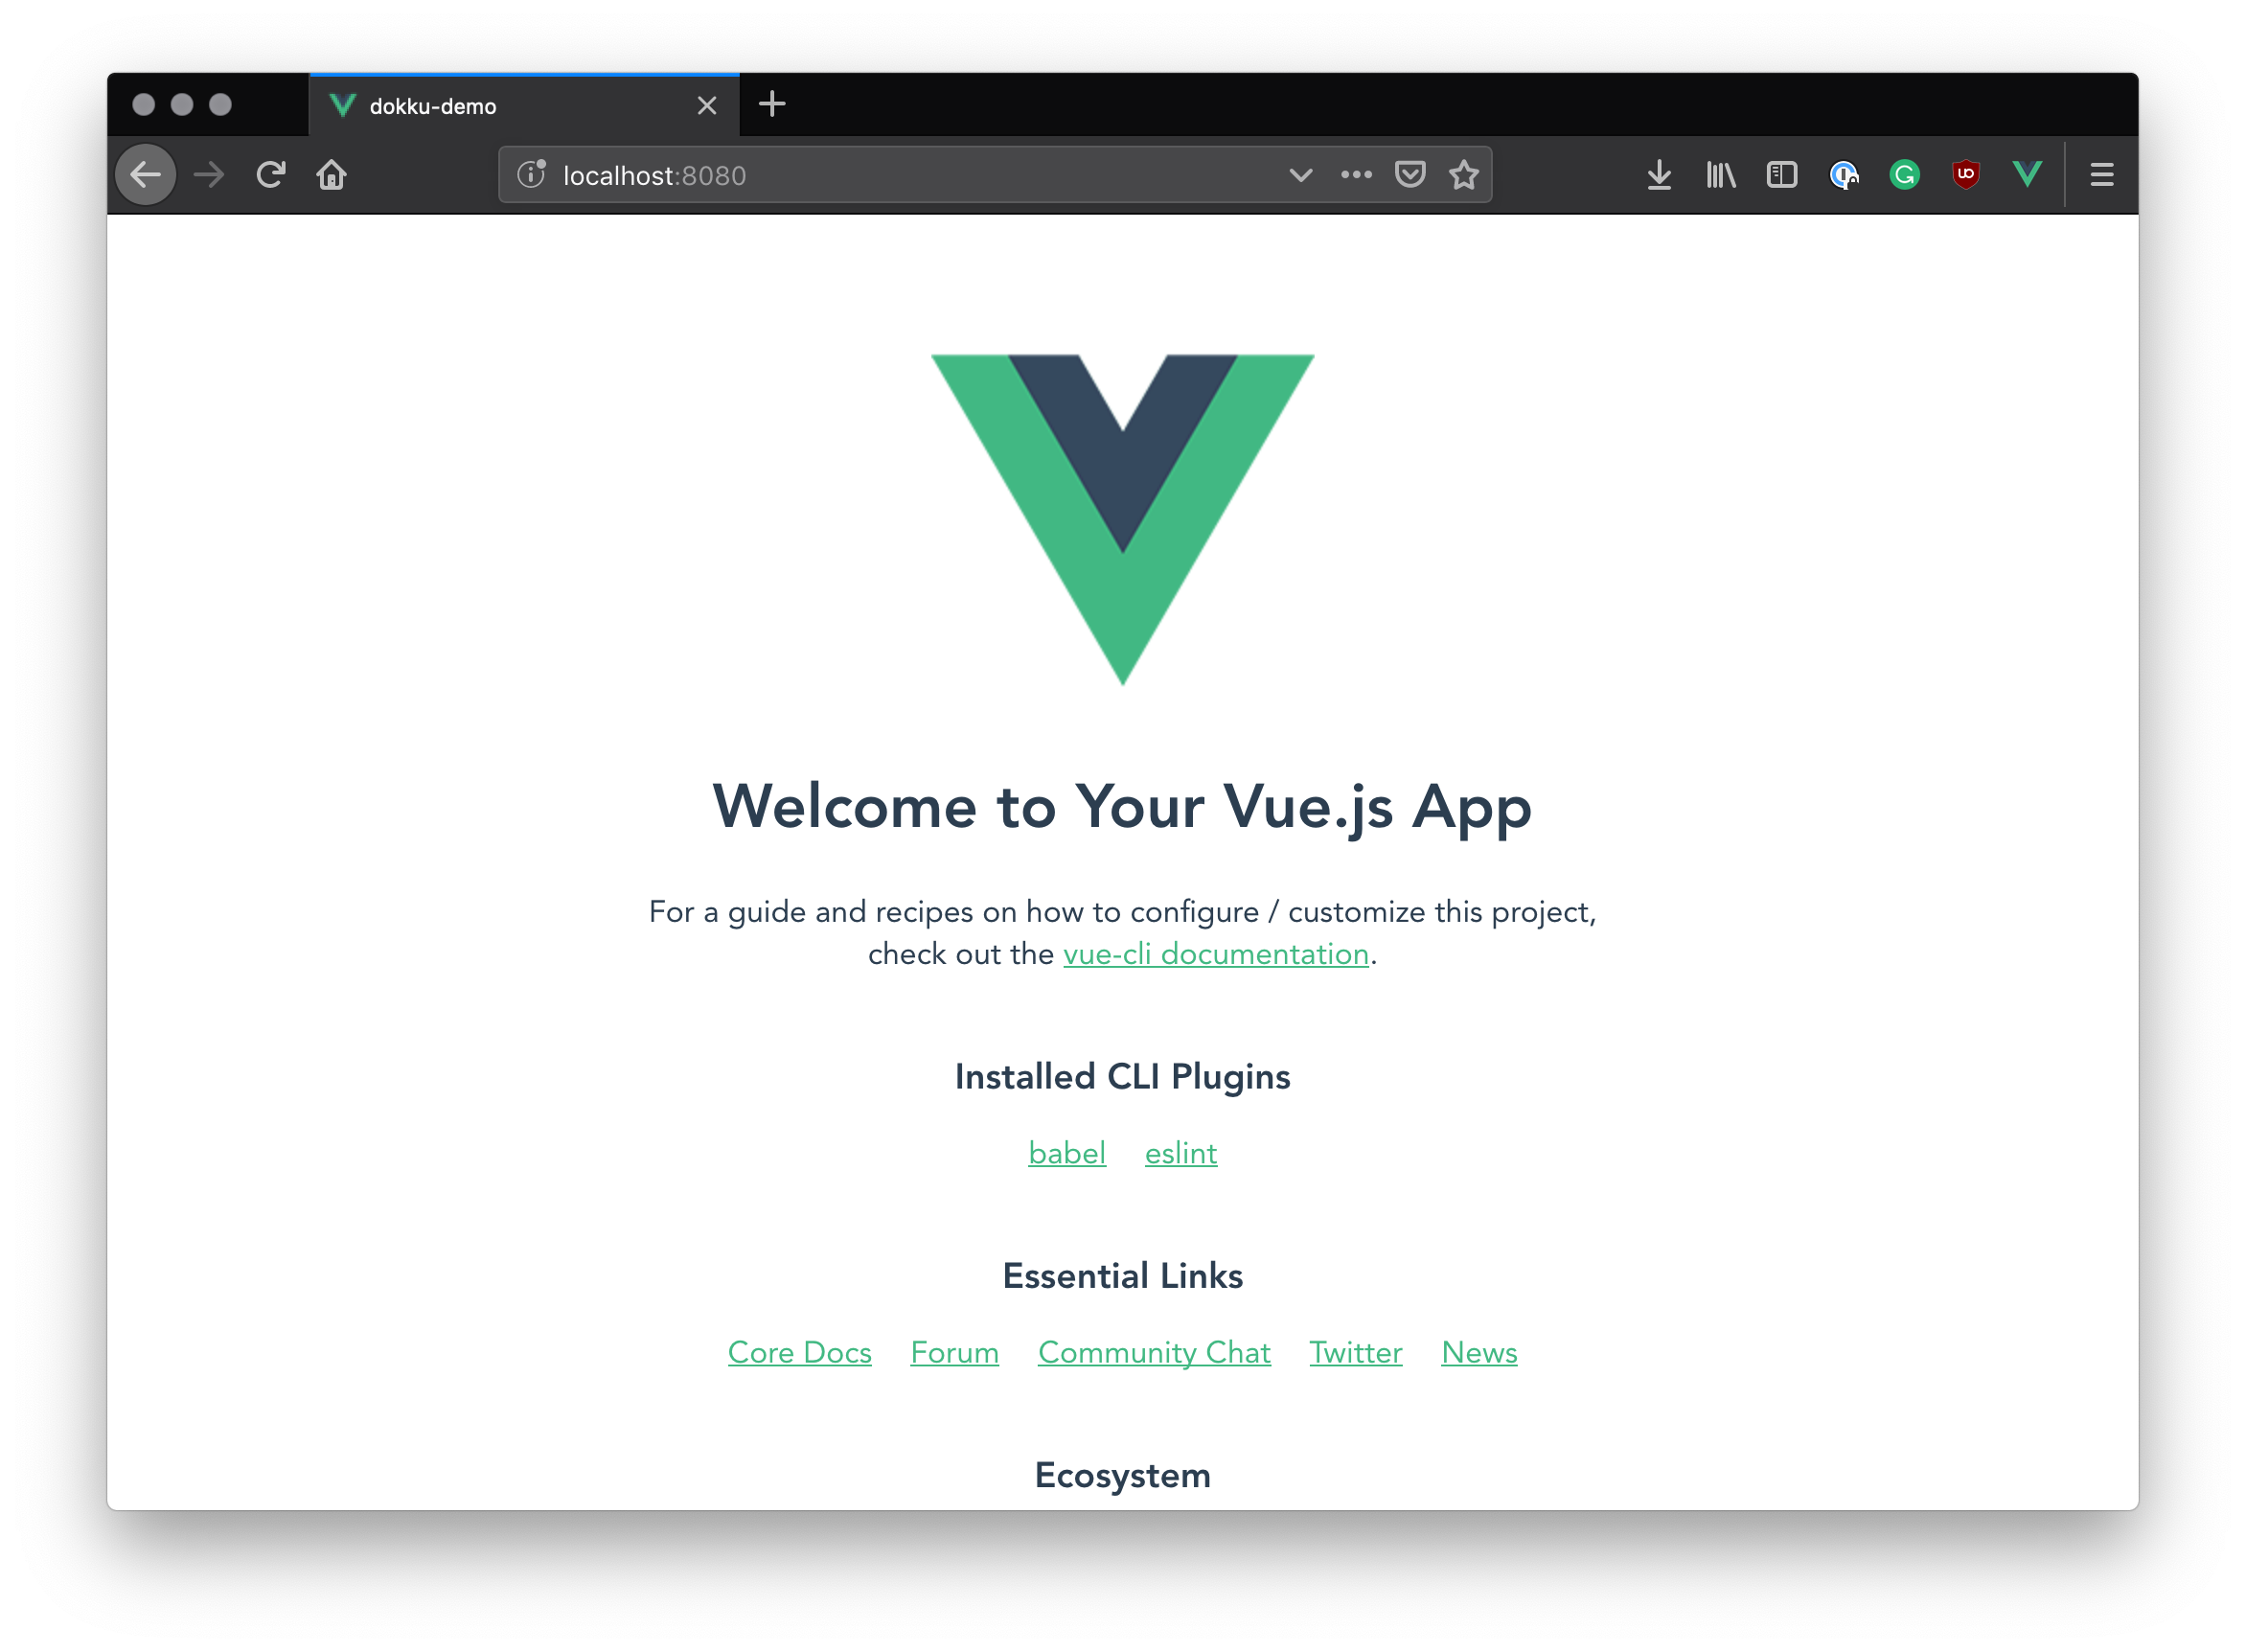
The application will spin up in the same way as if it had been started using npm run serve. Test this in the browser by browsing to http://localhost:8080 — you should see your application running!
Deploying the application
If all is well, we can now deploy this to our Dokku server. First, create a new commit with the Docker file in it, then push it to the server:
# Commit the change
git add . && git commit -m "Added a Dockerfile"

# Add in our remote Dokku repository
git remote add dokku dokku@<domain or IP address>:vue-demo

# Push the changes
git push dokku master
This time, Dokku will detect that a Dockerfile is present and use that to build the image containing your application.
Note that when using Dockerfile deployment, Dokku will try and set up the proxy with the same port that has been exposed in the Dockerfile (port 8080 in our case). Unfortunately, this means that by default, the application will only be available on port 8080 when it is deployed. We may find that when we try to access the application now, that we won't be able to see it. Or, we will see "Hello, Dokku!" being displayed from the Express application we created earlier.
To change the port mapping so that it maps to port 80, ssh into the Dokku server once again and run the following commands:
dokku proxy:ports-add vue-demo http:80:8080This will add a mapping on the http scheme from host port 80 to container port 8080.
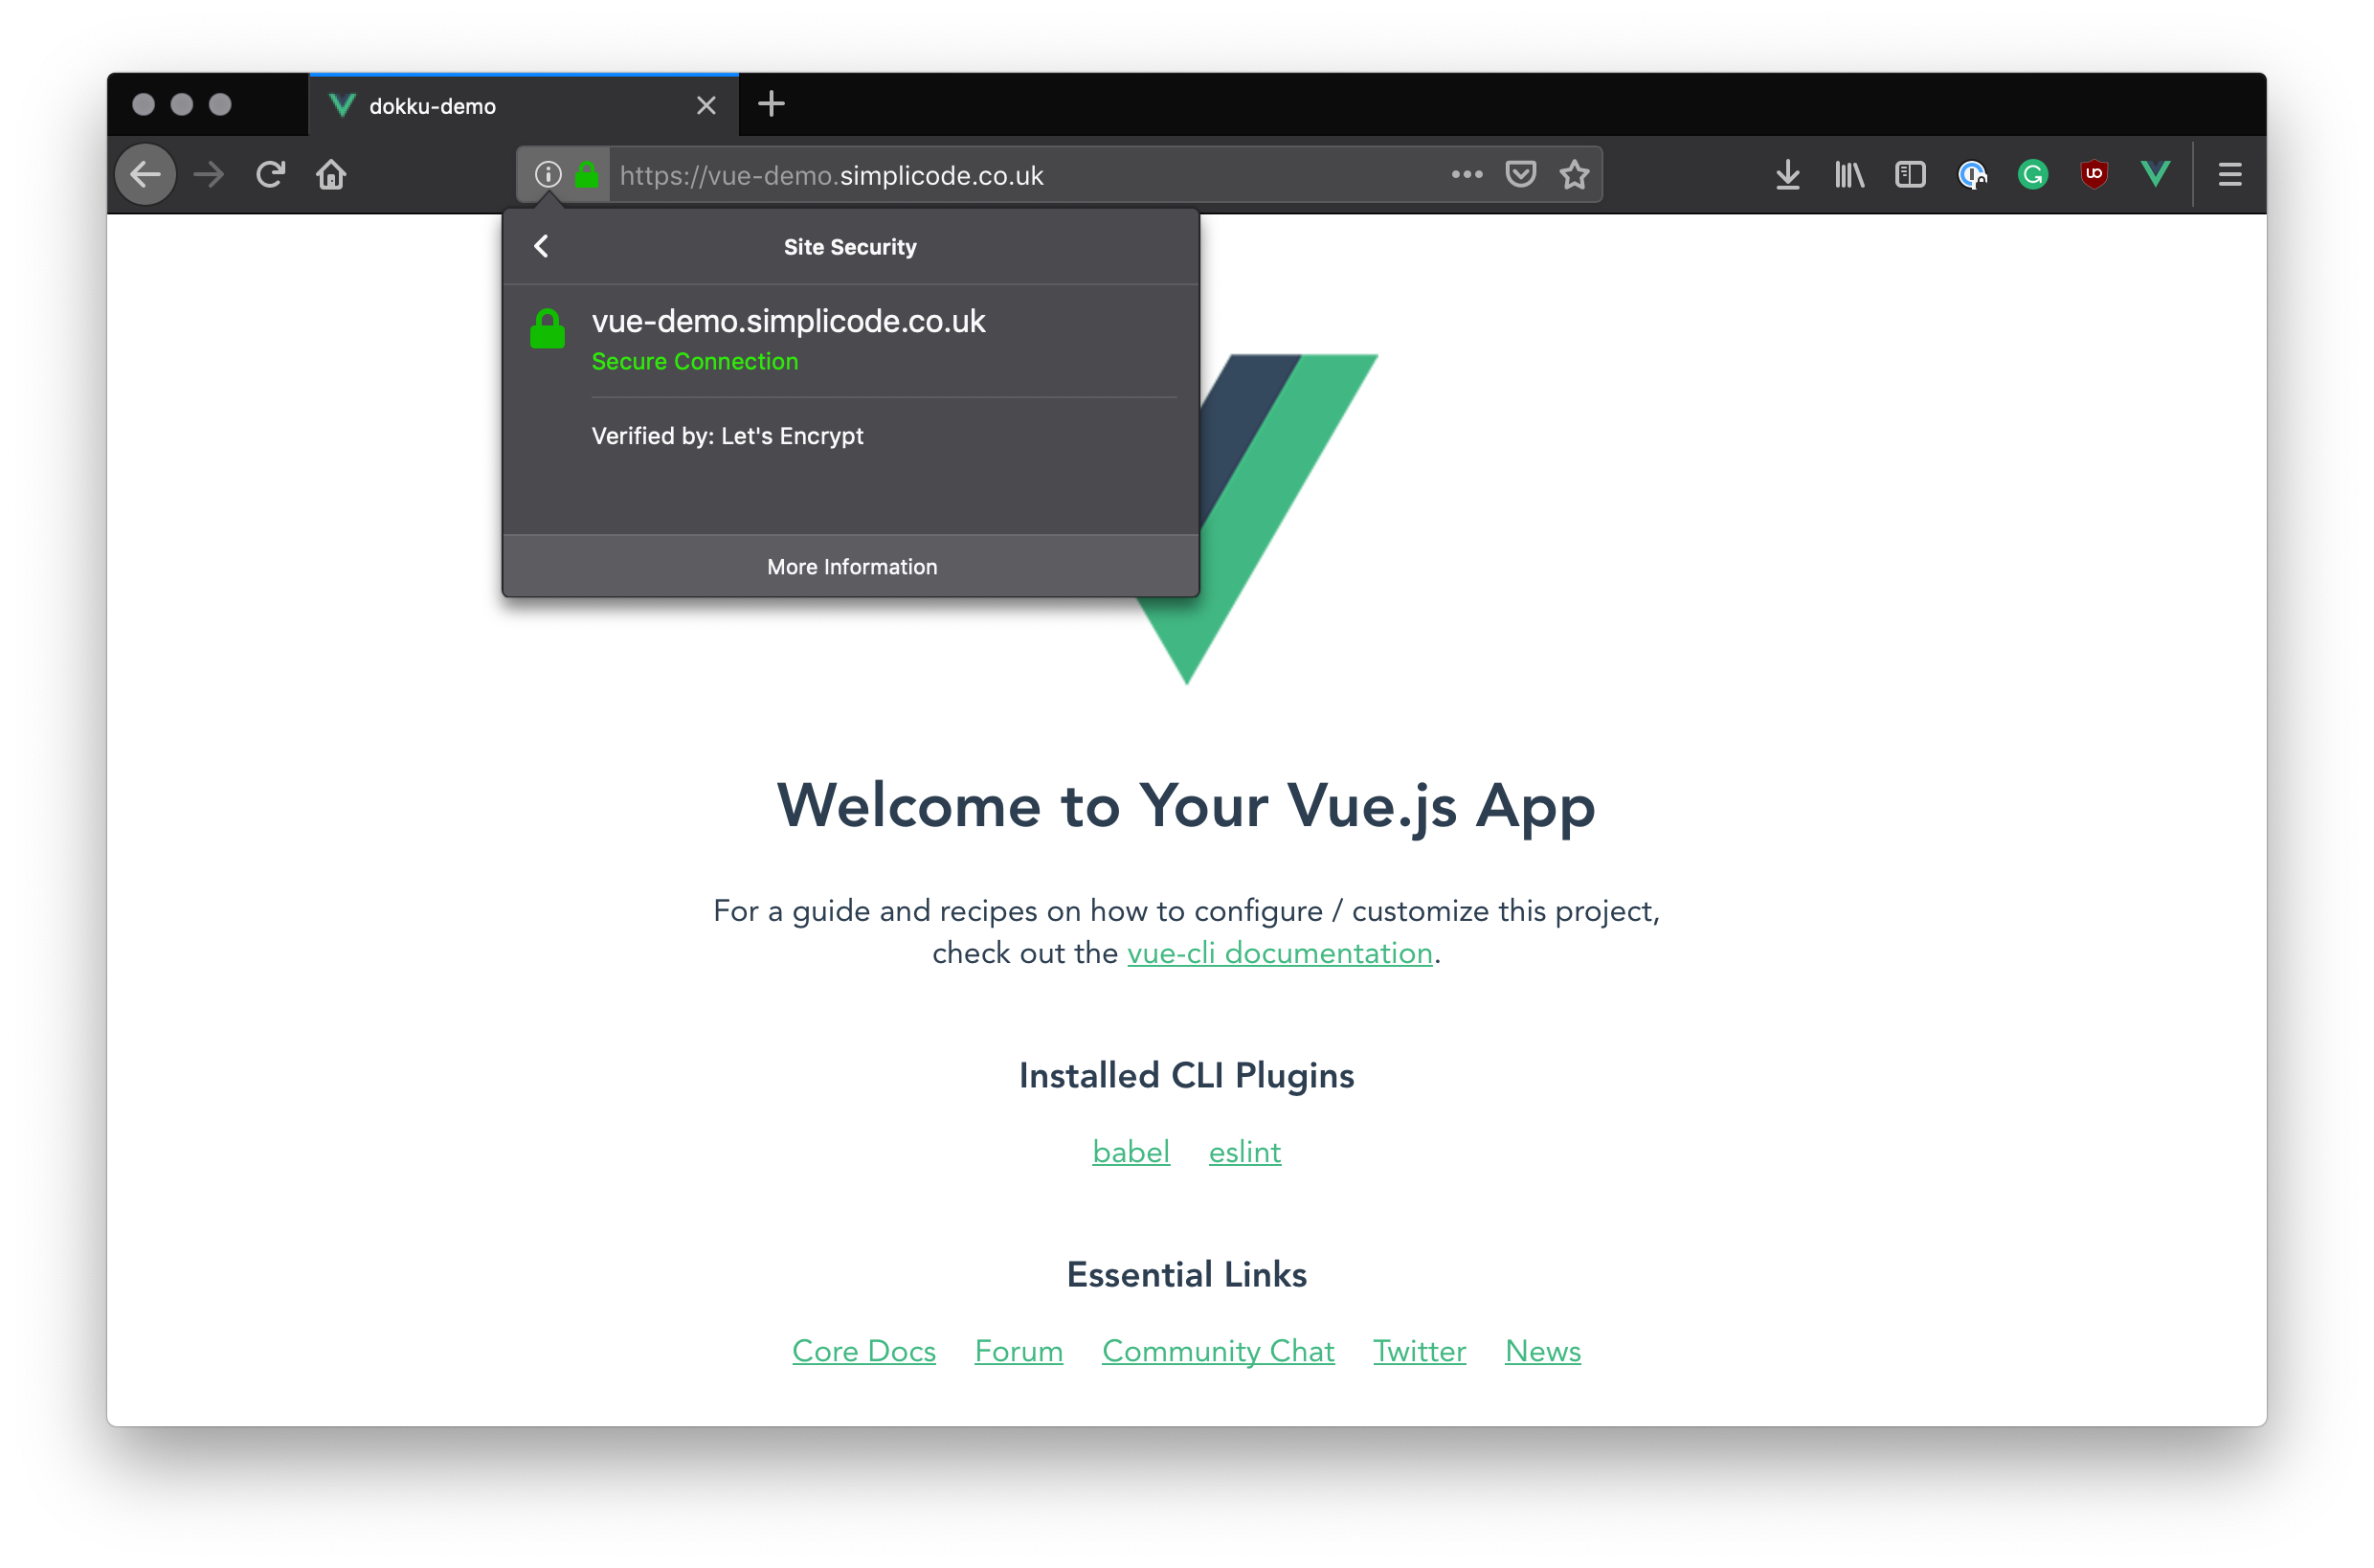
Now we should be able to see the application when we browse to http://vue-demo.<your domain>, or http://<your IP address> if not using virtualhost names.
Adding SSL Support with Let's Encrypt
To demonstrate how easy it is to get up an running with SSL and make your Dokku apps more secure (free of charge!), let's add the Let's Encrypt plugin and set our application up with an SSL certificate.
Note: If you are not using virtualhost naming with your Dokku server, you will not be able to complete this step, as Let's Encrypt do not offer SSL certificates for IP addresses.
Log into your Dokku server using ssh, and install the plugin using the following command:
sudo dokku plugin:install https://github.com/dokku/dokku-letsencrypt.gitNext, we need to add in an email address to the application's configuration so that the Let's Encrypt plugin can use it to request a certificate from the Let's Encrypt server. This can be done with the following command:
dokku config:set --no-restart DOKKU_LETSENCRYPT_EMAIL=<your email address>Here you should swap <your email address> for your own email address. This is used by Let's Encrypt to notify you when the certificate is about to expire.
Note: Normally when you add in configuration, Dokku will automatically restart the application for you. We don't need that in this case, so the
no-restartflag prevents that from happening.
Finally, to install an SSL certificate into our application, we can run this command:
dokku letsencrypt vue-demoThe plugin will request and retrieve the SSL certificate from Let's Encrypt, store it on the server and then configure the SSL port for your application. It will then reconfigure Nginx to automatically use SSL when accessing your app.
As a result, you should now have an SSL-enabled app!
"Add Let's Encrypt support to your Dokku applications using the official plugin"
Tweet This
Aside: Authenticate a Vue App
Using Auth0, you can protect your applications so that only authenticated users can access them. Let's explore how to authenticate a Vue application.
If you would like to have a more in-depth explanation of protecting a Vue application, you can follow this fantastic article: Beginner Vue.js Tutorial with User Login.
Setting up Auth0
To begin, you will need an Auth0 account. You can sign up for a free Auth0 account here. Once you are logged in, follow these steps to set up an Auth0 application.
- Go to your Auth0 Dashboard and click the "+ CREATE APPLICATION" button.
- Name your new app and select "Single Page Web Applications". Hit "Create".
- In the Settings for your new Auth0 application, add
http://localhost:8080to the Allowed Callback URLs, Allowed Logout URLs, Allowed Web Origins. Hit "Save Changes" at the bottom of the page.
Vue application
You will need to install the Auth0 auth0-spa-js SDK. To do so, run the following command:
npm install @auth0/auth0-spa-jsNext, within your src/ folder, create an auth folder. Within the auth folder, create a file named index.js. You should now have a path that is src/auth/index.js.
Within that newly created file, paste in the following code:
// src/auth/index.js

import Vue from 'vue';
import createAuth0Client from '@auth0/auth0-spa-js';

/** Define a default action to perform after authentication */
const DEFAULT_REDIRECT_CALLBACK = () =>
  window.history.replaceState({}, document.title, window.location.pathname);

let instance;

/** Returns the current instance of the SDK */
export const getInstance = () => instance;

/** Creates an instance of the Auth0 SDK. If one has already been created, it returns that instance */
export const useAuth0 = ({
  onRedirectCallback = DEFAULT_REDIRECT_CALLBACK,
  redirectUri = window.location.origin,
  ...options
}) => {
  if (instance) return instance;

  // The 'instance' is simply a Vue object
  instance = new Vue({
    data() {
      return {
        loading: true,
        isAuthenticated: false,
        user: {},
        auth0Client: null,
        popupOpen: false,
        error: null,
      };
    },
    methods: {
      /** Authenticates the user using a popup window */
      async loginWithPopup(o) {
        this.popupOpen = true;

        try {
          await this.auth0Client.loginWithPopup(o);
        } catch (e) {
          // eslint-disable-next-line
          console.error(e);
        } finally {
          this.popupOpen = false;
        }

        this.user = await this.auth0Client.getUser();
        this.isAuthenticated = true;
      },
      /** Handles the callback when logging in using a redirect */
      async handleRedirectCallback() {
        this.loading = true;
        try {
          await this.auth0Client.handleRedirectCallback();
          this.user = await this.auth0Client.getUser();
          this.isAuthenticated = true;
        } catch (e) {
          this.error = e;
        } finally {
          this.loading = false;
        }
      },
      /** Authenticates the user using the redirect method */
      loginWithRedirect(o) {
        return this.auth0Client.loginWithRedirect(o);
      },
      /** Returns all the claims present in the ID token */
      getIdTokenClaims(o) {
        return this.auth0Client.getIdTokenClaims(o);
      },
      /** Returns the access token. If the token is invalid or missing, a new one is retrieved */
      getTokenSilently(o) {
        return this.auth0Client.getTokenSilently(o);
      },
      /** Gets the access token using a popup window */

      getTokenWithPopup(o) {
        return this.auth0Client.getTokenWithPopup(o);
      },
      /** Logs the user out and removes their session on the authorization server */
      logout(o) {
        return this.auth0Client.logout(o);
      },
    },
    /** Use this lifecycle method to instantiate the SDK client */
    async created() {
      // Create a new instance of the SDK client using members of the given options object
      this.auth0Client = await createAuth0Client({
        domain: options.domain,
        client_id: options.clientId,
        audience: options.audience,
        redirect_uri: redirectUri,
      });

      try {
        // If the user is returning to the app after authentication...
        if (
          window.location.search.includes('code=') &&
          window.location.search.includes('state=')
        ) {
          // handle the redirect and retrieve tokens
          const { appState } = await this.auth0Client.handleRedirectCallback();

          // Notify subscribers that the redirect callback has happened, passing the appState
          // (useful for retrieving any pre-authentication state)
          onRedirectCallback(appState);
        }
      } catch (e) {
        this.error = e;
      } finally {
        // Initialize our internal authentication state
        this.isAuthenticated = await this.auth0Client.isAuthenticated();
        this.user = await this.auth0Client.getUser();
        this.loading = false;
      }
    },
  });

  return instance;
};

// Create a simple Vue plugin to expose the wrapper object throughout the application
export const Auth0Plugin = {
  install(Vue, options) {
    Vue.prototype.$auth = useAuth0(options);
  },
};
The comments in this file go over what each section does. To find more details about this file, please visit this blog post section.
Connecting Auth0 and the Vue application
To connect your Auth0 app and your Vue app, you will need to bring over some data from your Auth0 app that you set up earlier. You will want those values protected. To do so, create a file named auth_config.json in the root of your Vue application. Then in the .gitignore, you will want to put that newly created file in there.
In that file, put the following values:
// auth_config.json

{
  "domain": "your-domain.auth0.com",
  "clientId": "yourclientid"
}
Back in your Auth0 dashboard, click on the Settings tab of your Auth0 application. You will find the values "Domain" and "Client ID". Copy and paste those values into this file.
Using authentication globally in Vue
To use this authentication globally within the Vue app, you need to update the src/main.js file. Delete everything in the file and replace with the following code:
// src/main.js

import Vue from 'vue';
import App from './App.vue';
import router from './router';

// Import the Auth0 configuration
import { domain, clientId } from '../auth_config.json';

// Import the plugin here
import { Auth0Plugin } from './auth';

// Install the authentication plugin here
Vue.use(Auth0Plugin, {
  domain,
  clientId,
  onRedirectCallback: (appState) => {
    router.push(
      appState && appState.targetUrl
        ? appState.targetUrl
        : window.location.pathname,
    );
  },
});

Vue.config.productionTip = false;

new Vue({
  router,
  render: (h) => h(App),
}).$mount('#app');
Log in and log out buttons
In order to use all this, you will want to add "Log In" and "Log Out" buttons. To do that, wherever you would like your buttons to be in your application, add this code within the <template> section of that file:
<div v-if="!$auth.loading">
  <!-- show login when not authenticated -->
  <a v-if="!$auth.isAuthenticated" @click="login">Log in</a>
  <!-- show logout when authenticated -->
  <a v-if="$auth.isAuthenticated" @click="logout">Log out</a>
</div>
In that same file within the <script> tag, add in these methods:
<script>
  export default {
    name: 'App',
    methods: {
      // Log the user in
      login() {
        this.$auth.loginWithRedirect();
      },
      // Log the user out
      logout() {
        this.$auth.logout({
          returnTo: window.location.origin,
        });
      },
    },
  };
</script>
You now have the necessary code to authenticate your Vue.js application!
More resources
Summary
In this article, we saw how to set up a new Dokku server using a DigitalOcean Droplet, and then deploy a simple Express application to it using Git Deployment. We then added a Dockerfile to customize the build process for a Vue.js application, creating a multi-stage build that used Vue's built static assets to create a small, optimized Docker image.
We also learned some of the basic Dokku commands, such as dokku apps, dokku proxy and ran the ls command from inside the app container.
Finally, we used the Let's Encrypt dokku plugin to SSL-enable our Vue app.


