


TL;DR: MDX is used to load, parse and render JSX in Markdown documents. In this tutorial, you'll learn how to use Markdown with React to build a project documentation app. Check out this GitHub repository if you'd like to dive straight into the code.
"MDX combines the readability of Markdown files with the expressiveness of JSX."
Tweet This

What is MDX?
MDX combines the readability of Markdown files with the expressiveness of JSX. It is a format that lets you seamlessly use JSX in your Markdown documents. MDX is fast, has no runtime compilation, provides customizable layouts, easily pluggable to existing projects and can import components, like interactive charts, and export metadata.
MDX (https://t.co/dcLf4AdE6o) for those who haven't seen it is a markdown parser for ambitious projects. It's extremely useful for using design system components to render markdown and weaving interactive components in with existing markdown.
— :party-corgi: (@chrisbiscardi) July 26, 2018
What We'll Build
There are several frameworks and projects for setting up documentation websites for open or closed-source software. Instead of setting up any of these projects for our documentation, we'll use MDX to build a documentation app for a fictional JavaScript framework called JollofJS. Once the app is feature-complete, we'll secure it with Auth0.
Getting Started
First, create a React app. To make this easy, use the create-react-app open-source software by Facebook.
# Install it globally
npm install -g create-react-app
Once you are done installing create-react-app on your machine, create a React app like so:
create-react-app jollofjs-docAnother option is to create a new React app via npx:
npx create-react-app jollofjs-docNote: Make sure you have node version >= v8.5 installed on your system and npx comes with npm 5.2+ and higher.
Go ahead to change and the new working directory, jollofjs-doc:
cd jollofjs-docNow, install react-app-rewired:
npm install react-app-rewired --save-devreact-app-rewired allows you tweak the create-react-app webpack config(s) without using eject and without creating a fork of the react-scripts.
Create a config-overrides.js file in the root directory and add the code below to it:
const { getBabelLoader } = require('react-app-rewired');
module.exports = (config, env) => {
    const babelLoader = getBabelLoader(config.module.rules);
    config.module.rules.map(rule => {
        if (typeof rule.test !== 'undefined' || typeof rule.oneOf === 'undefined') {
            return rule
        }

        rule.oneOf.unshift({
            test: /\.mdx$/,
            use: [
                {
                    loader: babelLoader.loader,
                    options: babelLoader.options
                },
                '@mdx-js/loader'
            ]
        });

        return rule
    });
    return config
};
Don't worry too much about the contents of this file. It's a file that utilizes Babel to load several packages and plugin such as the mdx-js/loader and .mdx files.
Go ahead and install the following packages:
npm install node-sass-chokidar @mdx-js/loader @mdx-js/mdx npm-run-all react-router react-router-dom --save- @mdx-js/loader: Webpack loader for MDX.
- @mdx-js/mdx: MDX Implementation for parsing the
mdxfiles. - node-sass-chokidar: For watching and converting scss to css files.
- npm-run-all: A CLI tool to run multiple npm-scripts in parallel or sequential.
- react-router and react-router-dom: Packages for routing within the app.
Once the installation is complete, open package.json in the root directory and change the existing calls to react-scripts in npm scripts
...
"scripts": {
  "build-css": "node-sass-chokidar src/ -o src/",
  "watch-css": "npm run build-css && node-sass-chokidar src/ -o src/ --watch --recursive",
  "start-js": "react-app-rewired start",
  "start": "npm-run-all -p watch-css start-js",
  "build-js": "react-app-rewired build",
  "build": "npm-run-all build-css build-js",
}
Now, run the app for the first time using npm start to be sure the packages got installed properly and the config works. Let's create our components.
Creating Our React Components
Components allow us to split the UI into reusable, independent pieces. Now, let's go ahead and create the following directories:
mkdir src/Page src/Header src/Nav src/GuardedRoute src/markdownThe markdown directory will contain all the markdown files that contain our documentation pages.
To get the .mdx files easily, follow this process:
- Clone the mdx-tutorial repo.
- Unzip the folder.
- Copy the files from
src/markdownin the downloaded folder. - Paste the copied files into your project's
src/markdownfolder.
Header Component
In the src/Header directory, create Header.js file and add the following:
src/Header/Header.js
import React from 'react';
import {Link, withRouter} from 'react-router-dom';

function Header(props) {

  return (
    <nav className="navbar navbar-dark bg-primary fixed-top">
      <Link className="navbar-brand" to="/">
        JollofJS Documentation App
      </Link>
      <button className="btn btn-dark">Sign In</button>
    </nav>
  );
}

export default withRouter(Header);
The Header component contains the Sign In button and will house the Sign out button when we add authentication later on in the tutorial.
Let's create the Page component. This is the major component that handles the processing of the markdown files.
Page Component
In the src/Page directory, create two files, Page.js and style.scss file and add code to them like so:
src/Page/Page.js
import React, { Component } from 'react';
import Nav from "../Nav/Nav";
import './style.css';

class Page extends Component {

    constructor(props){
      super(props);

      this.state = {
        Component: '',
        page: this.props.match.params.page
      }
    }

    async addComponent(name){
      import(`../markdown/${name}.mdx`)
        .then(component =>
          this.setState({
            Component: component.default
          })
        )
        .catch(() => {
          this.setState({
            Component: ''
          })
        });
    }

    static capitalize(text){
      return text.substr(0, 1).toUpperCase() + text.substr(1);
    }

    async componentDidMount() {
      await this.addComponent(Page.capitalize(this.state.page));
    }

    async componentDidUpdate(prevProps, prevState) {
      if(prevState.page !== this.state.page) {
         await this.addComponent(Page.capitalize(this.state.page));
      }
    }

    static getDerivedStateFromProps(nextProps, prevState) {
      if(nextProps.match.params.page !== prevState.page) {
        return {
          page: nextProps.match.params.page
        }
      }

      else return null;
    }

    render() {
        const { Component } = this.state;

        return (
            <div className="container">
                <div>
                    <Nav />
                    <div className="content">
                        { Component ? <Component /> : null }
                    </div>
                </div>
            </div>
        );
    }
}

export default Page;
Create style.scss file and copy the code from this file here to it.
Let's analyze this code properly.
- addComponent: The
addComponentfunction dynamically imports.mdxfiles from themarkdowndirectory and stores the content in the app's state. - capitalize: The
capitalizefunction simply capitalizes the name of the route to match the name of the file in themarkdowndirectory. - componentDidMount: This is a lifecycle method that's invoked once the
Pagecomponent loads. This method calls theaddComponentmethod when it is invoked. - getDerivedStateFromProps: This is a static method which is invoked after a component is instantiated as well as when it receives new props. It receives two params
nextPropsandprevState. We compared the prop stored in the state with the next prop. If it is different, it returns the new prop as a new state else it returns null. - componentDidUpdate: This is a new lifecycle method that's fired when state changes and we called the
addComponentmethod to load the content of the new markdown file.
This is the backbone of our application. This component is able to load the content of the mdx files because of the incredible @mdx-js/loader and @mdx-js/mdx tools.
Sidebar Navigation Component
In the src/Nav directory, create Nav.js file and add the following:
src/Nav/Nav.js
import React, { Component } from 'react';
import { NavLink } from "react-router-dom";
import './style.css';

class Nav extends Component{
  constructor(props){
    super(props);
  }

  render(){
    return (
      <div className="sidenav">
        <div className="sidenavbar">
          <NavLink to='/page/home' activeClassName="active">Home </NavLink>
          <NavLink to='/page/intro' activeClassName="active">Get Started </NavLink>
          <NavLink to='/page/concepts' activeClassName="active">Main Concepts </NavLink>
          <NavLink to='/page/reference' activeClassName="active">API Reference </NavLink>
          <NavLink to='/page/libraries' activeClassName="active">Libraries </NavLink>
          <NavLink to='/page/contributors' activeClassName="active">Contributors </NavLink>
        </div>
      </div>
    )
  }
}

export default Nav;
Create style.scss file and copy the code from this file into it.
The Nav component will be our sidebar navigation system. Without it, users won't be able to go through the various documentation pages.
Welcome Component
This is the component that makes up the landing page. Create a src/Welcome directory and add a Welcome.js file to it. Now add code to it like so:
src/Welcome/Welcome.js
import React, {Component} from 'react';

class Welcome extends Component {
  constructor(props) {
    super(props);
  }

  render() {
    return (
      <div className="container">
        <div className="row">
          <div className="jumbotron col-12">
            <h1 className="display-3">Welcome to the Jollof JS Framework</h1>
          </div>
        </div>
      </div>
    )
  }
}

export default Welcome;
Set Up Routing
Open up index.js and make sure it is set up to handle the routing like so:
src/index.js
import React from 'react';
import ReactDOM from 'react-dom';
import { BrowserRouter } from 'react-router-dom';
import './index.css';
import App from './App';
import registerServiceWorker from './registerServiceWorker';

ReactDOM.render(
  <BrowserRouter>
    <App/>
  </BrowserRouter>,
  document.getElementById('root')
);
registerServiceWorker();
In the code above, we can see clearly that App is imported. So, let's set up App.js properly with the routes.
src/App.js
import React, { Component } from 'react';
import {Route, withRouter} from 'react-router-dom';
import Header from './Header/Header';
import Welcome from './Welcome/Welcome';
import Page from "./Page/Page";

class App extends Component {

  render() {
    return (
      <div>
        <Header />
        <Route exact path='/' component={Welcome} />
        <Route exact path='/page/:page' component={Page} />
      </div>
    );
  }
}

export default withRouter(App);
One more thing. Set up bootstrap in the public/index.html file like so:
<!DOCTYPE html>
<html lang="en">
<head>
...
<link rel="manifest" href="%PUBLIC_URL%/manifest.json">
<link rel="shortcut icon" href="%PUBLIC_URL%/favicon.ico">
<link rel="stylesheet" href="https://bootswatch.com/4/flatly/bootstrap.min.css">
...
</head>
<body>
...
</body>
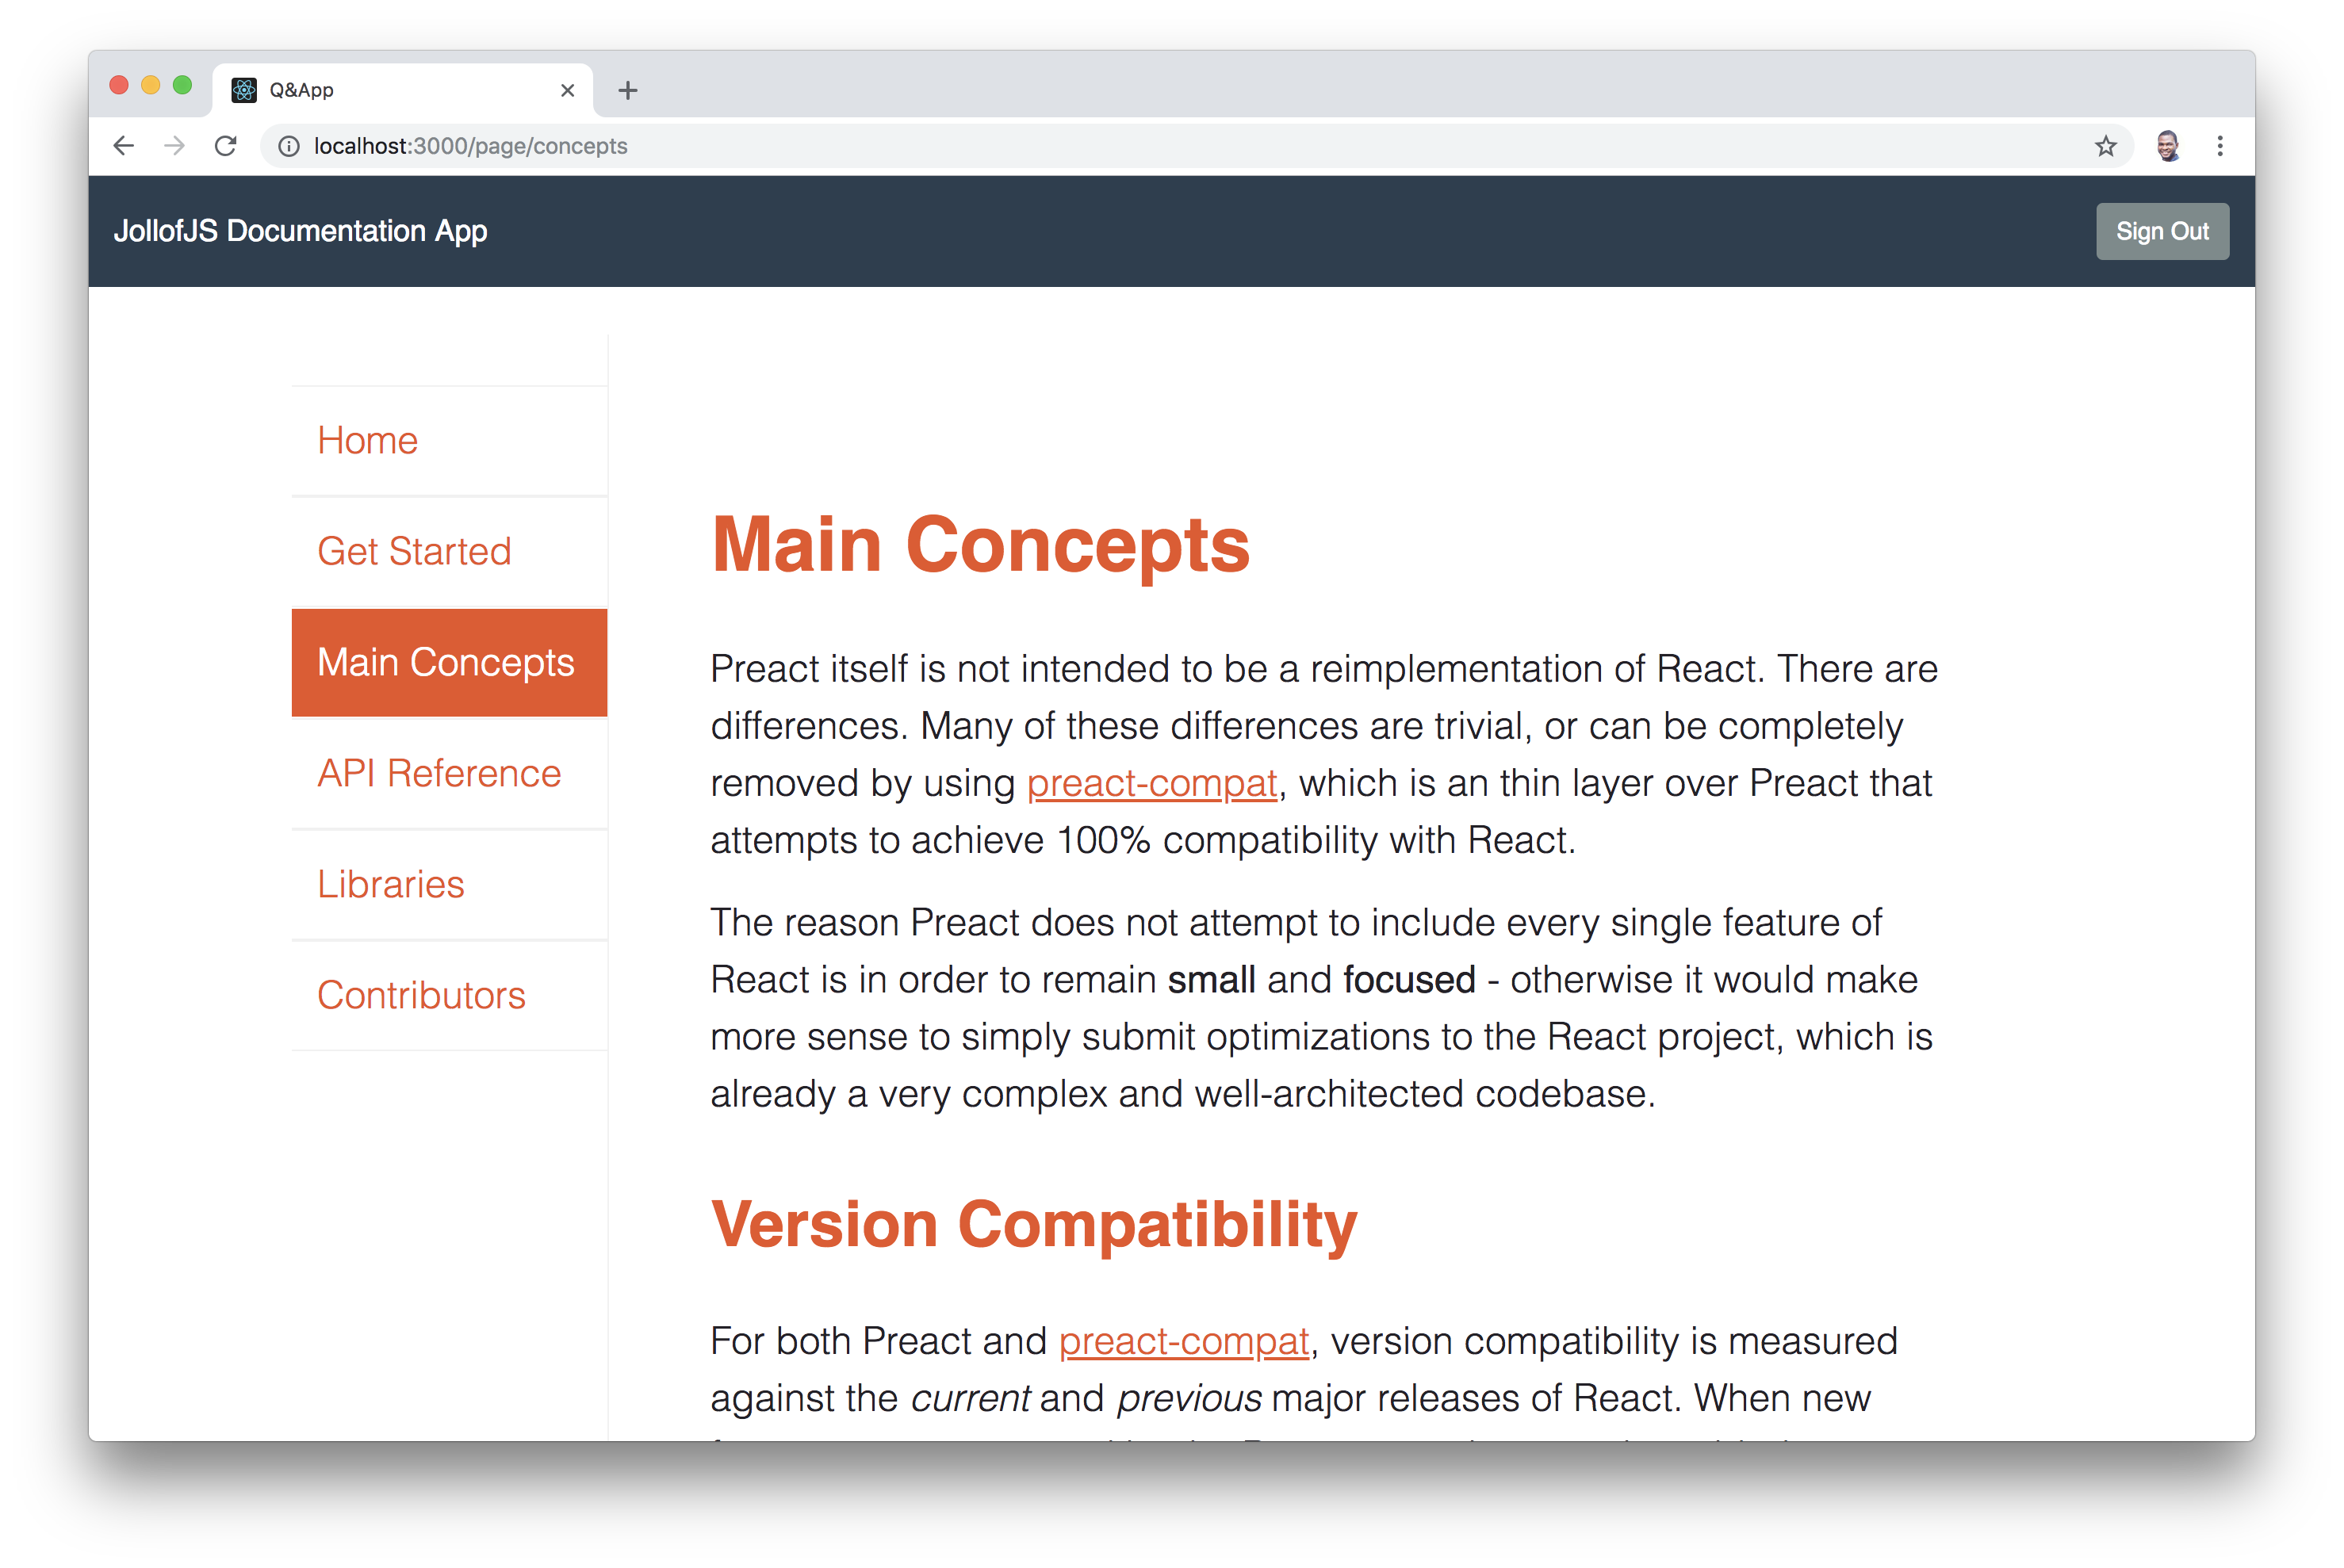
</html>If you need to, run your app again, open http://localhost:3000 and you'll see the Welcome screen as follows:

Now, go to the /page/home route and use the sidebar navigation to check the documentation for each section!
Adding Authentication to Our React App
Auth0 allows us to easily add authentication to applications. If you don't have an Auth0 account yet, you can sign up for a free one here. Login to your Auth0 management dashboard and create a new application. In the dialog shown, enter the name and select Single Page Application as its type:
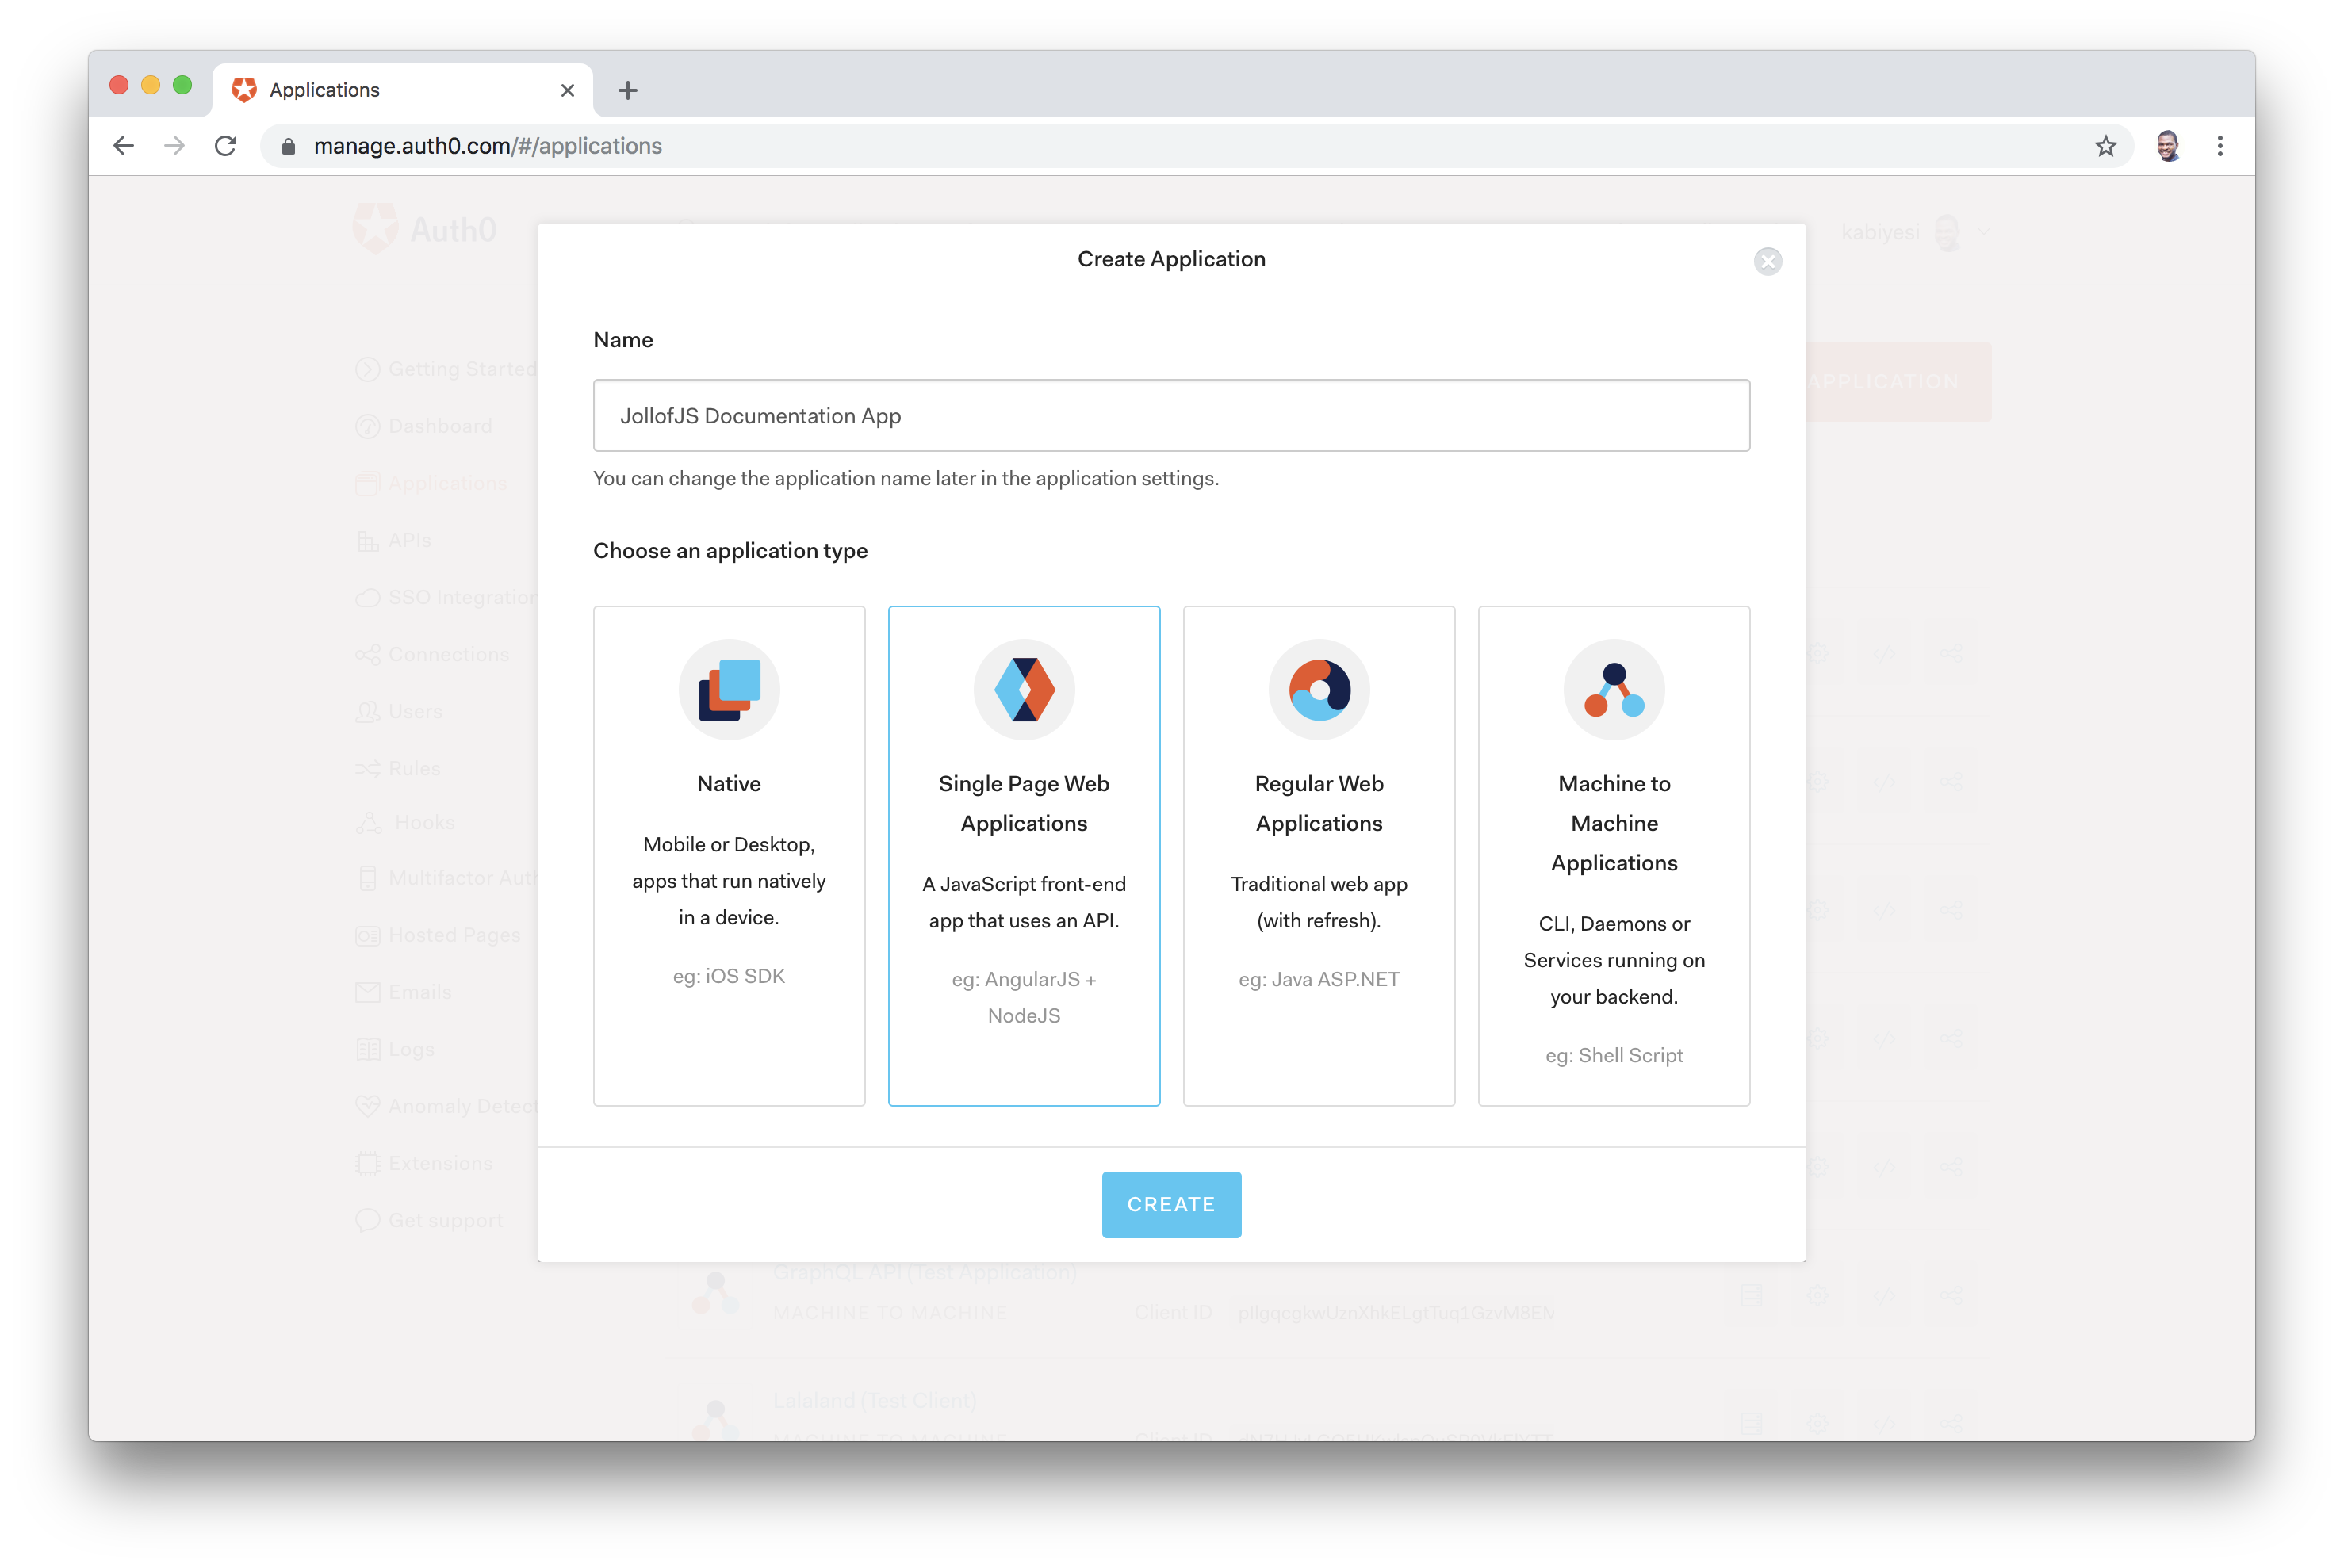
Then, click on the Create button. Go ahead and click on the Settings tab.
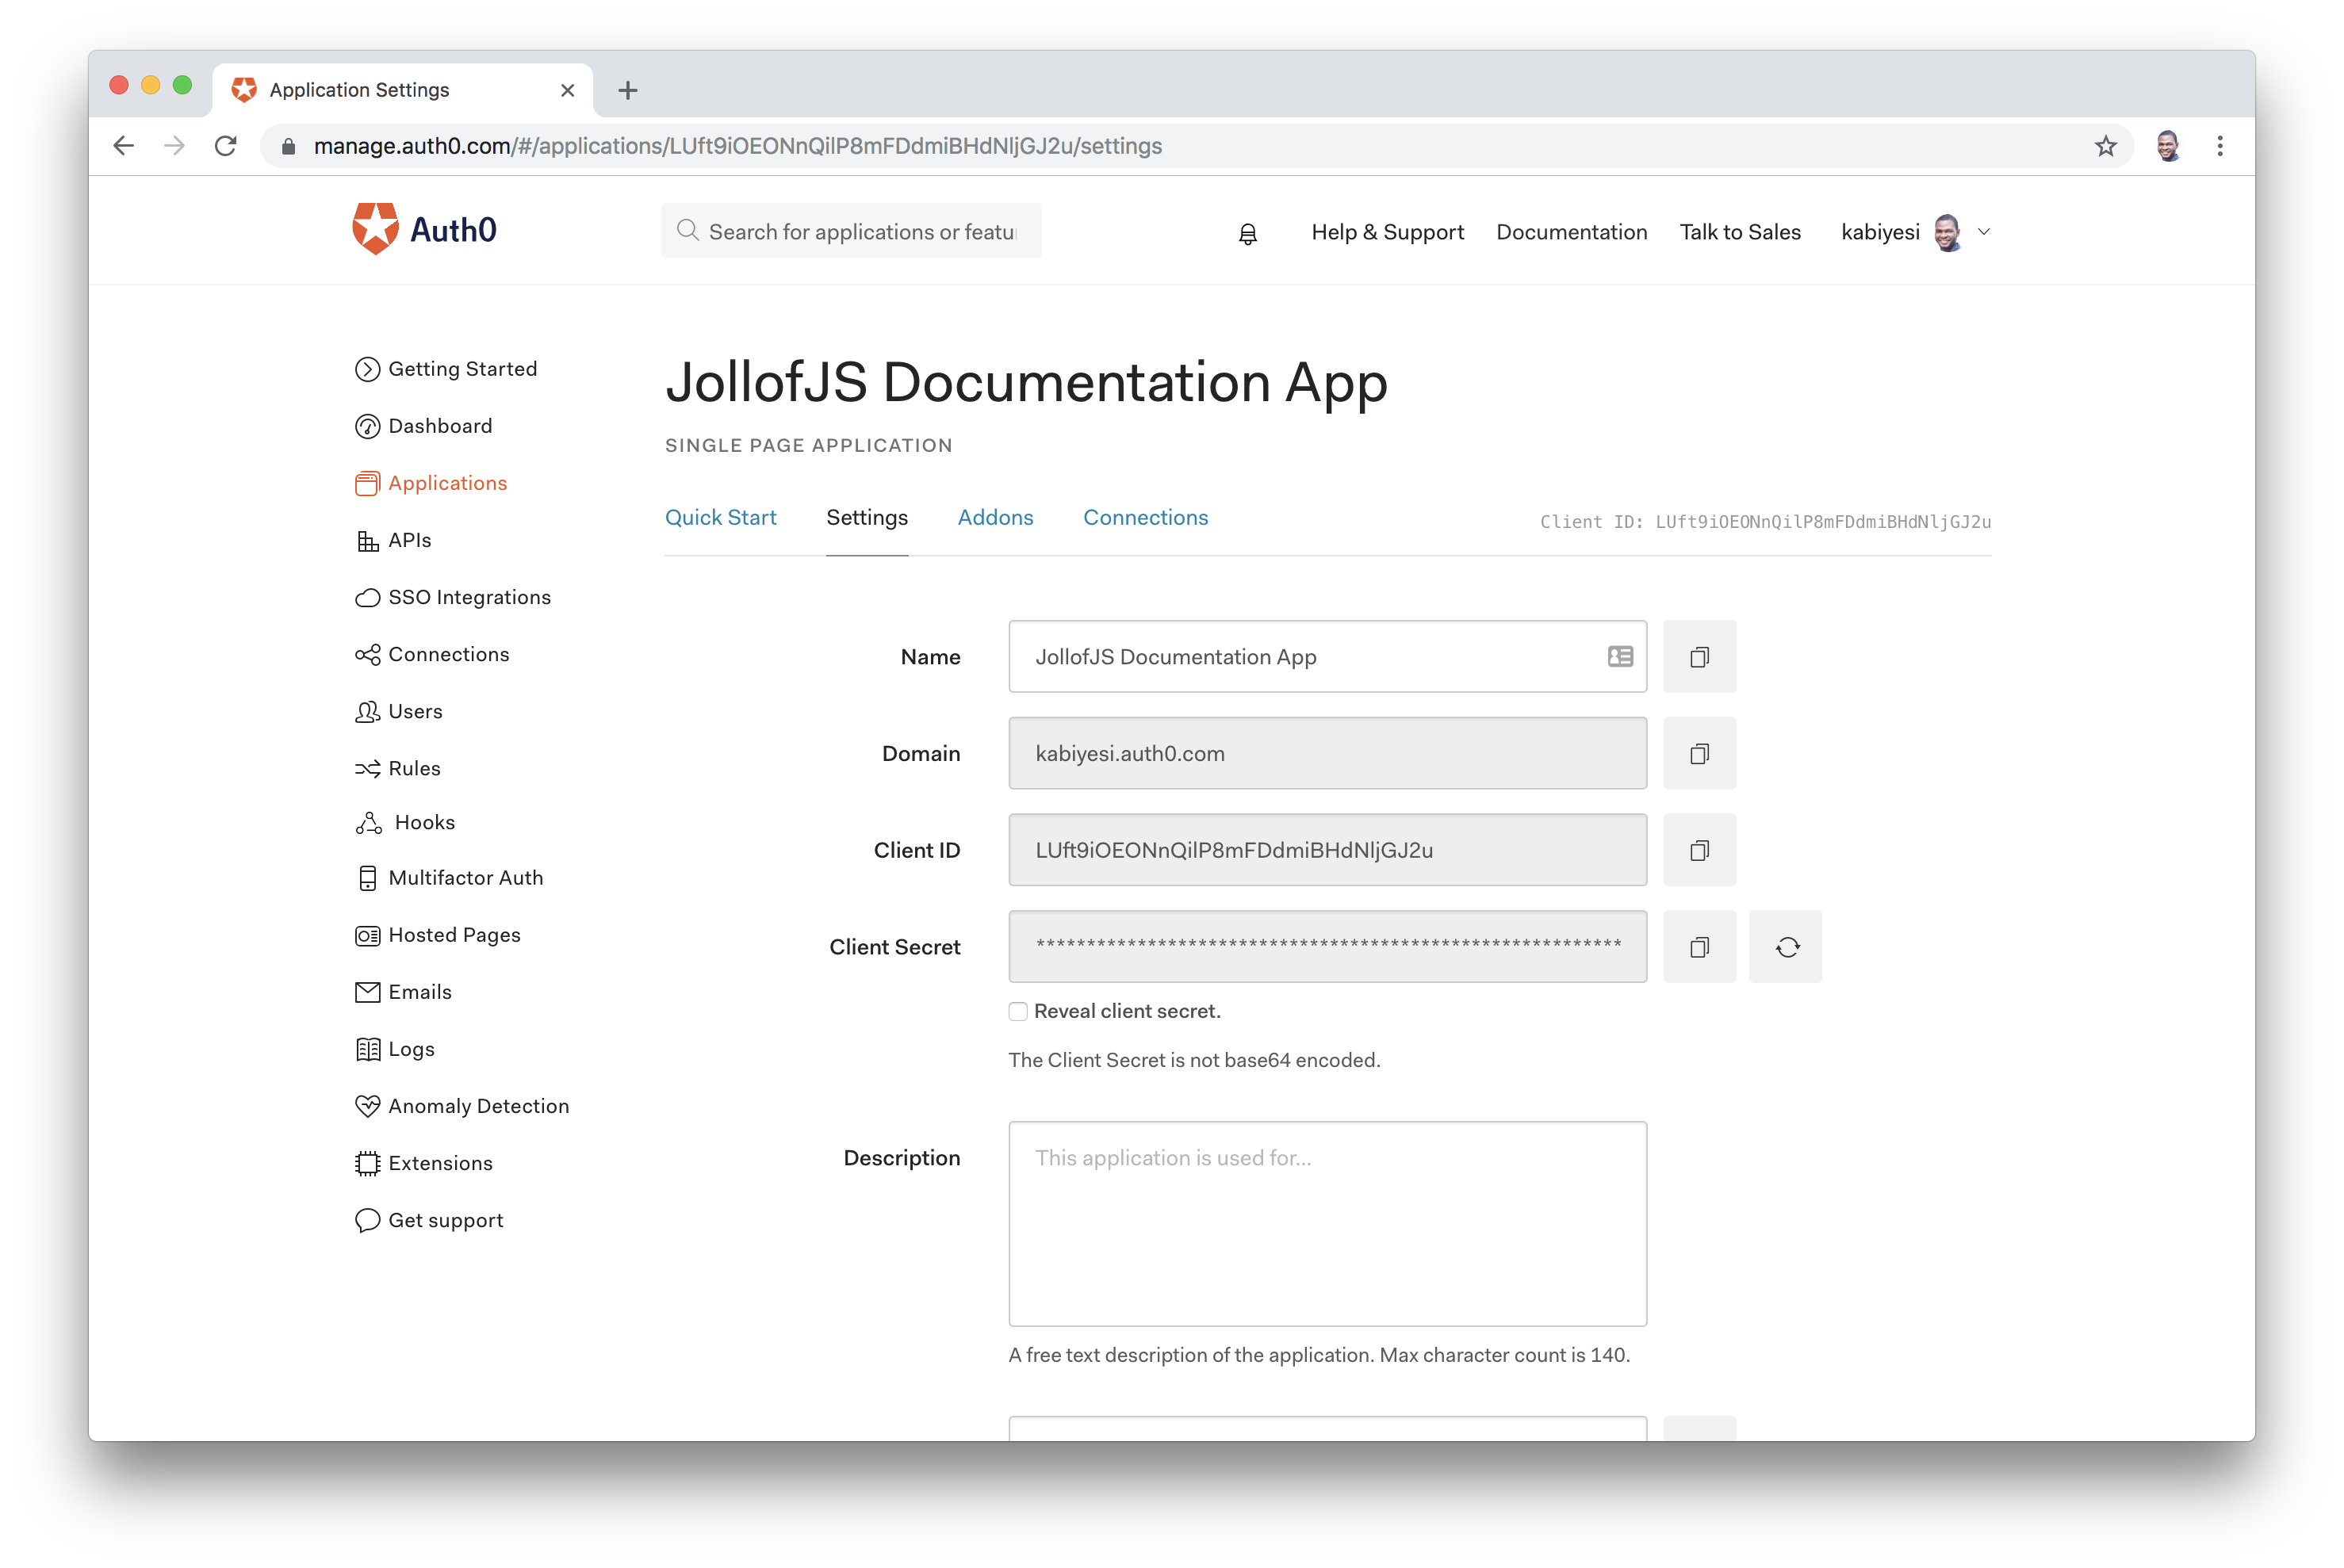
In the Settings tab, add http://localhost:3000/callback in the Allowed Callback URLs and http://localhost:3000 to the Allowed Origins (CORS).
Click on the SAVE CHANGES button once you are done modifying the settings with the information above.
Create the Auth Service
We'll create an authentication service to handle everything about authentication in our app. Go ahead and create an Auth.js file under the src directory.
Before we add code, you need to install auth0-js package like so:
npm install auth0-js --saveOpen up the Auth.js file and add code to it like so:
src/Auth.js
import auth0 from 'auth0-js';

class Auth {
  constructor() {
    this.auth0 = new auth0.WebAuth({
      // the following three lines MUST be updated
      domain: '<YOUR_AUTH0_DOMAIN>',
      clientID: '<YOUR_AUTH0_CLIENT_ID>',
      redirectUri: 'http://localhost:3000/callback',
      audience: 'https://<YOUR_AUTH0_DOMAIN>/userinfo',
      responseType: 'token id_token',
      scope: 'openid email'
    });

    this.handleAuthentication = this.handleAuthentication.bind(this);
    this.isAuthenticated = this.isAuthenticated.bind(this);
    this.signIn = this.signIn.bind(this);
    this.signOut = this.signOut.bind(this);
  }

  getIdToken() {
    return this.idToken;
  }

  handleAuthentication() {
    return new Promise((resolve, reject) => {
      this.auth0.parseHash((err, authResult) => {
        if (err) return reject(err);
        if (!authResult || !authResult.idToken) {
          return reject(err);
        }
        this.setSession(authResult);
        resolve();
      });
    })
  }

  isAuthenticated() {
    return new Date().getTime() < this.expiresAt;
  }

  setSession(authResult) {
    this.idToken = authResult.idToken;
    // set the time that the id token will expire at
    this.expiresAt = authResult.expiresIn * 1000 + new Date().getTime();
  }

  signIn() {
    this.auth0.authorize();
  }

  signOut() {
    // clear id token, and expiration
    this.idToken = null;
    this.expiresAt = null;
  }

  silentAuth() {
    return new Promise((resolve, reject) => {
      this.auth0.checkSession({}, (err, authResult) => {
        if (err) return reject(err);
        this.setSession(authResult);
        resolve();
      });
    });
  }
}

const auth = new Auth();

export default auth;
Note: Replace the <YOUR_AUTH0_CLIENT_ID> and <YOUR_AUTH0_DOMAIN> with the values from your Auth0 application settings.
- YOURAUTH0CLIENT_ID:
Client IDfrom the Auth0 application setting we created earlier. - YOURAUTH0DOMAIN:
Domainfrom the Auth0 application setting we created earlier.
Let's analyze what's going on in the authentication code above:
- constructor: An instance of
auth0.WebAuthis created and initialized with your Auth0 values and define some other important configurations. For example, you are defining that Auth0 will redirect users (redirectUri) to thehttp://localhost:3000/callbackURL (the same one you inserted in the Allowed Callback URLs field previously). - getIdToken: This method returns the
idTokengenerated by Auth0 for the current user. - handleAuthentication: This is the method that your app will call right after the user is redirected from Auth0. This method simply reads the hash segment of the URL to fetch the user details and the id token.
- isAuthenticated: This method returns whether there is an authenticated user or not.
- signIn: This method initializes the authentication process. This method sends your users to the Auth0 login page.
- signOut: This method signs a user out.
The configuration parameters of auth0.WebAuth are as follows:
- domain: Your Auth0 domain such as
example.auth0.com. - clientID: The
Client IDfound on your Application settings page. - redirectUri: The URL where Auth0 will call back to with the result of a successful or failed authentication. It must be whitelisted in the Allowed Callback URLs in your Auth0 Application's settings.
- audience: The default audience, used if requesting access to an API.
- responseType: Response type for all authentication requests. It can be any space separated list of the values code,
token,id_token. If you don't provide a global responseType, you will have to provide a responseType for each method that you use. - scope: The default scope used for all authorization requests.
Let's update the Header component to hide/show the login and logout buttons based on the user's authentication status.
Now, your Header component should be refactored to look like this:
src/Header/Header.js
import React from 'react';
import {Link, withRouter} from 'react-router-dom';
import auth from '../Auth';

function Header(props) {
  const signOut = () => {
    auth.signOut();
    props.history.replace('/');
  };

  return (
    <nav className="navbar navbar-dark bg-primary fixed-top">
      <Link className="navbar-brand" to="/">
        JollofJS Documentation App
      </Link>
      {
        !auth.isAuthenticated() &&
        <button className="btn btn-dark" onClick={auth.signIn}>Sign In</button>
      }
      {
        auth.isAuthenticated() &&
        <div>
          <button className="btn btn-dark" onClick={() => {signOut()}}>Sign Out</button>
        </div>
      }
    </nav>
  );
}

export default withRouter(Header);
Add A Callback Component
We will create a new component in the src directory and call it Callback.js. This component will be activated when the localhost:3000/callback route is called and it will process the redirect from Auth0 and ensure we received the right data back after a successful authentication.
src/Callback.js
import React, {Component} from 'react';
import {withRouter} from 'react-router-dom';
import auth from './Auth';

class Callback extends Component {
  async componentDidMount() {
    await auth.handleAuthentication();
    this.props.history.replace('/page/home');
  }

  render() {
    return (
      <p>Loading profile...</p>
    );
  }
}

export default withRouter(Callback);
Once a user is authenticated, Auth0 will redirect back to our application and call the /callback route. Auth0 will also append the id_token to this request, and our Callback component will make sure to properly process and store the token in the in-app memory. Then, the app will be redirected back to the / page and will be in a logged-in state.
Now, go ahead and add the /callback route in App.js.
src/App.js
...
import Callback from './Callback';
...
class App extends Component {
render() {
return (
<div>
<Header />
<Route exact path='/' component={Welcome} />
<Route exact path='/page/:page' component={Page} />
<Route exact path='/callback' component={Callback} />
</div>
);
}
}
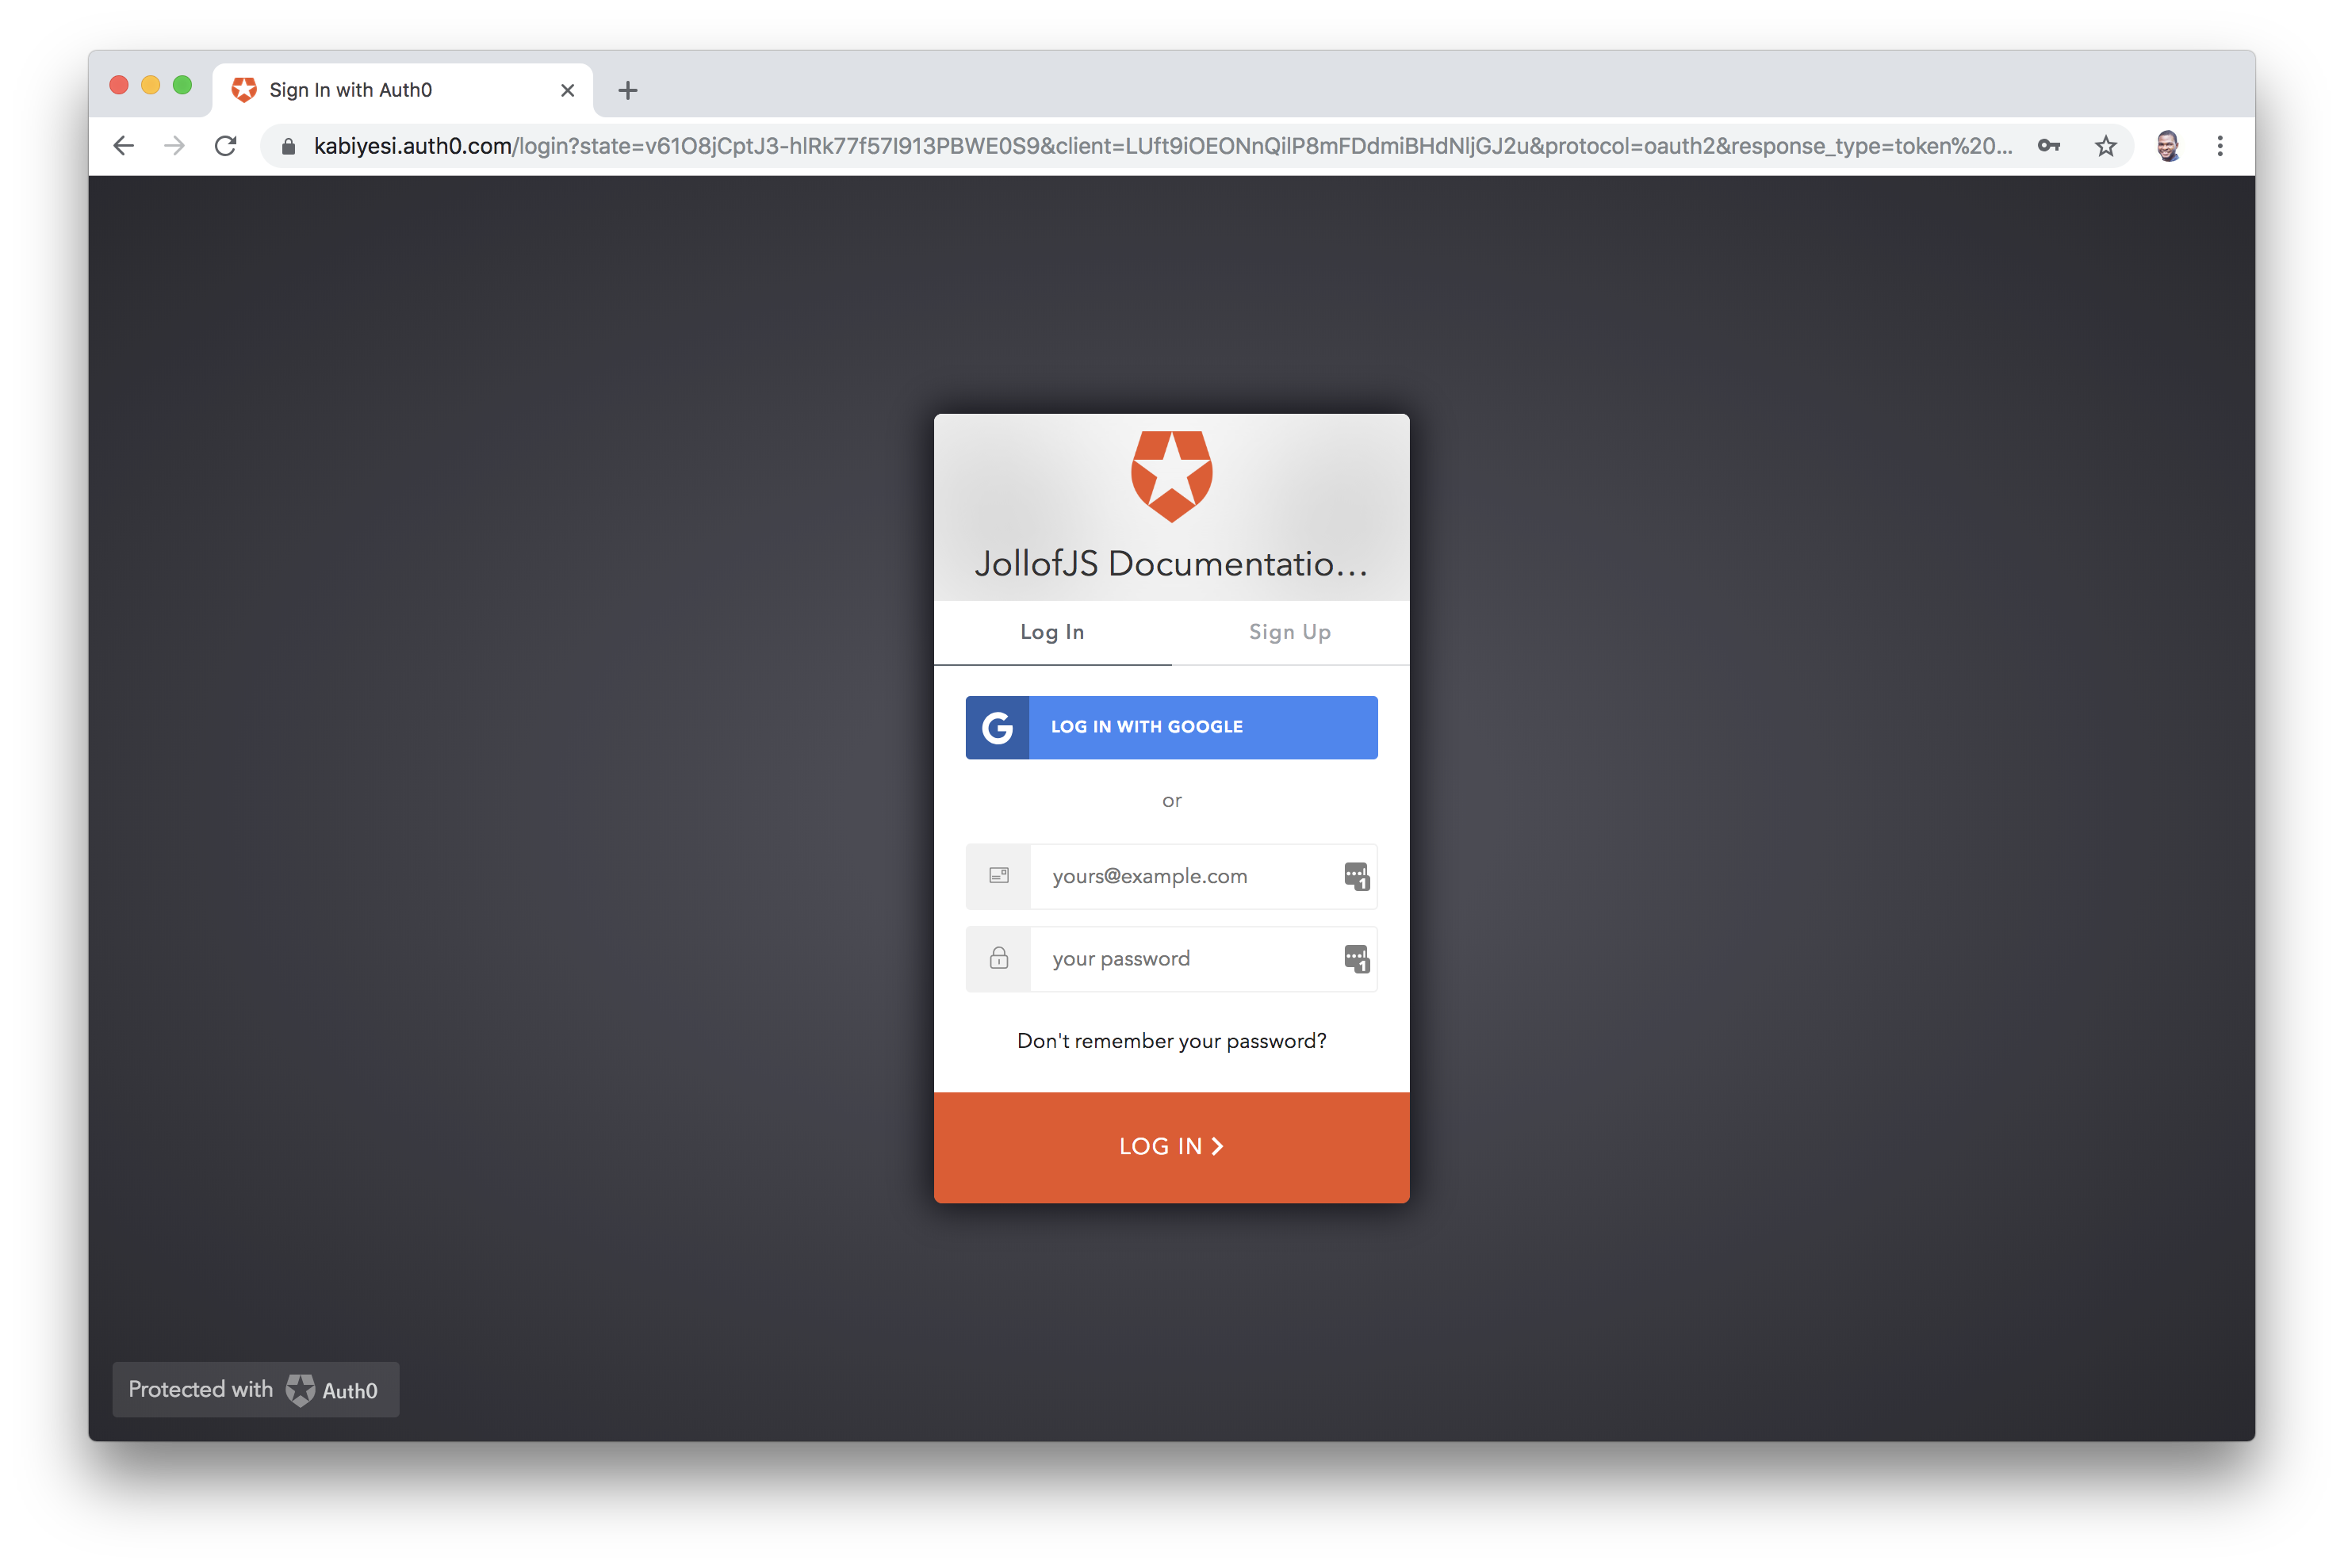
export default withRouter(App);Now, try to run the app again.
Click on the Sign In button.
Keeping Users Signed In
Right now, once you reload the application, the users automatically get logged out because the user's credentials are stored in the app's memory. Let's keep the users logged in!
Note: The routes are not guarded yet, so you can still navigate the app. We'll add a guard to secure the page route later on in this article.
We'll use the Silent Authentication provided by Auth0. Whenever your application is loaded, it will send a silent request to Auth0 to check if the current user (actually the browser) has a valid session. If they do, Auth0 will send back to you an idToken and an idTokenPayload, just like it does on the authentication callback.
Head over to the Applications section of your Auth0 dashboard. Click on the MDX app from the list provided, then head over to the Settings tab of the app and update the following:
- Allowed Web Origins: Add
localhost:3000to the field. Without this value there, Auth0 would deny any AJAX request coming from your app. - Social Connections: Auth0 auto-configure all new accounts to use development keys registered at Google for the social login. We expect developers to replace these keys with theirs once they start using Auth0 in more capacity. Furthermore, every time an app tries to perform a silent authentication, and that app is still using the development keys, Auth0 returns that there is no session active (even though this is not true). Head over to the Social connections on your dashboard, and update the Client ID and Client Secret fields with the new keys gotten from Connect your app to Google documentation provided by Auth0..
Note: If you don't want to use your Google keys, you can deactivate this social connection and rely only on users that sign up to your app through Auth0's Username and Password Authentication.
Check out the silentAuth function in the Auth.js file:
src/Auth.js
...
silentAuth() {
  return new Promise((resolve, reject) => {
    this.auth0.checkSession({}, (err, authResult) => {
      if (err) return reject(err);
      this.setSession(authResult);
      resolve();
    });
  });
}
...
This method is responsible for performing the Silent Authentication. It makes a request to AuthO's checkSession function and sets a new session.
Let's refactor the src/Auth.js file to ensure the new authentication works properly.
src/Auth.js
import auth0 from 'auth0-js';

class Auth {
  constructor() {
    ...
    this.authFlag = 'isLoggedIn';
    ...
  }

  ...

  isAuthenticated() {
    return JSON.parse(localStorage.getItem(this.authFlag));
  }

  setSession(authResult) {
    this.idToken = authResult.idToken;
    localStorage.setItem(this.authFlag, JSON.stringify(true));
  }

  signIn() {
    this.auth0.authorize();
  }

  signOut() {
    localStorage.setItem(this.authFlag, JSON.stringify(false));
    this.auth0.logout({
      returnTo: 'http://localhost:3000',
      clientID: '<YOUR_AUTH0_CLIENT_ID>',
    });
  }

  silentAuth() {
    if(this.isAuthenticated()) {
      return new Promise((resolve, reject) => {
        this.auth0.checkSession({}, (err, authResult) => {
          if (err) {
            localStorage.removeItem(this.authFlag);
            return reject(err);
          }
          this.setSession(authResult);
          resolve();
        });
      });
    }
  }
}

const auth = new Auth();

export default auth;
Note: Quickly head over to the Applications section of your Auth0 dashboard, click on the MDX app from the list provided, then head over to the Settings tab of the app and update the Allowed Logout URLs section with http://localhost:3000.
Let's analyze the change above. The authFlag constant is a flag that we store in local storage to indicate whether a user is logged in or not. It is also an indicator for renewing tokens with the Auth0 server after a full-page refresh.
Once the user is authenticated and redirected back to the app from the Auth0 server, the authFlag is set to true and stored in local storage so that if the user returns to the app later, we can check whether to ask the authorization server for a fresh token. The silentAuth method checks if the user is indeed authorized via the Auth0 checkSession method if the authFlag is true. If the user is authorized, new authentication data is returned and the setSession method is called. If the user is not authorized, the authFlag is deleted from local storage and logged out.
One more thing. Head over to App.js and update it like so:
src/App.js
import React, { Component } from 'react';
import {Route, withRouter} from 'react-router-dom';
import Header from './Header/Header';
import Welcome from './Welcome/Welcome';
import Callback from './Callback';
import Page from "./Page/Page";
import auth from './Auth';

class App extends Component {

  async componentDidMount() {
    if (this.props.location.pathname === '/callback') return;
    try {
      await auth.silentAuth();
      this.forceUpdate();
    } catch (err) {
      if (err.error === 'login_required') return;
    }
  }


  render() {
    return (
      <div>
        <Header />
        <Route exact path='/' component={Welcome} />
        <Route exact path='/page/:page' component={Page} />
        <Route exact path='/callback' component={Callback} />
      </div>
    );
  }
}

export default withRouter(App);
If the requested route is /callback, the app does nothing. This is the correct behavior because, when users are requesting for the /callback route, they do so because they are getting redirected by Auth0 after the authentication process. In this case, you can leave the Callback component to handle the process.
If the requested route is anything else, the app wants to try a silentAuth. Then, if no error occurs, the app calls forceUpdate so the user can see its name and that they are signed in.
If there is an error on the silentAuth, the app checks if the error is login_required. If this is the case, the app does nothing because it means the user is not signed in (or that you are using development keys, which you shouldn't). If there is an error that is not login_required, the error is simply logged to the console. Actually, in this case, it would be better to notify someone about the error so they could check what is happening.
Try to authenticate your app. Then, refresh your browser and you'll discover that you won't be logged out on a page refresh.
One more thing. Let's make sure the page routes can't be accessed if the user is not authenticated!
Secure Page Route
Create a GuardedRoute.js file in the src/GuardedRoute directory. Now add code to the GuardedRoute.js file:
src/GuardedRoute/GuardedRoute.js
import React from 'react';
import {Route} from 'react-router-dom';
import auth from '../Auth';

function GuardedRoute(props) {
  const { component: Component, path} = props;
  return (
    <Route exact path={path} render={(props) => {
     if (!auth.isAuthenticated()) return auth.signIn();
      return <Component {...props} />
    }} />
  );
}

export default GuardedRoute;
In the code above, we created a functional component that checks if a user is authenticated before rendering a component. Let's apply this recently created functionality to our Page route.
Open up App.js. Make sure the GuardedRoute is imported at the top of the file like so:
src/App.js
...
import GuardedRoute from './GuardedRoute/GuardedRoute';
...
Now, pass the Page component to the GuardedRoute and replace <Route exact path='/page/:page' component={Page}> with <GuardedRoute ... /> like so:
src/App.js
...
import GuardedRoute from './GuardedRoute/GuardedRoute';
...

class App extends Component {

  ...

  render() {
    return (
      <div>
        <Header />
        ...
        <GuardedRoute path='/page/:page' component={Page} />
      </div>
    );
  }
}

export default withRouter(App);
Once you try to access any /page route when you are not logged in, you'll be redirected to the login page.
Conclusion
There's a lot to learn about MDX. I just scratched the surface of what's possible in this tutorial. As a developer, MDX gives you enough flexibility and power to easily build awesome documentation software for your closed and open source projects while Auth0 takes care of securing the app.
"MDX gives you enough flexibility and power to easily build awesome documentation software for your closed and open source projects"
Tweet This
I'm learning more about MDX and its various use cases. Have you used MDX? Let me know in the comments section!


