---
title: "How to Connect Auth0 with Shopify: A Tech Quick Start Guide"
description: "Learn how to integrate Auth0 with Shopify customer accounts using OpenID Connect (OIDC) to enhance security and personalize experiences."
authors:
- name: "Stanley Varner"
url: "https://auth0.com/blog/authors/stanley-varner/"
date: "Aug 4, 2025"
category: "Developers,Tutorial"
tags: ["shopify", "oidc", "authentication", "integration"]
url: "https://auth0.com/blog/how-to-connect-auth0-with-shopify-a-tech-quick-start-guide/"
---
# How to Connect Auth0 with Shopify: A Tech Quick Start Guide
While in college, I started an e-commerce business and needed a platform to manage my online store. Shopify was just emerging at the time, and it quickly became the go-to platform for beginners. Its intuitive interface and comprehensive features made it incredibly easy to launch products and scale quickly. However, despite its many advantages, one persistent challenge stood out: customer authentication.
Previously, Shopify lacked support for social or external login options, leading many customers to check out as guests. This made it challenging to offer subscriptions, monitor customer behavior, and cultivate stronger relationships. Key features like multifactor authentication (MFA) for fraud prevention and breach password protection were absent. Additionally, there was no straightforward method to customize the login user interface (UI), execute custom logic during authentication, or establish a centralized identity across various applications. Although Shopify provided a multipass login feature, it necessitated custom code and a more advanced grasp of Auth0.
That’s changed.
## Shopify’s new identity provider integration
Shopify’s new customer accounts experience now allows merchants to [integrate external identity providers](https://help.shopify.com/en/manual/customers/customer-accounts/new-customer-accounts/identity-provider) using OpenID Connect (OIDC). This means you can bring your own authentication provider—like Auth0—to manage login, signup, passwordless options, MFA, and more, all while maintaining a unified user identity across applications.
## Why use Auth0 as an Identity Provider?
Auth0 provides a flexible and powerful authentication platform with support for social logins, enterprise connections, MFA, custom branding, attack protection, and extensible workflows. By integrating Auth0 with Shopify, you gain complete control over the customer login experience—while improving security, personalization, and the ability to scale.
## What this post covers
In this guide, I’ll walk you through how to:
* Set up an Auth0 application for Shopify
* Configure your Shopify store to connect to Auth0 using OpenID Connect (OIDC)
* Customize and test your authentication flow
* Troubleshoot common issues
* Understand the value of using Auth0 over the default Shopify login system
## Prerequisites
* A [Shopify Plus](https://www.shopify.com/plus) store or a Shopify [Developer](https://shopify.dev/) Account
* An Auth0 tenant with admin access
* Basic familiarity with OAuth 2.0 and OIDC concepts
## Steps
### Step 1: Enable new customer accounts in Shopify
In Shopify: Navigate to **Settings \> Customer Accounts.** Next, navigate to **Identity provider** \> **Manage \> Connect To Provider**. Under **Identity provider name**, enter in "Auth0".
Under **Provider**, select **Auth0**.
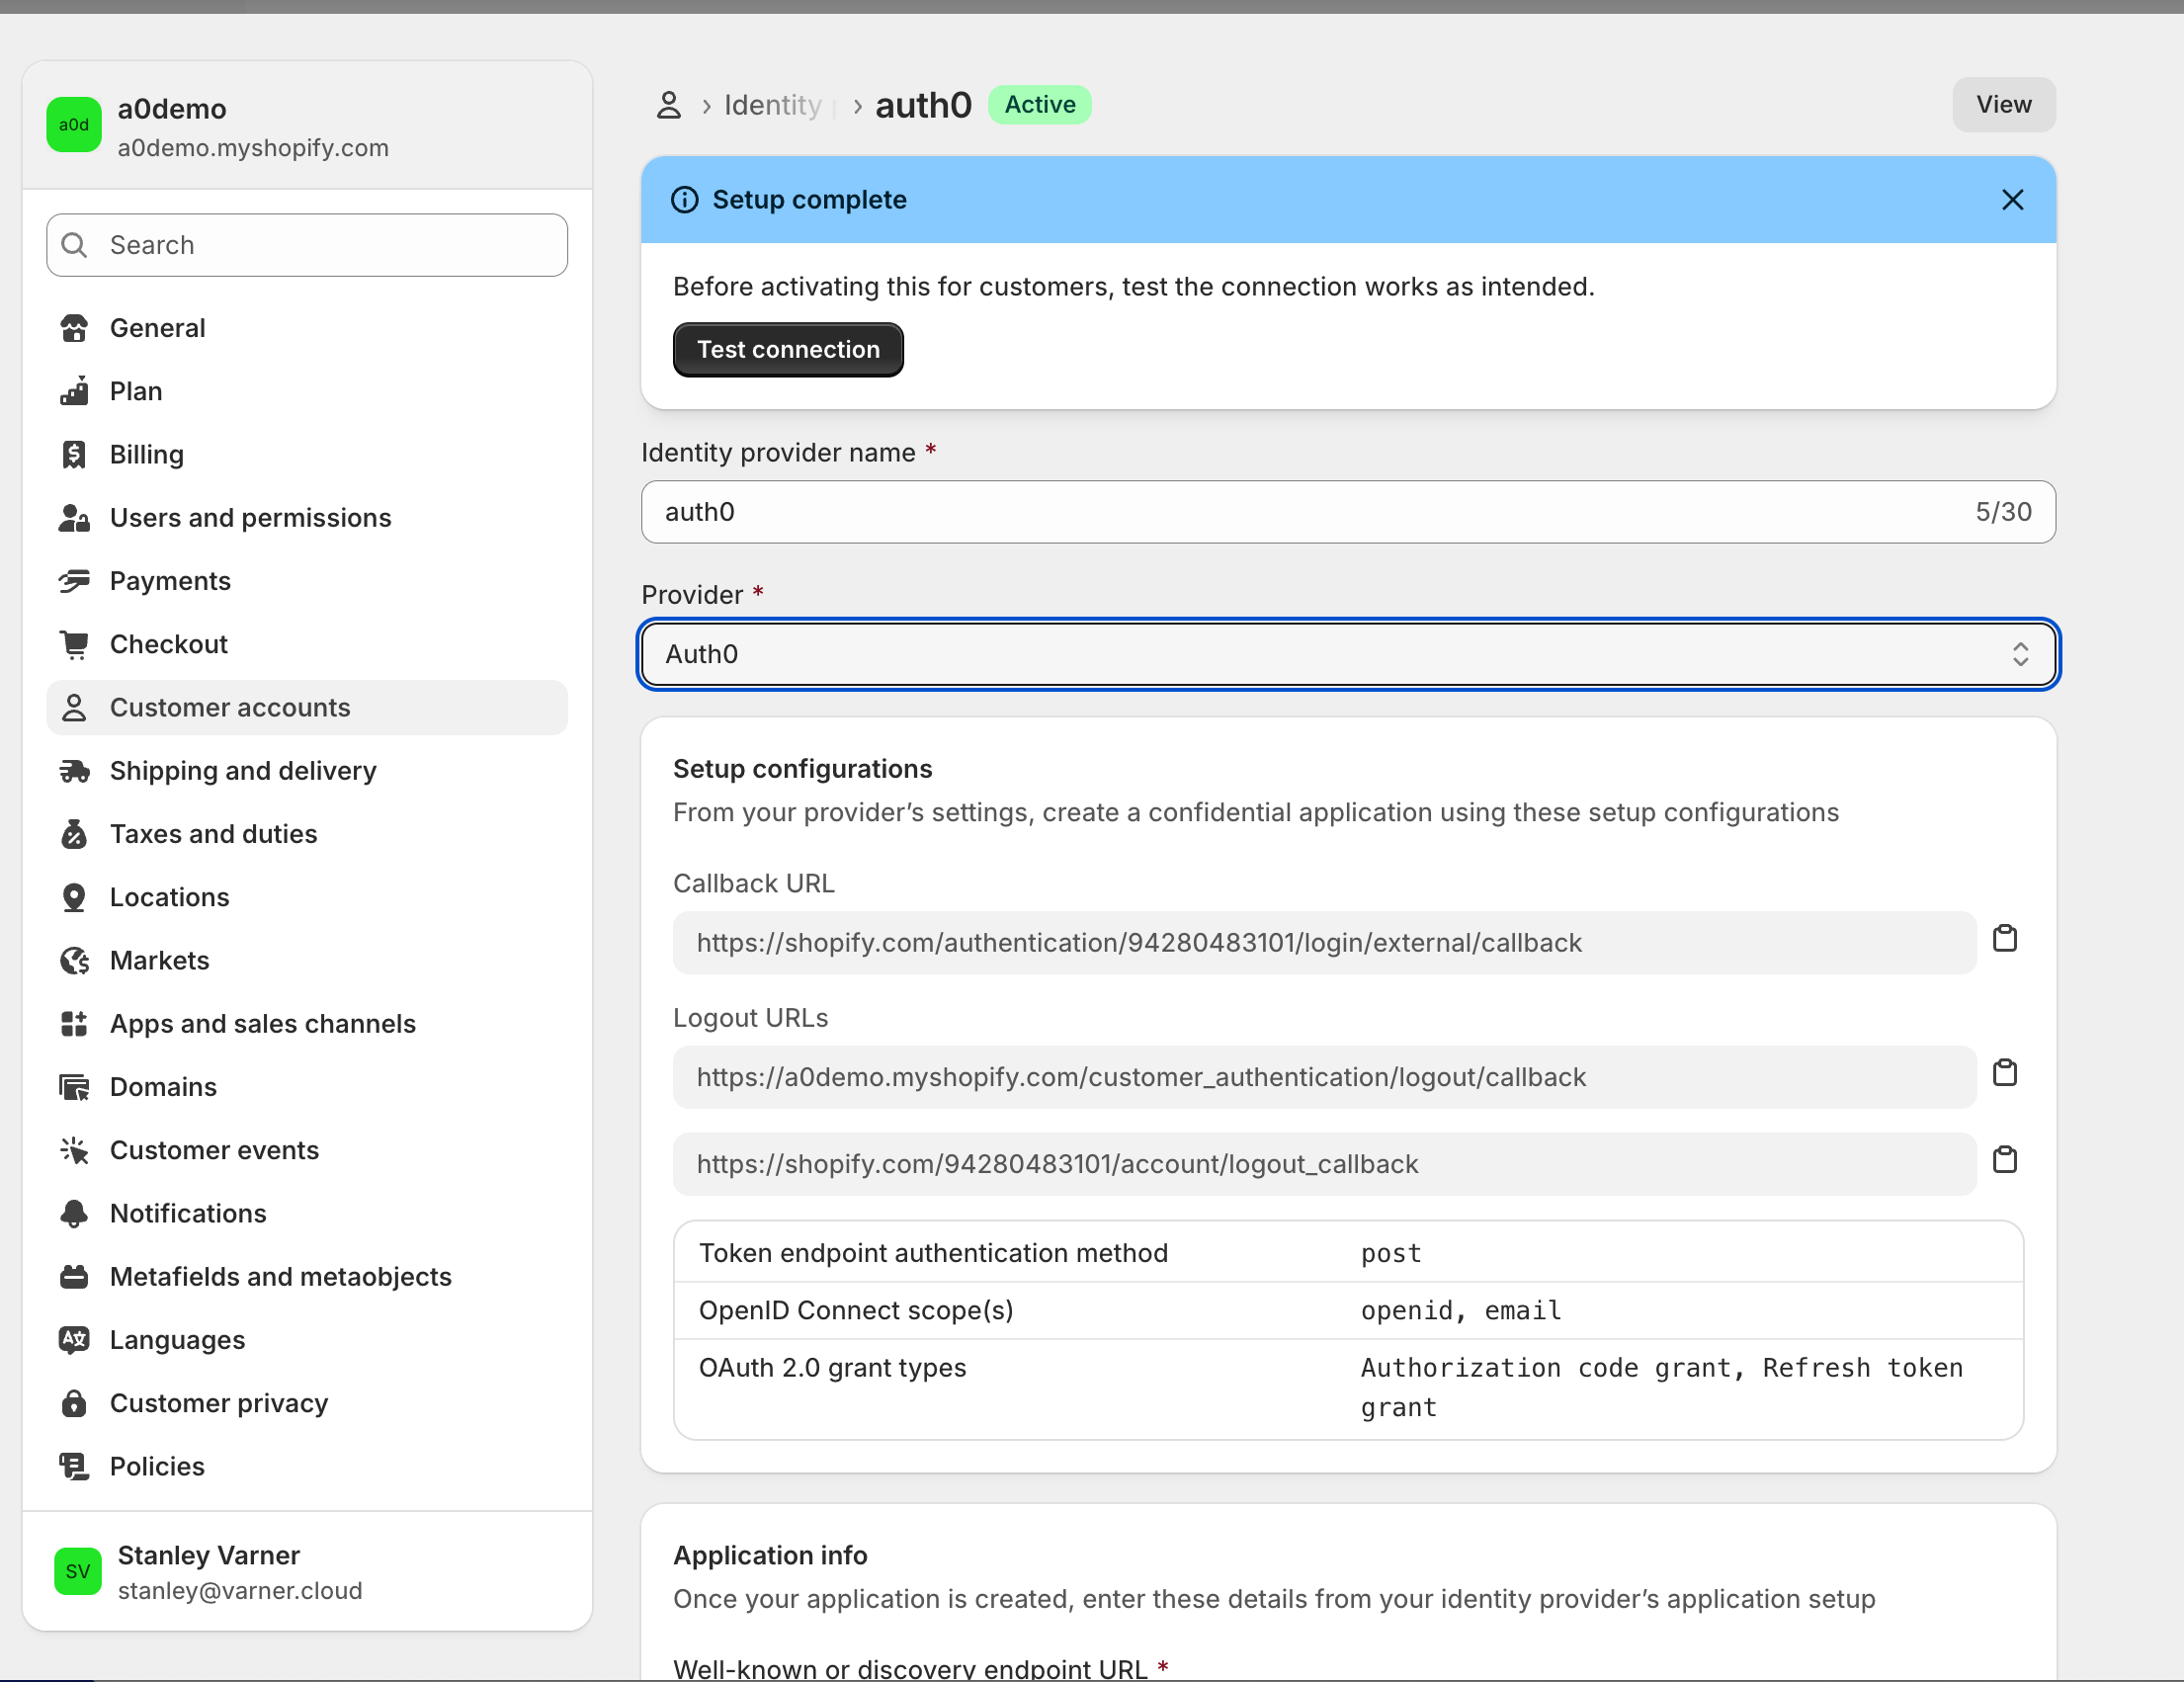 Once you select Auth0 as a provider, you will notice Setup configurations settings. These will be used in Auth0 shortly.
### Step 2: Set up an application in Auth0
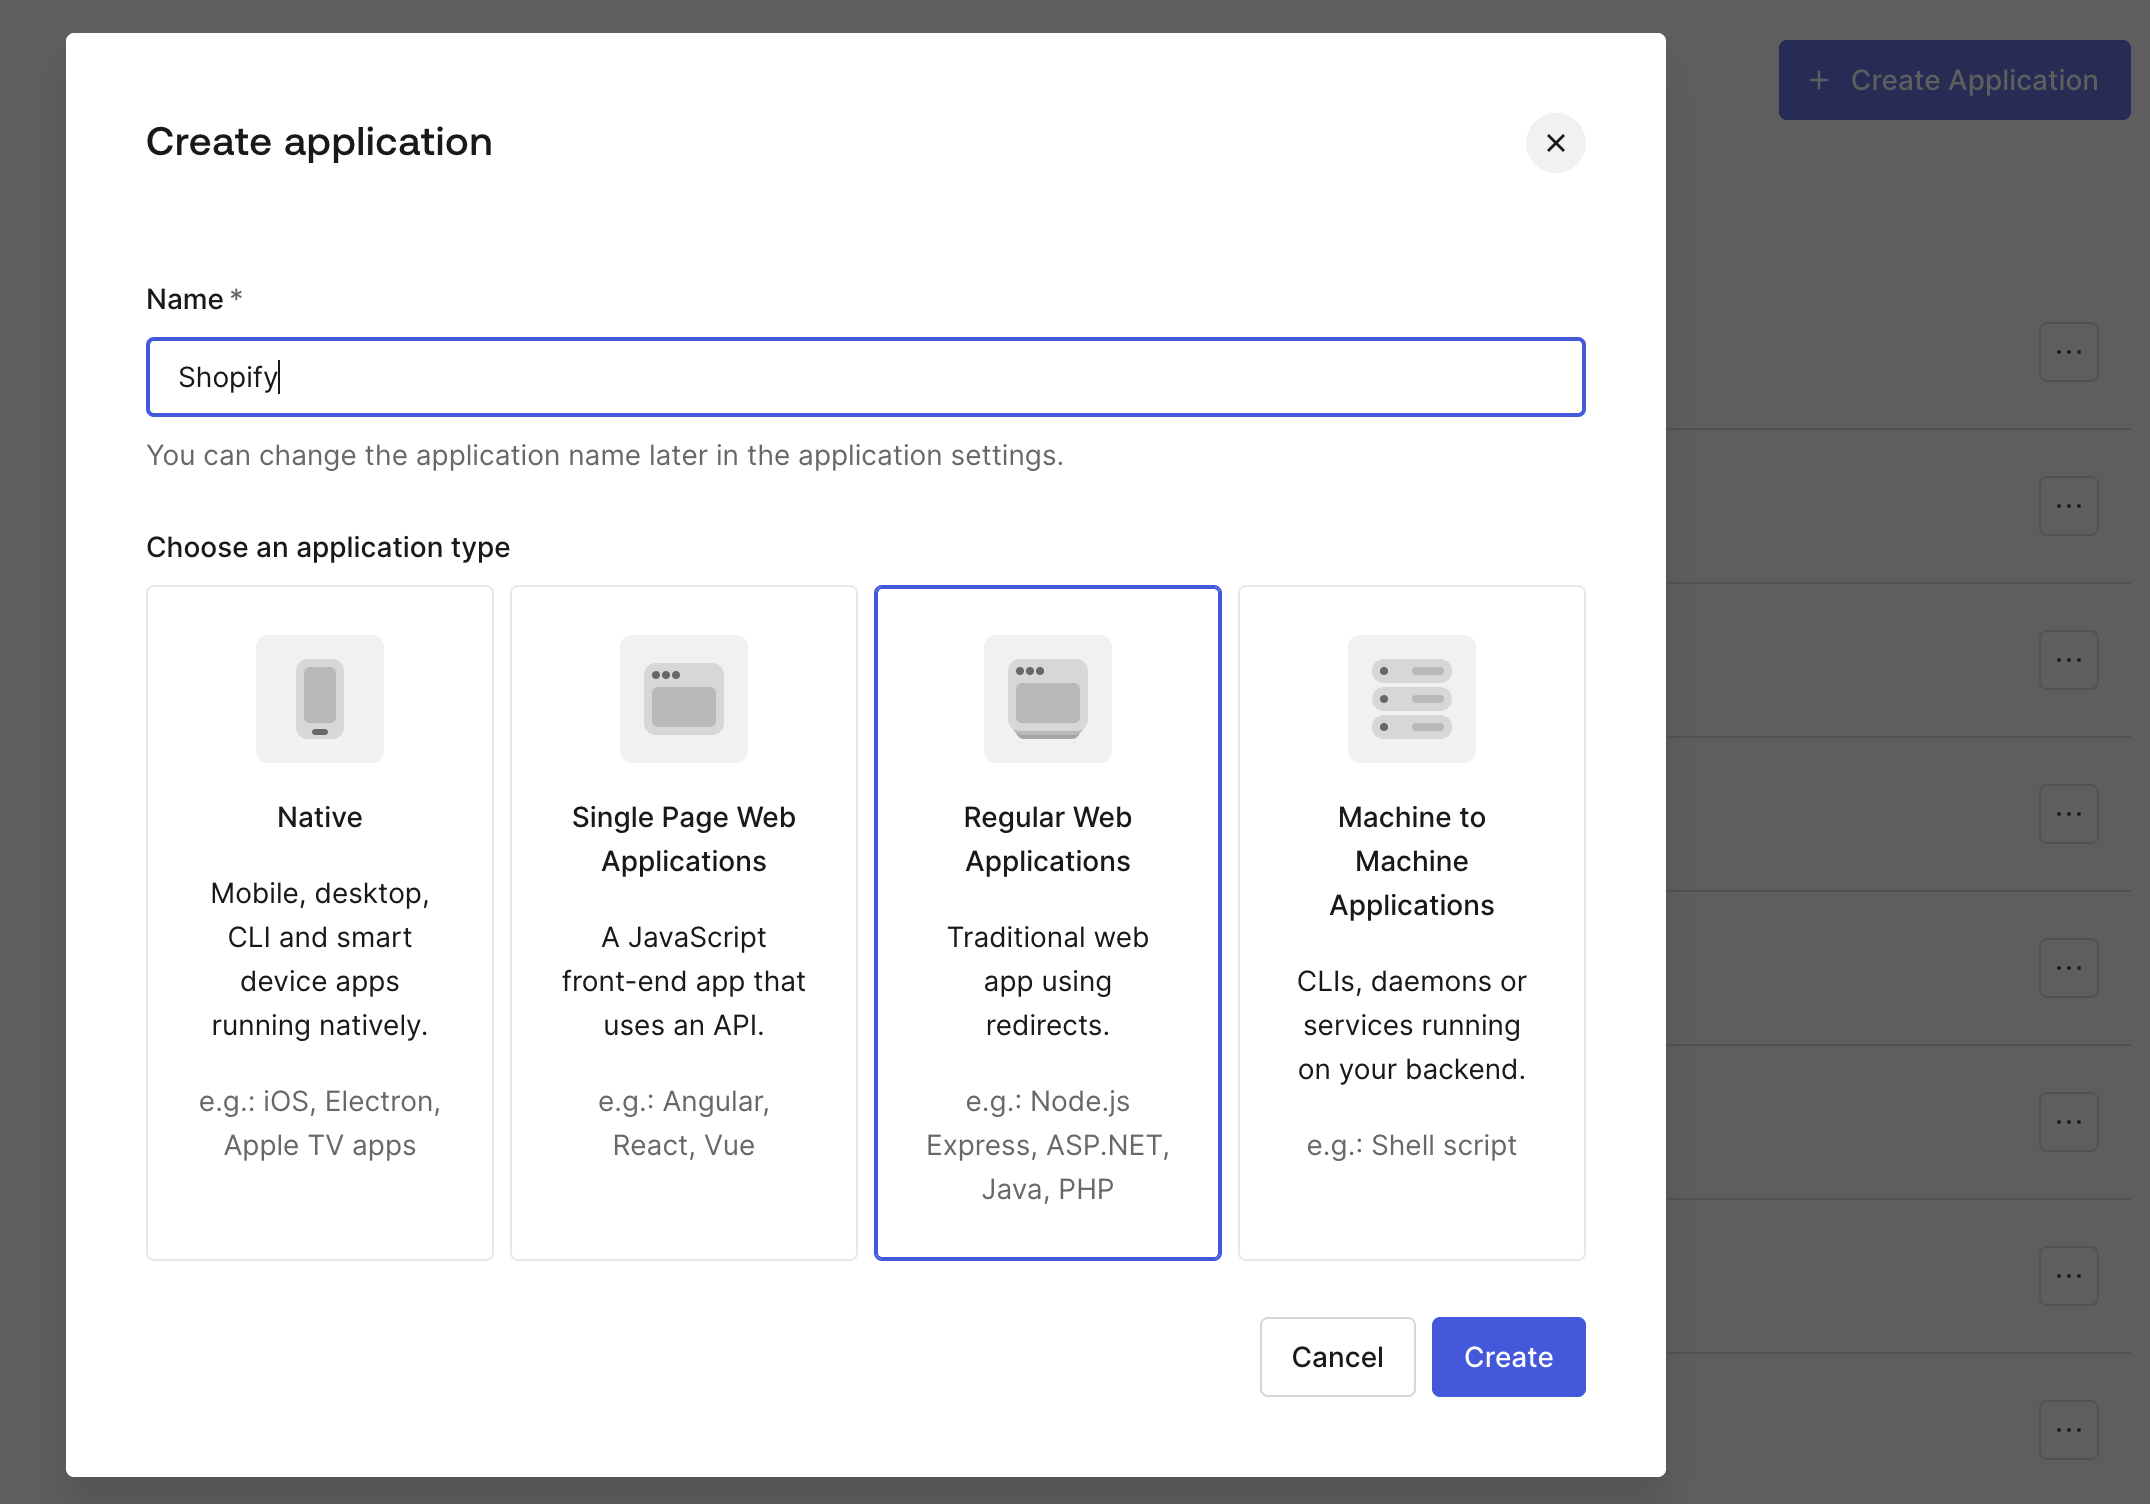
* Go to **Auth0 dashboard** \> **Applications** \> **Create Application.**
* Choose "**Regular Web Application**"
* Give it the name of “**Shopify**”
* Click **Create**
Once you select Auth0 as a provider, you will notice Setup configurations settings. These will be used in Auth0 shortly.
### Step 2: Set up an application in Auth0
* Go to **Auth0 dashboard** \> **Applications** \> **Create Application.**
* Choose "**Regular Web Application**"
* Give it the name of “**Shopify**”
* Click **Create**
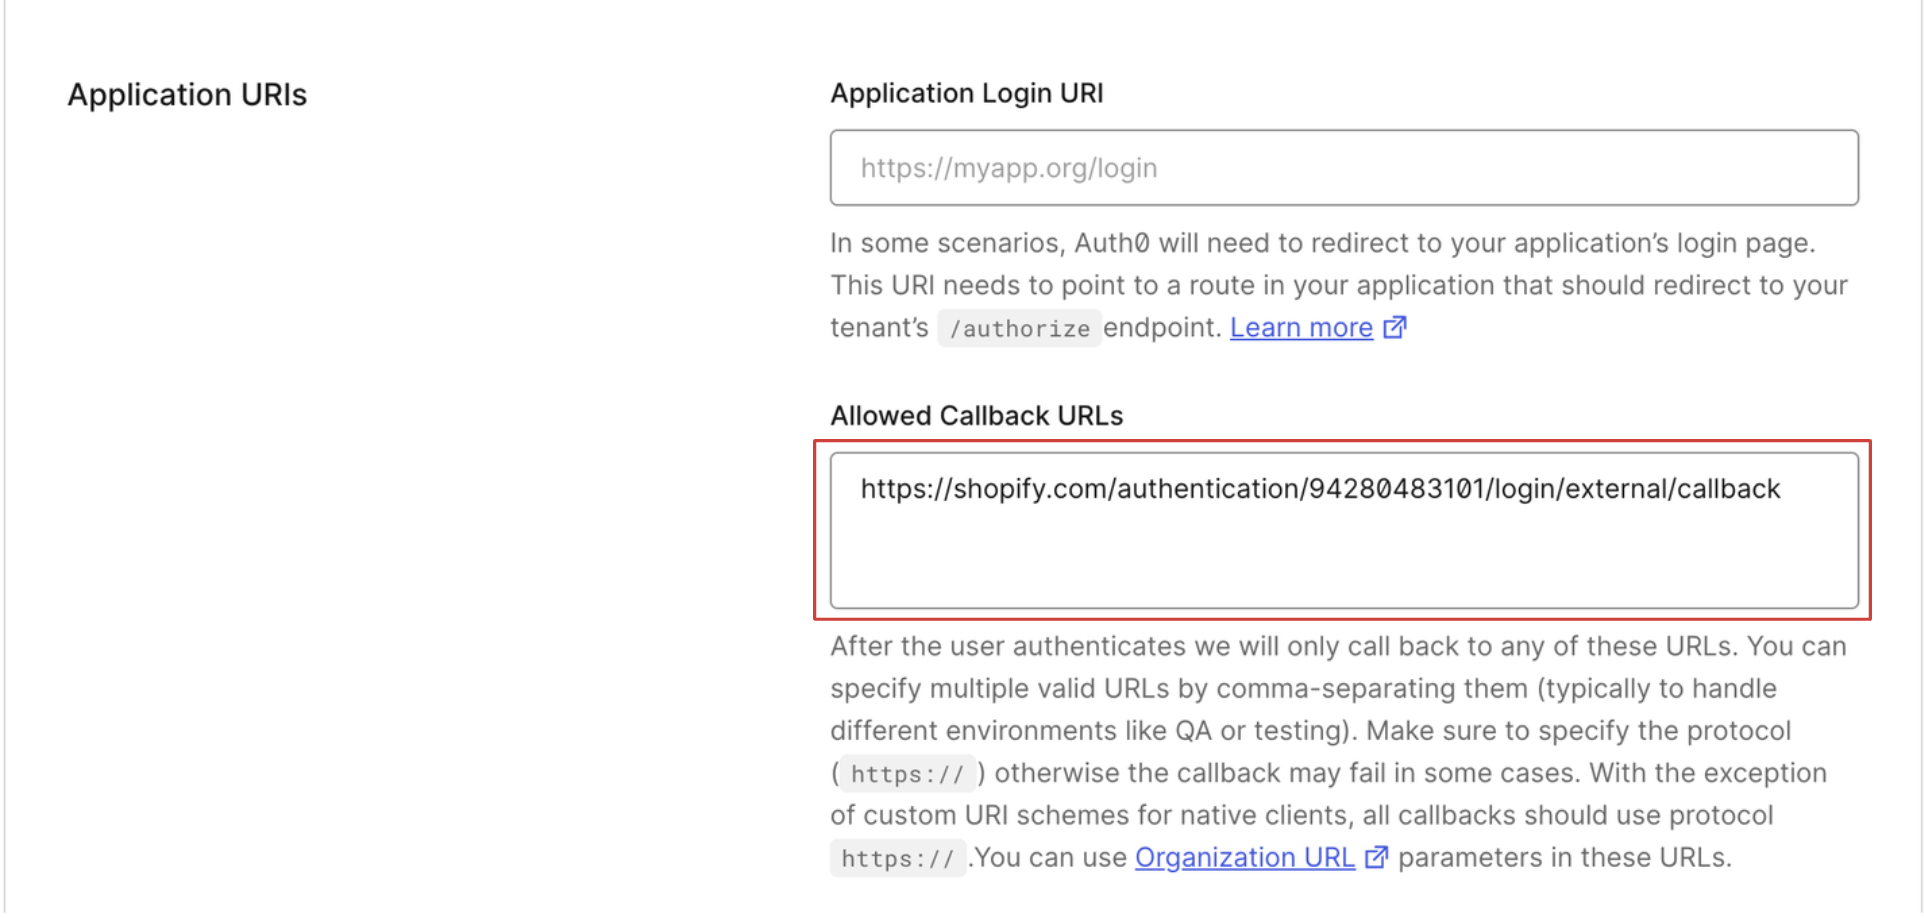
 In Shopify, copy your Callback URL from the **Setup configurations**:
 It will look like this URL:
```html
https://shopify.com/authentication//login/external/callback
```
Back in Auth0: Scroll down to where you see **Allowed Callback URLs** and paste the Callback URL in the **Allowed Callback URLs** field:
It will look like this URL:
```html
https://shopify.com/authentication//login/external/callback
```
Back in Auth0: Scroll down to where you see **Allowed Callback URLs** and paste the Callback URL in the **Allowed Callback URLs** field:
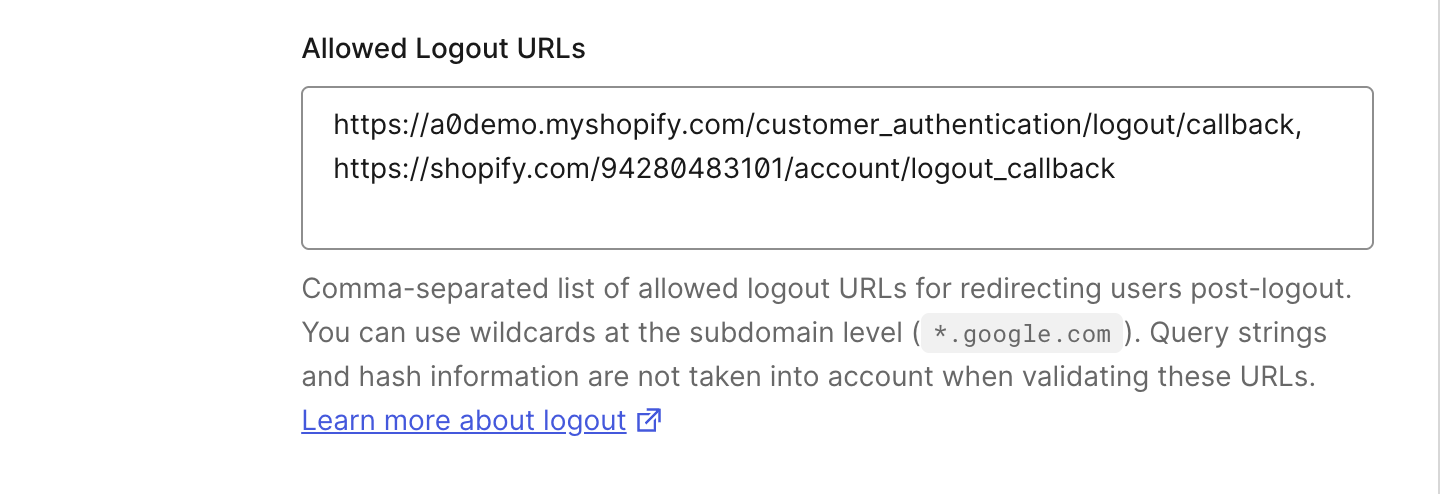
 Do the same thing for your Shopify **Logout URLs**.
They will look like this:
```html
https://.myshopify.com/customer_authentication/logout/callback
https://shopify.com//account/logout_callback
```
Paste in the **Allowed Logout URLs** field:
Do the same thing for your Shopify **Logout URLs**.
They will look like this:
```html
https://.myshopify.com/customer_authentication/logout/callback
https://shopify.com//account/logout_callback
```
Paste in the **Allowed Logout URLs** field:
 Click **Save**.
### Step 3: Finalize the Identity Provider settings in Shopify using Auth0 info
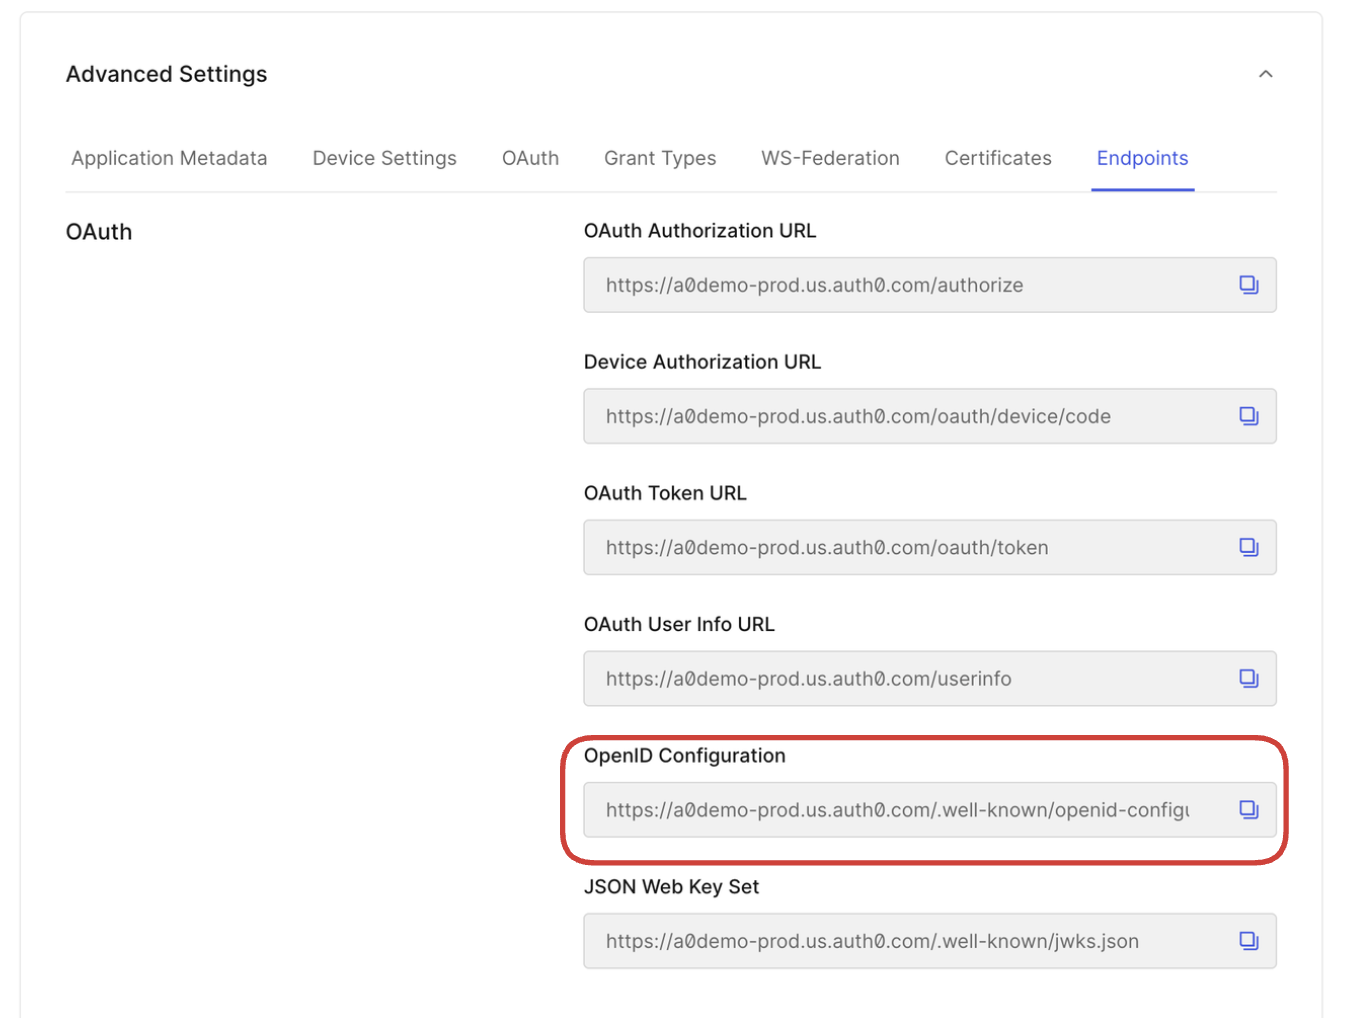
In Auth0, scroll down to **Advanced Settings** and select the **Endpoints** tab. Copy the **OpenID Configuration URL**.
Click **Save**.
### Step 3: Finalize the Identity Provider settings in Shopify using Auth0 info
In Auth0, scroll down to **Advanced Settings** and select the **Endpoints** tab. Copy the **OpenID Configuration URL**.
 Go back to **Shopify Admin \> Settings \> Customer Accounts \> Identity Providers**
Paste your OpenID Configuration URL into the **Well-known or discovery endpoint URL** field.
It will look like this:
```html
https:///.well-known/openid-configuration
```
Go back to **Shopify Admin \> Settings \> Customer Accounts \> Identity Providers**
Paste your OpenID Configuration URL into the **Well-known or discovery endpoint URL** field.
It will look like this:
```html
https:///.well-known/openid-configuration
```
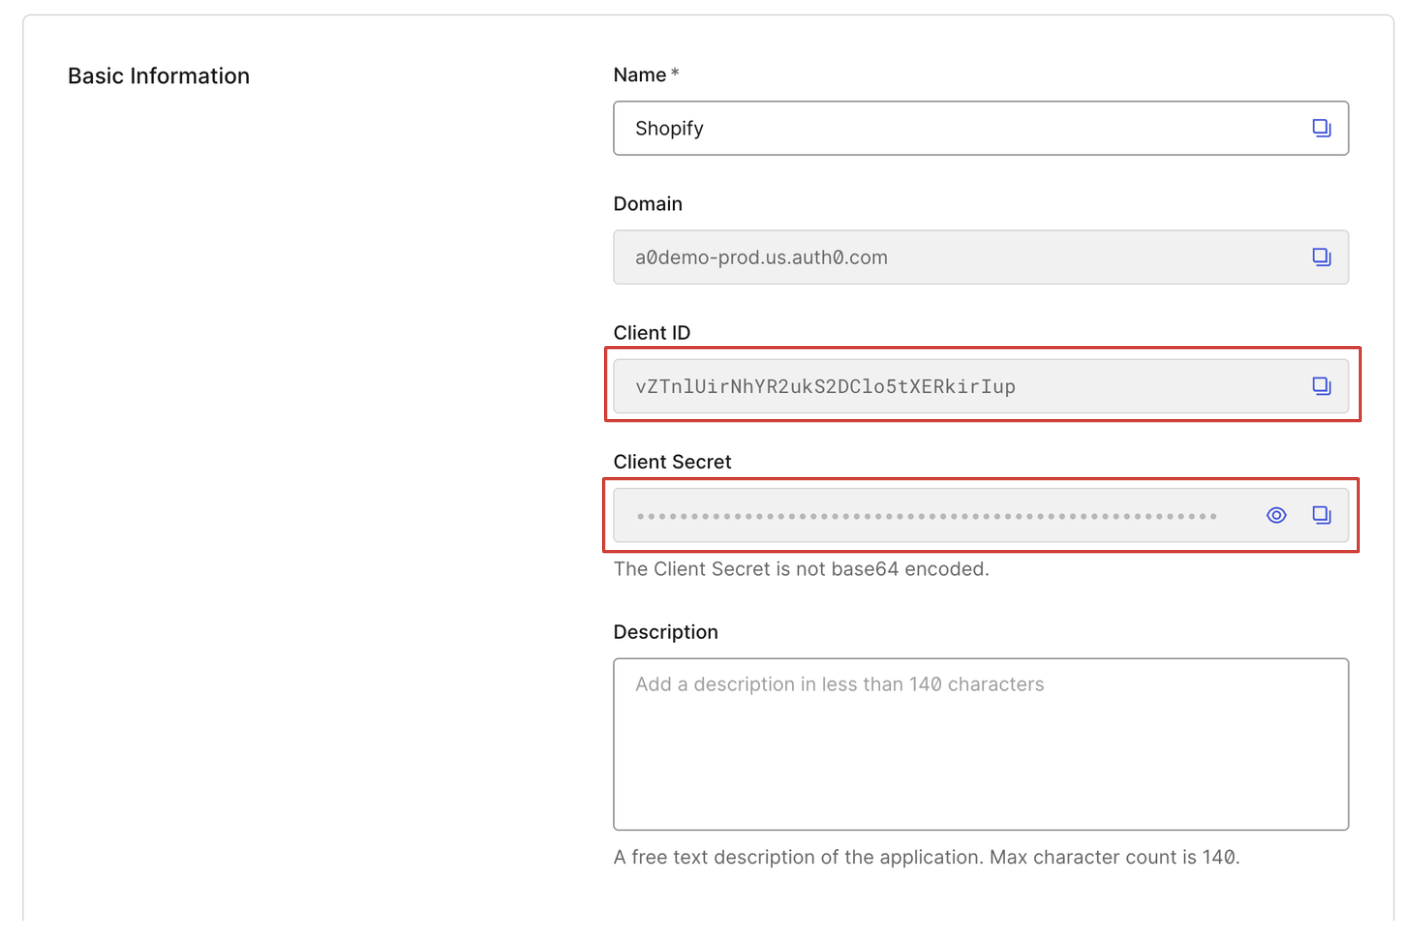
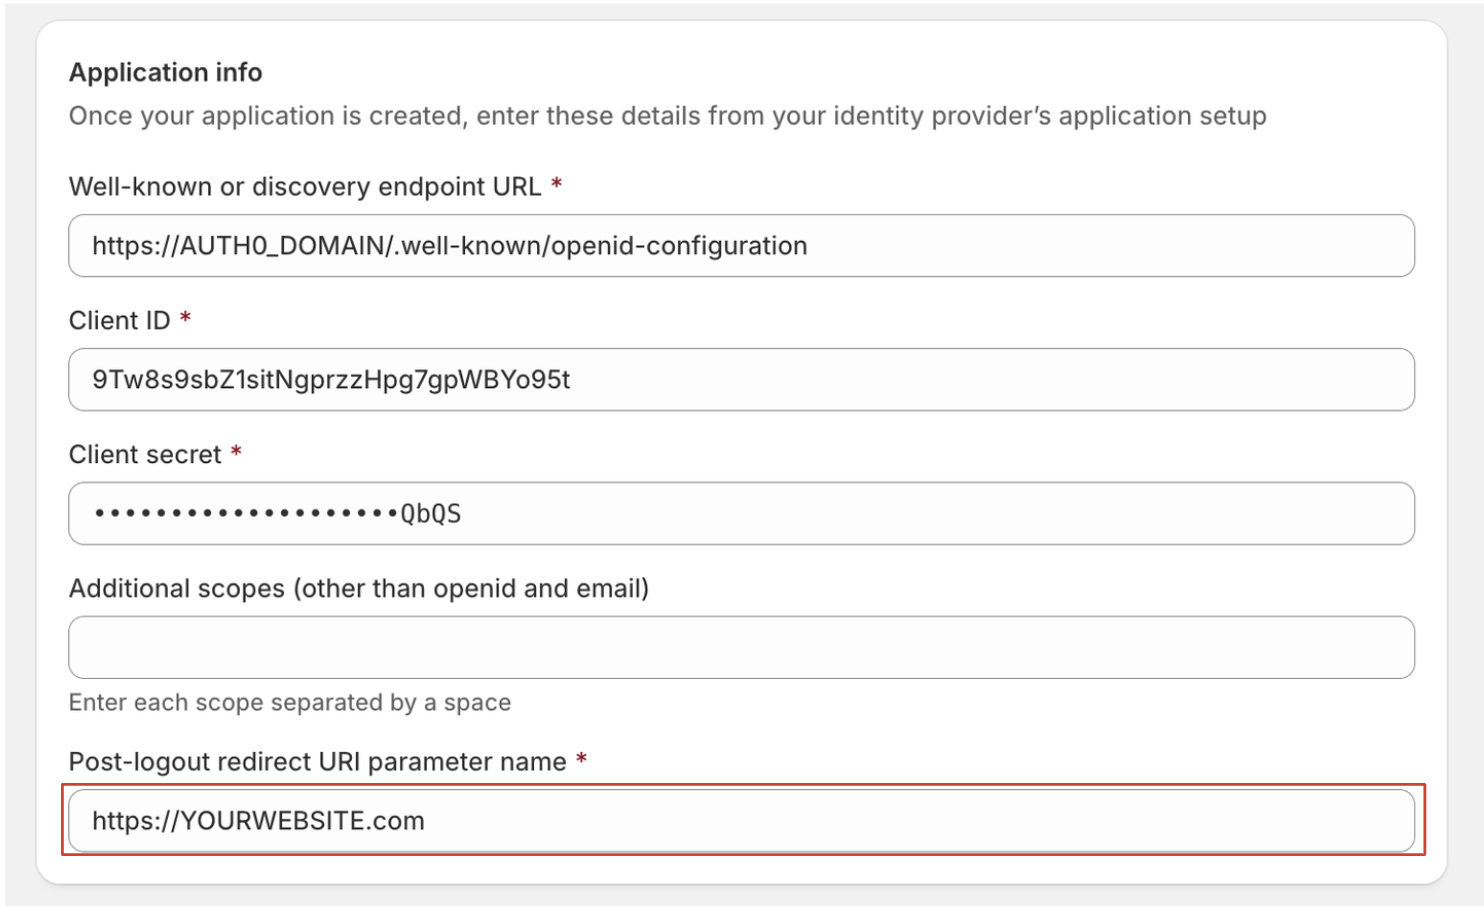
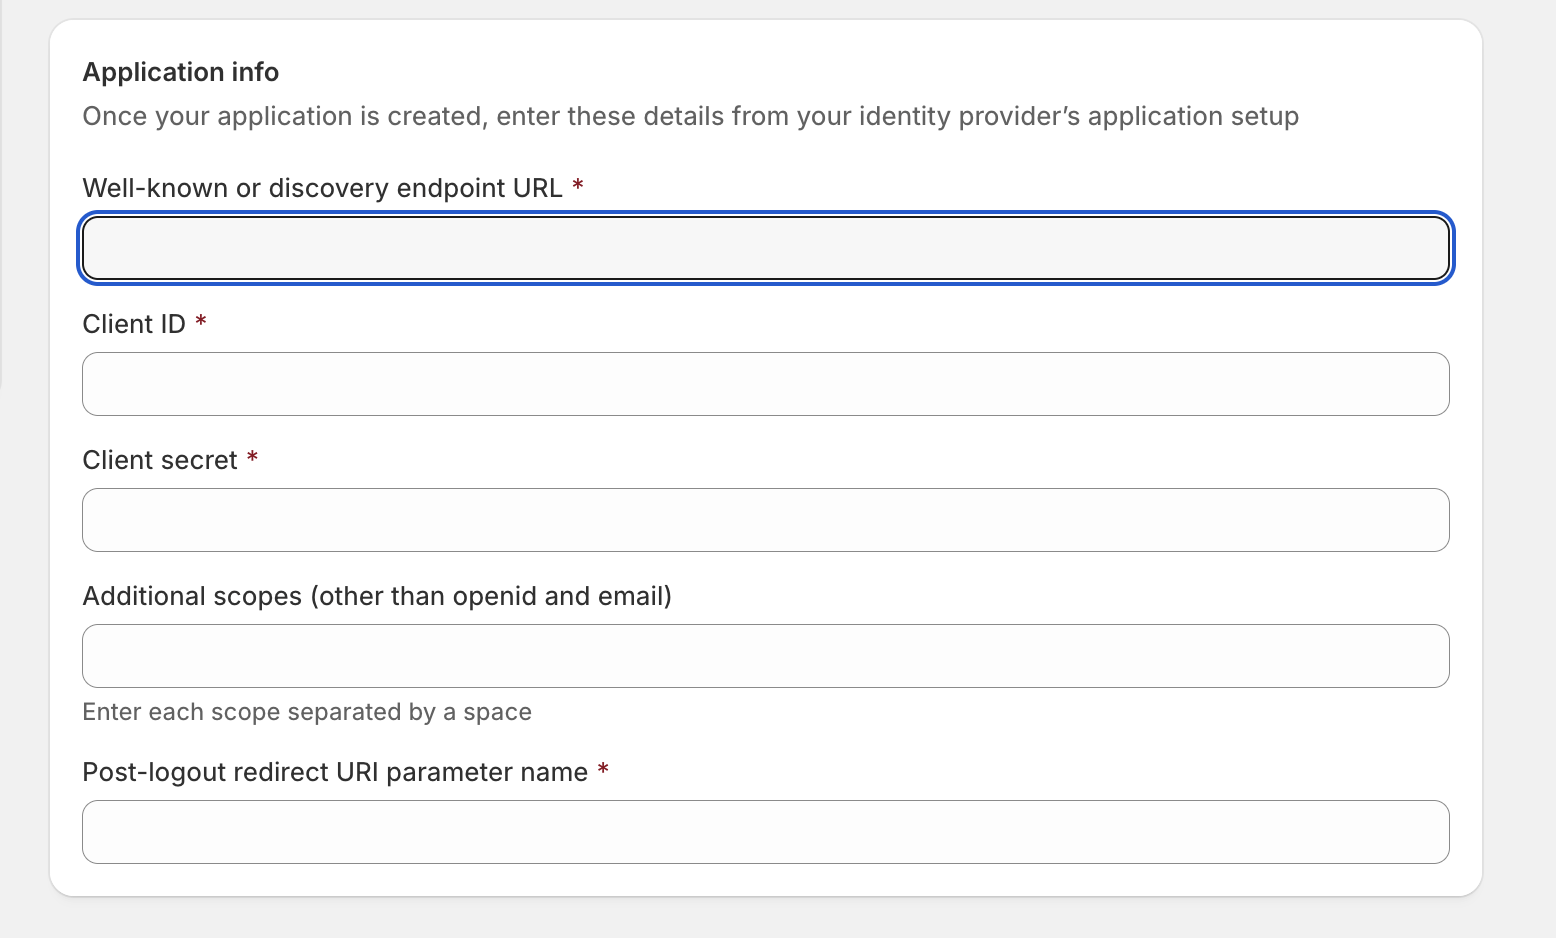 In Auth0: Scroll up to your **Basic Information** and copy your **Client ID** and **Client Secret**:
 Paste your **CLIENT ID** and **CLIENT SECRET**:
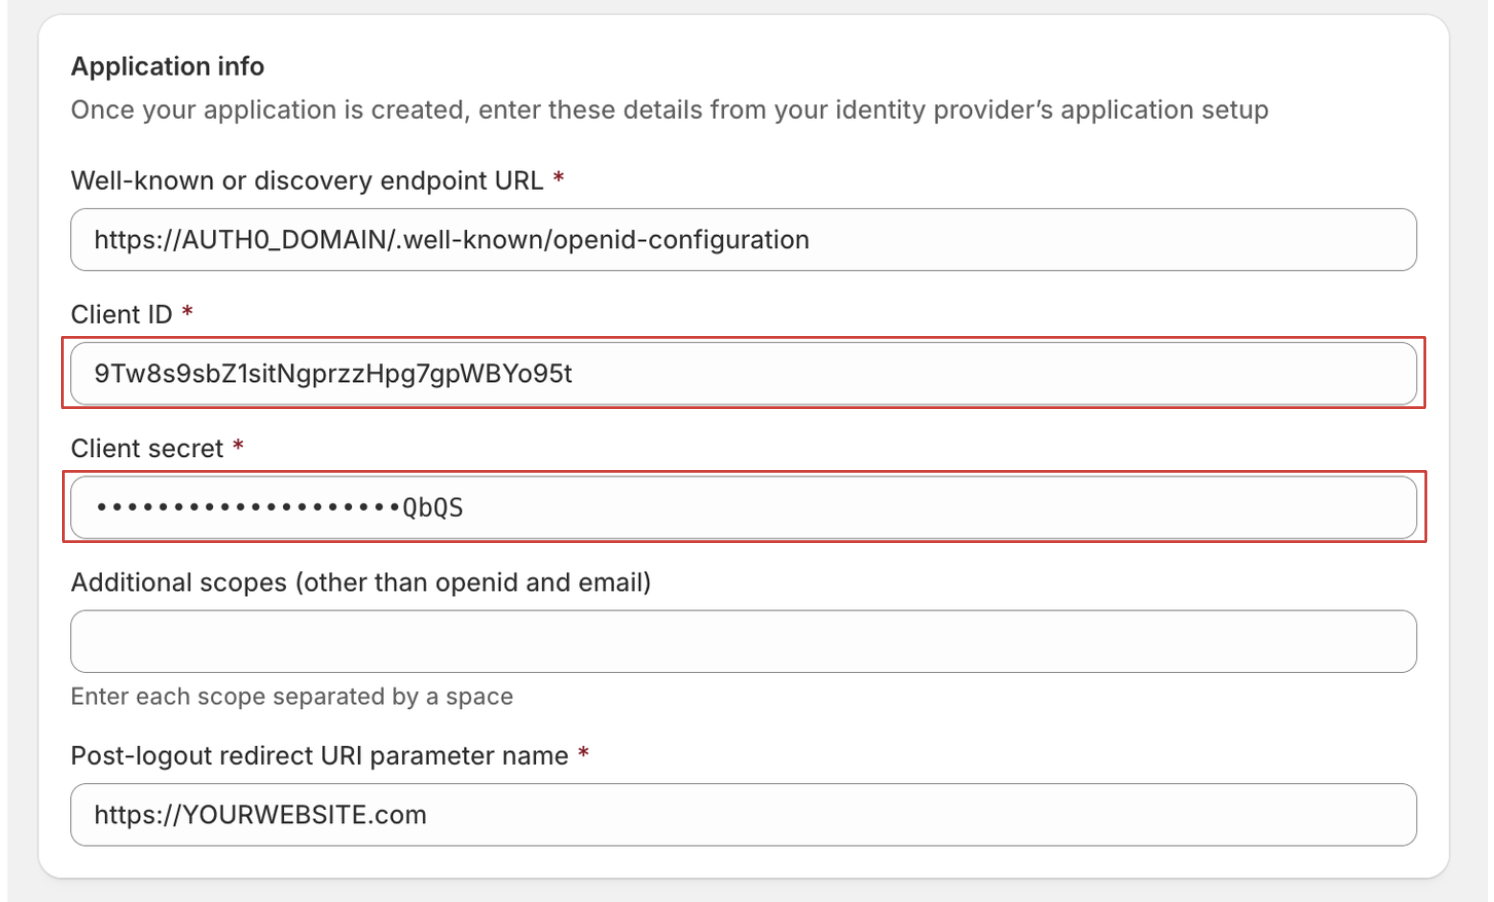 Next, add **Post-logout URI:**
Which will be your **website** or your Shopify **Store URL.**
```html
https://.myshopify.com
```
Next, add **Post-logout URI:**
Which will be your **website** or your Shopify **Store URL.**
```html
https://.myshopify.com
```
 Click **Save**.
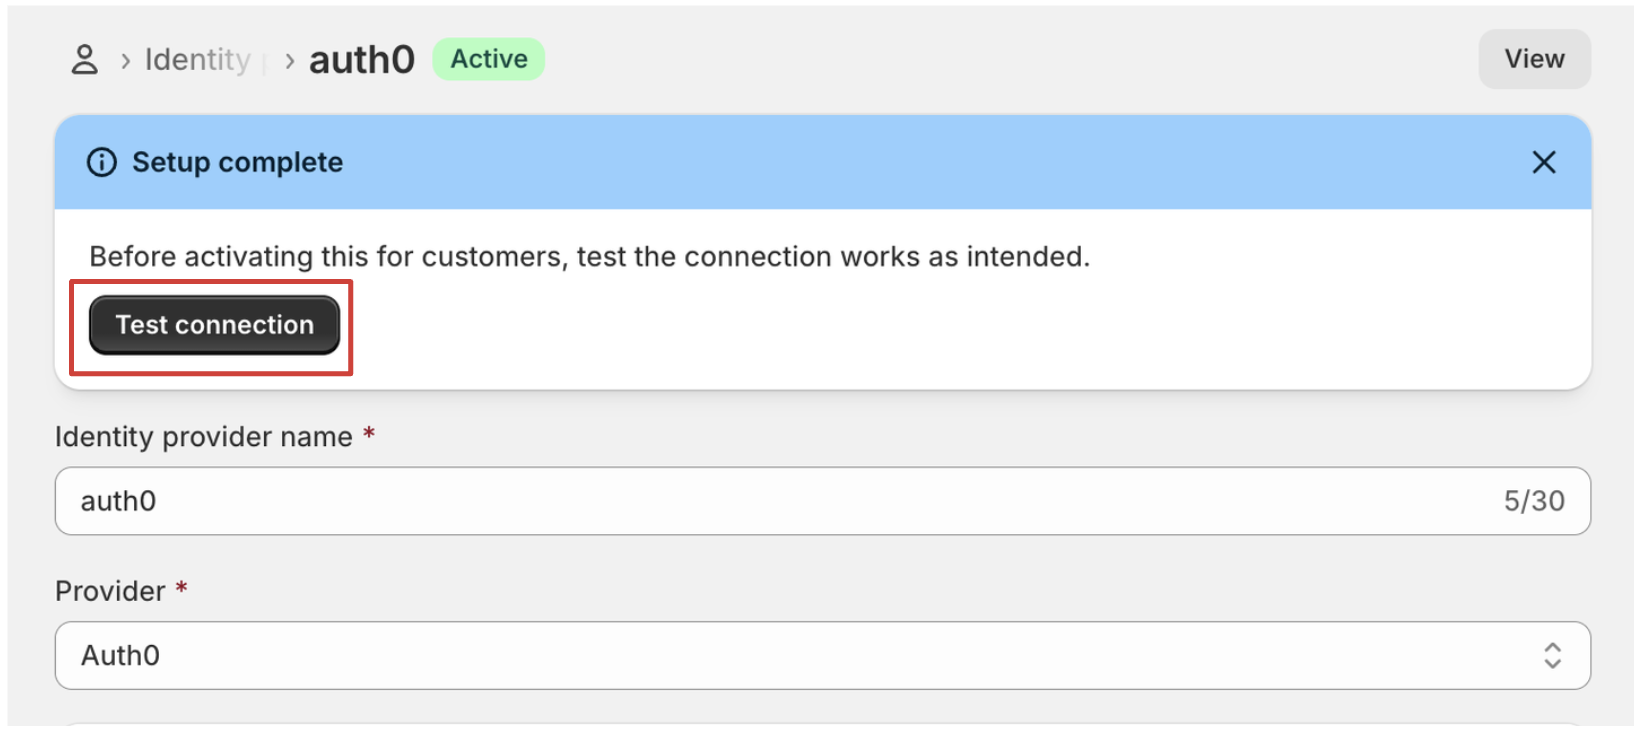
### Step 4: Test and activate the connection
* Use the **Test connection** button in Shopify to ensure everything works
Click **Save**.
### Step 4: Test and activate the connection
* Use the **Test connection** button in Shopify to ensure everything works
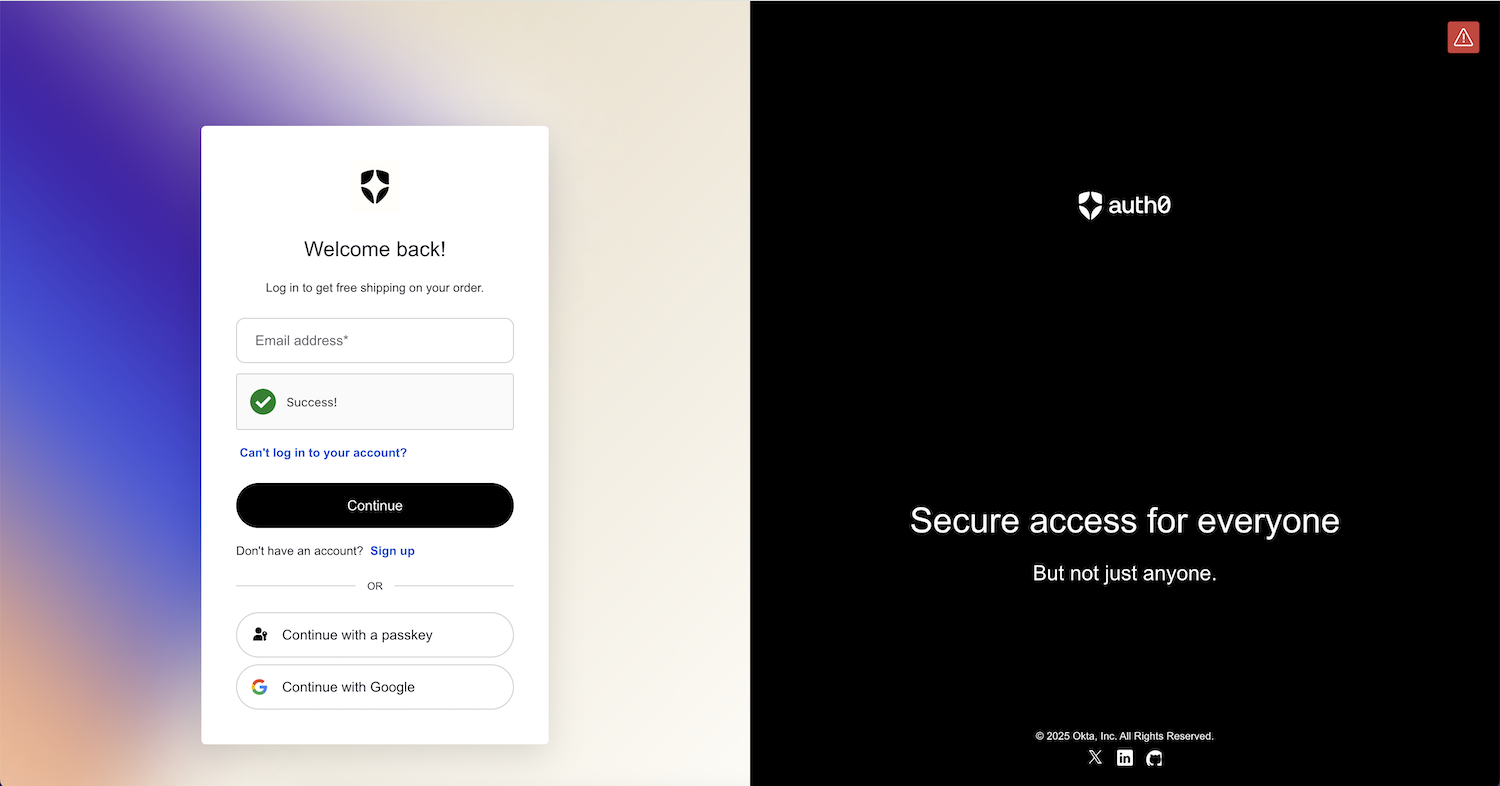
 You should now see your Auth0 login:
 **Common issues:**
* Callback/Logout URL mismatches
* Incorrect client ID, secret or well-known endpoint
## Summary
Shopify's support for OpenID Connect is a game changer for merchants looking to deliver a seamless, secure, and fully branded login experience. By integrating Auth0, you can go far beyond the limitations of traditional Shopify accounts—unlocking support for social logins, multi-factor authentication, custom extensibility via Actions, and unified user identities across your tech stack.
Whether you're aiming to improve customer retention, reduce fraud, or simply create a smoother onboarding experience, connecting Auth0 to Shopify sets a solid foundation.
In this post, we walked through:
* Enabling Auth0 as an Identity Provider in Shopify
* Setting up an Auth0 application with proper callbacks and logout URLs
* Linking your Auth0 tenant to Shopify using OIDC
* Testing and troubleshooting the integration
This is just the beginning. In future posts I will explore how to customize the login and signup experience, and leverage [Auth0 Actions](https://auth0.com/docs/customize/actions) to build powerful workflows during authentication.
If you’re ready to give your customers a modern login experience—backed by security and flexibility—Auth0 and Shopify are now better together.
> Shopify merchants can now also add Sign in with Shop through Auth0. For more information on how to install, check out the listing in the [Auth0 Marketplace](https://marketplace.auth0.com/integrations/shop).
**Common issues:**
* Callback/Logout URL mismatches
* Incorrect client ID, secret or well-known endpoint
## Summary
Shopify's support for OpenID Connect is a game changer for merchants looking to deliver a seamless, secure, and fully branded login experience. By integrating Auth0, you can go far beyond the limitations of traditional Shopify accounts—unlocking support for social logins, multi-factor authentication, custom extensibility via Actions, and unified user identities across your tech stack.
Whether you're aiming to improve customer retention, reduce fraud, or simply create a smoother onboarding experience, connecting Auth0 to Shopify sets a solid foundation.
In this post, we walked through:
* Enabling Auth0 as an Identity Provider in Shopify
* Setting up an Auth0 application with proper callbacks and logout URLs
* Linking your Auth0 tenant to Shopify using OIDC
* Testing and troubleshooting the integration
This is just the beginning. In future posts I will explore how to customize the login and signup experience, and leverage [Auth0 Actions](https://auth0.com/docs/customize/actions) to build powerful workflows during authentication.
If you’re ready to give your customers a modern login experience—backed by security and flexibility—Auth0 and Shopify are now better together.
> Shopify merchants can now also add Sign in with Shop through Auth0. For more information on how to install, check out the listing in the [Auth0 Marketplace](https://marketplace.auth0.com/integrations/shop).