

In this article, we’ll learn how to create a simple application using Kotlin, a statically typed programming language that targets the Java Virtual Machine (JVM). We’ll secure all communication with our application using JSON Web Tokens (JWT’s).
Don’t worry if you don’t know what a JSON Web Token (JWT) is. I’ll cover that in a bit.
And you don’t need to know any Kotlin, either. If you’ve got some decent programming experience with any programming language, you’ll be able to follow through without any difficulty. If you’re a Java programmer, though, you’ll feel right at home because Kotlin uses the Java API to do everything. It’s got a very sparse syntax with a lightweight standard library.
In fact, let us cover all of the features of Kotlin used in the code that goes with this article.
What We’re Going to Develop
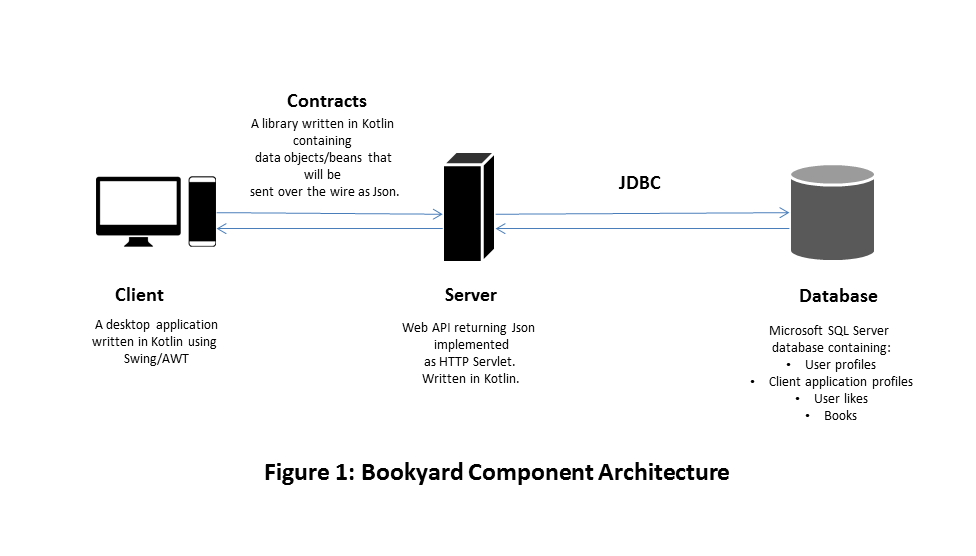
We’ll create a client/server application that gets from a web API a list of book recommendations for a logged-in user based on the user’s interests or likes. We’ll store the user’s likes in a database.
We’ll write both the client and the web API in Kotlin. The client will be a desktop application written using the Swing/AWT libraries. The server is an HTTP Servlet that returns data objects declared in a library named Contracts as JSON strings. We’ll call our application—in fact, we’ll call this whole system—by the name Bookyard.
Here’s what the high-level component architecture for Bookyard would look like:
Workflow
Assuming the servlet application is running, when the user launches the client application, a login dialog will appear.

A successful login will dismiss the login dialog and display a window listing the recommended books for the logged-in user.
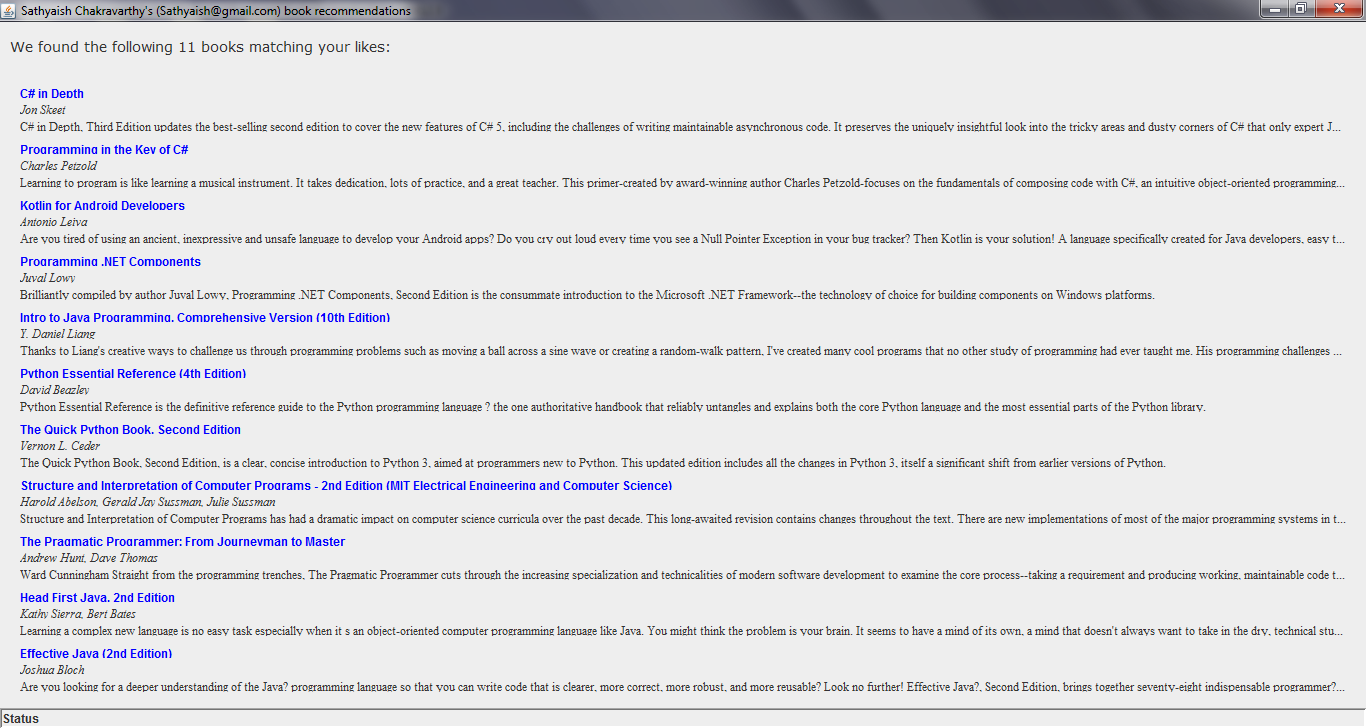
Please ignore the aesthetical anomalies of the graphical user interface.
OAuth 2.0 and Token /Claims Based Authorization
In order to understand how we’ll ensure secured communication between the client and the server of Bookyard, I’d like to provide a to-a-four-year-old explanation of some of the highfalutin terms popularly used in elite architect circles.
Consider a traditional web application that resides on a single server. That’s how it used to be done in the old days when the Web was a new thing—you had all the source code on a single server.
You had two parties:
A web server that had some server-side code that ran on the remote server and also some client-side code that ran on the browser.
Since both the client code and the server code were part of a single application usually written by a single developer or company, the server-side code and the client-side code could be considered a single entity or a single application.
The user using the application in a Web browser.
In those cases, a simple user name and password-based authentication was sufficient to validate the identity of the user. When the user logged in, the server would issue a session ID and an authentication cookie to the user’s browser. The browser would carry these two with every subsequent request to the server.
This all worked fine until the number of users outgrew the server’s capacity to handle requests.
Scenario 1: A Clustered Environment
When you had two servers running the same application code, you had a problem. If the login request came to server A, which issued a session cookie and an authentication cookie to the user, server B didn’t know anything about those cookies. Therefore, any subsequent requests coming in to server B even after the user had innocently validated his identity earlier with server A, would fail with server B.
One obvious solution to this problem is to make server A and server B share their session IDs. This could be done by having an external state server that held the session state for the entire Web application in an external data source, such as a database or an in-memory state server.
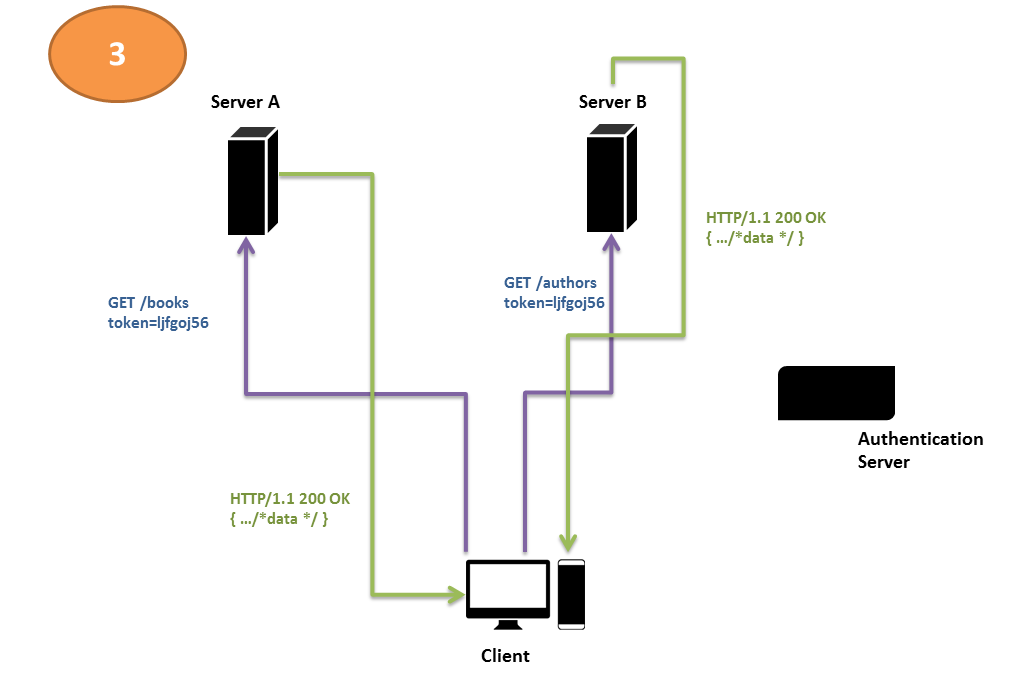
A similar but simpler and more secure solution, however, is to have a separate authentication server. Each request that comes to either of the servers—A or B—is validated for the presence of a special value in the request header—a value that could only have been obtained from the authentication server. If the value is present, the servers A or B service the request. If, however, the special value is missing, the client gets redirected to the authentication server, which, after logging the user in, issues this special value that represents a successful login and an active session. Let’s call this value returned by the authentication server an authentication token.
Below is a diagrammatic representation of this simple sequence of three interactions.
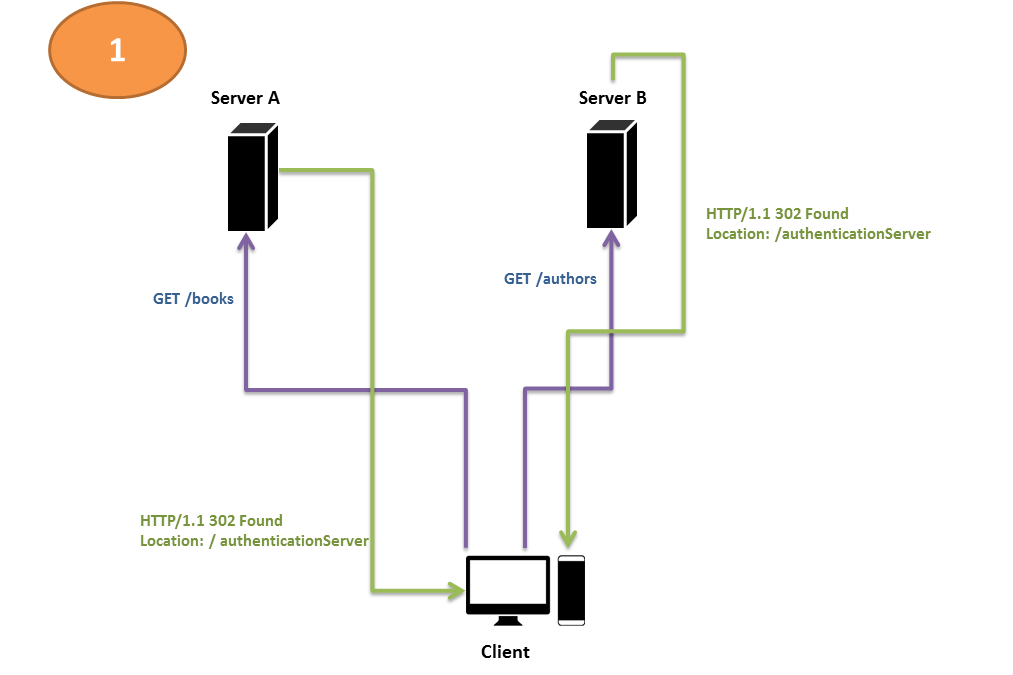
Under this regime, when the user sends in a request to either of the servers (A or B), each of them checks to see whether the user has an authentication token or not. If he doesn’t, they redirect his request to the authorization server, whose duty is to ask the user for his user name and password, authenticate his identity, and issue him an authentication token upon successful login.
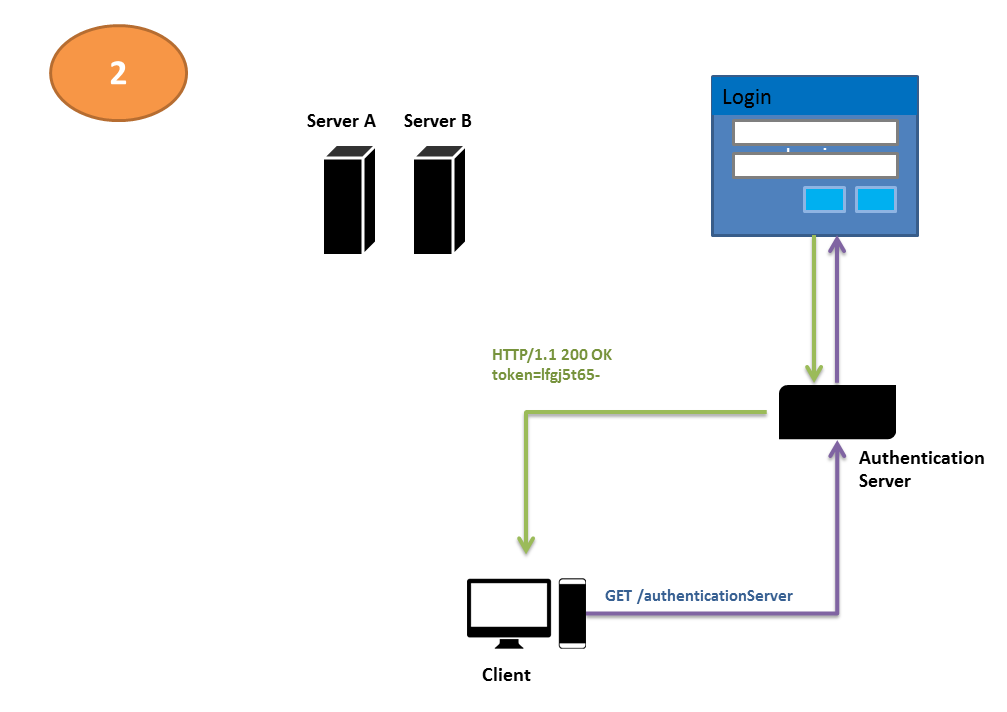
The user’s request is then redirected automatically back to the original URL he intended to get the data from-i.e., one of server A or server B. This time, his request carries with it the token, so either of the servers fulfills his request.
This scheme of authentication and authorization is known as token-based authentication or token-based authorization. A series of steps performed in a sequence, as indicated above, may also be called a workflow. Let us name this particular workflow the Simple Authentication Server Workflow.
I’d like to confess that the names authentication token and Simple Authentication Server Workflow are names I have made up. You will not find them in security literature. But in deliberately flying by the seat of my pants on good accord, I am trying to avoid trespassing names that already occur in security literature with specific connotations. If I named this token an access token, for example, or if I named the series of steps described above as Authorization Workflow, I’d be trespassing a commonly accepted nomenclature that we’ll make a nodding acquaintance with later in this article.
The above series of steps, though potent as a basic building block for more specialized variants, is rather simplistic in that it does not describe the contents of the token and ways of securing it against theft. In practice, how we name such a token is predicated on such puritanical considerations.
Token Uses and Composition
In our simple example, the client application is a Web application that serves a list of book recommendations for a user based on the user’s likes. The authentication server is a separate endpoint that could be a part of the same application or a different one. The simplicity, however, is born of an assumption that both the authentication server and the resource servers are developed by the same vendor.
Because both the authentication server and the resource servers are assumed to either be a part of the same Web application or—at worst—be URLs of two Web applications developed by the same vendor, the use of such a token was both to authenticate a user and consequently to authorize him for access to the data held in the resource servers.
The evolution of the Web in recent times has opened up a slew of interesting possibilities that call for variations on the workflow described above.
Authentication
Big players, such as Google, Yahoo!, and Facebook (to name a few) command large user bases of the total Internet population. This has encouraged users and Web application developers to trust these big players to authenticate users for their identity, consequently freeing up Web application developers to concentrate on developing just business logic, delegating the authentication of their users to these giants.
Imagine building a job search portal. You need to validate that the user is above 18 years of age and has a valid social security number. You don’t really care about any other information about the user. In this case, you could use the US government website to validate the user against these two parameters and receive a token containing identification information about the user. This specific need for authenticating a user’s identity dictates what the contents of the token will be.
Authorization
Another use that has come to light is the sharing of data from one Web application to another. Imagine yourself developing a photo editing software for your users. Instead of having users upload pictures to your Web server, you could pull out their pictures from their Flickr accounts, edit them in your application, and save them to the user’s dropbox or back to their Flickr accounts. In this case, you don’t care about the user’s identity as much as you care about their permission to use their Flickr photographs and their dropbox account.
Both the above uses—namely, the authentication and authorization of users—dictate the separation of the server granting the token, the role of such a token, and consequently its contents.
Though OAuth 2.0 access tokens are opaque strings, the authorization server may, upon request, attach additional information about a user, such as his full name, email address, organization, designation, and what have you into the token container. Such a workflow is illustrated by a variation named Open ID Connect, which builds on top of the OAuth 2.0 framework. This token would then be called an ID token. This would obviate the necessity for a database look-up. If such information were to be required by either of the servers (A or B), they could simply read it from the ID token itself without making a trip to the database server. Each such optional datum attached to an access token is known as a claim, as it establishes a claim upon the identity of the user. For this reason, token-based authentication is also referred to as claims-based authentication.
The client or server may communicate using tokens even when their dialog does not pertain to authentication or authorization. With each request, the client may package the information it needs to send to the server in the form of a token, although it wouldn’t be called an access token in that case. You’ll observe later that the login dialog of Bookyard Client sends the user’s username and password in such a token when making a login request to the Bookyard server. That is an example usage of a token of this type but not for the purposes of behaving like an access token.
Scenario 2: The Distributed Web and OAuth 2.0
This mechanism of claims-based authorization described in the above paragraphs has opened up the Web to new possibilities. Consider a scenario where you needed to import your Gmail contacts into Linked In so you can invite them all to join your Linked In network.
Until 2007, you couldn’t have done that without having your arm twisted. The only way to do that would have been for Linked In to present you with a screen wherein you typed your Gmail username and password into a Linked In user interface, effectively giving Linked In your Gmail username and password. What a shoddy life our younger selves lived!
Thankfully, a bunch of engineers at Twitter got together and said, “That must change.”
They started by identifying that in a transaction of the kind described above, there are three parties involved:
- A resource server: A server where the user’s data is kept. In this case, that would be Gmail because your contacts would be kept there.
- A user who owned the resources at Gmail; and
- A client: A third-party application that needed access to your data from the resource server. In other words, Linked In (the third party) that needed your Gmail (resource server) contacts.
They wrote out a bunch of rules that both the resource server (Gmail in this example) and the third-party application (Linked In in this example) would have to incorporate into their code in order to perform claims-based authorization so that you wouldn’t have to give your Gmail username and password to Linked In.
They called this grand scheme of interaction OAuth. It has since spread like wildfire.
OAuth has, since its advent, been revised twice as v1, v1a and v2.0. Version 2.0 is the most recent and popular one, and the versions are not backward compatible. Any reference to OAuth in this article without an explicit version suffix must be understood to mean OAuth 2.0.
Today, virtually every website—from Github to Gmail, Picassa to Flickr, and perhaps even your own company’s—has a resource server that exposes data in an OAuth way. The OAuth 2.0 specification also calls resource servers by the name OAuth servers, and the third-party clients by the name OAuth clients.
Today, virtually every user, knowingly or not, uses OAuth. Wherever on the Web you see buttons of the kind below, that is OAuth 2.0 in action.


The evolution of the Web has enabled a scenario where the traditional web application could be written by an OAuth provider. The client application, as was the case with Linked In in our example above, could be written by someone else, and the user could be someone else.
OAuth 2.0 access tokens are opaque and can be any string—even the string “Hello, World!” But such a value offers no security. In practice, an access token is a bit more useful than “Hello, World,” as it carries an expiry timestamp and may even be encrypted using symmetric or asymmetric encryption.
Securing Bookyard with JSON Web Tokens (JWTs)
When the user clicks the Login button on the Login dialog, the client application composes a JSON Web Token containing the following claims:
| Claim Name | Claim Meaning | Claim Value |
|---|---|---|
iss | Issuer of the JSON Web Token (JWT). Since the client is sending this new JWT, it writes its own application ID as the value of this claim. Though we’re using a JWT to send this information, we could have sent it as the body of a normal POST request. However, sending this information encrypted within a JWT makes it more secure. Also, this is a use of a JWT that is not used as an access token. An access token is granted by an authorization server to the client. This is an example of using a JWT as a means to communicate generic information securely between two parties. | The application ID of the client application. |
sub | The subject of the claim. | This can be any mutually agreed-upon value between the client and the OAuth server.In our example, the server expects the value “LoginRequest” for a login request coming from a client. |
username | The username of the user attempting to log in. | There’s presently no way to create a new user, and there exists just one user in the application at present. The username of that user is Sathyaish. |
password | The password of the user attempting to log in. | The password of the only user of this application is FooBar |
The code to send this information is in a class named APIAuthenticationManager, which resides in the Client project in the package bookyard.client, as shown by the code listing below.
Client: APIAuthenticationManager class
 package bookyard.client;

import java.util.HashMap;

import com.fasterxml.jackson.databind.JavaType;
import com.fasterxml.jackson.databind.ObjectMapper;

import io.jsonwebtoken.Jwts;
import io.jsonwebtoken.SignatureAlgorithm;
import bookyard.contracts.Constants;
import bookyard.contracts.IAuthenticationManager;
import bookyard.contracts.OperationResult;
import com.fasterxml.jackson.core.type.TypeReference;

public class APIAuthenticationManager :
                   IAuthenticationManager<String> {

    override public fun authenticateUser(
               userName : String?, password : String?,
               appId : String?, appSecret : String?) :
                                 OperationResult<String> {

        try {
            val claims : HashMap<String, Any?> = HashMap<String, Any?>();

            claims.put("iss", appId);
            claims.put("sub", "LoginRequest");
            claims.put("userName", userName);
            claims.put("password", password);

            // make a jwt out of the claims
            // using the jjwt/jwtk library
            val jwt : String = Jwts.builder()
                    .setClaims(claims)
                    .signWith(SignatureAlgorithm.HS256, appSecret)
                    .compact();

            // make a POST request sending the jwt in the request body
            val loginUrl : String? = Constants().loginUrl;
            val body : String? = "appId=" + appId + "&token=" + jwt;
            val responseString : String? = WebRequest().Post(loginUrl, body);

            // deserialize the response into an OperationResult<String>
            val mapper : ObjectMapper = ObjectMapper();
            val result : OperationResult<String> =
                    mapper.readValue<OperationResult<String>>(
                    responseString,
                    object: TypeReference<OperationResult<String>>() { })

            // return that to the caller
            return result;
        }
        catch(ex : Exception) {
            return OperationResult<String>(false, ex.message, null);
        }
    }
}
The client application uses the open-source library jjwt/jwtk to make the JSON Web Token (JWT). The JWT is then signed with the application secret.
When an OAuth client registers with an OAuth server, it is granted an application ID and an application secret. The database that the Web API references has these values stored for each client.
So that the Web API can know which client sent this request and fetch its application secret from the database and then use that secret to decrypt the JWT, the client sends in the body of the POST request its own application ID, in addition to the JWT.
The server returns a JSON string that is the serialized form of a class named OperationResult<String>. The OperationResult<T> class is declared in the Contracts module as follows:
Contracts: OperationResult<T> class
package bookyard.contracts;

import com.fasterxml.jackson.annotation.JsonCreator;
import com.fasterxml.jackson.annotation.JsonProperty;

data class OperationResult<T>
        @JsonCreator constructor(
            @JsonProperty("successful") val successful : Boolean,
        @JsonProperty("errorMessage") val errorMessage : String?,
        @JsonProperty("data") val data : T?) {
}
Assuming that the server’s root is at https://localhost:8443, the client sends this request to the following URL:
HTTP POST https://localhost:8443/login
A servlet named LoginServlet is configured to accept the HTTPS requests from this route.
Server : LoginServlet
package bookyard.server;

import java.io.IOException;
import java.util.Date;
import java.util.HashMap;

import javax.servlet.ServletException;
import javax.servlet.annotation.WebServlet;
import javax.servlet.http.HttpServlet;
import javax.servlet.http.HttpServletRequest;
import javax.servlet.http.HttpServletResponse;

import org.apache.commons.lang3.time.DateUtils;

import com.fasterxml.jackson.databind.ObjectMapper;

import io.jsonwebtoken.Claims;
import io.jsonwebtoken.Jws;
import io.jsonwebtoken.Jwts;
import io.jsonwebtoken.SignatureAlgorithm;

import bookyard.contracts.OperationResult;
import bookyard.contracts.Constants;
import bookyard.server.util.*;
import bookyard.contracts.beans.*;

open class LoginServlet : HttpServlet() {
    ...
}
The servlet invalidates GET requests on its endpoint by returning a 405, bad request/method not allowed HTTP status code. This is a security measure to ensure that the JWT and the appId are not sent as a part of the URL. Although there is nothing wrong with sending this information in the URL from a security viewpoint, the specification defining URLs allows a permissible length of 4096 bytes, so it is prudent that the server mandates that this information be sent only as an HTTP POST request.
Server : LoginServlet
package bookyard.server;

open class LoginServlet : HttpServlet() {

    override fun doGet(request : HttpServletRequest,
                       response : HttpServletResponse) {
        val msg: String = "HTTP GET method not supported.";

        try {

             response.sendError(
                  HttpServletResponse.SC_METHOD_NOT_ALLOWED, msg);

        } catch (e: IOException) {
            e.printStackTrace();
        }
    }
}
The servlet overrides the doPost method and delegates it to an internal implementation method named doPostInternal.
In the event that the parameters received in the request are invalid, an OperationResult<String> denoting a failure and containing an appropriate error message is sent to the client.
Server: LoginServlet
package bookyard.server;

open class LoginServlet : HttpServlet() {

    override fun doPost(request : HttpServletRequest,
                                         response : HttpServletResponse) {
        this.doPostInternal(request, response);
    }

    private fun doPostInternal(request: HttpServletRequest,
            response: HttpServletResponse) {
        try
        {
            var appId : String? = request.getParameter("appId");

            if(appId == null || appId.length == 0)
            {
                val result : OperationResult<String?> =
                        OperationResult<String?>(false,
                          "Bad Request. Missing appId.", null);

                val mapper : ObjectMapper = ObjectMapper();
                val resultString : String? =
                           mapper.writeValueAsString(result);
                response.getWriter().append(resultString);
                return;
            }

           // Get the application secret for this appId from
          // the database
            val appSecret : String? = getApplicationSecret(appId);

            if (appSecret == null || appSecret.length == 0)
            {
                val result : OperationResult<String> =
                      OperationResult<String>(false,
                             "Server error: appSecret not set.", null);

                val mapper : ObjectMapper = ObjectMapper();
                val resultString : String =
                              mapper.writeValueAsString(result);
                response.getWriter().append(resultString);
                return;
            }

          // To be continued in the next code snippet
           …

        }
        catch(ex : Exception)
        {
            ex.printStackTrace();

            val result : OperationResult<String> =
                     OperationResult<String>(false, ex.message, null);
            val mapper : ObjectMapper = ObjectMapper();
            val resultString : String = mapper.writeValueAsString(result);
            response.getWriter().append(resultString);
        }
    }
}
The server then uses the jjwt/jwtk library to decrypt and parse the JWT received. It validates that the request is, indeed, a login request by checking that the subject (sub) claim of the JWT has the value “LoginRequest”.
Server: LoginServlet
package bookyard.server;

open class LoginServlet : HttpServlet() {

    private fun doPostInternal(request: HttpServletRequest,
                    response: HttpServletResponse) {
        try
        {
            // parse the JWT in the request body
            val loginRequestJWT : String = request.getParameter("token");
            val jwsClaims : Jws<Claims>? = Jwts.parser()
                    .setSigningKey(appSecret)
                    .parseClaimsJws(loginRequestJWT);

            if (jwsClaims == null)
            {
                val result : OperationResult<String> =
                        OperationResult<String>(false,
                        "Invalid request: Bad request format.", null);

                val mapper : ObjectMapper = ObjectMapper();
                val resultString : String  =
                        mapper.writeValueAsString(result);
                response.getWriter().append(resultString);
                return;
            }
            else
            {
                val body : Claims = jwsClaims.getBody();

                if (!body.get("sub").toString()
            .contentEquals(Constants().JWT_SUBJECT_LOGIN_REQUEST))
                {
                    val result : OperationResult<String> =
                OperationResult<String>(false,
                "Bad request format. Invalid subject.", null);

                    val mapper : ObjectMapper = ObjectMapper();
                    val resultString : String =
                             mapper.writeValueAsString(result);
                    response.getWriter().append(resultString);
                    return;
                }


            }
        }
        catch(ex : Exception)
        {

        }
    }
}
The login servlet then reads the user claims from JWT and makes a database look-up to authenticate the user, ensuring that the user also belongs to the said application with the specified appId received in the request.
Server: LoginServlet
package bookyard.server;

open class LoginServlet : HttpServlet() {

    private fun doPostInternal(request: HttpServletRequest, response: HttpServletResponse) {
        try
        {
            if (jwsClaims == null)
            {
                ...
            }
            else
            {
                val body : Claims = jwsClaims.getBody();

                // get the user name and password from the JWT payload
                val userName : String = body.get("userName").toString();
                val password : String = body.get("password").toString();


                // Authenticate the user in the database. Make sure
                // that a user for the specified userName and password
                // exists and is a user of an application with the
                // specified appId, and that the appId indeed has the specified
                // appSecret.
                val operationResultOfUser : OperationResult<User> =
                        DatabaseAuthenticationManager()
                        .authenticateUser(userName, password, appId, appSecret);

                if (operationResultOfUser.successful == false) {
                    val result : OperationResult<String> =
                    OperationResult<String>(false,
                    operationResultOfUser.errorMessage, null);

                    val mapper : ObjectMapper = ObjectMapper();
                    val resultString : String =
                      mapper.writeValueAsString(result);
                    response.getWriter().append(resultString);
                    return;
                }

                val user : User? = operationResultOfUser.data;
                if (user == null) {
                    val result : OperationResult<String> =
                    OperationResult<String>(false, "Invalid login", null);

                    val mapper : ObjectMapper = ObjectMapper();
                    val resultString : String =
                      mapper.writeValueAsString(result);
                    response.getWriter().append(resultString);
                    return;
                }

                // To be continued in the next snippet

            }
        }
        catch(ex : Exception)
        {
        }
    }
}
Finally, if all adds up, the servlet constructs an access token, putting in the user information and an expiry timestamp of one hour from the time the token was generated. Then, it sends the access token as a serialized OperationResult<String>.
Server: LoginServlet
package bookyard.server;

open class LoginServlet : HttpServlet() {

    private fun doPostInternal(request: HttpServletRequest,
                          response: HttpServletResponse) {
        try
        {
            ...

            val claims : HashMap<String, Any?> =
                                 HashMap<String, Any?>();
            claims.put("iss", "Bookyard Server");
            claims.put("sub", "AccessToken");
            claims.put("userId", user.id);
            claims.put("userName", user.userName);
            claims.put("fullName", user.fullName);
            claims.put("email", user.email);
            claims.put("appId", user.appId);
            claims.put("applicationTableId", user.applicationTableId);
            claims.put("generatedTimestamp", Date().time);

            val expiryDate : Date = DateUtils.addHours(Date(), 1);

            // make a jwt out of the username and password
            val accessToken : String = Jwts.builder()
                    .setClaims(claims)
                    .setExpiration(expiryDate)
                    .signWith(SignatureAlgorithm.HS256, appSecret)
                    .compact();

            // Save the token in the database
            val saved : Boolean = saveOrUpdateAccessToken(
                    user.id, user.userName!!,
                    user.applicationTableId,
                    appId,
                    accessToken,
                    expiryDate);

            if (!saved)
            {
                val result : OperationResult<String> =
                    OperationResult<String>(false,
                            "Internal server error", null);

                val mapper : ObjectMapper = ObjectMapper();
                val resultString : String =
                  mapper.writeValueAsString(result);
                response.getWriter().append(resultString);
                return;
            }

            val result : OperationResult<String> =
                 OperationResult<String>(true, null, accessToken);
            val mapper : ObjectMapper = ObjectMapper();
            val resultString : String =
                mapper.writeValueAsString(result);
            response.getWriter().append(resultString);
            return;
        }
        catch(ex : Exception)
        {
            ...
        }
    }
}
The APIAuthenticationManager class at the client deserializes the JSON string response and gives it to its caller within the client.
The caller is the Login dialog, which checks to see if the response received is successful, meaning that if the user is a valid user, it unpacks the access token from the data property of the OperationResult<T> object and creates a new window to display the book recommendations. To the book recommendations window’s constructor, it passes the access token. The book recommendation screen needs this access token to make subsequent requests to retrieve the list of book recommendations from the server. It will need to send this access token with every request that it makes.
Client: LoginPane.btnLogin::actionListener
btnLogin.addActionListener(object : ActionListener {

    override fun actionPerformed(e : ActionEvent) {

        // Send an authentication request to the server
        val authMgr : IAuthenticationManager<String> =
               APIAuthenticationManager();

        // Get a deserialized OperationResult<String> object
        val result : OperationResult<String> =
                    authMgr.authenticateUser(userName,
                        password, appId, appSecret);

        if (result.successful) {
            // if the user is good, we close the
            // login dialog and load the new form
            containerDialog.setStatusLabel(null, Color.black);
            containerDialog.dispose();

            // Get the access token from the 'data'
            // property of the OperationResult<T> object
            // we received from the server
            val accessToken : String? = result.data;

            // Open the book recommendations window
            // giving it the access token we received from
            // the server. It will need this access token to
            // make any subsequent requests to the server.
            val bookRecommendationsFrame : JFrame =
                  BookRecommendationsFrame(accessToken);

            bookRecommendationsFrame.setSize(500, 500);
            bookRecommendationsFrame.setVisible(true);
        }
        else {
            // otherwise, we display the error message we
            // received from the API server
            containerDialog.setStatusLabel(
              result.errorMessage, Color.red);
        }
    }
});
The book recommendations window makes an HTTP post request, sending the access token in the HTTP Authorization header and the appId in the request body. It sends this new request to the recommendations URL of the Web API. The recommendations URL is at https://localhost:8443/recommend and is attended to by a servlet named RecommendServlet, which we will list later in this document.
Client: BookRecommendationsFrame
package bookyard.client;

public class BookRecommendationsFrame(var accessToken : String?) : JFrame() {

    ...

    private fun getBookRecommendations(accessToken : String?) : BookRecommendations? {

        try
        {
            // Get the recommendatations url to hit
            val recommendationsUrl : String =
              Constants().recommendationsUrl;

            // construct the authorization header with
            // the bearer token / access token
            val authorizationHeaderKey : String = "Authorization";
            val authorizationHeaderValue : String = "Bearer ${accessToken}";

            // Put the authorization header in the request
            // headers map
            val headers : MutableMap<String, String> =
                                     HashMap<String, String>();
            headers.put(authorizationHeaderKey, authorizationHeaderValue);

            // put the appId in the body of the request
            val body : String = "appId=${this.user!!.appId!!}";

            // Make a POST request to the server's recommendations url
            // with the appId in the body and the JWT access token in the
            // authorization header of the request
            val responseString : String? = WebRequest()
                    .Post(recommendationsUrl, body, headers);

            System.out.println(responseString);

            // deserialize the response into an
            // OperationResult<BookRecommendations>
            val mapper : ObjectMapper = ObjectMapper();
            val result : OperationResult<BookRecommendations> =
                mapper.readValue<OperationResult<BookRecommendations>>(
                    responseString,
                    object :  TypeReference<OperationResult<BookRecommendations>>() { });

            if  (result.successful)
            {
                return result.data;
            }
            else
            {
                println(result.errorMessage);
                return null;
            }
        }
        catch(ex : Exception)
        {
            ex.printStackTrace();
            return null;
        }
    }
}
From this point onwards, at the server, an authorization filter filters every request before it reaches any servlet or endpoint other than the /login endpoint.
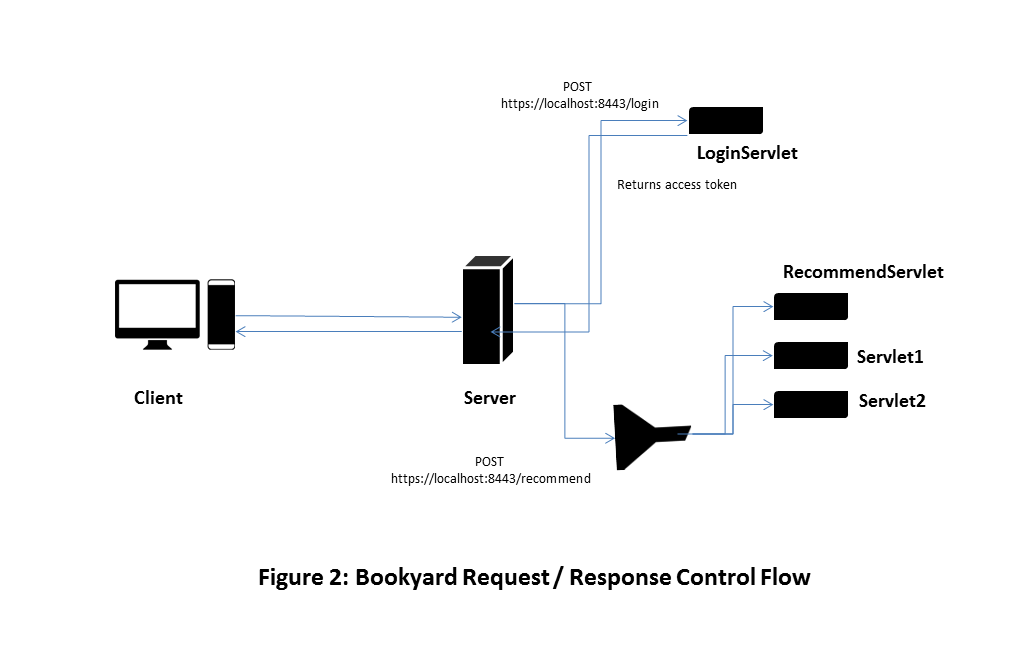
The authorization filter checks for the presence of an access token in the Authorization HTTP header, parses it, and validates the token.
If the token is valid, the request is passed to the next filter in the chain of filters and subsequently to its ultimate destination servlet. If not, the filter returns an appropriate error response as an OperationResult<T>.
Server: AuthorizationFilter
package bookyard.server;

public class AuthorizationFilter : Filter {

    override public fun doFilter(request : ServletRequest, response : ServletResponse, chain : FilterChain) {

        val req : HttpServletRequest = request as HttpServletRequest;

        val path : String = req.getServletPath();

        if (path.contentEquals("/login"))
        {
            req.setAttribute("User", null);
            chain.doFilter(request, response);
            return;
        }
        else
        {
            if (!req.getMethod().contentEquals("POST"))
            {
                req.setAttribute("User", null);
                chain.doFilter(request, response);
                return;
            }

            // Just check for the presence of the accessToken
            val bearerComponent : String = req.getHeader("Authorization");
            val bearerArray : List<String> = bearerComponent.split(" ");
            val accessToken : String = bearerArray[1];

            System.out.println(bearerComponent);
            System.out.println(accessToken);

            // access token can be decrypted using the appId's appSecret
            val appId : String? = req.getParameter("appId");
            if (appId == null || appId.length == 0)
            {
                req.setAttribute("User", null);
                chain.doFilter(request, response);

                val resp : HttpServletResponse = response as HttpServletResponse;
                resp.sendError(HttpServletResponse.SC_BAD_REQUEST, "Missing appId");
                return;
            }

            val appSecret : String? = getApplicationSecret(appId);

            if (appSecret == null || appSecret.length == 0)
            {
                req.setAttribute("User", null);
                chain.doFilter(request, response);

                val resp : HttpServletResponse = response as HttpServletResponse;
                resp.sendError(HttpServletResponse.SC_BAD_REQUEST, "Invalid appId.");
                return;
            }

            val user : User? = this.getUserFromAccessToken(accessToken, appSecret);

            if (user == null)
            {
                req.setAttribute("User", null);
                chain.doFilter(request, response);

                val resp : HttpServletResponse = response as HttpServletResponse;
                resp.sendError(HttpServletResponse.SC_BAD_REQUEST, "Invalid access token.");
                return;
            }

            // that a row exists against the userId obtained from the
            // access token in the access token table and that the token hasn't expired.
            val valid : Boolean = validateAccessToken(user.id, appId, accessToken, appSecret);

            if (!valid)
            {
                req.setAttribute("User", null);
                chain.doFilter(request, response);

                val resp : HttpServletResponse = response as HttpServletResponse;
                resp.sendError(HttpServletResponse.SC_BAD_REQUEST, "Expired access token.");
                return;
            }

            req.setAttribute("User", user);
            chain.doFilter(request, response);
        }
    }
}
The recommendations servlet embodied in the class RecommendServlet does not need to validate the request for the presence of an access token. It simply does what it is meant to do—return the list of recommendations based on a user’s likes. It does this by looking up the database.
Server: RecommendServlet
package bookyard.server;

@WebServlet("/recommend")
public class RecommendServlet : HttpServlet() {

    override protected fun doPost(request : HttpServletRequest,
    response : HttpServletResponse) {

        val user : User? = request
        .getAttribute("User") as User;

        if (user == null)
        {
            // return an error
        }

        // Get recommendations from the database
        // based on the user's likes, which are also
        // in the database
        val recommendations : BookRecommendations? =
                          getBookRecommendations(user);

        if (recommendations == null)
        {
            println("Failed to retrieve user's book recommendations from the database.");

            val result : OperationResult<BookRecommendations> =
             OperationResult<BookRecommendations>(false,
              "Internal Server Error", null);

            val mapper : ObjectMapper = ObjectMapper();
            val resultString : String =
             mapper.writeValueAsString(result);
            response.getWriter().append(resultString);
            return;
        }

        val result : OperationResult<BookRecommendations> =
          OperationResult<BookRecommendations>(true, null, recommendations);

        val mapper : ObjectMapper = ObjectMapper();
        val resultString : String = mapper.writeValueAsString(result);
        response.getWriter().append(resultString);
        return;
    }
}
Database Schema
It would make sense to look at the database scheme now. Most of the column names are descriptive, so you’ll get what they mean. I’ll provide an explanation only where it is necessary.
Table: User
| Column Name | Meaning |
|---|---|
| Id | Primary key |
| UserName | |
| PasswordHash | A hash of the user’s password. |
| FullName | |
Table: Application
| Column Name | Meaning |
|---|---|
| Id | Primary key |
| Name | A user-friendly name for the OAuth client |
| ApplicationId | A string representing the application ID that is displayed to the client application administrator. This string is used as the appId during all communication between any OAuth clients and this server. |
| ApplicationSecret | JWTs are signed with this symmetric key. |
Table: Membership
(A relationship table that stores what user belongs to which application/third party/OAuth client)
| Column Name | Meaning |
|---|---|
| Id | Primary key |
| UserId | Foreign key for [User].[Id] |
| UserName | |
| ApplicationTableId | Foreign key for [Application].[Id] |
| ApplicationId |
Table: AccessToken
(When a login request succeeds, the server generates a new access token for that request and creates a new entry in this table if one doesn’t already exist for the application and user making the request. If an entry already exists, the server updates the entry in this table to reflect the new access token and the new expiry time. The update is necessary; otherwise, we will have stale/expired access tokens in this table and requests made from valid OAuth clients after the expiry will fail.)
| Column Name | Meaning |
|---|---|
| Id | Primary key |
| UserId | Foreign key for [User].[Id] |
| UserName | |
| ApplicationTableId | Foreign key for [Application].[Id] |
| ApplicationId | |
| AccessToken | JWT String |
| ExpiryDate | Datetime2. Stored as absolute time but sent to the client in Unix Time—i.e., the number of milliseconds since 1st January 1970. |
Table: Likeable
(represents things that can be liked—e.g., “Programming,” “Java,” “Kotlin”)
| Column Name | Meaning |
|---|---|
| Id | Primary key |
| Name |
Table: UserLike
(Each entry represents a relationship between a user and the thing he likes)
| Column Name | Meaning |
|---|---|
| Id | Primary key |
| UserId | Foreign key for [User].[Id] |
| UserName | |
| LikeableId | Foreign key for [Likeable].[Id] |
Table: Book
| Column Name | Meaning |
|---|---|
| Id | Primary key |
| Name | Title of the book |
| Author | Name of the author |
| Description | |
| AmazonUrl |
Source Code
You can download the whole source code for this application from this github repository. As a C# developer aiming to localize complexity, after learning some basic Kotlin syntax and practicing it, I wrote the application first in Java and then translated each line to Kotlin. You’ll find both the Java and the C# versions in the Bookyard repository.
To know more about the toolset, the modules in the project, known issues, and how to launch the application, read the ReadMe.md file in the Bookyard repository.
Further Reading
- Kotlin Documentation
- Bookyard Source Code
- Bookyard ReadMe file
- What is OAuth?
- OAuth is about authorization, not about authentication.
- OAuth is delegated authorization.
- OAuth 2.0 Authorization Code Flow
- Demo: OAuth 2.0 Authorization Code Flow
- OAuth 2.0 YouTube Playlist
Summary
In this article, we learned how to use the Kotlin programming language, which is a statically typed programming language that targets the Java Virtual Machine. We described the function of the Bookyard application.
Then, we meandered about ways we could use token-based authentication and authorization to secure an application. We learned what OAuth 2.0 is, what JSON Web Tokens (JWTs) are, and how we used JWTs to secure the Bookyard application.
Auth0 provides the simplest and easiest to use User interface tools to help administrators manage user identities including password resets, creating and provisioning, blocking and deleting users.


