


Source code versioning is a subject that has been widely discussed and which has many solutions created to address it, like Git, Subversion and Mercurial. But, what about our data and the schema that represents it? How do they keep in sync with the application that manipulates it? In this article, we are going to learn about Flyway, a solution that helps developers to handle version control of database schemas and data on Java applications.
What is Flyway
Flyway is a tool, developed by Boxfuse, that enables developers to apply version control practices to the database that supports a Java application. With it, we can tightly integrate plain SQL scripts in the lifecycle of an application, guaranteeing that its database will always be compatible without manual intervention.
How Does Flyway Works
Flyway works by checking the current version of the database and by applying new migrations automatically before the rest of the application starts. Whenever a developer needs to change the schema of a database, or to issue some changes to the data residing on it they need to create a SQL script, following a name convention in the directory read by Flyway. Usually this directory is classpath:db/migration, but one can change the default value if needed.
Flyway's name convention consists of:
- a prefix: which defaults to
V - a version: dots or underscores separated in as many parts as one likes
- separator: which defaults to
__(two underscores) and separates the version from the description - description: a text with words separated by underscores or spaces
- suffix: which defaults to
.sql
For example, the following are all valid Flyway scripts:
- V1.0001some_description.sql
- V10001_another_description.sql
- V00215mynewscript.sql
- V15someotherscript.sql
Internally, Flyway controls the version of a database through records on a specific table in the database itself. The first time that Flyway runs (i.e. in the first migration), it creates a table called schema_version, with the following definition:
# column name  | column type
installed_rank | integer
version        | varchar(50)
description    | varchar(200)
type           | varchar(20)
script         | varchar(1000)
checksum       | integer
installed_by   | varchar(100)
installed_on   | timestamp
execution_time | integer
success        | boolean
Then Flyway adds to it a record identifying that the first migration occurred. For example, let's say that our script is called V1__users.sql. When Flyway syncs up the database with this script, it adds to the schema_version table a record like this:
installed_rank | version | description | type |     script     |  checksum   | installed_by |     installed_on
---------------+---------+-------------+------+----------------+-------------+--------------+----------------------
             1 | 1       | users       | SQL  | V1__users.sql  |   841518221 | postgres     | 2017-03-25 19:15:59
Then when a developer adds a second script, naming it as something like V2__another_script.sql, Flyway is able to query the schema_version table to see on what version the database is and can figure it out what scripts it needs to run.
Most of the default properties used by Flyway to control the version of the database can be changed. If needed, developers can change the name of the table that Flyway uses, whether migrations can be run out of order or not, where these scripts are, and etc. Take a look at Flyway's documentation for more.
How Can We Integrate Flyway
Flyway easily integrates with most of the build tools available on the Java environment. Out of the box, Boxfuse made available plugins to Maven, Gradle, Ant and SBT. But, even if we don't use one of—or don't want to integrate with—these build tools, we can still use Flyway through a CLI tool, or directly through its API.
Besides these options, a few plugins were crafted by the developers community. These plugins make smooth the usage of Flyway with some popular frameworks like Spring Boot, Grails and Play.
In the next section, we will see Flyway in action with Spring Boot.
Flyway In Action
To better understand how Flyway, and other solutions that handle version control of databases, can help us, let's do a practical exercise. We will start with an empty Spring Boot application where we will first add a Customer entity with contact details (contact name, email address and phone) directly on it. We will use Flyway to create the database schema (a single table) with some data. We will also create one RESTful endpoint that will be used to retrieve all the persisted customers.
After creating this first version of our application, we then will refactor it to extract contact details to an entity of its own, Contact. This new entity will make it possible to add more than one contact to a Customer. In this process, we will use Flyway again to create the second table, contact, and to migrate the preexisting customers' contacts.
Bootstrapping the Spring Boot Application
First of all, let's fork and clone the GitHub repo that contains an empty Spring Boot application. This application is based on Maven, which makes possible to import it in any Maven compatible IDE. So far, only two dependencies were added to it: spring-boot-starter-web and spring-boot-starter-data-jpa.
Running the application is just a matter of issuing mvn spring-boot:run in the root directory of it, or through our IDE. But it won't do much for the time being as we didn't add the Customer entity, nor the RESTful endpoint.
Integrating Spring Boot with Flyway
To integrate Spring Boot with Flyway, we will need to add flyway-core as a dependency to our application. But, as we still don't have any database configured, we will also add another dependency: hsqldb. HSQLDB is an in-memory database, written in Java, that easily integrates with Spring and, as such, will help us on our exercise. To add both dependencies, open the pom.xml file and include the following elements:
<?xml version="1.0" encoding="UTF-8"?>
<project ...>
    <!-- everything else -->

    <dependencies>
        <!-- other dependencies -->
        <dependency>
            <groupId>org.flywaydb</groupId>
            <artifactId>flyway-core</artifactId>
        </dependency>
        <dependency>
            <groupId>org.hsqldb</groupId>
            <artifactId>hsqldb</artifactId>
            <version>2.3.3</version>
        </dependency>
    </dependencies>
  <!-- everything else -->

</project>
To make HSQLDB persist our data after an application restart, we will need to configure it by editing the
src/main/resources/application.properties file with following key-value pairs:
# defining location for HSQLDB's data
spring.datasource.url=jdbc:hsqldb:file:data/app
# disabling Hibernate's auto schema generation
spring.jpa.hibernate.ddl-auto=none
Handling the Customer Entity
Now that we have properly configured a database in our application, and Flyway to handle its versioning, let's create the Customer entity. We will create this entity in the com.auth0.samples package, with the following content:
package com.auth0.samples;

import javax.persistence.Entity;
import javax.persistence.GeneratedValue;
import javax.persistence.GenerationType;
import javax.persistence.Id;

@Entity
public class Customer {
    @Id
    @GeneratedValue (strategy = GenerationType.IDENTITY)
    private Long id;

    private String name;
    private String contactName;
    private String email;
    private String phone;

    // getters & setters for all properties
}
To be able to persist and retrieve customers from the database, we will create an interface that extends JpaRepository. We will call this interface CustomerRepository and will also create it in the com.auth0.samples package. CustomerRepository will have the following content:
package com.auth0.samples;

import org.springframework.data.jpa.repository.JpaRepository;

public interface CustomerRepository extends JpaRepository<Customer, Long> {
}
If you are not familiar with Spring Data, you might think that this interfaces isn't much of a help. But that is not true, this interface does a lot actually. It enables us to findAll() customers, save() customers, and findOne() customer by its ID. It also gives us a nice feature called Query Methods, that allows us to create queries simply by defining an empty method declaration. For example, we could create a query to find Customers by their names by adding a single-line method declaration like List<Customer> findByName(String name);. Take a look at the JpaRepository reference for more.
We are now capable of instatiating customers and persisting them in the database. But we didn't define a way to expose these customers to the world (like to a web browser or to any other device). So, let's tackle this by creating a RESTful endpoint that responds for /customers/. For that, we will create a class called CustomerController, in the com.auth0.samples package, with the following source code:
package com.auth0.samples;

import org.springframework.beans.factory.annotation.Autowired;
import org.springframework.web.bind.annotation.RequestMapping;
import org.springframework.web.bind.annotation.RequestMethod;
import org.springframework.web.bind.annotation.RestController;

import java.util.List;

@RestController
public class CustomerController {

    @Autowired
    private CustomerRepository customerRepository;

    @RequestMapping(path = "/customers/", method = RequestMethod.GET)
    public List<Customer> getCustomers() {
        return customerRepository.findAll();
    }
}
As we can see, this CustomerController class uses CustomerRepository, which is automatically injected, to expose customers. With this class, we can now respond to HTTP GET requests with an array of persisted customers. But the problem is that we don't have anything persisted yet and, actually, we don't even have the customer table on our database. Let's use Flyway to create the table and populate it.
Creating a Flyway Script
To create our customer table, and populate it with a few records, we will create a SQL script in the src/main/resources/db/migration/ folder. Flyway, as stated before, organizes its scripts based on the numeric part of the naming pattern. As this will be our first script, we will create the file naming it as V1__customers.sql. The content of this file will be:
create table customer (
  id int identity primary key,
  name varchar(255) not null,
  contact_name varchar (255) not null,
  email varchar (255) not null,
  phone varchar (255) not null
);

insert into customer (name, contact_name, email, phone) values
  ('Coca Cola', 'John Doe', 'john.doe@cocacola.com', '202-555-0143'),
  ('Dell', 'Bob Frapples', 'bob.frapples@dell.com', '202-555-0180'),
  ('Apple', 'Barb Ackue', 'barb.ackue@apple.com', '202-555-0128'),
  ('Google', 'Sue Vaneer', 'sue.vaneer@google.com', '202-555-0174'),
  ('FedEx', 'Robin Banks', 'robin.banks@fedex.com', '202-555-0146'),
  ('Salesforce', 'Zack Lee', 'zack.lee@salesforce.com', '202-555-0122');
If we start our application now, Flyway will identify that this script is unapplied and will execute it. This process happens before Spring Boot gets a chance to bootstrap the application. This is important to guarantee that our database will have the customer table available, otherwise we would face an error when issuing GET requests to the endpoint created.
As our application was properly configured, and Flyway got a chance to run the script, we can now issue GET requests to /customers/ without a problem. The following screenshot shows the result of a GET request issued using Postman—which is a great tool to use when developing RESTful endpoints.
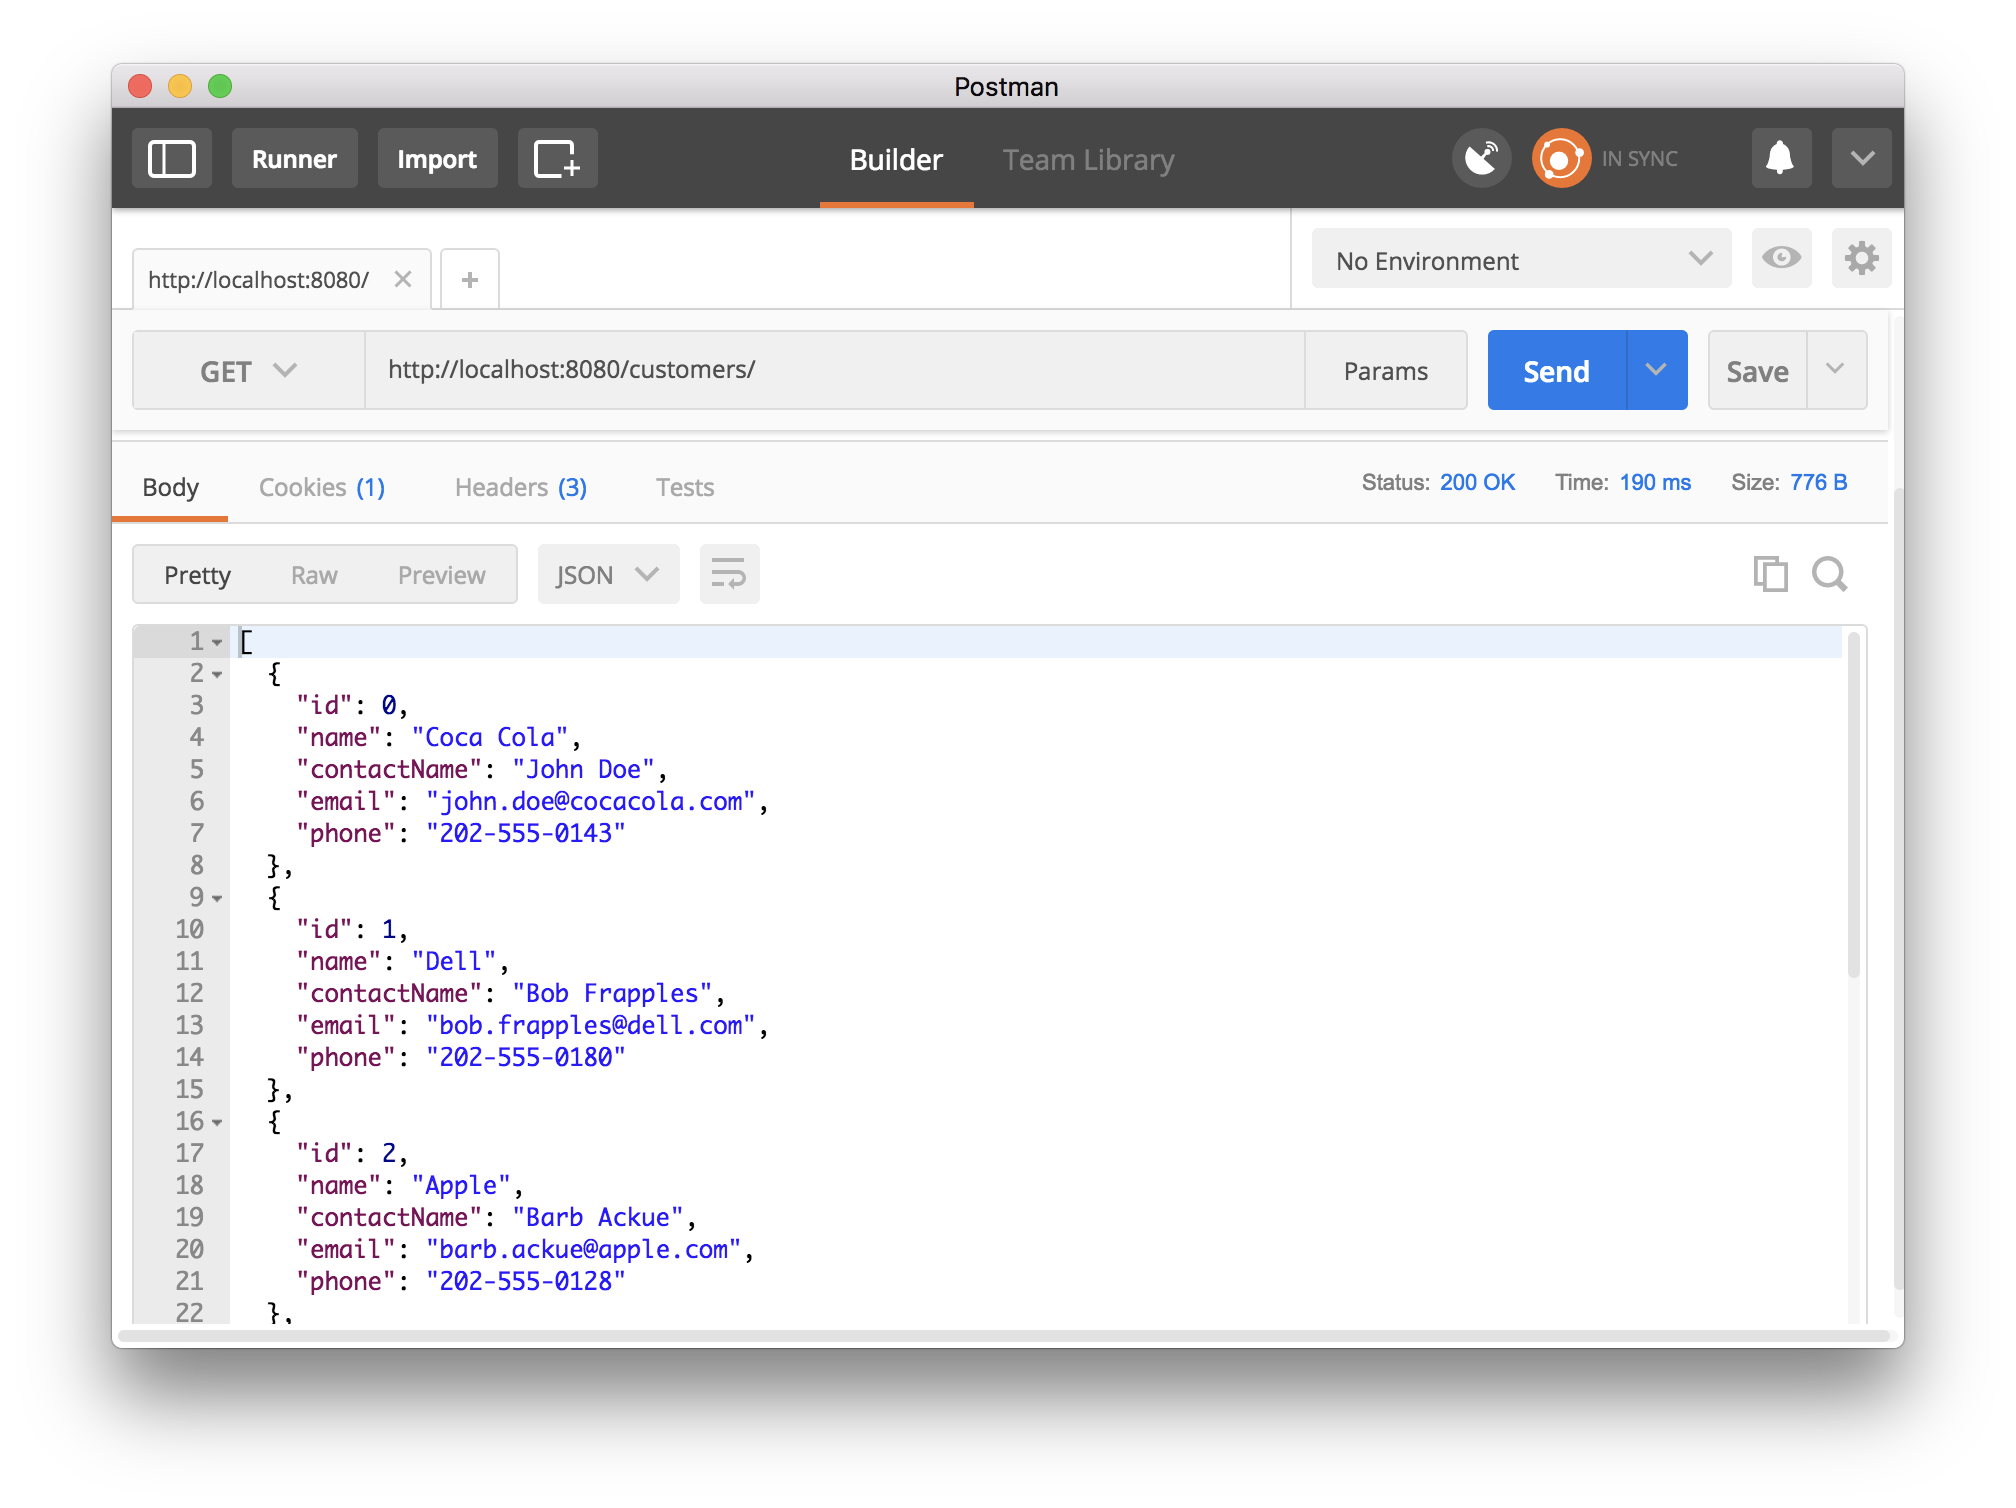
As we can see, the /customers/ endpoint responded properly with the array of customers created in our first script.
Saving Multiple Contacts to Customers
Let's say that the Product Owner of our team has spoken to the users of the application and that they were complaining about not being able to save more than one contact per customer. What can we do to help these users? Well, the first thing we can do is to refactor the Customer entity, extracting the contact fields to an entity of its own. This will require us to use JPA to tie both entities, mapping Many contacts To One customer, which is accomplished through the @ManyToOne annotation. Lastly, will require us to create another endpoint to permit the front-end application to retrieve an array of contacts of a specific customer.
The refactoring stated above refers only to the source code of our application. Accomplishing all these changes won't be enough as the database will still contain a single table, customer, with contact details embedded. To fix this issue, we will create another Flyway script, which will contain a command to create the contact table and another command to move customers' contact details to this new table.
Refactoring the Source Code
Let's begin the refactoring process by addressing the source code of our application. The first thing we will do is to create the Contact class, which will hold contact details of customers. We will create this class in the com.auth0.samples package, with the following content:
package com.auth0.samples;

import com.fasterxml.jackson.annotation.JsonIgnore;

import javax.persistence.*;

@Entity
public class Contact {

    @Id
    @GeneratedValue(strategy = GenerationType.IDENTITY)
    private Long id;

    @JsonIgnore
    @ManyToOne
    @JoinColumn (name = "customer_id")
    private Customer customer;

    private String name;
    private String email;
    private String phone;

    // getters & setters
}
Note that the Contact entity just created has the exact same fields that refer to the contact details of a customer, plus a property customer that points to the customer itself. This property has three annotations on it:
@JsonIgnorekeeps the endpoint, that we will create, from serializing the customer details multiple times@ManyToOneindicates to JPA that Many contacts To One customer can exist@JoinColumnindicates to JPA which table column will be used as a foreign key
After creating the Contact entity, we will now refactor the Customer entity to remove contact properties from it. The Customer class will now look as:
package com.auth0.samples;

import com.fasterxml.jackson.annotation.JsonIgnore;

import javax.persistence.*;
import java.util.List;

@Entity
public class Customer {
    @Id
    @GeneratedValue (strategy = GenerationType.IDENTITY)
    private Long id;

    private String name;

    @JsonIgnore
    @OneToMany (mappedBy = "customer")
    private List<Contact> contacts;

    // getters & setters
}
The only property on Customer that refers to contacts now is a List of contacts annotated with @JsonIgnore and @OneToMany. The first annotation keeps the existing endpoint, /customers/, from serializing contacts of customers, which could be expensive as there are no limits to the number of contacts on a customer. The second annotation, @OneToMany, indicates to JPA that can exist One customer To Many contacts.
The last thing that we will do to finish the source code refactoring, is to create the new endpoint which will be responsible for serializing the contacts of a customer. This endpoint will be created in the CustomerController class as follows:
package com.auth0.samples;

// other imports

import org.springframework.web.bind.annotation.PathVariable;

@RestController
public class CustomerController {

    // customerRepository definition and getCustomers() method

    @RequestMapping(path = "/customers/{customerId}/contacts/", method = RequestMethod.GET)
    public List<Contact> getCustomerContacts(@PathVariable("customerId") Long customerId) {
        return customerRepository.findOne(customerId).getContacts();
    }
}
Note that to retrieve the contacts of a customer, the request issuer will have to append the customer id to the URL of the endpoint. That is, to get the contacts of Coca Cola, the front-end application has to issue a GET request to /customers/1/contacts/. But not before refactoring the database.
Refactoring the Database
As already mentioned, running the application after refactoring the source code, and before refactoring the database, will generate errors. The database doesn't have the contact table yet, and the contact details are still residing in the customer table. To address this issue, we will create a second Flyway script. We will call this script V2__contacts.sql and will create it alongside with V1__customers.sql in the src/main/resources/db/migration/ folder. On it, we will add the following SQL commands:
create table contact (
  id int identity primary key,
  customer_id int not null,
  name varchar (255) not null,
  email varchar (255) not null,
  phone varchar (255) not null,
  constraint contact_customer_fk
    foreign key (customer_id)
    references customer (id)
);

insert into contact (customer_id, name, email, phone)
  select id, contact_name, email, phone from customer;

alter table customer drop column contact_name;
alter table customer drop column email;
alter table customer drop column phone;
This script has three responsibilities:
- It has to
createthecontacttable. - It has to
insertthe customers' contact details in this new table. - It has to
dropthe contact details columns from thecustomertable.
This is everything we need to do to refactor our database, and it is enough to make it compatible with the refactored source code. Running the application now will make Flyway identify the new script available, V2__contacts.sql, and run it before Spring Boot, making everything work together smoothly.
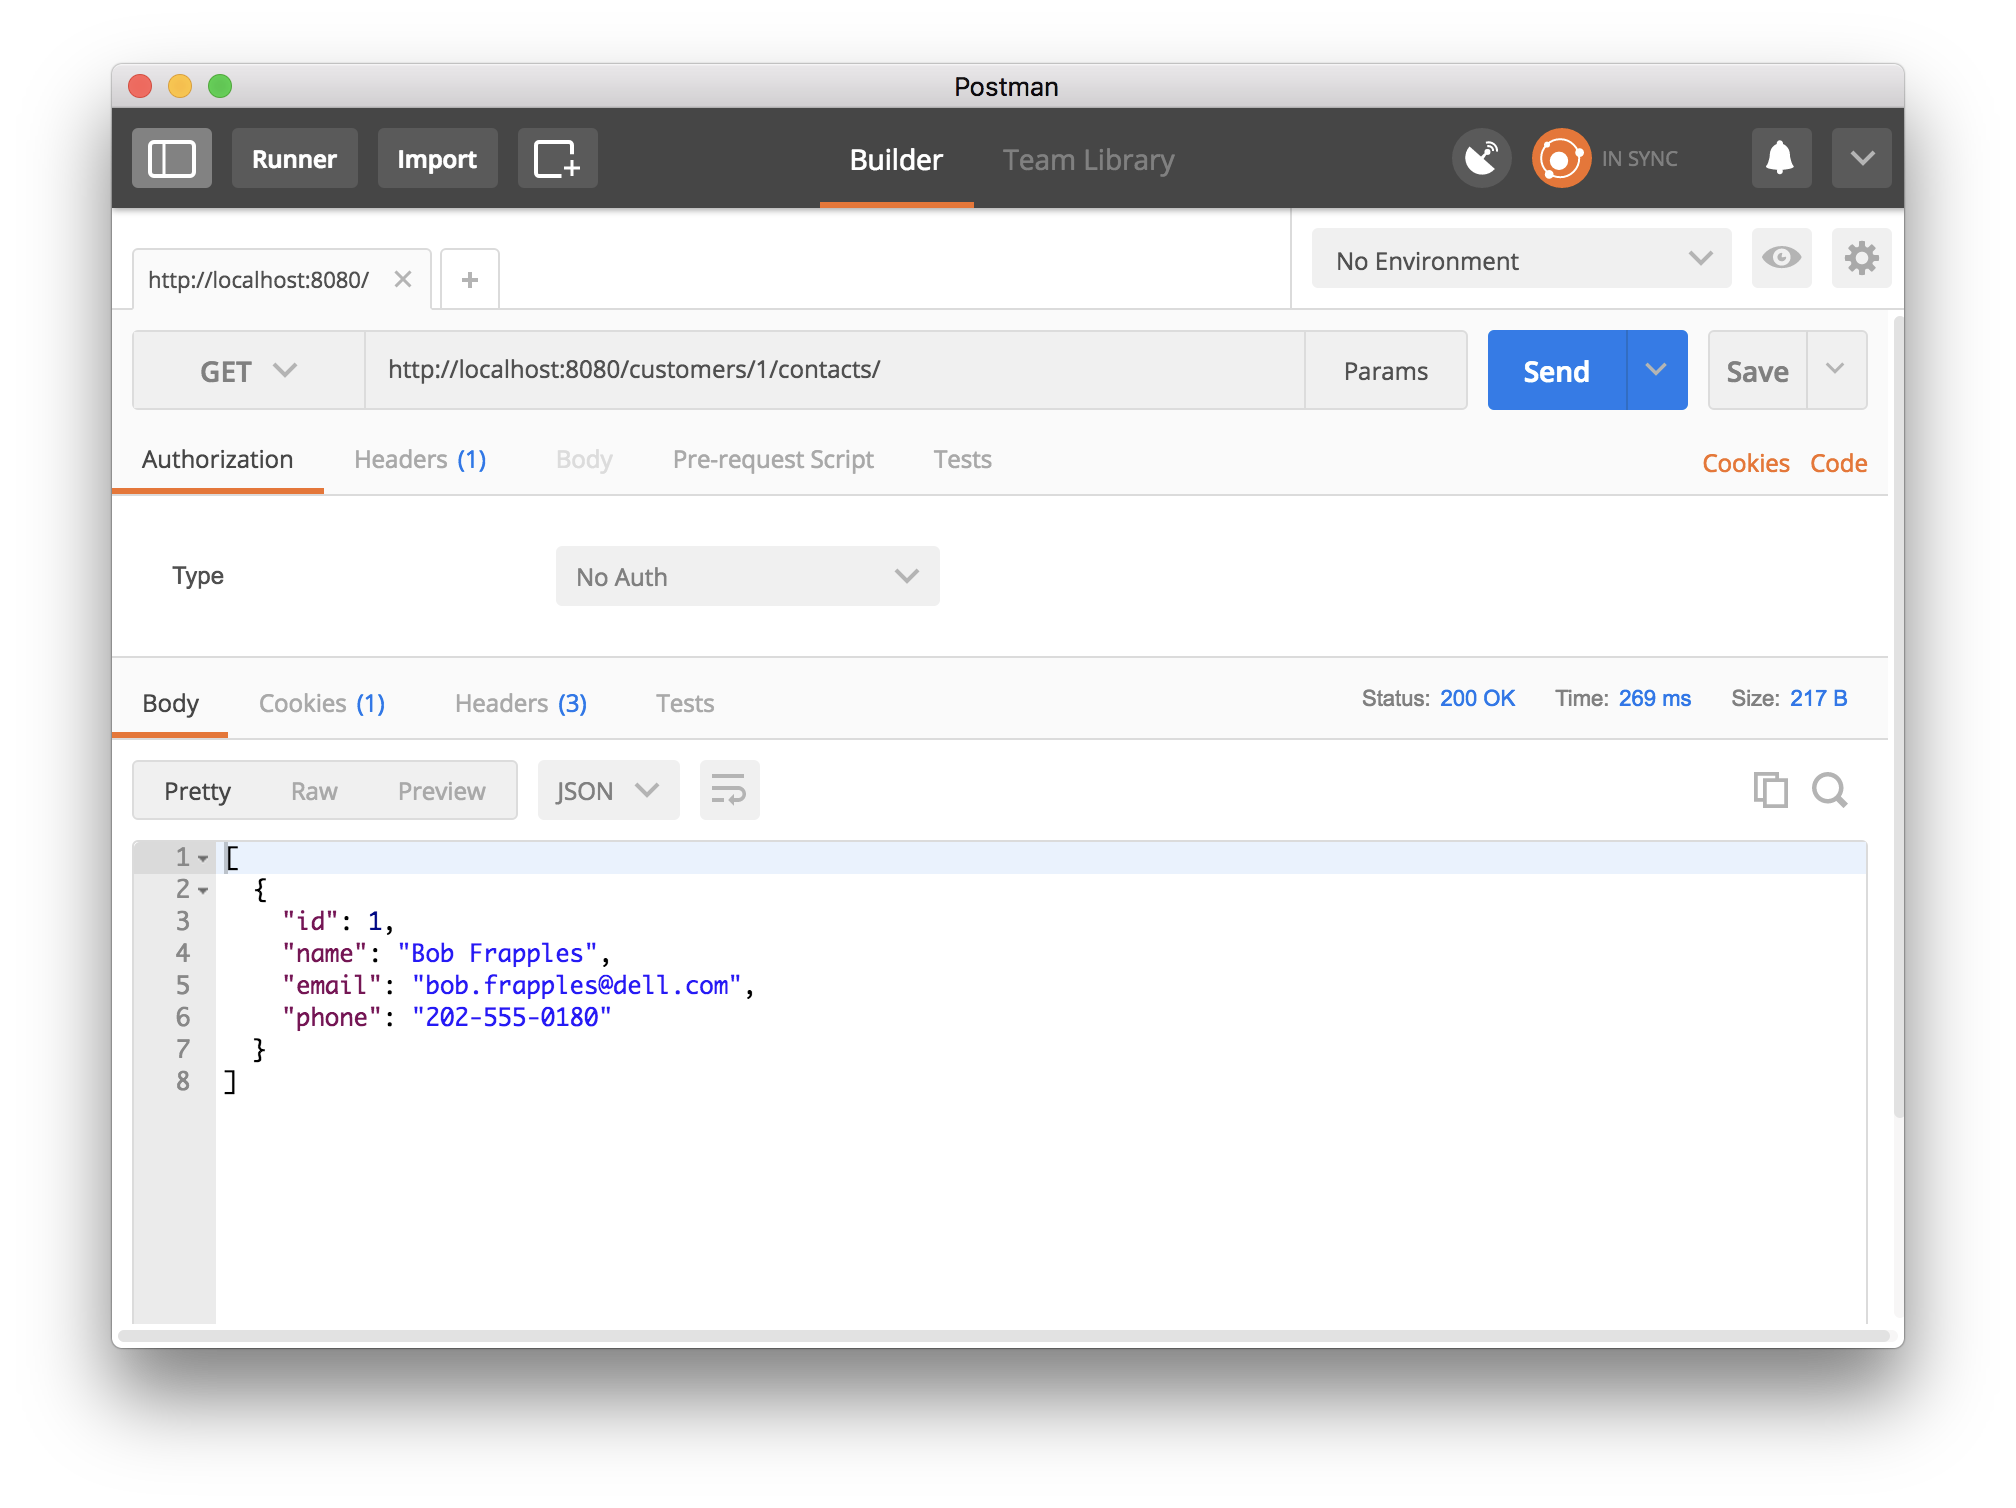
If we issue a GET request to /customers/1/contacts/ now, the endpoint will properly respond with the contact details of Coca Cola, as shown below:
Aside: Securing Java Applications with Auth0
Auth0 makes it easy for developers to implement even the most complex identity solutions for their web, mobile, and internal applications. Need proof? Check out how easy it is to secure a RESTful Spring Boot application with Auth0.
Auth0 provides the simplest and easiest to use user interface tools to help administrators manage user identities including password resets, creating and provisioning, blocking and deleting users.
For starters, we would need to include a couple of dependencies. Let's say that we are using the Apache Maven build manager. In that case, we would open our pom.xml file and add the following dependencies:
<?xml version="1.0" encoding="UTF-8"?>
<project xmlns="http://maven.apache.org/POM/4.0.0" xmlns:xsi="http://www.w3.org/2001/XMLSchema-instance"
         xsi:schemaLocation="http://maven.apache.org/POM/4.0.0 http://maven.apache.org/xsd/maven-4.0.0.xsd">
  <!--project definitions ...-->
  <dependencies>
    <!--other dependencies ...-->

    <dependency>
      <groupId>com.auth0</groupId>
      <artifactId>auth0</artifactId>
      <version>1.0.0</version>
    </dependency>

    <dependency>
      <groupId>com.auth0</groupId>
      <artifactId>auth0-spring-security-api</artifactId>
      <version>1.0.0-rc.2</version>
    </dependency>
  </dependencies>
</project>
After that we would simply create, or update, our WebSecurityConfigurerAdapter extension, as shown in the following code excerpt:
package com.auth0.samples;

import com.auth0.spring.security.api.JwtWebSecurityConfigurer;
import org.springframework.beans.factory.annotation.Value;
import org.springframework.context.annotation.Configuration;
import org.springframework.security.config.annotation.web.builders.HttpSecurity;
import org.springframework.security.config.annotation.web.configuration.EnableWebSecurity;
import org.springframework.security.config.annotation.web.configuration.WebSecurityConfigurerAdapter;

@Configuration
@EnableWebSecurity
public class WebSecurityConfig extends WebSecurityConfigurerAdapter {
    @Value("${auth0.audience}")
    private String audience;

    @Value("${auth0.issuer}")
    private String issuer;

    @Override
    protected void configure(HttpSecurity http) throws Exception {
        http.authorizeRequests()
                .antMatchers("/").permitAll()
                .antMatchers("/api/**").authenticated();

        JwtWebSecurityConfigurer
                .forRS256(audience, issuer)
                .configure(http);
    }
}
And then configure three parameters in the Auth0 SDK, which is done by adding the following properties in the application.properties file:
# change this with your own Auth0 client id
auth0.audience=LtiwyfY1Y2ANJerCNTIbT7vVsX5zKBS5
# change this with your own Auth0 domain
auth0.issuer=https://bkrebs.auth0.com/
Making these small changes would give us a high level of security alongside with a very extensible authentication solution. With Auth0, we could easily integrate our authentication mechanism with different social identity providers—like Facebook, Google, Twitter, GitHub, etc—and also with enterprise solutions like Active Directory and SAML. Besides that, adding Multifactor Authentication to the application would become a piece of cake.
Want more? Take a look at Auth0's solutions and at an article that thoroughly describes how to secure a Spring Application with JWTs.
Auth0 offers a generous free tier to get started with modern authentication.
Conclusion
Having a tool like Flyway integrated in our application is a great addition. With it, we can create scripts that will refactor the database to a state that is compatible with the source code, and we can move data around to guarantee that it will reside in the correct tables.
Flyway will also be helpful if we eventually run into an issue where we need to recover the database from a backup. In a case like that, we can rest assured that Flyway will correctly identify if the combination of the source code version and the database version that we are running have any scripts that need to be applied.


