


In our last post from the JavaScript for Microcontrollers and IoT series we implemented a small web server using only JavaScript on top of the JerryScript interpreter and the Particle Photon. In this post we will switch platforms! It's time to introduce the popular ESP8266 and Espruino, a firmware with a JavaScript interpreter integrated in it. We will also be exploring how to use a serial fingerprint reader. Will Espruino plus the ESP8266 be a better alternative to JavaScript on a microcontroller? Let's find out!
"Are Espruino + the ESP8266 a better alternative for JS on a microcontroller? Let's find out!"
Tweet This

Introduction
In our second post in this series we succeeded in implementing a small script on top of the Particle Photon and JerryScript, a small JavaScript engine. In that post we found out that we still had to do a lot of work in C to use JavaScript for a small task. Of course, the idea was to do the C part only once and then rely only on JavaScript from then on. So, to really find out if it was worth it, we pressed on and in the third post we got our hands dirtier and implemented a web server using only JavaScript on top of what we had done for previous posts. The experience left us with a bitter taste: it worked and run OK, but we still had to workaround limitations of the interpreter and to use a bit of C for the missing parts. Up to this point we could only recommend going the JavaScript route for your microcontroller development tasks if you were willing to pay a considerable initial cost in developing all the C code necessary to get things running.
For this post we decided to take a different route: we picked Espruino, a microcontroller firmware with a strong emphasis on JavaScript. On Espruino the preferred "business-logic" language is JavaScript! A custom JavaScript interpreter is included with it, and all the APIs are already exposed through it out of the box. If things work as they should, we should find ourselves relying only on JavaScript code. Was that the case? First, let's take a brief look at Espruino and the ESP8266.
Our New Contenders
The ESP8266
The ESP8266 was developed by Espressif Systems as a small WiFi module for bigger microcontrollers. It initially sported a serial interface that accepted Hayes commands to manage WiFi and TCP connections. Very little documentation was initially available in languages other than chinese, but its low price, power, and flexibility quickly made it very popular. It was later established that the embedded microcontroller in the ESP8266 was powerful enough to handle applications on its own, and a new development platform based solely on it was established. Espressif and other manufacturers quickly developed bigger, more powerful variants.
On the software side, many OSes designed for microcontrollers were quick to target the ESP8266. Not only was Espressif's SDK available, but third party firmwares too.
The ESP8266 remains cheap enough that getting one of the more powerful variants is usually the better option. In our case, we have decided to pick NodeMCU's ESP8266 development kit. This kit includes the ESP-12E variant of the ESP8266 plus all the necessary external components to interact with the ESP8266 for development. Of these, the most important are the voltage regulator (which converts 5V to 3.3V, allowing us to power the kit through USB or a cellphone charger), and the USB-to-SERIAL interface chip, which will allow us to easily interact with the ESP8266 using a USB cable.

Image courtesy of Wikipedia user Vowstar
This variant of the ESP8266 includes:
- 802.11b/g/n support
- SoftAP mode (access point mode)
- SDIO (SD card) support
- SPI
- 2 UARTs (Serial port)
- i^2^c
- PWM outputs
- Analog-digital-converter
- 4MiB of ROM
- 128KiB of RAM
Espressif's SDK is based on FreeRTOS and uses C as the main programming language. Fortunately there are other options like NodeMCU's own firmware, which extends the original SDK with the use of Lua, a small scripting language well suited to embedded use. In our case, we are going to explore the use of JavaScript on the ESP8266, and one of the best options for that is Espruino.
Espruino
Espruino is a firmware for microcontrollers with a strong emphasis on writing business-logic in JavaScript. For this it makes use of its home-grown JavaScript interpreter. Espruino exposes its whole API in its JavaScript environment, and comes with a series of tools designed to make using and uploading JavaScript code very easy. It even includes a REPL! Espruino is also the name of several development boards that are specifically designed to work with this firmware. Fortunately, Espruino also works with other popular boards such as the ESP8266.
Espruino comes with its own IDE:
And its API is very simple and inspired on Node.js:
var http = require("http");
http.get("http://www.espruino.com", function(res) {
  res.on('data', function(data) {
    console.log(data);
  });
});
It even supports TLS if you upload the right certificates!
// WARNING: upload the right CA certificates before trusting a connection
require("http").get("https://www.google.com", function(res) {
  res.on('data', function(data) { /* ... */ });
});
To see how to upload certificates, check here.
And it even comes with pin mappings for NodeMCU's ESP8266 out of the box!
digitalWrite(NodeMCU.D4, false);Having so much functionality obviously comes at a cost: Espruino uses a lot of memory, and its JavaScript interpreter is not an exception. We will talk more about this in the following section: the example.
The Example
For our example for this post we will use Espruino on the ESP8266 to operate a fingerprint scanner. We will use only JavaScript to develop a library to communicate with it. We will also write code to open a smart lock (which will be simulated using a LED) in case certain condition occur. We will also integrate this project with our sensor hub from previous posts. The sensor hub will send reports to our smart-lock controller and will unlock the door in case a critical condition occurs (like the flame sensor going off, or a gas leak is detected). In other words, this example will make us:
- Use JavaScript to interact with a fingerprint scanner using a binary level protocol.
- Use JavaScript to read and write from the serial port.
- Use JavaScript to create a server that can listen for sensor events and parse them.
- Use JavaScript to operate GPIO pins to open and close the smart lock.
Will the Espruino interpreter be up to the task?
The Fingerprint Scanner
For this example we have picked one of the most popular fingerprint scanners: the KOOKYE Fingerprint Scanner, based on Olimex's ZFM-20 protocol.
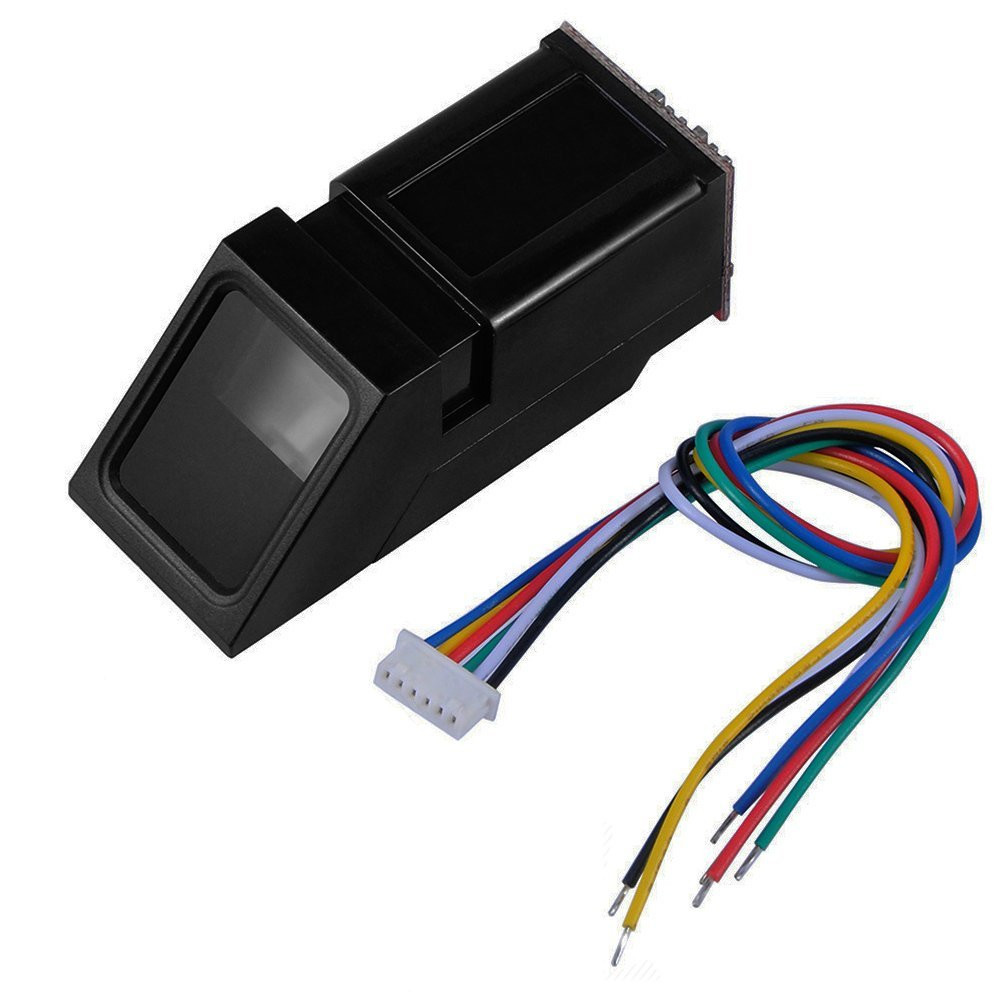
This fingerprint scanner is cheap and quite powerful. It comes with its own microcontroller to process the fingerprints and match them against a database. It also comes with enough memory to store over 190 fingerprints. You can also upload and download fingerprints from it. It is perhaps too small for industrial purposes, but more than enough for ours.
Step 1: Flashing Espruino
The NodeMCU ESP8266 development kit comes pre-flashed with its own firmware. Fortunately, Espressif provides a simple command line tool to flash the ESP8266 with whatever firmware we choose. Let's install it.
- Make sure you have Python 2 or 3 installed. If not, follow the instructions for your platform.
- Make sure you have PIP installed (Python's package manager). If not, follow the instructions for your platform.
- Now use
pipto installesptool:
pip install esptool- Connect your ESP8266 board to your computer using a USB cable.
- Now get the latest Espruino firmware. Extract the file to a directory of your choosing.
- Using your terminal, enter the
espruino_1v93_esp8266_4mbdirectory where you extracted the Espruino firmware. - Flash the firmware:
esptool.py --port /dev/ttyUSB0 --baud 115200 write_flash --flash_freq 80m --flash_mode qio --flash_size 32m 0x0000 "boot_v1.6.bin" 0x1000 espruino_esp8266_user1.bin 0x3FC000 esp_init_data_default.bin 0x3FE000 blank.binReplace /dev/ttyUSB0 with the right port for your platform. If you are using Linux and you have no other Serial-USB devices, the port should be /dev/ttyUSB0. On Linux, you can check the output of dmesg right after connecting the board to see what port gets assigned to it. On Windows you should use one of the COM ports (for example: COM1).
You should see the ESP8266 flash its light and a confirmation message on the screen.
Step 2: Get The IDE
Espruino uses a very simple IDE to interact with the development kit. It is distributed as a Chrome extension. Go to the Chrome Web Store and install it. Let's try it!
- Open the Espruino IDE through Chrome or using you applications menu (if you Chrome is set up to expose apps that way). You should see this:
Let's connect to our board through USB:
- Click on the
Gearicon on the top right corner of the screen. - Now go to
Communicationson the left. - Set the
Baud Rateto 115200. Then close the window. - Now click on the
Plugicon on the top left corner of the screen. Select the right serial port for your ESP8266.
- Click on the
Once you are connected, type
process.memory();in the console on the left and hit enter. The board should reply with details about memory use. That's the REPL! You can start trying stuff right there.
Step 3: Set up WiFi
We want our ESP8266 board to connect to our internal network automatically. Fortunately, with a few lines of JavaScript in the console we can configure it and store these settings in flash memory. Put these lines in the editor on the right of the Espruino IDE, then click the Send to Espruino button (below the Save file button).
var wifi = require("Wifi");
wifi.setHostname("Espruino");
wifi.stopAP();
wifi.connect("my-ssid", {password:"my-pwd"}, function(err){
  console.log("connected? err=", err, "info=", wifi.getIP());

  // Make this persistent across power cycles.
  wifi.save();
});
Take note of the IP address that was assigned to the ESP8266. Alternatively, remember the DHCP name we set there (wifi.setHostname("Espruino");). Once WiFi is set, the wifi.save() command in the block of code above makes the setting permanent, even after a cold boot. Settings are stored in flash memory.
One cool thing you can do after setting up WiFi is to tell the IDE to connect to the board using WiFi! That's right, you don't need to use USB to upload or test code once WiFi is setup. How cool is that?
- Click on the
Gearicon on the top right corner of the screen. - Now go to
Communicationson the left. - In the
Connect over TCP Addressinput box put the IP address you got when setting up WiFi. Then close the window. - Now click on the
Plugicon on the top left corner of the screen. Select theTCP/IPoption.
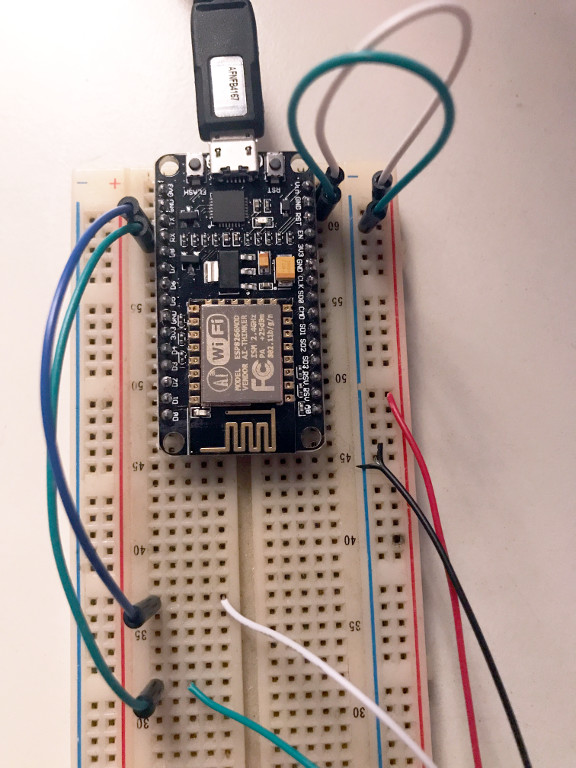
Step 4: Connect the Fingerprint Scanner
Our circuit for this scenario is very simple.
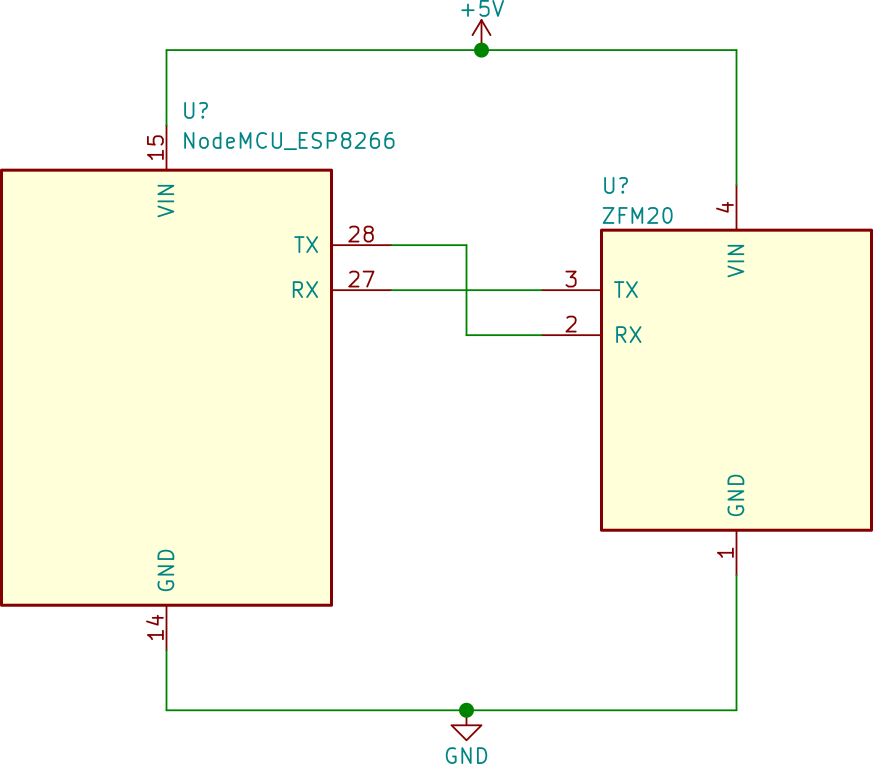
The fingerprint scanner uses a serial communications protocol and operates using 3.3V signal levels. This is important because the ESP8266 has no 5V-tolerant pins, in contrast with the Particle Photon which we used in previous posts. The circuit simply connects the GND (black cable) and VIN (red cable) pins of the fingerprint scanner to the same pins on the microcontroller. This allows us to power the fingerprint scanner using the same power source as the microcontroller (a USB cable or smartphone charger). The other two pins are for serial communications. These are the TX and RX pins of RS-232. The TX (transmit) pin from the fingerprint scanner goes to the RX (receive) pin on the microcontroller, and the RX pin from the fingerprint scanner goes to the TX pin on the microcontroller. For the ZFM20 variants of fingerprint scanners, the RX pin is the white cable, and the TX pin is the green cable.
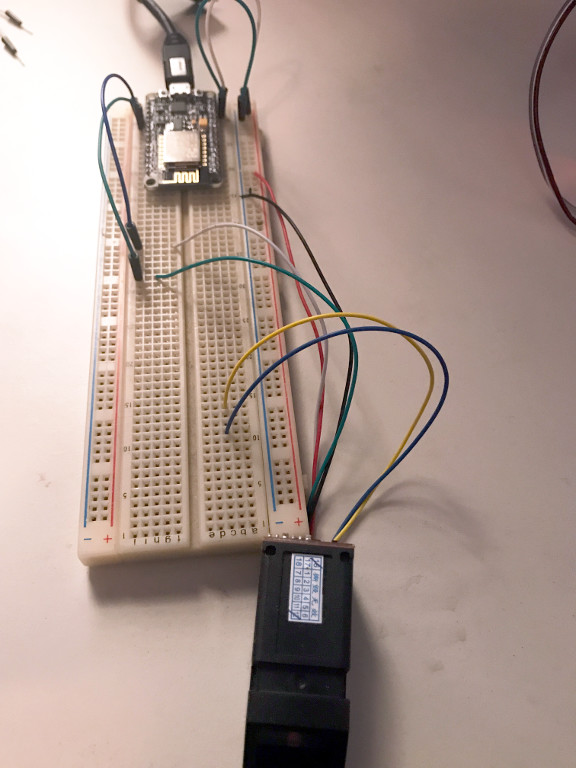
If you need help using a breadboard, check post 2.
Step 5: The Code
A big part of what we did for this post has to do with interacting with the fingerprint scanner. As mentioned before, the ZFM20 variants of fingerprint scanners use a serial protocol. The protocol is quite simple, and there are already libraries available for C++ and Node.js.
The whole point of this post is to explore JavaScript as a first class development environment, so we decided against using the C++ library. This option would also force us to compile a custom version of the Espruino firmware, further complicating our development process. We are, after all, using precompiled binary images of the Espruino firmware, and we want to keep doing that!
So we turned to the ZFM20 Node.js library. The ZFM20 library relies on one thing which is not available on Espruino: the serialport library. Fortunately, this is easy to change, so we decided to try that. After doing that we hit the first big roadblock using Espruino: memory use.
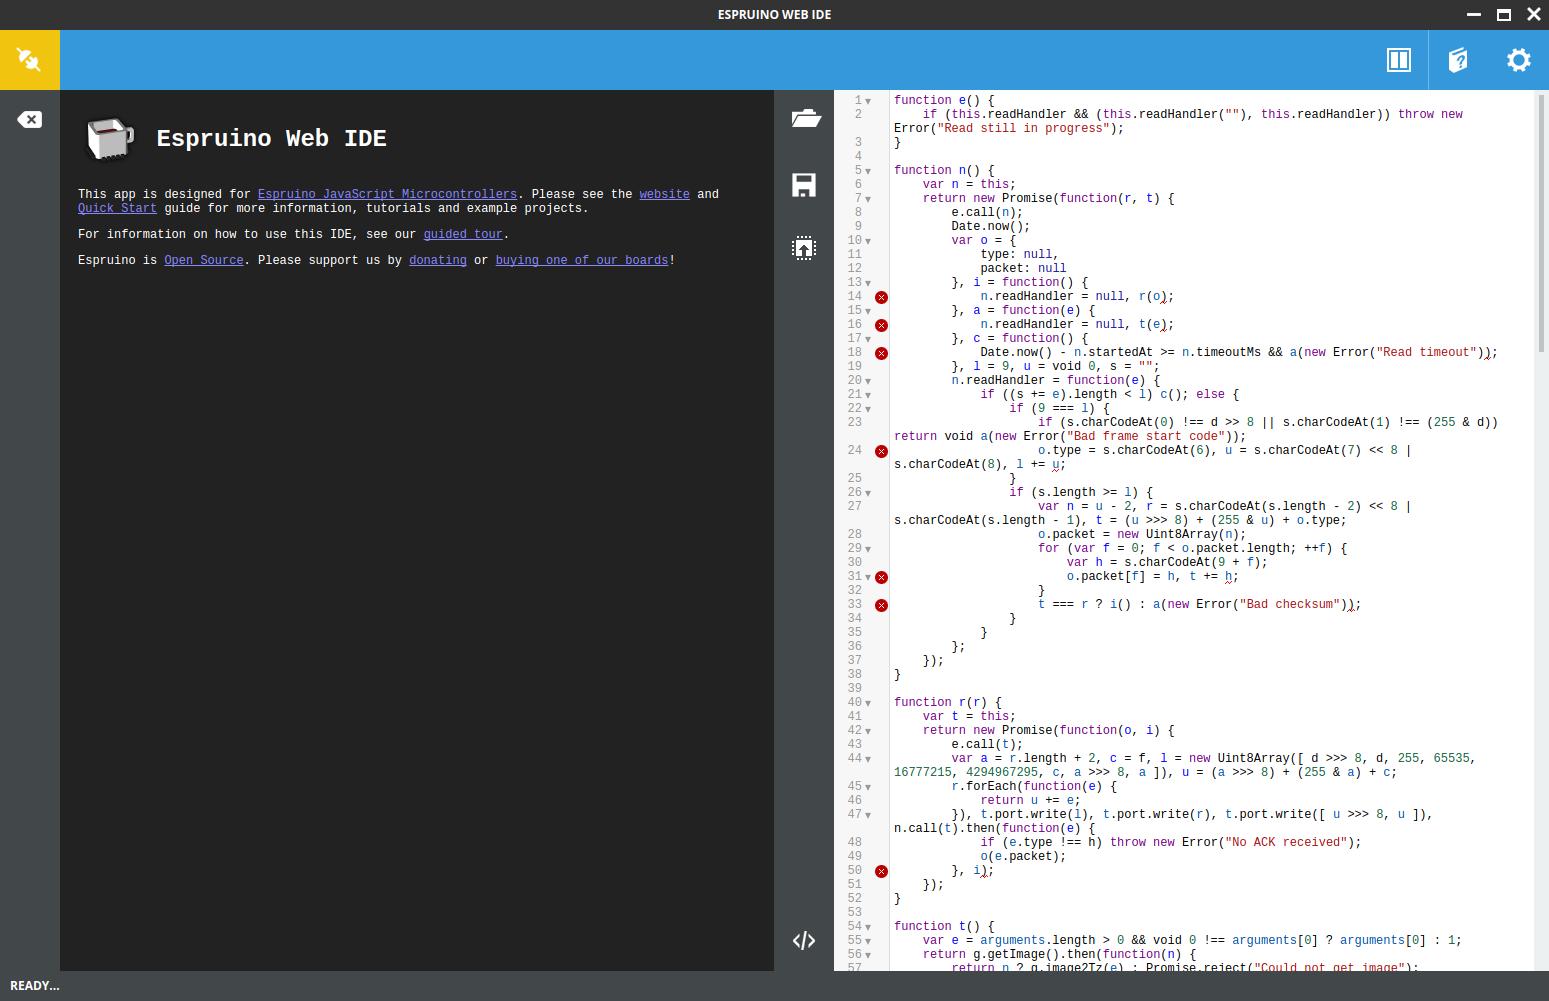
As it turns out, the JavaScript interpreter in Espruino is quite advanced. It executes code directly from the textual representation. This has pros and cons. The biggest advantage is that debugging is easier: the interpreter will tell you exactly what line caused trouble, this is a big step up from JerryScript, which could not do that (to keep memory use as low as possible). The downside is, of course, memory use: Espruino uses quite a bit of RAM. This leaves very little RAM for your scripts. Furthermore, scripts consume lots of RAM very quickly. Even after using Rollup and Uglify.js memory use with the ZFM20 library was just too much. Our hypothesis is that the async-result library used by the ZFM20 library consumes too much memory. The async-result library is a custom replacement for handling asynchronous tasks, in the spirit of ECMAScript 2015 Promises. By the way, Promises are supported by Espruino!
Read more about memory management in Espruino.
Our next option was to develop something custom: a smaller library to interact with the ZFM20 fingerprint scanner. This fortunately worked, however it remains a problem for serious development that Espruino on the ESP8266 is so limited with regards to RAM use. For contrast, consider that the Particle Photon comes with the same amount of RAM, and using it with JerryScript allowed us to work on quite complex scripts.
The ZFM20 protocol is quite simple. Here is the send function from our custom library:
function send(packet) {
    return new Promise((resolve, reject) => {
        ensureAvailability.call(this);

        const address = 0xFFFFFFFF;
        const length = packet.length + 2;
        const type = PACKAGE_ID_COMMAND;

        // Uint8Array.of does not work on Espruino
        const header = new Uint8Array([
            FRAME_START_CODE >>> 8,
            FRAME_START_CODE,
            address >>> 24,
            address >>> 16,
            address >>> 8,
            address,
            type,
            length >>> 8,
            length
        ]);

        let checksum = (length >>> 8) + (length & 0xFF) + type;
        packet.forEach(v => checksum += v);

        this.port.write(header);
        this.port.write(packet);
        this.port.write([checksum >>> 8, checksum]);

        read.call(this).then(reply => {
            if(reply.type !== PACKAGE_ID_ACK) {
                throw new Error('No ACK received');
            }

            // Payload of ACK packet
            resolve(reply.packet);
        }, reject);
    });
}
You may have noticed something odd about the way we initialize the Uint8Array for header. In Espruino, Uint8Array.of does not work so it is necessary to initialize the array in some other way. Other than that, this is fairly typical JavaScript code. Promises and Uint8Array are included in Espruino. Other ECMAScript 2015 features like arrow functions and const are converted using Babel to ECMAScript 5.1 to ensure compatibility.
As you can see in the code above, the protocol is simple. There is a header that starts with a magic number (the "start code"). All numbers are passed in big-endian order. After the start code, an address is sent. The protocol allows for several fingerprint scanners on the same bus. Each scanner can have its own address. For just one scanner, you can use the default address: 0xFFFFFFFF. After the address goes a single byte that establishes the type of packet that is sent as a payload. "Command" packets are packets that send an instruction or action for the fingerprint scanner to perform. A different type of packet, for example, is the "acknowledge" packet, sent by the fingerprint scanner as a response to a command. After that goes the length of the payload (called packet in the ZFM20 documentation). The payload can carry different types of data. Commands, for instance, can include additional parameters. This makes the length of the packet variable. After the length comes the actual payload, which depends according to commands and responses. And last comes the checksum: a simple sum to verify the received frame's integrity.
As an example, here's the payload (packet) for the Get Image command. The Get Image command tells the fingerprint scanner to immediately attempt to read a fingerprint using the optical scanner.
getImage() {
    const packet = new Uint8Array([
        INSTRUCTION_GET_IMAGE
    ]);

    return send.call(this, packet).then(reply => {
        return reply[0] === CONFIRMATION_CODE_OK;
    });
}
The code for our zfm20-simple library is quite readable, take a look for yourself.
Searching the Database
Here is a breakdown of the usual "read then search the database" operation:
const zfm20 = new ZFM20(Serial1, 3000, 0);

function getImageAndProcessIt(bufferId = 1) {
    return zfm20.getImage().then(result => {
        if(!result) {
            return Promise.reject('Could not get image');
        }

        return zfm20.image2Tz(bufferId);
    });
}

function findFingerprint() {
    return getImageAndProcessIt().then(result => {
        if(!result) {
            return Promise.reject("Couldn't read/process fingerprint");
        }

        return zfm20.search();
    });
}

// Normal operation, check fingerprint against database
findFingerprint().then(r => {
  if(r.found) {
    console.log(`Finger found (id: ${r.id}, ` +
          `score: ${r.score})`);
    timedOpenLock();
  } else {
    console.log('Finger not found');
  }
}, e => {
  console.log('Error while searching for fingerprint: ' + e);
});
The code basically performs a series of operations one after the other:
- It calls
getImagetelling the scanner to attempt to read a fingerprint. - If it succeeds, it then calls
image2Tz. This command tells the fingerprint scanner to process the fingerprint image and generate a "binary representation" that can later be used for storage or comparison purposes. This binary representation is stored in a buffer inside the fingerprint scanner. The fingerprint scanner has two buffers for this purpose, that's what thebufferIdargument is used for. - If the
image2Tzcommand succeeds, the code then sends thesearchcommand to the fingerprint scanner. Thesearchcommand compares the binary representation stored in one of the buffers to each binary representation of previously stored fingerprints in the scanner's flash memory. The scanner can perform this operation very fast. - Lastly, if the
scannercommand succeeds, either the fingerprint is found (and a score for the match is returned) or the fingerprint is not found.
Simple, and completely asynchronous. That's the power of JavaScript and Promises! Take a look at the code.
Enrolling Fingerprints
To actually use the code above, we first need to store fingerprints in the scanner's memory. Here's how to do that:
function getImageAndProcessIt(bufferId = 1) {
    return zfm20.getImage().then(result => {
        if(!result) {
            return false;
        }

        return zfm20.image2Tz(bufferId);
    });
}

function enrollFingerprint() {
    console.log(`Starting enrollment of new fingerprint ${fingerprintCount}`);

    // Workaround: Espruino Promises cause leaks when exceptions are thrown
    // inside 'then', so we use Promise.reject
    return getImageAndProcessIt(1).then(r => {
        if(!r) {
            return Promise.reject('Could not process first fingerprint');
        }

        return getImageAndProcessIt(2);
    }).then(r => {
        if(!r) {
            return Promise.reject('Could not process second fingerprint');
        }

        return zfm20.createModel();
    }).then(r => {
        if(!r) {
            return Promise.reject('Failed to create model for fingerprints');
        }

        return zfm20.storeModel(fingerprintCount);
    }).then(r => {
        if(!r) {
            return Promise.reject('Failed to store fingerprint');
        }

        return fingerprintCount++;
    });
}
Just like the previous case, enrolling a new fingerprint requires sending a series of commands to the scanner.
- First we use
getImageAndProcessIttwice. This function is identical to the one we explained before for searching for a fingerprint: it gets an image and then processes it to generate a binary representation. The binary representation is stored in one of two buffers in the fingerprint scanner's memory. In this case we call this function twice and we store the processed fingerprint in both buffers. In other words, we scan the same fingerprint twice and we store the results in the buffers. - If everything went fine, we then send the
createModelcommand. This commands combines two binary representations of the same fingerprint into a single representation. This representation is better suited for comparisons as it includes more information about the fingerprint. The result is stored back in both buffers in the scanner. - Lastly we send the
storeModelcommand. This command stores the resulting binary representation on the flash memory of the scanner. The argument passed to this command is the "slot" where the fingerprint model will be saved. ZFM20 based fingerprint scanners have a limited amount of slots. In our scanner, there are over 190 slots.
Listen for Sensor Events
The last part of our example is the simple TCP server that will get sensor events to open the lock in case of emergency. Espruino allows us to create TCP servers using an API that is similar to Node's.
// Listen for data from sensors
const server = require("net").createServer(conn => {
    conn.on('data', data => {
        try {
            const sensors = JSON.parse(data);
            console.log(sensors);

            if(sensors.flame || sensors.gas > 1000) {
                console.log('Flame or gas detected, opening lock');
        openLock();
      }
        } catch(e) {
            console.log(`Error parsing sensor data: ${e}`);
        }
    });
});
server.listen(3000);
A TCP server in 15 lines of code! This is the power of Espruino and a reasonable JavaScript API. This code awaits reports from the sensor hub we built in posts 2 and 3 and if a critical condition is detected it automatically unlocks the door. Check the code.
WARNING: all the code in these articles is for educational purposes. Do not use this code for critical systems like flame sensors or gas detectors. Always rely on professionally developed systems for those tasks.
Step 6: Build and Upload
Now that we have all the code that we need, it's time to build it and upload it to Espruino. As we mentioned before, we will be using Rollup, Babel and UglifyJS to produce bundles that can be uploaded to Espruino. The use of UglifyJS is important because Espruino keeps the code in its source form. By minifying the code we can reduce the use of RAM. Certain minification features do not work correctly with Espruino so we have decided to use conservative settings. We have also found that throwing exceptions inside Promise#then handlers results in leaks. This appears to be a bug in the interpreter.
To build the code make sure Node.js and NPM are installed and run the build.sh script:
./build.shAfter the script is finished, you will find two bundles in the dist directory. One of these bundles is used for enrolling fingerprints (main-enroll.bundle.js). When you run this bundle every fingerprint that gets scanned by the fingerprint reader will be stored in its memory. The memory of the scanner is cleared when the script runs, so every time you run it, you will begin enrolling fingerprints from the first slot.
After you have enrolled all the fingerprints you want, you can then switch to normal operation using main-read.bundle.js. This file continuously scans for fingerprints. If a valid fingerprint is found, it opens the lock for a few seconds. If the fingerprint is invalid nothing happens. This file also sets up a TCP server that listens for sensor events. When a critical sensor condition is detected, the lock is opened and remains opened until the sensors stop reporting the condition and a valid fingerprint is used to reset the lock.
Upload It!
To upload the code simply copy and paste the contents of any bundle to the editor on the right in Espruino IDE. Then click the Send to Espruino button in the middle of the screen. The code will run immediately.
If you want the code to be stored in flash memory so it runs automatically after a power cycle, you can send the save() command in the REPL. This will cause the currently loaded code to be stored in flash.
Step 7: Change the Sensor Report URL in the Particle Photon
For sensor reports to arrive at our smart lock controller, we need to tell the Particle Photon running our sensor hub the right IP address or host name. This is located in the sensors.js file of post 3. Edit this file and put the IP address or the host name of the lock controller. After that flash the Particle Photon following the steps explained in post 3. If you followed this example when setting up WiFi, the hostname is Espruino
const interval = 5000;
const host = 'Espruino'; // <--- PUT THE IP ADDRESS OR HOSTNAME HERE
const eventReport = 'sensor-report';
const eventAlarm = 'sensor-alarm';
const port = 3000;
const gasThreshold = 1000;
const tempThreshold = 40;
const alarmWaitMs = 5000;

// (...)
It's Working!
In the first video we can see the lock being unlocked (blue LED) when a valid fingerprint is read. In the second video we can see the lock being unlocked without a time limit when a critical condition is detected (gas leak). When the gas leak stops, a valid fingerprint can reset the lock to its normal state.
Aside: JavaScript at Auth0
At Auth0 we use JavaScript heavily. Using our authentication and authorization server from your JavaScript web apps is a piece of cake. Here's one simple example using ECMAScript 2015 features and the Auth0.js library. You could use this to expose an authenticated API from your Espruino app by using the HTTP library and checking the validity of a JWT.
This is the main client-side script to authenticate and authorize a user to access an API. It also updates the DOM to show some user data. You can send this as part of a HTML page served directly from the ESP8266. We showed how to do this in post 3 of this series using the Particle Photon.
const auth0 = new window.auth0.WebAuth({
    clientID: "YOUR-AUTH0-CLIENT-ID",
    domain: "YOUR-AUTH0-DOMAIN",
    scope: "openid email profile YOUR-ADDITIONAL-SCOPES",
    audience: "YOUR-API-AUDIENCES", // See https://auth0.com/docs/api-auth
    responseType: "token id_token",
    redirectUri: "http://localhost:9000" //YOUR-REDIRECT-URL
});

function logout() {
    localStorage.removeItem('id_token');
    localStorage.removeItem('access_token');
    window.location.href = "/";
}

function showProfileInfo(profile) {
    var btnLogin = document.getElementById('btn-login');
    var btnLogout = document.getElementById('btn-logout');
    var avatar = document.getElementById('avatar');
    document.getElementById('nickname').textContent = profile.nickname;
    btnLogin.style.display = "none";
    avatar.src = profile.picture;
    avatar.style.display = "block";
    btnLogout.style.display = "block";
}

function retrieveProfile() {
    var idToken = localStorage.getItem('id_token');
    if (idToken) {
        try {
            const profile = jwt_decode(idToken);
            showProfileInfo(profile);
        } catch (err) {
            alert('There was an error getting the profile: ' + err.message);
        }
    }
}

auth0.parseHash(window.location.hash, (err, result) => {
    if(err || !result) {
        // Handle error
        return;
    }

    // You can use the ID token to get user information in the frontend.
    localStorage.setItem('id_token', result.idToken);
    // You can use this token to interact with server-side APIs.
    localStorage.setItem('access_token', result.accessToken);
    retrieveProfile();
});

function afterLoad() {
    // buttons
    var btnLogin = document.getElementById('btn-login');
    var btnLogout = document.getElementById('btn-logout');

    btnLogin.addEventListener('click', function () {
        auth0.authorize();
    });

    btnLogout.addEventListener('click', function () {
        logout();
    });

    retrieveProfile();
}

window.addEventListener('load', afterLoad);
Get the fully working generic example and signup for a free account to try it yourself!
Conclusion
In this post we finally explored a different alternative to the Particle Photon and JerryScript. In this case it was Espruino and the ESP8266. We were impressed by the amount of functionality included in Espruino. Everything is available out of the box through the JavaScript interpreter. The interpreter, although not perfect, comes with a lot of functionality, including typed arrays and promises. It even supports TLS out of the box! We did run into some issues with the use of memory, though. In all honesty, we cannot recommend Espruino for microcontrollers with as little RAM as the ESP8266. It may, however, be an excellent option for bigger microcontrollers, like the new ESP32 from Espressif (520KB of RAM!). We also run into some bugs in the interpreter, like leaks when throwing exceptions inside promise handlers and hangs for completely minified code. Even so, we remain impressed. It is amazing to be able to write a TCP server in 15 lines of code, or to be able to test and debug code through the REPL. We are also impressed by the ESP8266: it's cheap, it has WiFi, and it allows you to run different types of firmwares. We are eager to see what can be done with newer stuff like the ESP32 and future versions of Espruino. If you are interested in using JavaScript for one of your embedded projects, take a serious look at Espruino, it's amazing. Just make sure you have more than 128KiB of RAM. Hack on!


