---
title: "アイデンティティ攻撃に対するAuth0セキュリティの包括的なガイド"
description: "開発者向けに不可欠なAuth0セキュリティのベストプラクティスを深く掘り下げたガイドです。設定ミス、アカウント詐欺、MFAバイパス、トークンハイジャックを防ぐ方法を学びます。"
authors:
- name: "Maria Vasilevskaya"
url: "https://auth0.com/blog/authors/maria-vasilevskaya/"
date: "Nov 21, 2025"
category: "Identity & Security"
tags: ["security", "mfa bypass", "hijacking", "attack protection"]
url: "https://auth0.com/blog/jp-comprehensive-guide-auth0-security-identity-attacks/"
---
# アイデンティティ攻撃に対するAuth0セキュリティの包括的なガイド
>本記事は「[A Comprehensive Guide to Auth0 Security Against Identity Attacks](https://auth0.com/blog/comprehensive-guide-auth0-security-identity-attacks/)」を翻訳した記事です。
本記事では、Auth0の顧客が日常的に直面している現在のアイデンティティの脅威状況に対処し、Auth0テナントを強化するための多数のセキュリティ推奨事項をまとめました。
## 5つの重点分野
現在、アイデンティティ分野で普及しており、Auth0の顧客が対処する必要がある5つの分野があります。以下の通りです。
1. 設定ミス
2. アカウント作成詐欺
3. 認証情報を狙う攻撃
4. MFAバイパス
5. セッションとトークンのハイジャック
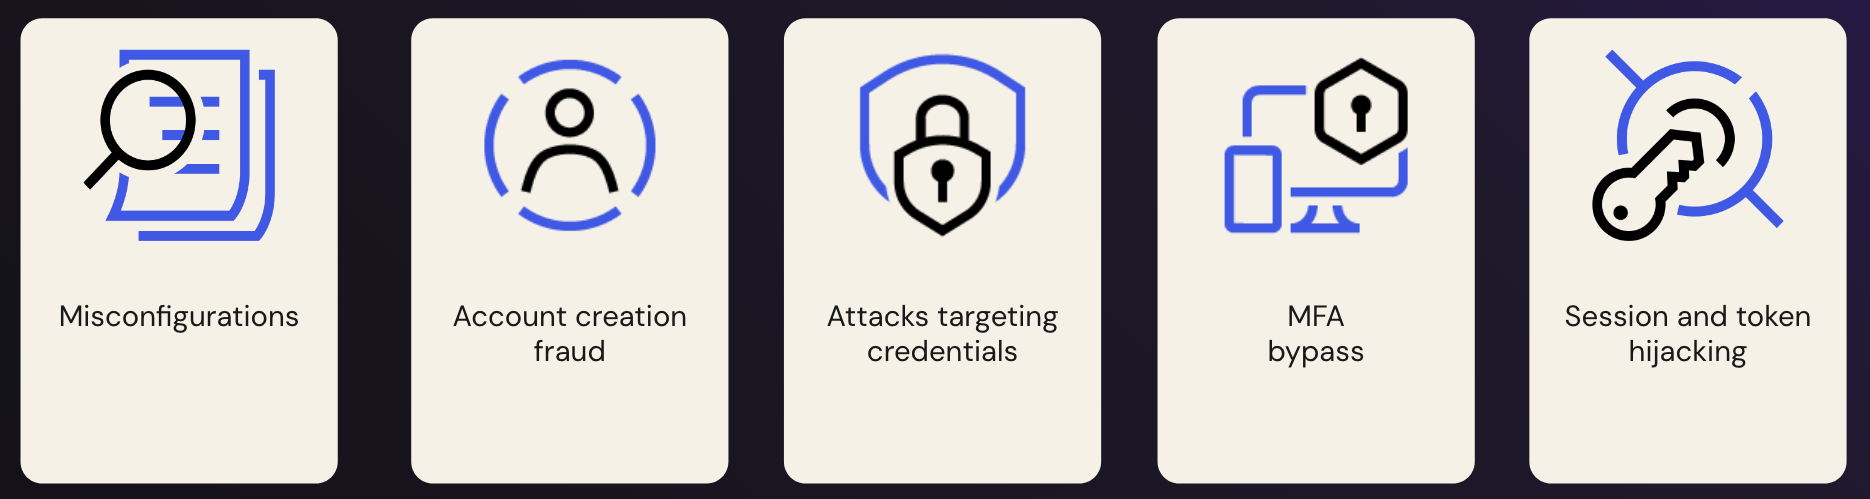 AIの時代において、攻撃ベクトルの多くは、ボットやボットネット、住宅用プロキシ、サービスとしてのフィッシングインフラストラクチャを利用した高速な自動化攻撃です。
アイデンティティ防御の観点から、主な原則として、2つの効率的な実践を適用することを推奨します。
1. アイデンティティ業界のベストプラクティスとAuth0固有の推奨事項に基づき、適切な設定を適用する
2. 設定の弱体化や新しい攻撃ベクトルの出現などによりセキュリティ状況が変化した際に対応できるよう、検出機能を強化する
 検出コンポーネントについては、[サインアップ詐欺](https://auth0.com/blog/detecting-signup-fraud-3-ways-to-use-auth0-logs-to-protect-your-business/)、[リフレッシュトークンのセキュリティ](https://auth0.com/blog/refresh-token-security-detecting-hijacking-and-misuse-with-auth0/)、[クレデンシャルスタッフィング](https://auth0.com/blog/Log-Detections-Credential-Stuffing-MFA-Exploit-Prevention/)に関する一連の記事で詳しく説明しました。検出ルールは、Auth0環境のセキュリティ監視用ルールのコレクションである[Auth0 Detection Catalog](https://github.com/auth0/auth0-customer-detections)として公開されています。本記事では、主に設定、ベストプラクティス、対応に焦点を当てます。
## 設定ミス: Auth0防御の最前線
セキュリティリスクにつながる設定ミスは、テナントやアイデンティティプロバイダー、アプリケーションレベルの両方に当てはまります。不適切なセッション管理、トークン検証、トークン保存はすべてアプリケーション側の設定ミスの例です。[トークン検証](https://www.jwt.io/libraries)や[アイデンティティプロトコルの処理](https://auth0.com/docs/libraries)の詳細について、既知のオープンソースライブラリやSDKを活用することで、リスクを大幅に軽減できます。本記事では主にテナント側の設定ミスに焦点を当てます。
現在のセキュリティ関連設定の概要をすばやく把握する最良の方法は、標準、ガイダンス、Auth0セキュリティのベストプラクティスに照らしてテナント設定をレビューする[Checkmate for Auth0](https://auth0.com/blog/introducing-checkmate-for-auth0/)を実行することです。Checkmateはセルフサービスツールです。[Readiness Check](https://auth0.com/blog/readiness-check/)機能もAuth0 Dashboardで直接利用できます。執筆時点では、Checkmateはより広範な設定レビューバリデーターを提供しています。本セクションでは、いくつかの一般的な推奨事項を強調します。
認可コードインジェクション攻撃のリスクを軽減するため、通常のWebアプリケーションであっても、Proof Key for Code Exchange(PKCE)を使用したAuthorization Codeグラントを[OAuth2.1グラント](https://datatracker.ietf.org/doc/html/draft-ietf-oauth-v2-1)のデフォルトの選択肢とする必要があります。アプリケーション側の設定ですが、[Auth0 Action](https://auth0.com/blog/introducing-auth0-actions/)でPKCEを強制する[post-login trigger](https://auth0.com/docs/customize/actions/explore-triggers/signup-and-login-triggers/login-trigger)を使用して、Auth0テナントに強制適用できます。
```shell
exports.onExecutePostLogin = async (event, api) => {
//enforce PKCE - if code_challenge is not defined then revoke
if (!event.request.query.code_challenge) {
api.session.revoke("PKCE is enforced");
}
};
```
Implicit Grantフローは非推奨であり、PKCEを使用したAuthorization Code Flowを優先して避ける必要があります。レガシーアプリケーションを提供するために必要であるなど、Implicit Grantの使用が絶対に避けられないまれなエッジケースがある場合は、デフォルト以外のバージョンの使用を検討してください。たとえば、`response\_mode`として`form\_post`を強制することで、レスポンスの本文でトークンを配信でき、ブラウザの履歴やプロキシのログ記録によるトークン漏洩のリスクを軽減できます。設定はAuth0のpost-login Actionでも強制できます。
```shell
exports.onExecutePostLogin = async (event, api) => {
const responseType = event.request.query.response_type;
// When response_mode is not set in the request,
// it defaults to the url fragment
const responseMode = event.request.query.response_mode || 'url';
// Implicit Grant without form_post is not allowed
if((responseType && (responseType.includes('token') ||
responseType.includes('id_token'))) &&
(!responseMode || responseMode !== 'form_post')){
api.session.revoke('Login is not allowed. Contact support.');
console.log(`Application ${event.client.client_id} applies insecure grant:
response_type=${responseType} and
response_mode=${responseMode}`);
}
};
```
Checkmateが回避を推奨するもう1つのグラントは、`/token`エンドポイントへのリクエストでユーザーの認証情報が直接提供されるResource Owner Password Grant(ROPG)です。主なセキュリティリスクは、クライアントがユーザーの認証情報を完全に信頼されることですが、アプリケーションがユーザー環境で動作する場合、つまりパブリッククライアントである場合、前提は成り立ちません。アプリケーション開発者が認証情報を安全に処理すると約束したとしても、クライアント側の脆弱性(クロスサイトスクリプティングや悪意のあるサードパーティコードなど)によってログイン試行全体が侵害され、ユーザーの認証情報が直接盗まれる危険性があります。最新のアイデンティティセキュリティの基本原則は、ユーザーの認証情報に関してクライアントを決して信頼しないことです。認証情報は常に信頼できる認可サーバー(本記事のケースでは[Auth0 Universal Login](https://auth0.com/docs/authenticate/login/auth0-universal-login))にのみ送信する必要があります。
開発者がROPGを使用したいと考える理由はいくつかあります。安全でないオプションをデフォルトにするのではなく、以下にリストされている別のソリューションを検討することを推奨します。
| 課題 | ROPGの代替となるソリューション |
| :---- | :---- |
| Webリダイレクトを避けるため | [Auth0 Native Login](https://auth0.com/docs/authenticate/login/native-login)を検討する |
| UIを完全に制御するため | [Auth0 Advanced Customization for Universal Login](https://auth0.com/docs/customize/login-pages/advanced-customizations)を検討する |
| キオスクのユースケースを実装するため | [OAuth2.0 device flow](https://auth0.com/docs/get-started/authentication-and-authorization-flow/device-authorization-flow)を検討する |
クライアントアプリケーションが認可コードをトークンと交換するために認可サーバーに対して自身を認証する必要がある場合、使用される方法は重要です。クライアント認証は、認証情報の機密性を維持できるコンフィデンシャルクライアントに適用されます。コンフィデンシャルクライアントの典型的な例には、通常のWebアプリケーションやマシンツーマシンアプリケーションが含まれます。対照的に、パブリッククライアントは通常、シングルページアプリケーション(SPA)やネイティブアプリケーションです。
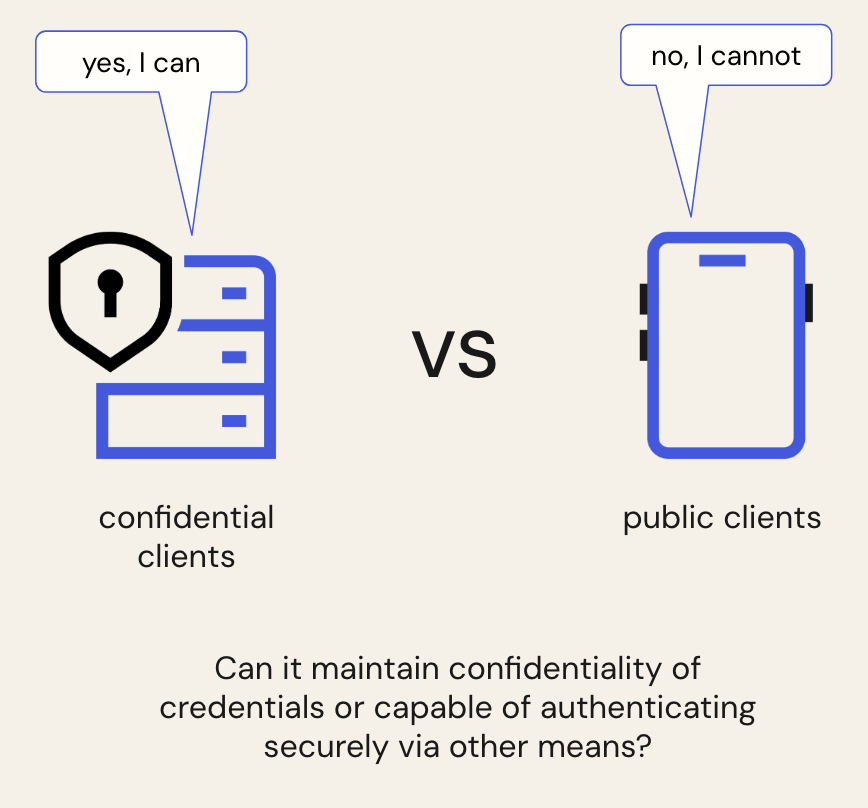 Auth0は、2つの異なるカテゴリに分類できる[クライアント認証](https://manage.cic-demo-platform.auth0app.com/docs/secure/application-credentials#application-authentication-methods)の標準的なアプローチを実装しています。
1. ネットワーク経由で送信される共有シークレット(`client\_secret\_basic`および`client\_secret\_post`)
2. 送信する共有シークレットがない(`private\_key\_jwt`および相互TLS/mTLS)
2番目のグループのメソッドは、より高いセキュリティ特性を提供します。`private\_key\_jwt`とmTLSはどちらも非同期暗号化に依存しており、認可サーバーにはシークレットの公開部分のみが(直接公開鍵として、またはX.509証明書として)提供されます。機密性の高い秘密鍵は通常、シンプルで再利用可能なクライアントシークレット文字列とは異なり、送信されることはなく、アプリケーションの環境内で管理および保護されるため、メソッドはクライアントアプリケーションが認証情報を公開するリスクを本質的に軽減します。
## Attack Protection: アカウント作成詐欺と認証情報を狙う攻撃に対処するための共通項
Auth0が提供する重要な防御レイヤーは、[Auth0 Bot Detection](https://auth0.com/blog/the-future-of-bot-protection-smarter-attacks-demand-a-layered-approach/)をはじめとする一連の[Attack Protection](https://auth0.com/docs/secure/attack-protection)機能です。各防御機能は、さまざまな閾値の調整、感度の変更、対応の選択などによりカスタマイズできることを強調しておきます。カスタマイズは、特定の環境の正常性に固有であり、直面している現在の脅威状況に適切な摩擦を維持するのに役立ちます。たとえば、[Auth0 Suspicious IP throttling](https://auth0.com/docs/secure/attack-protection/suspicious-ip-throttling)の場合、失敗したログインとサインアップの回数の閾値と、両方の補充率を消費量に合わせて適切に設定することが重要です。攻撃が検出されないままになるほど寛容であってはならず、正当な消費に影響を与えるほど保守的であってもいけません。テナントで機能をデプロイまたは有効にする際に、デフォルトを再検討することを推奨します。
顧客に十分に活用されていないもう1つの強力な機能は、現在の脅威状況に合わせて機能を適応させる能力です。さらに、公開した[検出ルール](https://github.com/auth0/auth0-customer-detections)と対応する[Auth0 Management API](https://auth0.com/docs/api/management/v2/attack-protection/patch-bot-detection)を組み合わせることで、攻撃を受けているときは制御を強化し、そうでないときは緩和する強力なセキュリティ自動化を実装できます。
たとえば、[クレデンシャルスタッフィングのシグナル](https://auth0.com/blog/Log-Detections-Credential-Stuffing-MFA-Exploit-Prevention/)が進行中の攻撃を示している場合、[Auth0 Management API](https://auth0.com/docs/api/management/v2/attack-protection/patch-bot-detection)を利用してBot Detectionの設定を強化します。`When Risky`モードが推奨される場合は感度を上げ、攻撃が特に執拗な場合は設定を`Always`に変更します。
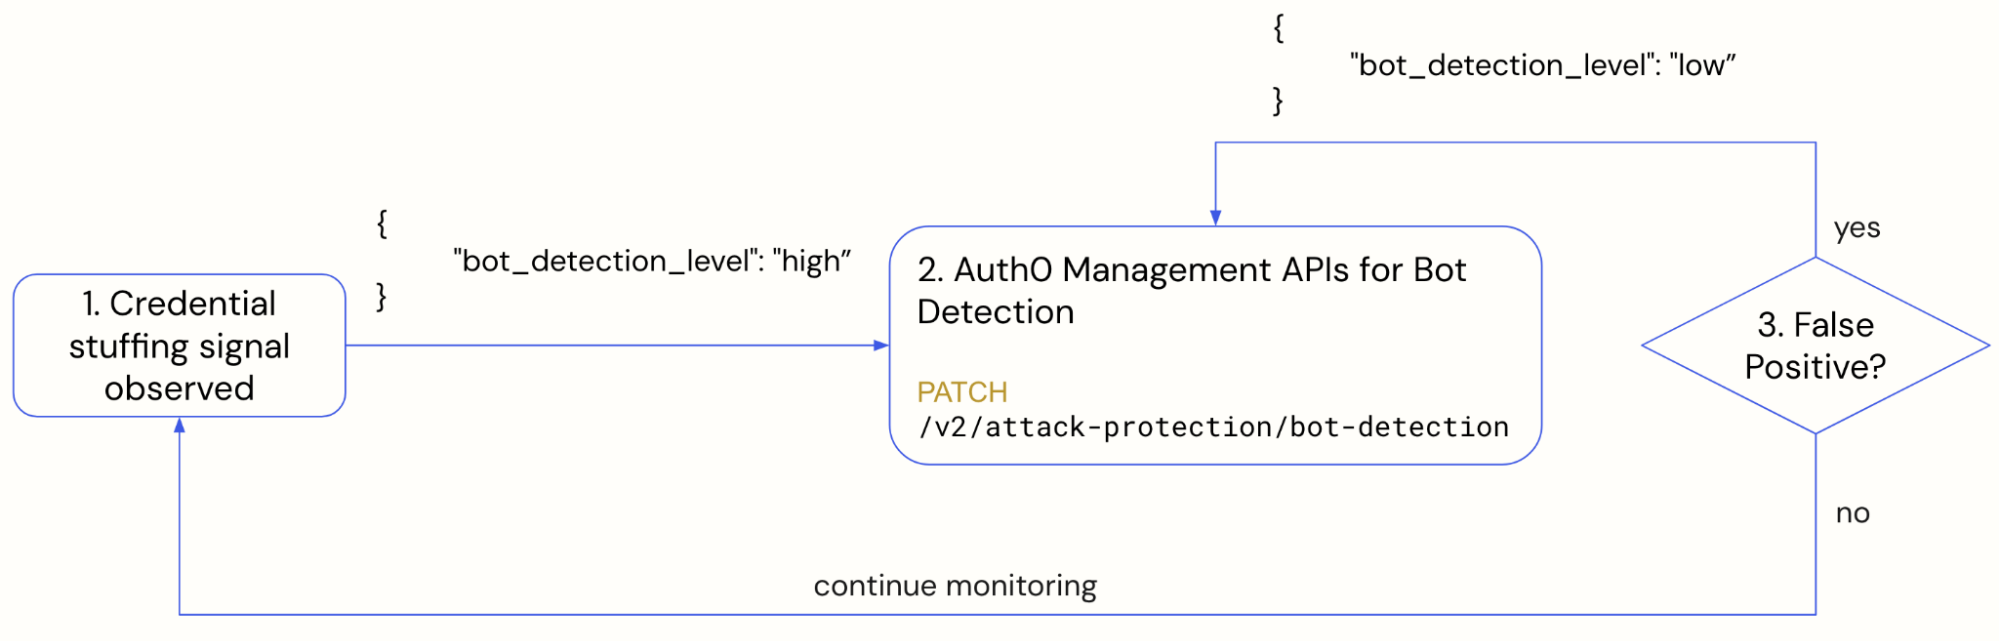 Attack Protection機能によって観測されたシグナルの結果を分析する際、監視の結果の1つとして、IP、地理的位置、TLSフィンガープリントなど、悪意のあるアクティビティの強力なシグナルを特定できます。情報は、[Network ACL](https://auth0.com/docs/secure/tenant-access-control-list)のブロックでさらに活用できます。例として、[Auth0 Detection Catalog](https://github.com/auth0/auth0-customer-detections)で検出ルール[logins\_or\_signups\_from\_suspicious\_ips.yml](https://github.com/auth0/auth0-customer-detections/blob/main/detections/logins_or_signups_from_suspicious_ips.yml)を公開しました。
## アカウント作成詐欺
不正なサインアップは、クレジットカード情報の操作、サインアップインセンティブの消費や収集、またはトールフラウドを実行するためのSMS MFAへの登録など、直接的な金融詐欺に続くことがよくあります。
ほとんどの場合、メールはビジネスとユーザー間の主要な接続および通信チャネルです。不審な動作を診断するためにも利用できます。ユーザーがアプリケーションに登録するのを許可する前に、メールの検証とメールのレピュテーションに焦点を当てます。
Auth0には、[メールマジックリンク](https://auth0.com/docs/manage-users/user-accounts/verify-emails#email-verification-links)と[メールOTP](https://auth0.com/docs/manage-users/user-accounts/verify-emails#one-time-passwords)によるメール検証の標準機能があります。
2つのアプローチの主な違いは、[メールOTP](https://auth0.com/docs/manage-users/user-accounts/verify-emails#one-time-passwords)を使用する場合、ユーザーはテナントに作成されないため、メール検証要件をバイパスできないことです。一方、[メールマジックリンクベース](https://auth0.com/docs/manage-users/user-accounts/verify-emails#email-verification-links)の検証を使用する場合、ユーザーアカウントは`email\_verified`属性が`false`に設定された状態でテナントに作成されます。したがって、追加の制御を適用し、post-login Action内で未検証のメールを持つユーザーのアクセスを拒否することが重要です。
```shell
exports.onExecutePostLogin = async (event, api) => {
if(!event.user.email_verified){
api.session.revoke("You cannot login without verified your email");
}
};
```
セッション全体を取り消したことに注意してください。これによりアクセスが拒否され、リフレッシュトークンも取り消されます。Auth0は、[`api.access.deny`](https://auth0.com/docs/customize/actions/explore-triggers/signup-and-login-triggers/login-trigger/post-login-api-object#api-access-deny-reason)でセッションを終了したり、リフレッシュトークンを取り消したりすることなく、アクセスを拒否する柔軟性を提供します。ただし、より優れたセキュリティ特性を得るには、デフォルトでバインドされたリフレッシュトークンを取り消す完全な[セッション終了](https://auth0.com/docs/customize/actions/explore-triggers/signup-and-login-triggers/login-trigger/post-login-api-object#api-session-revoke-reason,-options)をデフォルトに設定します。
進行中の攻撃の強力な指標の1つは、[レピュテーションの低いメールドメイン](https://blog.castle.io/fraudulent-email-domain-tracker-october-2025/)(注: リソースは作成者によって毎月更新されます)の使用です。たとえば、簡単に不正アクセスするための使い捨てドメインなどです。脅威に対応するため、post-login Actionを使用して、アプリケーションで既知の使い捨てドメインの使用を許可しないようにできます。
```shell
exports.onExecutePreUserRegistration = async (event, api) => {
const DENY_DOMAIN_LIST = ["drrieca.com", "dependity.com"];
// Extract the domain
const emailDomain = event.user.email?.split('@').pop();
if (DENY_DOMAIN_LIST.includes(emailDomain)) {
api.access.deny('Registration denied. Contact our support center.');
console.log(`Registration denied for user ${event.user.email}.
Domain '${emailDomain}' is on the deny list.`);
}
};
```
代替として、[Twilio SendGridレピュテーションサービス](https://www.twilio.com/docs/sendgrid/glossary/email-reputation-score)などのメールレピュテーションベースのサービスを利用できます。
ビジネスの観点から、単にレピュテーションの低いドメインを避けることが選択肢にならない場合は、ユーザーにフラグを立てて特別な処理を適用できます。考えられる特別な処理手順は以下の通りです。
* トールフラウド攻撃を避けるため、SMSベースのMFAへの登録を許可しない
* [ActionsのセッションAPI](https://auth0.com/docs/manage-users/sessions/manage-sessions-actions#customize-session-inactivity-timeout-based-on-the-organization)を使用して、セッションの有効期間と非アクティブタイマーを最小限に抑える
* 身元確認やより強力なMFA要素などを通じて、アイデンティティの保証を高める
以下は、[Auth0カスタムMFA機能](https://auth0.com/blog/using-actions-to-customize-your-mfa-factors/)を活用して、ユーザーがレピュテーションの低いメールドメインでサインアップした場合に、非SMS MFA要素にユーザーを再ルーティングするpost-login Actionの例です。
```shell
exports.onExecutePostLogin = async (event, api) => {
// Check if the user is enrolled in any factor other than 'email'.
const hasNonEmailFactor
= event.user.enrolledFactors?.some(factor => factor.type !== 'email');
let isDisposable = event.user.app_metadata?.isDisposable ?? null;
// This logic can be a part of a separate Action
// Setting the isDisposable flag after registration
if (event.stats.logins_count === 1 || isDisposable === null) {
try {
isDisposable = isLowReputationDomain(event.user.email);
} catch (e) {
// Fail secure
// If the external API fails for any reason,
// assume the domain is disposable to protect the account
console.error("External domain reputation check failed." +
"Assuming disposable.", e);
isDisposable = true;
}
// Persist as app_metadata
api.user.setAppMetadata("isDisposable", isDisposable);
}
// Define the factors once, based on the disposable email status.
const nonSmsFactors = [{ type: 'push-notification' }, { type: 'otp' }];
const smsFactor = [{ type: 'phone' }];
// if disposable domain -> use non-SMS, otherwise -> use SMS
const factorsToUse = isDisposable ? nonSmsFactors : smsFactor;
if (hasNonEmailFactor) {
api.authentication.challengeWithAny(factorsToUse);
} else {
api.authentication.enrollWithAny(factorsToUse);
}
};
function isLowReputationDomain(email){
var emailDomain = email.split('@')[1];
// Alternatively, make an external check
var LOW_REPUTATION_DOMAIN_LIST = ["drrieca.com", "dependity.com", "atko.email"];
return LOW_REPUTATION_DOMAIN_LIST.includes(emailDomain);
}
```
トールフラウドが脅威アクターの主な動機である場合、つまり可能な限り多くのSMSを送信する場合、単純なスロットリングロジックが効果的な抑止力になります。Auth0は、SMS MFAを介して[1人のユーザーが送信するSMSを1時間に10件に制限する](https://auth0.com/docs/secure/multi-factor-authentication/multi-factor-authentication-factors/configure-sms-voice-notifications-mfa#security-considerations)組み込み機能を提供します。ただし、脅威アクターが複数のユーザーを作成する場合、防御は効率的ではありません。ケースでは、アプリケーションレベルまたはテナントレベルの制限を使用して、SMSの送信を停止できます。あるいは、Twilioなどの電話プロバイダー固有のスロットリング機能を活用することもできます。ロジックは、以下に例示するActionsで利用可能な専用の[send-phone-message trigger](https://auth0.com/docs/customize/actions/explore-triggers/mfa-notifications-trigger)内で実装できます。
```shell
const TIME_WINDOW_MS = 60 * 60 * 1000; // 1 hour in milliseconds
exports.onExecuteSendPhoneMessage = async (event, api) => {
const ManagementClient = require('auth0').ManagementClient;
// Enhance with the Token Caching technique as per
// https://support.auth0.com/center/s/article/Caching-tokens
const management = new ManagementClient({
domain: event.secrets.domain,
clientId: event.secrets.clientId,
clientSecret: event.secrets.clientSecret,
});
try {
const now = Date.now();
const id = event.client.client_id;
const fetchParameters = await management.clients.get(id);
const { client_metadata } = fetchParameters;
// Read parameters if set or assign defaults
const allowedSms = parseInt(client_metadata.allowed_sms_send_per_hour, 10)
|| 100;
let smsResetTimer = parseInt(client_metadata.sms_reset_timer, 10) || now;
let currentSmsCount = parseInt(client_metadata.current_sms_count, 10) || 0;
// Check if parameters were defined as application metadata
// or defaults were selected
if(!client_metadata.allowed_sms_send_per_hour ||
!client_metadata.sms_reset_timer ||
!client_metadata.current_sms_count)
console.log('Some or all parameters are not defined.' +
'Inititilizing with a default values ' +
'(max count, current count, reset timer): ',
allowedSms, smsResetTimer, currentSmsCount);
if ((now - smsResetTimer) < TIME_WINDOW_MS){
// Still within a current time window
if (currentSmsCount >= allowedSms) {
throw Error("no more sms to send within this hour");
}else {
// Still in a time window.
// Send SMS and increase the counter
await sendPhoneMessage();
currentSmsCount++;
}
}else{
// Time window expired.
// Resetting the counter to 1 and timer to now.'
// As well as sending a SMS.
await sendPhoneMessage();
currentSmsCount = 1;
smsResetTimer = now;
}
const params = {
client_metadata: {
"sms_reset_timer": smsResetTimer.toString(),
"current_sms_count": currentSmsCount.toString(),
"allowed_sms_send_per_hour": allowedSms.toString()
}};
const updateResult = await management.clients.update(id, params);
} catch (e) {
console.log(e)
// Handle error
}
};
async function sendPhoneMessage(){
//your provider logic
}
```
上記の例示的なActionでは、カウンターとリセットタイマーをアプリケーションメタデータとして保存し、その後、Management APIを使用してパラメーターを取得および更新しました。これにより、ロジックを純粋にAuth0テナント内に含めることができますが、消費される[レート制限](https://auth0.com/docs/troubleshoot/customer-support/operational-policies/rate-limit-policy)に注意する必要があります。あるいは、Actionはカウンターとタイマーを操作するために外部APIを呼び出すことができます。さらに、スロットリングsend-phone-message Actionである対策は、公開された検出ルール[`sms\_bombarding.yml`](https://github.com/auth0/auth0-customer-detections/blob/main/detections/sms_bombarding.yml)によって攻撃が特定された場合に一時的に適用できます。前のセクションで概説した自動化を使用することが望ましいです。
スロットリングのもう1つのアプローチは地理に基づいています。つまり、ユーザーが通常活動している国以外から不審なトラフィックを受信していることに気付いた場合です。以下は、地理に基づいてスロットリングするsend-phone-message Actionの例です。
```shell
const PhoneNumber = require('libphonenumber-js');
exports.onExecuteSendPhoneMessage = async (event, api) => {
//List of disallowed countries by code
const DISALLOWED_COUNTRY_CODES = ["MX", "EG"];
const to = event.message_options.recipient;
const code = event.message_options.code;
var pn = new PhoneNumber(to);
const phoneCountryCode = pn.country;
if(!DISALLOWED_COUNTRY_CODES.includes(phoneCountryCode)){
sendPhoneMessage(phoneCountryCode, to, code);
}else{
// Prevent sending SMS to disallowed countries
var errorMessage = `An attempt to enroll with phone number ${to}
from country ${phoneCountryCode}`;
throw new Error(errorMessage)
}
};
async function sendPhoneMessage(countryCode, to, code){
//your provider logic here
}
```
## 認証情報を狙う攻撃
認証情報を狙う攻撃の主なリスクは、消費者の直接的な経済的損失につながるアカウントの乗っ取りです。環境内での攻撃の存在をすばやく特定できるようにするための出発点として、[クレデンシャルスタッフィングとMFAエクスプロイト防止のための8つのログ検出](https://auth0.com/blog/Log-Detections-Credential-Stuffing-MFA-Exploit-Prevention/)を公開しました。Auth0 Attack Protection機能はすべて、前述のようにリスクの軽減に貢献しています。考慮すべき追加の側面があり、本セクションで説明します。
### パスワードリセットフロー
もちろん、パスワードが主要な認証方法として使用される場合、強力なパスワードポリシーは全体的なセキュリティに大きく貢献します。ポリシーは、パスワードの強度、パスワードの履歴、パスワード辞書、および個人データの使用の禁止に基づいて構築されます。
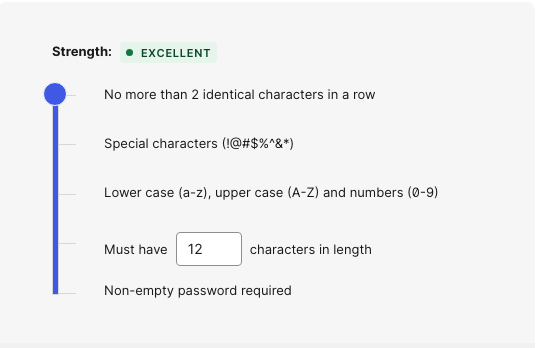 見落とされがちな効果的なパスワードポリシーのもう1つのコンポーネントは、パスワードリセットフローです。さらに、強力なパスワードリセットフローは、メールの受信トレイが脅威アクターの制御下にある場合の攻撃ベクトルに対する強力な防御になります。
デフォルトのパスワードリセットフローの弱点は、責任の100%をメールボックスに委任しているため、メールが最も弱いリンクになることです。メールの受信トレイが侵害されたらどうなるでしょうか。
リスクに対処するため、Auth0は[password reset flow trigger](https://auth0.com/docs/customize/actions/explore-triggers/password-reset-triggers)と[カスタムMFA](https://auth0.com/blog/using-actions-to-customize-your-mfa-factors/)の強力な組み合わせを提供します。2つの機能を使用して、以下の防御を構築できます。
* メールが検証された場合にのみパスワードリセットを許可する
* 少なくとも1つの要素が登録されている場合はMFAチャレンジを要求し、要素が登録されていない場合は身元確認を要求する
* トランザクションが危険な場合、またはメールの侵害が疑われる場合は、身元確認を要求する
* 顧客に特定のニーズがある場合は、カスタムMFAプロバイダーにリダイレクトする。たとえば、トランザクションの保証を高めるための[補助的な手段として知識ベースのアプローチ](https://www.okta.com/blog/identity-security/security-questions/)を使用する
ROPGや[クロスオリジン認証](https://auth0.com/docs/authenticate/login/cross-origin-authentication)など、アプリケーションレベルでユーザーの認証情報を直接漏洩させる安全でない実践に依存した結果として認証情報が公開された場合、効果的なパスワードポリシーは不十分になります。設定ミスについて説明した際に、安全でない実践の代替案についてはすでに説明しました。
### パスキーのオンボーディング
認証情報を狙う攻撃の最大の緩和策は、パスキーをオンボーディングして認証情報を最小限に抑えることです。次善の策は、MFA、できればWebAuthnなどの強力なMFAでパスワードをバックアップすることです。SMSベースのMFAを導入すると、トールフラウドに関連する他の問題が発生することに注意してください。
詳細な記事[Auth0のパスキーについて知っておくべきことすべて](https://auth0.com/blog/all-you-need-to-know-about-passkeys-at-auth0/)と[Philippe De RyckによるPasskey Handbook](https://auth0.com/resources/ebooks/the-passkeys-handbook)は、パスキーの技術を理解するための優れた入門書です。
Auth0の強化されたパスキーのユーザーエクスペリエンスは、いくつかの方法で採用の摩擦を減らします。
* モバイルアプリケーション用のネイティブパスキー
* 近接性とローカル登録で強制されるリモート認証
* プログレッシブ登録
Auth0でパスキーを有効にしても、パスワードベースの認証を提供する可能性がなくなるわけではありません。両方の認証方法は1つのデータベース接続内で利用できるためです。
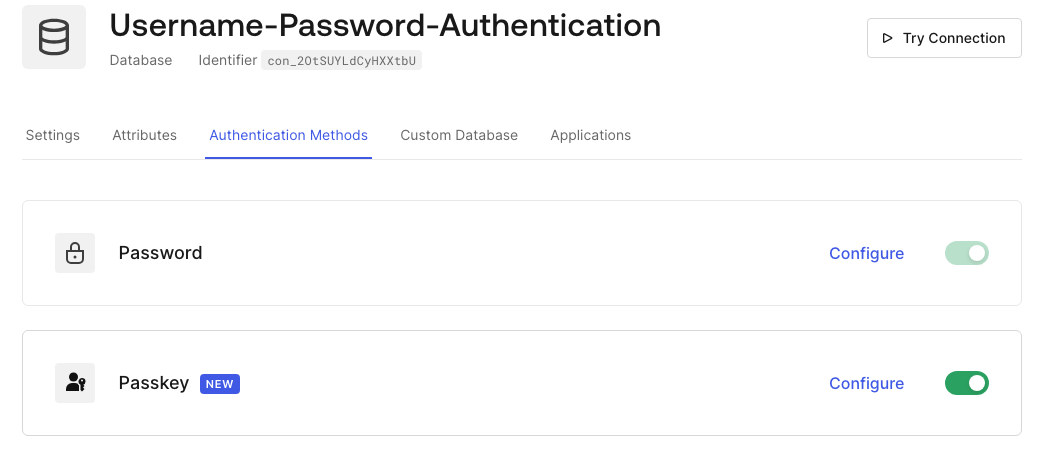 パスワードをオプションとして提供しつつ、移行パスの概要を説明する必要があります。Auth0で実装できるアプローチは少なくとも以下の2つあります。
**アプローチ1**: `Progressive enrollment for passkeys`オプションを有効にして、既存のパスワードベースのユーザーにパスキーの提供を開始します。ユーザーがパスキーに登録されると、post-login Actionを通じてユーザーのパスワードの使用を許可しないようにできます。これにより、パスキーに登録したユーザーのパスワードを段階的に廃止できます。
**アプローチ2**: グリーンフィールド展開の状況、つまりパスキーのみを提供したい場合、またはアプローチ1をしばらく実行してパスキーが大幅に採用された後、post-login Actionで実装されたカスタムロジックを使用して、認証用のパスワードを一度に許可しないようにできます。
以下に両方のアプローチを例示します。
```shell
exports.onExecutePostLogin = async (event, api) => {
// Optional flags to combine two approaches
const denyPwdForAll = false;
const denyPwdPerUser = true;
const nameOfPasskeyEnabledConnection = 'Username-Password-Authentication';
// Get a method used for authentication
const methods = event.authentication?.methods;
const ifPwdUsed = methods?.some(method => method.name === 'pwd')
// Approach 1: deny for the whole connection
if (denyPwdForAll &&
event.connection.name == nameOfPasskeyEnabledConnection){
if(ifPwdUsed){
api.session.revoke('Please, login with passkeys');
}
}
// Approach 2: deny per user basis
if (denyPwdPerUser && ifPwdUsed){
const ManagementClient = require('auth0').ManagementClient;
// Enhance with Token Caching technique as per
// https://support.auth0.com/center/s/article/Caching-tokens
const management = new ManagementClient({
domain: event.secrets.domain,
clientId: event.secrets.clientId,
clientSecret: event.secrets.clientSecret,
});
const params = { include_totals: true};
const id = event.user.user_id;
try {
const res = await management.users.authenticationMethods.list(id, params)
if (res.response.total > 0){
const authenticators = res.response?.authenticators
const ifPasskeyPresent = authenticators?.some(authenticator =>
authenticator.type === 'passkey');
// If a user enrolled into a passkey, deny login with a password
if(ifPasskeyPresent){
api.session.revoke('Please, login with passkeys');
}
}
} catch (e) {
console.log(e)
// Handle error
}
}
};
```
例示的なActionはManagement APIを使用するため、全体的な[レート制限のカウント](https://auth0.com/docs/troubleshoot/customer-support/operational-policies/rate-limit-policy)に寄与することに注意してください。
## MFAバイパス
SIMスワッピング、プッシュ通知の疲労、OTPフィッシングは、フィッシング耐性のある要素がオンボーディングされるとすべてなくなります。今日からMFAの採用を開始してください。
顧客アイデンティティドメインが直面する大きな課題は、ユーザーに余分な摩擦をもたらすという論理的な障壁です。対処するため、Auth0はMFA実装の2つのパラダイムをサポートしています。
1. [ステップアップ認証](https://auth0.com/docs/secure/multi-factor-authentication/step-up-authentication)は、アプリケーションを機密領域と非機密領域に分割できるという考えに基づいてリソースを保護します。ユーザーがアプリケーションのより機密性の高い部分に移動した場合にのみ、MFAチャレンジのプロンプトを表示します。
2. [Adaptive MFA](https://auth0.com/docs/secure/multi-factor-authentication/adaptive-mfa)はセッションを保護します。組み込みのリスク評価スコアに基づき、デバイス、移動速度、IPレピュテーションなどのシグナルに基づいてリスクが高い場合にのみ、ユーザーにプロンプトが表示されます。開発者がActionsを使用して独自のリスク評価ロジックを統合できる[独自のリスク評価の持ち込み](https://auth0.com/docs/secure/multi-factor-authentication/adaptive-mfa/customize-adaptive-mfa)をサポートしており、プラットフォームのネイティブ機能を拡張して、独自のビジネスニーズや新たな脅威に適合させることができます。
[クレデンシャルスタッフィングとMFAエクスプロイト防止のための8つのログ検出](https://auth0.com/blog/Log-Detections-Credential-Stuffing-MFA-Exploit-Prevention/)には、[プッシュ通知の疲労](https://github.com/auth0/auth0-customer-detections/blob/main/detections/risk_for_mfa_push_fatigue.yml)や[SMSパンピング](https://github.com/auth0/auth0-customer-detections/blob/main/detections/sms_bombarding.yml)攻撃など、いくつかの形式のMFAバイパスを特定するための検出ルールがいくつかあります。
## セッションとトークンのハイジャック
セッションとトークンのハイジャックは、不正アクセスやアカウントの乗っ取りの機会を与えるなりすましにつながる可能性があります。攻撃者がブラウザのCookieとして表されるセッションや、[OAuth2.1グラント](https://datatracker.ietf.org/doc/html/draft-ietf-oauth-v2-1)によって発行されたトークンを盗むことでアクセスを取得できる場合、パスワードレスの防御でさえ不十分になります。ここでの主な攻撃ベクトルは、クロスサイトスクリプティング(XSS)やマルウェアなどのクライアントベースの脆弱性、EvilginxやMuraenaなどを活用した中間者フィッシング、Implicit Grantが使用された場合にブラウザのURL経由でトークンが配信された結果など、安全でないアプリケーションレベルの実践によるトークンの漏洩です。
最新の認証フローで使用されるトークンには、IDトークン、アクセストークン、リフレッシュトークンの3つの主要なタイプがあります。簡単に言うと、IDトークンはユーザーを識別するために使用されます。アクセストークンはリソースやAPIへの短期間のアクセスを提供します。リフレッシュトークンは、ユーザーの操作なしでアクセスやアクセストークンを更新するために使用される長期間のアーティファクトです。トークンは、OAuth 2.1/OIDCフローが正常に実行された結果として、認可サーバーによって発行されます。ユーザーセッションは、アプリケーションまたはサービス内でのユーザーの長期間の存在を表し、ユーザーとサーバーの対話の結果として作成されます。ユーザーエージェントがCookieを保存できる場合(ブラウザの場合)、Cookieとして追跡されます。
リフレッシュトークンとユーザーセッションはどちらも、ユーザーに長期間の認証状態とアクセスを提供することに注意してください。ただし、ユーザーセッションとリフレッシュトークンは同じではありません。リフレッシュトークンは、特定のアクセストークンとオプションでIDトークンを返します。アクティブなセッションを使用すると、必要なだけ多くの異なるトークン(異なるスコープ、オーディエンスを持つ)をリクエストできます。より優れたセキュリティのために、すべてを保護する必要があります。
### トークンハイジャック
トークンの面では、最大の防御策はOAuth2.1のベストプラクティスに従うことです。たとえば、IDトークンとアクセストークンの漏洩を防ぐためにPCKEを使用したAuthorization Codeグラントをデフォルトにし、それぞれのリフレッシュトークンを保護するためにリフレッシュトークンローテーションを適用します。[リフレッシュトークンのセキュリティ: Auth0でのハイジャックと誤用の検出](https://auth0.com/blog/refresh-token-security-detecting-hijacking-and-misuse-with-auth0/)では、リフレッシュトークンのハイジャックを検出する可能な方法と、考えられる対応について説明しています。
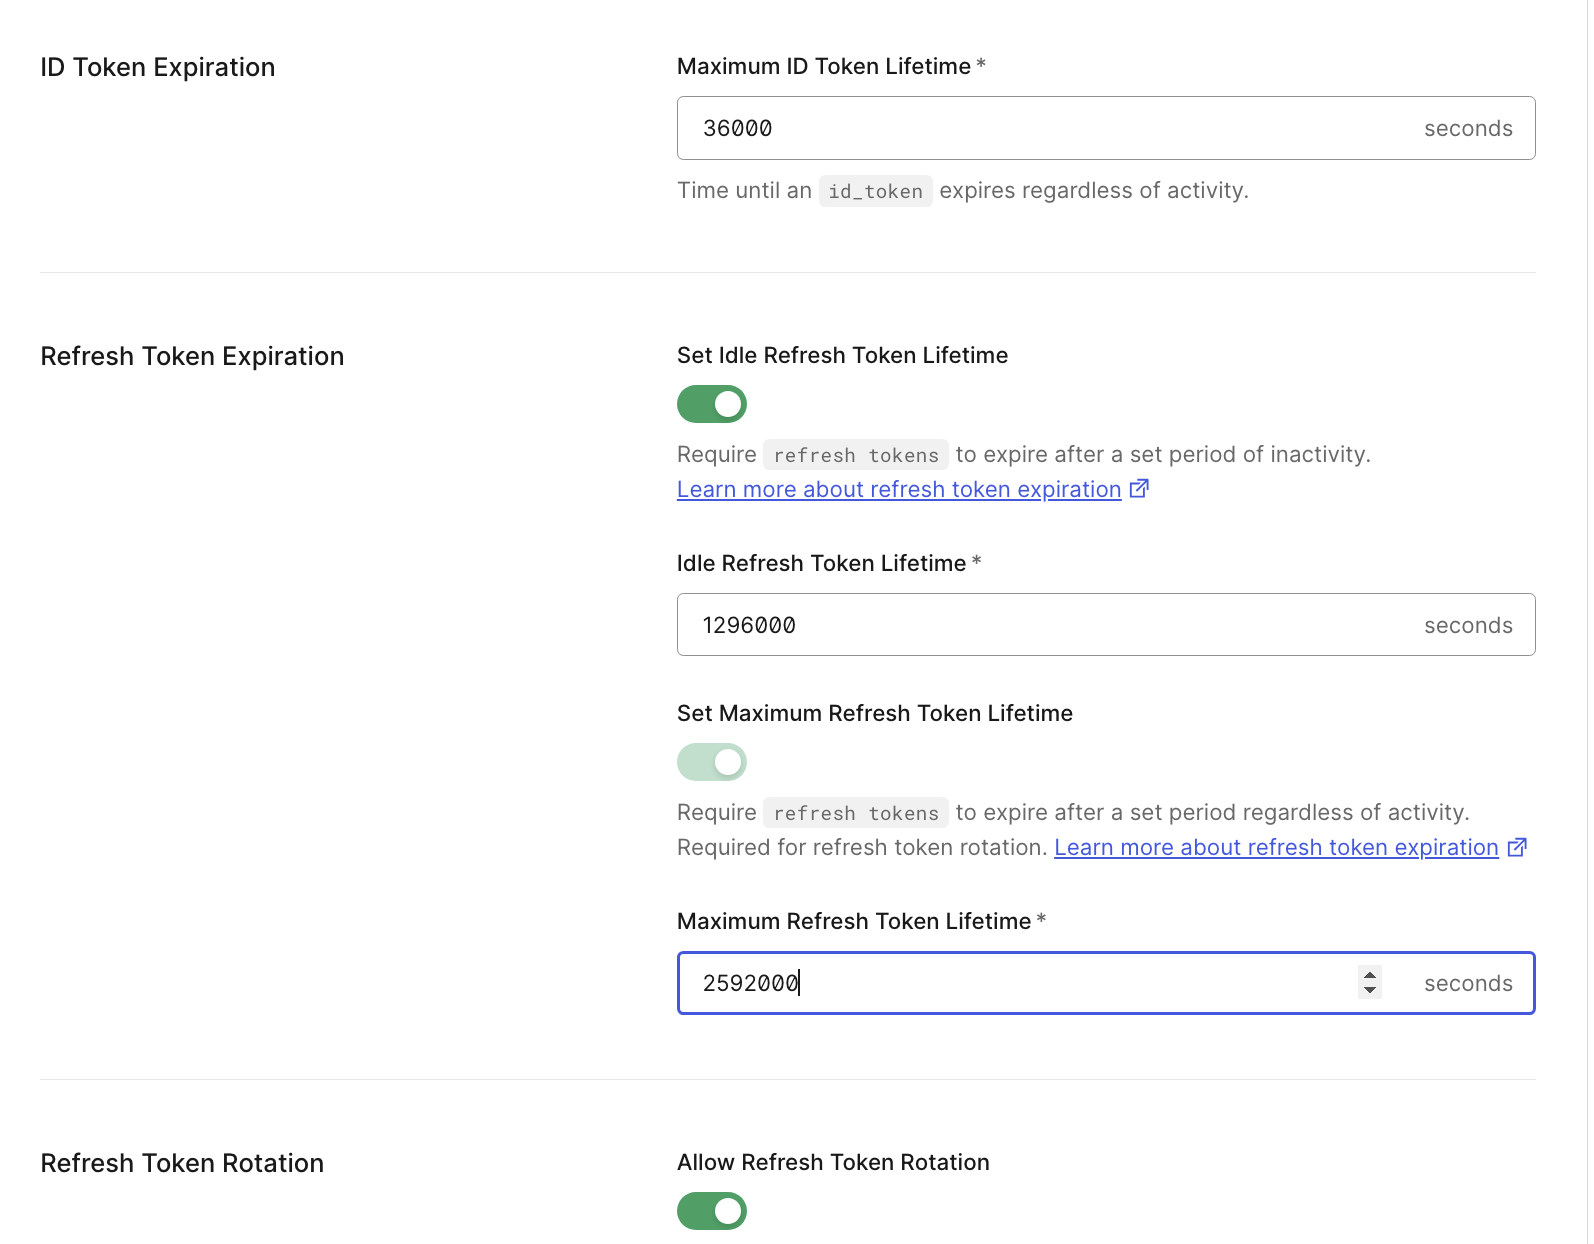
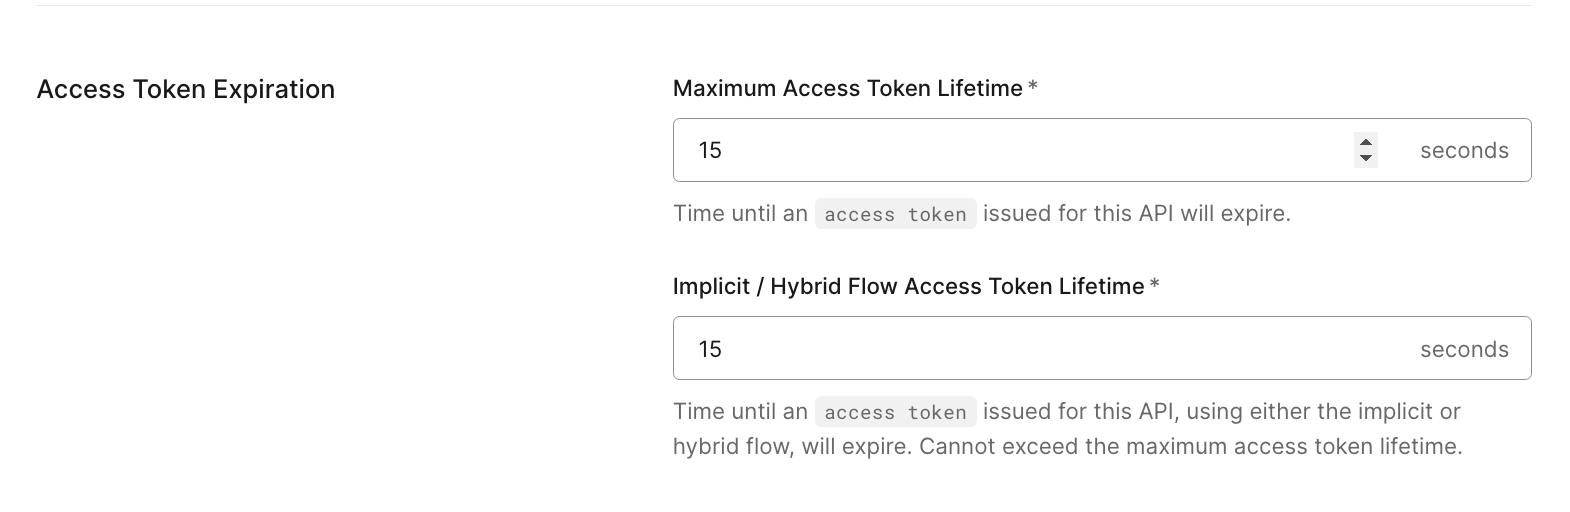
トークンまたはセッションが正常にハイジャックされると、脅威アクターはユーザーになりすまし始め、アーティファクトの有効期間が許す限り検出されないままになります。さらに、脅威アクターは後で悪用するために当面保存したり、セッションやトークンをサイバー犯罪市場で販売したりすることを選択する可能性があります。唯一の効果的な防御策は、すべてのアイデンティティアーティファクトの有効期間と非アクティブタイマーを積極的に制御することです。
Auth0は、アプリケーション(IDトークンとリフレッシュトークン)およびAPI(アクセストークン)ごとに、IDトークン、アクセストークン、リフレッシュトークンの個別の最大タイマーとアイドルタイマーを定義するきめ細かな制御を提供します。タイマーを最小限に抑えることで、攻撃者が盗んだアーティファクトを使用する機会の窓を劇的に減らし、なりすましに対する味方に時計を効果的に変えることができます。
 そもそもトークンハイジャックのリスクを軽減するための強力な対応は、受信したアクセストークンが送信者(つまりアプリケーション)によって使用されることが許可されているかどうかを検証する手段をリソースが持つ[送信者制約フロー](https://auth0.com/docs/secure/sender-constraining)です。Auth0は、トランスポートレイヤーとアプリケーションレイヤーで機能する、それぞれ[相互TLS](https://auth0.com/docs/secure/sender-constraining/mtls-sender-constraining)と[Demonstrating Proof-of-Possession(DPoP)](https://auth0.com/docs/secure/sender-constraining/demonstrating-proof-of-possession-dpop)の2つの送信者制約のアプローチを提供します。最近の記事[DPoP(Demonstrating Proof of Possession)でアクセストークンを保護する](https://auth0.com/blog/protect-your-access-tokens-with-dpop/)では、アプリケーション開発者の観点から2つのアプローチを比較しており、優れた出発点となります。
### セッションハイジャック
セッションハイジャックの対応を進める前に、関与するセッションが1つだけではないことを理解することが重要です。
- アプリケーションセッション: 完全に制御下にあります。
- Auth0セッション: Auth0の制御下にあり、[Session Management API](https://auth0.com/blog/introducing-session-management-api/)で制御されます。
- アイデンティティプロバイダー(IdP)セッション: 外部IdPが関与する場合にオプションです。
アプリケーションセッションは開発者の制御下にありますが、[バックチャンネルログアウト](https://auth0.com/docs/authenticate/login/logout/back-channel-logout)を活用して、対応するAuth0セッションが取り消されたらアプリケーションセッションを終了することが重要です。
3つのセッションすべてを包括的に処理する必要がありますが、本記事の残りの部分ではAuth0セッションに焦点を当てます。
セッションCookieの保護に関して制御する必要がある重要な設定は、永続性、有効期間、非アクティブタイマーの3つです。3つのパラメーターはすべて、[Auth0 Dashboard](https://auth0.com/docs/manage-users/sessions/configure-session-lifetime#auth0-dashboard)または[Auth0 Management API](https://auth0.com/docs/manage-users/sessions/configure-session-lifetime#auth0-management-api)を通じてテナントレベルで設定できますが、最も柔軟性と粒度が高いのは、post-login Actionsで利用可能な[api.session](https://auth0.com/docs/manage-users/sessions/configure-session-lifetime#auth0-post-login-actions)を通じた動的制御です。動的制御は、リスクの高い国からのログイン、不審なTLSフィンガープリントからのログイン、単一のセッション全体でIP属性が変化した場合など、不審なシグナルを観測した際にリスクを軽減するためのより妥当な方法(つまり、消費を完全に停止する代わりの方法)として活用できます。post-login Actionの例を提供します。
```shell
exports.onExecutePostLogin = async (event, api) => {
const sessionInitialASN = event.session?.device?.initial_asn;
const sessionCurrentASN = event.request.asn;
const created = Date.parse(event.session?.created_at ?? "");
// Read timers defined in the application metadata
const lifetimeWhenRisky = event.client.metadata.session_lifetime_when_risky;
const inactivityWhenRisky = event.client.metadata.session_inactivity_when_risky;
// if there the ASN change
if (sessionInitialASN &&
sessionCurrentASN &&
sessionInitialASN != sessionCurrentASN) {
if (event.user.app_metadata.isAdmin){
// Be strict for Admins - simply revoke the session
api.session.revoke('Invalid ASN change')
}else {
// Otherwise minimize session duration and disable persistence
api.session.setCookieMode('non-persistent');
if (event.session?.id &&
lifetimeWhenRisky &&
inactivityWhenRisky) {
api.session.setExpiresAt(created + Number(lifetimeWhenRisky));
api.session.setIdleExpiresAt(created + Number(inactivityWhenRisky));
}
}
}
};
```
潜在的なアカウントの乗っ取りを検出したら、被害を抑えるために迅速に対応する必要があります。アイデンティティ分野では、[ユーザーセッションの終了](https://auth0.com/docs/api/management/v2/users/delete-sessions-for-user)、[トークンの取り消し](https://auth0.com/docs/api/management/v2/users/delete-refresh-tokens-for-user)、[ユーザーのブロック](https://auth0.com/docs/api/management/v2/users/patch-users-by-id)、および[パスワードリセットフロー](https://auth0.com/docs/api/authentication/change-password/change-password)を通じたユーザーの誘導によって行います。効果的な4つのステップは、Auth0 Management API、Auth0 Authentication API呼び出し、および[post-change-password trigger](https://auth0.com/docs/customize/actions/explore-triggers/password-reset-triggers/post-change-password-trigger)の組み合わせによって機能します。
| ステップ1 | トークンの取り消しとセッションの終了 | セッション: DELETE /api/v2/users/{user\_id}/sessions
リフレッシュトークン: DELETE /v2/users/{user\_id}/refresh-tokens |
| :---- | :---- | :---- |
| ステップ2 | ユーザーのブロック | PATCH /api/v2/users/{user\_id}
Body:
{
"blocked": true
} |
| ステップ3 | パスワードリセットのリクエスト | POST /dbconnections/change\_password
Body:
{
"email": "{user\_id}",
"connection": "{connection\_name}"
}
または、Management API呼び出しを使用できます。
POST /api/v2/tickets/password-change
チケットを含むメールを別の場所に送信します |
| ステップ4 | ユーザーのブロック解除 | Post Change Password Action |
以下は、ステップ4としてユーザーのブロックを解除するpost-change-password Actionの例です。
```shell
exports.onExecutePostChangePassword = async (event, api) => {
const ManagementClient = require('auth0').ManagementClient;
//apply Token Caching as per
//https://support.auth0.com/center/s/article/Caching-tokens
const management = new ManagementClient({
domain: event.secrets.domain,
clientId: event.secrets.clientId,
clientSecret: event.secrets.clientSecret,
});
const params = { id : event.user.user_id};
const data = { "blocked" : false};
try {
const res = await management.users.update(params, data)
} catch (e) {
console.log(e)
// Handle error
}
};
```
例示的なActionはManagement APIを使用するため、全体的な[レート制限のカウント](https://auth0.com/docs/troubleshoot/customer-support/operational-policies/rate-limit-policy)に寄与することに注意してください。
## 次のステップ: まだ始まったばかり
顧客環境の保護は目的地ではなく、継続的な旅です。脅威の状況が進化するにつれて、Auth0の顧客には新しい機能が登場するたびに探索することを推奨します。たとえば、[Akamaiシグナルの補完](https://tus.auth0.com/docs/secure/attack-protection/use-akamai-supplemental-signals-actions)を検討し、Auth0のログ、Actions、Network ACLで利用可能になったJA3/JA4フィンガープリントを活用してください。
さらに、独自の豊富なセキュリティセンターを構築するために、[Auth0 Detection Catalog](https://github.com/auth0/auth0-customer-detections)を探索してください。
本記事はこれで終わりますが、セキュリティの旅は終わりません。