---
title: "Auth0 for AI Agentsを使用してGemini Enterprise Agent Platform Runtimeを保護する
"
description: "本包括的なガイドでは、Gemini Enterprise Agent Platform Runtimeにおける認証と認可のためのセキュアなフレームワークの実装について概説します。
"
authors:
- name: "Kapil Patil"
url: "https://auth0.com/blog/authors/kapil-patil/"
date: "Apr 22, 2026"
category: "AI"
tags: ["ai", "ai agents", "google"]
url: "https://auth0.com/blog/jp-securing-gemini-enterprise-agent-platform-runtime-auth0/"
---
# Auth0 for AI Agentsを使用してGemini Enterprise Agent Platform Runtimeを保護する
>本記事は「[Securing Gemini Enterprise Agent Platform Runtime with Auth0 for AI Agents](https://auth0.com/blog/securing-gemini-enterprise-agent-platform-runtime-auth0/)」を翻訳した記事です。
現代のエージェント型ワークフローは、従来のアイデンティティおよびアクセス管理(IAM)における委譲のギャップを露呈させています。エージェント型システムは過剰な権限を持つサービスアカウントや共有認証情報に依存することが多いためです。きめ細かい認可(Fine-Grained Authorization, 以降”FGA”)が欠如していると、エージェントは通常ユーザーの全権限を継承します。結果としてリスクの高いアクションを保護することが困難になります。
堅牢な「On-Behalf-Of(代理)」プロトコルがないと、正当なユーザー主導のタスクと、信頼されたアクセスを悪用する「混乱した代理人」攻撃を区別することは困難です。エージェントが機密性の高いAPIをまたぐマルチステップの実行に移行するにつれて、人間のアイデンティティからエージェントのアクションまでの管理の連鎖を保護することは、現在エンタープライズの信頼における基本的な要件となっています。
## AIエージェントの認証と認可
エージェント型ソリューションの保護は、業界標準の欠如と一般的なセキュリティ上の欠陥によって妨げられています。
* エージェントには固有のユーザーアイデンティティやコンテキストが欠如している
* APIキーは不適切である
* プロンプトエンジニアリングだけでは安全性に不十分である
* 「はい」という同意だけでは不適切である
* 動的な情報発見によりロールベースのアクセス制御が機能しない
* LLMは認証情報を処理してはならない
欠陥のある慣行は、不正なデータアクセス、古い権限、コンプライアンスの問題、脆弱な認可、シークレットの漏洩、プライバシーの侵害といったセキュリティ障害を頻繁に引き起こします。結果としてAIエージェントの成功や大規模な展開を妨げます。
本包括的なガイドでは、Auth0 for AI Agentsの機能を使用してGemini Enterprise Agent Platform Runtimeを保護するための手順を段階的に説明します。[ソリューションの完全なコードリポジトリは本記事で利用可能です](https://github.com/patilkapil/Vertex_A4AA)。堅牢なセキュリティの必要性は最重要であり、本ガイドではプロセスを実演します。
## ソリューションの前提条件
開始する前に、Auth0 for AI Agents、Auth0 FGA、Google Cloudのアカウントが必要です。
まず、以下の環境が適切にセットアップされていることを確認します。
* **Google Cloud:** Gemini Enterprise Agent Platform APIとSecret Manager APIの両方を有効にしたGoogle Cloudプロジェクトを準備する必要があります。Google Cloudアカウントを持っていない場合は、[cloud.google.com](https://cloud.google.com/)でサインアップしてください。
* **Auth0 for AI Agentsアカウントの作成:** Auth0を初めて利用する場合は、[アカウントを作成](https://auth0.com/signup?onboard_app=genai)して利用を開始してください。すでにアカウントを持っている場合は、既存のAuth0認証情報を使用してログインしてください。
* **Auth0 FGAアカウントの作成:** すでにAuth0アカウントを持っている場合は、同じ認証情報を使用して[dashboard.fga.dev](https://dashboard.fga.dev/)のAuth0 FGAダッシュボードにログインできます。Auth0アカウントを持っていない場合は、[dashboard.fga.dev](https://dashboard.fga.dev/)にアクセスして無料アカウントを作成してください。
## Auth0 for AI Agents
[Auth0 for AI Agents](https://auth0.com/ai)は、AI展開の堅牢なセキュリティを確保し、厳格な認証と認可の要件を満たします。エージェントの対話はAuth0によって保護されます。Auth0は認証されたユーザーに安全で制限されたアクセスを提供することを要求します。Auth0は不正なアクションを阻止し、データ侵害を防ぎます。
## Gemini Enterprise Agent Platform Runtime
Gemini Enterprise Agent Platformの一部であるGemini Enterprise Agent Platform Runtimeは、開発者が本番環境でAIエージェントを展開、管理、拡張できるようにするサービスセットです。Gemini Enterprise Agent Platform Runtimeは本番環境でエージェントを拡張するためのインフラストラクチャを処理します。そのためアプリケーションの作成に集中できます。
## Auth0で保護されたGemini Enterprise Agent Platform Runtimeのアーキテクチャ
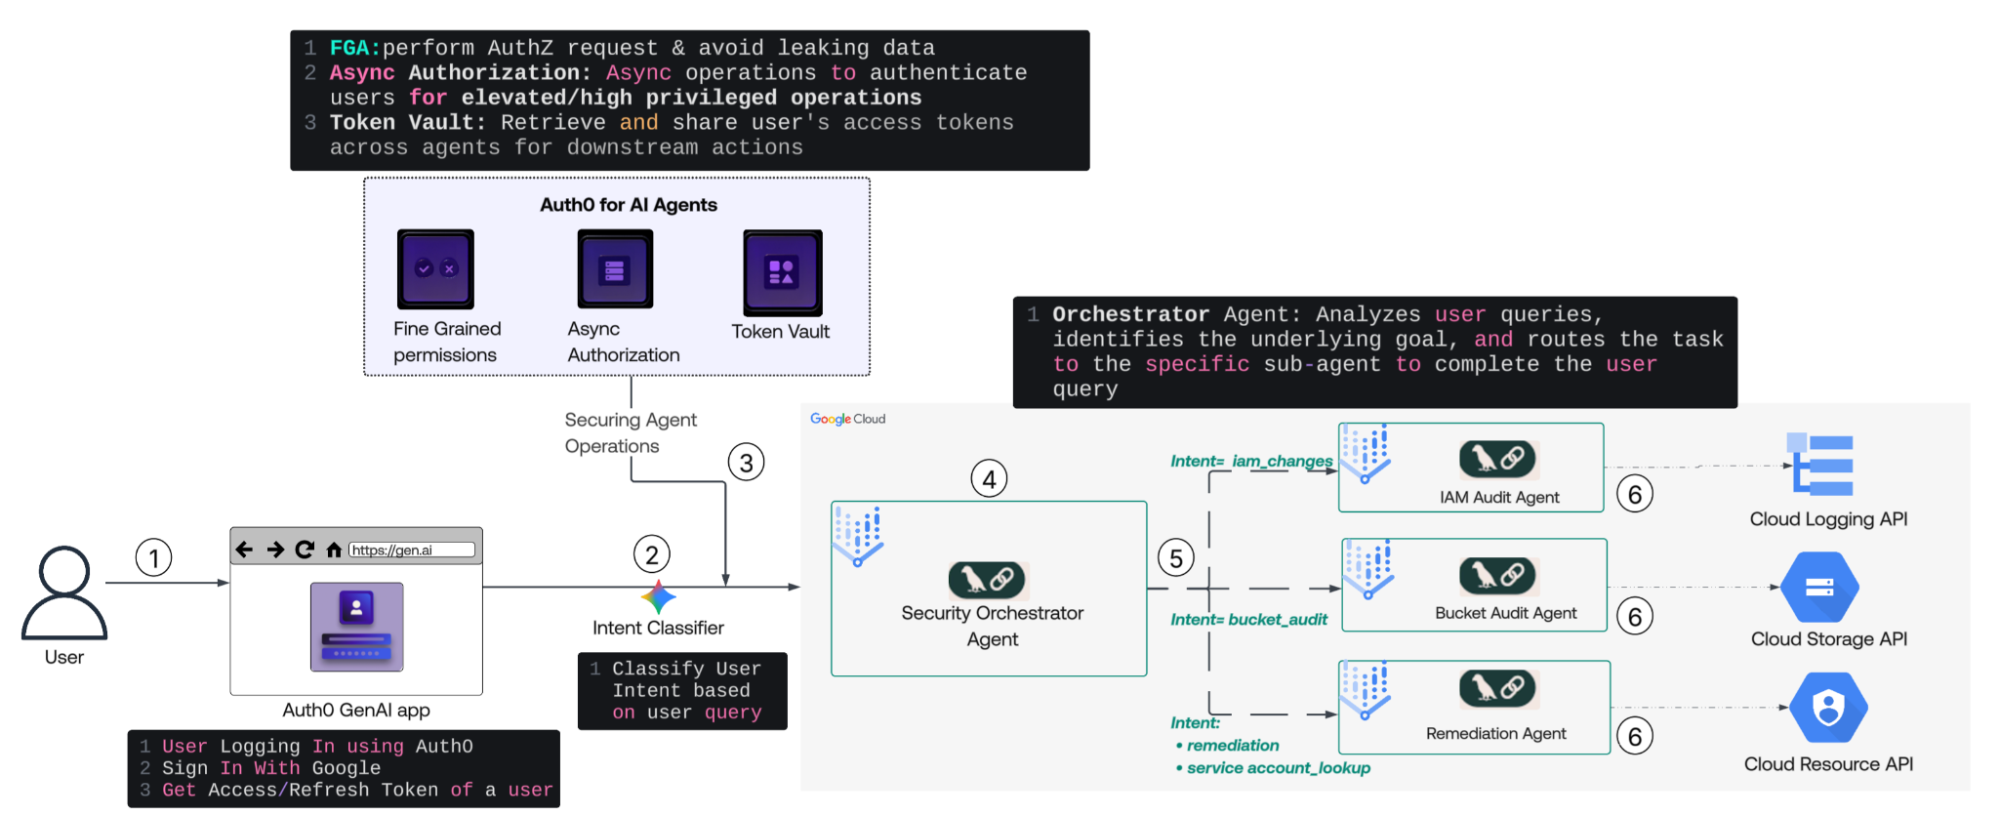
*Auth0 and Gemini Enterprise Agent Platform Runtime Architecture*
1. **ユーザー認証:** ユーザーはAuth0を使用してアプリケーションにログインします。これによりGoogle Cloud接続用のアクセストークンとリフレッシュトークンの取得がトリガーされます。トークンはAuth0 Token Vaultに保存されます。
2. **インテント分類:** システムはユーザーの自然言語クエリをWebアプリケーション内のインテント分類器に渡し、リクエストの特定の目標を決定します。
3. **セキュリティポスチャの注入:** エージェントの実行前に、WebアプリはAuth0 for AI Agentsを統合し、以下を利用します。
* **ユーザー認証:** 認証されたユーザーのみがAIエージェントにアクセスできるようにします。
* **FGA:** データのプライバシーを確実にするために使用します。
* **非同期認可:** 高権限の操作に使用します。
* **Token Vault:** ユーザートークンをダウンストリームのエージェントと安全に共有します。
4. **オーケストレーション:** Security Orchestrator Agentは、分類されたインテント、ユーザーコンテキスト、セキュリティコンテキストを受け取ります。中央ハブとして機能し、タスクを完了するためにどの特化型サブエージェントが必要かを決定します。
5. **エージェントのディスパッチと実行:** Orchestratorは、特定の「インテントドメイン」に基づいて、タスクを目的のサブエージェントにルーティングします。
* **IAM Audit Agent:** アイデンティティとアクセスの変更用です。
* **Bucket Audit Agent:** ストレージのセキュリティチェック用です。
* **Remediation Agent:** アクティブなサービスアカウントのIAMロールを検索し、更新します。
6. **リソースの対話:** 選択されたエージェントは、対応するGoogle Cloud API(Logging、Storage、またはResource Manager)と対話してタスクを実行し、結果をユーザーに返します。
本ワークフローでは4つのエージェントを使用します。ワークフローを管理し、ユーザーのリクエストインテントに基づいて適切なエージェントに制御を向ける1つのOrchestrator Agentと、クラウドリソースやAPIと対話してユーザーの入力操作を実行する3つのOperational Agentです。
## 構築方法
ソリューションのコンポーネントを調査し、相互関係とGemini Enterprise Agent Platform Runtimeの保護への貢献を理解しましょう。構築プロセスを5つのセクションに分けます。
1. エージェントを保護するためのAuth0の設定。アプリの作成、グラントタイプ、Google Cloudとのソーシャル接続を含みます。
2. サポートするGoogle Cloudインフラストラクチャのセットアップ。
3. Gemini Enterprise Agent Platform Runtimeの構築。エージェントの作成と展開を含みます。
4. FGAの実装。FGAモデルとタプルの設定を含みます。
5. アプリケーションの設定とテスト。Flaskアプリのセットアップとテスト計画を含みます。
本ガイドの最後まで進めると、[Auth0 for AI Agents](https://a0.to/ai-content)によって保護された、完全にセキュアなGemini Enterprise Agent Platform Runtimeが完成します。
### ユースケース
セキュリティチームは現在、Google CloudのIAMの変更やパブリックバケットを追跡し、ログや個別の検査、Google CloudコンソールやCLIを介して手動でアクセスを取り消しています。ガードレールが欠如しており、時間がかかりエラーが発生しやすいプロセスです。
本プロジェクトでは、ワークフローを置き換える対話型AIアシスタントを導入します。オペレーターは「どのようなIAMの変更がありましたか」や「編集者ロールを取り消す」のような平易な英語のクエリを使用して、実際のGoogle Cloudデータから即座に正確な回答を得られます。
ソリューションは堅牢なセキュリティを保証します。すべてのアクションは共有アカウントではなく、ユーザーのGoogleアイデンティティの下で実行されます。FGAと、破壊的なアクションに必要なステップアップ承認を組み合わせることで、監査可能でアクセス制御されたエンタープライズ対応のAIセキュリティアシスタントが実現します。
## パート1: Auth0の設定
Webインターフェースを通じてGemini Enterprise Agent Platform Runtimeと対話するため、まずはAuth0でWebアプリケーションをセットアップします。
### アプリケーションの作成
Auth0ダッシュボードで「Create Application」をクリックし、「Regular Web application」ダイアログを選択して「Create」をクリックし、Regular Webアプリケーション(Python/Flaskアプリケーション)を作成します。
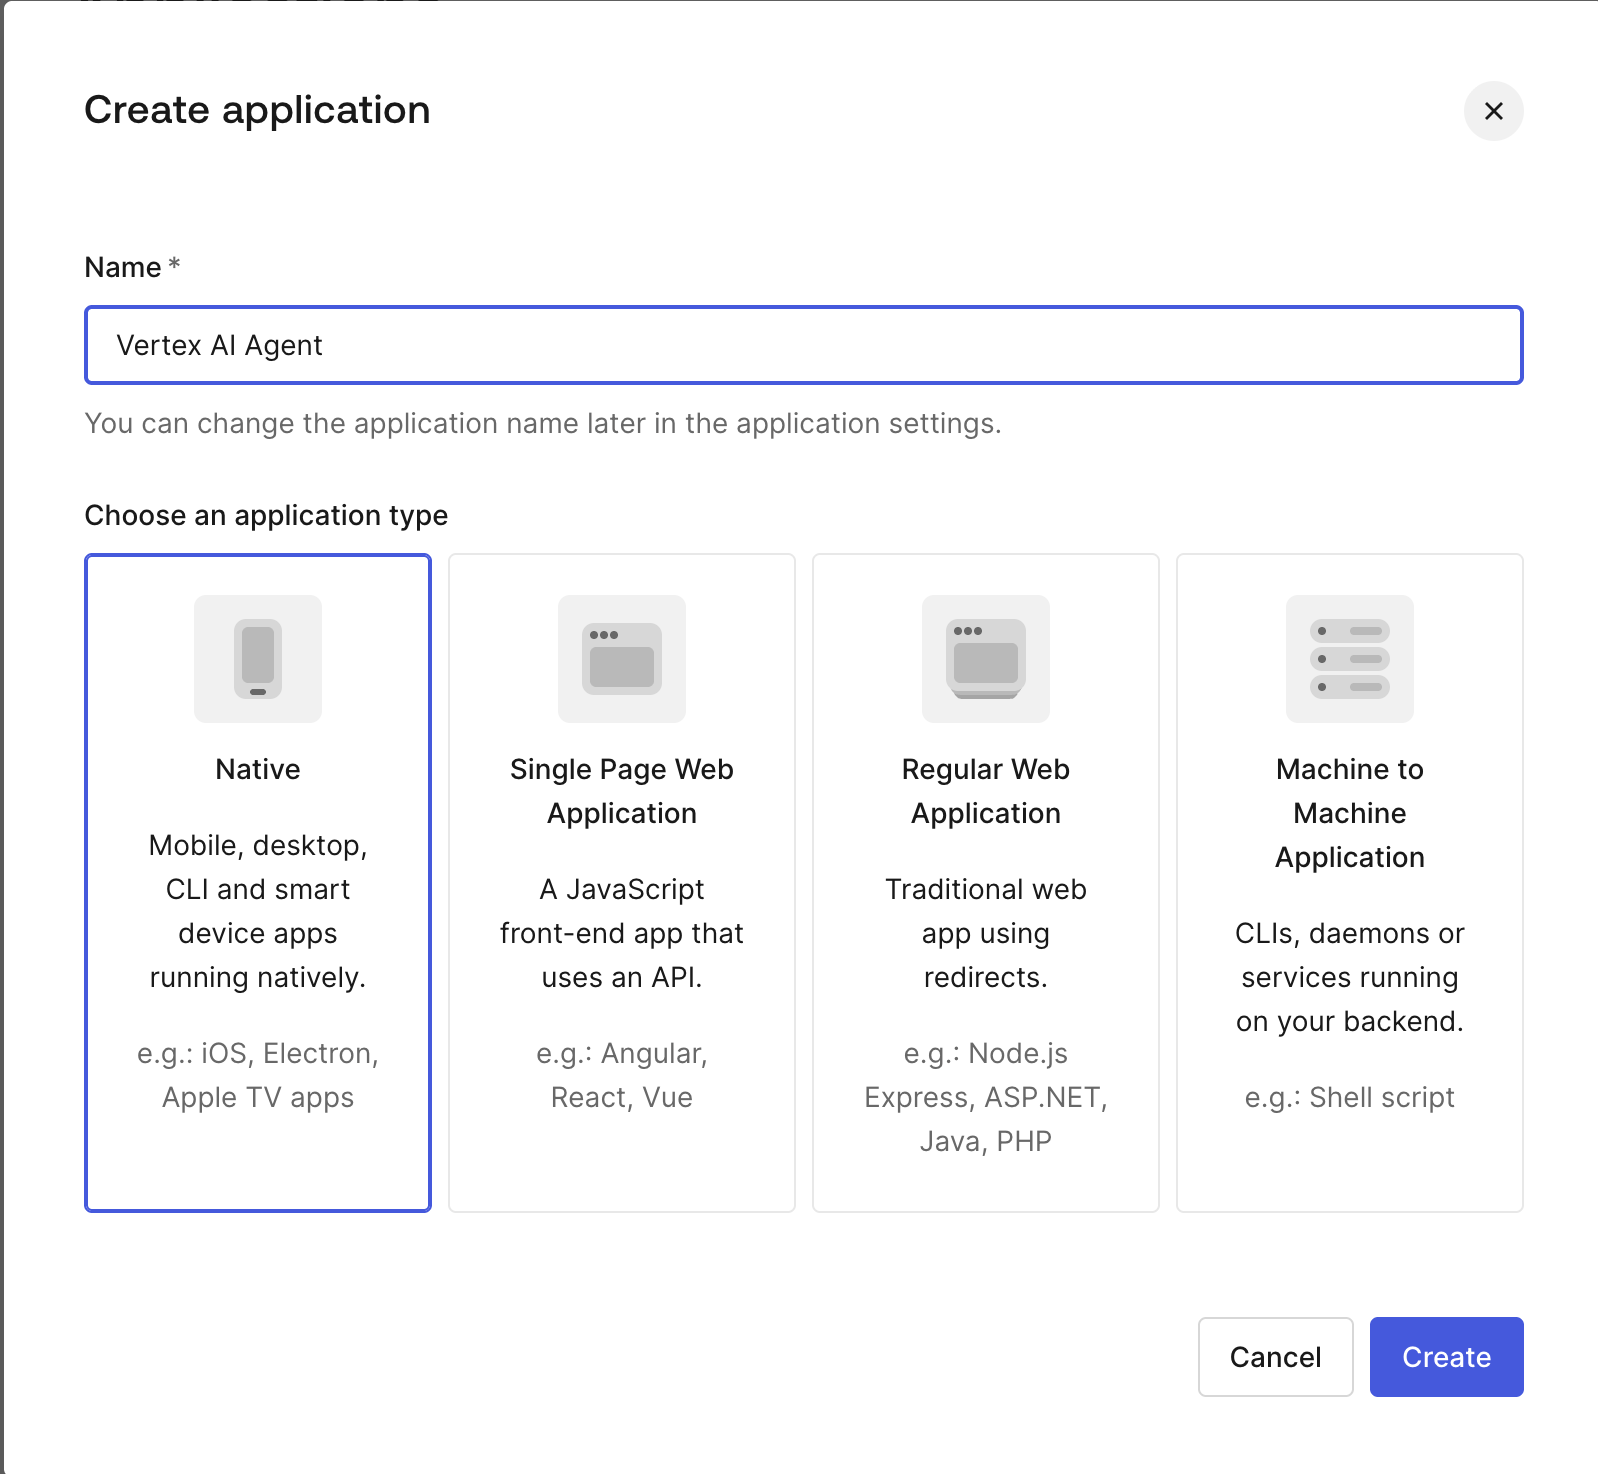
*Auth0: Creating a Web Application*
### アプリケーションの設定
Settings画面をクリックして、必須の設定パラメーターにアクセスします。ClientID、Client Secret、Domainの値をメモします。値は[Webアプリのコードベース](https://github.com/patilkapil/Vertex_A4AA/blob/main/Web_app/sample.env)で使用されます。
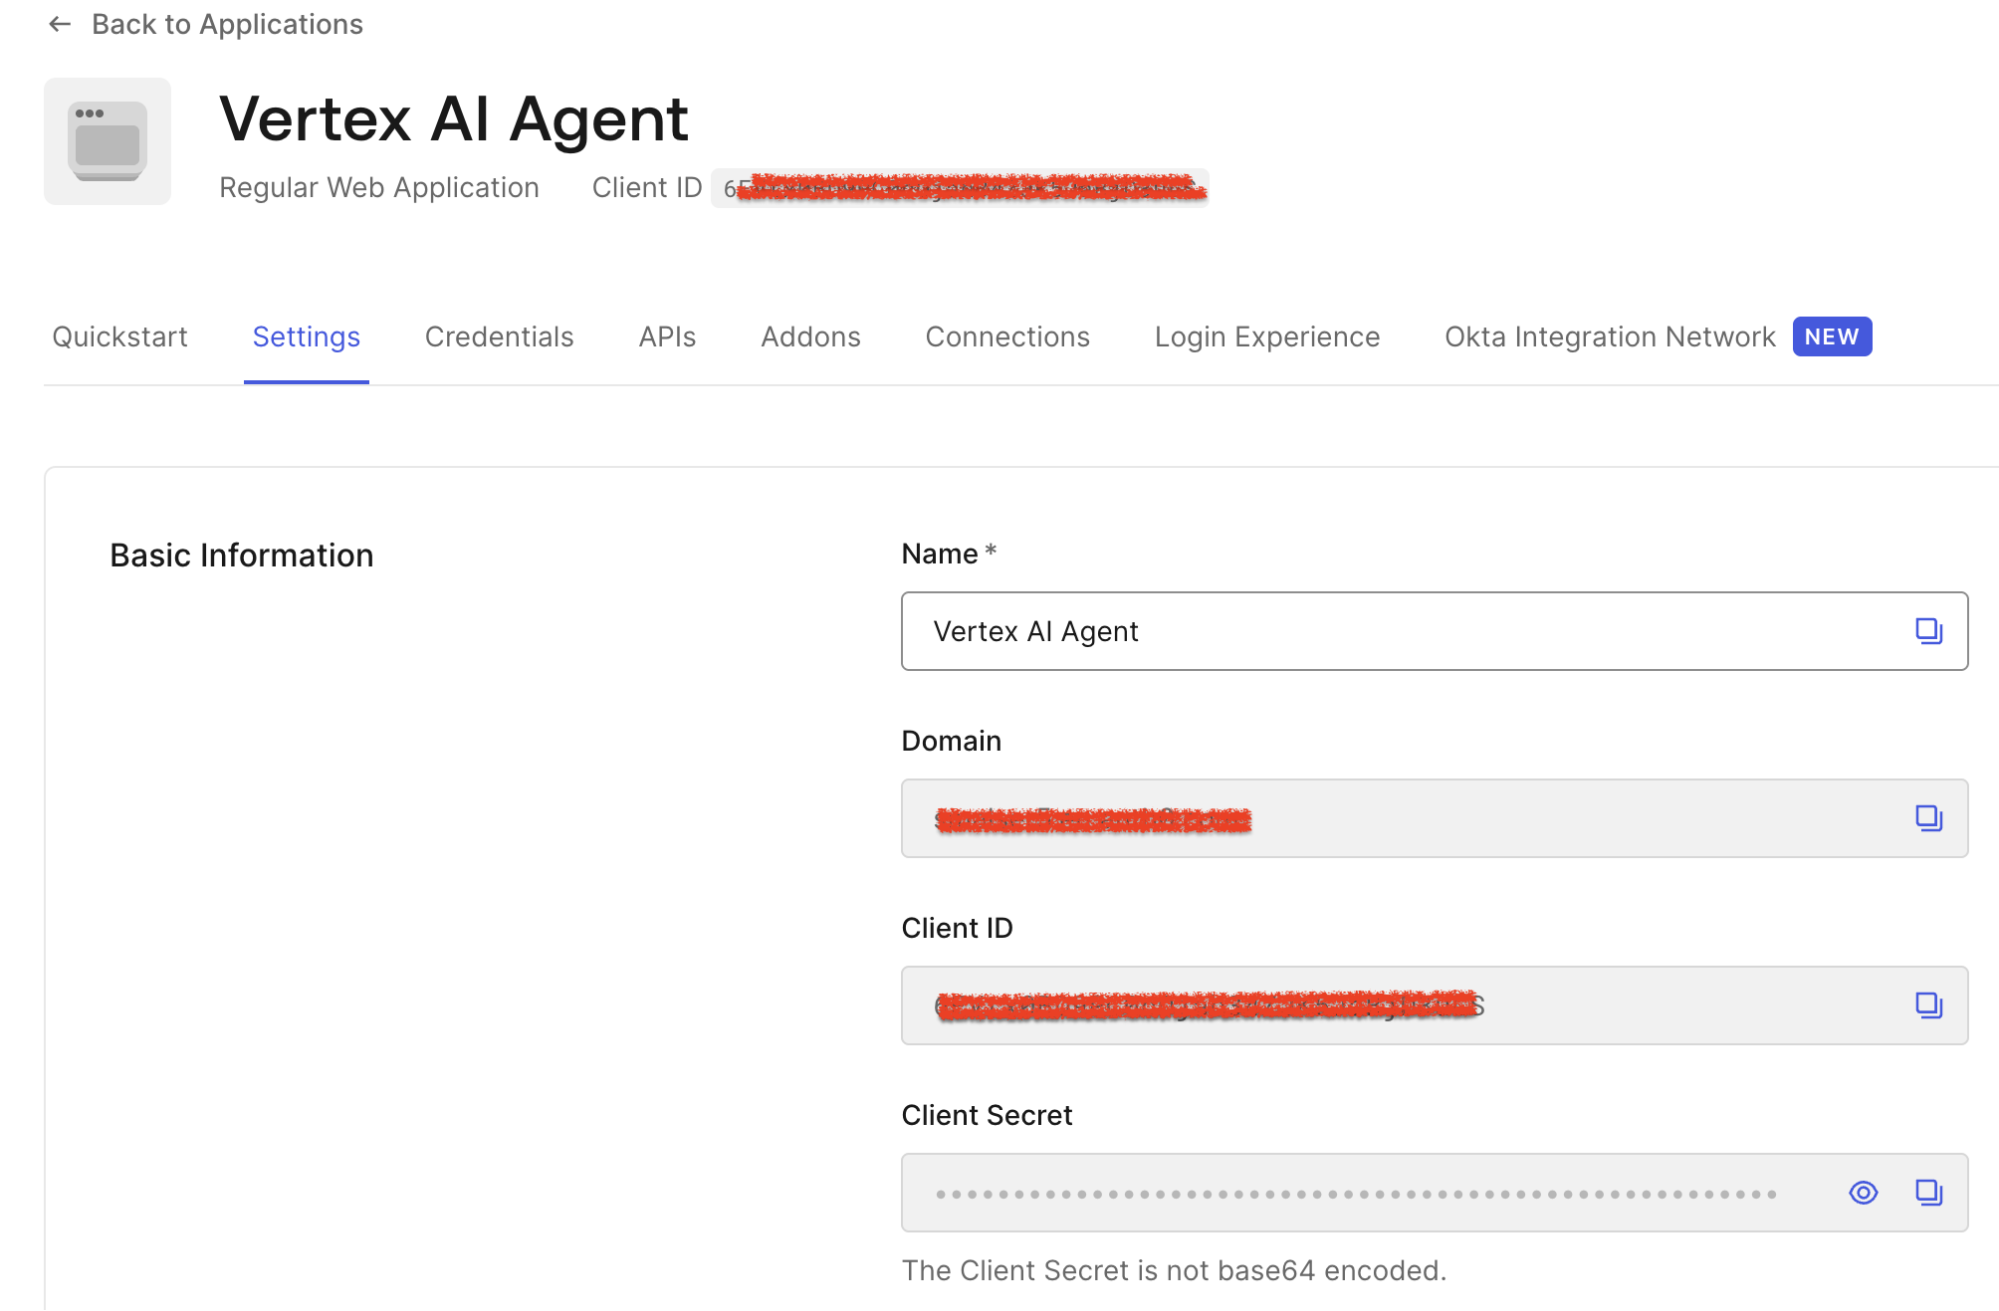
*Auth0: Configuration Parameters for the Auth0 Web Application*
Advanced Settingsセクションの下部に移動してGrant Typesをクリックします。Token VaultとCIBAのチェックボックスがオンになっていることを確認します。
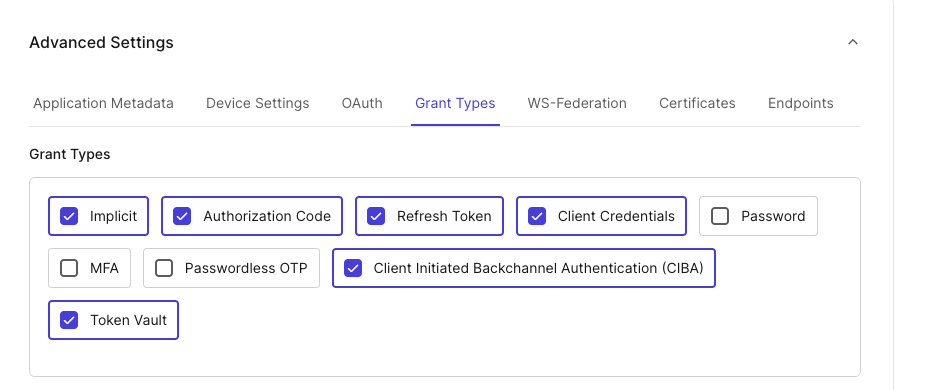
*Auth0: Enabling CIBA and token Vault for the Auth0 application*
ページ右下のSaveをクリックします。
### Google Cloud接続の作成
[Google Cloud接続を作成する手順](https://auth0.com/ai/docs/integrations/google#create-google-oauth-client)に従います。設定が完了したら、Authentication -> Social -> google-oauth2の下にあるOIDC接続に移動し、`offline_scope`が有効になっていることを確認します。
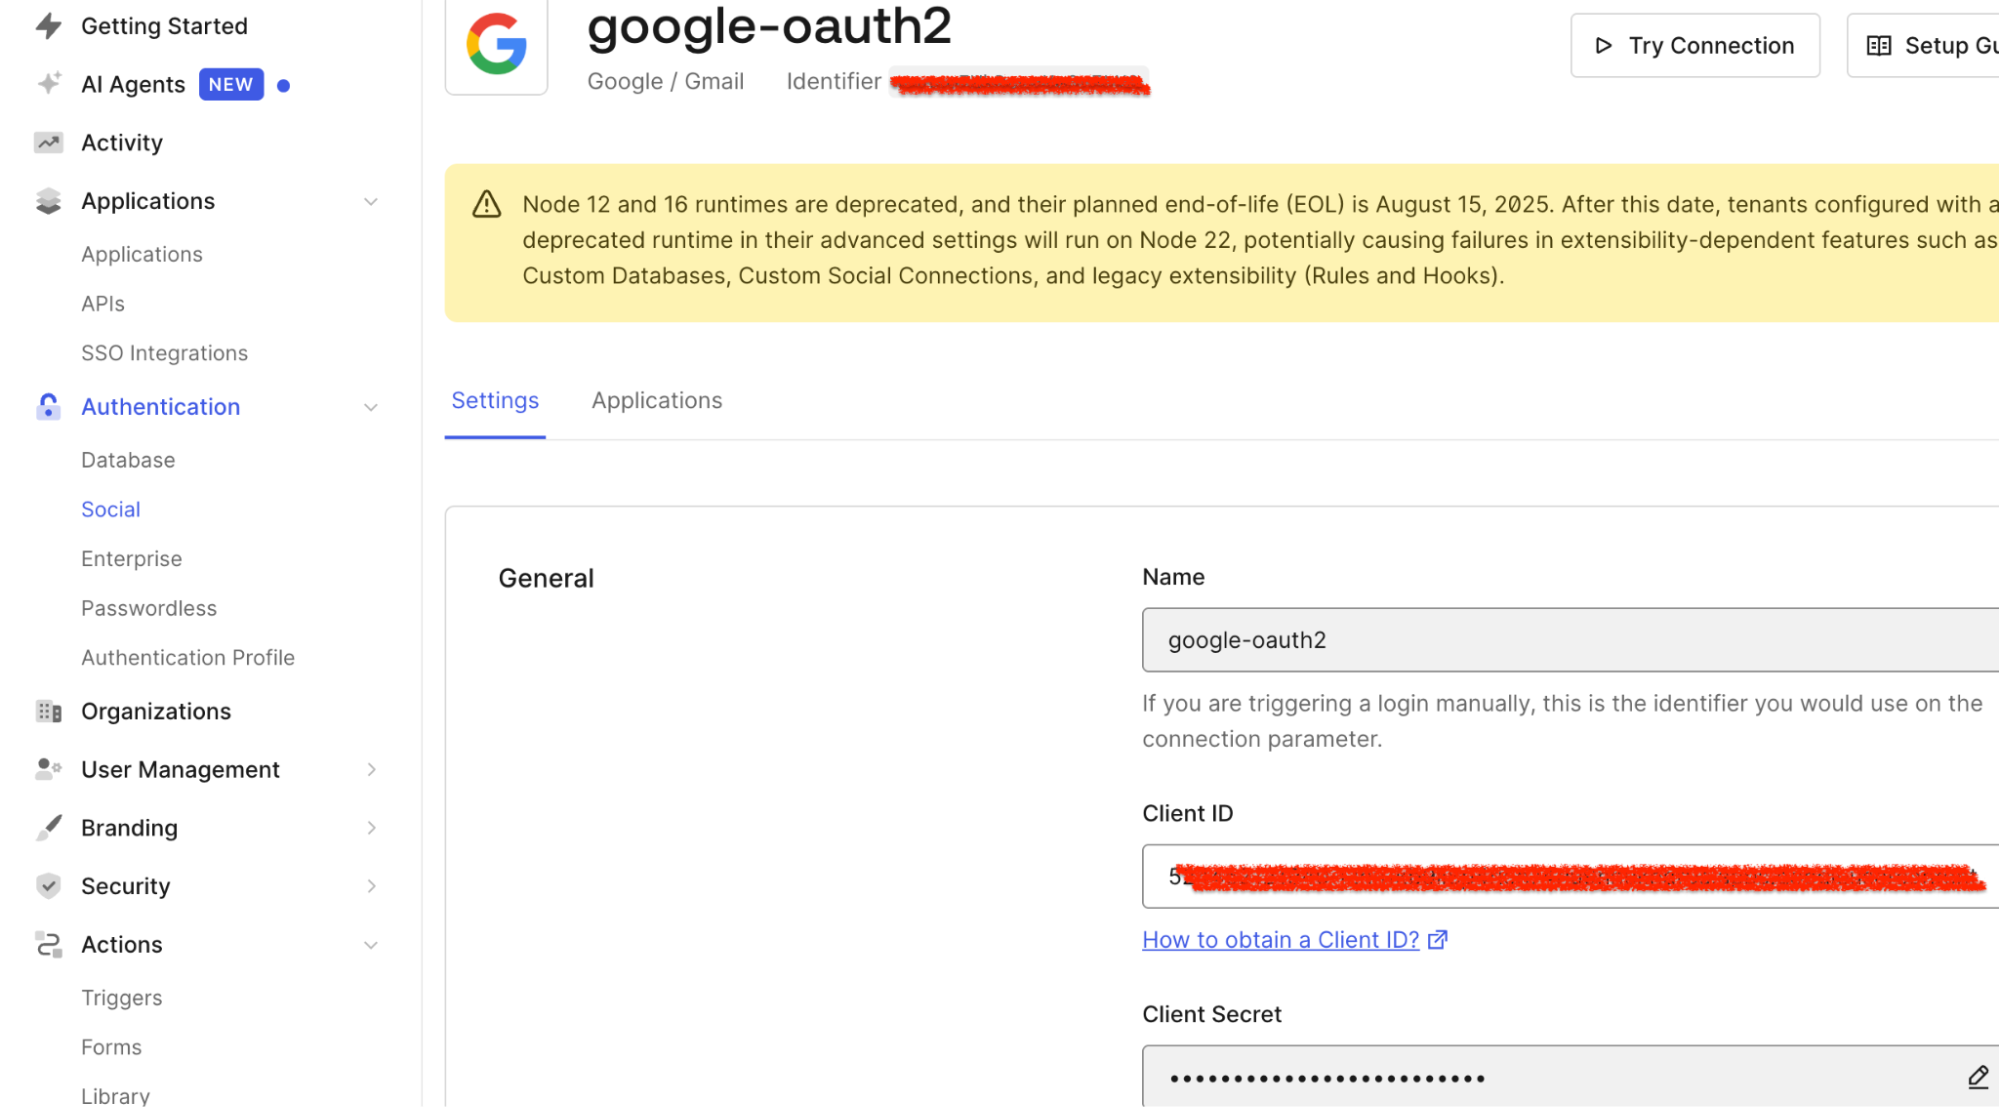
*Auth0: Setting up a Google Cloud Connection*
2つの特定の文字列をAuth0ダッシュボードに持ち帰る必要があります。
1. **Client ID:** Google CloudのOAuthアプリケーションのパブリック識別子です(例: 12345-abcde.apps.googleusercontent.com)。
2. **Client Secret:** Google Cloudのプライベートパスワードです。
次に、作成したGoogleソーシャル接続のApplicationsタブに移動し、先ほど作成したアプリに割り当てます。

*Auth0: Assigning the application to the Google Cloud connection*
アプリケーションが設定され、作成したWebアプリケーションはすべての設定を使用します。アプリケーションファイルと設定関連の情報については、以下の[GitHubリポジトリ](https://github.com/patilkapil/Vertex_A4AA/tree/main/Web_app)を参照してください。指示に従って、[Auth0の設定と構成を.envファイルですべて使用](https://github.com/patilkapil/Vertex_A4AA/blob/main/Web_app/sample.env)します。
### Token VaultのMy Account APIの有効化
ユーザーが外部アイデンティティプロバイダー(Google Cloudなど)に接続すると、Auth0はユーザープロファイルに「接続されたアカウント」を追加します。これによりアプリケーションは単一のAuth0プロファイルを通じて外部APIにアクセスできます。
Auth0は必要なアクセストークンとリフレッシュトークンをToken Vaultに保存します。アプリケーションは安全なトークン交換を通じてトークンを取得します。カスタムプロバイダーの統合を必要とせずに外部APIを呼び出せます。
Connected Accountsフローは[My Account API](https://auth0.com/docs/manage-users/my-account-api)を使用して、サポートされている外部プロバイダー全体でユーザーのアカウントを作成および管理します。ユーザーはConnected Accountsリクエストを要求し、[My Account API](https://auth0.com/blog/auth0-my-account-api/)を使用できます。
My Accounts APIを有効にするには、Applications > APIsに移動し、MyAccount APIバナーを見つけてActivateを選択します。
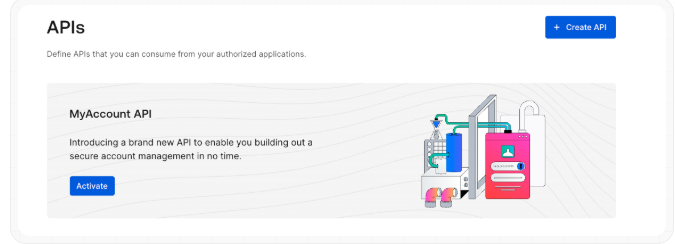
*Auth0: Enable My Account API*
有効化したら、Auth0 My Account APIのApplication Accessタブを選択し、作成したばかりのアプリの横にあるEditをクリックします。

*Auth0: Authorize Application to the My Account API*
次にUser Accessタブを選択し、アプリケーションのすべてのConnected Accountsスコープを選択してSaveをクリックします。
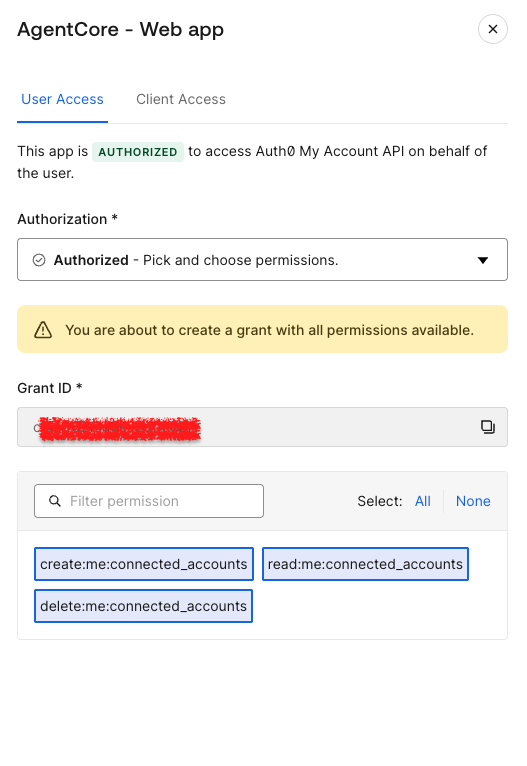
*Auth0: Select Scopes assigned for the application*
[Token VaultとMy Account APIの連携方法に関する詳細情報は本記事](https://auth0.com/docs/secure/call-apis-on-users-behalf/token-vault/connected-accounts-for-token-vault)で確認できます。
## パート2: Google Cloudコンポーネントのセットアップ
セットアッププロセスでは、Google Cloud内のいくつかのリソースを設定します。具体的には以下のとおりです。
* APIの有効化。
* Google Cloud環境内でのOAuthクライアントの生成。
* Gemini Enterprise Agent Platform RuntimeとOrchestratorエージェントの作成と展開。
* パブリックなGoogle Cloudバケットの作成。
* Gemini Enterprise Agent Platform Runtimeの環境変数の設定。
### APIの有効化
ユースケースはユーザーのアイデンティティに基づいています。アプリとエージェントはGoogle REST APIを使用し、Auth0から取得したフェデレーションOAuthトークンを各リクエストのBearerトークンとして渡します。必要なAPIは以下のとおりです。ユースケースのために以下のAPIを有効にする必要があります。ソリューションで利用されるAPIは以下のとおりです。
| API | コンポーネント/用途 |
| ----- | ----- |
| `aiplatform.googleapis.com` | Gemini Enterprise Agent Platform Runtime (Reasoning Engines) |
| `logging.googleapis.com` | IAM Changes Agent (Cloud Audit Logsのクエリ) |
| `storage.googleapis.com` | Bucket Audit Agent (バケットとIAMポリシーのリスト化) |
| `cloudresourcemanager.googleapis.com` | Remediation Agent (プロジェクトIAMポリシーの取得と設定) |
アーキテクチャ図で説明したように、各特化型エージェントはrequestsライブラリを使用してツール関数内で直接対応するGoogle REST APIを呼び出します。実行時にユーザーのフェデレーショントークンをAuthorization: Bearerヘッダーとして注入します。
WebアプリはGoogle Cloudトークンで初期化されたGemini Enterprise Agent Platform SDKを使用します。cloud-platformスコープのGoogle Cloudトークンをフェデレーションして取得したトークンは、4つすべてのGoogle Cloud APIへのアクセスを提供します。
Google CloudプロジェクトでAPIを有効にするには、[Google CloudプロジェクトでのAPIの有効化に関するドキュメント](https://docs.cloud.google.com/endpoints/docs/openapi/enable-api)を確認してください。
### Google Cloudの権限
以下の表は、A4AAおよびGemini Enterprise Agent Platformのコンテキスト内で必要なGoogle Cloudロールと関連する目的の概要を示しています。
| Google Cloudロール | 目的 |
| ----- | ----- |
| `roles/aiplatform.user` | ユーザーのフェデレーショントークンはGemini Enterprise Agent Platformを初期化します。クライアントはインテント分類のためにGenerativeModelを呼び出し、展開されたGemini Enterprise Agent Platform RuntimeのOrchestratorエージェントにクエリを実行するために使用されます。 |
| `roles/storage.admin` | Bucket Audit Agentはユーザーのフェデレーショントークンを使用して、list\_bucketsとget\_bucket\_iam\_policyの2つのCloud Storage APIを呼び出します。storage.admin権限が必要です。エージェントのツールはすべてのバケットをチェックするために使用します。 |
| `roles/logging.viewer` | IAM Changes Agentは、クエリ実行時にAPIへのPOSTリクエストを介してCloud Loggingからログを読み取る必要があります。 |
| `roles/resourcemanager.projectIamAdmin` | Remediation Agentは、Cloud Resource Manager APIを使用してプロジェクトIAMポリシーを読み取り、変更、書き込みする権限を必要とします。非常に権限の高いロールは認可された修復ユーザー向けです。CIBAステップアップ承認後のクエリ実行時に、ユーザーのフェデレーショントークンを使用してAPIを呼び出すために使用されます。 |
| `roles/storage.objectAdmin` | ステージングバケットは、ローカルマシンとGemini Enterprise Agent Platformビルドパイプラインの間の中間転送場所として機能します。具体的には、認証情報を使用してバケットにデータを書き込み、Gemini Enterprise Agent Platformサービスエージェントがデータを読み取ります。展開時の操作にのみ使用されます。 |
**注:**
* Gemini Enterprise Agent Platform Runtimeはコンテナ内にエージェントを展開します。プロジェクトのGemini Enterprise Agent Platform Service Agent `(service-PROJECT_NUMBER@gcp-sa-aiplatform.iam.gserviceaccount.com)`の下で実行されます。コンテナの初期化中にパッケージ化されたエージェントアーティファクトを読み取るために、サービスエージェントがステージングバケットで`roles/storage.objectViewer`ロールを持っていることを確認してください。
* エージェントはmodel="gemini-2.5-pro"で展開され、Webアプリはインテント分類にgemini-2.0-flashを使用します。モデルはGoogle CloudコンソールのGemini Enterprise Agent Platform Model Gardenで明示的に有効にする必要があります。
* デモンストレーション目的でのみロールを作成しました。特定のユースケースでは、最小権限の原則に基づいてロールを実装してください。
### バケット
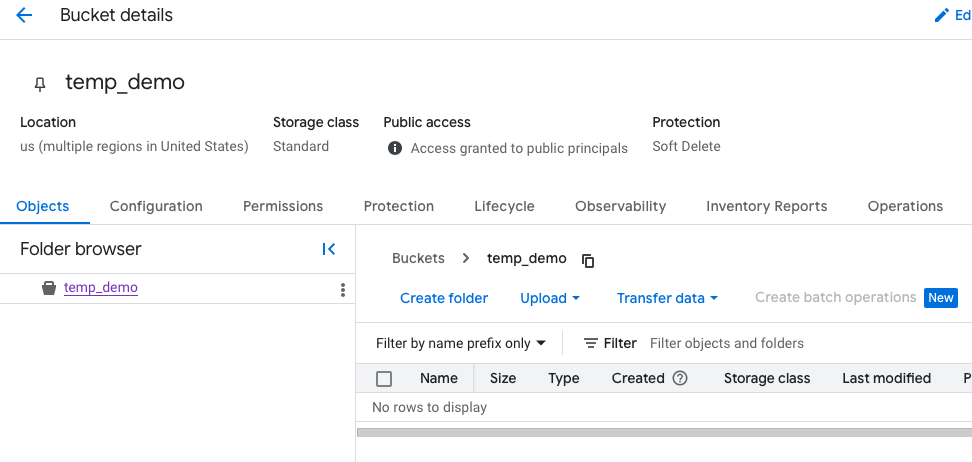
ユースケースには、プライベートな**ステージングバケット**とパブリックな**デモバケット**の2つの異なるGoogle Cloudバケットが必要です。
**ステージングバケット(プライベート):** エージェントの展開中にのみ使用され、プライベートなエージェントコードアーティファクトをGemini Enterprise Agent Platformにアップロードします。実装を保護するためにプライベートのままにする必要があります。エージェントを展開する前にバケットを作成してください。
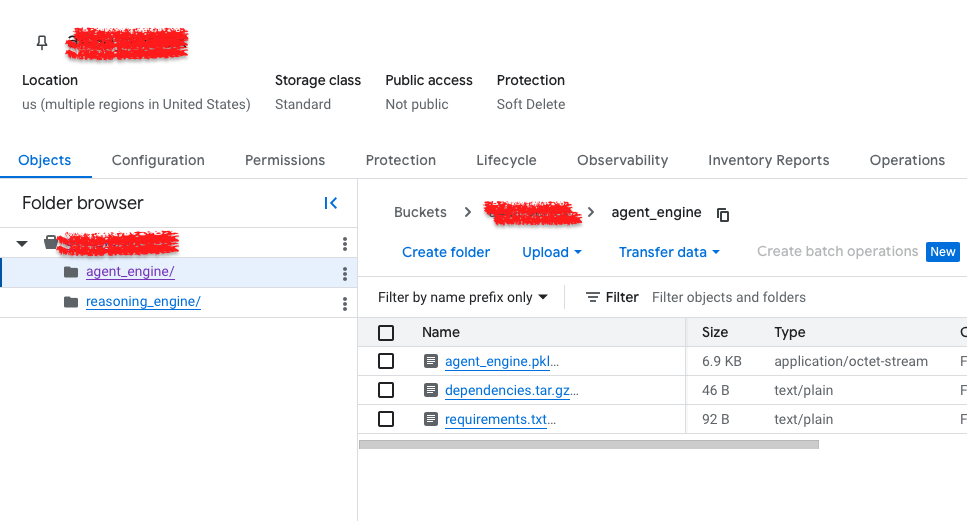
*Google Cloud : Staging bucket for deployment*
**デモバケット(パブリック):** デモンストレーション中にBucket Audit Agentがパブリックバケットを見つけ、意味のある結果を返すように、意図的にパブリック(`allUsers:objectViewer`)に設定されています。
デモバケットの目的は、Bucket Policy Agentの`find_public_buckets()`ツールの検出結果を提供することだけです。
*Google Cloud: Demo bucket for Agent’s operation*
## パート3: Gemini Enterprise Agent Platform Runtimeの構築と展開、およびエージェントとWebアプリケーションの接続
### Gemini Enterprise Agent Platform Runtime
本プロジェクトには、Orchestratorエージェントと特化型エージェントの2層階層に配置された4つのエージェントがあります。各エージェントはGemini Enterprise Agent Platform Runtimeに展開された独立したエージェントです。
**Orchestrator**は、入ってくるすべてのユーザーの質問に対する唯一のゲートウェイとして機能します。機能はクエリを受け取り、対処するのに最も適切な特化型エージェントを特定し、リクエストをルーティングすることに限定されます。重要な点として、Google Cloud APIを直接呼び出すことはありません。ルーティングを容易にするために、3つすべての特化型エージェントのリソースIDがハードコードされた状態で展開されます。これにより各ユーザーの問い合わせをどこに送信するかを正確に把握できます。
**特化型エージェント:** 3つの特化型エージェントがあり、それぞれが特定のセキュリティドメインを所有しています。IAM Audit Specialist、Bucket Audit Specialist、Remediation Specialistです。
[**IAM Audit Specialist**](https://github.com/patilkapil/Vertex_A4AA/blob/main/Agents/iam-changes-agent.py)は、IAMポリシーの変更(誰が、何を、いつ、特定のロールバインディングの追加/削除)を詳述するイベントについてCloud Logging APIにクエリを実行します。
```python
def get_iam_changes(hours_back: int = 24) -> str:
"""Query Cloud Audit Logs for IAM policy changes in the last N hours."""
url = "https://logging.googleapis.com/v2/entries:list"
body = {
"resourceNames": [f"projects/{project_id}"],
"filter": f'protoPayload.methodName="SetIamPolicy" AND timestamp>="{since}"',
"orderBy": "timestamp desc",
}
resp = requests.post(url, headers={"Authorization": f"Bearer {token}"}, json=body)
return resp.json()
```
[**Bucket Audit Specialist**](https://github.com/patilkapil/Vertex_A4AA/blob/main/Agents/bucket-audit-agent.py)は、Cloud Storage APIを使用してすべてのプロジェクトバケットをリスト化し、IAMポリシーバインディングをチェックします。パブリックにアクセス可能なバケットと公開されているロールを報告します。
```python
def find_public_buckets() -> str:
"""List all GCS buckets and flag any that grant access to allUsers or allAuthenticatedUsers."""
PUBLIC_PRINCIPALS = {"allUsers", "allAuthenticatedUsers"}
buckets = requests.get("https://storage.googleapis.com/storage/v1/b",
headers={"Authorization": f"Bearer {token}"},
params={"project": project_id}).json().get("items", [])
for bucket in buckets:
iam = requests.get(f"https://storage.googleapis.com/storage/v1/b/{bucket['name']}/iam",
headers={"Authorization": f"Bearer {token}"}).json()
```
[**Remediation Specialist**](https://github.com/patilkapil/Vertex_A4AA/blob/main/Agents/remediation-agent.py)は、サービスアカウントの現在のロールを検索してIAMロールを取り消します。唯一の書き込みエージェントとして、アクションにはWebアプリでのヒューマンインザループのステップアップ承認が必要です。
```python
def revoke_service_account_binding(service_account_email: str, role: str) -> str:
"""Read-modify-write the project IAM policy to remove a specific binding."""
policy = requests.post(f"{base_url}:getIamPolicy",
headers={"Authorization": f"Bearer {token}"}, json={}).json()
# remove the matching member+role binding
policy["bindings"] = [
{**b, "members": [m for m in b["members"] if m != f"serviceAccount:{service_account_email}"]}
for b in policy["bindings"] if b["role"] == role
]
requests.post(f"{base_url}:setIamPolicy",
headers={"Authorization": f"Bearer {token}"},
json={"policy": policy})
```
### エージェントの展開
展開は順次行われ、順序に依存します。3つの特化型エージェントは最初にそれぞれ独立して展開されます。順序は問いません。各展開では、projects/.../locations/.../reasoningEngines/...の形式のリソース名が出力されます。エンドポイント情報はGoogle Cloudコンソールで確認できます。
展開プロセスでは、最初に3つの特化型エージェント(IAM Audit Specialist、Bucket Audit Specialist、Remediation Specialist)を展開し、リソース名を[.envファイル](https://github.com/patilkapil/Vertex_A4AA/blob/main/Agents/sample.env)に書き込む必要があります。
次に、3つの名前を使用してOrchestratorが展開されます。最後にOrchestrator自身のリソース名がWebアプリの[.envファイル](https://github.com/patilkapil/Vertex_A4AA/blob/main/Web_app/sample.env)に追加されます。
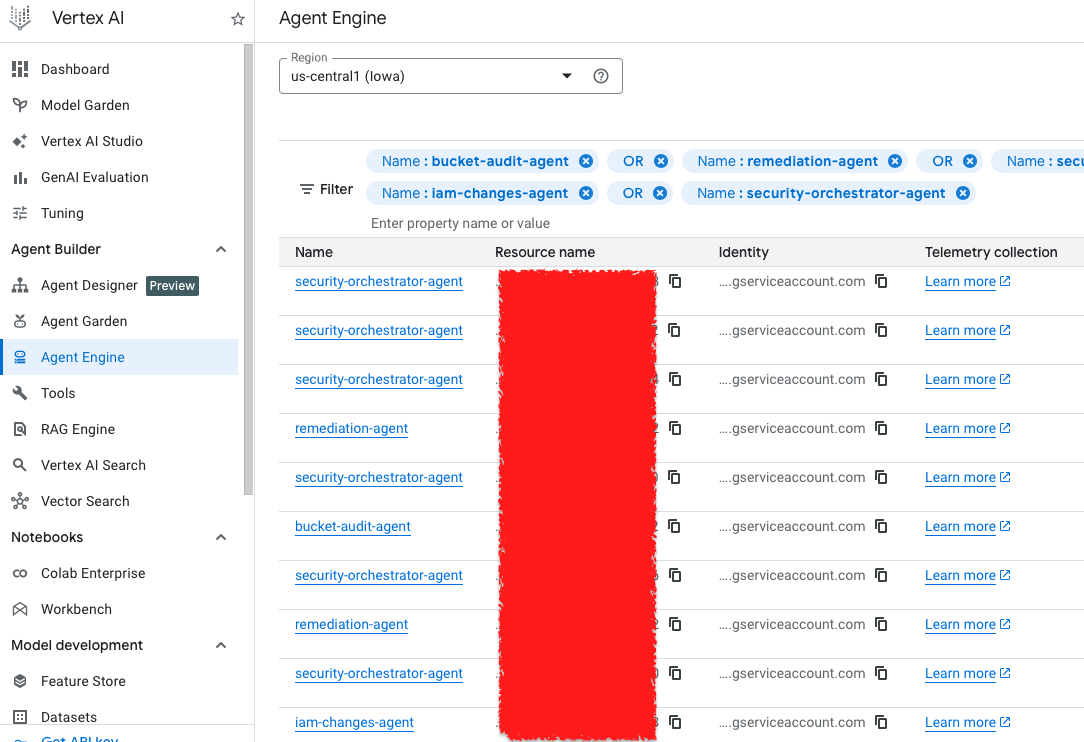
*Google Cloud : Deployment Successful window*
本記事をクリックすると、エンドポイントを確認できます。

*Google Cloud : Access resource endpoints for deployed agents*
[**Security Orchestratorエージェント**](https://github.com/patilkapil/Vertex_A4AA/blob/main/Agents/security-orchestrator-agent.py)
Security Orchestratorはエージェント層への単一のエントリポイントです。エージェントはWebアプリからユーザーのメッセージとフェデレーションされたGoogle Cloudトークンを受け取ります。エージェントはどの特化型エージェントがクエリに回答できるかを決定します。Google Cloud APIを直接呼び出すツールは持っていません。委譲する方法のみを知っています。
ルーティングは`set_up()`で定義され、Orchestratorの唯一のツールとして登録された関数である`call_specialist_agent()`内で発生します。Orchestrator内のGoogleのGeminiモデルがどの特化型エージェントを呼び出すかを決定すると、以下の関数を呼び出します。
```python
# Resource endpoints for worker agents
SPECIALIST_AGENT_MAP = {
"iam_changes": os.environ.get("GOOGLE_CLOUD_AGENT_ENGINE_ID_IAM_CHANGES"),
"bucket_audit": os.environ.get("GOOGLE_CLOUD_AGENT_ENGINE_ID_BUCKET_AUDIT"),
"remediation": os.environ.get("GOOGLE_CLOUD_AGENT_ENGINE_ID_REMEDIATION"),
}
#Dictionary of intent label
_agent_map = {
"iam_changes": SPECIALIST_AGENT_MAP["iam_changes"],
"bucket_audit": SPECIALIST_AGENT_MAP["bucket_audit"],
"sa_lookup":SPECIALIST_AGENT_MAP["remediation"],#same agent,read-only tool
"remediation": SPECIALIST_AGENT_MAP["remediation"],# same agent, update-service_account-only tool
}
#Calls the specialist agent based on the intent discovered
def call_specialist_agent(agent_type: str, user_query: str) -> str:
resource_id = _agent_map.get(agent_type.lower())
response =reasoning_engines.ReasoningEngine(resource_id).query(
input=user_query,
user_id=self._user_id,
access_token=self._access_token)
```
*注: `sa_lookup`とremediationはどちらも同じエージェントリソースにマッピングされます。両方の操作が同じCloud Resource Manager APIを使用するため、同じ展開されたエージェントがロールの読み取りと取り消しを処理します。*
### インテント分類器
ユーザーがメッセージを送信すると、Webアプリはすぐにapp.pyの[`_classify_intent()`](https://github.com/patilkapil/Vertex_A4AA/blob/main/Web_app/app.py#L610)を通じて実行します。返されたインテント文字列は以下に使用されます。
* FGA認可チェック。ユーザーが操作を実行できることを確認します。
* インテントが*remediation*の場合、エージェントが呼び出される前に承認のためにCIBAプッシュ通知がユーザーのデバイスに送信されます。
* FGAチェックに合格した他のすべてのインテントについて、WebアプリはGemini Enterprise Agent Platform Runtimeを初期化します。
その後、Orchestratorが引き継ぎ、`call_specialist_agent()`を呼び出してルーティング先の特化型エージェントを決定します。
```python
# Step 1: classify the user's free-text into a structured intent
intent = _classify_intent(user_message) # → "iam_changes" | "bucket_audit" | "sa_lookup" | "remediation"
# Step 2: FGA check — is this user allowed to perform this intent?
if not await _fga_check(user_email, intent):
messages.append({"sender": "system", "message": "This action is not authorized."})
return RedirectResponse(url="/chat", status_code=302)
# Step 3: CIBA step-up — remediation requires out-of-band device approval before proceeding
if intent == "remediation":
bc_data = await auth_client.initiate_backchannel_authentication({
"login_hint": {"sub": user_sub},
"binding_message": "Approve access to the remediation capability",
})
request.session["ciba_pending"] = True
request.session["ciba_auth_req_id"] = bc_data["auth_req_id"]
return RedirectResponse(url="/chat", status_code=302)
# Step 4: initialize Gemini Enterprise Agent Platform with the user's federated Google Cloud token
credentials = Credentials(token=federated_token)
vertexai.init(project=..., location=..., credentials=credentials)
# Step 5: call the orchestrator — passes the original message and token
remote_agent = reasoning_engines.ReasoningEngine(_orchestrator_id)
response = remote_agent.query(
input=user_message,
user_id=user_email,
access_token=federated_token,
)
```
## パート4: FGAの実装
[Auth0 FGA](https://auth0.com/blog/relationship-based-access-control-rebac/)は認可モデルを使用して、ユーザーと実行可能な操作の間のすべての関係を管理します。本セクションでは、Gemini Enterprise Agent Platform Runtimeが特定のユースケース用に作成されたFGAモデルを活用し、ログインしたユーザーに基づいて認可の決定を行う方法を実演します。
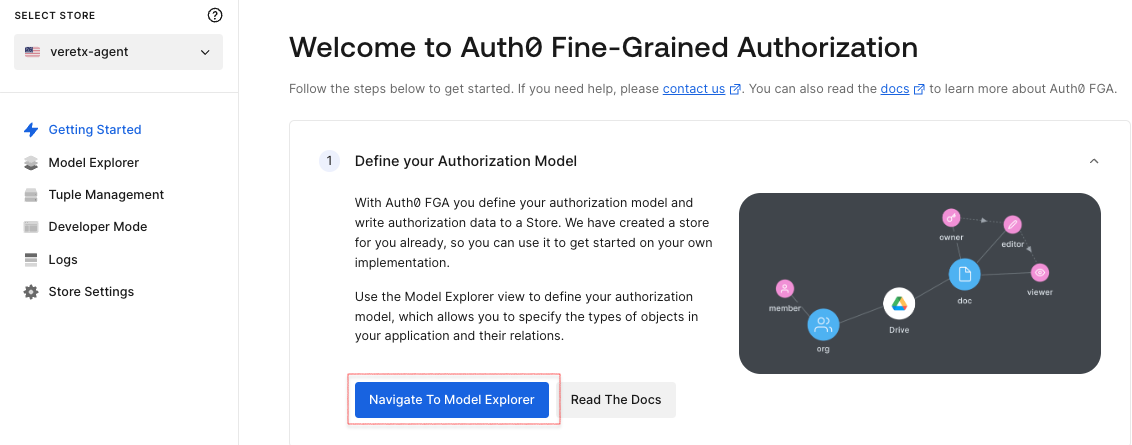
*Auth0 FGA Console*
以下のFGA認可モデルをモデルエディターに追加し、Saveをクリックします。
```bash
model
schema 1.1
type user
type capability
relations
define can_access: [user]
```
モデルを保存すると、プレビューと認可モデルが表示されます。
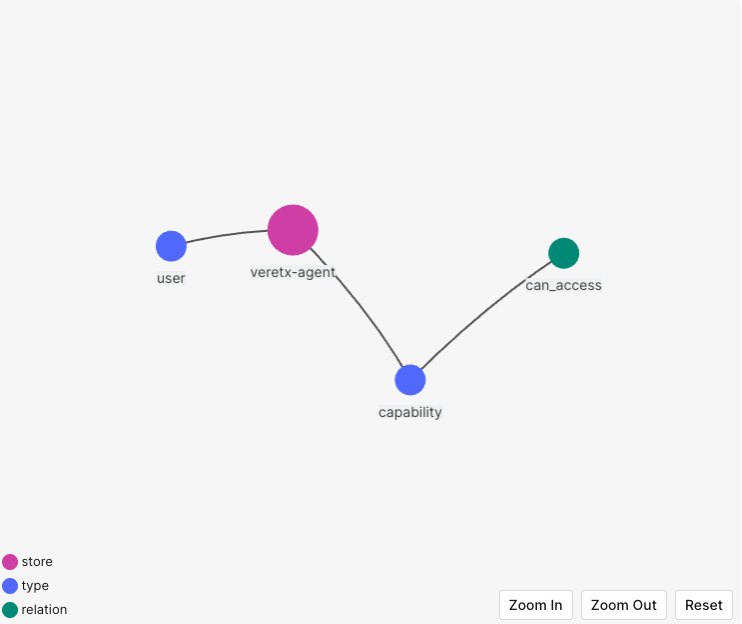
*FGA Authorization preview*
メインダッシュボードからアクセスできるTuple Managementセクションに移動し、ユーザーとさまざまなアプリケーションオブジェクトとの関係を定義します。
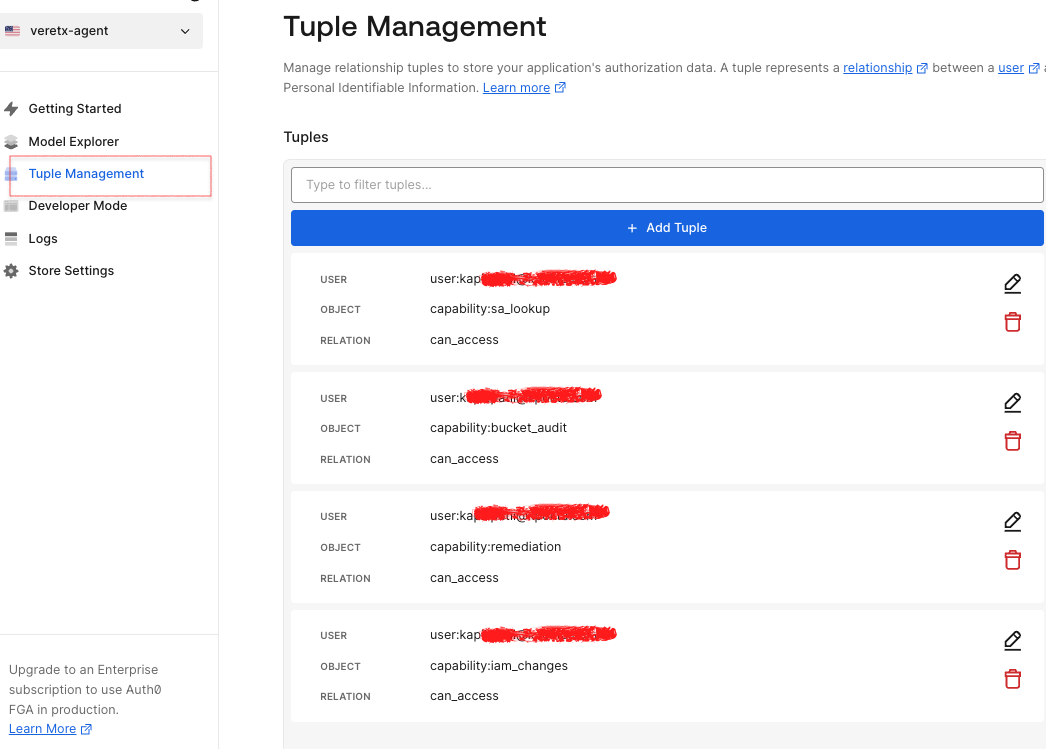
*Tuple Management Dashboard*
Add Tupleボタンをクリックして関係データを追加し、デモンストレーション用のタプルを追加します。
以下のタプルは、ユーザーIDがGemini Enterprise Agent Platform Runtimeの特定のインテントや操作にアクセスできることを表しています。
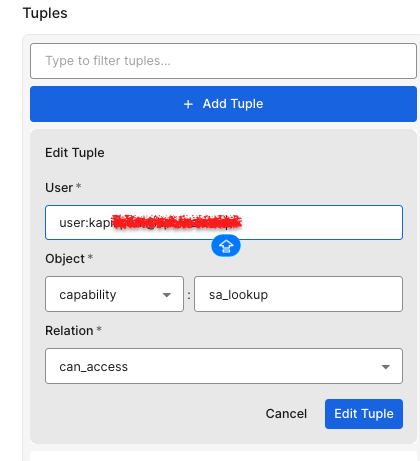
*Adding Tuples*
これでOkta FGA認可モデルとすべての関係の準備が整いました。
### FGA認可モデルの設定
アプリケーションへの接続に役立つ認可モデルのAuthorized Clientを設定するには、作業中の認可モデルの設定メニューをクリックし、+ Create Clientをクリックします。
アプリケーションに必要な適切な権限セットを選択し、Createをクリックします。
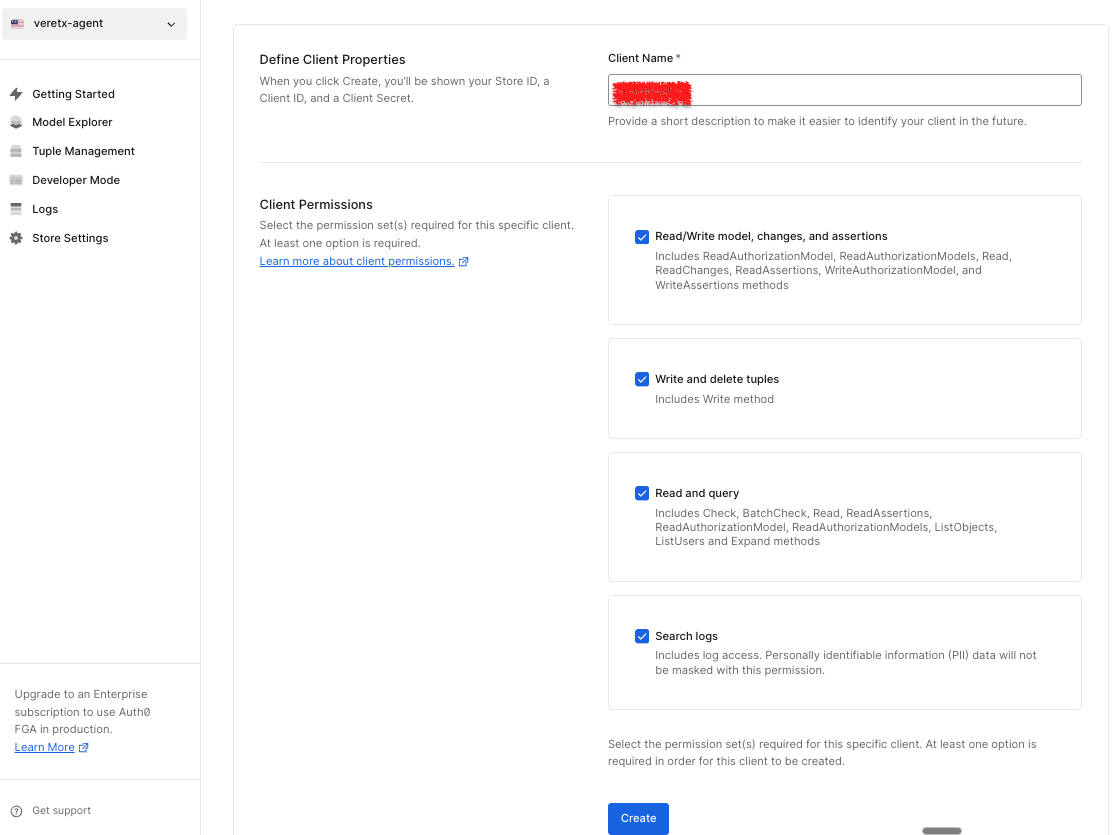
*FGA Authorization Model Settings*
本ステップでアプリに必要な認証情報が作成されます。continueボタンをクリックする前に値を保存してください。
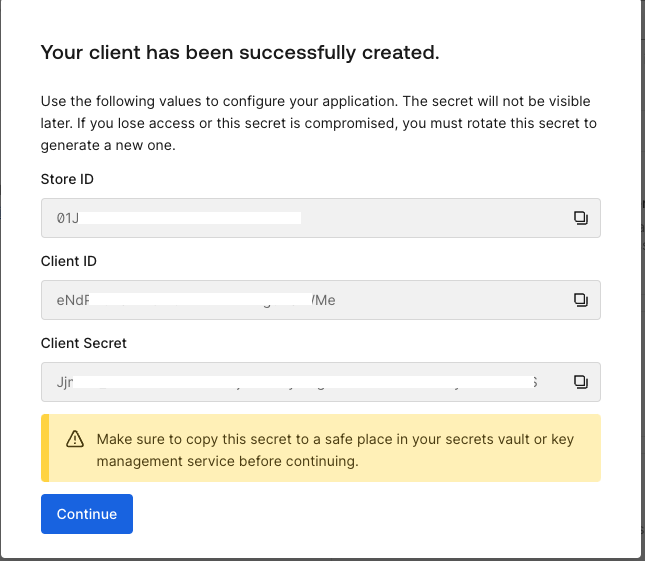
*FGA Authorization Model Settings*
認可モデルはGemini Enterprise Agent Platform Runtimeの認可決定をサポートするために実装されます。WebアプリはFGAを活用して、エージェントの実行前にユーザーが実行を認可されたアクションを評価および制御します。
## パート5: アプリケーションの設定とテスト
これでデモに必要なすべてのコンポーネントの設定が完了しました。これまでにAuth0アプリ、Auth0 FGAモデル、Google Cloudリソース、Gemini Enterprise Agent Platform Runtimeをセットアップしました。次のステップはFlaskアプリケーションを設定して要素を統合することです。
提供されている[GitHubリポジトリ](https://github.com/patilkapil/Vertex_A4AA/tree/main/Web_app)を使用してFlask Webアプリケーションを作成することから始めます。アプリケーションは前のステップで作成したGemini Enterprise Agent Platform Runtimeと通信します。
アプリケーションのテスト方法は以下のとおりです。
1. ブラウザでWebアプリのURLを開き、Auth0認証情報を使用してログインします。
**期待される結果:** 同意を提供し、Auth0 Guardianを介してMFAに登録するように求められます。ログインは正常に完了します。
2. 新しいタブでAuth0ダッシュボードに移動し、Security -> Multi-factor Authに移動して、MFAポリシーを「None」に設定します。
**期待される結果:** アカウントのMFAが無効になり、今後のログイン時にトリガーされなくなります。変更によりToken Vaultが期待どおりに機能することが保証されます。
3. Webアプリに戻り、チャットボットインターフェースが表示されていることを確認します。
**期待される結果:** チャットボットUIが読み込まれ、対話の準備が整います。チャットボットの入力ボックスに「Show me IAM changes in the last 24 hours」と入力してメッセージを送信します。期待される結果: チャットボットはアカウントに関連付けられたIAMの変更のリストで応答します。
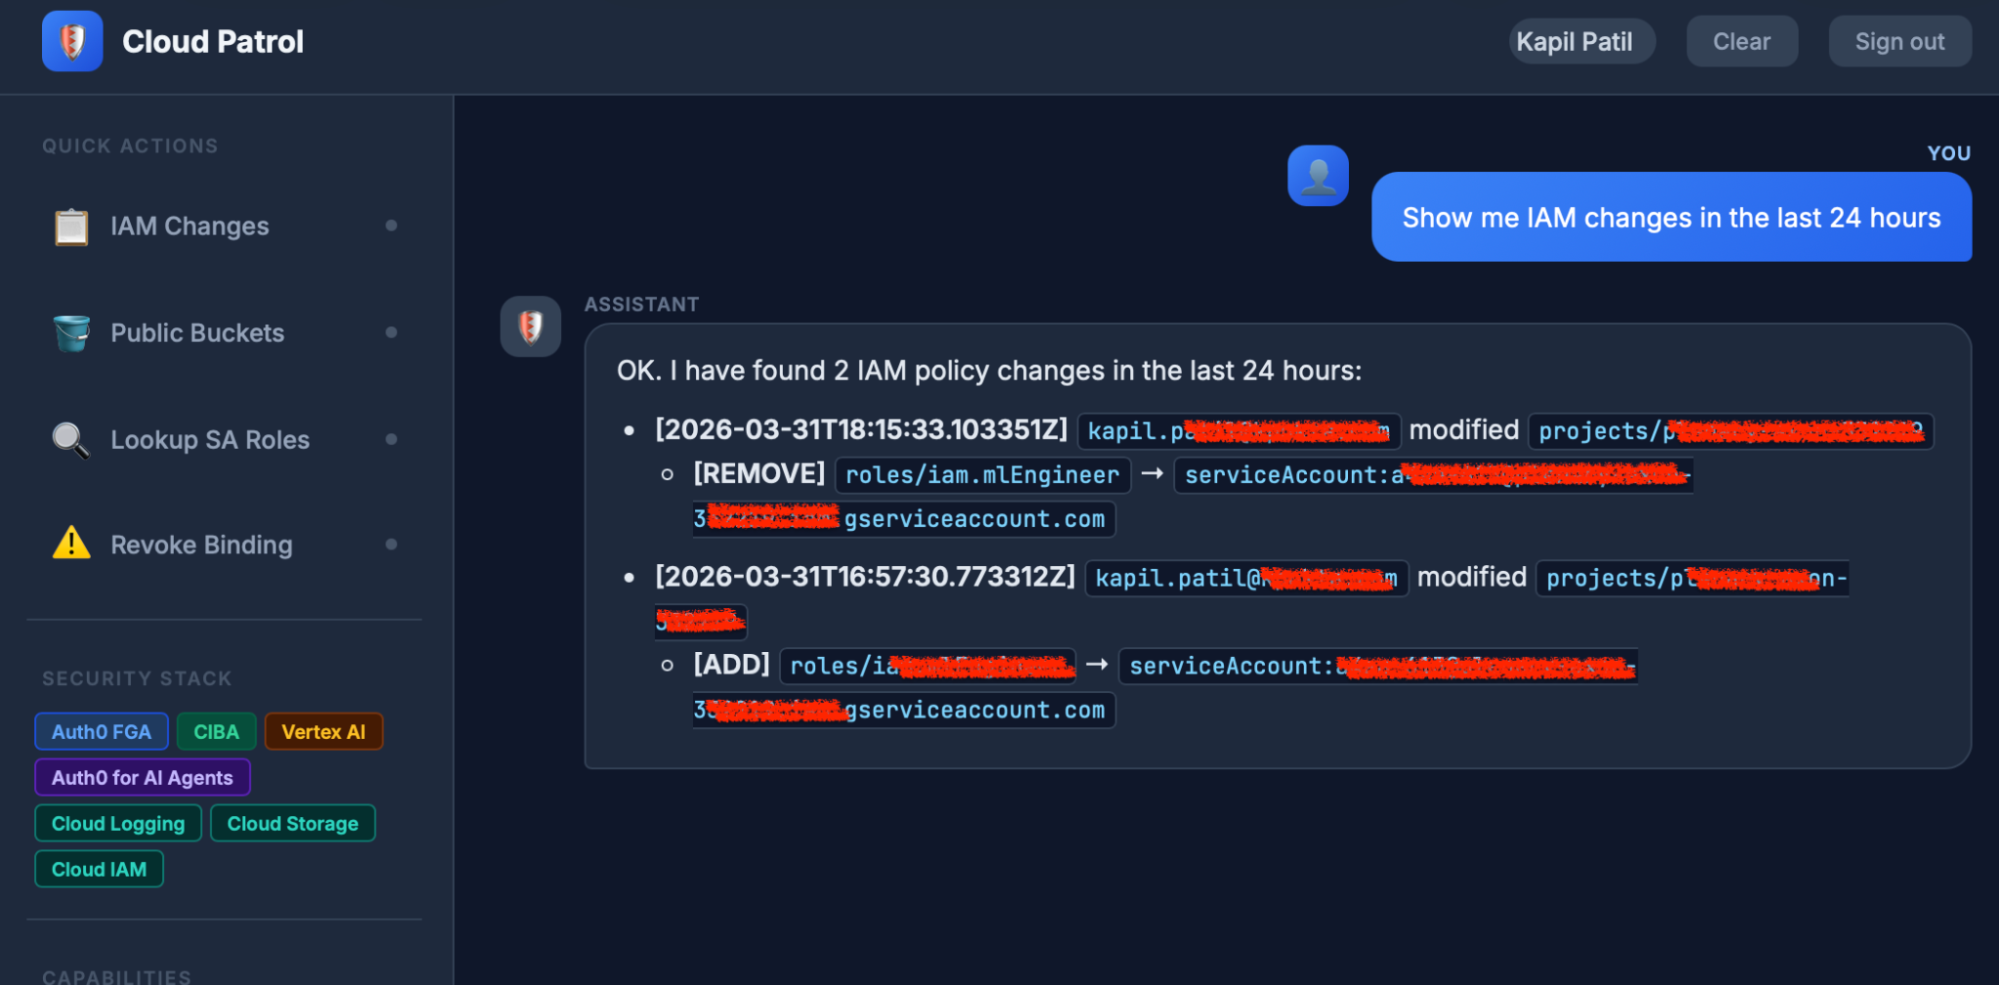
*Test Case: Accessing Google Cloud Resources API using Auth0 Token Vault*
4. チャットボットに「Are any storage buckets publicly accessible?」と入力します。
**期待される結果:** ユーザーは以前の設定で公開されたバケットを確認できます。
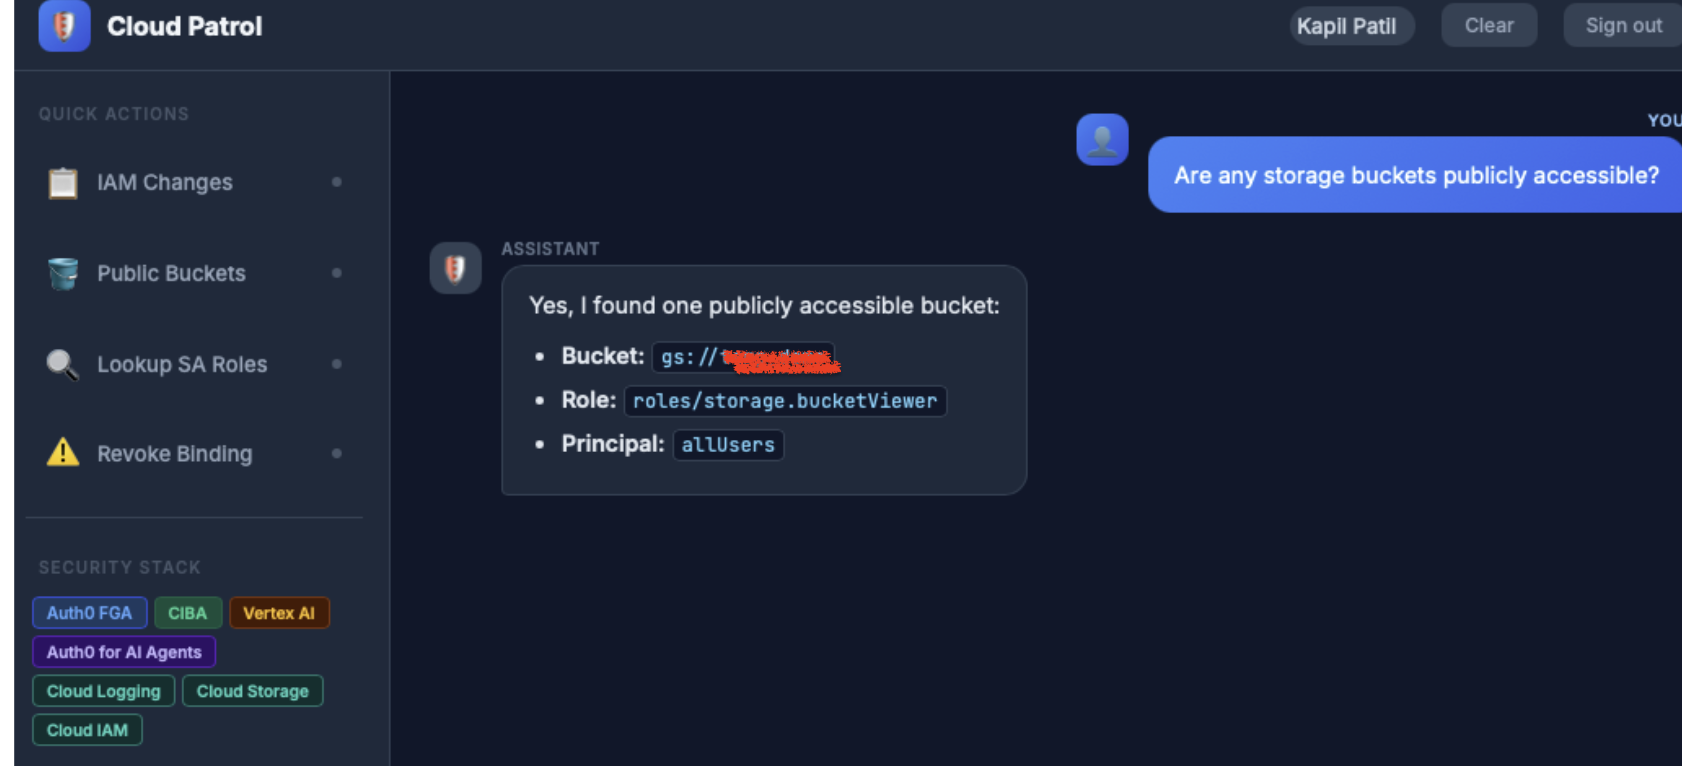
*Test Case: List public Google Cloud buckets*
5. チャットボットに「What roles does serviceAccount: name@project.iam.gserviceaccount.com have?」と入力してEnterキーを押します。
**期待される結果:** ユーザーはサービスアカウントに設定されている内容に基づいてIAMロールのリストを確認できます。
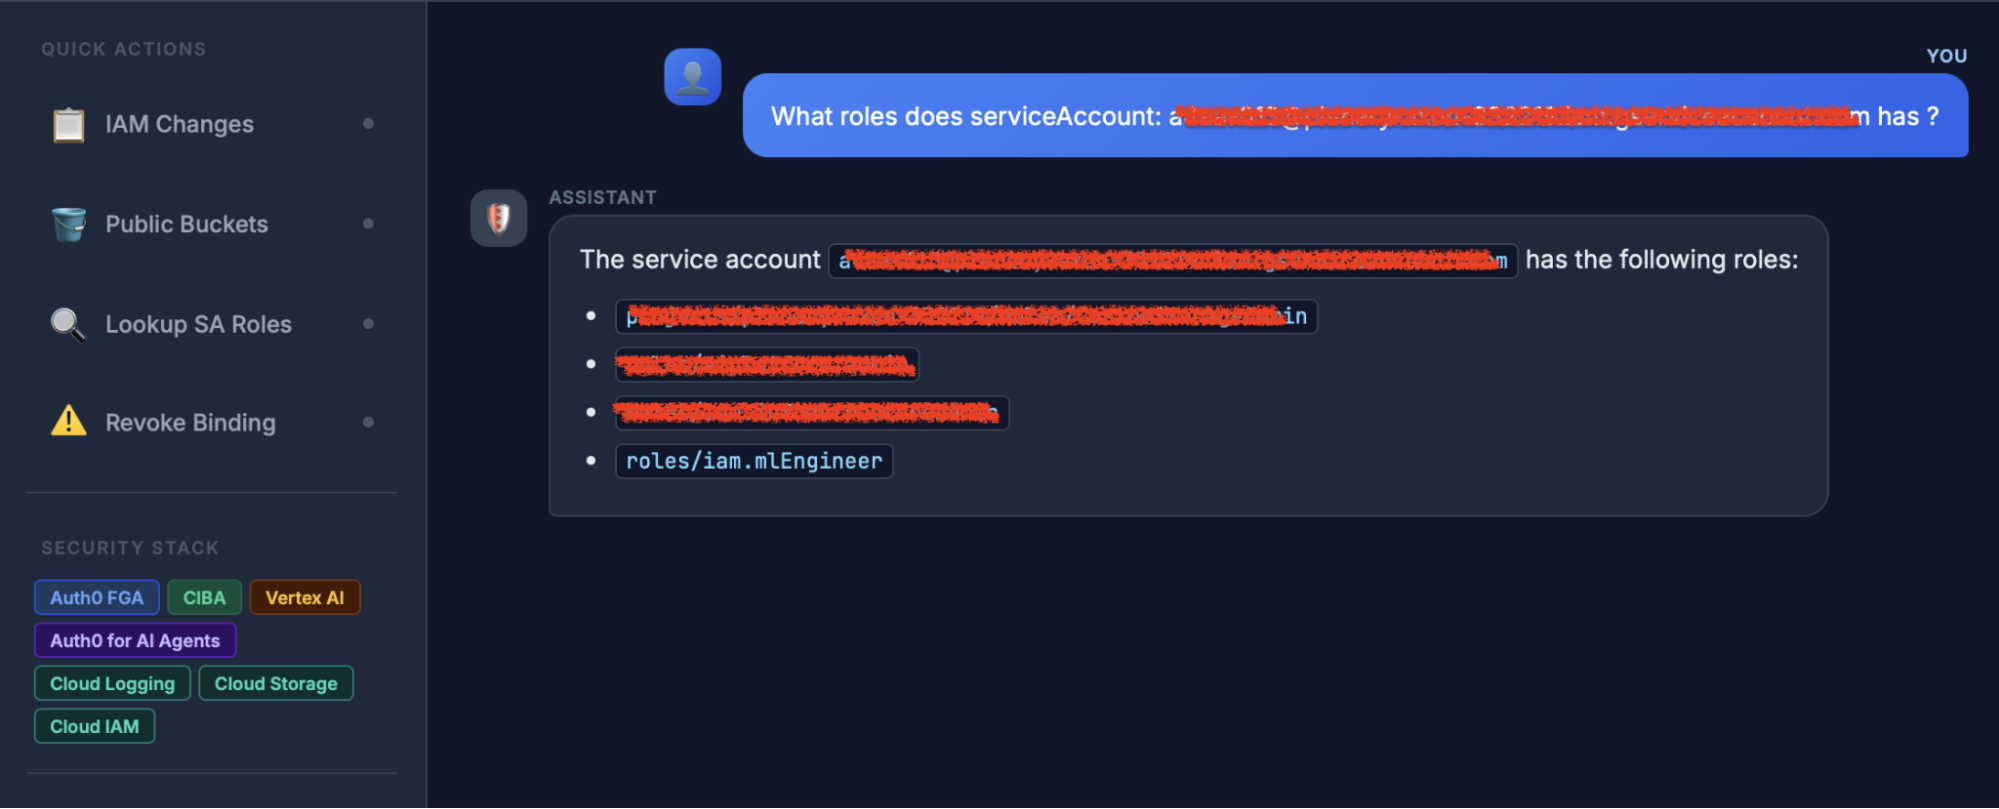
*Test Case: List IAM roles for a service account.*
6. 次のステップとして、以前に使用されたサービスアカウントからIAM ML Engineerロールを削除します。
設定されたモバイルアプリケーションへの認可リクエストに気づくでしょう。
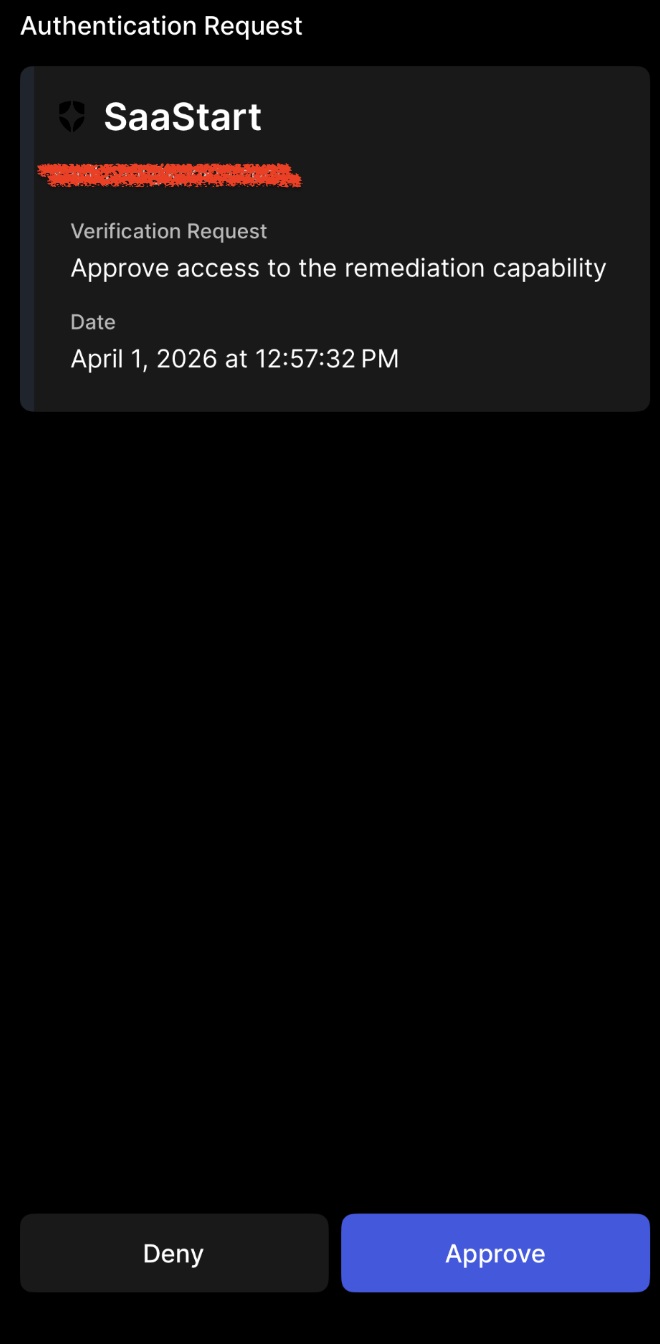
*Test Case: CIBA Flow*
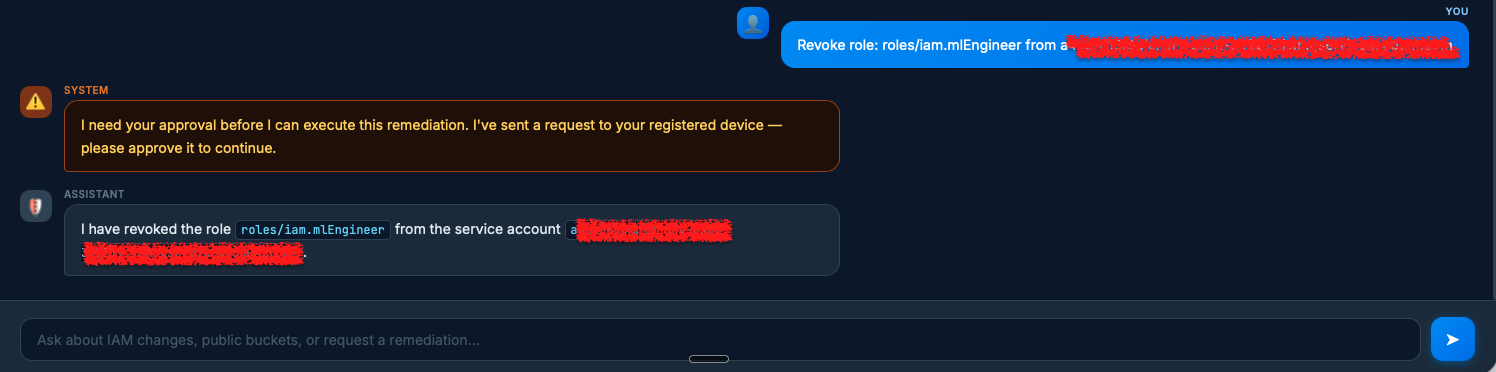
*Test Case: Remove IAM role from service account post CIBA request approval.*
## 今後の展望
本統合は、Auth0のセキュアなアイデンティティサービス(認証、認可、きめ細かな権限/Fine-Grained Access Control)とGemini Enterprise Agent Platform Runtimeを組み合わせて、セキュアでアイデンティティを認識するAI機能を作成します。これによりエージェント型ワークフローのセキュリティと説明責任が強化されます。AIエージェントがユーザーの代理として行動し、ポリシーを即座に適用し、機密データを危険にさらすことなく完全なユーザーコンテキストを保持できるようになります。
次は実践に移し、Auth0 for AI AgentsでGemini Enterprise Agent Platform Runtimeを保護するためのブループリントを使用する番です。
次のステップは以下のとおりです。
1. アカウントの取得: まだの場合は、無料の[Auth0 for AI Agentsアカウント](https://auth0.com/signup?onboard_app=genai)と[Google Cloudアカウント](https://cloud.google.com/)にサインアップしてください。
2. コードへのアクセス: [GitHubリポジトリ](https://github.com/patilkapil/Vertex_A4AA)から完全なソリューションコードをクローンします。
3. 展開と保護: 段階的な手順に従ってAuth0を設定し、Gemini Enterprise Agent Platform Runtimeをセットアップして、FGAを適用します。
セキュアで説明責任があり、エンタープライズ対応のAIエージェントの構築を今日から始めましょう。