---
title: "Multi-Tenant SaaS: Managing Auth0 Organizations with the My Organization API"
description: "Empower customers with self-service admin using Auth0's My Organization API. This guide shows how to build a Next.js dashboard in your SaaS app so they can manage their own settings, reducing your overhead."
authors:
- name: "Daizen Ikehara"
url: "https://auth0.com/blog/authors/daizen-ikehara/"
date: "Apr 21, 2026"
category: "Developers,Tutorial,My Oraganizations API"
tags: ["auth0", "b2b saas", "organizations"]
url: "https://auth0.com/blog/managing-auth0-organizations-my-organization-api/"
---
# Multi-Tenant SaaS: Managing Auth0 Organizations with the My Organization API
Auth0 Organizations is a powerful feature that enables your SaaS application to support multi-tenant environments seamlessly. By leveraging Organizations, you can represent business customers as distinct entities, configure branded login flows, and implement Role-Based Access Control (RBAC) to assign precise permissions to members.
Ultimately, building these administration capabilities into your product allows your business customers to self-manage their organizations, drastically reducing your operational overhead. Historically, developers have used the [Auth0 Management API](https://auth0.com/docs/api/management/v2) to accomplish this. While this approach initially meets their needs, developers often hit a wall with rate limits as their businesses grow and the number of organizations in their Auth0 tenant expands.
The Management API is intended to configure Auth0 tenants globally and is not designed for frequent, granular calls. It can quickly become a bottleneck for routine operations like updating settings or inviting members. Enter the **My Organization API**. This API focuses on efficiently managing organizations in your Auth0 tenant with much higher performance and scalability.
In this blog post, I will show you how to enable the My Organization API and update an existing organization's settings directly from a **SaaS multi-tenancy Next.js** application.
## Configure the Auth0 Tenant
To use the My Organization API, we first need to configure your Auth0 tenant by setting up an Auth0 Organization, activating the API, and configuring an application to consume it.
### Prerequisites
Before starting, ensure you have at least one user created in your tenant. In this guide, we use a registered user: `org-admin@example.com`.
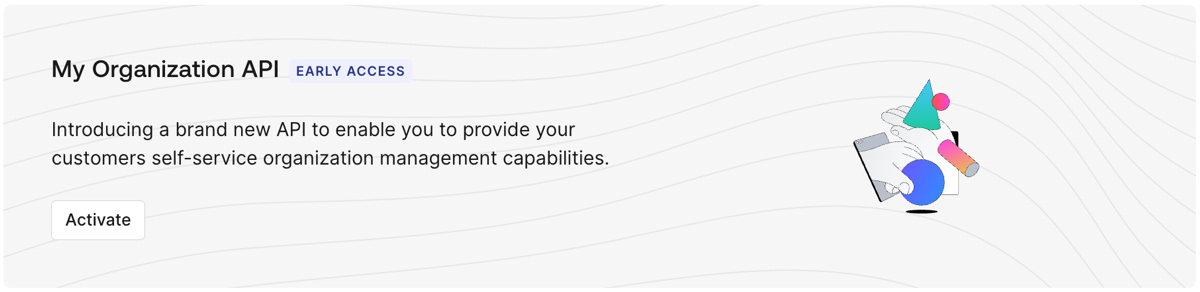
### Activate the My Organization API
First, you must enable the API in your tenant:
1. Go to the Auth0 Management Dashboard > **Applications** > **APIs**.
2. Locate the **My Organization API banner** and select **Activate**.
Once activated, keep in mind:
- The API is disabled for all client applications by default.
- You must grant access to applications and roles using Client Grants or RBAC policies.
- Your business customers can retrieve Organization details or configure IdPs on behalf of their own Organizations.
- The API supports a wide variety of granular scopes, including `read:my_org:details`, `update:my_org:details`, and many more.
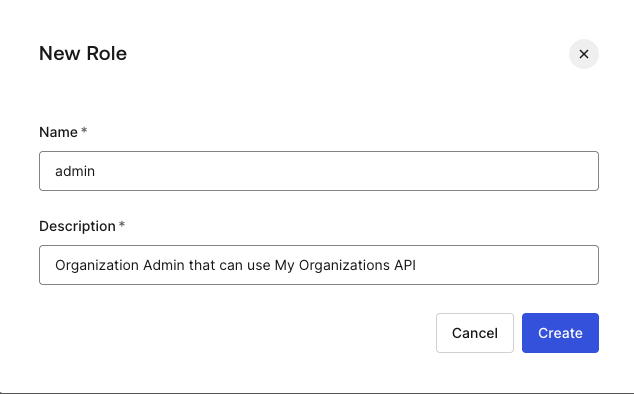
### Create Roles to Control Access for the My Organization API
Next, let's create roles to govern who can use the My Organization API.
In the Auth0 Management dashboard, go to **User Management** > **Roles** and create a new role named `admin` (Organization Admin).
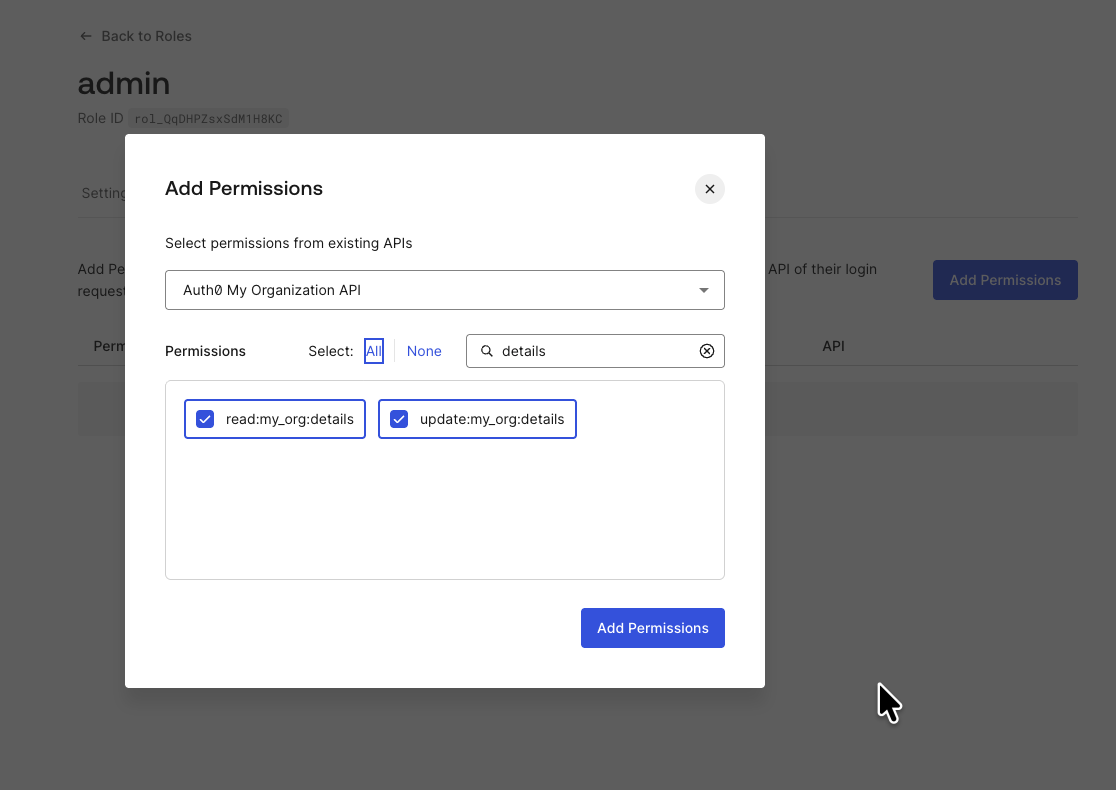
Once the role is created, go to the **Permissions** tab and click **Add Permission**.
Choose the Auth0 My Organization API. Add the `read:my_org:details` and `update:my_org:details` permissions.
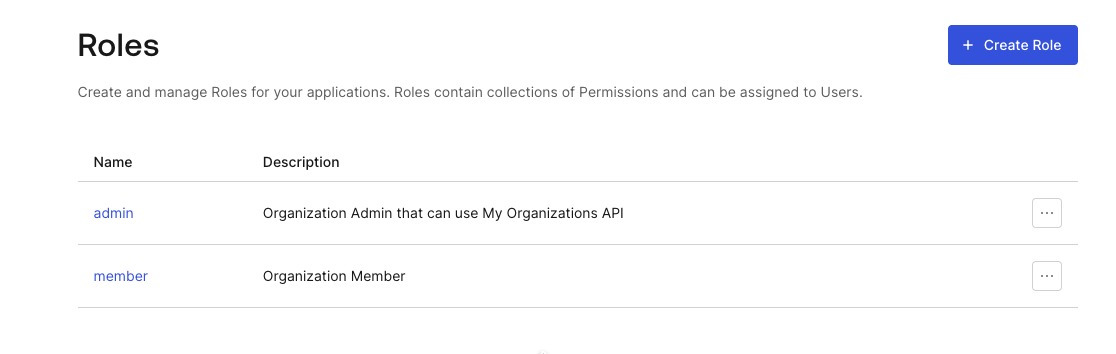
Also, create a second role named member (Organization Member) without these elevated API permissions.
### Create an Organization and Add a User as Admin
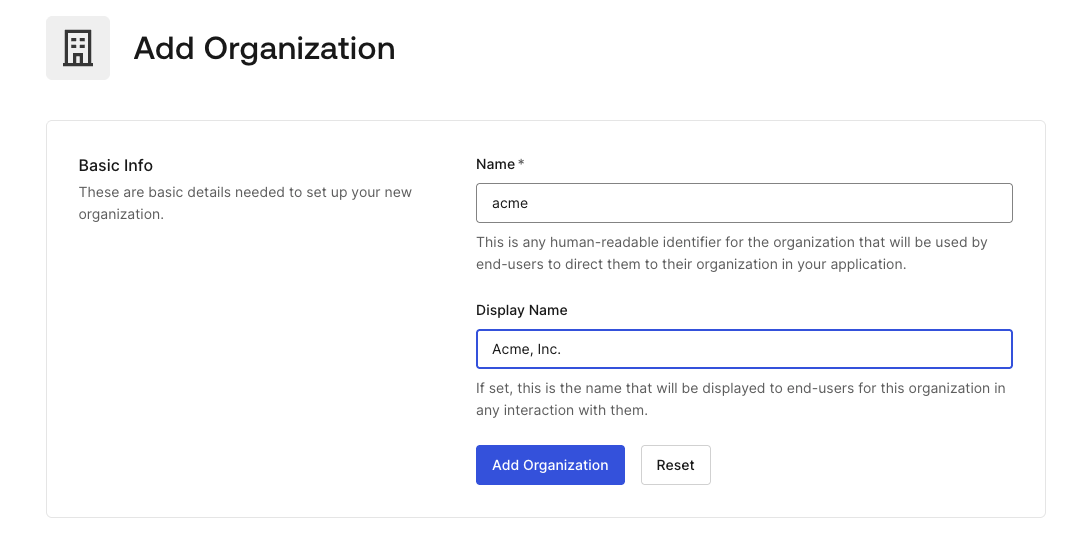
Now, let's create an organization and assign a member and a domain.
Navigate to **Organizations** and click **Create Organization**. Enter the name `acme` and the display name `Acme, Inc.`.
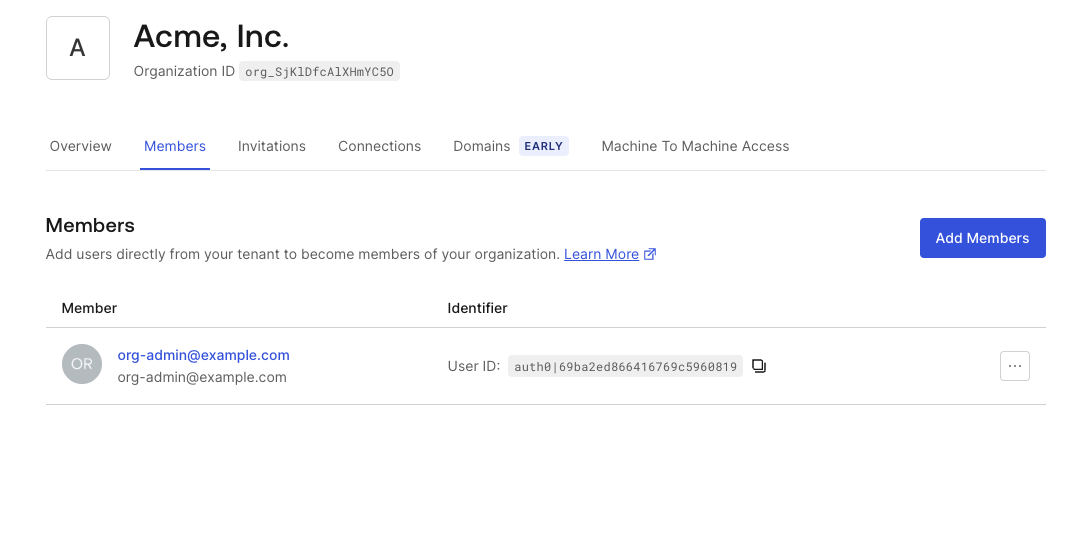
Once the organization is created, go to the **Members** tab and click **Add Members**. Add your test user (e.g., `org-admin@example.com`).
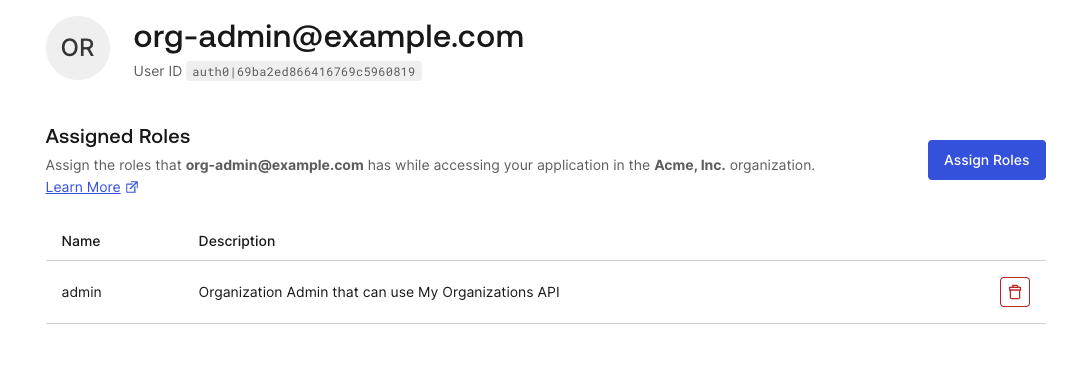
Click the user's link, then assign the `admin` role you just created.
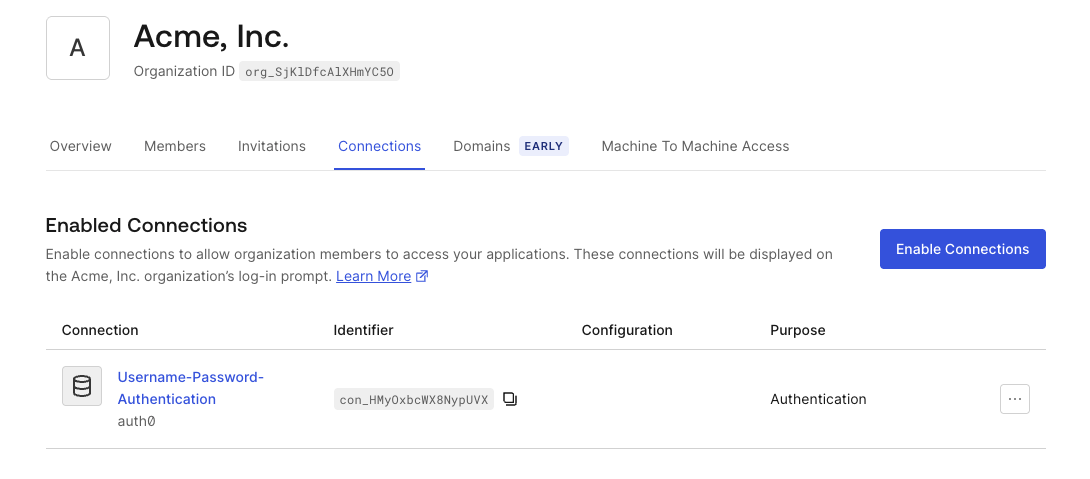
Navigate back to the Organization's settings and go to the **Connections** tab, click **Enable Connections**, and choose `Username-Password-Authentication`.
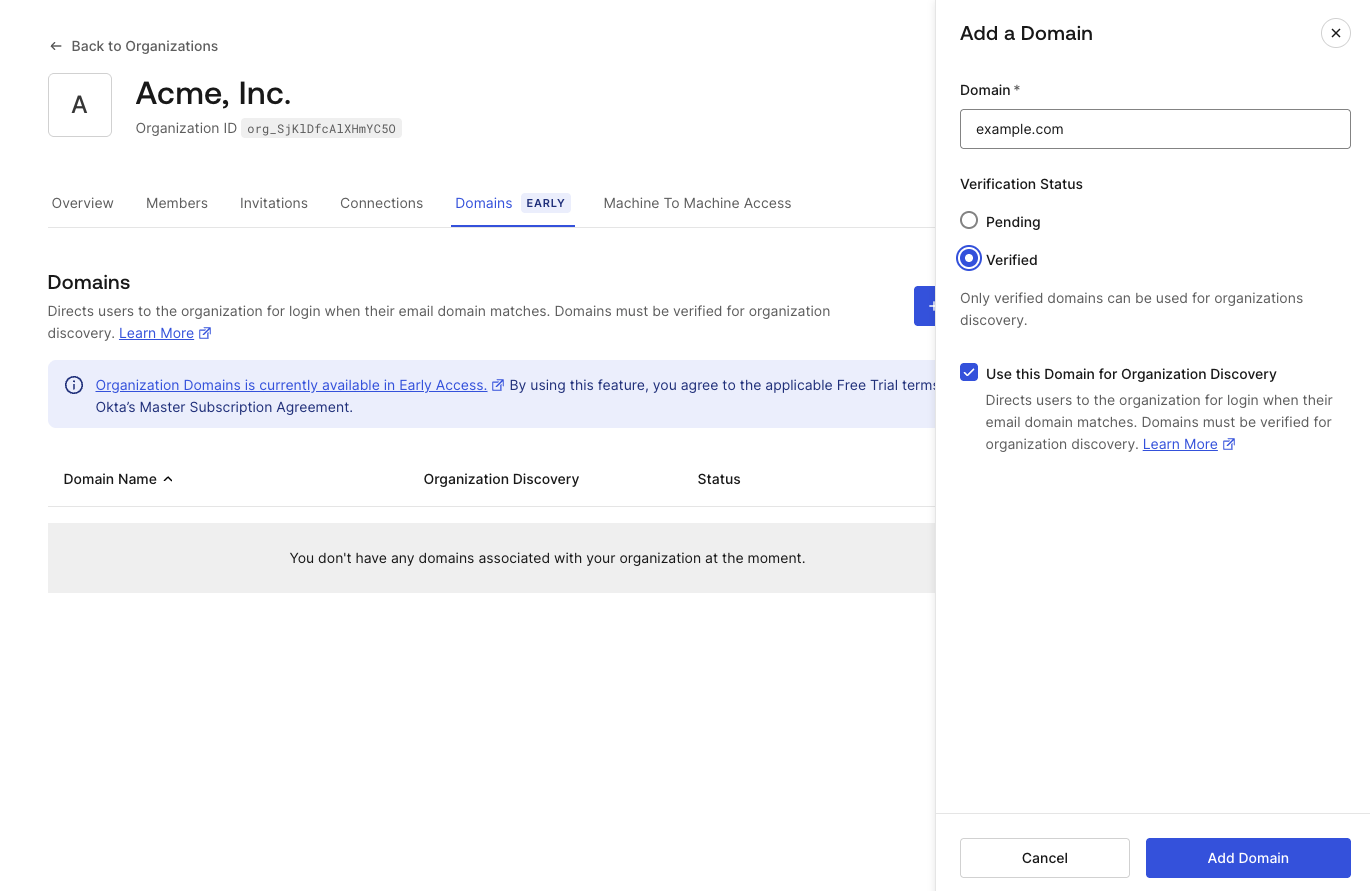
Finally, go to the **Domains** tab and click **Add Domain**.
- **Domain**: `example.com`
- **Status**: `Verified`
- Check the box for Use this Domain for Organization Discovery.
The domain verification allows an organization to prove ownership of a specific email domain. This allows Auth0 to discover the user’s organization based on the email domain and route the login flow to the specific organization.
### Create an Application and Associate It with My Organization API
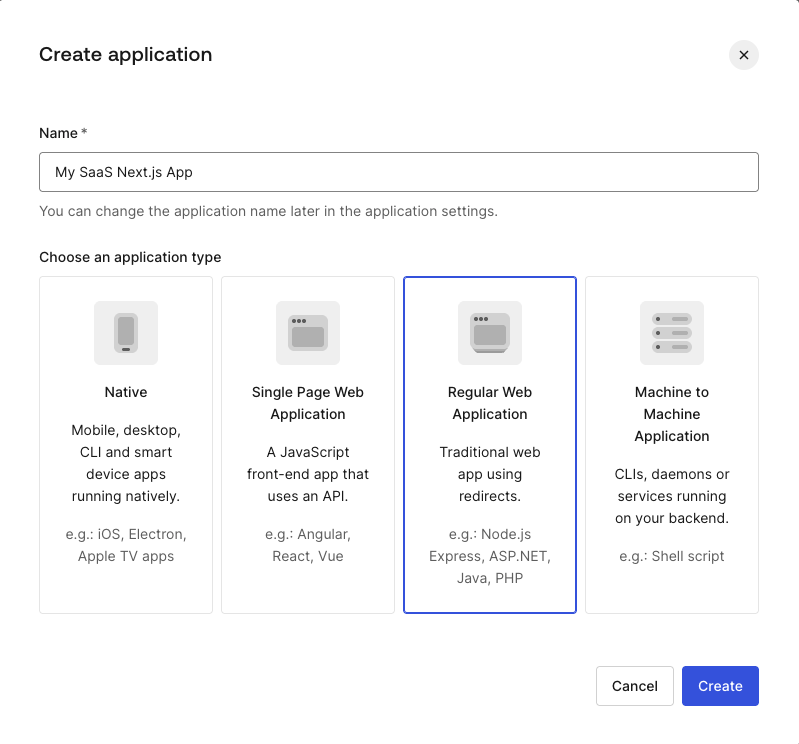
To use the My Organization API from an application, we need to create an Auth0 Application in the Management Dashboard.
Navigate to **Applications** > **Applications** and click **Create Application** (choose Regular Web Application and name `My SaaS Next.js App`).
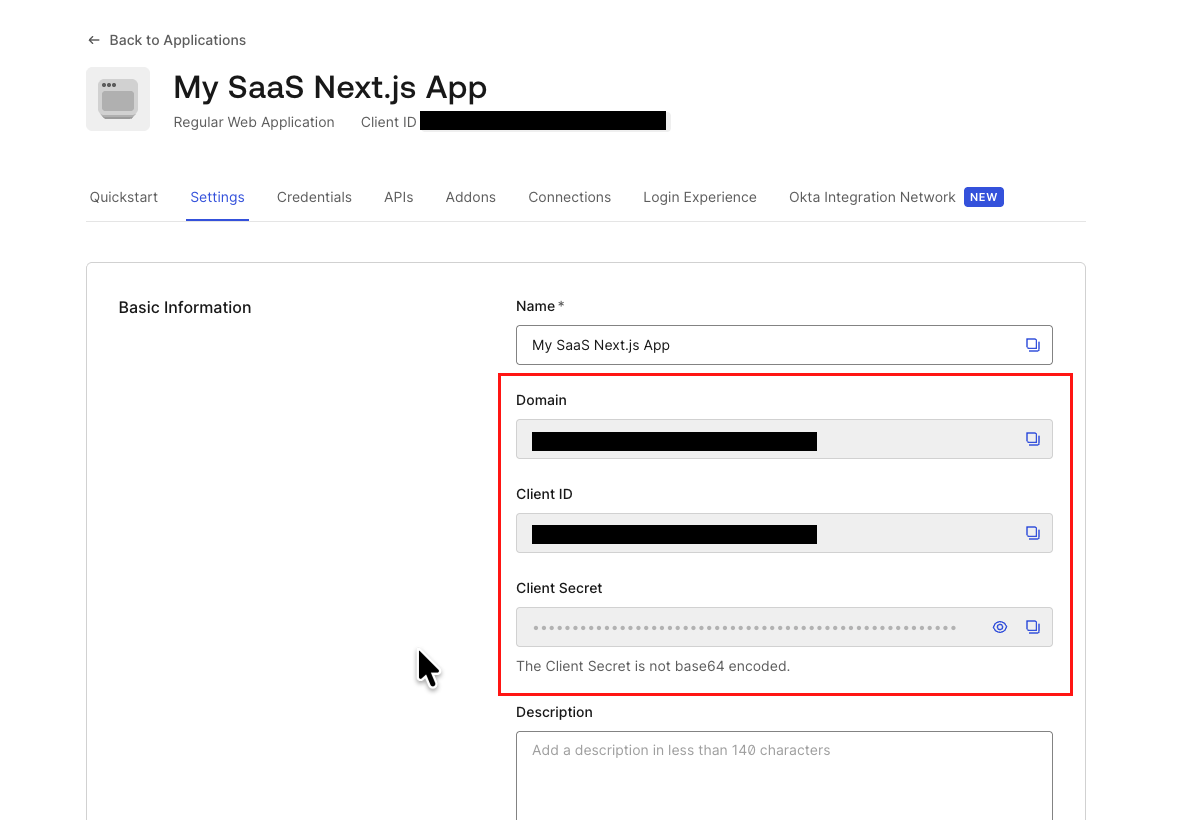
In the **Settings** tab, note down the application's **Domain**, **Client ID**, and **Client Secret**. These will be used in the Next.js application later.
Also, configure the following fields:
- **Allowed Callback URLs**: `http://localhost:3000/auth/callback`
- **Allowed Logout URLs**: `http://localhost:3000`
- **Allowed Web Origins**: `http://localhost:3000`
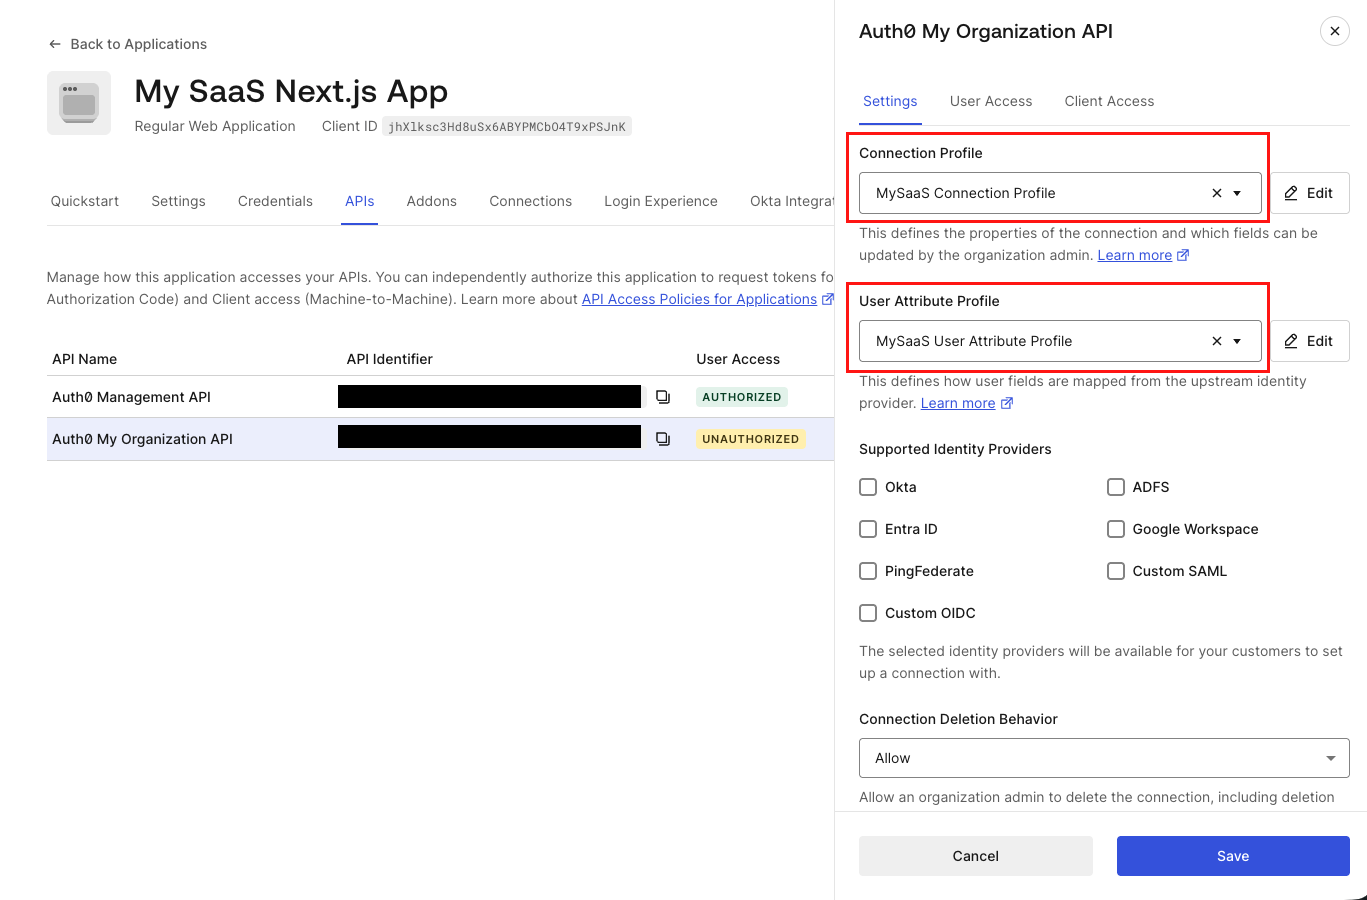
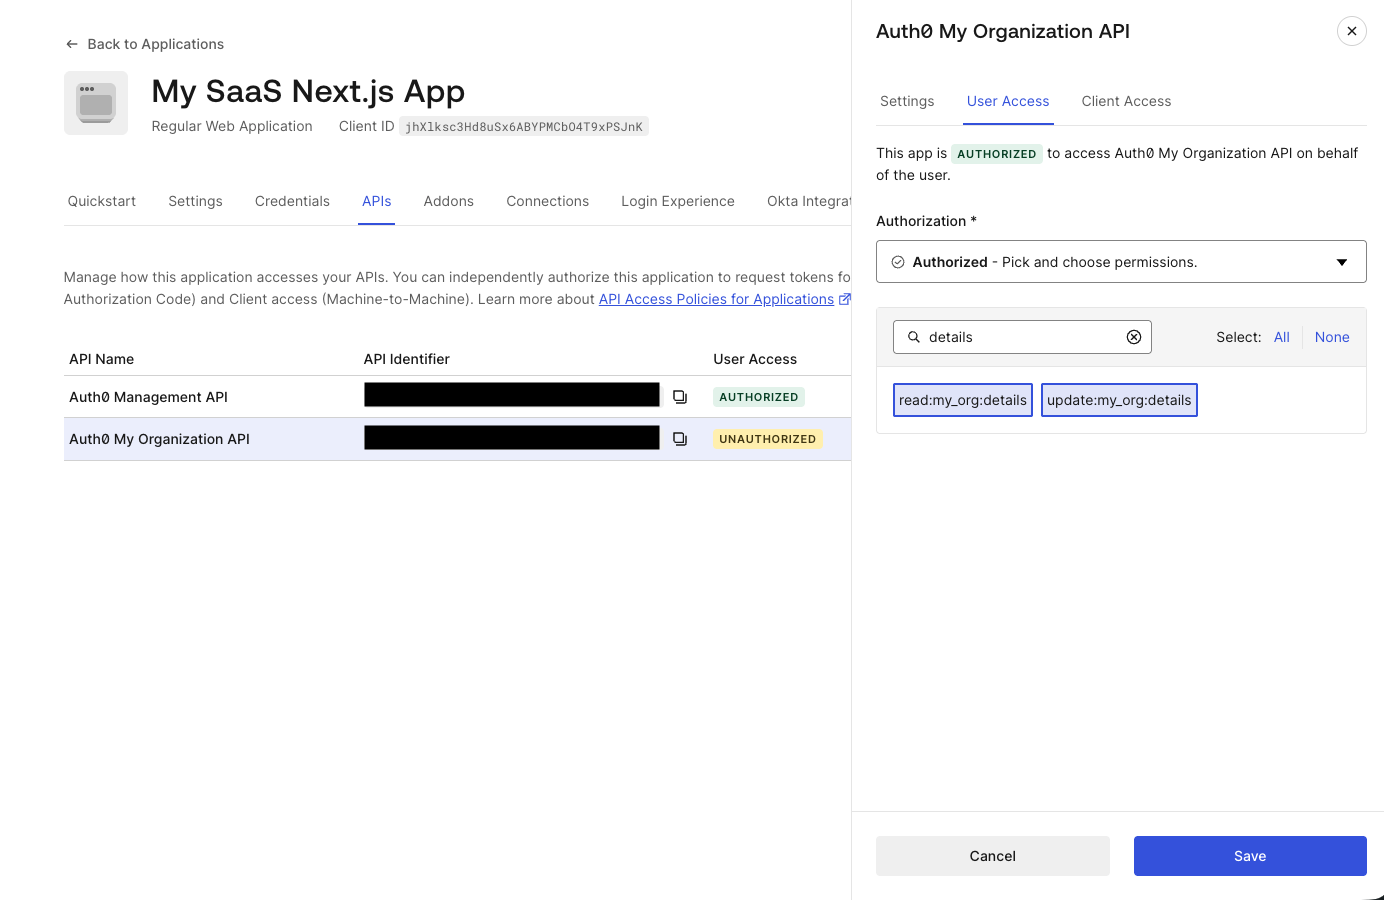
Next, navigate to the **APIs** tab and locate the Auth0 My Organization API.
To use the My Organization API in the application, we need to configure profiles and authorize **User Access** and/or **Client Access**. Click the **Edit** button.
Under the **Settings** tab:
- **Connection Profile**: Select **+ Create New** to create a new profile and name it `MySaaS Connection Profile`.
- **User Attribute Profile**: Select **+ Create New** to create a new profile and name it `MySaaS User Attribute Profile`.
Under **User Access** tab:
- **Authorization**: `Authorized`
- Add `read:my_org:details` and `update:my_org:details` permissions.
Keep **Client Access** set to `UNAUTHORIZED` for this blog post.
This allows the Auth0 Application to access the My Organization API.
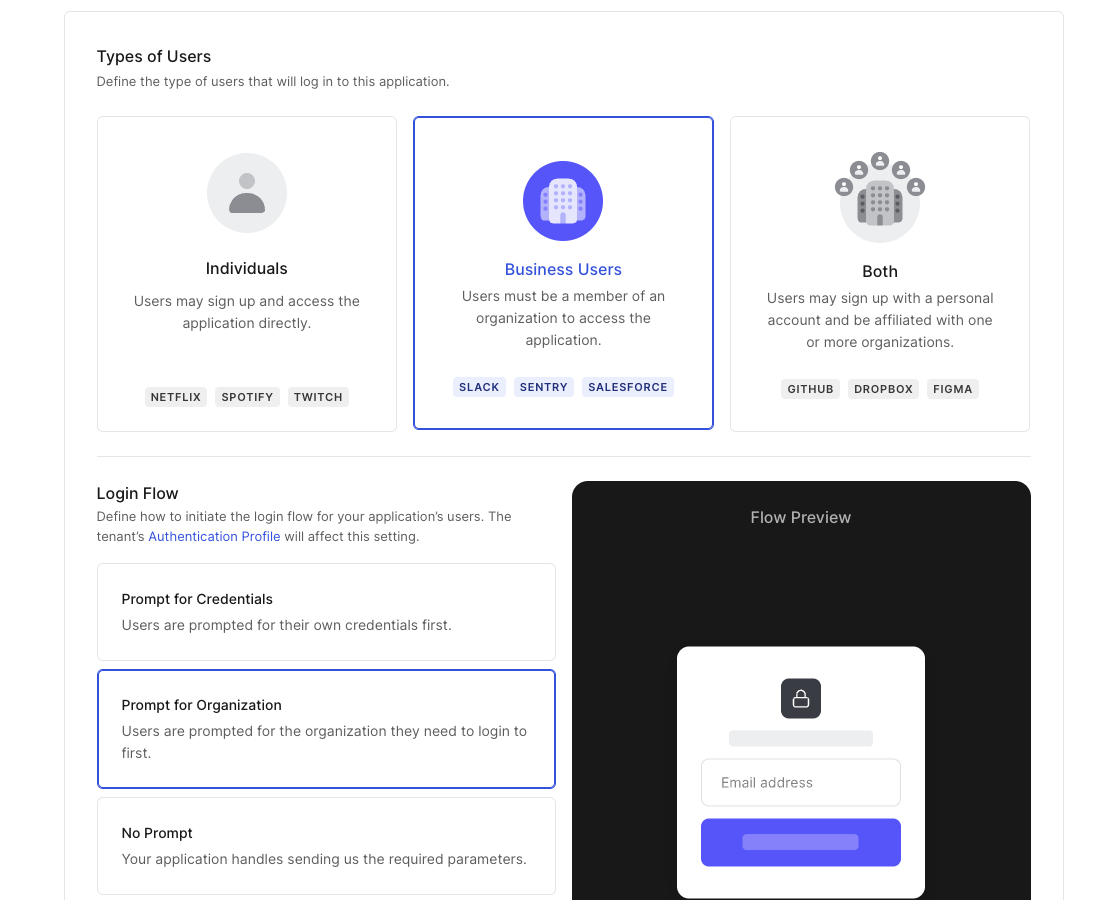
Finally, in the **Login Experience** tab:
- **Types of Users**: `Business Users`
- **Login Flow**: `Prompt for Organization`
- **Organization Discovery**: `Prompt for Organization Email`
We have now configured an Auth0 Application with access to the My Organization API.
We are almost done. We just need to add two more things to the Auth0 tenant.
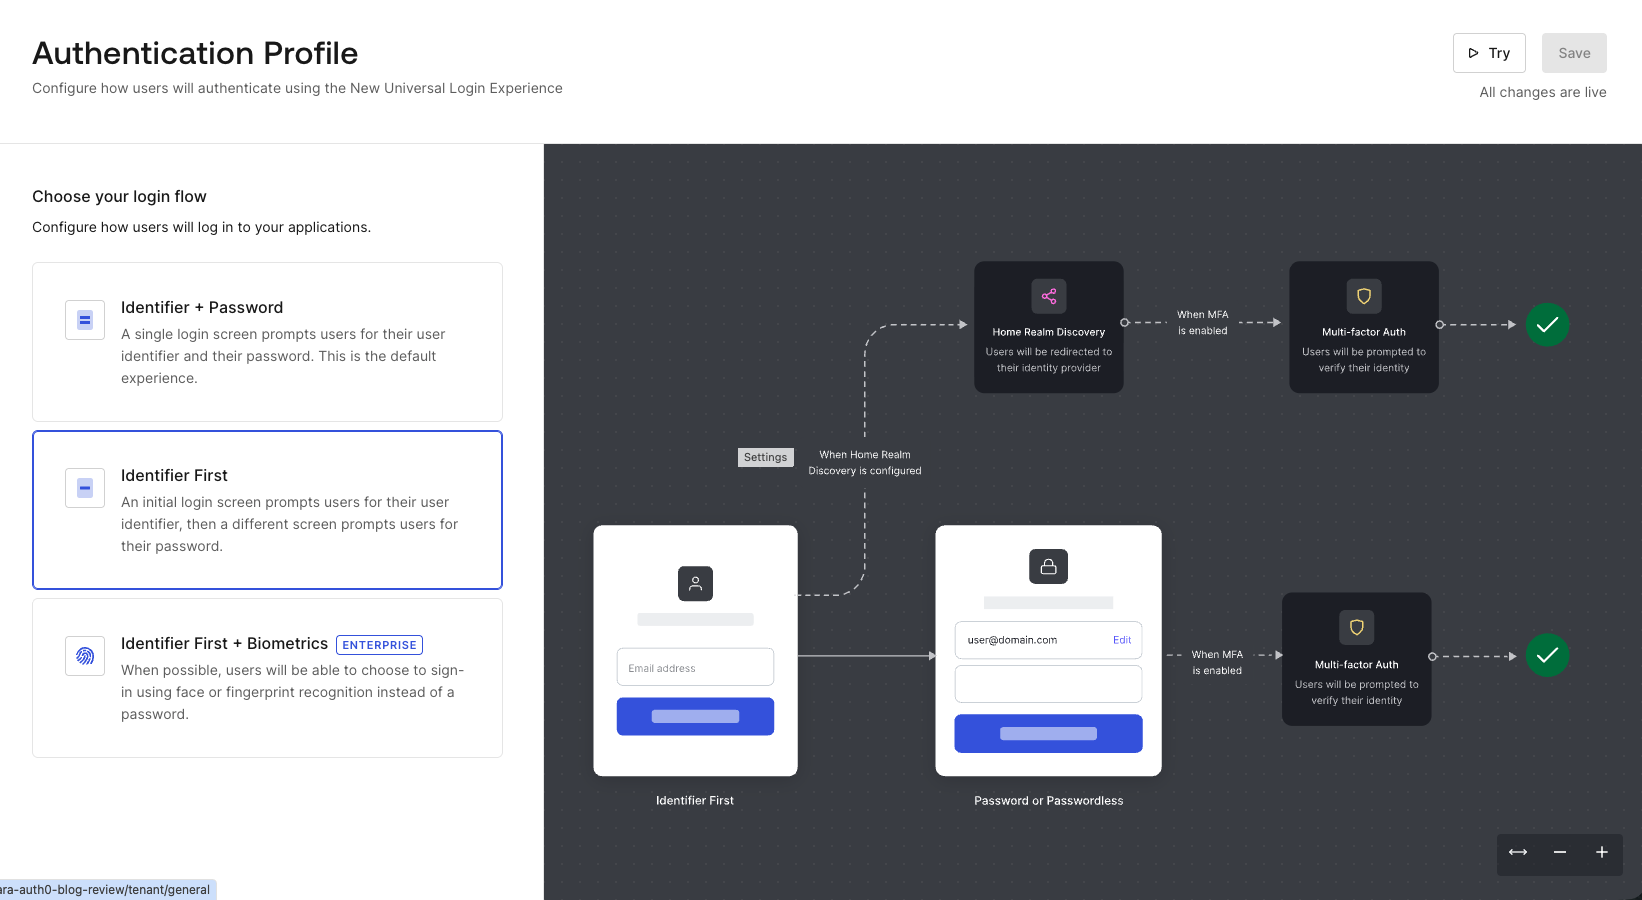
### Configure Authentication Profile
To ensure a smooth login flow for our business users, we will change the authentication flow.
Navigate to **Authentication** > **Authentication Profile**, and set the profile to Identifier First. Users will be asked to enter their email associated with an organization, in this case: `example.com`.
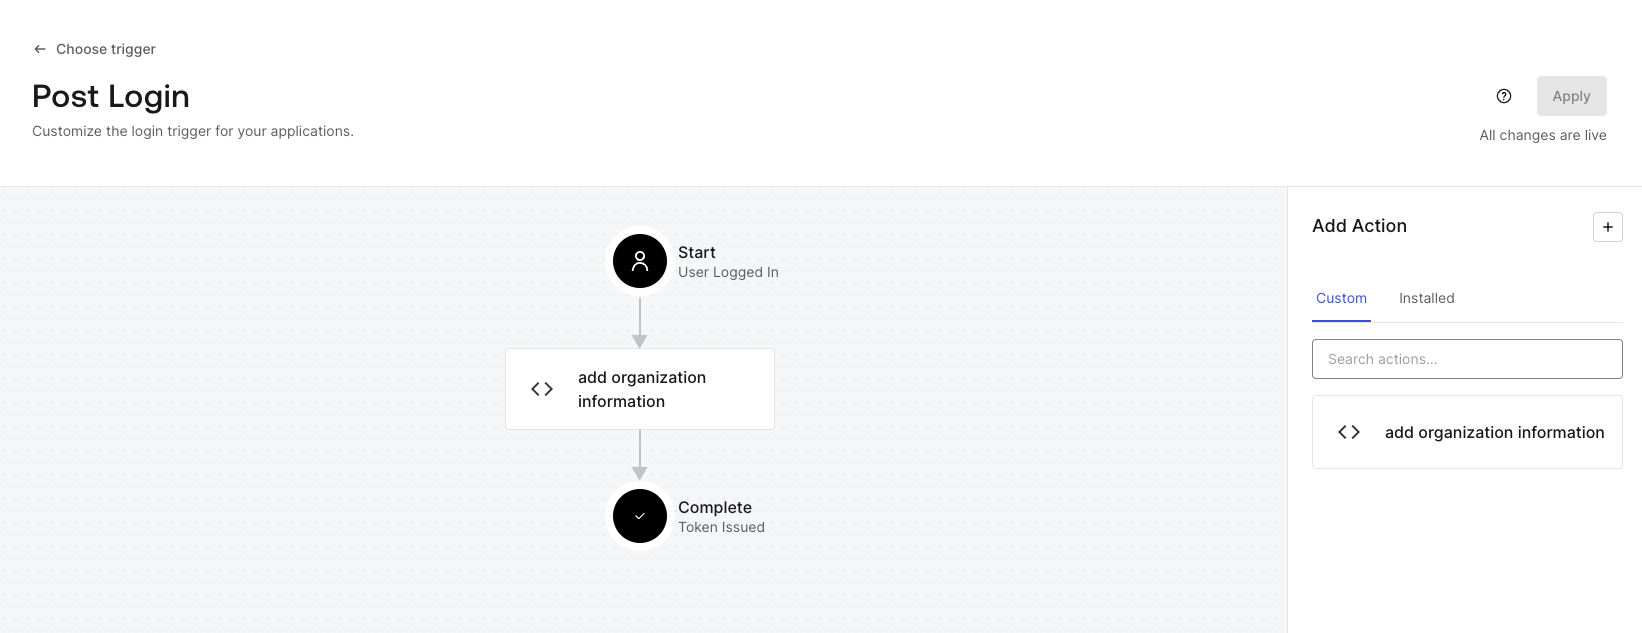
### Add Actions to Add Custom Roles to Token
We need our application to know whether the user is an `admin` to secure access to the admin dashboard, which we will implement later in this blog. By default, the ID Token contains `org_id` and not organization roles. The easiest way to include organization roles in ID Tokens is to use Auth0 Actions to add them.
Navigate to **Actions** > **Library** > **Create Action** > **Create Custom Action**.
- **Name**: `add organization roles`
- **Trigger**: `Login / Post Login`
- **Runtime**: `Node 22 (Recommended)`
Paste the following code into the editor, save, and deploy the Action:
```javascript
exports.onExecutePostLogin = async (event, api) => {
if (event.organization) {
const namespace = 'https://my-app';
// Add organization roles
if (event.authorization?.roles) {
api.idToken.setCustomClaim(`${namespace}/org_roles`, event.authorization.roles);
}
}
}
```
Note that `https://my-app` is a placeholder for this blog post. You should use your own unique namespace.
After deploying the Action, navigate to **Actions** > **Triggers** and select **post-login**. Then drag this new action into the flow.
You are all set with the Auth0 tenant.
## Build a Next.js Application with Domain Dashboard
Let's see it in action. We will build a Next.js application that utilizes our new Auth0 configuration.
### Clone a Starter Project
To get started quickly, clone the starter project from [GitHub](https://github.com/auth0-blog/nextjs-my-org-api).
Note: This project is built for demo purposes and lacks production-ready security features. Please use it at your own discretion.
```bash
git clone --branch starter --single-branch https://github.com/auth0-blog/nextjs-my-org-api
cd nextjs-my-org-api
```
This project's foundation was built by following [Auth0 Next.js quickstart](https://auth0.com/docs/quickstart/webapp/nextjs).
### Set Environment Variables
Create a `.env.local` file in the root of your project and populate it with the values you noted earlier:
```bash
AUTH0_DOMAIN=''
AUTH0_CLIENT_ID=''
AUTH0_CLIENT_SECRET=''
# Run `openssl rand -hex 32` in your terminal to generate a random 32-byte hex string
AUTH0_SECRET=''
APP_BASE_URL='http://localhost:3000'
```
### Confirm Current State of the Application
Let’s confirm the current state of the application. Run the following commands to install the necessary dependencies and run:
```bash
npm install && npm run dev
```
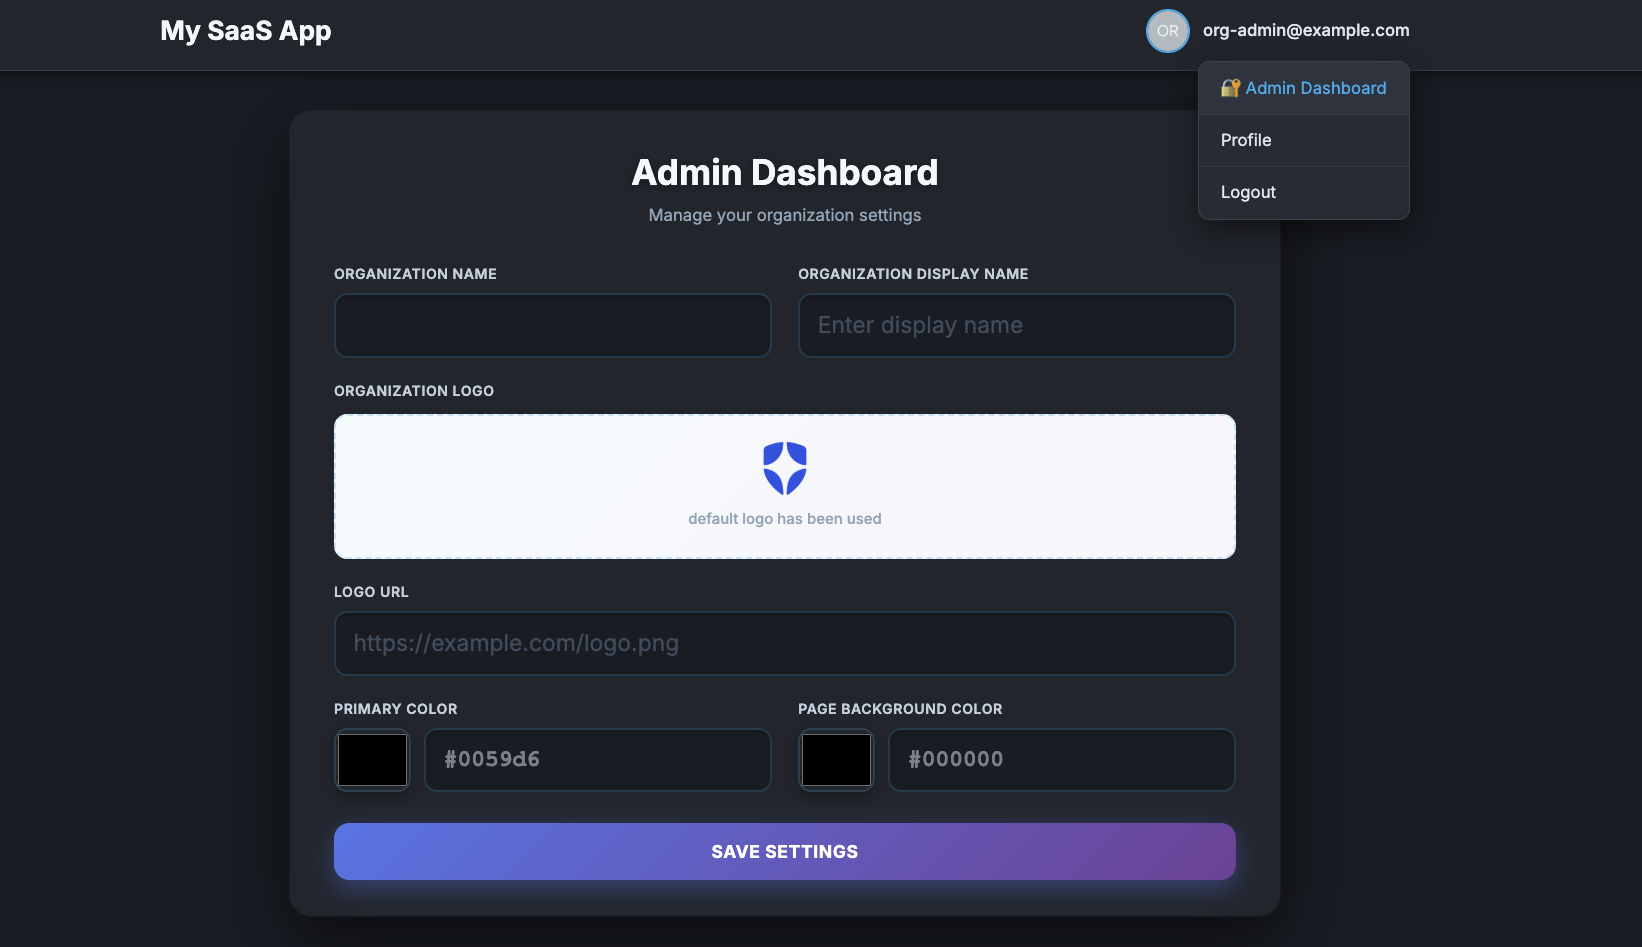
The core authentication features are already implemented in this starter application. When you navigate to [`http://localhost:3000`](http://localhost:3000), you should see a welcome screen, and `org-admin@example.com` will be able to log in.
Because this user was assigned the admin role, you will see a link for the __Admin Dashboard__ in the header after authenticating. I have already built the UI pages to display the organization details, but it is not calling the API yet.
## Use My Organization API in Next.js Application
To wire up the My Organization API in this application, we need to complete a few steps:
- Install the `my-organization-js` SDK.
- Acquire the access token for the API.
- Set up the MyOrganizationClient.
- Retrieve Organization details on the admin page.
- Implement a Server Action to update those details.
### Install my-organization-js SDK
We have developed a dedicated SDK to make calling the My Organization API a breeze. Stop your dev server and install it:
```bash
npm install @auth0/myorganization-js
```
### Acquire the Access Token for the API
To call the API, we need an access token. First, we configure `Auth0Client`. In the `src/lib/auth0.ts` file, add `authorizationParameters` with `scope` and `audience` to be able to obtain an access token for the My Organization API. Also adding `tokenRefreshBuffer` to renew the token if the token expires within 180 seconds.
In the `audience`, we use Auth0’s domain, and `/my-org/` specifies the endpoint for the My Organization API.
```javascript
// src/lib/auth0.ts
export const auth0 = new Auth0Client({
// 👇 new code
// authorizationParameters are passed to the /authorize endpoint.
// required scope of 'openid profile email offline_access' and custom scopes for API access. The audience is required to get a refresh token.
authorizationParameters: {
scope: 'openid profile email offline_access read:my_org:details update:my_org:details',
...(process.env.AUTH0_DOMAIN && {
audience: `https://${process.env.AUTH0_DOMAIN.replace(//$/, '')}/my-org/`,
}),
},
// The SDK will attempt to renew the token if the user is active and the token will expire within the next 180 seconds.
tokenRefreshBuffer: 180,
// 👆 new code
// Filter out default ID token claims and promote custom namespaced claims (org_roles) to top-level claims for easier access throughout the app.
async beforeSessionSaved(session: SessionData) {
// Namespace for custom claims set via Auth0 Actions
const namespace = 'https://my-app';
const orgRoles = session.user[`${namespace}/org_roles`];
return {
...session,
user: {
...filterDefaultIdTokenClaims(session.user),
// Promote namespaced org_roles to a top-level claim for app-wide use
...(orgRoles !== undefined ? { org_roles: orgRoles } : {}),
},
};
},
});
```
To obtain an access token, we call `auth0.getAccessToken()`. In our Next.js application, access token management for Server Components is handled in the `src/proxy.ts` file because it's not possible to persist both an access token and a refresh token within Server Components. In this way, we are ensuring the session cookie always contains a fresh access token. Server Components can access the access token via `session.tokenSet.accessToken` if it is available.
```javascript
/// src/proxy.ts
export async function proxy(request: NextRequest) {
const authRes = await auth0.middleware(request);
// Let Auth0 handle its own auth routes (/auth/login, /auth/callback, etc.)
if (request.nextUrl.pathname.startsWith("/auth")) {
return authRes;
}
// Guard /admin routes - only accessible to authenticated org admins.
if (request.nextUrl.pathname.startsWith("/admin")) {
// Must pass `request` here (required in proxy/middleware context)
const session = await auth0.getSession(request);
// Not authenticated: redirect to login
if (!session) {
const redirectRes = NextResponse.redirect(
new URL(`/auth/login?returnTo=/admin`, request.nextUrl.origin)
);
// Copy set-cookie from authRes so rolling session/token refresh updates are preserved.
authRes.headers.forEach((value, key) => {
if (key.toLowerCase() === "set-cookie") {
redirectRes.headers.append("set-cookie", value);
}
});
return redirectRes;
}
// Authenticated but not an org admin → redirect to home
if (!isOrgAdmin(session.user)) {
const redirectRes = NextResponse.redirect(new URL("/", request.nextUrl.origin));
// Copy set-cookie from authRes so rolling session/token refresh updates are preserved.
authRes.headers.forEach((value, key) => {
if (key.toLowerCase() === "set-cookie") {
redirectRes.headers.append("set-cookie", value);
}
});
return redirectRes;
}
// 👇 new code
// Ensure the session cookie always holds an active access token before the Server Component runs.
try {
await auth0.getAccessToken(request, authRes);
} catch (err) {
console.error("Token refresh failed in proxy:", err instanceof Error ? err.message : String(err));
return NextResponse.redirect(
new URL("/auth/logout", request.nextUrl.origin)
);
}
// 👆 new code
}
return authRes;
}
```
`isOrgAdmin()` is implemented separately in this project to check whether the user is the organization admin. The implementation is the following:
```javascript
// src/lib/auth0-utils.ts
import type { User } from "@auth0/nextjs-auth0/types";
// Returns true if the user's org_roles claim contains the exact role "admin".
export function isOrgAdmin(user: User): boolean {
const roles: string[] = Array.isArray(user.org_roles) ? user.org_roles : [];
return roles.includes("admin");
}
```
We will use this function later in the blog post again.
### Use an Instance of MyOrganizationsClient in Admin Page to Retrieve Organization Details
With the access token, let's set up an instance of `MyOrganizationClient` in the admin page to retrieve organization details and show them in the UI.
In `src/app/admin/page.tsx`, add imports.
```javascript
import OrgSettingsForm from "./OrgSettingsForm";
// add imports
import { auth0 } from "@/lib/auth0";
import { MyOrganization, MyOrganizationClient } from "@auth0/myorganization-js";
```
Then create a new instance of `MyOrganizationClient` inside of the `AdminDashboard()` function.
```javascript
export default async function AdminDashboard() {
// 👇 new code
if (!process.env.AUTH0_DOMAIN) throw new Error('AUTH0_DOMAIN environment variable is not set');
const session = await auth0.getSession();
const token = session?.tokenSet?.accessToken;
if (!token) throw new Error("No access token in session");
// Initialize the MyOrganizationClient.
const client = new MyOrganizationClient({
domain: process.env.AUTH0_DOMAIN,
token: token,
});
// 👆 new code
// ...
```
As explained previously, we set a token for the client from the session cookie because we're using the MyOrganizationClient inside the Server Component.
After initialization, use the instance to call the `organizationDetails.get()` function to request Organization Details via the My Organization API. We will get a `MyOrganization.OrgDetailsRead` object as the response on success.
```javascript
export default async function AdminDashboard() {
if (!process.env.AUTH0_DOMAIN) throw new Error('AUTH0_DOMAIN environment variable is not set');
const session = await auth0.getSession();
const token = session?.tokenSet?.accessToken;
if (!token) throw new Error("No access token in session");
// Initialize the MyOrganizationClient.
const client = new MyOrganizationClient({
domain: process.env.AUTH0_DOMAIN,
token: token,
});
// 👇 new code
// Fetch initial org settings to populate the form. This is a Server Component, so the data is fresh on each request.
const initialSettings: MyOrganization.OrgDetailsRead =
(await client.organizationDetails.get()) ?? {};
// 👆 new code
// ...
```
Let's pass the `MyOrganization.OrgDetailsRead` object to `OrgSettingsForm`.
```javascript
export default async function AdminDashboard() {
if (!process.env.AUTH0_DOMAIN) throw new Error('AUTH0_DOMAIN environment variable is not set');
const session = await auth0.getSession();
const token = session?.tokenSet?.accessToken;
if (!token) throw new Error("No access token in session");
// Initialize the MyOrganizationClient.
const client = new MyOrganizationClient({
domain: process.env.AUTH0_DOMAIN,
token: token,
});
// Fetch initial org settings to populate the form. This is a Server Component, so the data is fresh on each request.
const initialSettings: MyOrganization.OrgDetailsRead =
(await client.organizationDetails.get()) ?? {};
return (
Admin Dashboard
Manage your organization settings
{/* 👇 change code */}
{/* 👆 change code */}
);
}
```
Next, update `OrgSettingsForm.tsx` to accept the organization details.
In `src/app/admin/OrgSettingsForm.tsx`, add `initialSettings` as an interface.
```javascript
// add imports
import { MyOrganization } from "@auth0/myorganization-js";
// initialSettings will be passed as a prop from the Server Component.
interface Props {
initialSettings: MyOrganization.OrgDetailsRead;
}
```
Change the constructor of `OrgSettingsForm` to accept the `initialSettings`.
```javascript
// 👇 change code
export default function OrgSettingsForm({ initialSettings }: Props) {
// 👆 change code
```
Create a local state and initialize it with props from the Server Component. This is used to display values and allow users to update them.
```javascript
export default function OrgSettingsForm({ initialSettings }: Props) {
const [saving, setSaving] = useState(false);
const [message, setMessage] = useState("");
const [saveError, setSaveError] = useState(false);
// 👇 new code
// Local state for form fields, initialized with props from the Server Component.
const [settings, setSettings] = useState(initialSettings);
// 👆 new code
// Save settings
const handleSave = async () => {
// implement save feature.
};
// rest of code
```
We need to wire values to the UI. For example,
```javascript
// ...
export default function OrgSettingsForm({ initialSettings }: Props) {
// ...
return (