


TL;DR: MobX is one of the popular state management libraries out there frequently used with React. In this article, you will learn how to manage the state of your React apps with MobX. If you need, you can find the code developed throughout the article in this GitHub repository.
"Learn how to manage the state of your @reactjs apps with MobX, an alternative to Redux."
Tweet This

Prerequisites
Before diving into this article, you are expected to have prior knowledge of React already. If you still need to learn about React, you can find a good React article here.
Besides knowing React, you will need Node.js and NPM installed on your machine. If you don't have them, please, follow the instructions here.
State Management in React
Before understanding the concept of state management, you have to realize what a state is. A state in this context is the data layer of your application. When it comes to React and the libraries that help it manage state, you can say that state is an object that contains the data that your application is dealing with. For instance, if you want to display a list of items on your app, your state will contain the items you intend to display. State influences how React components behave and how they are rendered. Yes! It is as simple as that.
State management, therefore, means monitoring and managing the data (i.e., the state) of your app. Almost all apps have state in one way or the other and, as such, managing state has become one of the most important parts of building any modern app today.
When you think about state management in React apps, basically, there are three alternatives:
- Redux;
- the new React Context API;
- and MobX.
Redux
Redux is the most popular state management solution for React apps. Redux strictly abides by the single source of truth principle. With this library, the state is kept in one location (the store) and made a read-only entity. Redux revolves around three concepts: the store, the reducer, and actions. The store holds the state, actions represent intents to change the state, and reducers specify how the application's state changes in response to actions. To alter the state of your application, reducers listen to actions emitted and returns a new state based on the action performed.
Reducers do not mutate the current state. They copy the current state, modify it based on actions emitted, and return a new state. This way, your state is not mutated in an irregular manner. Reducers are seen as the most important of the three concepts.
To learn more about Redux, check out this article.
React Context API
The React Context API is another alternative for state management in your React app. This is not a library like the earlier mentioned alternatives. Rather, this is a framework in-built solution. Actually, this API is not something new, it had existed in React a long while ago. However, you will frequently listen people calling it as the new React Context API because only recently (more specifically on React v16.3) this API has reached a mature stage.
In fact, Redux uses this API behind the scenes. The API provides a way to pass data down a React component tree without explicitly passing it through all the child components. This API revolves around two components, the Provider (used by a component located in a higher hierarchy of the component tree) to provide the data and the Consumer (used by a Component down the hierarchy) to consume data.
To learn more about the new React Context API, check out this article.
In the next section, you will learn about the third alternative at your disposal, MobX.
MobX Introduction
As mentioned, MobX is another state management library available for React apps. This alternative uses a more reactive process, and it is slowly gaining popularity in the community. MobX is not just a library for React alone, it is also suitable for use with other JavaScript libraries and frameworks that power the frontend of web apps.
"MobX is a reactive alternative to Redux and integrates very well with @reactjs apps."
Tweet This
MobX is sponsored by reputable companies such as Algolia, Coinbase, etc. MobX hit 16,719 stars on GitHub at the time of writing. That obviously tells you it is becoming a solid choice for state management in React applications.
In the following subsections, you will learn about important concepts that you have to keep in mind while developing with MobX. Then, in the next section, you will see MobX in action while creating a sample app.
Observable State on MobX
Observable state is one of the main concepts of MobX. The idea behind this concept is to make an object able to emit new changes on them to the observers. You can achieve this with the @observable decorator. For example, imagine you have a variable named counter that you expect to change with time. You can make it observable like so:
@observable counter = 0Or, you can declare it like so:
decorate(ClassName, {
  counter: observable
})ClassName, in the second example, is the name of the class where the counter object resides. This decorator can be used in instance fields and property getters.
Computed Values on MobX
Computed value is another important concept of MobX. These values are represented by the @computed decorator. Computed values work in hand with observable states. With computed values, you can automatically derive values. Say you have a snippet like this:
class ClassName {
  testTimes100 = 0;
  @observable test = 0;
  @computed get computedTest() {
    return this.testTimes100 * 100;
  }
}
In this snippet, if the value of test changes, the computedTest method is called and testTimes100 is updated automatically. So, with computed values, MobX can automatically compute other values when needed by using @computed.
Reactions on MobX
Reactions are very similar to computed values. The difference here is that, instead of computing and returning a value, a reaction simply triggers a side effect, more like it performs a side operation. Reactions occur as a result of changes on observables. Reactions could affect the UI, or they could be background actions. MobX provides three main types of reaction functions: when, autorun, and reaction.
The when reaction accepts two functions as parameters, the predicate and the effect. This reaction runs and observes the first function (the predicate) and, when this one is met, it runs the effect function.
Here you can see an example of how this function works:
when(
  // predicate
  () => this.isEnabled,
  // effect
  () => this.exit()
);
Once the isEnabled class property is true, the effect executes the exit function. The function that returns isEnabled must be a function that reacts. That is, isEnabled must be marked with @computed so that the value is automatically computed or, better yet, marked with an @observable decorator.
The next reaction function is the autorun function. Unlike the when function, this function takes in one function and keeps running it until it is manually disposed. Here you can see how you can use an autorun function:
@observable age = 10
const dispose = autorun(() => {
  console.log("My age is: ", age.get())
})
With this in place, anytime the variable age changes, the anonymous function passed to autorun logs it out. This function is disposed once you call dispose.
The next one, the reaction function, mandatorily accepts two functions: the data function and side effect function. This function is similar to the autorun function but gives you more control on which observables to track. Here, the data function is tracked and returns data to be used inside effect function. Whereas an autorun function reacts to everything used in its function, the reaction function reacts to observables you specify.
Here you can see a simple use case:
const todos = observable([
  {
    title: "Read Auth0 Blog",
    done: false,
  },
  {
    title: "Write MobX article",
    done: true
  }
]);

const reactionSample = reaction(
  () => todos.map(todo => todo.title),
  titles => console.log("Reaction: ", titles.join(", "))
);
In this case, the reaction function reacts to changes in the length and title of the list.
Another reaction function available for React developers is the observer function. This one is not provided by the main MobX package but, instead, provided by the mobx-react library. To use the observer function, you can simply add the @observer decorator in front of it like so:
@observer class ClassName {
  // [...]
}
With this reaction function, if an object tagged with the @observable decorator is used in the render method of the component and that property changes, the component is automatically re-rendered. The observer function uses autorun internally.
Actions on MobX
Actions are anything that modifies the state. You can mark your actions using the @action decorator. As such, you are supposed to use the @action on any function that modifies observables or has side effects. A simple example is this:
@observable variable = 0;

@action setVariable(newVariable){
  this.variable = newVariable;
}
This function is updating the value of an observable, and so it is marked with @action.
MobX and React in Practice
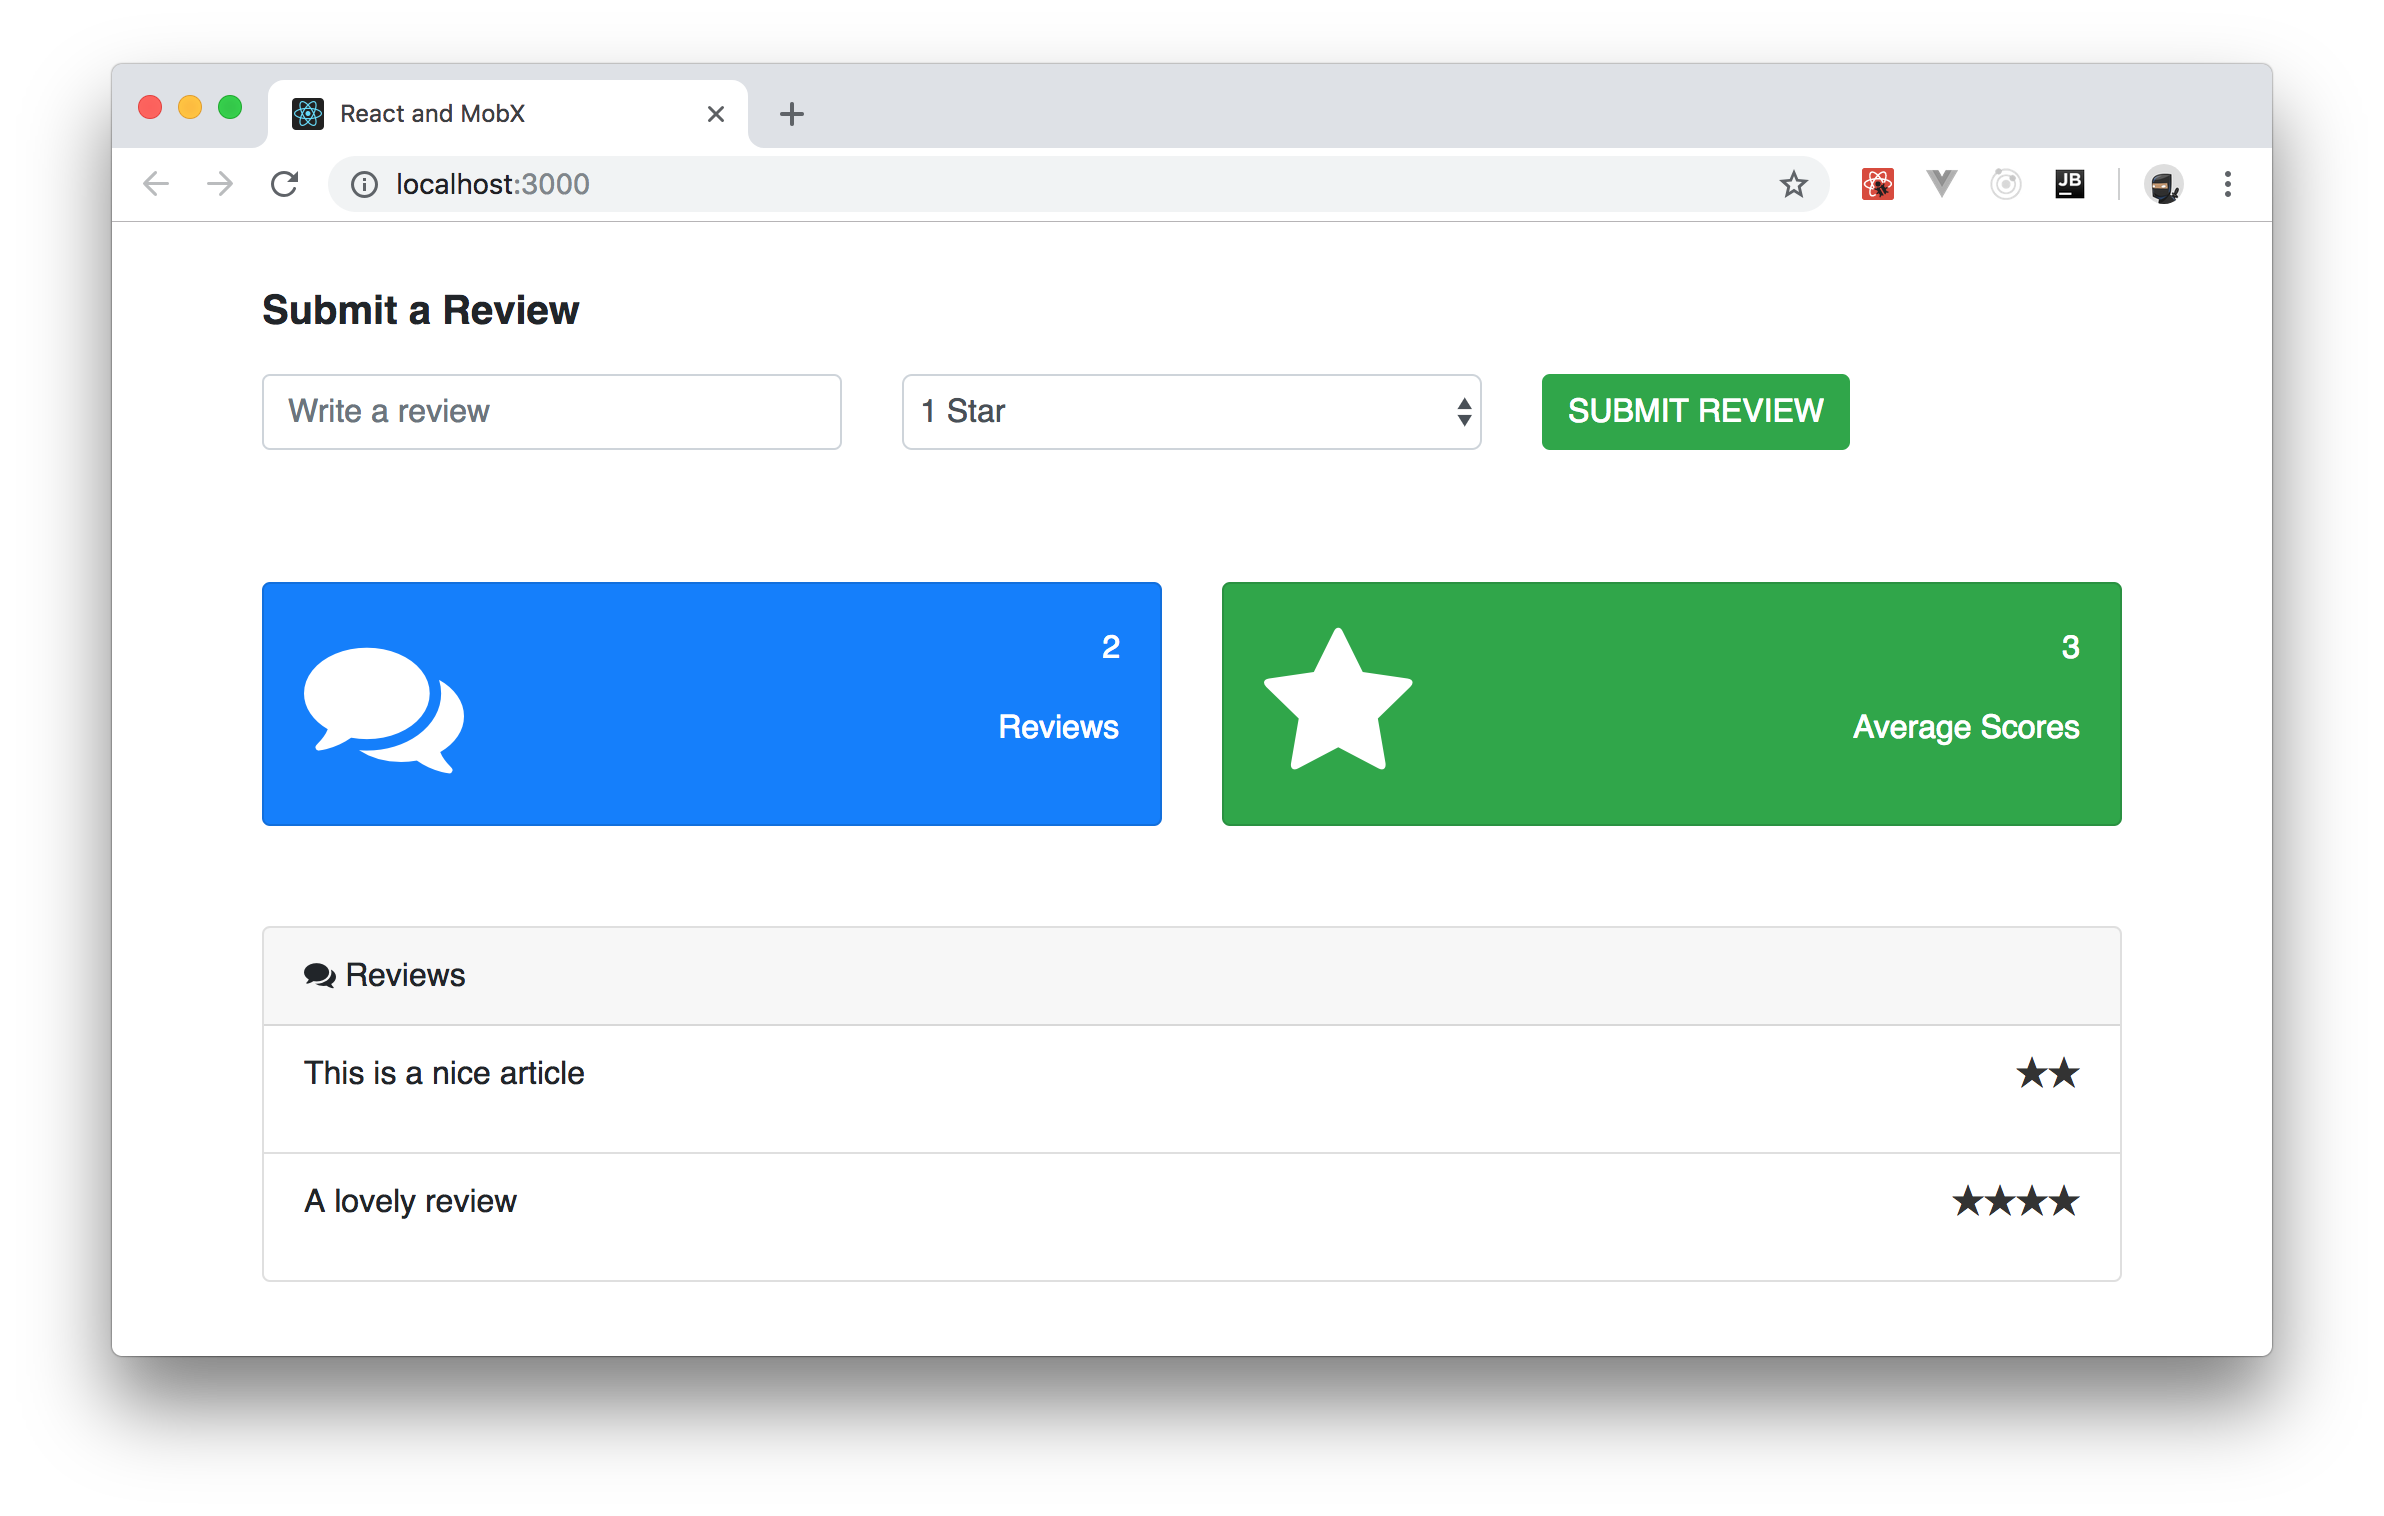
Now that you have gone through the main concepts in MobX, it is time to see it in action. In this section, you will build a simple user review dashboard. In the review dashboard, a user will enter a review using an input field, select a rating from a dropdown list, and finally submit the review.
The dashboard will show the total number of reviews, the average star rating, and a list of all the reviews. You will use MobX to manage certain operations like updating the reviews in realtime on the dashboard, calculating the total number of reviews submitted and lastly, obtaining the average star rating. Once you are done, your app will look similar to this:
Scaffolding a new React app
To quickly scaffold a new React app, you will use the create-react-app CLI tool to bootstrap your React quickly. If you are on NPM v5.2.0 or greater, you can open a terminal, move into the directory where you usually save your projects, and issue the following command:
npx create-react-app react-mobx-tutorialIf you have an older version of NPM, you will have to proceed as follows:
# install create-react-app globally
npm install -g create-react-app

# use it to create your project
create-react-app react-mobx-tutorial
This tool will need some seconds (or even a couple of minutes depending on your internet connection) to finish its process. After that, you can open your new project (react-mobx-tutorial) on your preferred IDE.
Installing Dependencies
After creating your app, the next step is to install the required dependencies. For this article, you need only three dependencies: the main mobx library to add MobX to your app; the mobx-react library to add React specific functions available through MobX; and the react-star-rating-component dependency to easily implement a rating bar in the app.
To install them, move into your project and use NPM, as follows:
# move into app directory
cd react-mobx-tutorial

# install deps
npm install mobx mobx-react react-star-rating-component --save
Creating a Store with MobX
You might wonder why haven't you heard about stores on the last section (MobX Introduction). The thing is, MobX does not require you to use stores to hold your data. Actually, they explain in this resource, stores are part of an opinionated approach that they discovered at Mendix while working with MobX.
"The main responsibility of stores is to move logic and state out of your components into a standalone testable unit that can be used in both frontend and backend JavaScript." - Best Practices for building large scale maintainable projects
As such, the first thing you are going to do in your app is to add a store. This will ensure that the app reads from (and writes to) a global state object instead of its own components' state. To set this up, create a new file called Store.js inside the src directory and add the following code to it:
class Store {
  reviewList = [
    {review: "This is a nice article", stars: 2},
    {review: "A lovely review", stars: 4},
  ];

  addReview(e) {
    this.reviewList.push(e);
  }

  get reviewCount() {
    return this.reviewList.length;
  }

  get averageScore() {
    let avr = 0;
    this.reviewList.map(e => avr += e.stars);
    return Math.round(avr / this.reviewList.length * 100) / 100;
  }
}

export default Store;
In this store, you defined a reviewList array containing some items already. This is the list your whole app will feed on. Besides defining this array, the store also defines three methods:
addReview(): Through this method, your app will add new reviews to thereviewListarray.averageScore(): This is the method that your app will use to get the average score inputted by users.reviewCount(): You will use this method to get the size ofreviewList.
Next, you will expose these methods as observables so that other parts of your application can make use of it. MobX has a set of decorators that defines how observable properties will behave (as discussed earlier). To declare these observables, you will use the decorate function and add it to your App.js file as shown here:
// ... leave other imports untouched ...
import Store from './Store';
import {decorate, observable, action, computed} from 'mobx';

decorate(Store, {
  reviewList: observable,
  addReview: action,
  averageScore: computed,
  reviewCount: computed
});

// ... leave class definition and export statement untouched ...
As you can see, you are using the decorate function to apply the observable, action, and computed decorators to the fields defined by Store. This makes them tightly integrated with MobX, and you can now make your app react to changes in them.
Updating the Store on MobX
Next, you will create a component with the form that will collect users' review and update the store accordingly. To keep things organized, you will create a directory called components inside the src directory. For the rest of the article, you will use this directory for all your React components.
After creating the components directory, add a file called Form.js inside it and add the following code to this file:
import React, {Component} from 'react';

export default class Form extends Component {

  submitReview = (e) => {
    e.preventDefault();
    const review = this.review.value;
    const stars = Number(this.stars.value);
    this.props.store.addReview({review, stars})
  };

  render() {
    return (
      <div className="formSection">
        <div className="form-group">
          <p>Submit a Review</p>
        </div>
        <form onSubmit={this.submitReview}>
          <div className="row">
            <div className="col-md-4">
              <div className="form-group">
                <input type="text" name="review" ref={node => {
                  this.review = node;
                }} id="review" placeholder="Write a review" className="form-control"/>
              </div>
            </div>

            <div className="col-md-4">
              <div className="form-group">
                <select name="stars" id="stars" className="form-control" ref={node => {
                  this.stars = node;
                }}>
                  <option value="1">1 Star</option>
                  <option value="2">2 Star</option>
                  <option value="3">3 Star</option>
                  <option value="4">4 Star</option>
                  <option value="5">5 Star</option>
                </select>
              </div>
            </div>

            <div className="col-md-4">
              <div className="form-group">
                <button className="btn btn-success" type="submit">SUBMIT REVIEW</button>
              </div>
            </div>
          </div>
        </form>
      </div>
    )
  }
}
The new component that you just defined contains only two functions: submitReview and render. The submitReview function, which React will call when users submit the form, get the review inputted by users and the number of stars and then call the addReview function from the store. Note that this component is calling the addReview function through props. As such, while using the Form component, you will have to pass this function to it.
Now, regarding the render function, although lengthy, you can see that all it does is to use some HTML elements and some Bootstrap classes to define a beautiful form with:
- a title: "Submit a Review";
- an
inputtext where users will write their review; - a drop-down box (
select) where users will choose how many stars they give to the review (between 1 and 5); - and a
submitthat will trigger thesubmitReviewfunction when clicked (through theonSubmit={this.submitReview}property of theformelement).
Reacting to Changes with MobX
Once users submit the form and the store receives the new review, you need to display the updated data to your users immediately. For this purpose, you will create a component that will display the average number of stars from reviews given and the total number of reviews.
To create this component, create a new file called Dashboard.js inside the components directory and insert the following code into it:
import React from 'react';
import {observer} from 'mobx-react'

function Dashboard({store}) {
  return (
    <div className="dashboardSection">
      <div className="row">
        <div className="col-md-6">
          <div className="card text-white bg-primary mb-6">
            <div className="card-body">
              <div className="row">
                <div className="col-md-6">
                  <i className="fa fa-comments fa-5x" />
                </div>
                <div className="col-md-6 text-right">
                  <p id="reviewCount">{store.reviewCount}</p>
                  <p className="announcement-text">Reviews</p>
                </div>
              </div>
            </div>
          </div>
        </div>

        <div className="col-md-6">
          <div className="card text-white bg-success mb-6">
            <div className="card-body">
              <div className="row">
                <div className="col-md-6">
                  <i className="fa fa-star fa-5x" />
                </div>
                <div className="col-md-6 text-right">
                  <p id="averageScores">{store.averageScore}</p>
                  <p className="announcement-text">Average Scores</p>
                </div>
              </div>
            </div>
          </div>
        </div>
      </div>
    </div>
  )
}

export default observer(Dashboard);
As you can see, this component contains two card elements (or Bootstrap components). The first one uses store.reviewCount to show how many reviews were inputted so far. The second one uses store.averageScore to show the average score given by reviewers.
One thing that you must note is that, instead of exporting the Dashboard component directly, you are encapsulating the component inside the observer() function. This turns your Dashboard into a reactive and smart component. With this in place, any changes made to any content in store within the component above will make React re-render it. That is, when averageScore and reviewCount get updated in your store, React will update the user interface with new contents instantaneously.
Besides this dashboard, you will also create a component that will show all reviews inputted by users. As such, create a file called Reviews.js inside the components directory and paste the following code into it:
import React from 'react';
import {observer} from 'mobx-react';
import StarRatingComponent from 'react-star-rating-component';

function List({data}) {
  return (
    <li className="list-group-item">
      <div className="float-left">{data.review}</div>
      <div className="float-right">
        <StarRatingComponent name="reviewRate" starCount={data.stars}/>
      </div>
    </li>
  )
}

function Reviews({store}) {
  return (
    <div className="reviewsWrapper">
      <div className="row">
        <div className="col-12">
          <div className="card">
            <div className="card-header">
              <i className="fa fa-comments"/> Reviews
            </div>
            <ul className="list-group list-group-flush">
              {store.reviewList.map((e, i) =>
                <List
                  key={i}
                  data={e}
                />
              )}
            </ul>
          </div>
        </div>
      </div>
    </div>
  )
}

export default observer(Reviews);
In the snippet above, you are importing the StarRatingComponent installed earlier to display the number of stars selected by the user during the review. Also, you are creating a component called Review that is used only inside this file. This component is what will render the details of a single review, like the comment inputted (review) and the amount of stars.
Then, in the end, you are defining the Reviews component, which is also wrapped by the observer() function to make the component receive and display changes in the MobX store as they come. This component is quite simple. It uses the card Bootstrap component to display an unordered (ul) list of reviews (reviewList) and a title ("Reviews").
Wrapping Up your MobX App
With these components in place, your app is almost ready for the prime time. To wrap up things, you will just make some adjustments to the UI, make your App component use the components you defined in the previous sections, and import Bootstrap (which you have been using but you haven't imported).
So, for starters, open the App.css file in your project and replace its contents like this:
.formSection {
  margin-top: 30px;
}

.formSection p {
  font-weight: bold;
  font-size: 20px;
}

.dashboardSection {
  margin-top: 50px;
}

.reviewsWrapper {
  margin-top: 50px;
}
These are just small adjustments so you can have a beautiful user interface.
Next, open the App.js file and update this as follows:
// ... leave the other import statements untouched ...
import Form from './components/Form';
import Dashboard from './components/Dashboard';
import Reviews from './components/Reviews';
import Store from './Store';

// ... leave decorate(Store, {...}) untouched ...

const reviewStore = new Store();

class App extends Component {
  render() {
    return (
      <div className="container">
        <Form store={reviewStore}/>
        <Dashboard store={reviewStore}/>
        <Reviews store={reviewStore}/>
      </div>
    );
  }
}

export default App;
There are three new things happening in the new version of your App component:
- You are importing and using all the components you defined before (
Form,Dashboard, andReviews). - You are creating an instance of your
Storeclass and calling itreviewStore. - You are passing the
reviewStoreas a prop calledstoreto all components.
With that in place, the last thing you will have to do is to open the index.html file and update it as follows:
<!DOCTYPE html>
<html lang="en">
  <head>
    <!-- ... leave other tags untouched ... -->
    <title>React and MobX</title>
    <link rel="stylesheet" href="https://maxcdn.bootstrapcdn.com/bootstrap/4.0.0/css/bootstrap.min.css">
    <link href="https://maxcdn.bootstrapcdn.com/font-awesome/4.7.0/css/font-awesome.min.css" rel="stylesheet">
  </head>
  <!-- ... leave body and its children untouched ... -->
</html>
In this case, you are simply changing the title of your app to "React and MobX" and making it import Bootstrap and Font Awesome (a library of icons that you are using to enhance your UI).
After refactoring the index.html file, go back to your terminal and make your app run by issuing the following command:
# from the react-mobx-tutorial
npm start
Now, if you open http://localhost:3000/ in your preferred browser, you will be able to interact with your app and see React and MobX in action. How cool is that?
"I just learned how to used MobX to manage the state of a @reactjs app"
Tweet This
Aside: Securing React Apps with Auth0
As you will learn in this section, you can easily secure your React applications with Auth0, a global leader in Identity-as-a-Service (IDaaS) that provides thousands of enterprise customers with modern identity solutions. Alongside with the classic username and password authentication process, Auth0 allows you to add features like Social Login, Multifactor Authentication, Passwordless Login, and much more with just a few clicks.
To follow along the instruction describe here, you will need an Auth0 account. If you don't have one yet, now is a good time to sign up for a free Auth0 account.
Also, if you want to follow this section in a clean environment, you can easily create a new React application with just one command:
npx create-react-app react-auth0Then, you can move into your new React app (which was created inside a new directory called react-auth0 by the create-react-app tool), and start working as explained in the following subsections.
Setting Up an Auth0 Application
To represent your React application in your Auth0 account, you will need to create an Auth0 Application. So, head to the Applications section on your Auth0 dashboard and proceed as follows:
- click on the Create Application button;
- then define a Name to your new application (e.g., "React Demo");
- then select Single Page Web Applications as its type.
- and hit the Create button to end the process.
After creating your application, Auth0 will redirect you to its Quick Start tab. From there, you will have to click on the Settings tab to whitelist some URLs that Auth0 can call after the authentication process. This is a security measure implemented by Auth0 to avoid the leaking of sensitive data (like ID Tokens).
So, when you arrive at the Settings tab, search for the Allowed Callback URLs field and add http://localhost:3000/callback into it. For this tutorial, this single URL will suffice.
That's it! From the Auth0 perspective, you are good to go and can start securing your React application.
Dependencies and Setup
To secure your React application with Auth0, there are only three dependencies that you will need to install:
auth0.js: This is the default library to integrate web applications with Auth0.react-router: This is the de-facto library when it comes to routing management in React.react-router-dom: This is the extension to the previous library to web applications.
To install these dependencies, move into your project root and issue the following command:
npm install --save auth0-js react-router react-router-domNote: As you want the best security available, you are going to rely on the Auth0 login page. This method consists of redirecting users to a login page hosted by Auth0 that is easily customizable right from your Auth0 dashboard. If you want to learn why this is the best approach, check the Universal vs. Embedded Login article.
After installing all three libraries, you can create a service to handle the authentication process. You can call this service Auth and create it in the src/Auth/ directory with the following code:
// src/Auth/Auth.js
import auth0 from 'auth0-js';

export default class Auth {
  constructor() {
    this.auth0 = new auth0.WebAuth({
      // the following three lines MUST be updated
      domain: '<AUTH0_DOMAIN>',
      audience: 'https://<AUTH0_DOMAIN>/userinfo',
      clientID: '<AUTH0_CLIENT_ID>',
      redirectUri: 'http://localhost:3000/callback',
      responseType: 'token id_token',
      scope: 'openid profile',
    });

    this.getProfile = this.getProfile.bind(this);
    this.handleAuthentication = this.handleAuthentication.bind(this);
    this.isAuthenticated = this.isAuthenticated.bind(this);
    this.login = this.login.bind(this);
    this.logout = this.logout.bind(this);
    this.setSession = this.setSession.bind(this);
  }

  getProfile() {
    return this.profile;
  }

  handleAuthentication() {
    return new Promise((resolve, reject) => {
      this.auth0.parseHash((err, authResult) => {
        if (err) return reject(err);
        console.log(authResult);
        if (!authResult || !authResult.idToken) {
          return reject(err);
        }
        this.setSession(authResult);
        resolve();
      });
    });
  }

  isAuthenticated() {
    return new Date().getTime() < this.expiresAt;
  }

  login() {
    this.auth0.authorize();
  }

  logout() {
    // clear id token and expiration
    this.idToken = null;
    this.expiresAt = null;
  }

  setSession(authResult) {
    this.idToken = authResult.idToken;
    this.profile = authResult.idTokenPayload;
    // set the time that the id token will expire at
    this.expiresAt = authResult.expiresIn * 1000 + new Date().getTime();
  }
}
The Auth service that you just created contains functions to deal with different steps of the sign in/sign up process. The following list briefly summarizes these functions and what they do:
getProfile: This function returns the profile of the logged-in user.handleAuthentication: This function looks for the result of the authentication process in the URL hash. Then, the function processes the result with theparseHashmethod fromauth0-js.isAuthenticated: This function checks whether the expiry time for the user's ID token has passed.login: This function initiates the login process, redirecting users to the login page.logout: This function removes the user's tokens and expiry time.setSession: This function sets the user's ID token, profile, and expiry time.
Besides these functions, the class contains a field called auth0 that is initialized with values extracted from your Auth0 application. It is important to keep in mind that you have to replace the <AUTH0_DOMAIN> and <AUTH0_CLIENT_ID> placeholders that you are passing to the auth0 field.
Note: For the
<AUTH0_DOMAIN>placeholders, you will have to replace them with something similar toyour-subdomain.auth0.com, whereyour-subdomainis the subdomain you chose while creating your Auth0 account (or your Auth0 tenant). For the<AUTH0_CLIENT_ID>, you will have to replace it with the random string copied from the Client ID field of the Auth0 Application you created previously.
Since you are using the Auth0 login page, your users are taken away from the application. However, after they authenticate, users automatically return to the callback URL that you set up previously (i.e., http://localhost:3000/callback). This means that you need to create a component responsible for this route.
So, create a new file called Callback.js inside src/Callback (i.e., you will need to create the Callback directory) and insert the following code into it:
// src/Callback/Callback.js
import React from 'react';
import { withRouter } from 'react-router';

function Callback(props) {
  props.auth.handleAuthentication().then(() => {
    props.history.push('/');
  });

  return <div>Loading user profile.</div>;
}

export default withRouter(Callback);
This component, as you can see, is responsible for triggering the handleAuthentication process and, when the process ends, for pushing users to your home page. While this component processes the authentication result, it simply shows a message saying that it is loading the user profile.
After creating the Auth service and the Callback component, you can refactor your App component to integrate everything together:
// src/App.js

import React from 'react';
import { withRouter } from 'react-router';
import { Route } from 'react-router-dom';
import Callback from './Callback/Callback';
import './App.css';

function HomePage(props) {
  const { authenticated } = props;

  const logout = () => {
    props.auth.logout();
    props.history.push('/');
  };

  if (authenticated) {
    const { name } = props.auth.getProfile();
    return (
      <div>
        <h1>Howdy! Glad to see you back, {name}.</h1>
        <button onClick={logout}>Log out</button>
      </div>
    );
  }

  return (
    <div>
      <h1>I don't know you. Please, log in.</h1>
      <button onClick={props.auth.login}>Log in</button>
    </div>
  );
}

function App(props) {
  const authenticated = props.auth.isAuthenticated();

  return (
    <div className="App">
      <Route
        exact
        path="/callback"
        render={() => <Callback auth={props.auth} />}
      />
      <Route
        exact
        path="/"
        render={() => (
          <HomePage
            authenticated={authenticated}
            auth={props.auth}
            history={props.history}
          />
        )}
      />
    </div>
  );
}

export default withRouter(App);
In this case, you are actually defining two components inside the same file (just for the sake of simplicity). You are defining a HomePage component that shows a message with the name of the logged-in user (that is, when the user is logged in, of course), and a message telling unauthenticated users to log in.
Also, this file is making the App component responsible for deciding what component it must render. If the user is requesting the home page (i.e., the / route), the HomePage component is shown. If the user is requesting the callback page (i.e., /callback), then the Callback component is shown.
Note that you are using the Auth service in all your components (App, HomePage, and Callback) and also inside the Auth service. As such, you need to have a global instance for this service, and you have to include it in your App component.
So, to create this global Auth instance and to wrap things up, you will need to update your index.js file as shown here:
// src/index.js

import React from 'react';
import ReactDOM from 'react-dom';
import { BrowserRouter } from 'react-router-dom';
import Auth from './Auth/Auth';
import './index.css';
import App from './App';
import registerServiceWorker from './registerServiceWorker';

const auth = new Auth();

ReactDOM.render(
  <BrowserRouter>
    <App auth={auth} />
  </BrowserRouter>,
  document.getElementById('root'),
);
registerServiceWorker();
After that, you are done! You just finished securing your React application with Auth0. If you take your app for a spin now (npm start), you will be able to authenticate yourself with the help of Auth0, and you will be able to see your React app show your name (that is, if your identity provider does provide a name).
If you are interested in learning more, please, refer to the official React Quick Start guide to see, step by step, how to properly secure a React application. Besides the steps shown in this section, the guide also shows:
Conclusion
In this post, you learned about state management in React apps. You also had the opportunity to take a quick look at the various alternatives for managing state in React apps, more specifically, MobX.
After that, you were able to build an app to show the most important concepts in MobX. MobX might not as popular as Redux when it comes to state management on React, but it is very mature, easy to start with, and provides a seamless way to integrate into a new or an existing application.
I do hope that you enjoyed this tutorial. Happy hacking!


