---
title: "MS Agent Framework and Python: Use the Auth0 Token Vault to Call Third-Party APIs"
description: "Build a secure Python AI Agent with Microsoft Agent Framework and FastAPI and learn to use Auth0 Token Vault to securely connect to the Gmail API."
authors:
- name: "Andrea Chiarelli"
url: "https://auth0.com/blog/authors/andrea-chiarelli/"
date: "Oct 27, 2025"
category: "Developers,Tutorial,AI"
tags: ["ai", "agent-framework", "python", "fastapi", "token-vault", "api"]
url: "https://auth0.com/blog/microsoft-agent-framework-python-auth0-token-vault/"
---
# MS Agent Framework and Python: Use the Auth0 Token Vault to Call Third-Party APIs
This article will walk you through the process of creating a sophisticated AI-powered help desk application that helps users to distribute support requests to the right department. The application will be built with Python, featuring FastAPI for the web framework, the new [Microsoft Agent Framework](https://learn.microsoft.com/en-us/agent-framework/overview/agent-framework-overview) for our AI agent's logic, and Auth0 for secure authentication and API access. Specifically, we'll leverage the [Auth0 Token Vault](https://auth0.com/docs/secure/tokens/token-vault) to securely connect to the Gmail API, allowing our agent to send email notifications.
## Prerequisites
Before you begin, ensure you have the following:
* **Python 3.12 or later**
* **An OpenAI account and API key**: You can obtain an API key from the [OpenAI platform documentation](https://platform.openai.com/docs/overview).
* **A Google Account with OAuth 2.0 access for Google APIs configured**: Refer to the [Google Developers documentation for OAuth 2.0](https://developers.google.com/identity/protocols/oauth2) for setup instructions.
* **An Auth0 account**: If you don't already have one, you can [sign up for free](https://auth0.com/ai).
Here is the plan to build our application:
* We'll start by setting up a simple web-based chat interface using Python and FastAPI.
* Then, we'll use the Microsoft Agent Framework to create an intelligent agent capable of understanding user requests.
* We'll add Auth0 authentication to protect our API endpoints and manage user sessions.
* Finally, we'll leverage the Auth0 Token Vault to enable our agent to securely access the Gmail API and send emails on behalf of the user.
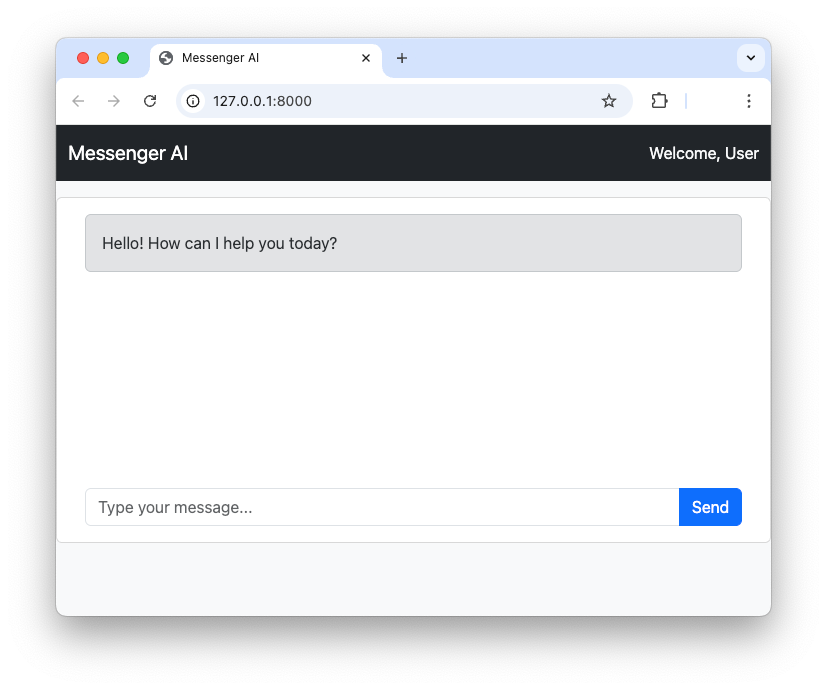
## The Basic Chat Application
First, let's set up the foundation of our application: a simple web-based chat interface using [FastAPI](https://fastapi.tiangolo.com/). This will serve as the user-facing part of our help desk.
Create a `main.py` file with the following content:
```python
#main.py
from fastapi import FastAPI
from fastapi.responses import FileResponse
from fastapi.staticfiles import StaticFiles
from config import Settings
import uvicorn
settings = Settings()
app = FastAPI()
# Mount the static directory for JS and other static assets
app.mount("/static", StaticFiles(directory="static"), name="static")
@app.get("/")
async def read_index():
return FileResponse('static/index.html')
if __name__ == "__main__":
uvicorn.run(app, host=settings.HOST, port=settings.PORT)
```
This file creates an instance of a FastAPI application that serves a static page: `index.html`. It uses `uvicorn` as its web server, which listens on the host and port taken from the environment variables `HOST` and `PORT`.
In your development environment, you create a `.env` file with the required variables:
```shell
#.env
# Server Configuration
HOST=0.0.0.0
PORT=8000
```
These variables are loaded in the `config.py` module with the following code:
```python
#config.py
from pydantic_settings import BaseSettings
class Settings(BaseSettings):
# Server settings
HOST: str = "0.0.0.0"
PORT: int = 8000
@property
def app_base_url(self) -> str:
return f"http://{self.HOST}:{self.PORT}"
class Config:
env_file = ".env"
env_file_encoding = "utf-8"
extra = "ignore" # This will ignore any extra fields in the environment
```
Then, create a folder named `static` and add there a file named `index.html` with the following markup:
```html
Messenger AI
Hello! How can I help you today?
```
The HTML code defines the layout and appearance of the chat.
In the same static folder, create an `app.js` file with the following JavaScript code:
```javascript
//static/app.js
async function sendMessage() {
const input = document.getElementById('message-input');
const message = input.value.trim();
if (message) {
const messagesContainer = document.getElementById('chat-messages');
messagesContainer.innerHTML += `
`;
}
}
document.addEventListener('DOMContentLoaded', async () => {
const messageInput = document.getElementById('message-input');
const sendButton = document.getElementById('send-button');
messageInput.addEventListener('keypress', (e) => {
if (e.key === 'Enter') sendMessage();
});
sendButton.addEventListener('click', sendMessage);
});
```
This code manages the interactivity with the user and sends the prompt inserted by the user to a `/prompt` endpoint that we will build soon. We won’t go into the details of the web UI since the focus of this article will be on the server side of the application.
Now, let’s install the needed packages with the following command:
```shell
pip install fastapi uvicorn pydantic-settings
```
Finally, run the application with the following command to make sure everything works as expected:
```shell
python main.py
```
Pointing your browser to `http://localhost:8000` you should see the following screen:
## Using the Microsoft Agent Framework
Microsoft Agent Framework is a powerful new open-source SDK for building AI agents and multi-agent workflows in both .NET and Python. It's the successor to Semantic Kernel and AutoGen, combining the strengths of both. For our help desk, we'll use it to create an agent that can understand user issues and decide on the appropriate action.
Let’s start by installing the framework:
```shell
pip install agent-framework
```
Now, we can create a simple agent. Microsoft Agent Framework supports several model providers including Azure OpenAI, OpenAI, and Azure AI.
> Microsoft Agent Framework also supports [GitHub Models](https://docs.github.com/en/github-models) in .NET. However, at the time of writing, GitHub Models are not supported in Python.
In our project, we are going to use OpenAI, so make sure you have an API key to invoke their models. To build the AI agent, create file named `messenger_agent.py` and add the following code:
```python
# messenger_agent.py
from agent_framework.openai import OpenAIChatClient
from config import Settings
settings = Settings()
system_prompt = """
You are an email assistant. Your task is to help users compose and send emails based on their
requests. You have access to a tool called `send_email` which you can use to send emails.
When a user provides a request, you should first try to understand the content of the email they
want to send and determine the recipient's email address based on the context.
If the user's text is related to a technical problem, such as related to their computer, printer, internet connection, software or hardware, then send the email to the technical support email address.
If the user's text is related to an administrative issue, such as related to a contract, a billing issue, or a general inquiry, then send the email to the administrative support email address.
If the user's text does not clearly indicate the type of problem, ask the user to review their request in order to specify if it is a technical or administrative issue.
Compose the email by creating the subject and body of the email message.
After composing the email, use the `send_email` tool to send the email to the recipient and specify the type of message.
After sending the email, you should inform the user that the email has been sent successfully.
If there are any errors while sending the email, you should inform the user about the error.
"""
agent = OpenAIChatClient(
model_id=settings.OPENAI_CHAT_MODEL_ID,
api_key=settings.OPENAI_API_KEY,
).create_agent(
instructions=system_prompt
)
async def create_and_send_message(prompt: str) -> str:
response = await agent.run(prompt)
return response.text
```
In the code snippet above, you see that `OpenAIChatClient` is imported from the `agent_framework` package and used to configure the OpenAI model. The specific model comes from the value of the `OPENAI_CHAT_MODEL_ID` variable, while the API key is stored in the `OPENAI_API_KEY` variable.
The `create_agent()` method creates the AI agent instance using the prompt assigned to the `system_prompt` variable.
Finally, the `create_and_send_message()` function takes the prompt sent by the user, runs the agent on this prompt, and returns the answer.
Let’s store the values for the `OPENAI_CHAT_MODEL_ID` and `OPENAI_API_KEY` variables in the `.env` file:
```shell
#.env
# Agent Configuration
OPENAI_API_KEY=
OPENAI_CHAT_MODEL_ID=gpt-4o-mini
# ...existing settings...
```
Let’s add these keys to the `config.py` file as well:
```python
#config.py
from pydantic_settings import BaseSettings
class Settings(BaseSettings):
# Server settings
HOST: str = "0.0.0.0"
PORT: int = 8000
# 👇 new code
# OpenAI settings
OPENAI_API_KEY: str
OPENAI_CHAT_MODEL_ID: str = "gpt-3.5-turbo"
# ...existing code...
```
Now, let’s integrate the newly created agent into the web application. You will implement the `/prompt` endpoint, which is called by the JavaScript you encountered earlier.
The following code snippet highlights the changes you need to apply to your `main.py` file:
```python
# main.py
from fastapi import FastAPI, HTTPException, Request, Response # 👈 updated
from fastapi.responses import FileResponse
from fastapi.staticfiles import StaticFiles
from config import Settings
from pydantic import BaseModel # 👈 new
from messenger_agent import create_and_send_message # 👈 new
import uvicorn
# ...existing code...
@app.get("/")
async def read_index():
return FileResponse('static/index.html')
class Prompt(BaseModel):
prompt: str
# 👇 new code
@app.post("/prompt")
async def submit_prompt(
data: Prompt,
request: Request
):
result = await create_and_send_message(
data.prompt
)
return {"response": result}
# 👆 new code
# ...existing code...
```
You imported some supporting objects from the `fastapi` and `pydantic` modules, but primarily you imported the `create_and_send_message()` function from the `messenger_agent` module you just created.
Then, you implemented the `/prompt` endpoint, which handles a POST request by passing the prompt received by the client to the agent via the `create_and_send_message()` function. The result of the execution of this function is returned back to the client.
Now you have the backbone of your helpdesk AI agent in place\!
## Add Authentication and Protect the API
The goal of the agent is to compose a support request email and send it to the proper department on behalf of the user. This means that the agent must first make sure of the user identity and prevent unauthorized access to the endpoints exposed by the FastAPI application. For this purpose, you will add Auth0 authentication support to the application and secure the endpoints using the classic cookie based authentication approach.
### Register with Auth0
Make sure you have an [Auth0 account](https://a0.to/signup) and access your [Auth0 dashboard](https://manage.auth0.com/). Then, register your application as a regular web application following the steps described [here](https://auth0.com/docs/get-started/auth0-overview/create-applications/regular-web-apps). Take note of the domain, client ID, and client secret generated by Auth0 for your application, and assign them to the following three variables that you will add to the `.env` file:
```shell
# .env
# ...existing settings...
# Auth0 Configuration
AUTH0_DOMAIN=
AUTH0_CLIENT_ID=
AUTH0_CLIENT_SECRET=
```
Replace the ``, ``, and `` placeholders with the actual values from your Auth0 dashboard.
Add the corresponding keys to `config.py`:
```python
#config.py
from pydantic_settings import BaseSettings
class Settings(BaseSettings):
# ...existing code...
# 👇 new code
# Auth0 settings
AUTH0_DOMAIN: str
AUTH0_CLIENT_ID: str
AUTH0_CLIENT_SECRET: str
# ...existing code...
```
### Auth0 integration and session setup
Now let’s integrate Auth0 authentication in your application and set up authenticated session support.
First, install the needed packages with the following command:
```shell
pip install auth0-fastapi starlette itsdangerous
```
This command installs the [Auth0 FastAPI SDK](https://github.com/auth0/auth0-fastapi) and the middleware for securely managing sessions.
Then, create an Auth0 client instance by adding the following code to a new file named `auth0.py`:
```python
# auth0.py
from auth0_fastapi.auth import AuthClient
from auth0_fastapi.config import Auth0Config
from config import Settings
settings = Settings()
auth0_config = Auth0Config(
domain=settings.AUTH0_DOMAIN,
client_id=settings.AUTH0_CLIENT_ID,
client_secret=settings.AUTH0_CLIENT_SECRET,
authorization_params={
"scope": "openid profile email offline_access",
"prompt": "consent"
},
mount_connected_account_routes = True,
app_base_url=settings.app_base_url,
secret=settings.SESSION_SECRET)
)
auth0_client = AuthClient(auth0_config)
```
`Auth0Config` uses the settings from the Auth0 dashboard to create the `auth0_config` object. Notice the authorization parameters passed there. Among the other scopes that enable user authentication, the `offline_access` scope requests a refresh token in addition to an access token. This ensures that the application has continuous and secure authorization even when the access token expires. This is also needed to use the Auth0 Token Vault that we will discuss later.
> To learn more about [refresh tokens, check out this article](https://auth0.com/blog/refresh-tokens-what-are-they-and-when-to-use-them/).
The `mount_connected_account_routes` parameter tells the Auth0 FastAPI SDK to enable the endpoints that allow you to manage the user’s connected account, as we will see later.
The last parameter of `Auth0Config` is `secret`. Its value is used to encrypt the session data stored in the cookie session created after the user authentication, and comes from the `SESSION_SECRET` environment variable. Let’s add it to the `.env` file:
```shell
SESSION_SECRET=
```
As best practices suggest, replace the `` placeholder with a randomly generated string using OpenSSL, as in the following example:
```shell
openssl rand -hex 32
```
Don’t forget to add the key to the config.py file too:
```python
#config.py
from pydantic_settings import BaseSettings
class Settings(BaseSettings):
# Server settings
SESSION_SECRET: str # 👈 new code
HOST: str = "0.0.0.0"
PORT: int = 8000
# ...existing code...
```
The last statement in the `auth0.py` file creates an Auth0 client based on the `auth0_config` configuration object:
```python
# auth0.py
# ...existing code...
auth0_client = AuthClient(auth0_config)
```
Now let’s enforce authentication and protect the endpoints by applying the following changes to the code in the `main.py` file:
```python
# main.py
# 👇 updated code
from fastapi import FastAPI, Request, Response, Depends
from fastapi.responses import FileResponse, RedirectResponse
# 👆 updated code
# ...other imports...
# 👇 new code
from starlette.middleware.sessions import SessionMiddleware
from auth0_fastapi.server.routes import router, register_auth_routes
from auth0_fastapi.errors import AccessTokenForConnectionError
from auth0 import auth0_config, auth0_client
# 👆 new code
# ...existing code...
app = FastAPI()
# 👇 new code
app.add_middleware(SessionMiddleware, secret_key=settings.SESSION_SECRET)
app.state.auth_config = auth0_config
app.state.auth_client = auth0_client
register_auth_routes(router, auth0_config)
app.include_router(router)
# 👆 new code
app.mount("/static", StaticFiles(directory="static"), name="static")
# 👇 updated code
@app.get("/")
async def read_index(request: Request, response: Response):
try:
await auth0_client.require_session(request, response)
except Exception as e:
return RedirectResponse(url="/auth/login")
return FileResponse("static/index.html")
# 👆 updated code
class Prompt(BaseModel):
prompt: str
@app.post("/prompt")
async def submit_prompt(
data: Prompt,
request: Request,
auth_session = Depends(auth0_client.require_session)
# 👆 added line
):
result = await create_and_send_message(
data.prompt
)
return {"response": result}
# ...existing code...
```
As you can see, there are a few updates to the existing imports and the addition of new imports to make Auth0 authentication and session management support available.
Then, you configure session management middleware and register the FastAPI router provided by the Auth0 FastAPI SDK.
To protect the root endpoint (`/`), you check if a session cookie exists. If not, you redirect the user to the internal `/auth/login` endpoint provided by the Auth0 FastAPI SDK. This redirects the user to the [Auth0 Universal Login page](https://auth0.com/docs/authenticate/login/auth0-universal-login) for user authentication.
To protect the `/prompt` endpoint, you require the session cookie presence via `Depends(auth0_client.require_session)` .
Authentication support and endpoint protection are done!
## Call the Third-Party API Using the Token Vault
Now for the most exciting part: enabling our agent to send emails. We'll create a [tool](https://learn.microsoft.com/en-us/agent-framework/user-guide/agents/agent-tools) for our agent that uses the Gmail API. To securely access the Gmail API on behalf of the user, we'll use the [Auth0 Token Vault](https://auth0.com/features/token-vault).
The Auth0 Token Vault is a feature that allows you to securely store and manage tokens for third-party services. Instead of your application directly handling the user's Gmail refresh token, Auth0 stores it and provides you with a short-lived access token when you need it.
Here's how it works:
1. The user logs in to your application using their Google account via Auth0.
2. During the login process, they grant your application permission to access their Gmail account.
3. Auth0 stores the Gmail API tokens in the secure Token Vault.
4. When your AI agent needs to send an email, your application requests a Gmail access token from the Token Vault.
5. Your application uses this token to make a secure call to the Gmail API.
> To learn more about [the Auth0 Token Vault, check out this blog post](https://auth0.com/blog/auth0-token-vault-secure-token-exchange-for-ai-agents/). For more technical details, read [the documentation](https://auth0.com/docs/secure/tokens/token-vault).
In the following, you will configure your application on Auth0 to use the Gmail API and the Auth0 Token Vault. Then you will build the sending email tool, and finally will enable your agent to use the tool.
### Connect the user's account
As a first step, you need to enable the user's Auth0 account to connect with their Google account, so that your app can securely access the Gmail API on the user's behalf through the Token Vault. So, go back to your Auth0 dashboard, navigate to [Applications \> API](https://manage.auth0.com/dashboard/#/apis), and click the *Activate* button in the [My Account API](https://auth0.com/docs/manage-users/my-account-api) banner shown below:
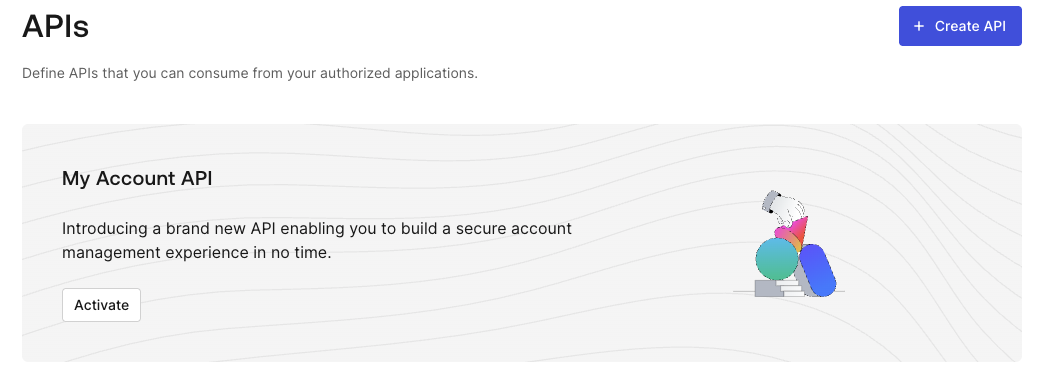
This adds the *Auth0 My Account API* item to the API list.
Click on the newly created *Auth0 My Account API* item and then select the *Applications* tab. Toggle the switch button to authorize your application to use the My Account API. Then, expand the area below the application line and select the `create:me:connected_accounts permission`, as shown in the following picture:
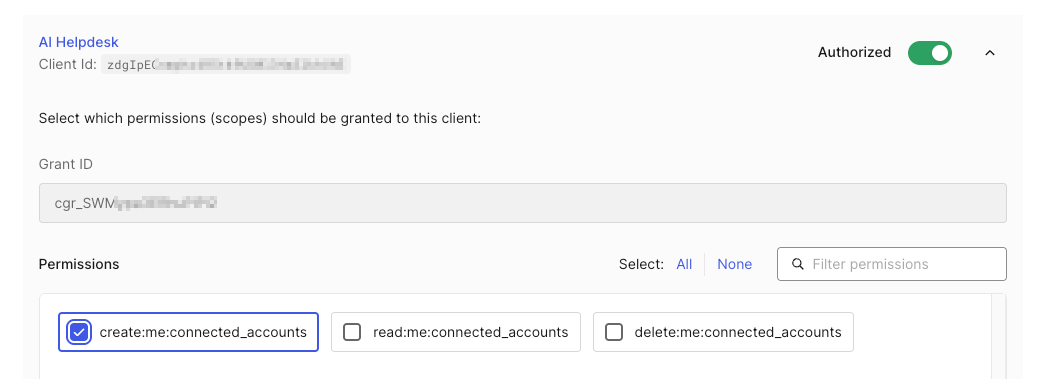
To save the changes, click the *Update* button.
Still on the My Account API page, select the *Settings* tab, locate the *Access Settings* section, and make sure that the *Allow Skipping User Consent* switch is enabled. Don’t forget to click the *Save* button.
Now, your application is enabled to use the My Account API. Thanks to this API, when the user logs in to your application using their Google account, it will be able to connect their Auth0 account with their Google account in order to manage their Gmail API’s access token on their behalf through the Token Vault.
The next step is to enable [Multi-Resource Refresh Token](https://auth0.com/docs/secure/tokens/refresh-tokens/multi-resource-refresh-token), which allows your application to get an access token for calling the My Account API. Navigate to [Applications \> Applications](https://manage.auth0.com/dashboard/#/applications) and select your application. In the Settings tab, scroll down to reach the *Multi-Resource Refresh Token* section. Click the *Edit Configuration* button and then enable the MRRT toggle for the Auth0 My Account API. As shown below:
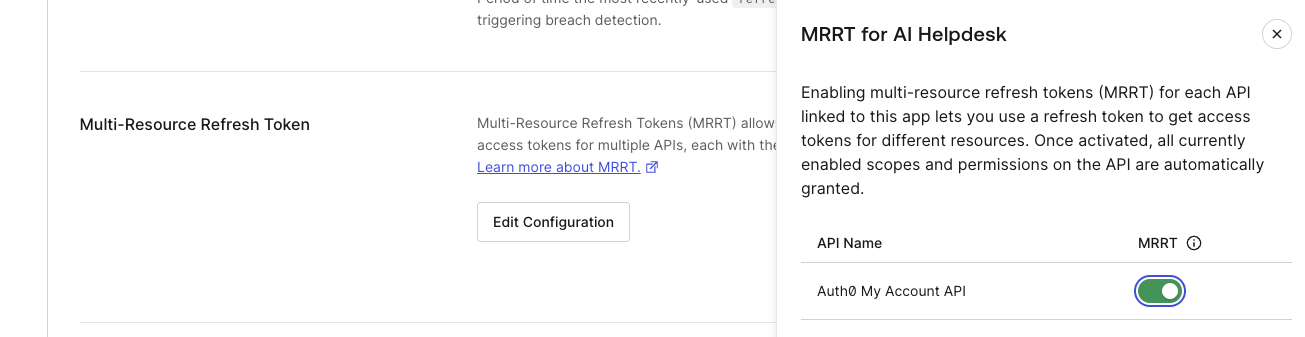
Click the *Save* button at the bottom of the page.
Now your application is enabled to connect the user account to third-party APIs through the Auth0 Token Vault.
> Check out the documentation to learn more about the [My Account API](https://auth0.com/docs/manage-users/my-account-api) and the [Multi-Resource Refresh Token](https://auth0.com/docs/secure/tokens/refresh-tokens/multi-resource-refresh-token) features.
### Enable Auth0 to use the Gmail API
To enable Auth0 to use the Gmail API, you need first to create an OAuth 2.0 client on your [Google Developer Console](https://console.developers.google.com) and use the client’s settings to configure your Google connection on your Auth0 dashboard. Follow [this guide](https://auth0.com/ai/docs/integrations/google) to connect your Auth0 application to Google services
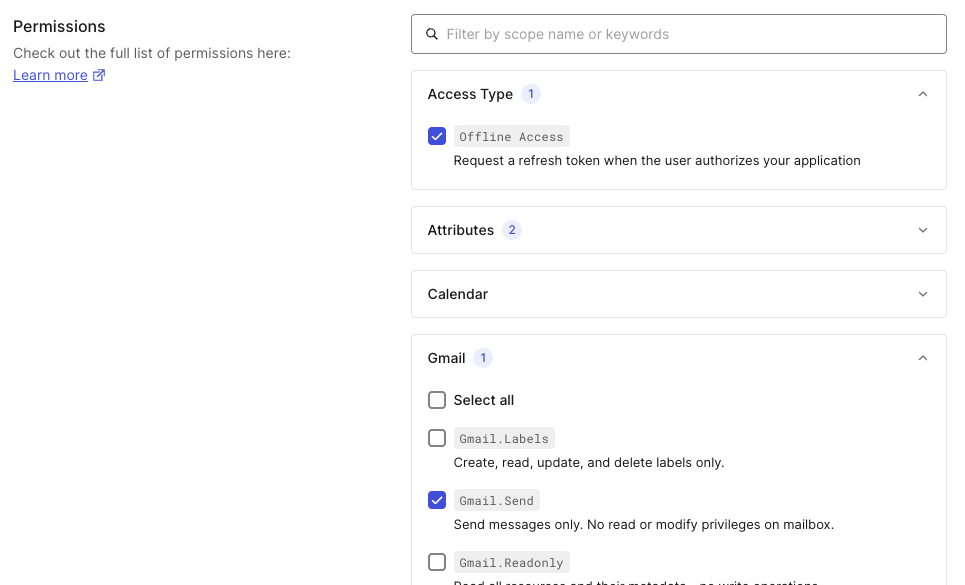
For the purposes of this article, make sure you have enabled the `https://www.googleapis.com/auth/gmail.send` scope for your Google OAuth 2.0 client in your Google Developer Console. Also, make sure you have enabled `Offline Access` and `Gmail.Send` flags in the *Permissions* section of your Google connection in the Auth0 dashboard, as shown below:
Still in the Google connection page in your Auth0 dashboard, go to the *Purpose* section and select *Authentication and Connected Accounts for Token Vault*:
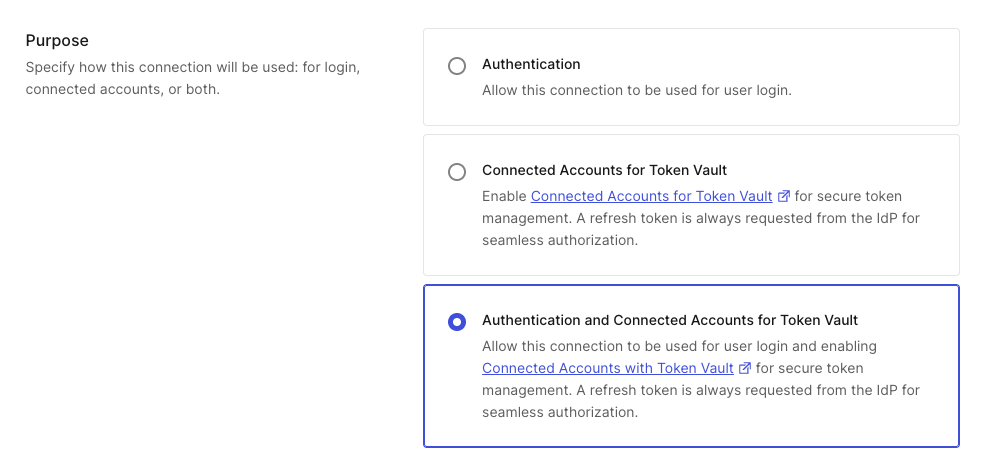
Click *Save Changes* to apply these settings to your Google connection.
Now go to the [Applications > Applications](https://manage.auth0.com/#/applications) section of your Auth0 dashboard and select your registered application. Scroll down to the *Advanced Settings* section, select the *Grant Types* tab, and check the *Token Vault* checkbox:
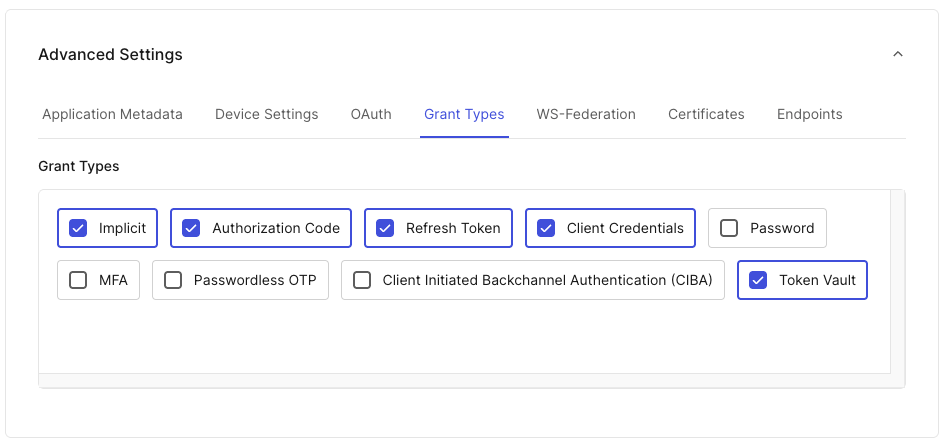
Your configuration step is complete!
### Create the email sending tool
Back to your application, let’s build the tool that your agent will use to send the email. Create a new file and name it `send_email.py`. Add the following code to it:
```python
# send_email.py
import base64
import requests
from email.mime.text import MIMEText
from typing_extensions import Annotated
from agent_framework import ai_function
from pydantic import Field
from config import Settings
settings = Settings()
def create_email_sender(gmail_token: str):
@ai_function(name="send_email", description="Sends an email using Gmail API.")
async def send_email(
subject: Annotated[str, Field(description="The subject of the email message.")],
body: Annotated[str, Field(description="The body of the email message.")],
type: Annotated[str, Field(description="The type of the issue: 'technical' or 'administrative'.")]
)-> str:
try:
to_email = settings.TECHNICAL_SUPPORT_EMAIL_ADDRESS if type.lower() == "technical" else settings.ADMINISTRATIVE_SUPPORT_EMAIL_ADDRESS
message = MIMEText(body)
message['to'] = to_email
message['subject'] = subject
raw_message = base64.urlsafe_b64encode(message.as_bytes()).decode('utf-8')
response = requests.post(
'https://gmail.googleapis.com/gmail/v1/users/me/messages/send',
headers={
'Authorization': f'Bearer {gmail_token}',
'Content-Type': 'application/json'
},
json={'raw': raw_message}
)
response.raise_for_status()
sent_message = response.json()
return f"Email sent successfully to {to_email}. Message ID: {sent_message['id']}"
except Exception as e:
return f"Unexpected error sending email: {e}"
return send_email
```
Let’s highlight a few important things from this code.
Notice that we have defined the `send_email()` function, which is the actual email sender, inside the `create_email_sender()` function. Why? The reason is security. To call the Gmail API, your agent will need the access token. Providing the access token directly to the agent is not a good move, because you are not in direct control of the AI model and it could be leaked due to [possible vulnerabilities](https://auth0.com/blog/identity-challenges-for-ai-powered-apps/). This nested function definition creates a [closure](https://en.wikipedia.org/wiki/Closure_\(computer_programming\)) that protects the `gmail_token` parameter.
You also can see the `@ai_function` annotation. This is imported from the Microsoft Agent Framework and allows you to describe the tool, which helps the AI model identify and use it correctly. For the same reason, the parameters of the inner function `send_email()` are annotated with a detailed description. As you will see in a moment, the `send_email()` function will be accessible to your agent.
The body of the inner function uses the two environment variables `TECHNICAL_SUPPORT_EMAIL_ADDRESS` and `ADMINISTRATIVE_SUPPORT_EMAIL_ADDRESS`. You need to include these variables in your `.env` file:
```shell
# .env
# ...existing settings...
# Support Email Configuration
TECHNICAL_SUPPORT_EMAIL_ADDRESS=tech-support@yourdomain.com
ADMINISTRATIVE_SUPPORT_EMAIL_ADDRESS=admin-support@yourdomain.com
```
Also add the settings to the `config.py` file:
```python
#config.py
from pydantic_settings import BaseSettings
class Settings(BaseSettings):
# ...existing code...
# 👇 new code
# Email settings
TECHNICAL_SUPPORT_EMAIL_ADDRESS: str
ADMINISTRATIVE_SUPPORT_EMAIL_ADDRESS: str
# ...existing code...
```
Now, let’s provide the tool to the agent by applying the following changes to the code in `messenger_agent.py`:
```python
# messenger_agent.py
from agent_framework.openai import OpenAIChatClient
from config import Settings
# 👇 new code
from send_email import create_email_sender
# ...existing code...
async def create_and_send_message(prompt: str, gmail_token: str) -> str:
# 👇 updated code
email_tool = create_email_sender(gmail_token)
response = await agent.run(prompt, tools=[email_tool])
# 👆 updated code
return response.messages[0].contents[0].text
# ...existing code...
```
As you can see, you import the tool, create an instance of the `send_email()` function by invoking the `create_email_sender()` function, and pass this instance to the agent by assigning it to the `tools` parameter of the `run()` method.
Your agent is now enabled to send emails!
### Token Vault management
The only missing part at this point is to pass the access token so we can call the Gmail API. We said that when the user authenticates via Google, Auth0 receives an access token and a refresh token, which are stored in the Token Vault. We need to retrieve this token from the Token Vault so we can use it in the call.
Here are the changes that we need to make:
```python
# main.py
# ...existing code...
@app.post("/prompt")
async def submit_prompt(
data: Prompt,
request: Request,
response: Response, # 👈 new code
auth_session = Depends(auth0_client.require_session)
):
# 👇 new code
try:
store_options={"request": request, "response": response}
gmail_token = await auth0_client.client.get_access_token_for_connection(
{"connection": "google-oauth2"},
store_options=store_options
)
# 👆 new code
result = await create_and_send_message(
data.prompt,
gmail_token # 👈 new code
)
return {"response": result}
# 👇 new code
except AccessTokenForConnectionError:
# User hasn't connected their Google account yet
# Instruct frontend to POST to /auth/connect to initiate Connected Accounts flow
raise HTTPException(
status_code=403,
detail={
"error": "google_account_not_connected",
"message": "Please connect your Google account first",
"connect_endpoint": "/auth/connect",
"connect_params": {
"connection": "google-oauth2"
}
}
)
# 👆 new code
# ...existing code...
```
Basically, you use the `get_access_token_for_connection()` method of the `auth0_client.client` object provided by the Auth0 FastAPI SDK. You pass the name of your Google connection (`google-oauth2`, in the example) and the current HTTP content (`store_options`).
In case an access token is unavailable because the user account is not yet connected to their Google account, the error is caught, and the frontend initiates the [connected account flow](https://auth0.com/docs/secure/call-apis-on-users-behalf/token-vault/connected-accounts-for-token-vault). This flow uses the `/auth/connect` endpoint provided by the FastAPI SDK and enabled by the `mount_connected_account_routes` parameter we mentioned earlier.
Let’s adapt the frontend app’s code to start the connected account flow. Open the `app.js` file in the static folder and modify its code as shown in the following code block:
```javascript
// static/app.js
async function sendMessage() {
const input = document.getElementById('message-input');
const message = input.value.trim();
if (message) {
//...existing code...
const data = await response.json();
// 👇 changed code
// Handle connected account error
if (response.status == 403 && data.detail?.error === 'google_account_not_connected') {
messagesContainer.innerHTML += `
${data.detail.message}
`;
// Redirect to /auth/connect to initiate the Connected Accounts flow
const connection = data.detail.connect_params?.connection || 'google-oauth2';
window.location.href = `/auth/connect?connection=${connection}`;
return;
}
// Display the response or error
const messageText = data.response || data.message || 'An error occurred';
messagesContainer.innerHTML += `
${messageText}
`;
// 👆 changed code
}
}
//...existing code...
```
The code changes handle any errors related to the connected account by redirecting the user to the `/auth/connect` endpoint with the `connection` parameter specifying the name of the connection to which the current user's account should be connected. The user will be prompted for permissions to connect the account so that Google’s access and refresh tokens can be handled through the Token Vault.
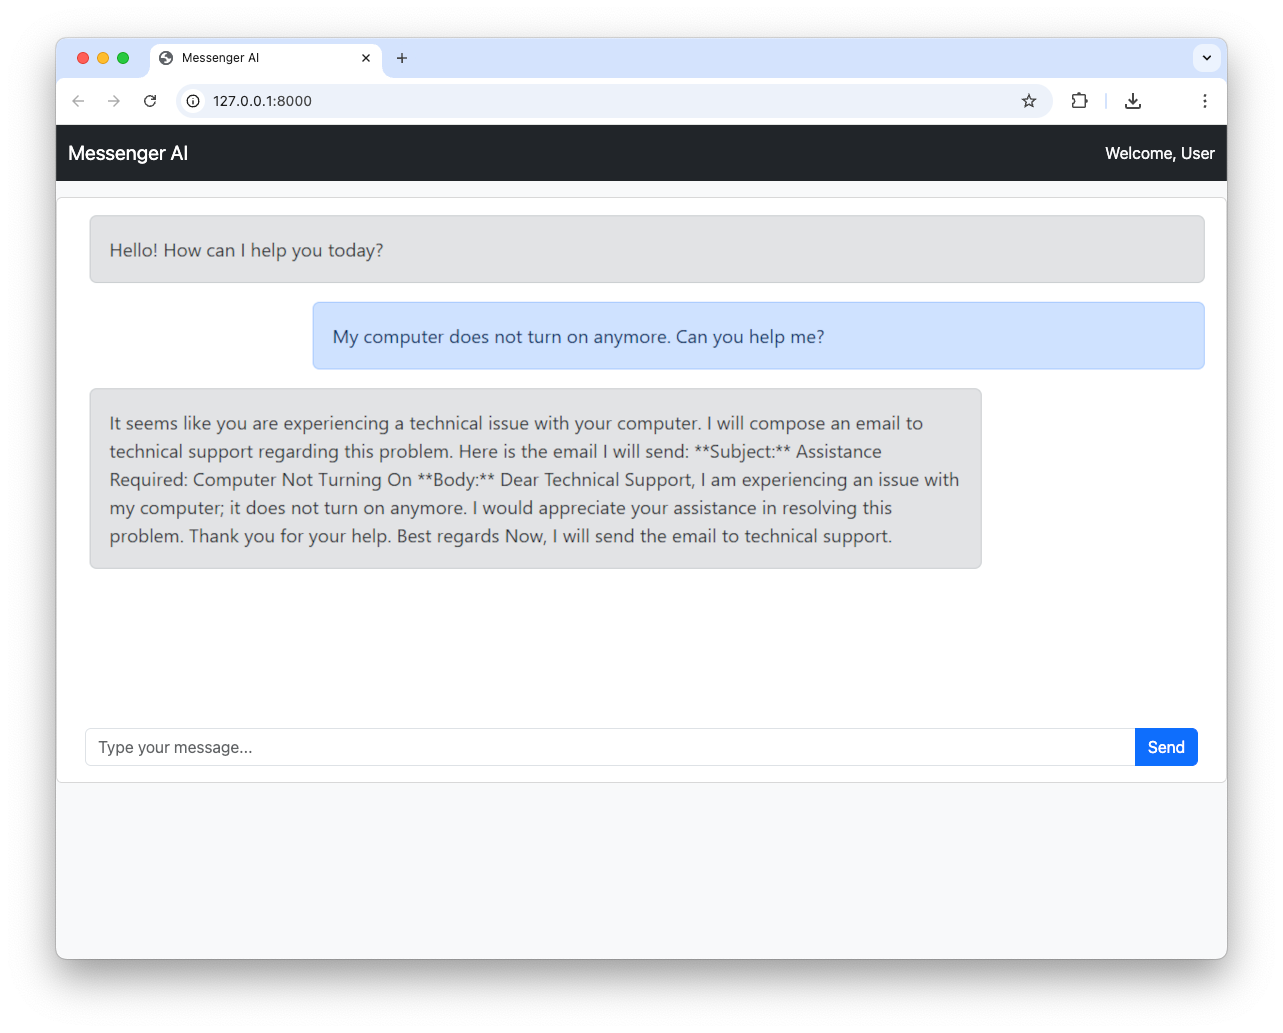
Now your AI agent can send email on behalf of the user securely!
The following screenshot shows an example of conversation between a user and the agent:
## Recap
In this article, we've outlined how to build a powerful and secure AI-powered help desk application. We started with a basic FastAPI web application, then introduced the Microsoft Agent Framework to create our AI agent. We secured our application with Auth0 and, most importantly, used the Auth0 Token Vault to enable our agent to securely send emails via the Gmail API.
This is just the beginning. Download the source code of the sample project built throughout the article from GitHub following [these instructions](https://github.com/auth0-samples/auth0-ai-samples/blob/main/call-apis-on-users-behalf/others-api/ms-agent-framework-vault-token-py/README.md). You can expand this application by adding more tools to your agent, integrating other services, with an eye on the security side by using [Auth0 for AI Agents](http://a0.to/ai-content).