---
title: "Node.js and Express Tutorial: Building and Securing RESTful APIs"
description: "Learn how to develop RESTful APIs with Node.js and Express while securing it with Auth0."
authors:
- name: "Bruno Krebs"
url: "https://auth0.com/blog/authors/bruno-krebs/"
date: "Oct 7, 2021"
category: "Developers,Tutorial,Express"
tags: ["express", "express-js", "node", "node-js", "api", "apis", "restful", "rest", "restful-apis", "auth0", "security", "identity", "oauth"]
url: "https://auth0.com/blog/node-js-and-express-tutorial-building-and-securing-restful-apis/"
---
# Node.js and Express Tutorial: Building and Securing RESTful APIs
**TL;DR:** In this article, you will learn how to develop RESTful APIs with Node.js, Express, and Auth0. You will start from scratch, scaffolding a new Node.js project, then you will go through all the steps needed to build a secure API. You can check the full code developed throughout this article in [this GitHub repository](https://github.com/auth0-blog/auth0-express).
## Prerequisites
To follow along with this article, you will need to have prior knowledge around JavaScript. If you have never used JavaScript before (even for frontend development), you might not understand the article well and it might make sense to learn about it first. If you do have previous experience with JavaScript, but you haven't used Node.js, don't worry, you _won't_ have a hard time here. Although it would be ideal to know a bit about Node.js, you will see that the code and the concepts explained in this article are not complex.
Other than that, you will need to have Node.js and NPM installed in your machine. If you don't have these, please, follow [the instructions over here](https://nodejs.org/en/download/).
## What You Will Build
As mentioned before, in this article, you will start from scratch (i.e., from an empty directory), then you will go through all the steps needed to build a secure RESTful API. The API that you will build will allow clients (third-party applications) to issue requests to manipulate _resources_. The resources, in this case, will represent _ads_ (as in products or services being advertised) that users will create, retrieve, update, and delete.
If you don't know what RESTful APIs are or what this term stands for, take a look at this brief definition and explanation of RESTful APIs:
> A RESTful API is an Application Programming Interface (API) that uses HTTP verbs like `GET`, `PUT`, `POST`, and `DELETE` to operate data. Also referred to as RESTful web services, RESTful APIs are based on the REpresentational State Transfer (REST) approach, an architectural style that enables developers to manipulate data.
For more information, check the following resources:
- [Representational state transfer](https://en.wikipedia.org/wiki/Representational_state_transfer)
- [Richardson Maturity Model](https://martinfowler.com/articles/richardsonMaturityModel.html)
## Building and Securing RESTful APIs
Now that you know what you will create and what the prerequisites are, it's time to starting building your application. For starters, open a terminal, move it to the directory where you usually create your projects, and create a new directory there:
```bash
mkdir express-ads-api
```
Then, move into this new directory and use `npm` to scaffold a new project:
```bash
npm init -y
```
The command above will scaffold the project with some default properties. If you open this directory in a text editor or in an IDE (like [Visual Studio Code](https://code.visualstudio.com/) or [WebStorm](https://www.jetbrains.com/webstorm/download/)), you will see that the `npm` command you issued created a file called `package.json`. Opening this file, you will see the following contents:
```json
{
"name": "express-ads-api",
"version": "1.0.0",
"description": "",
"main": "index.js",
"scripts": {
"test": "echo \"Error: no test specified\" && exit 1"
},
"keywords": [],
"author": "",
"license": "ISC"
}
```
Right now, this file is quite short and doesn't have that much interesting information (it just exposes some properties like the project `name`, `version`, and `description`). However, as you start adding dependencies to your project, the tendency is that this file will grow and get more interesting.
Next, you will create a new directory called `src` inside the project root:
```bash
mkdir src
```
The idea here is to put all your source code (i.e., the JavaScript files) inside this directory. So, after creating this directory, create a new file called `index.js` inside it, and add the following code to it:
```javascript
// ./src/index.js
console.log('Hello, world!');
```
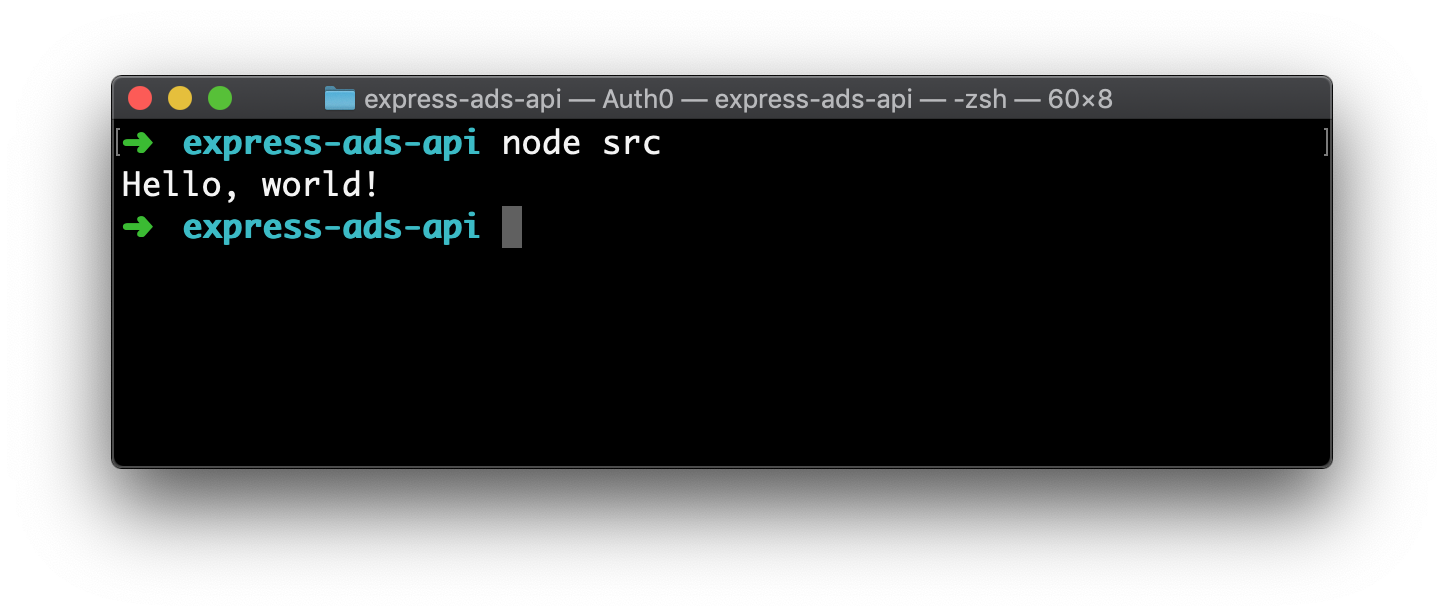
After saving this file, you can head back to your terminal and issue the following command to test it (make sure you are on the project root):
```bash
node src
```
If everything works as expected, you will see "Hello, world!" printed out in your terminal.
### Creating your first Express API
Right now, the project you created just logs a static message. As this is not very useful, after building your "Hello, world!" application with Node.js, you can start focusing on creating a RESTful API. For that, the first thing you will need is to install some dependencies. So, head to your terminal and issue the following command:
```bash
npm install body-parser cors express helmet morgan
```
This command will install five dependencies in your project:
- [`body-parser`](https://github.com/expressjs/body-parser): You will use this dependency to convert the body of incoming requests into JavaScript objects.
- [`cors`](https://github.com/expressjs/cors): You will use this dependency to configure Express to add headers stating that your API accepts requests coming from other origins. This is known as [Cross-Origin Resource Sharing (CORS)](https://developer.mozilla.org/en-US/docs/Web/HTTP/CORS).
- [`express`](https://github.com/expressjs/express): This is the Express library itself.
- [`helmet`](https://github.com/helmetjs/helmet): This library helps to secure Express APIs by defining various HTTP headers.
- [`morgan`](https://github.com/expressjs/morgan): This library adds some logging capabilities to your Express API.
> **Note:** After issuing the command above, you will notice two things in your project. First, the `package.json` file will contain a new property called `dependencies` with all the libraries above. This is how NPM knows what dependencies your project needs. Second, you will notice a new file called `package-lock.json` inside the project root. This file helps NPM identify what are [the exact libraries you used while developing, so it uses the same ones everywhere](https://docs.npmjs.com/files/package-lock.json) (i.e., in other environments).
When NPM finishes installing these dependencies (it might take a few seconds, depending on your internet connection), you can open the `index.js` file, and replace its code with the following:
```javascript
// ./src/index.js
// importing the dependencies
const express = require('express');
const bodyParser = require('body-parser');
const cors = require('cors');
const helmet = require('helmet');
const morgan = require('morgan');
// defining the Express app
const app = express();
// defining an array to work as the database (temporary solution)
const ads = [
{title: 'Hello, world (again)!'}
];
// adding Helmet to enhance your API's security
app.use(helmet());
// using bodyParser to parse JSON bodies into JS objects
app.use(bodyParser.json());
// enabling CORS for all requests
app.use(cors());
// adding morgan to log HTTP requests
app.use(morgan('combined'));
// defining an endpoint to return all ads
app.get('/', (req, res) => {
res.send(ads);
});
// starting the server
app.listen(3001, () => {
console.log('listening on port 3001');
});
```
The new version of this file starts by importing all the dependencies you installed moments ago, goes through the creation and configuration of a new Express application (`const app = express()`), and ends by making this application listen on port `3001` (`app.listen(3001, ...)`). Besides that, this code defines two important things:
- an array called `ads` that works, temporarily, as an in-memory database (you will replace this soon);
- and an endpoint that listens to HTTP `GET` requests and that, when triggered, returns all the content of the `ads` array.
> **Note:** The code snippet above contains comments that can help you understand each line. If you want to learn more about the middleware being used (i.e., about `helmet`, `bodyParser`, `cors`, and `morgan`), please, refer to their official documentation.
After updating this file, you can issue `node src` again from the project root. Then, in another terminal, you can use `curl` to issue an HTTP request to test your API:
```bash
curl http://localhost:3001/
```
> **Note:** If no verb is explicitly configured (through the `-X` parameter), `curl` command will issue an HTTP `GET` request.
If you prefer, you can also use a graphical HTTP client like [Insomnia](https://insomnia.rest/) or [Postman](https://www.getpostman.com/). For example, the screenshot below shows Insomnia after issuing a request to the Express API.
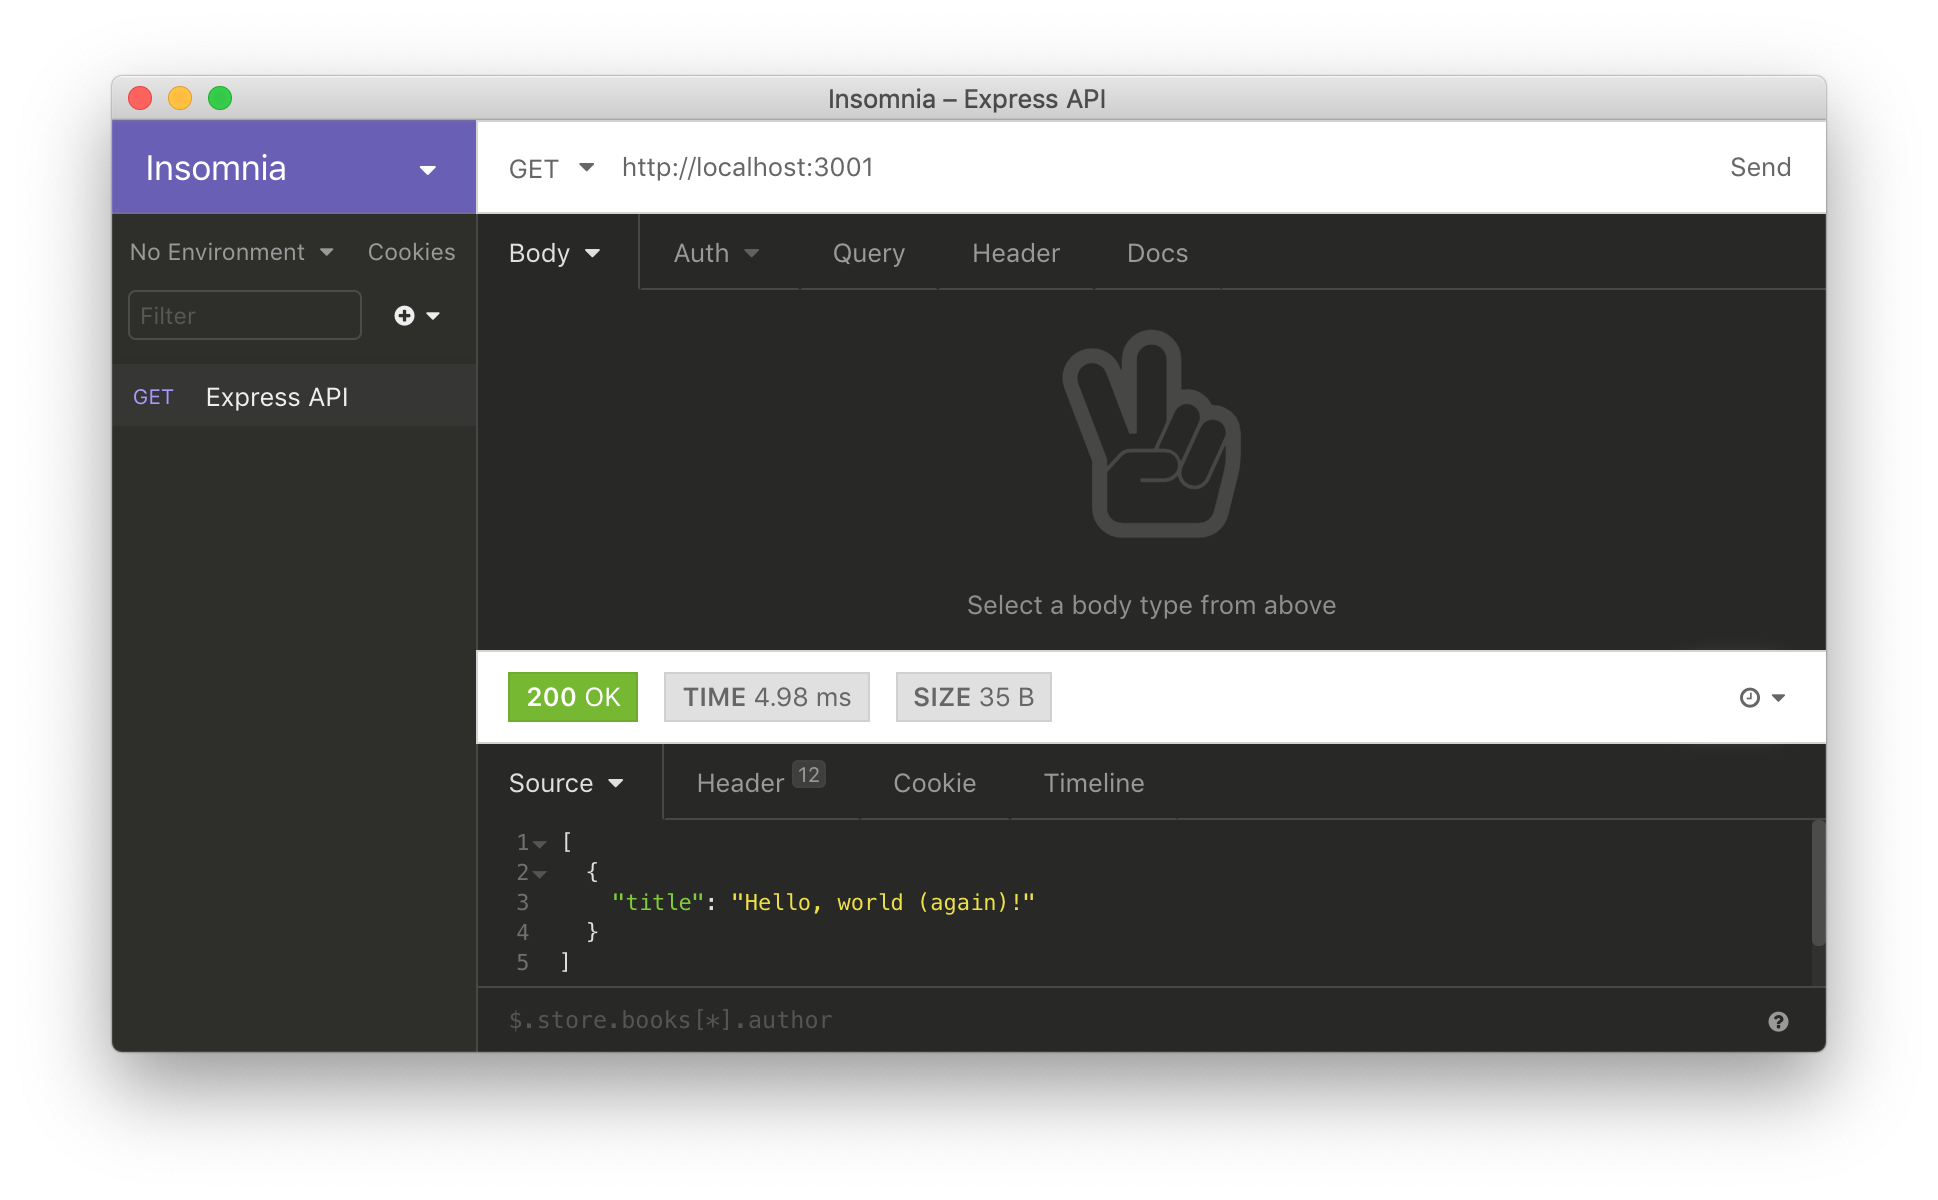
No matter how you decide to issue the request, after receiving it, the application will delegate this request to the `app.get('/', ...)` endpoint. Then, as defined, the endpoint will send back to the client the following response (i.e., the `ads` array):
```json
[
{
"title": "Hello, world (again)!"
}
]
```
### Integrating Express and MongoDB
When it comes to databases, the most popular choice among Node.js developers is (by far) [MongoDB](https://www.mongodb.com/). This database engine allows developers to use a flexible document data model that plays particularly well with Node.js apps. As you will see throughout the article, manipulating a MongoDB database from a Node.js application is easy and efficient.
Before learning about how to make your Express API operate MongoDB though, you will need a database instance. For that, you have several options like installing MongoDB in your machine, running it in a container, or using a cloud provider like [MongoDB Atlas](https://www.mongodb.com/cloud/atlas). However, to facilitate the process, you will use a package called `mongodb-memory-server` that spins up a MongoDB instance programmatically for testing or mocking during development. What is nice about this library is that, by default, it holds the data in memory. Also, you will install [the official `mongodb` NPM package](https://github.com/mongodb/node-mongodb-native) to make your app interact with this in-memory database.
So, back into your terminal, use `npm` to install these packages:
```bash
npm i mongodb-memory-server mongodb
```
After installing them, create a new directory called `database` inside the `src` directory and, inside it, create a new file called `mongo.js`. Inside this file, add the following code:
```js
// ./src/database/mongo.js
const {MongoMemoryServer} = require('mongodb-memory-server');
const {MongoClient} = require('mongodb');
let database = null;
async function startDatabase() {
const mongo = new MongoMemoryServer();
const mongoDBURL = await mongo.getConnectionString();
const connection = await MongoClient.connect(mongoDBURL, {useNewUrlParser: true});
database = connection.db();
}
async function getDatabase() {
if (!database) await startDatabase();
return database;
}
module.exports = {
getDatabase,
startDatabase,
};
```
As you can see, this file `exports` two functions. One to initialize the in-memory database (`startDatabase`) and one that returns a reference to it (`getDatabase`).
With that in place, create a new file called `ads.js` inside the `database` directory and add the following code to it:
```js
// ./src/database/ads.js
const {getDatabase} = require('./mongo');
const collectionName = 'ads';
async function insertAd(ad) {
const database = await getDatabase();
const {insertedId} = await database.collection(collectionName).insertOne(ad);
return insertedId;
}
async function getAds() {
const database = await getDatabase();
return await database.collection(collectionName).find({}).toArray();
}
module.exports = {
insertAd,
getAds,
};
```
The `ads.js` file is also defining and exporting two functions. The difference though is that this file exports a function that allows you to insert an ad into the database (`insertAd`) and one that retrieves all the records persisted there (`getAds`). Note that both of these functions use the `getDatabase` function exported by the `mongo.js` file to get the reference that points to your in-memory database.
After creating this file, open the `index.js` file and update it as follows:
```javascript
// ./src/index.js
// ... leave the other require statements untouched ...
const {startDatabase} = require('./database/mongo');
const {insertAd, getAds} = require('./database/ads');
// ... leave the app definition and the middleware config untouched ...
// replace the endpoint responsible for the GET requests
app.get('/', async (req, res) => {
res.send(await getAds());
});
// start the in-memory MongoDB instance
startDatabase().then(async () => {
await insertAd({title: 'Hello, now from the in-memory database!'});
// start the server
app.listen(3001, async () => {
console.log('listening on port 3001');
});
});
```
With this refactoring, you are:
- importing and calling the `startDatabase` function to initialize the in-memory instance _before_ making the Express API listen to requests;
- importing and calling the `insertAd` function to create a new ad right after starting the database;
- and importing and calling the `getAds` inside the endpoint responsible for the `GET` requests.
Note that you are replacing the previous implementation of the `GET` endpoint to stop returning the static `ads` array and to start returning the records available inside the database. As such, you can remove the lines that define the `ads` constant.
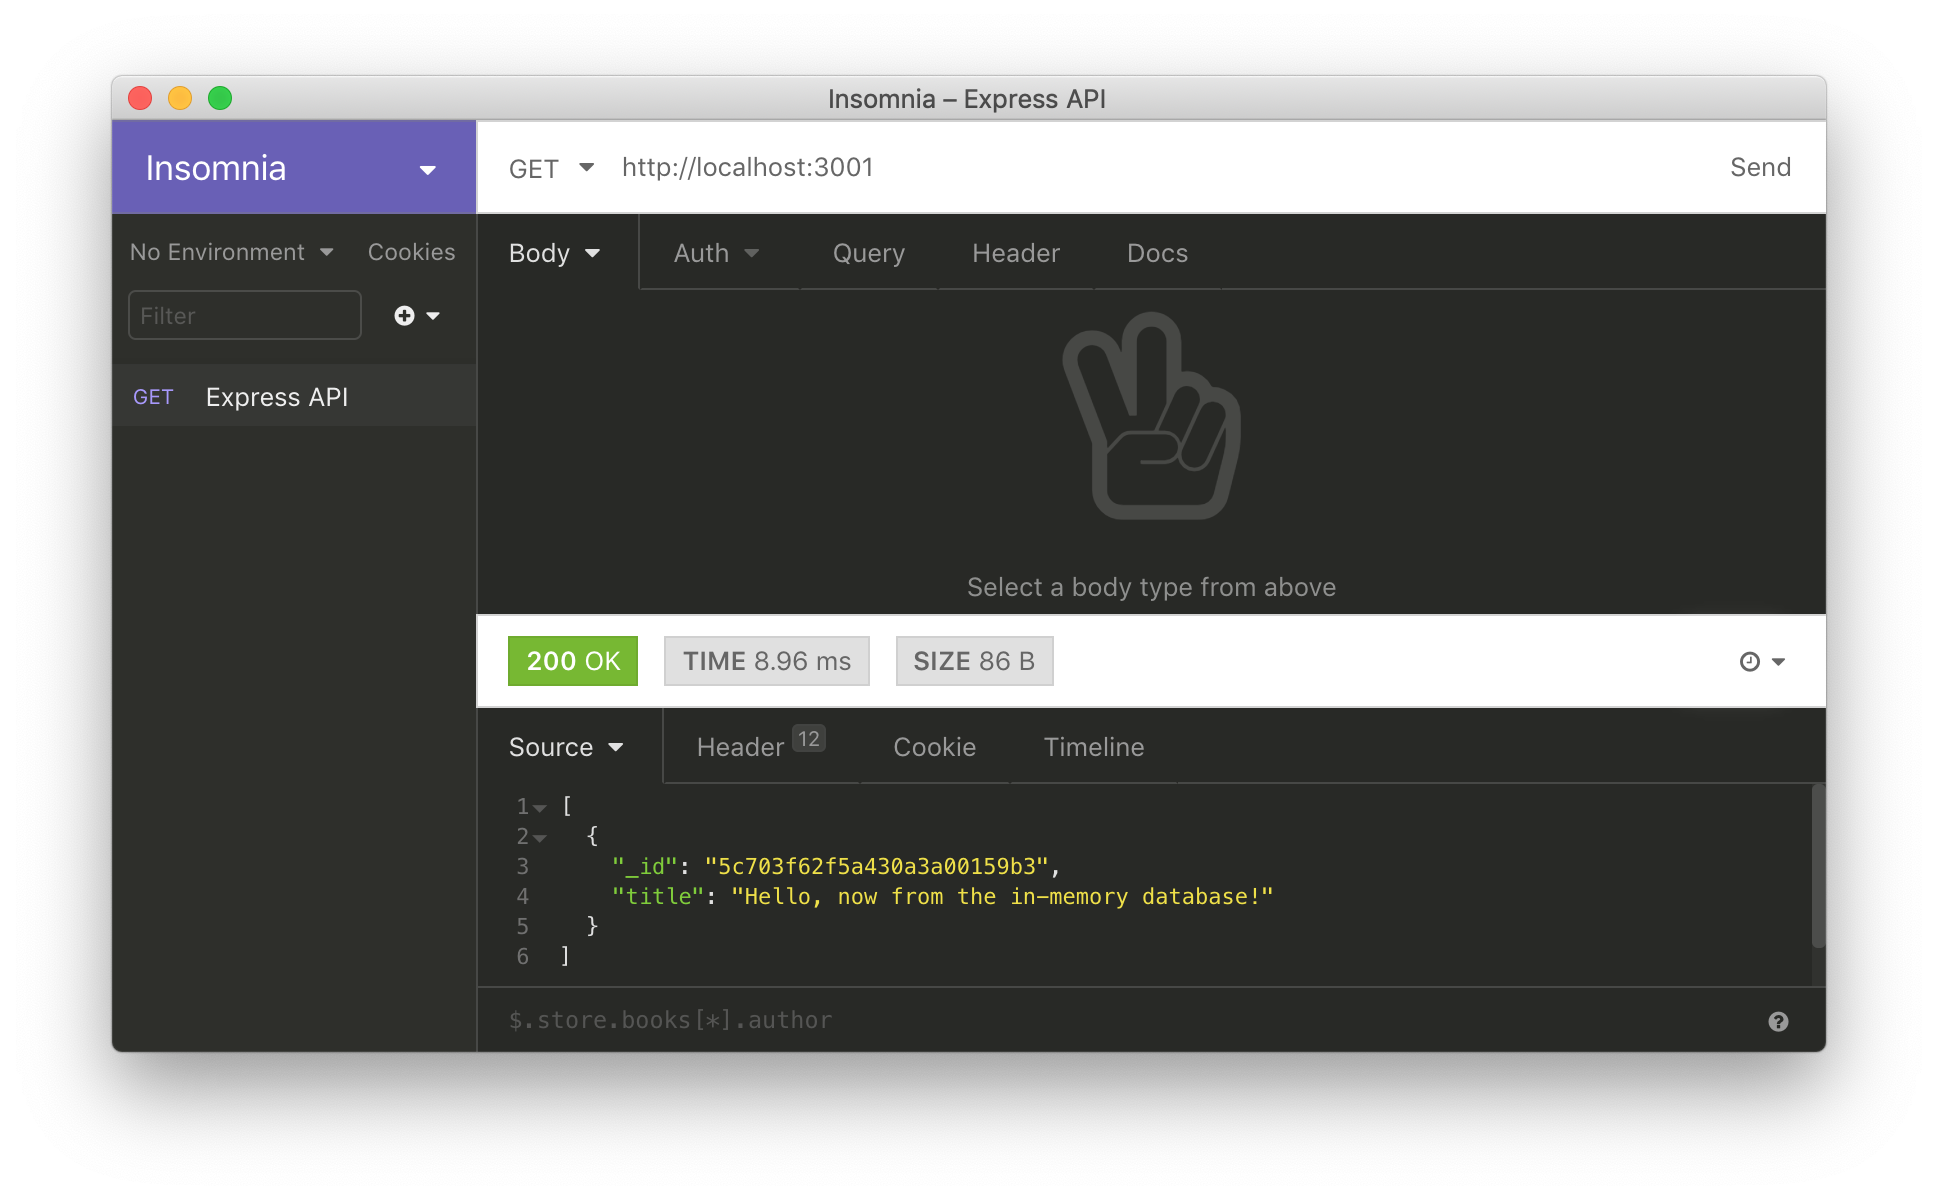
When you finish with the refactoring, you can stop your API (by hitting `control` + `C`), start it again (`node src`), and issue the same HTTP request as before (`curl http://localhost:3001/`). The difference is that, now, your API will respond with an array that contains an object with two properties: `title` (just like before) and `_id` (which refers to its _primary key_ on the database).
### Adding endpoints to allow clients to insert, update, and delete resources
Now that you have an Express API integrated with MongoDB, it is time to implement the other HTTP verbs (i.e., the other endpoints). In this section, you will add three new endpoints to your API:
- an endpoint responsible for `POST` requests: this will allow clients to use your API to save new ads;
- an endpoint responsible for `DELETE` requests: this will allow clients to delete ads from your API;
- an endpoint responsible for `PUT` requests: this will allow clients to update existing ads;
To add these endpoints, you will start by defining the functions that will interact with your MongoDB instance. So, open the `ads.js` file (it resides inside the `database` directory), and update it as follows:
```js
// ./src/database/ads.js
// ... leave the other require statements untouched ...
const {ObjectID} = require('mongodb');
// ... leave collectionName, insertAd, and getAds untouched ...
async function deleteAd(id) {
const database = await getDatabase();
await database.collection(collectionName).deleteOne({
_id: new ObjectID(id),
});
}
async function updateAd(id, ad) {
const database = await getDatabase();
delete ad._id;
await database.collection(collectionName).update(
{ _id: new ObjectID(id), },
{
$set: {
...ad,
},
},
);
}
module.exports = {
// ... insertAd, getAds ...
deleteAd,
updateAd,
};
```
Here, you are adding only two new functions (`deleteAd` and `updateAd`) because you already have a function that allows the insertion of new ads (`insertAd`). Note that both new functions need an element called `ObjectID` to be able to tell the database which specific element you want to update or delete.
Another important thing to grasp is the object passed to the `$set` property on the `update` operation. While updating a document in a MongoDB database, you can inform only the properties that have changed and omit whatever remains the same. For example, if you have an object in your database with fields called `name`, `phone`, and `address`, you can pass to `$set` only the `phone` property to change it while leaving the rest untouched. If this is not clear yet, you will see this is in action in a bit.
After refactoring this file, you will have to open the `index.js` file and update it as follows:
```js
// ./src/index.js
// ... other require statements ...
const {deleteAd, updateAd} = require('./database/ads');
// ... app definition, middleware configuration, and
app.post('/', async (req, res) => {
const newAd = req.body;
await insertAd(newAd);
res.send({ message: 'New ad inserted.' });
});
// endpoint to delete an ad
app.delete('/:id', async (req, res) => {
await deleteAd(req.params.id);
res.send({ message: 'Ad removed.' });
});
// endpoint to update an ad
app.put('/:id', async (req, res) => {
const updatedAd = req.body;
await updateAd(req.params.id, updatedAd);
res.send({ message: 'Ad updated.' });
});
// ... startDatabase ...
```
On the new version of this file, you are adding the endpoints responsible for the three HTTP verbs mentioned before (`POST`, `DELETE`, and `PUT`). What is important to note here is that you are using [Express route parameters](https://expressjs.com/en/guide/routing.html#route-parameters) to be able to fetch, from the URL requested, the `id` of the ad you want to delete or update (`/:id`). Also, as you can see on both the `post` and `put` endpoints, you are getting the details of the ad being inserted or updated from the request body (`req.body`).
After changing this file, you can stop your API (by hitting `control` + `C`), start it again (`node src`), and issue some HTTP requests (as presented on the following code snippet) to test the new endpoints.
```bash
# insert a new ad
curl -X POST -H 'Content-Type: application/json' -d '{
"title": "Pizza",
"price": 10.5
}' http://localhost:3001/
# get all ads (including the one that you just added)
curl http://localhost:3001/
# update the ad
ID=${AD_ID}
curl -X PUT -H 'Content-Type: application/json' -d '{
"price": 12.5
}' http://localhost:3001/$ID
# delete the ad
curl -X DELETE http://localhost:3001/$ID
```
> **Note:** If you are using the code snippet above, right after inserting a new ad, you are issuing a request to get all ads persisted on the database. Use the result of this request to copy the `_id` property of the new ad and use it to replace the `${AD_ID}` placeholder.
If everything works as expected, the first request will persist a new ad in your API, the second one will return all the ads persisted there, the third request will update the price of the new ad (from `10.5` to `12.5`), and the fourth one will remove the ad from the
On the `PUT` request, you can see that you are passing just one field on the request body (`price`). As the `$set` object passed to the `update` operation is using this exact body to update the ad, the `title` of the ad (which is "Pizza") will not be changed. Neat, right?
### Securing Express APIs with Auth0
Right now, you have an Express API that exposes endpoints that allow clients to insert, update, delete, and retrieve ads. This is a nice start, but you could use some security, right?
For example, let's say that you want to enable all users (no matter if they are visitors or if they are authenticated) to list ads, but you want only authenticated users to be able to insert, update, and delete objects. How would you do this? An easy answer to this question is "by using [Auth0](https://auth0.com)".
As you will see in this section, securing Express APIs with Auth0 is very easy. For starters, you will need to sign up to Auth0 so you can integrate it into your API. If you already have an existing account, you can use it without a problem. If you do not have one, now is a good time to sign up for a free Auth0 account. What is cool about Auth0 is that, with your free account, you will have access to the following features:
- [Lock for Web, iOS & Android](https://auth0.com/docs/libraries/lock/v11)
- [Up to 2 social identity providers (like Twitter and Facebook)](https://auth0.com/learn/social-login/)
- [Unlimited Serverless Rules](https://auth0.com/docs/rules/current)
- [Community Support](http://community.auth0.com/)
After signing up, you will have to create an [Auth0 API](https://auth0.com/docs/api/info) to represent your Express project. So, head to the APIs section of your [Auth0 Dashboard](https://manage.auth0.com/#/apis) and click on the _Create API_ button. When you click on this button, Auth0 will show you a dialog where it will ask you for three things:
- _Name_: A friendly name for your API. As this is just used inside the Auth0 Dashboard itself, don't worry much about this value (e.g., you can use something like "Express APIs Tutorial").
- _Identifier_: A logical identifier for the API you are creating. As Auth0 recommends using an URL-like value, you can add something like `https://ads-api` here (although this looks like an URL, Auth0 will never call it).
- _Signing Algorithm_: Leave this set to `RS256`.
After filling this form, click on the _Create_ button. Then, back to the terminal, issue the following command:
```bash
# from the project root
npm i express-jwt jwks-rsa
```
Here, you are installing two new libraries:
- [`express-jwt`](https://github.com/auth0/express-jwt): A middleware that validates JSON Web Tokens (JWTs) and sets the `req.user` with its attributes.
- [`jwks-rsa`](https://github.com/auth0/node-jwks-rsa): A library to retrieve RSA public keys from a JWKS (JSON Web Key Set) endpoint.
After that, open the `./src/index.js` file and import these libraries as follows:
```js
// ./src/index.js
// ... other require statements ...
const jwt = require('express-jwt');
const jwksRsa = require('jwks-rsa');
```
Still on this file, create the following constant (`checkJwt`) right before the `POST` endpoint (`app.post`):
```js
// ... require statements ...
// ... app definitions ...
// ... app.get endpoint ...
const checkJwt = jwt({
secret: jwksRsa.expressJwtSecret({
cache: true,
rateLimit: true,
jwksRequestsPerMinute: 5,
jwksUri: `https:///.well-known/jwks.json`
}),
// Validate the audience and the issuer.
audience: '',
issuer: `https:///`,
algorithms: ['RS256']
});
// ... post, delete, put, startDatabase ...
```
This constant is actually an Express middleware that will validate [access tokens](https://auth0.com/docs/tokens/overview-access-tokens). Note that, to make it work, you will have to replace the `` placeholder with the identifier of the Auth0 API you created (e.g., `https://ads-api`). Also, you will have to replace `` with your Auth0 domain (e.g., `blog-samples.auth0.com`).
> **Note:** Not sure what your Auth0 domain is? When you create a new account with Auth0, you are asked to pick a name for your *Tenant*. This name, appended with `auth0.com`, will be your Auth0 domain. For more information, please, check [the _Learn the Basic_ doc](https://auth0.com/docs/getting-started/the-basics#domains).
With that in place, you can secure the `post`, `put`, and `delete` endpoints by adding the following line right _before_ their definition:
```js
// ... require statements, app definitions, app.get endpoint, and checkJwt ...
app.use(checkJwt);
// ... post, delete, put, startDatabase ...
```
On the code snippet above, you are configuring the Express application to `use` the `checkJwt` middleware. Note that, as you are defining it _after_ the `get` endpoint, the `checkJwt` middleware _will not_ intercept requests to this endpoint. In the same way, as you are defining it _before_ the `post`, `delete`, and `put` endpoints, the `checkJwt` middleware _will_ intercept requests to them.
After making this change, restart your API (by hitting `control` + `C` and then issuing `node src` to start it again), and issue the following request to confirm that the `get` endpoint is still public:
```bash
curl http://localhost:3001
```
If everything works as expected, you will still be able to fetch the ads from this endpoint. However, if you try to issue requests to any other endpoint, you will get an error saying that "No authorization token was found":
```bash
# this command will not work, as it does not contain an access token
curl -X POST -H 'Content-Type: application/json' -d '{
"title": "Pizza",
"price": 10.5
}' http://localhost:3001/
```
To be able to use these endpoints again, you will need an access token. The process of getting a token will depend on [what type of client you are dealing with](https://auth0.com/docs/api-auth/which-oauth-flow-to-use). This is out of scope here but, if you are dealing with a SPA application (like those created with React, Angular, and Vue.js), you can use [the `auth0-js` NPM library](https://auth0.com/docs/libraries/auth0js/v9). If you are dealing with some other type of client (e.g., regular web application or native application), check [the Auth0's docs](https://auth0.com/docs/) for more info.
Nevertheless, to see the whole thing in action, you can head back to your Auth0 Dashboard, open the API you created before, and move to the _Test_ section. On this section, you will see a button called _Copy Token_ that will provide you a temporary token that you can use to test your API.

So, click on this button and then use your HTTP client to issue a request to your API with the test token:
```bash
# use the token copied to set the TOKEN variable
TOKEN=eyJ...DRA
# issue an authenticated HTTP POST request
curl -X POST -H 'Authorization: Bearer '$TOKEN -H 'Content-Type: application/json' -d '{
"title": "Pizza",
"price": 10.5
}' http://localhost:3001/
```
If everything works as expected, you will be able to use your API endpoints again. Awesome, huh?
## Conclusion
In this article, you learned about how easy it is to develop RESTful APIs with Express and Node.js. More specifically, you started by using `npm` to scaffold a brand new application. After that, you used Express to expose API endpoints to manipulate ads. Then, in the end, you learned how to secure your API with Auth0.
With this setup, you are ready to move on and start building your production-ready APIs backed by Node.js, Express, Mongo, and Auth0. However, before doing so, one important thing you might want to learn about is `express-validator`, an Express middleware that helps you validate data sent by users. For that, [check this article we recently published](https://auth0.com/blog/express-validator-tutorial/).
> Was this fast (and fun) enough for you? Let us know in the comments section below.