


That's right! Node.js version 14 is here! 🎉
Whether you have upgraded your Node version already or are thinking about doing it soon, let's discuss some of the things that this new version gives us! We'll even chat about older versions and what to expect there in the coming months.
Node.js v 14 is here! 🎉💚 https://t.co/iB7dK5uljY
— Node.js (@nodejs) April 21, 2020
How to Upgrade
Want to upgrade your current Node.js version? Following the instructions here to download for any operating system: macOS, Windows, and Linux. We will find that Node.js 14.0.0 includes npm 6.14.4.
What's New?
There are many things to look forward to with this major release. Some of the new features include:
- The once experimental feature, Diagnostic Reporting, is now stable!
- V8 has been upgraded to V8 8.1
- Node Streams have been updated
- Removal of Experimental Modules Warning
Let's walk through these!
To find the full list of changes, you can visit this page.
"That's right! Node.js version 14 is here! 🎉"
Tweet This

Diagnostic Reporting is now stable!
Diagnostic reporting generates a JSON-formatted file that can aid in diagnosing problems. When things go wrong in your app, like slow performance or memory leaks, it's helpful to have a full report on where issues are occurring. Even if our app were to crash, this report would have information on that as well. We can run this report in development, testing, or production.
Back when Node.js v12 was released, diagnostic reporting was experimental. We now have it as a stable feature in this new version.
To run the report, run the following in your command line:
node --report-uncaught-exception --report-on-signal \
--report-on-fatalerror app.js
Let's break down this command:
--report-uncaught-exception: The report will generate on uncaught exceptions. We want to make sure all errors are caught and handled.--report-on-signal: This will allow for reports to be generated when a specific signal is sent to the Node.js process.--report-on-fatalerror: Reports all the fatal errors. It lets us know of all the errors that would cause our js applications to stop working.app.js: Where we are running the diagnostic report.
There are many different variations to this command. Visit this page for the official docs on diagnostic reporting in Node.js and other ways to use the command.
"Diagnostic Reporting is now stable in Node.js v14!"
Tweet This
V8 upgraded to v8.1
This Node.js v14.x release also comes with the newly upgraded Javascript engine: v8.1!
There are a handful of things that were added into this version; one that we'll cover here is the nullish coalescing operator.
The nullish coalescing operator looks like this: ??. The operator returns the results of the expression to the right of the operator only when the expression to the left of it is null or undefined. Otherwise, the results from the left expression are returned. Let's see that in action:
const newVersion = null ?? 'Does this work?';
console.log(newVersion);
// expected output: "Does this work?"

const nullishTest = 0 ?? 55;
console.log(nullishTest);
// expected output: 0
The value on the left-hand has to be null or undefined for the right-hand value to be ran. So in the second example, it was a 0 on the left; because that is not null or undefined, it returned with the 0 number.
This helps a lot with values that are returned null or undefined when we were not expecting them to do so. So if something happens in our app and it returns null, the operator moves on to maybe an error message or a default value (the value on the right-hand side of the operand) and gives the user something to see.
Some other things that are in v8.1 include:
- Optional Chaining
- Intl.DisplayNames
- Enables calendar and numberingSystem options for Intl.DateTimeFormat
Streams
Streams can help with many things in Node, here are a few:
- Handling data
- Handling writing/reading files
- Network communication
Streams have not been recently added (they've been around for a while), but consistency has improved. Some examples that were mentioned were:
http.OutgoingMessageis similar tostream.Writable. To learn more aboutstream.Writable, visit this docs page.net.Socketbehaves exactly likestream.Duplex. To learn more aboutstream.Duplex, visit this docs page.
A blog post by Michael Dawson and Bethany Griggs recommends that if your application relies heavily on streams, start testing now! This will help us get ready for the Node.js v14 LTS release in October 2020.
The full stream module official documentation can be found here.
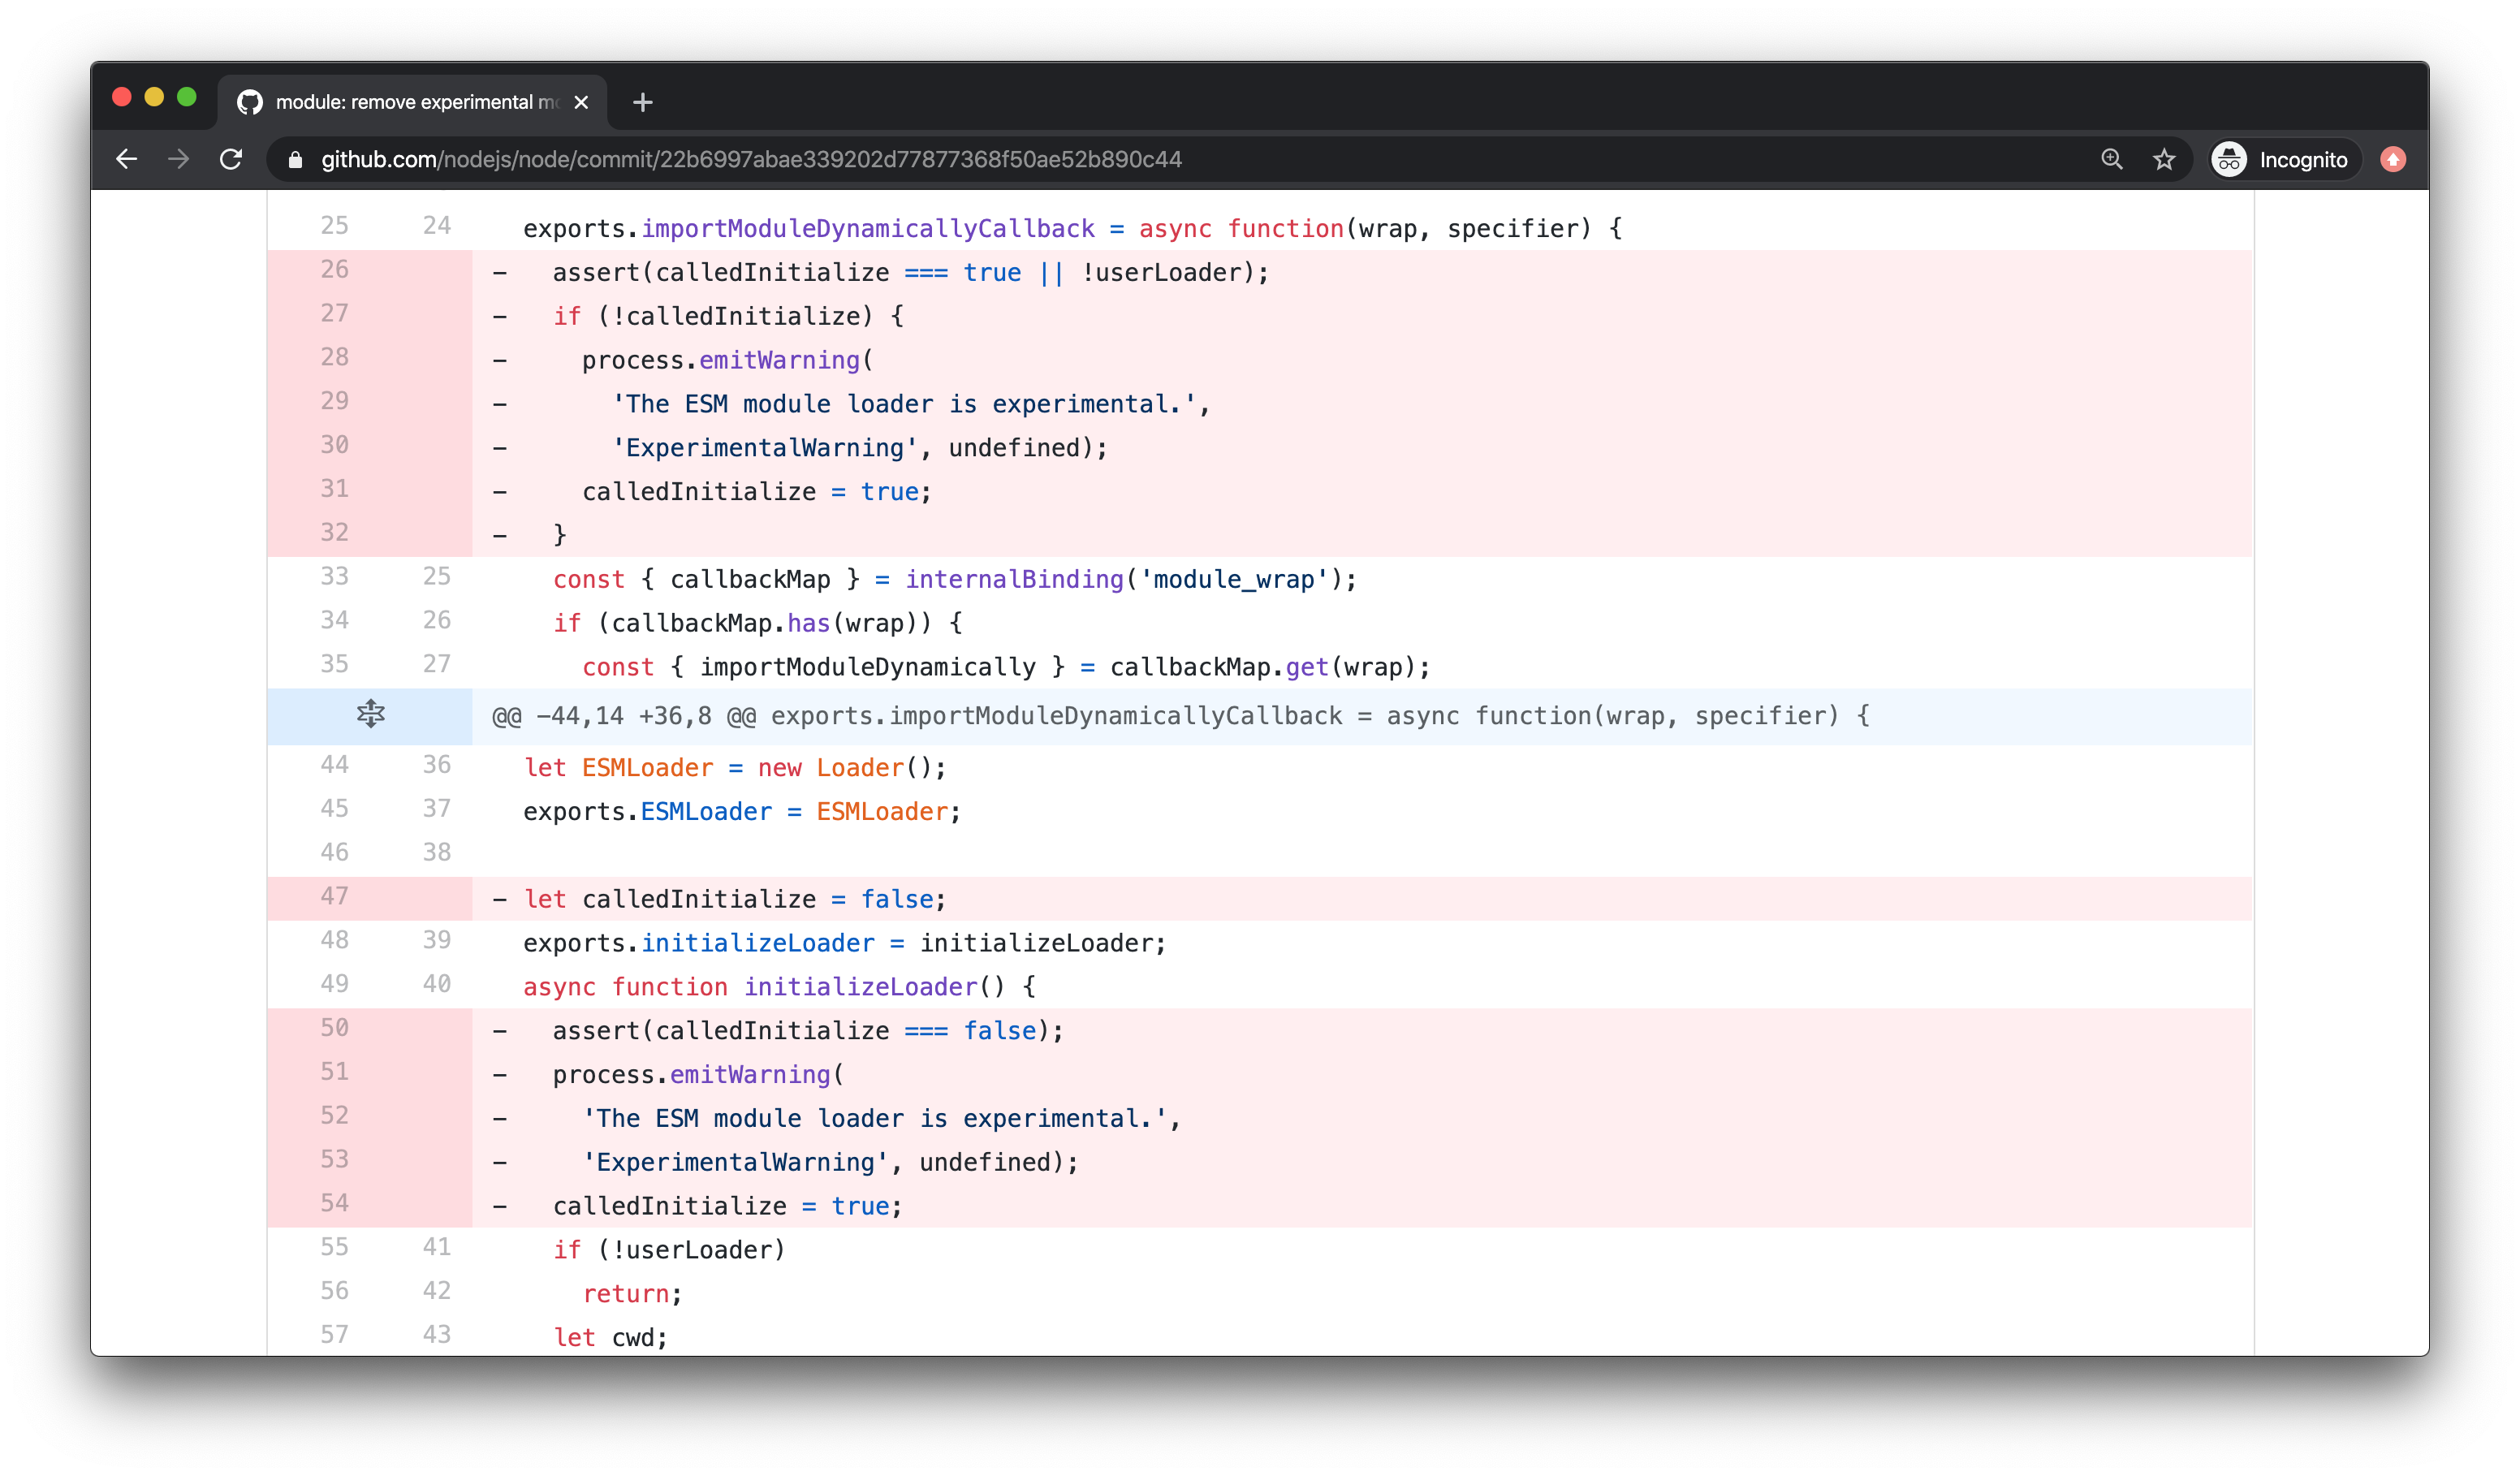
Removal of Experimental Modules Warning
When running an ECMAScript Modules (ESM) in Node.js, we would get an "Experimental Warning". That warning has now been removed. That's it! It's still experimental, the warning has just been removed.
ESM is JavaScript's standard module system. It helps with managing variables, organizing functions, and grouping things that would make sense in our code. To learn more about this feature, check out the official documentation.
ESM is the best module format thanks to its simple syntax, async nature, and tree-shakeability.
Experimental Additions
In this version update, we see a couple of experimental additions. Those include:
Head on over to the official Node.js v14 docs to find out all the updates and experiments!
What About Older Versions?
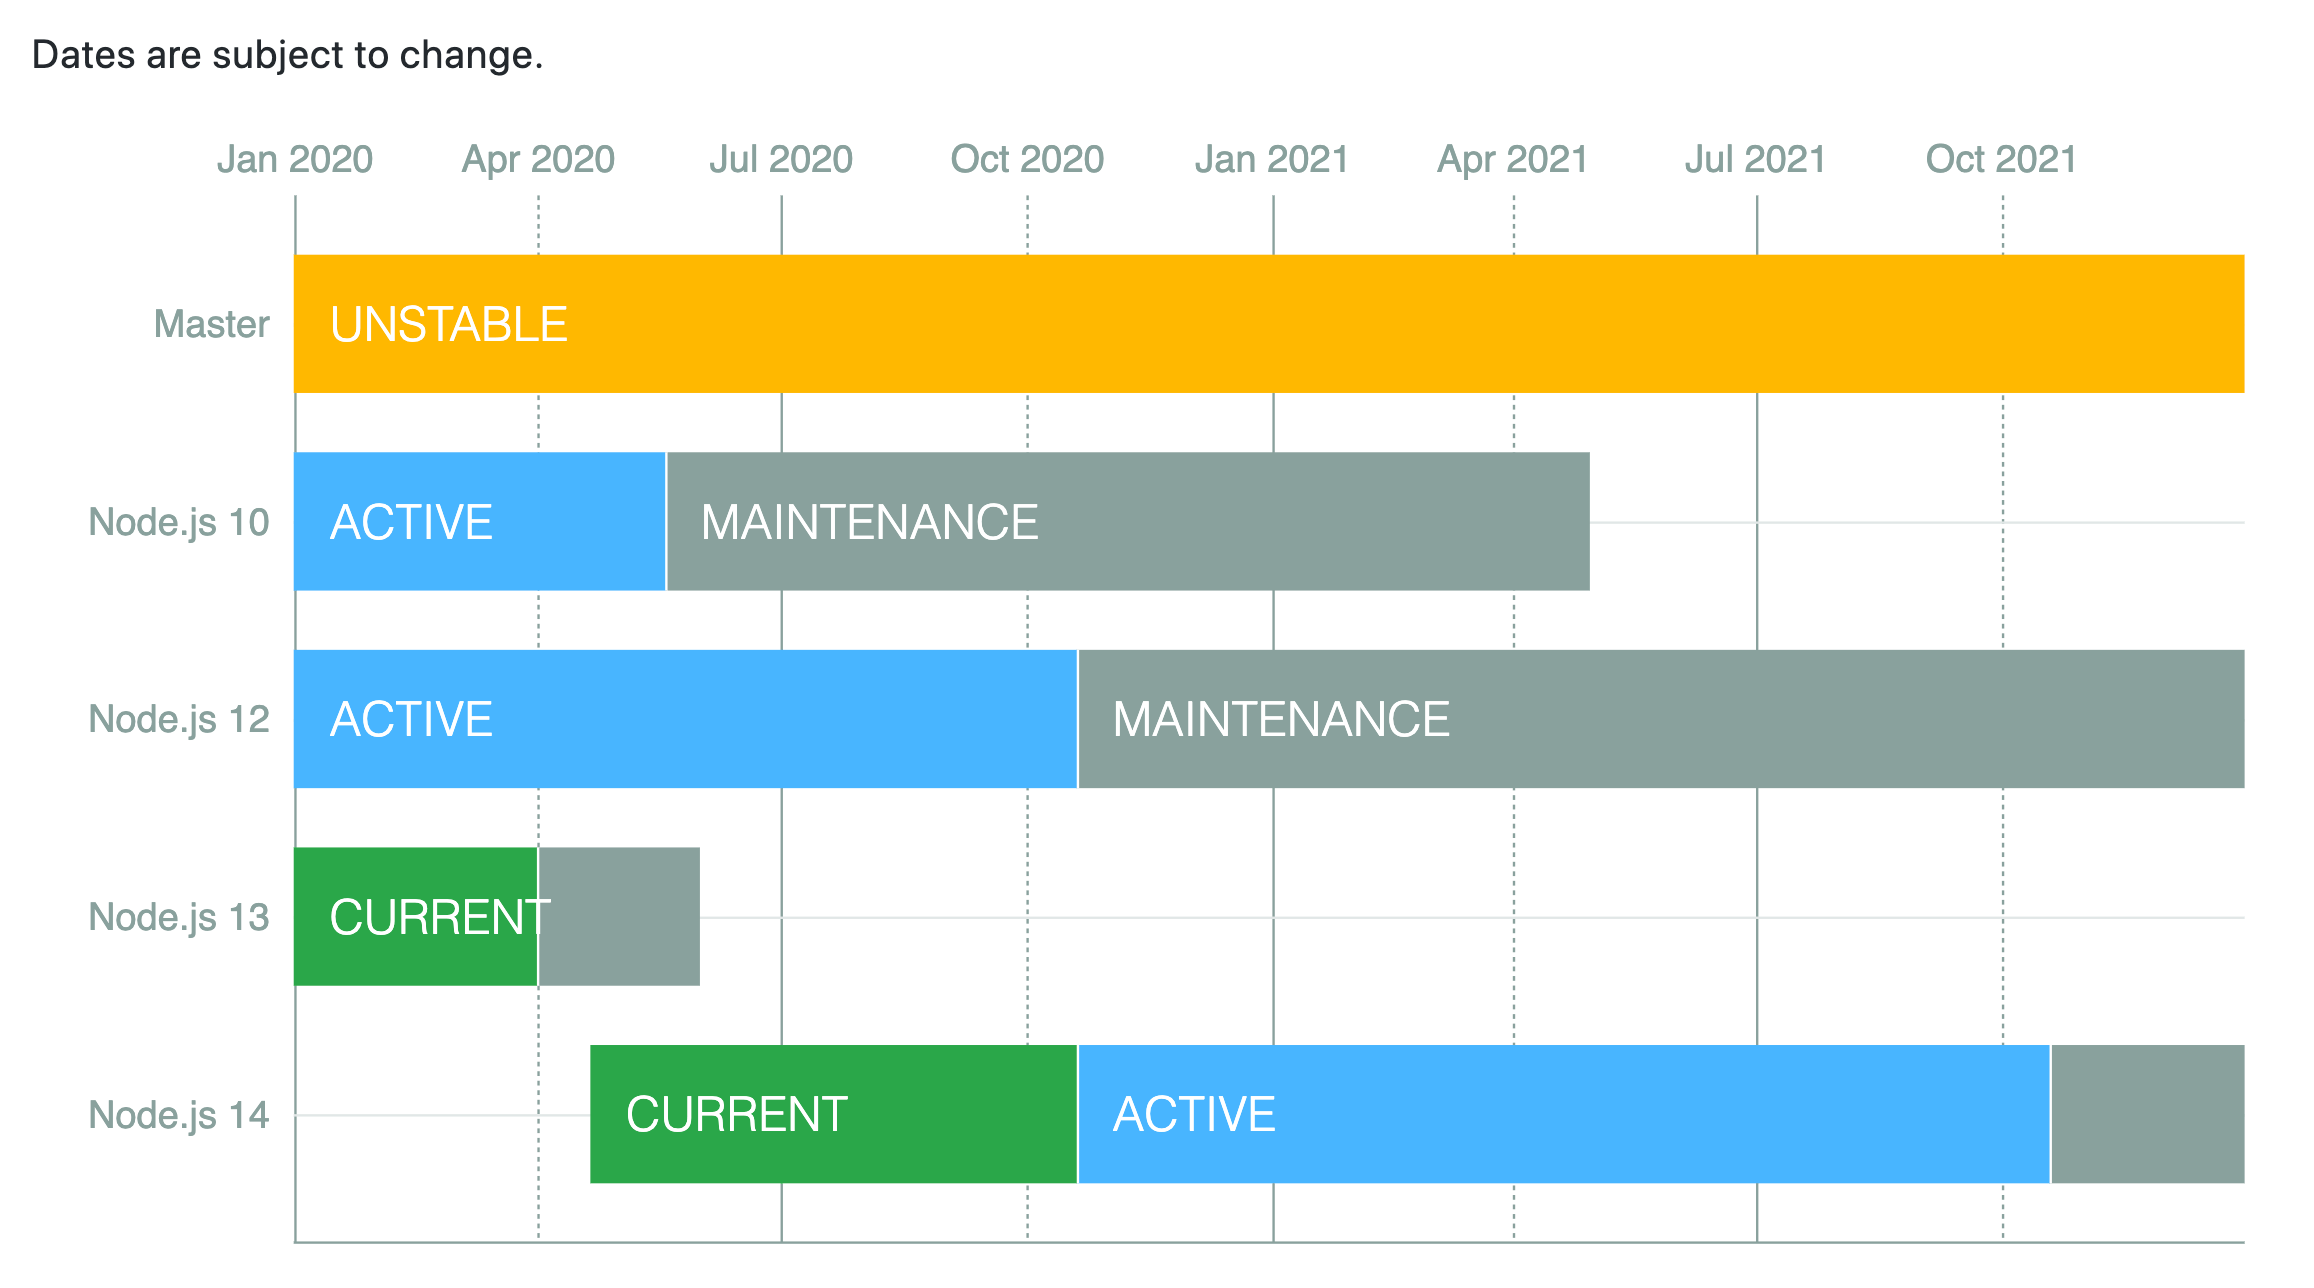
Nervous about what is going to happen to your older versioning? Not ready to upgrade just yet? The older versions will lose their support soon, but we've got time! The LTS version release status is "long-term support", which typically guarantees that critical bugs will be fixed for a total of 30 months.
We can see the support and release line here:
Aside: Securing Node.js Applications with Auth0
Securing Node.js applications with Auth0 is easy and brings a lot of great features to the table. With Auth0, we only have to write a few lines of code to get solid identity management solution, single sign-on, support for social identity providers (like Facebook, GitHub, Twitter, etc.), and support for enterprise identity providers (like Active Directory, LDAP, SAML, custom, etc.).
In the following sections, we are going to learn how to use Auth0 to secure Node.js APIs written with Express.
Creating the Express API
Let's start by defining our Node.js API. With Express and Node.js, we can do this in two simple steps. The first one is to use NPM to install three dependencies: npm i express body-parser cors.
Note: If we are starting from scratch, we will have to initialize an NPM project first:
npm init -y. This will make NPM create a new project in the current directory. As such, before running this command, we have to create a new directory for our new project and move into it.
The second one is to create a Node.js script with the following code (we can call it index.js):
// importing dependencies
const express = require('express');
const bodyParser = require('body-parser');
const cors = require('cors');

// configuring Express
const app = express();
app.use(bodyParser.json());
app.use(cors());

// defining contacts array
const contacts = [
  { name: 'Bruno Krebs', phone: '+555133334444' },
  { name: 'John Doe', phone: '+191843243223' },
];

// defining endpoints to manipulate the array of contacts
app.get('/contacts', (req, res) => res.send(contacts));
app.post('/contacts', (req, res) => {
  contacts.push(req.body);
  res.send();
});

// starting Express
app.listen(3000, () => console.log('Example app listening on port 3000!'));
The code above creates the Express application and adds two middleware to it: body-parser to parse JSON requests, and cors to signal that the app accepts requests from any origin. The app also registers two endpoints on Express to deal with POST and GET requests. Both endpoints use the contacts array as some sort of in-memory database.
Now, we can run and test our application by issuing node index in the project root and then by submitting requests to it. For example, with cURL, we can send a GET request by issuing curl localhost:3000/contacts. This command will output the items in the contacts array.
Registering the API at Auth0
After creating our application, we can focus on securing it. Let's start by registering an API on Auth0 to represent our app. To do this, let's head to the API section of our management dashboard (we can create a free account) if needed) and click on "Create API". On the dialog that appears, we can name our API as "Contacts API" (the name isn't really important) and identify it as https://contacts.blog-samples.com/ (we will use this value later).
Securing Express with Auth0
Now that we have registered the API in our Auth0 account, let's secure the Express API with Auth0. Let's start by installing three dependencies with NPM: npm i express-jwt jwks-rsa. Then, let's create a file called auth0.js and use these dependencies:
const jwt = require('express-jwt');
const jwksRsa = require('jwks-rsa');

module.exports = jwt({
  // Fetch the signing key based on the KID in the header and
  // the singing keys provided by the JWKS endpoint.
  secret: jwksRsa.expressJwtSecret({
    cache: true,
    rateLimit: true,
    jwksUri: `https://${process.env.AUTH0_DOMAIN}/.well-known/jwks.json`,
  }),

  // Validate the audience and the issuer.
  audience: process.env.AUTH0_AUDIENCE,
  issuer: `https://${process.env.AUTH0_DOMAIN}/`,
  algorithms: ['RS256'],
});
The goal of this script is to export an Express middleware that guarantees that requests have an access_token issued by a trust-worthy party, in this case Auth0. Note that this script expects to find two environment variables:
AUTH0_AUDIENCE: the identifier of our API (https://contacts.mycompany.com/)AUTH0_DOMAIN: our domain at Auth0 (in my casebk-samples.auth0.com)
We will set these variable soons, but it is important to understand that the domain variable defines how the middleware finds the signing keys.
After creating this middleware, we can update our index.js file to import and use it:
// ... other require statements ...
const auth0 = require('./auth0');

// ... app definition and contacts array ...

// redefining both endpoints
app.get('/contacts', auth0(), (req, res) => res.send(contacts));
app.post('/contacts', auth0(), (req, res) => {
  contacts.push(req.body);
  res.send();
});

// ... app.listen ...
In this case, we have replaced the previous definition of our endpoints to use the new middleware that enforces requests to be sent with valid access tokens.
Running the application now is slightly different, as we need to set the environment variables:
export AUTH0_DOMAIN=blog-samples.auth0.com
export AUTH0_AUDIENCE="https://contacts.blog-samples.com/"
node index
After running the API, we can test it to see if it is properly secured. So, let's open a terminal and issue the following command:
curl localhost:3000/contactsIf we set up everything together, we will get a response from the server saying that "no authorization token was found".
Now, to be able to interact with our endpoints again, we will have to obtain an access token from Auth0. There are multiple ways to do this and the strategy that we will use depends on the type of the client application we are developing. For example, if we are developing a Single Page Application (SPA), we will use what is called the Implicit Grant. If we are developing a mobile application, we will use the Authorization Code Grant Flow with PKCE. There are other flows available at Auth0. However, for a simple test like this one, we can use our Auth0 dashboard to get one.
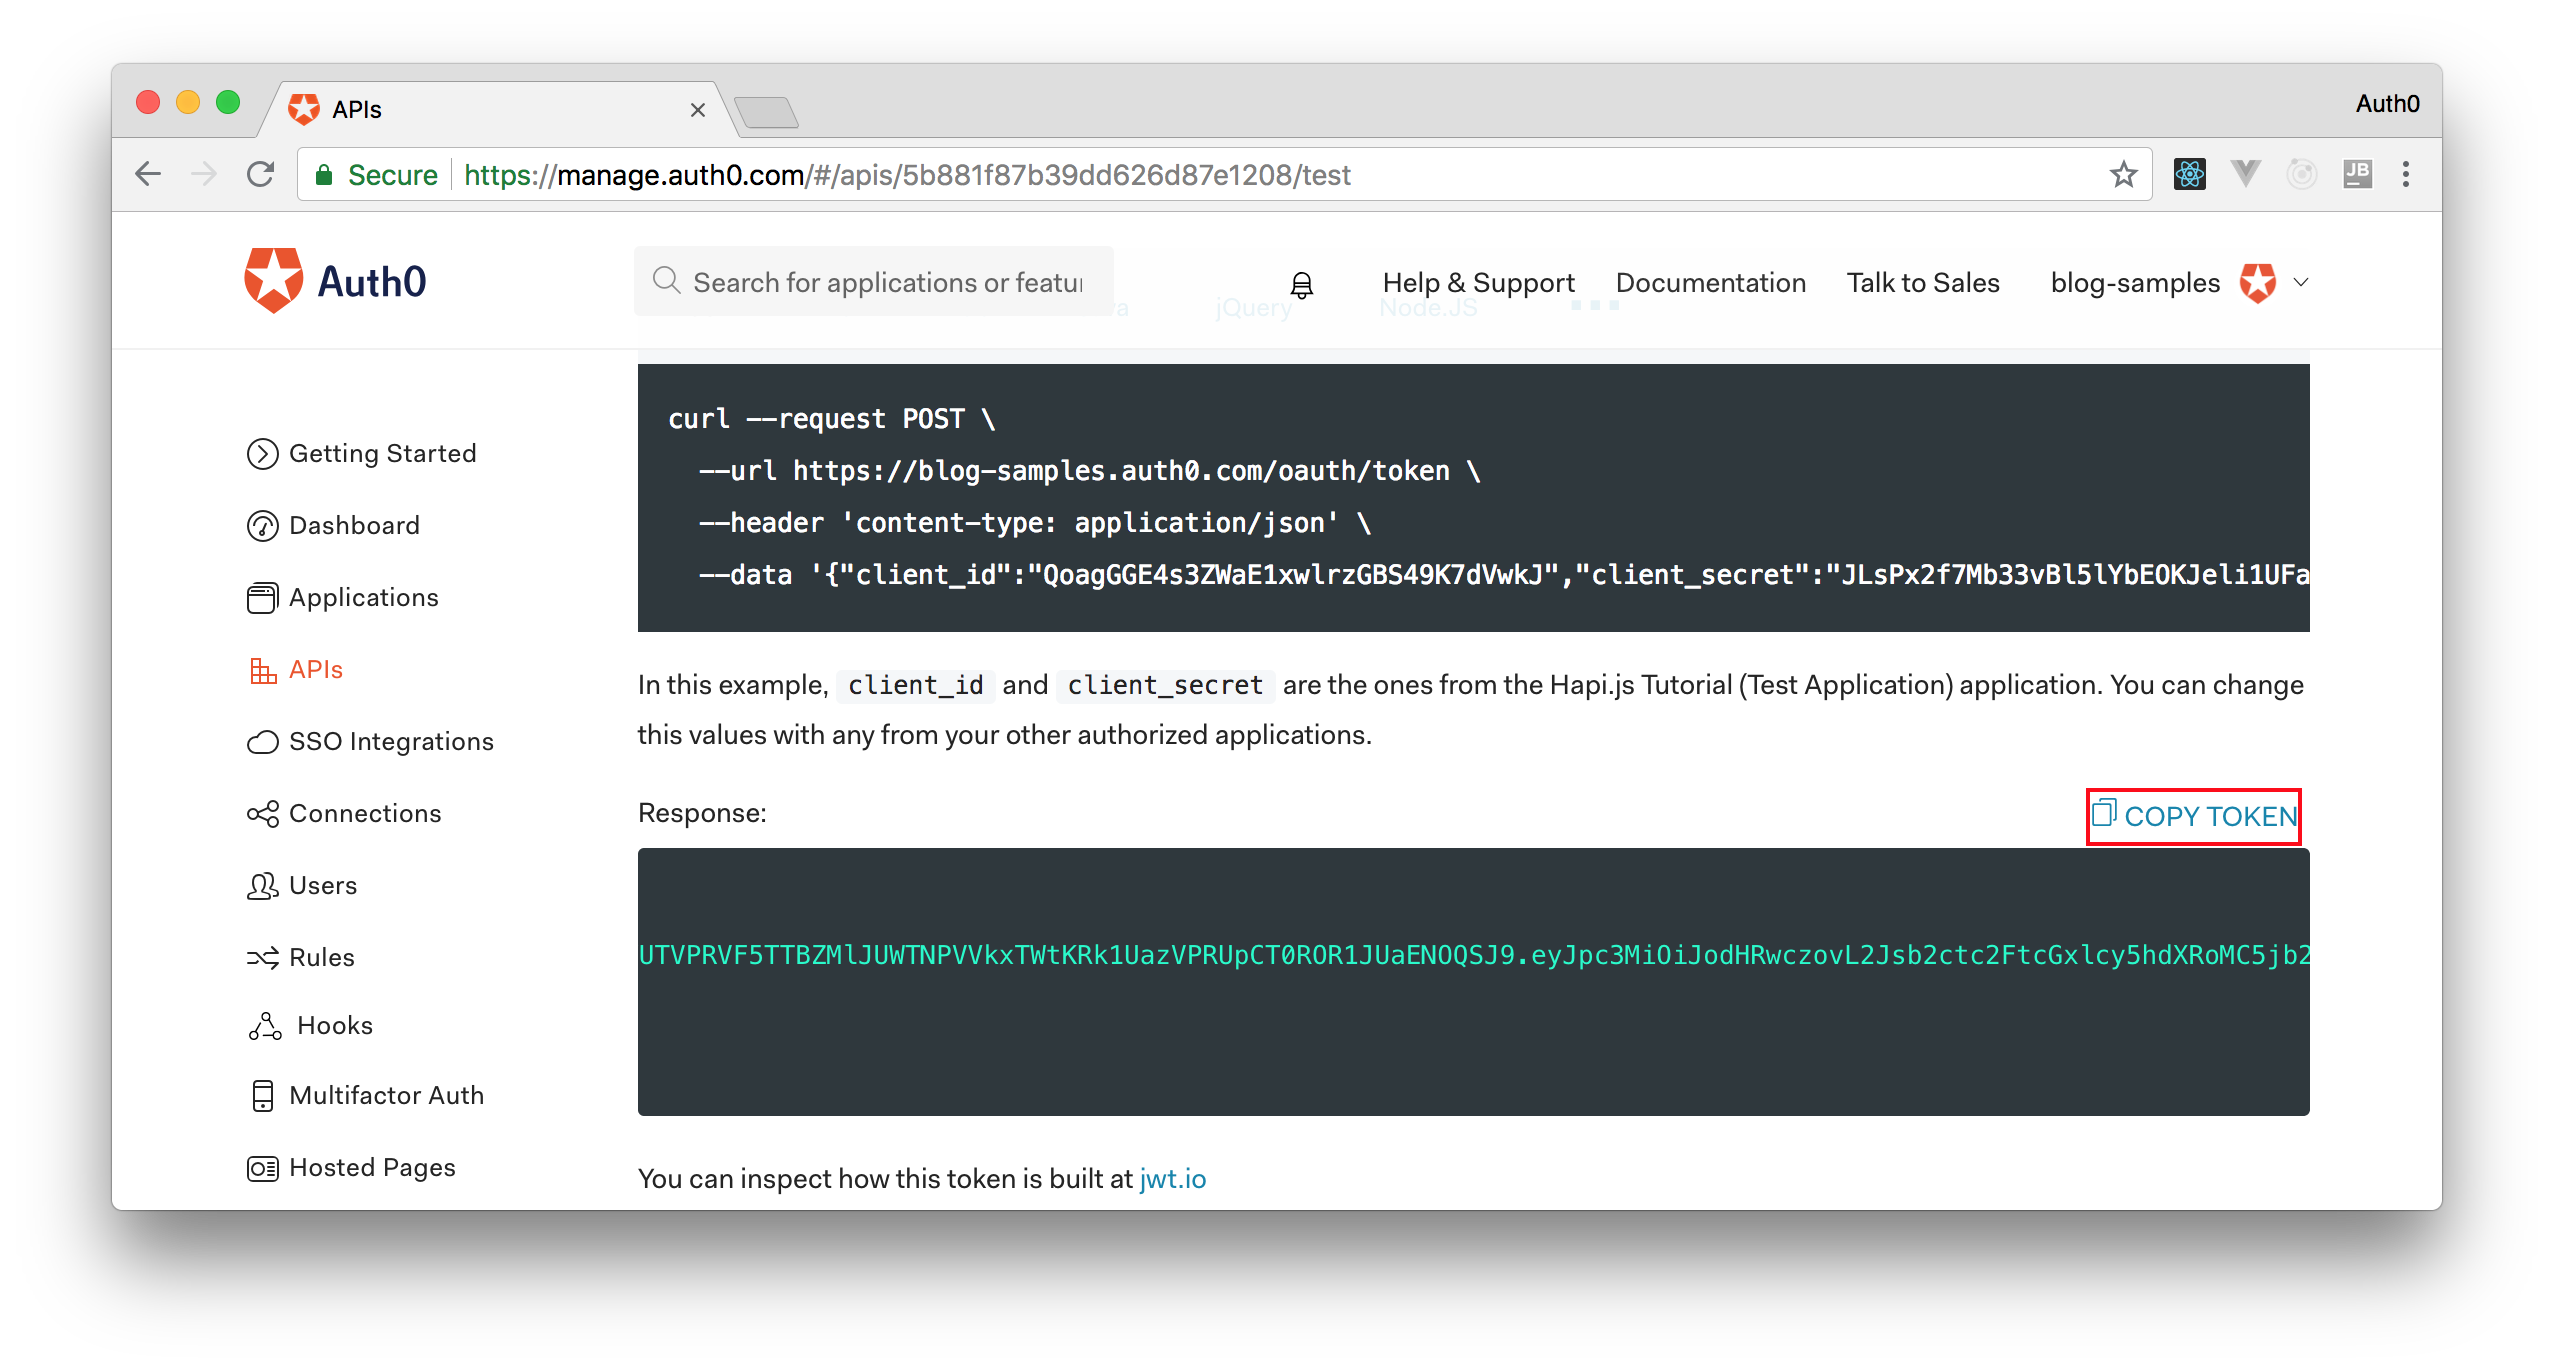
Therefore, we can head back to the APIs section in our Auth0 dashboard, click on the API we created before, and then click on the Test section of this API. There, we will find a button called Copy Token. Let's click on this button to copy an access token to our clipboard.
After copying this token, we can open a terminal and issue the following commands:
# create a variable with our token
ACCESS_TOKEN=<OUR_ACCESS_TOKEN>

# use this variable to fetch contacts
curl -H 'Authorization: Bearer '$ACCESS_TOKEN http://localhost:3000/contacts/
Note: We will have to replace
<OUR_ACCESS_TOKEN>with the token we copied from our dashboard.
As we are now using our access token on the requests we are sending to our API, we will manage to get the list of contacts again.
That's how we secure our Node.js backend API. Easy, right?
Conclusion
This Node.js release is exciting, and after looking at some of the new updates, I'm super excited to try it! Let me know if you have updated your Node.js version and what you think of version 14.


