


Actions make it possible for you to customize the way Auth0 works. They do this by letting you insert scripts — called Actions — into various Auth0 workflows to add functionality and enhance your users’ experience.
Actions can be complex, but they don’t need to be. In this article, I’ll show you a handful of Actions that can you can enter in a minute or two, but perform tasks that you’ll find useful in the day-to-day running of your applications.
Redirect Users to a “Downtime” Page
Sooner or later, your application will have downtime. If all goes well, it will be scheduled downtime, but there will likely be unscheduled downtime too. In either case, it’s useful to have a web page where you can redirect users to inform them that your application is unavailable and provide additional details.
You can do this by adding the following Action to the Login flow, replacing {SYSTEM DOWNTIME PAGE URL} with the location of the web page explaining the downtime:
// Login flow

exports.onExecutePostLogin = async (event, api) => {
  api.redirect.sendUserTo("{SYSTEM DOWNTIME PAGE URL}");
};
When your application is down, drag this Action into your tenant’s Login flow. It uses the api.redirect.sendUserTo() method to redirect the user to the given URL after they log in.
Keep in mind that users will see the downtime page only after logging in successfully.
Temporarily Disable New Account Sign-ups
It is possible to have too much of a good thing. You generally want many users signing up to use your application, but there can be times when you need to stop registration to scale up your systems or allow your staff to catch up.
If you’re ever in this kind of situation, one of the measures you can take is to disable sign-ups temporarily. You can do this by creating a new Action named “Refuse New Sign-ups” in the Pre User Registration flow:
// Pre User Registration flow

exports.onExecutePreUserRegistration = async (event, api) => {
  api.access.deny('too_many_signups', "We’re not accepting sign-ups at the moment.");
};
This Action uses the api.access.deny() method, which cancels the user registration process and any subsequent Actions. It takes two arguments:
reason: This is a string that provides an internal reason why you’re denying the user’s attempt to sign up for an account. This is for the benefit of the application’s developers and administrators and will appear in the tenant’s logs. We recommend that this be a short label rather than a sentence.userMessage: This is also a string, and it’s the user-facing reason why they’re not able to sign up for an account. You want this message to be user-friendly, and we recommend that this be a full sentence.
With the “Refuse New Sign-ups” Action deployed and added to the Pre User Registration flow, this is what the user will see when they attempt to sign up:
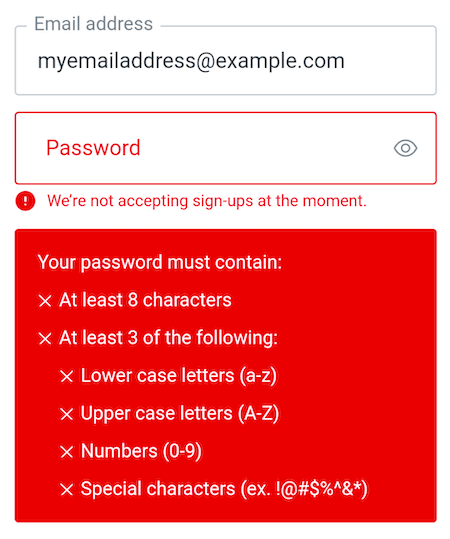
While the login box shows the “We’re not accepting sign-ups at the moment” message, you can see that the message is dwarfed by the big red box containing password requirements.
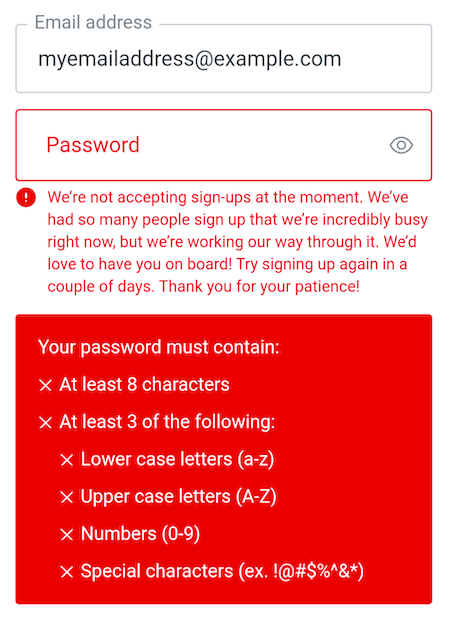
At the moment, there’s no way to “turn off” that big red box, which was created before we had Actions and the Pre User Registration flow. For now, you should use messages that are at least two sentences long in order for them to be more easily seen:
Initialize a New User’s Metadata
Every Auth0 user account stores information about the user as metadata, which your application access. Two kinds of metadata are stored:
- User metadata: A set of attributes about the user that don’t affect the app’s core functionality. The user can view and modify this information, which typically comprises user preferences and settings.
- App metadata: A set of attributes about the user that do affect the app’s core functionality. The user cannot view and modify this information, which includes things such as their status and state within the application, or any other settings that determine what features or activities are available to the user.
You can use an Action in the Pre User Registration flow to set the user’s user and app metadata to their initial values. In the example below, the Action sets values in both a newly-created user’s user metadata and app metadata:
// Pre User Registration flow
exports.onExecutePreUserRegistration = async (event, api) => {
api.user.setUserMetadata("ui_color", "default");
api.user.setUserMetadata("use_verbose_messages", false);
api.user.setAppMetadata("is_new_user", true);
api.user.setAppMetadata("reward_status", 0)
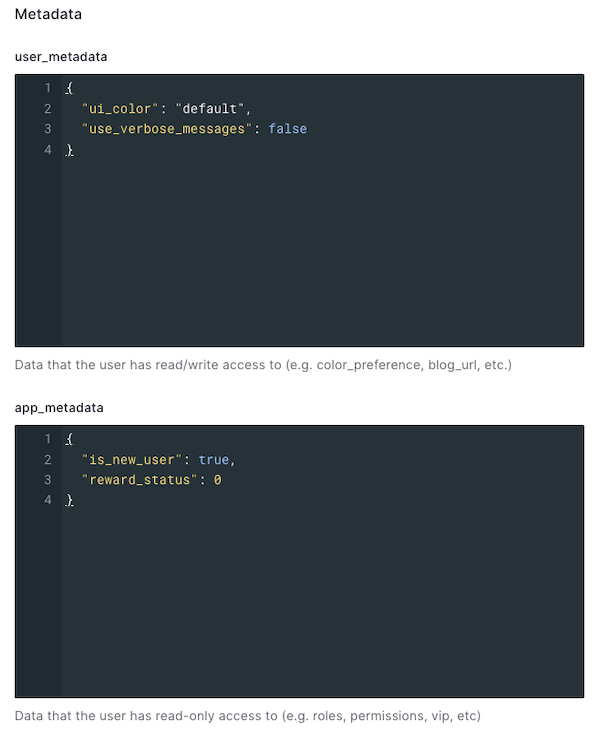
};The code above uses two methods — api.user.setUserMetadata() and api.user.setAppMetadata() — to initialize the new user’s user and app metadata respectively.
With this Action inserted into the Pre User Registration flow, every new user — whether created by clicking the Sign up link in the login box, or through the Auth0 dashboard or management API — will have the following user and app metadata:
Email the User after a Password Change
It’s good to email the user immediately after the password to their account changes. If the user made the change, the email is a reminder of when they last updated their password. If the user didn’t make the change, it could be a sign that an unwanted party has access to their account.
You can set up this kind of email notification by adding an Action to the Post Change Password flow, as shown below:
// Post Change Password flow

function sendGmail(username, password, emailAddress, subject, message) {
  try {
    const send = require('gmail-send')({
      user: username,
      pass: password,
      to: emailAddress,
      subject: subject,
    });
    send({
      text: message,
    }, (error, result, fullResult) => {
      if (error) console.error(error);
      console.log(result);
    })
  } catch (err) {
    console.log(`Error sending email to ${emailAddress}:`, err.message)
  }
}

exports.onExecutePostChangePassword = async (event) => {
  sendGmail(
    event.secrets.GMAIL_USERNAME,
    event.secrets.GMAIL_PASSWORD,
    event.user.email,
    "Your password has been changed",
    `
This is a quick message to let you know that your password has been changed. If you made this change,
you can ignore this email. If you DIDN’T make this change, please contact the administrator.
    `
  );
};
This is a more complex Action than the previous examples. It requires more setup, which I’ve outlined below.
Wait… a Gmail account?
While you shouldn’t use Gmail as an email server for a production app, I find that a Gmail account dedicated to testing can be useful for prototyping.
To set up such an account, sign up for a new Gmail account. Don’t enable two-factor authentication on this account, because doing so makes the next step in the process unavailable.
Go to the home page for your newly-created account and select Security from the menu on the left side of the page. Scroll down until you see the Less secure app access section and click on the Turn on access (not recommended) link. Set the Allow less secure apps switch to the ON position.
You will now be able to use this Gmail account to send emails on behalf of your Action.
Please remember you should use this account for testing purposes only! For a production application, use a dedicated email-sending API.
Don’t forget that Gmail has an API that provides authorized access to the data in a user’s Gmail account and can be used to perform several actions, including reading, sorting, sending, and backing up mail, as well as managing user settings such as aliases, signatures, filtering, and forwarding.
Store your secrets
The onExecutePostChangePassword() function delegates the sending of email to another function, sendGmail(). When the time comes to move the Action out of the prototyping phase, I can have onExecutePostChangePassword() call a different function with the same parameters that accesses an email API that’s more suitable for production.
You may have noticed that I didn’t hard-code the Gmail account’s username and password values into the Action. Instead, they appear to be properties of the event.secrets object. These are secrets — values that are securely stored in the Secrets section of the action.
To manage an Action’s secrets, click on the key icon on the left side of the Action editor. This will open the Secrets panel, where you can add, edit, and delete values that you want to keep secret:
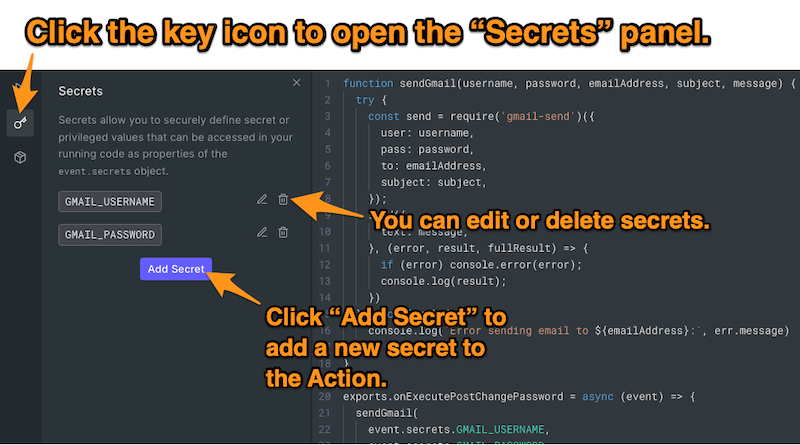
When you click the Add Secret button, a pop-up appears, allowing you to define a secret as a key-value pair:
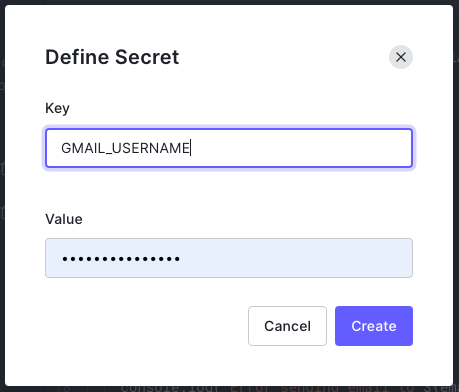
Once defined, you can access secrets as properties of the event.secrets object. The two secrets that I defined — GMAIL_USERNAME for the username of my prototyping Gmail account and GMAIL_PASSWORD for its password — can be accessed in the Action code as event.secrets.GMAIL_USERNAME and event.secrets.GMAIL_PASSWORD.
Add modules
The sendGmail() function uses the require() function to include the gmail-send npm module to send email notifications to the user through Gmail. But how do you make gmail-send available to your Action?
You do it using the Modules panel, which you can access by clicking on the package icon on the left side of the Action editor:
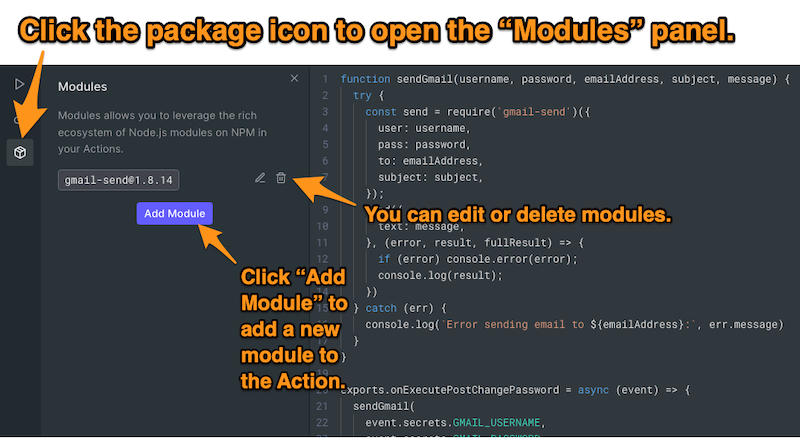
The Modules panel lets you bring in functionality from any combination of modules in npm’s vast collection.
To add a module to your Action, click the Add Module button. A pop-up will appear, allowing you to specify an npm module to include and optionally, which version:
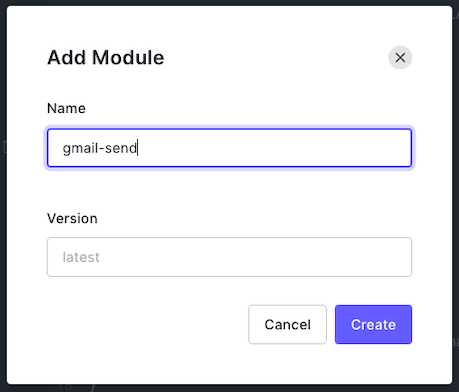
I added the latest version of the gmail-send module to the Action.
Conclusion
As I mentioned in the beginning, Actions don’t need to be lengthy or complicated to achieve useful results. Sometimes a single line is all you need!
You should use the Actions provided above as a “jumping-off point” for writing your own custom Actions to meet your users’ needs. Use your imagination, and don’t be afraid to experiment!


