


TL;DR: React Router 4 is a body of navigational components that offers declarative routing in your React apps. In this tutorial, you are going to learn how to use React Router 4 through practical examples.
Routing is of uttermost importance in almost every application's architecture. The larger your app becomes, the more your routing functionality becomes complex, from simple to deeply nested routing scenarios.
React Router is the most popular and commonly used library for routing in React applications. As your application grows to require several views and routes, it's ideal you choose a good router to help manage the transition between views, redirects, getting URL parameters easily, et al.
"React Router is the most popular and commonly used library for routing in React applications. "
Tweet This

Before now, previous versions of React Router involved declaring your app's routes upfront, declaring all the routes in a file as part of your app's initialization before rendering occurs. With React Router 4, you get to route declaratively. React Router 4's API is basically just components thus making it easy to use if you already compose components in React. Let's dive in!
Setup and Installation
You'll need:
- Node.js (version 6.0 or greater) and npm.
- create-react-app for bootstrapping a new project.
React Router is composed of these packages: react-router, react-router-dom, and react-router-native.
- react-router: comprises of the core routing components.
- react-router-dom: comprises of the routing API required for browsers.
- react-router-native: comprises of routing API for mobile applications.
Create a new project with createreactapp and navigate to the directory created as shown below:
create-react-app bose
cd bose
Install react-router-dom.
npm install --save react-router-domWhat we'll cover
We'll focus on using React Router 4 for the browser. We'll cover the very important concepts listed below:
- Basic Routing
- Nested Routing and URL Parameters
- Route Protection and Authentication
- Link Component Customization
- Handling Non-existent Routes
- SideBar Rendering
Basic Routing
There are two types of Router components that you can use in your React web application. The BrowserRouter and HashRouter. The former gives you a URL without the #, while the latter gives you a URL with the #.
Note: If you are building a web application that supports legacy browsers, it's recommended that you use the
HashRouter.
Open up your src/index.js and add the code below to it:
import React from 'react';
import ReactDOM from 'react-dom';
import { BrowserRouter as Router, Route, Link } from "react-router-dom";
import './index.css';
import App from './App';
import registerServiceWorker from './registerServiceWorker';

ReactDOM.render(
  <Router>
    <App />
  </Router>, document.getElementById('root'));
registerServiceWorker();
In the code above, I imported the BrowserRouter, Route, and Link component from react-router-dom. And I wrapped the <App/> component with Router which is the alias of BrowserRouter. The Router component is the first step to routing successfully. It serves as the container for every other route component. Furthermore, the Router component can only have one child element or component. Now, how do we define our routes?
Open up src/App.js. Here, we will define our routes.
import React, { Component } from 'react';
import { Route, Link } from 'react-router-dom';
import './App.css';


const Home = () => (
  <div>
    <h2> Home </h2>
  </div>
);

const Airport = () => (
  <div>
     <ul>
      <li>Jomo Kenyatta</li>
      <li>Tambo</li>
      <li>Murtala Mohammed</li>
    </ul>
  </div>
);

const City = () => (
  <div>
    <ul>
      <li>San Francisco</li>
      <li>Istanbul</li>
      <li>Tokyo</li>
    </ul>
  </div>
);

class App extends Component {
  render() {
    return (
      <div>
        <ul>
          <li><Link to="/">Home</Link></li>
          <li><Link to="/airports">Airports</Link></li>
          <li><Link to="/cities">Cities</Link></li>
        </ul>

        <Route path="/" component={Home}/>
        <Route path="/airports" component={Airport}/>
        <Route path="/cities" component={City}/>
      </div>
    );
  }
}

export default App;
In the code above, we have links that should direct the user to /, /airports, and cities using the <Link> component. Each of these links has a component that should be rendered once the current location matches the route's path. However, something is off here. Let's check the results.
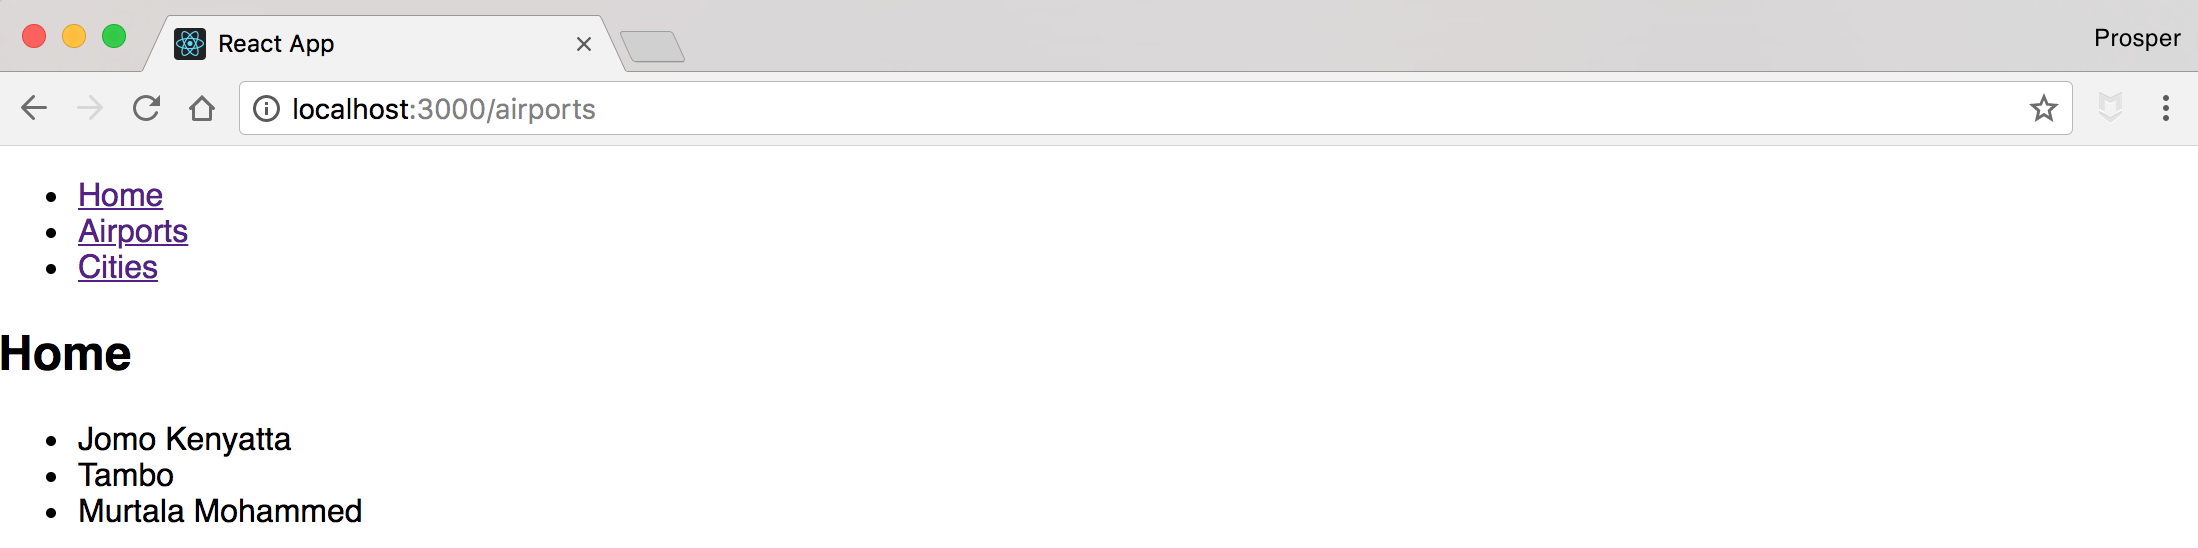
Home which is the UI for Home component should be rendered only on the /, root route. However, it is rendered on all the routes. The / matches /airports and /cities routes, therefore rendering its component in these two other routes. The solution to this is to simply add the exact prop to the / route.
src/App.js
<Route path="/" exact component={Home}/>
<Route path="/airports" component={Airport}/>
<Route path="/cities" component={City}/>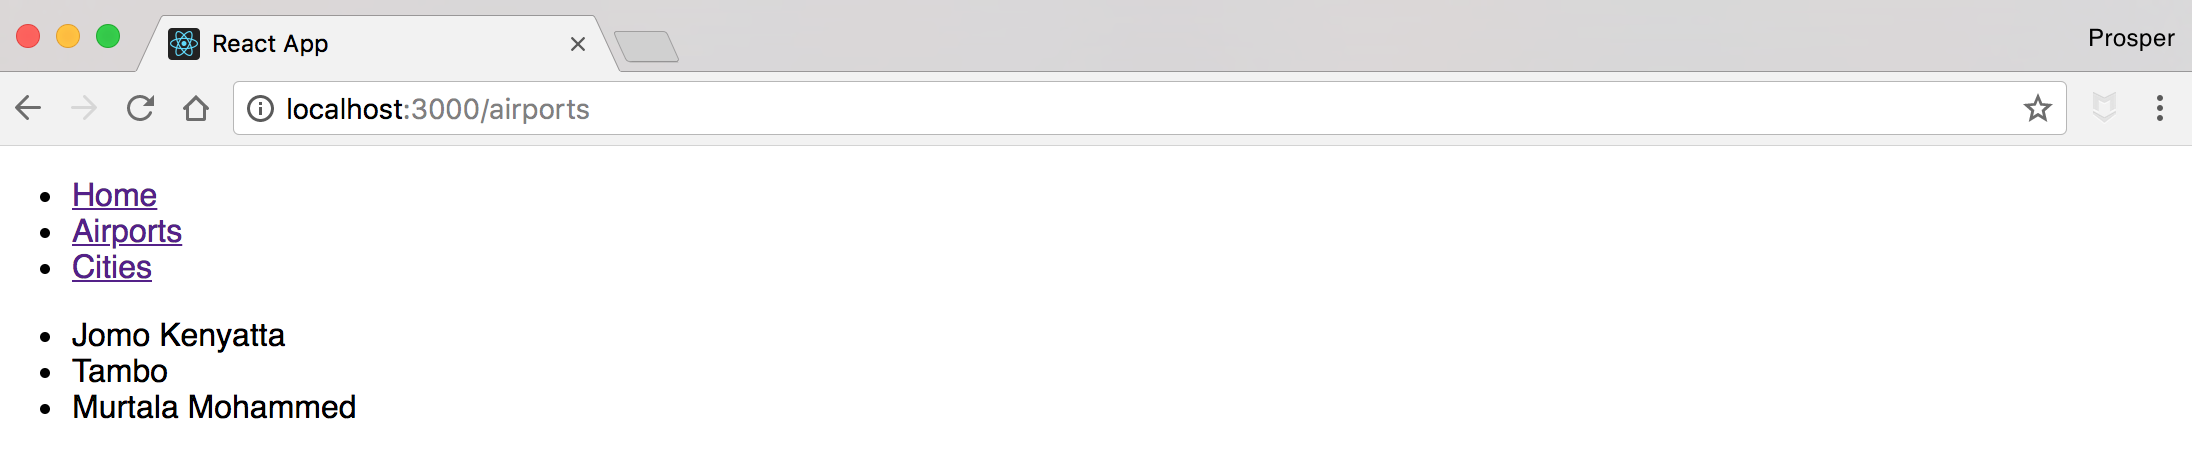
In the examples above, all the <Route /> components have a component prop that renders a component when the URL visited matches the Route's path. What if you just want to render a small function instead of a whole component? You can use the render prop as shown in the code below.
<Route path="/airports"
       render={() => (<div> This is the airport route </div>)}/>
Nested Routing & URL Parameters
What if you needed URLs like /courses/business, and /courses/technology/? How would you accomplish this?
src/App.js
import React, { Component } from 'react';
import { Route, Link } from 'react-router-dom';
import './App.css';


const Courses = ({ match }) => (
  <div>
     <ul>
        <li><Link to="/courses/technology">Technology</Link></li>
        <li><Link to="/courses/business">Business</Link></li>
        <li><Link to="/courses/economics">Economics</Link></li>
    </ul>


    <Route exact path="/courses/technology" render={() => (<div> This is technology </div>)}/>
    <Route path="/courses/business" component={() => (<div> This is business </div>)}/>
    <Route path="/courses/economics" component={() => (<div> This is economics </div>)}/>
  </div>
);

/* Home Component */ // code hidden

/* City Component */ //code hidden

class App extends Component {
  render() {
    return (
      <div>
        <ul>
          <li><Link to="/">Home</Link></li>
          <li><Link to="/courses">Courses</Link></li>
          <li><Link to="/cities">Cities</Link></li>
        </ul>

        <Route path="/" exact component={Home}/>
        <Route path="/courses" component={Courses}/>
        <Route path="/cities" component={City}/>
      </div>
    );
  }
}

export default App;
If the URL location matches the /courses path, then the technology, business, and economics links are rendered via the Courses component. Going one step further, if the URL location matches /courses/technology, /courses/business, and /courses/economics path, then This is technology, This is business, and This is economics are rendered respectively.
As a developer, I'm sure you are already looking at this approach with a set of refactoring eyes. In the code sample above, there's a lot of repetition and hardcoding. The more the lines of code, the harder it becomes to change a route. Let's refactor.
React Router 4 ships with a match API. The match object is created when a router's path and URL location successfully matches. The match object has some properties but I'll outline the properties you should immediately know about:
- match.url: returns a string that shows the URL location. Used for s
- match.path: returns a string that shows the route's path. Used for
s - match.params: returns an object with values parsed from the URL.
Let's refactor step by step. Refactor the Courses component to have the match object like so:
const Courses = ({ match }) => (
  <div>
     <ul>
        <li><Link to={`${match.url}/technology`}>Technology</Link></li>
        <li><Link to={`${match.url}/business`}>Business</Link></li>
        <li><Link to={`${match.url}/economics`}>Economics</Link></li>
    </ul>

    <Route exact path="/courses/technology" render={() => (<div> This is technology </div>)}/>
    <Route path="/courses/business" component={() => (<div> This is business </div>)}/>
    <Route path="/courses/economics" component={() => (<div> This is economics </div>)}/>
  </div>
);
Test if your URLs are working. Now do the same for the routes but with match.path.
const Courses = ({ match }) => (
  <div>
     <ul>
        <li><Link to={`${match.url}/technology`}>Technology</Link></li>
        <li><Link to={`${match.url}/business`}>Business</Link></li>
        <li><Link to={`${match.url}/economics`}>Economics</Link></li>
    </ul>

    <Route exact path={`${match.path}/technology`} render={() => (<div> This is technology </div>)}/>
    <Route path={`${match.path}/business`} component={() => (<div> This is business </div>)}/>
    <Route path={`${match.path}/economics`} component={() => (<div> This is economics </div>)}/>
  </div>
);
Check your app. Everything should work fine. Now one last step. We can actually replace those three lines of <Route> code with just one line.
const Courses = ({ match }) => (
  <div>
     <ul>
        <li><Link to={`${match.url}/technology`}>Technology</Link></li>
        <li><Link to={`${match.url}/business`}>Business</Link></li>
        <li><Link to={`${match.url}/economics`}>Economics</Link></li>
    </ul>

    <Route exact path={`${match.path}/:course`} render={({match}) => (<div> This is {match.params.course} </div>)}/>
  </div>
);
We used the match.params which provides a key/value object of the URL location. :course is the URL param. Therefore, match.params.course will provide the value of the correct URL location. Awesome!
Route Protection and Authentication
When developing web applications, there are scenarios where certain routes have to be protected from access. Most times, these routes can only be accessed by authorized users.
In previous versions of React Router such as v3, route protection code looks like this:
index.js
const Root = () => {
  return (
    <div className="container">
      <Router history={browserHistory}>
        <Route path="/" component={Display}/>
        <Route path="/upload" component={Upload} onEnter={requireAuth} />
        <Route path="/callback" component={Callback} />
      </Router>
    </div>
  )
}
The <Route/> component had a onEnter prop that accepts a method that allows entry or refusal to a URL location based on a user's authentication status. Now, it's different for React Router 4.
Let's build out three components, Public, Private, and Login.
App.js
import React, { Component } from 'react';
import {
  Route,
  Link,
  BrowserRouter as Router,
} from 'react-router-dom';

const Public = () => (
  <div> This is a public page </div>
);

const Private = () => (
  <div> This is a private page </div>
);

const Login = () => (
  <div> Login Page <button>login</button> </div>
);


class App extends Component {
  render() {
    return (
      <Router>
        <div style={{width: 1000, margin: '0 auto'}}>
          <ul>
            <li><Link to='/public'> Public </Link></li>
            <li><Link to='/private'> Private </Link></li>
          </ul>

          <hr/>

          <Route path='/public' component={Public} />
          <Route path='/private' component={Private} />
        </div>
      </Router>
    );
  }
}
export default App;
Right now, we can access both routes, /public, and /private. Now, let's make sure the /private route can't be accessed until a user is logged in. React Router 4 uses a declarative approach, so it's convenient that we have a component such as <SecretRoute /> that we can use. However, the react router 4 library doesn't provide it. We'll build it. But let's come up with an Auth Service.
In this example, the Auth Service will simply be an object like so:
const AuthService = {
  isAuthenticated: false,
  authenticate(cb) {
    this.isAuthenticated = true
    setTimeout(cb, 100)
  },
  logout(cb) {
    this.isAuthenticated = false
    setTimeout(cb, 100)
  }
}
Now, let's build the <SecretRoute /> like so:
const SecretRoute = ({ component: Component, ...rest }) => (
  <Route {...rest} render={(props) => (
    AuthService.isAuthenticated === true
      ? <Component {...props} />
      : <Redirect to='/login' />
  )} />
);
SecretRoute component
The code above simply illustrates that if the authentication status of the user is true, then a component would be rendered else the user would be redirected to the /login route. Let's try it out.
App.js
import React, { Component } from 'react';
import {
  Route,
  Link,
  Redirect,
  BrowserRouter as Router,
} from 'react-router-dom';

const Login = () => (
  <div> Login Page <button>login</button> </div>
);

const AuthService = {
  isAuthenticated: false,
  authenticate(cb) {
    this.isAuthenticated = true
    setTimeout(cb, 100)
  },
  logout(cb) {
    this.isAuthenticated = false
    setTimeout(cb, 100)
  }
};

const SecretRoute = ({ component: Component, ...rest }) => (
  <Route {...rest} render={(props) => (
    AuthService.isAuthenticated === true
      ? <Component {...props} />
      : <Redirect to='/login' />
  )} />
);

class App extends Component {
  render() {
    return (
      <Router>
        <div style={{width: 1000, margin: '0 auto'}}>
          <ul>
            <li><Link to='/public'> Public </Link></li>
            <li><Link to='/private'> Private </Link></li>
          </ul>

          <hr/>

          <Route path='/public' component={Public} />
          <SecretRoute path='/private' component={Private} />
        </div>
      </Router>
    );
  }
}

export default App;
When you click on the Private link, you are redirected back to /login route. Great! Let's take it a step further by trying to actually log in and log out. Modify the login component like so:
App.js
...
class Login extends React.Component {
  state = {
    redirectToPreviousRoute: false
  };

  login = () => {
    AuthService.authenticate(() => {
      this.setState({ redirectToPreviousRoute: true });
    });
  };

  render() {
    const { from } = this.props.location.state || { from: { pathname: "/" } };
    const { redirectToPreviousRoute } = this.state;

    if (redirectToPreviousRoute) {
      return <Redirect to={from} />;
    }

    return (
      <div>
        <p>You must log in to view the page at {from.pathname}</p>
        <button onClick={this.login}>Log in</button>
      </div>
    );
  }
}
We have modified the Login Component to be able to have a login function and also redirect back to the route that the user was trying to log onto when the user was denied access. This should be typical behavior of your routing system else users will always be redirected to a particular page rather than where they came from!
Now, we'll have to modify the props of the <Redirect /> component in <SecretRoute />.
App.js
const SecretRoute = ({ component: Component, ...rest }) => (
  <Route {...rest} render={(props) => (
    AuthService.isAuthenticated === true
      ? <Component {...props} />
      : <Redirect to={{
          pathname: '/login',
          state: { from: props.location }
        }} />
  )} />
);
We are almost done. However, wouldn't it be nice if we can provide a logout button for the user after successful authentication? Let's create an <AuthStatus /> component.
App.js
...
const AuthStatus = withRouter(({ history }) => (
  AuthService.isAuthenticated ? (
    <p>
      Welcome! <button onClick={() => {
        AuthService.logout(() => history.push('/'))
      }}>Sign out</button>
    </p>
  ) : (
    <p>You are not logged in.</p>
  )
));
In the above code sample, we used withRouter and history.push. withRouter is a higher order component from React Router that allows re-rendering of its component every time the route changes with the same props. history.push is one way of redirecting asides using the <Redirect /> component from React Router.
Now, go ahead and render the <AuthStatus /> component.
App.js
class App extends Component {
  render() {
    return (
      <Router>
        <div style={{width: 1000, margin: '0 auto'}}>
          <AuthStatus />
          <ul>
            <li><Link to='/public'> Public </Link></li>
            <li><Link to='/private'> Private </Link></li>
          </ul>

          <hr/>

          <Route path='/public' component={Public} />
          <Route path="/login" component={Login}/>
          <SecretRoute path='/private' component={Private} />
        </div>
      </Router>
    );
  }
}
Now, try it in the browser again. You should be able to log in and log out successfully!
Link Component Customization
Link Component Customization? What's that? It's simple. You'll learn how to customize your links to have a distinctive look when a particular link is active. React Router 4 has an easy way of accomplishing this task.
Have the code below in your App.js like so:
import React from 'react'
import {
  BrowserRouter as Router,
  Route,
  Link
} from 'react-router-dom'


const Home = () => (
  <div>
    <h2>Home Page</h2>
  </div>
)

const Contact = () => (
  <div>
    <h2>Contact Page</h2>
  </div>
)

class App extends React.Component {
  render() {
    return (
      <Router>
        <div>
            <CustomLink exact={true} to="/">
              Home
            </CustomLink>
            <CustomLink to="/contact">
              Contact
            </CustomLink>

          <hr/>

          <Route exact path="/" component={Home}/>
          <Route path="/contact" component={Contact}/>
        </div>
      </Router>
    )
  }
}

export default App;
The <CustomLink /> is in charge of making the active link distinct. Now, what makes up the<CustomLink /> component? Check out the code below:
const CustomLink = ({ children, to, exact }) => (
  <Route path={to} exact={exact} children={({ match }) => (
    <div className={match ? 'active' : ''}>
      {match ? '> ' : ''}
      <Link to={to}>
        {children}
      </Link>
    </div>
  )}/>
);
It's not complex. The <CustomLink> harnessed the power of <Route>. In the code above, it uses the match object to determine whether to add > symbol whenever the path matches the URL location.
There are 3 ways to render something with a <Route>; <Route component>, <Route render>, and <Route children>. The code above used the children prop. This render prop takes in a function that receives all the same route props as the component and render methods, except when a route doesn't match the URL location. This process gives you the power to dynamically adjust your UI based on whether or not the route matches. And that's all we need to create a custom Link!
Handling Non-existent Routes
As a developer, you need to handle scenarios where certain routes don't exist. If a user stumbles upon your site and visits a non-existent route such as /babalawo. What do you do? Do you just allow your site to break?
This is how to handle this scenario. Add code to your App.js like so:
App.js
import React, { Component } from 'react';
import {
  Route,
  Link,
  Redirect,
  Switch,
  BrowserRouter as Router,
} from 'react-router-dom';

const Home = () => (
  <div>
    <h2>Home Page</h2>
  </div>
)

const Contact = () => (
  <div>
    <h2>Contact Page</h2>
  </div>
)

class App extends Component {
  render() {
    return (
       <Router>
        <div>
          <ul>
            <li>
              <Link to="/">Home</Link>
            </li>
            <li>
              <Link to="/contact">Contact</Link>
            </li>
          </ul>

        <Switch>
          <Route exact path="/" component={Home}/>
          <Route path="/contact" component={Contact}/>
          <Route render={() => (<div> Sorry, this page does not exist. </div>)} />
        </Switch>
        </div>
      </Router>
    );
  }
}

export default App;
In the code above, we imported a new component, <Switch /> from React Router. And we wrapped our routes inside the <Switch /> component. Now, if none of the URLs visited matches the routes defined with a path, then the <Switch /> component invokes the <Route /> with no path and a render function.
Try it out in your browser. Visit a URL that doesn't exist. Your app will display a Sorry, this page does not exist message.
SideBar Rendering
Sidebars in apps have been in existence for a very long time. Let's learn how to make a sidebar using React Router 4. The first step is to throw our routes into an array like so:
import React from 'react'
import {
  BrowserRouter as Router,
  Route,
  Link,
} from 'react-router-dom'

const routes = [
  { path: '/',
    exact: true,
    leftbar: () => <div>Home</div>,
    main: () => <h2>Home</h2>
  },
  { path: '/about',
    leftbar: () => <div>About</div>,
    main: () => <h2>About</h2>
  },
  { path: '/contact',
    leftbar: () => <div>Contact</div>,
    main: () => <h2>Contact</h2>
  }
]

class App extends React.Component {
  render() {
    return (
      <Router>
        <div style={{ display: 'flex' }}>
          <div style={{
            padding: '10px',
            width: '40%',
            background: '#FF6347'
          }}>
            <ul style={{ listStyleType: 'none', padding: 0 }}>
              <li><Link to="/">Home</Link></li>
              <li><Link to="/about">About</Link></li>
              <li><Link to="/contact">Contact</Link></li>
            </ul>

          </div>
        </div>
      </Router>
    )
  }
}

export default App
In the code above, we have a leftbar and a main key. They'll come in handy soon and make our work super easy.
Now, all we need to do is map over the routes array as shown in the code below:
App.js
render() {
  return (
    <Router>
      <div style={{ display: 'flex' }}>
        <div style={{
          padding: '10px',
          width: '40%',
          background: '#FF6347'
        }}>
          <ul style={{ listStyleType: 'none' }}>
            <li><Link to="/">Home</Link></li>
            <li><Link to="/about">About</Link></li>
            <li><Link to="/contact">Contact</Link></li>
          </ul>
          {routes.map((route) => (
            <Route
              key={route.path}
              path={route.path}
              exact={route.exact}
              component={route.leftbar}
            />
          ))}
        </div>

        <div style={{ flex: 1, padding: '20px' }}>
          {routes.map((route) => (
            <Route
              key={route.path}
              path={route.path}
              exact={route.exact}
              component={route.main}
            />
          ))}
        </div>
      </div>
    </Router>
  )
}
In the code above, whenever the route's path matches the URL location, the leftbar component will be rendered. Try it out in your browser and see your left sidebar in action!
Aside: Securing React Apps with Auth0
As you will learn in this section, you can easily secure your React applications with Auth0, a global leader in Identity-as-a-Service (IDaaS) that provides thousands of enterprise customers with modern identity solutions. Alongside with the classic username and password authentication process, Auth0 allows you to add features like Social Login, Multifactor Authentication, Passwordless Login, and much more with just a few clicks.
To follow along the instruction describe here, you will need an Auth0 account. If you don't have one yet, now is a good time to sign up for a free Auth0 account.
Also, if you want to follow this section in a clean environment, you can easily create a new React application with just one command:
npx create-react-app react-auth0Then, you can move into your new React app (which was created inside a new directory called react-auth0 by the create-react-app tool), and start working as explained in the following subsections.
Setting Up an Auth0 Application
To represent your React application in your Auth0 account, you will need to create an Auth0 Application. So, head to the Applications section on your Auth0 dashboard and proceed as follows:
- click on the Create Application button;
- then define a Name to your new application (e.g., "React Demo");
- then select Single Page Web Applications as its type.
- and hit the Create button to end the process.
After creating your application, Auth0 will redirect you to its Quick Start tab. From there, you will have to click on the Settings tab to whitelist some URLs that Auth0 can call after the authentication process. This is a security measure implemented by Auth0 to avoid the leaking of sensitive data (like ID Tokens).
So, when you arrive at the Settings tab, search for the Allowed Callback URLs field and add http://localhost:3000/callback into it. For this tutorial, this single URL will suffice.
That's it! From the Auth0 perspective, you are good to go and can start securing your React application.
Dependencies and Setup
To secure your React application with Auth0, there are only three dependencies that you will need to install:
auth0.js: This is the default library to integrate web applications with Auth0.react-router: This is the de-facto library when it comes to routing management in React.react-router-dom: This is the extension to the previous library to web applications.
To install these dependencies, move into your project root and issue the following command:
npm install --save auth0-js react-router react-router-domNote: As you want the best security available, you are going to rely on the Auth0 login page. This method consists of redirecting users to a login page hosted by Auth0 that is easily customizable right from your Auth0 dashboard. If you want to learn why this is the best approach, check the Universal vs. Embedded Login article.
After installing all three libraries, you can create a service to handle the authentication process. You can call this service Auth and create it in the src/Auth/ directory with the following code:
// src/Auth/Auth.js
import auth0 from 'auth0-js';

export default class Auth {
  constructor() {
    this.auth0 = new auth0.WebAuth({
      // the following three lines MUST be updated
      domain: '<AUTH0_DOMAIN>',
      audience: 'https://<AUTH0_DOMAIN>/userinfo',
      clientID: '<AUTH0_CLIENT_ID>',
      redirectUri: 'http://localhost:3000/callback',
      responseType: 'token id_token',
      scope: 'openid profile',
    });

    this.getProfile = this.getProfile.bind(this);
    this.handleAuthentication = this.handleAuthentication.bind(this);
    this.isAuthenticated = this.isAuthenticated.bind(this);
    this.login = this.login.bind(this);
    this.logout = this.logout.bind(this);
    this.setSession = this.setSession.bind(this);
  }

  getProfile() {
    return this.profile;
  }

  handleAuthentication() {
    return new Promise((resolve, reject) => {
      this.auth0.parseHash((err, authResult) => {
        if (err) return reject(err);
        console.log(authResult);
        if (!authResult || !authResult.idToken) {
          return reject(err);
        }
        this.setSession(authResult);
        resolve();
      });
    });
  }

  isAuthenticated() {
    return new Date().getTime() < this.expiresAt;
  }

  login() {
    this.auth0.authorize();
  }

  logout() {
    // clear id token and expiration
    this.idToken = null;
    this.expiresAt = null;
  }

  setSession(authResult) {
    this.idToken = authResult.idToken;
    this.profile = authResult.idTokenPayload;
    // set the time that the id token will expire at
    this.expiresAt = authResult.expiresIn * 1000 + new Date().getTime();
  }
}
The Auth service that you just created contains functions to deal with different steps of the sign in/sign up process. The following list briefly summarizes these functions and what they do:
getProfile: This function returns the profile of the logged-in user.handleAuthentication: This function looks for the result of the authentication process in the URL hash. Then, the function processes the result with theparseHashmethod fromauth0-js.isAuthenticated: This function checks whether the expiry time for the user's ID token has passed.login: This function initiates the login process, redirecting users to the login page.logout: This function removes the user's tokens and expiry time.setSession: This function sets the user's ID token, profile, and expiry time.
Besides these functions, the class contains a field called auth0 that is initialized with values extracted from your Auth0 application. It is important to keep in mind that you have to replace the <AUTH0_DOMAIN> and <AUTH0_CLIENT_ID> placeholders that you are passing to the auth0 field.
Note: For the
<AUTH0_DOMAIN>placeholders, you will have to replace them with something similar toyour-subdomain.auth0.com, whereyour-subdomainis the subdomain you chose while creating your Auth0 account (or your Auth0 tenant). For the<AUTH0_CLIENT_ID>, you will have to replace it with the random string copied from the Client ID field of the Auth0 Application you created previously.
Since you are using the Auth0 login page, your users are taken away from the application. However, after they authenticate, users automatically return to the callback URL that you set up previously (i.e., http://localhost:3000/callback). This means that you need to create a component responsible for this route.
So, create a new file called Callback.js inside src/Callback (i.e., you will need to create the Callback directory) and insert the following code into it:
// src/Callback/Callback.js
import React from 'react';
import { withRouter } from 'react-router';

function Callback(props) {
  props.auth.handleAuthentication().then(() => {
    props.history.push('/');
  });

  return <div>Loading user profile.</div>;
}

export default withRouter(Callback);
This component, as you can see, is responsible for triggering the handleAuthentication process and, when the process ends, for pushing users to your home page. While this component processes the authentication result, it simply shows a message saying that it is loading the user profile.
After creating the Auth service and the Callback component, you can refactor your App component to integrate everything together:
// src/App.js

import React from 'react';
import { withRouter } from 'react-router';
import { Route } from 'react-router-dom';
import Callback from './Callback/Callback';
import './App.css';

function HomePage(props) {
  const { authenticated } = props;

  const logout = () => {
    props.auth.logout();
    props.history.push('/');
  };

  if (authenticated) {
    const { name } = props.auth.getProfile();
    return (
      <div>
        <h1>Howdy! Glad to see you back, {name}.</h1>
        <button onClick={logout}>Log out</button>
      </div>
    );
  }

  return (
    <div>
      <h1>I don't know you. Please, log in.</h1>
      <button onClick={props.auth.login}>Log in</button>
    </div>
  );
}

function App(props) {
  const authenticated = props.auth.isAuthenticated();

  return (
    <div className="App">
      <Route
        exact
        path="/callback"
        render={() => <Callback auth={props.auth} />}
      />
      <Route
        exact
        path="/"
        render={() => (
          <HomePage
            authenticated={authenticated}
            auth={props.auth}
            history={props.history}
          />
        )}
      />
    </div>
  );
}

export default withRouter(App);
In this case, you are actually defining two components inside the same file (just for the sake of simplicity). You are defining a HomePage component that shows a message with the name of the logged-in user (that is, when the user is logged in, of course), and a message telling unauthenticated users to log in.
Also, this file is making the App component responsible for deciding what component it must render. If the user is requesting the home page (i.e., the / route), the HomePage component is shown. If the user is requesting the callback page (i.e., /callback), then the Callback component is shown.
Note that you are using the Auth service in all your components (App, HomePage, and Callback) and also inside the Auth service. As such, you need to have a global instance for this service, and you have to include it in your App component.
So, to create this global Auth instance and to wrap things up, you will need to update your index.js file as shown here:
// src/index.js

import React from 'react';
import ReactDOM from 'react-dom';
import { BrowserRouter } from 'react-router-dom';
import Auth from './Auth/Auth';
import './index.css';
import App from './App';
import registerServiceWorker from './registerServiceWorker';

const auth = new Auth();

ReactDOM.render(
  <BrowserRouter>
    <App auth={auth} />
  </BrowserRouter>,
  document.getElementById('root'),
);
registerServiceWorker();
After that, you are done! You just finished securing your React application with Auth0. If you take your app for a spin now (npm start), you will be able to authenticate yourself with the help of Auth0, and you will be able to see your React app show your name (that is, if your identity provider does provide a name).
If you are interested in learning more, please, refer to the official React Quick Start guide to see, step by step, how to properly secure a React application. Besides the steps shown in this section, the guide also shows:
Conclusion
Understanding React Router 4 requires a shift in your mental model of routing. I covered the main API concepts for using React Router 4 for the web in this tutorial. However, you can always consult the official documentation for more information.
"Understanding React Router 4 requires a shift in your mental model of routing."
Tweet This


