---
title: "Secrets Access with Managed Identities in .NET Applications"
description: "How to securely access secrets stored in the Azure Key Vault service using the new Azure SDK and managed identities."
authors:
- name: "Daniel Krzyczkowski"
url: "https://auth0.com/blog/authors/daniel-krzyczkowski/"
date: "Jun 17, 2021"
category: "Developers,Tutorial,.NET"
tags: ["dotnet", "secrets", "managed-identities", "azure", "azure-key-vault"]
url: "https://auth0.com/blog/secrets-access-managed-identities-dotnet/"
---
# Secrets Access with Managed Identities in .NET Applications
**TL;DR:** Managing secrets and credentials used to secure communication between the different components of a cloud solution can be challenging for developers. This can be simplified with managed identities available in the Microsoft Azure cloud. Let's see how to deal with secrets management in ASP .NET Core applications hosted on the Azure cloud.
## Managing Secrets Securely in the Azure Cloud
Managing secrets in cloud solutions can be a big challenge. Whether it's a database password or a connection string to access a specific service — these values should be stored securely. In the Microsoft Azure cloud, there is a dedicated service called [Azure Key Vault](https://docs.microsoft.com/en-us/azure/key-vault/general/basic-concepts). It is a cloud service for securely storing and accessing secrets. When thinking about secrets, we should have in mind that they can be in many different forms. A database password is a secret, a certificate is a secret, and a cryptographic key is also considered a secret.
Storing secrets in places like a configuration file can expose our application to vulnerabilities similar to the ones due to bad programming practices or bugs. Many developers struggle with managing secrets properly and looking for a solution to test the application locally without worrying about secrets management after deployment. This is where Azure Key Vault and Azure managed identities can help.
In this article, we will explore how to set up Azure Key Vault, store the secret in it, and access this secret from the ASP .NET Core application using Azure managed identity. We will learn how to combine using secrets locally and access them after the deploying to the Azure cloud.
## What Are Managed Identities for Azure Resources?
[Managed identities](https://docs.microsoft.com/en-us/azure/active-directory/managed-identities-azure-resources/overview) is a concept in the Microsoft Azure cloud that eliminates the need for developers to manage credentials after deploying their application. With managed identity, we can access different Azure services securely without storing any credentials like connection strings or passwords. Many [services support managed identities](https://docs.microsoft.com/en-us/azure/active-directory/managed-identities-azure-resources/services-support-managed-identities).
Managed identities can be helpful when we want to access Key Vault from an Azure Function App or access Azure Blob Storage from an Azure Web App, for example. More examples are in the [documentation provided by Microsoft](https://docs.microsoft.com/en-us/azure/active-directory/managed-identities-azure-resources/overview#how-can-i-use-managed-identities-for-azure-resources).
There are two [types of managed identities](https://docs.microsoft.com/en-us/azure/active-directory/managed-identities-azure-resources/overview#managed-identity-types):
- **System-assigned** identity, which is enabled directly on the Azure cloud service. For example, we can enable managed identity for an Azure Web App instance. Once this resource is deleted, the managed identity created for it is also deleted.
- **User-assigned** identity, which is a standalone Azure resource that can be created independently from the concrete service instance. We can then assign it to one or more Azure resources. It means that we can use a *user-assigned* identity with an Azure Web App and an Azure Function simultaneously. Resources assigned to this type of managed identity are deleted independently. So it means that this type of managed identity will not be deleted even if we delete the Azure Web App to which this managed identity is assigned.
I recommend watching [this short video about Azure managed identities](https://youtu.be/OzqpxeD3fG0) to learn more about this concept. This article will use the system-assigned managed identity for an [Azure Web App](https://azure.microsoft.com/en-us/services/app-service/web/) to securely access a secret stored in the Azure Key Vault.
## Azure Cloud Services Configuration
We will use the Azure Web App service to host an ASP .NET Core Web API (.NET 5). We will enable managed identity and grant access to the Azure Key Vault service to read a secret stored in it. Let's see how to create an Azure Key Vault instance and use the Azure Web App services.
### Create the Azure Web App instance
First of all, we need an Azure subscription. We can create our account for free on [this page](https://azure.microsoft.com/en-us/free/). Once we have access to the [Azure portal](https://portal.azure.com/), we can create a new Azure Web App instance to host our .NET application.
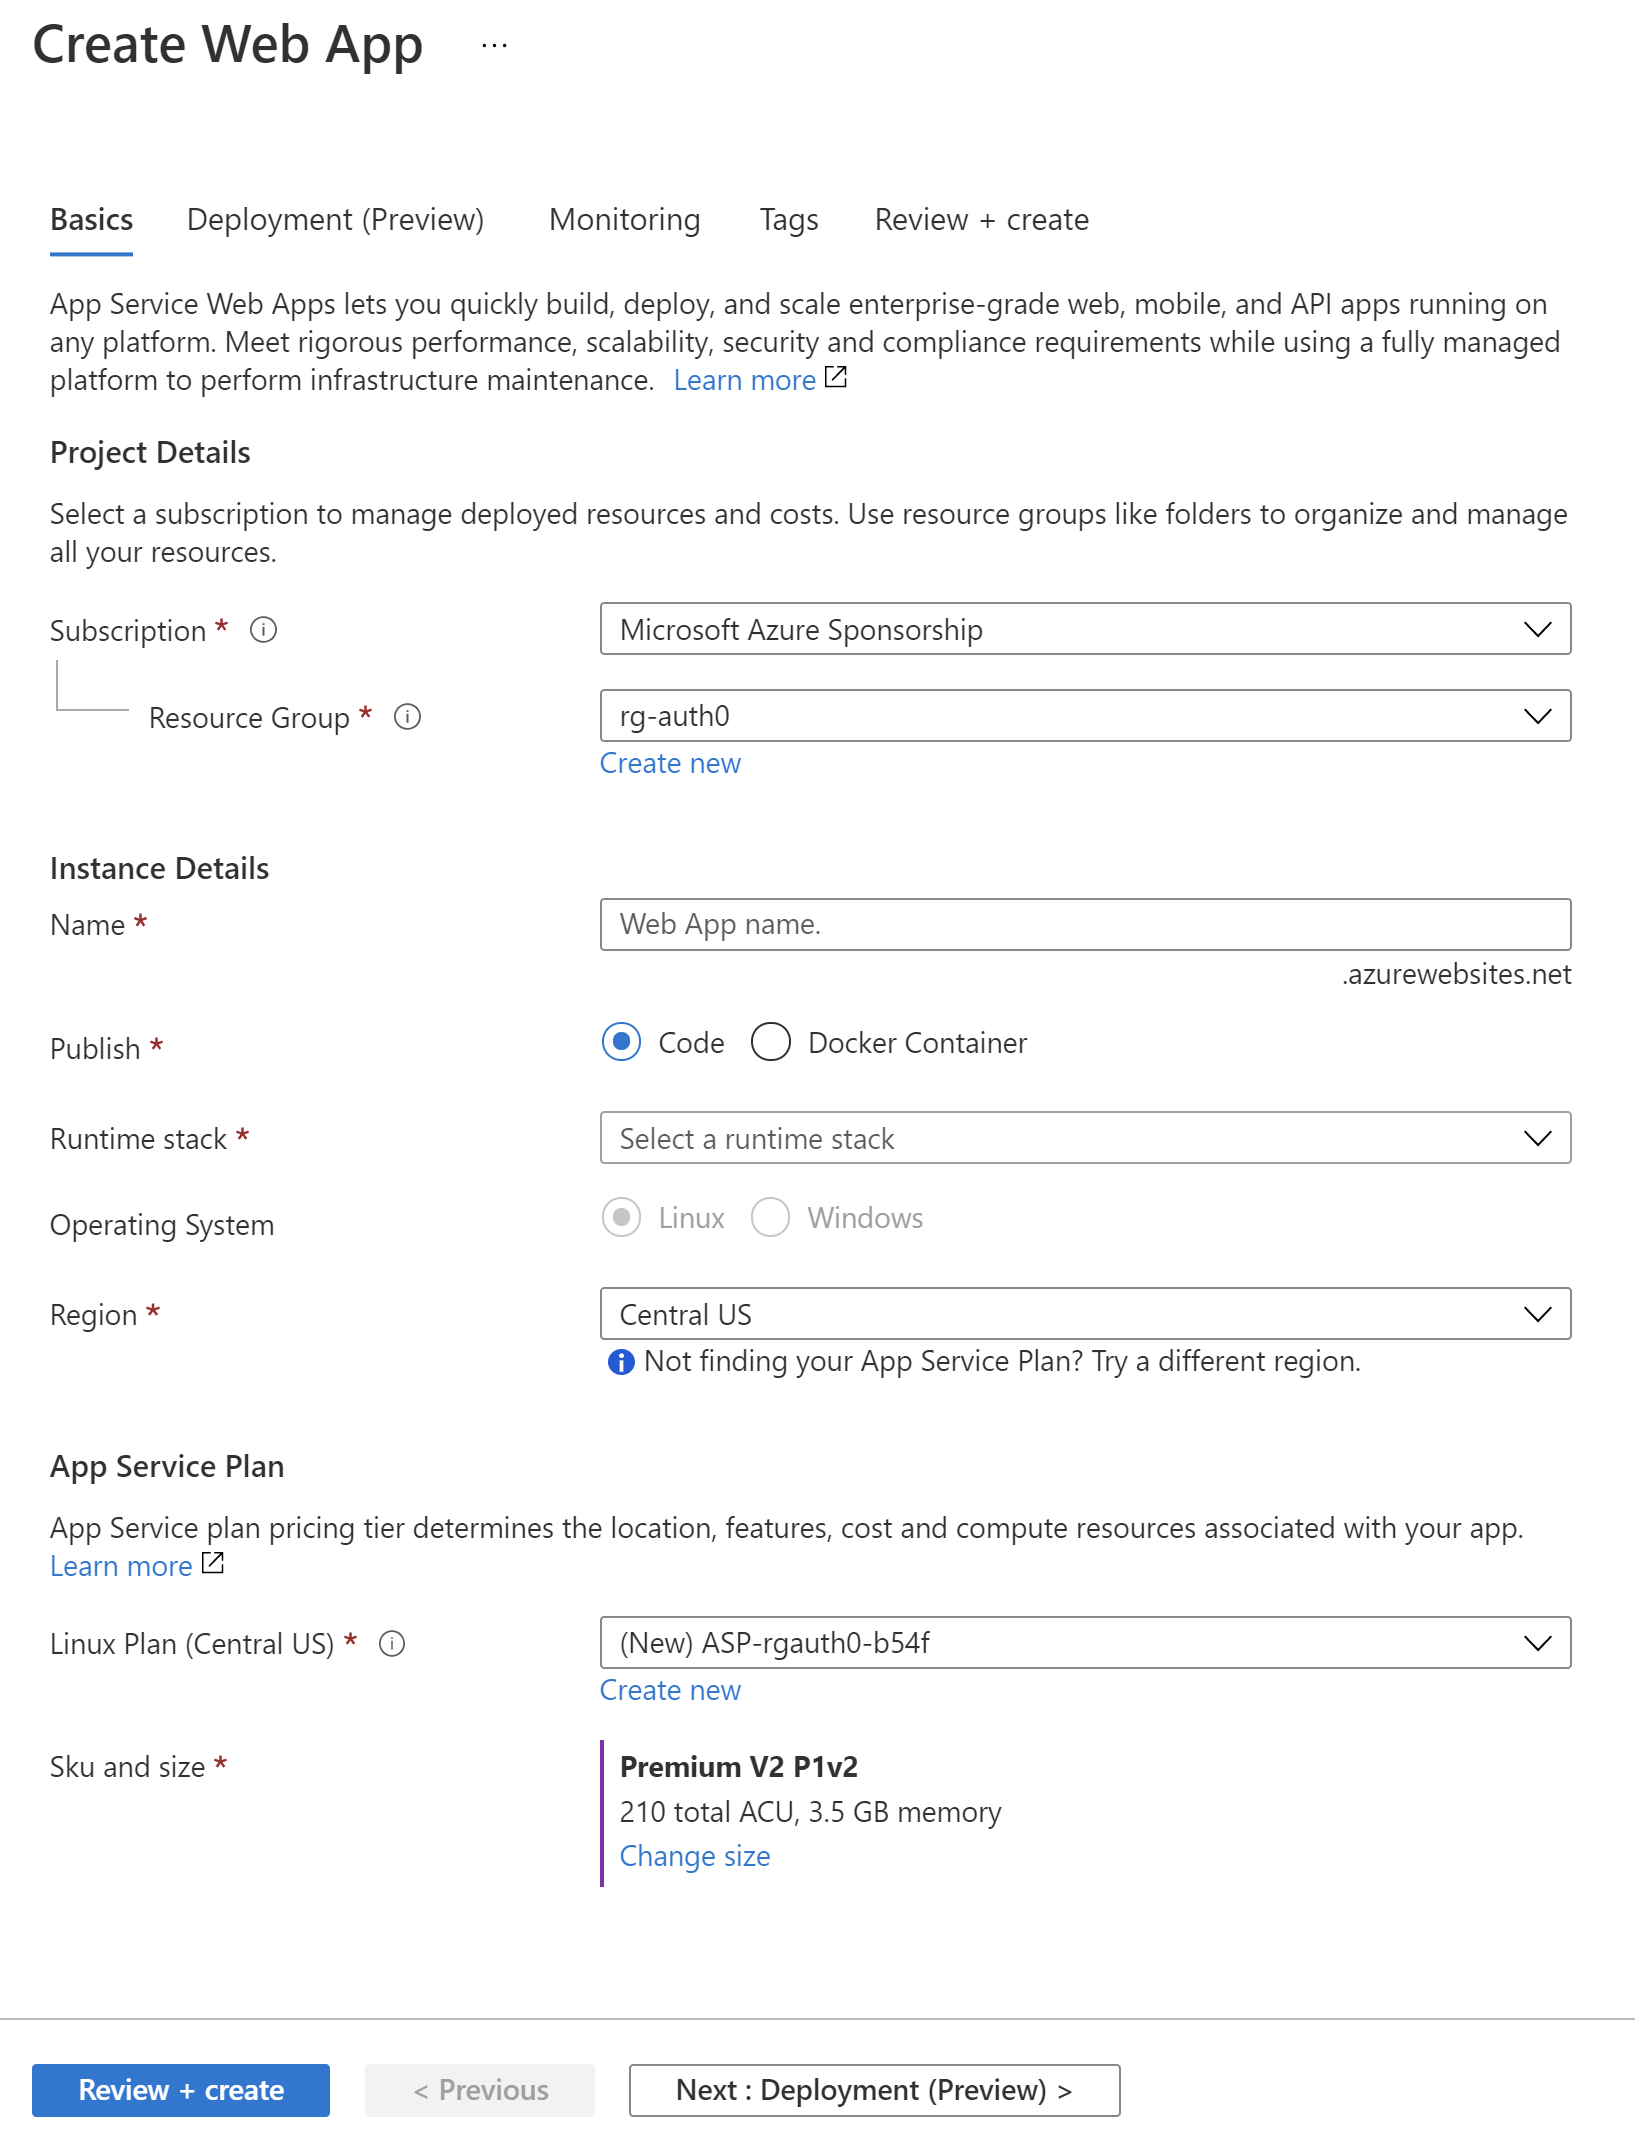
In the Azure portal, follow these steps to create a new Azure Web App instance:
1. First, we have to click *Create a resource* from the left menu.
2. Then, we select *Web App* from the list.
3. Next, we have to provide a name in the *Resource Group* section — it can be *rg-managed-identities*.
4. In the *name* field, we have to provide the name of our Azure Web App instance.
5. In the *Publish* section, we select *Code*.
6. Then, we select *.NET 5* in the *Runtime stack* section.
7. We have to set *Operation system* to be *Windows*.
8. For the region, we have to select the closest region to us — in my case *West Europe*.
We can leave the other options to their default values.
The following picture shows an example of the configuration for a Web App instance:
Finally, we have to click the *Review + create* button. If there are no issues, our Azure Web App instance should be ready in a minute. Once it is ready, we can click the *Go to resource* button.
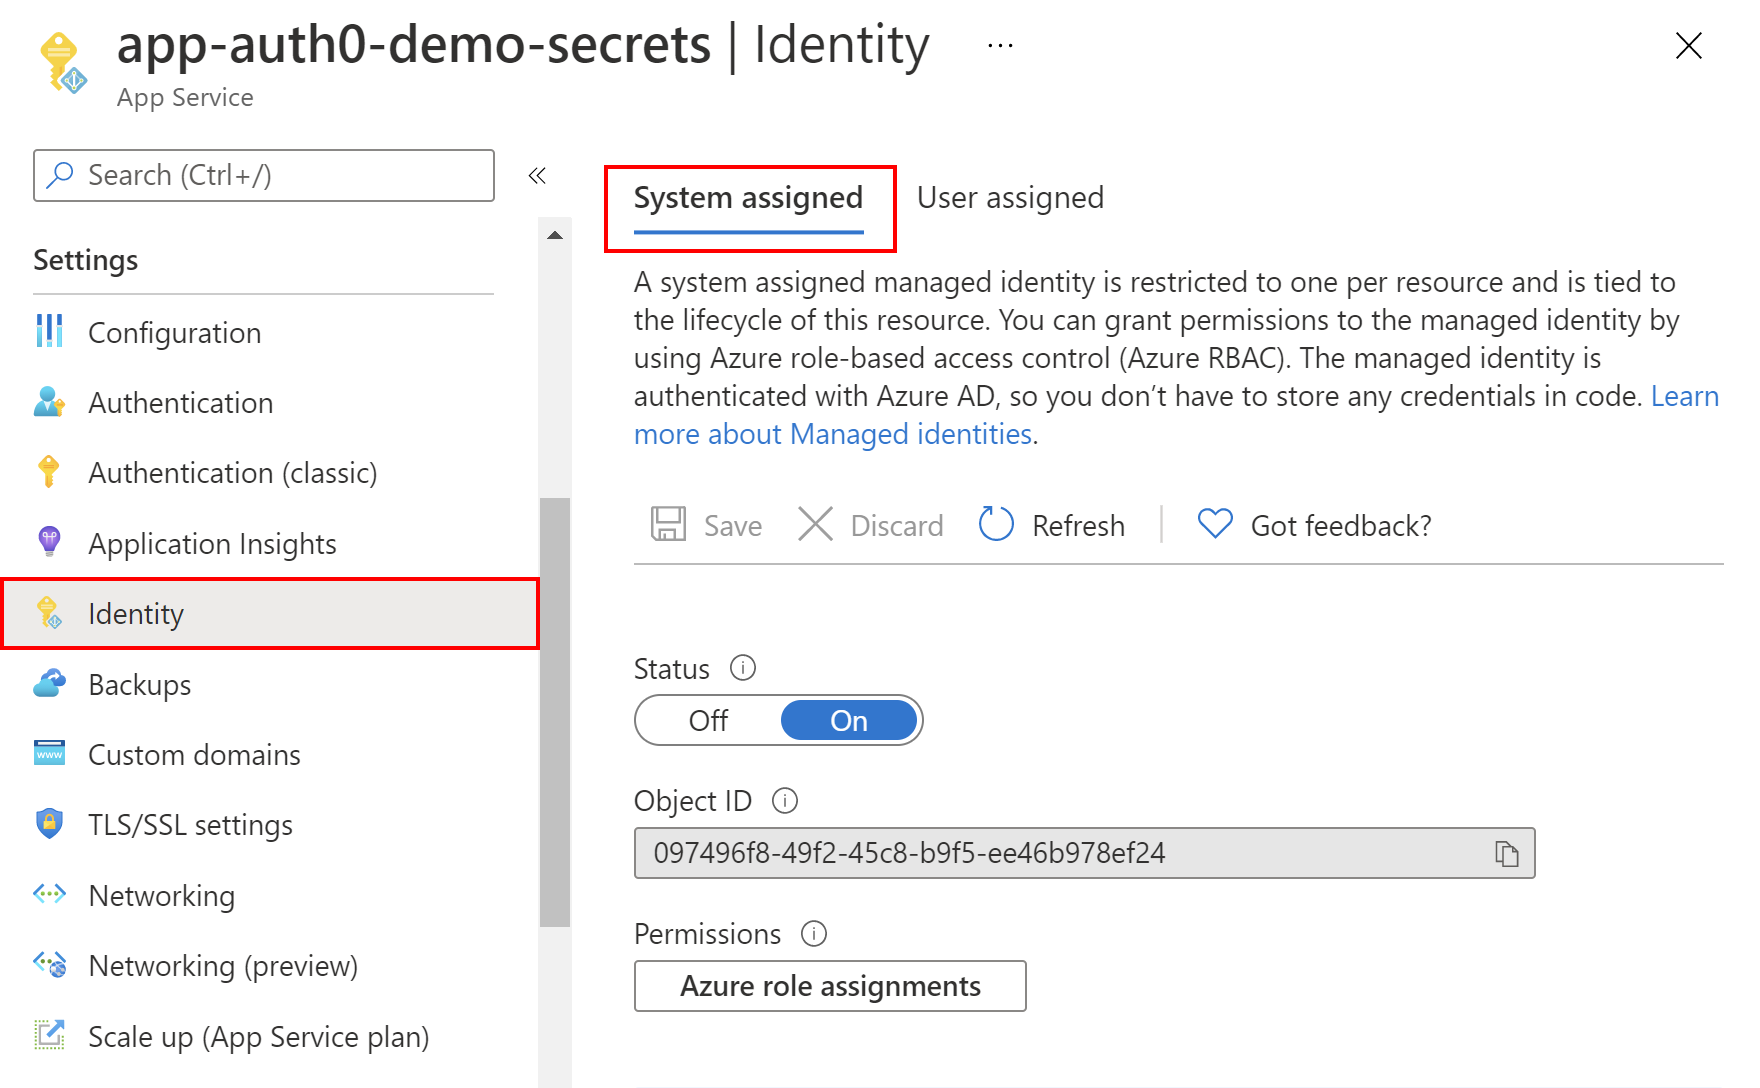
### Enable the Azure managed identity
Now, the management blade should be displayed. So, we have to enable the system-assigned managed identity for our Azure Web App. From the left menu, we select *Identity* under the *Settings* section. Under the *System-assigned* tab, we switch the *Status* toggle to be *On*. After a few seconds, we should see the *Object ID* value displayed. Let's copy it because we are going to use it later in the article. That's it! We enabled managed identity for our Azure Web App instance.
The following picture summarizes an example of managed identity configuration:
### Create the Azure Key Vault instance.
Now we have to create an Azure Key Vault instance and make it possible for our web application to read the secret from there.
In the [Azure portal](https://portal.azure.com/), we have to follow [these steps](https://docs.microsoft.com/en-us/azure/key-vault/general/quick-create-portal#create-a-vault) to create a new Azure Key Vault instance. Once the Key Vault is ready, we can add a secret to it and make it accessible from the Azure Web App we created before.
From the left menu of the Key Vault configuration page, we select *Secrets* from the *Settings* section. Then, we click the *+ Generate/Import* button. For the *Upload options*, we select *Manual*. For the *Name*, let's type *APP-SECRET*. For the *Value*, let's type *Secret value from the Azure Key Vault*. We can leave the other options to their default values.
In the following picture, we can see an example of that configuration:
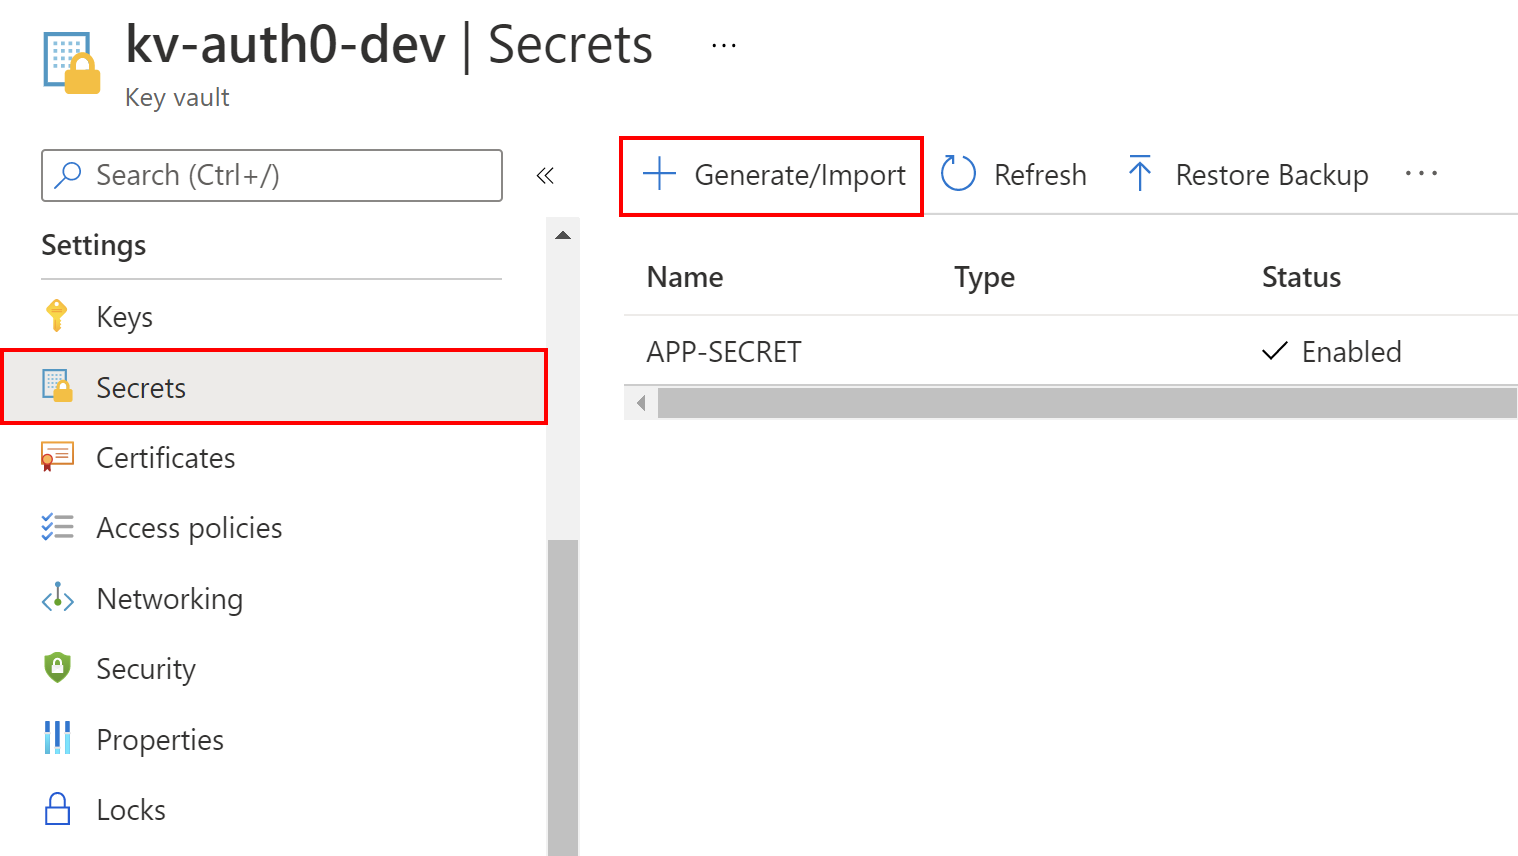
We have to click the *Create* button to create the new secret. It should be displayed on the list after its creation.
### Grant access to the secret
To make this secret accessible from the ASP .NET Core application hosted on the Azure Web App service we created before, we have to grant access to read secrets. From the left menu of the Key Vault page, we select *Access policies*, and then we click *+ Add Access Policy*, as shown in the following picture:
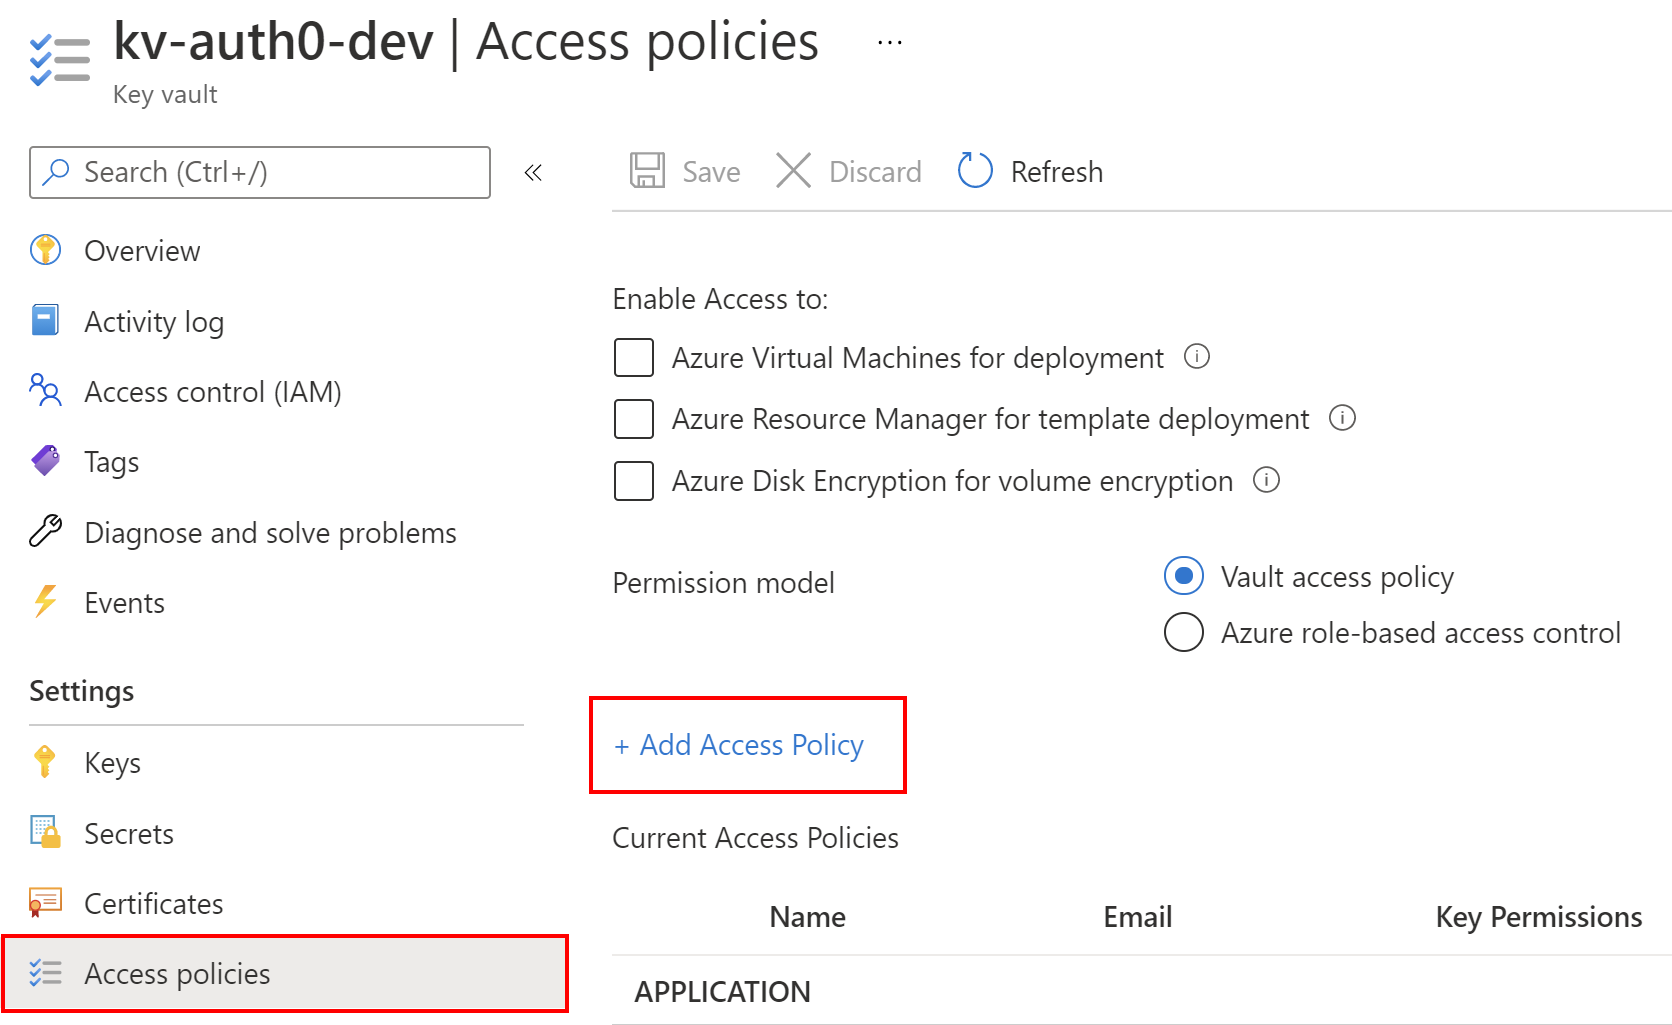
From the *Secrets permissions*, we select *Get* and *List*. This will allow us to list and read the secret values stored in the Azure Key Vault instance. Then, we click the *Select principal* link. In the search box, we have to provide the value of *Object ID* for the system-assigned managed identity we created above for our Azure Web App instance. Once we paste it into the search box, it should be displayed on the list. We have to select it from the list and click the *Select* button. Finally, we click *Add* button. In the end, we have to remember to click the *Save* button from the top of the blade.
This is all. We created an Azure Web App, enabled and assigned its managed identity, and granted it access to secrets stored in the Azure Key Vault. Now let's look at the application source code.
## Set up The Sample Application
To see how managed identities work, we will use a sample ASP. NET Core Web API (.NET5) application. We will see how to access secrets on the local machine and then in the Azure Key Vault once the application is deployed to the Azure Web App instance.
### Get the sample application
Let's start by cloning the ASP.NET Core (.NET 5) application from [this GitHub repository](https://github.com/auth0-blog/aspnet-secrets-managed-identity) by using the following command:
```git
git clone https://github.com/auth0-blog/aspnet-secrets-managed-identity
```
The sample application is pretty simple: it is a web app that reads the secret from our local configuration when running on the local machine and from the Azure Key Vault when it is deployed to the Azure Web App instance. This article will focus on using the managed identities to access the Key Vault secrets but the application can also access secrets stored on the local machine. To learn more about managing secrets locally in .a NET application using the *Secret Manager*, I encourage you to read the [Secrets Management in .NET Applications](https://auth0.com/blog/secret-management-in-dotnet-applications/) article.
### Store a secret locally
For the local development, we can store our secrets using the Secret Manager. I stored a secret called *APP-SECRET* with the value set to *This is the local secret value*. To learn how to store secrets on our local machine, we can follow [these instructions](https://auth0.com/blog/secret-management-in-dotnet-applications/#Store-your-secrets).
### Prepare the app to read secrets using managed identities
To enable our ASP .NET Core Web API application to read secrets from the Azure Key Vault once deployed to the Azure Web App, we need to add the proper `NuGet` packages. In the sample project, we used two packages:
- [Microsoft.Extensions.Azure](https://www.nuget.org/packages/Microsoft.Extensions.Azure/) — with this `NuGet` package, we can easily inject dependencies for using different [Azure SDK clients](https://azure.github.io/azure-sdk/releases/latest/dotnet.html) for accessing Azure services. In this article, we will use *SecretClient* to access secrets stored in the Azure Key Vault.
- [Azure.Security.KeyVault.Secrets](https://www.nuget.org/packages/Azure.Security.KeyVault.Secrets) — with this `NuGet` package, we can use a *SecretClient* instance to access secrets stored in the Azure Key Vault.
With the above packages, we can use managed identities to access Key Vault secrets from the ASP .NET Core Web API application hosted on the Azure Web App. To authenticate using managed identities, Azure SDK provides a class called [`DefaultAzureCredential`](https://docs.microsoft.com/en-us/dotnet/api/overview/azure/identity-readme#defaultazurecredential). Our implementation combines credentials commonly used to authenticate when the application is deployed to the cloud with credentials used to authenticate in a development environment. If the application is deployed to an Azure host with managed identity enabled, the `DefaultAzureCredential` will authenticate with that account.
### Prepare the application settings
.NET provides us with a powerful infrastructure to manage settings for our application. Its basic use relies on the `appsettings.json` configuration file.
Our application has to know to which Key Vault it should connect to retrieve secrets. This is why the `appsettings.json` file has a section called `KeyVault`, where we provide the `VaultUri` of the Key Vault instance we created earlier in the Azure portal:
```json
"KeyVault": {
"VaultUri": "https://xxx.vault.azure.net/"
}
```
We can find this address in the *Overview* section of the Key Vault instance's page in the Azure portal.
### Manage access to secrets stored locally and in the cloud
Once we fill in the details of Key Vault in the `appsettings.json` file, we can focus on the `SecretManager` class. Here is the source code:
```csharp
// SecretManagement/SecretManager.cs
// ...existing using section...
namespace TMF.Secure.API.SecretManagement
{
public class SecretManager
{
private readonly SecretClient _secretClient;
private readonly IConfiguration _configuration;
public SecretManager(SecretClient secretClient,
IConfiguration configuration)
{
_secretClient = secretClient;
_configuration = configuration;
}
public async Task GetSecretAsync(string secretName)
{
string secretValue = string.Empty;
#if DEBUG
secretValue = _configuration[secretName];
#else
try
{
KeyVaultSecret secret = await _secretClient.GetSecretAsync(secretName);
secretValue = secret.Value;
}
catch (RequestFailedException ex)
{
if (ex.Status == 404)
{
return secretValue;
}
else
{
throw;
}
}
#endif
return secretValue;
}
}
}
```
The `SecretManager` class has one asynchronous method taking `secretName` as a parameter and returning a `string` value. It enables us to the access secrets stored on the local machine and those stored in the Azure Key Vault once the application is deployed to the Azure cloud. In the above code, we use the `configuration` parameter to access the settings from the `appsettings.json` and secrets stored on the local machine. This parameter implements the `IConfiguration` interface, and its value is provided by [the .NET dependency injection system](https://auth0.com/blog/dependency-injection-in-dotnet-core/). To access the secret from the local machine, we just pass the name of the secret to the `IConfiguration` instance using `_configuration[secretName]`.
To retrieve secrets from the Azure Key Vault, we use the `SecretClient` instance that is injected by the .NET dependency injection system. To retrieve a secret by its name, we call `_secretClient.GetSecretAsync(secretName)` method on the `SecretClient` instance.
> Please note that in the `Task GetSecretAsync(string secretName)` method we use compiler directives. So, if we debug our .NET application, we use secret from the local machine. If we run our application in *Release* mode, the secret will be loaded from the Azure Key Vault.
### Register the dependencies
To use the `SecretManager` class in the controllers, we have to register it in the dependency injection container. This is done in the `Startup` class using the `services.AddSecretServices(Configuration)` method, as shown below:
```csharp
// Startup.cs
// ...existing using section...
namespace TMF.Secure.API
{
public class Startup
{
public Startup(IConfiguration configuration)
{
Configuration = configuration;
}
public IConfiguration Configuration { get; }
public void ConfigureServices(IServiceCollection services)
{
services.AddSecretServices(Configuration);
// ...existing code...
}
// ...existing code...
}
}
```
The `services.AddSecretServices(Configuration)` method is located in the `SecretServiceCollectionExtensions` static class. The relevant code is shown below:
```csharp
// Core/DependencyInjection/SecretServiceCollectionExtensions.cs
// ...existing using section...
namespace TMF.Secure.API.Core.DependencyInjection
{
public static class SecretServiceCollectionExtensions
{
public static IServiceCollection AddSecretServices(
this IServiceCollection services,
IConfiguration configuration)
{
services.AddAzureClients(builder =>
{
builder.AddSecretClient(configuration.GetSection("KeyVault"));
});
services.AddSingleton();
return services;
}
}
}
```
This is the place where we register the `SecretClient` instance provided by the [Azure.Security.KeyVault.Secrets](https://www.nuget.org/packages/Azure.Security.KeyVault.Secrets) library. In the `services.AddAzureClients` method, we invoke `builder.AddSecretClient(configuration.GetSection("KeyVault"))` method with the Key Vault configuration section from the `appsettings.json` configuration file. According to the [best practices](https://devblogs.microsoft.com/azure-sdk/lifetime-management-and-thread-safety-guarantees-of-azure-sdk-net-clients/) related to lifetime management, the `SecretClient` class is registered as a singleton in the IoC container.
Next, we register the `SecretManager` instance also as a singleton.
### Display the secret value
For testing purposes, we use the `SecretsController` class to display the secret value. The controller responds to an HTTP GET request with the `secretName` query parameter containing the secret's name. The _403 Bad Request_ response is returned if no `secretName` query parameter is passed. If there is no secret stored locally or in the Key Vault with the provided name, the message *There is no secret stored in the Key Vault* is returned. Here is the code that implements this behavior:
```csharp
// Controllers/SecretController.cs
// ...existing using section...
namespace TMF.Secure.API.Controllers
{
// ...existing code...
public class SecretsController : ControllerBase
{
private readonly SecretManager _secretManager;
public SecretsController(SecretManager secretManager)
{
_secretManager = secretManager;
}
[HttpGet("", Name = "Get secret value by the secret name")]
public async Task GetAsync([FromQuery] string secretName)
{
if(string.IsNullOrEmpty(secretName))
{
return BadRequest();
}
string secretValue = await _secretManager.GetSecretAsync(secretName);
if (!string.IsNullOrEmpty(secretValue))
{
return Ok(secretValue);
}
else
{
return Ok("There is no secret stored in the Key Vault");
}
}
}
}
```
## Test the Sample Application
With all that said, we can verify if the above implementation works both on the local machine and on the Azure cloud.
### Run your application locally
We start the application using *Debug* mode. As mentioned before, I stored a secret called *APP-SECRET* with the value set to *This is the local secret value*. Once the application is launched, we call GET the */Secrets* endpoint with *APP-SECRET* passed as its query parameter.
The following picture shows an example of the response to the HTTP GET request:
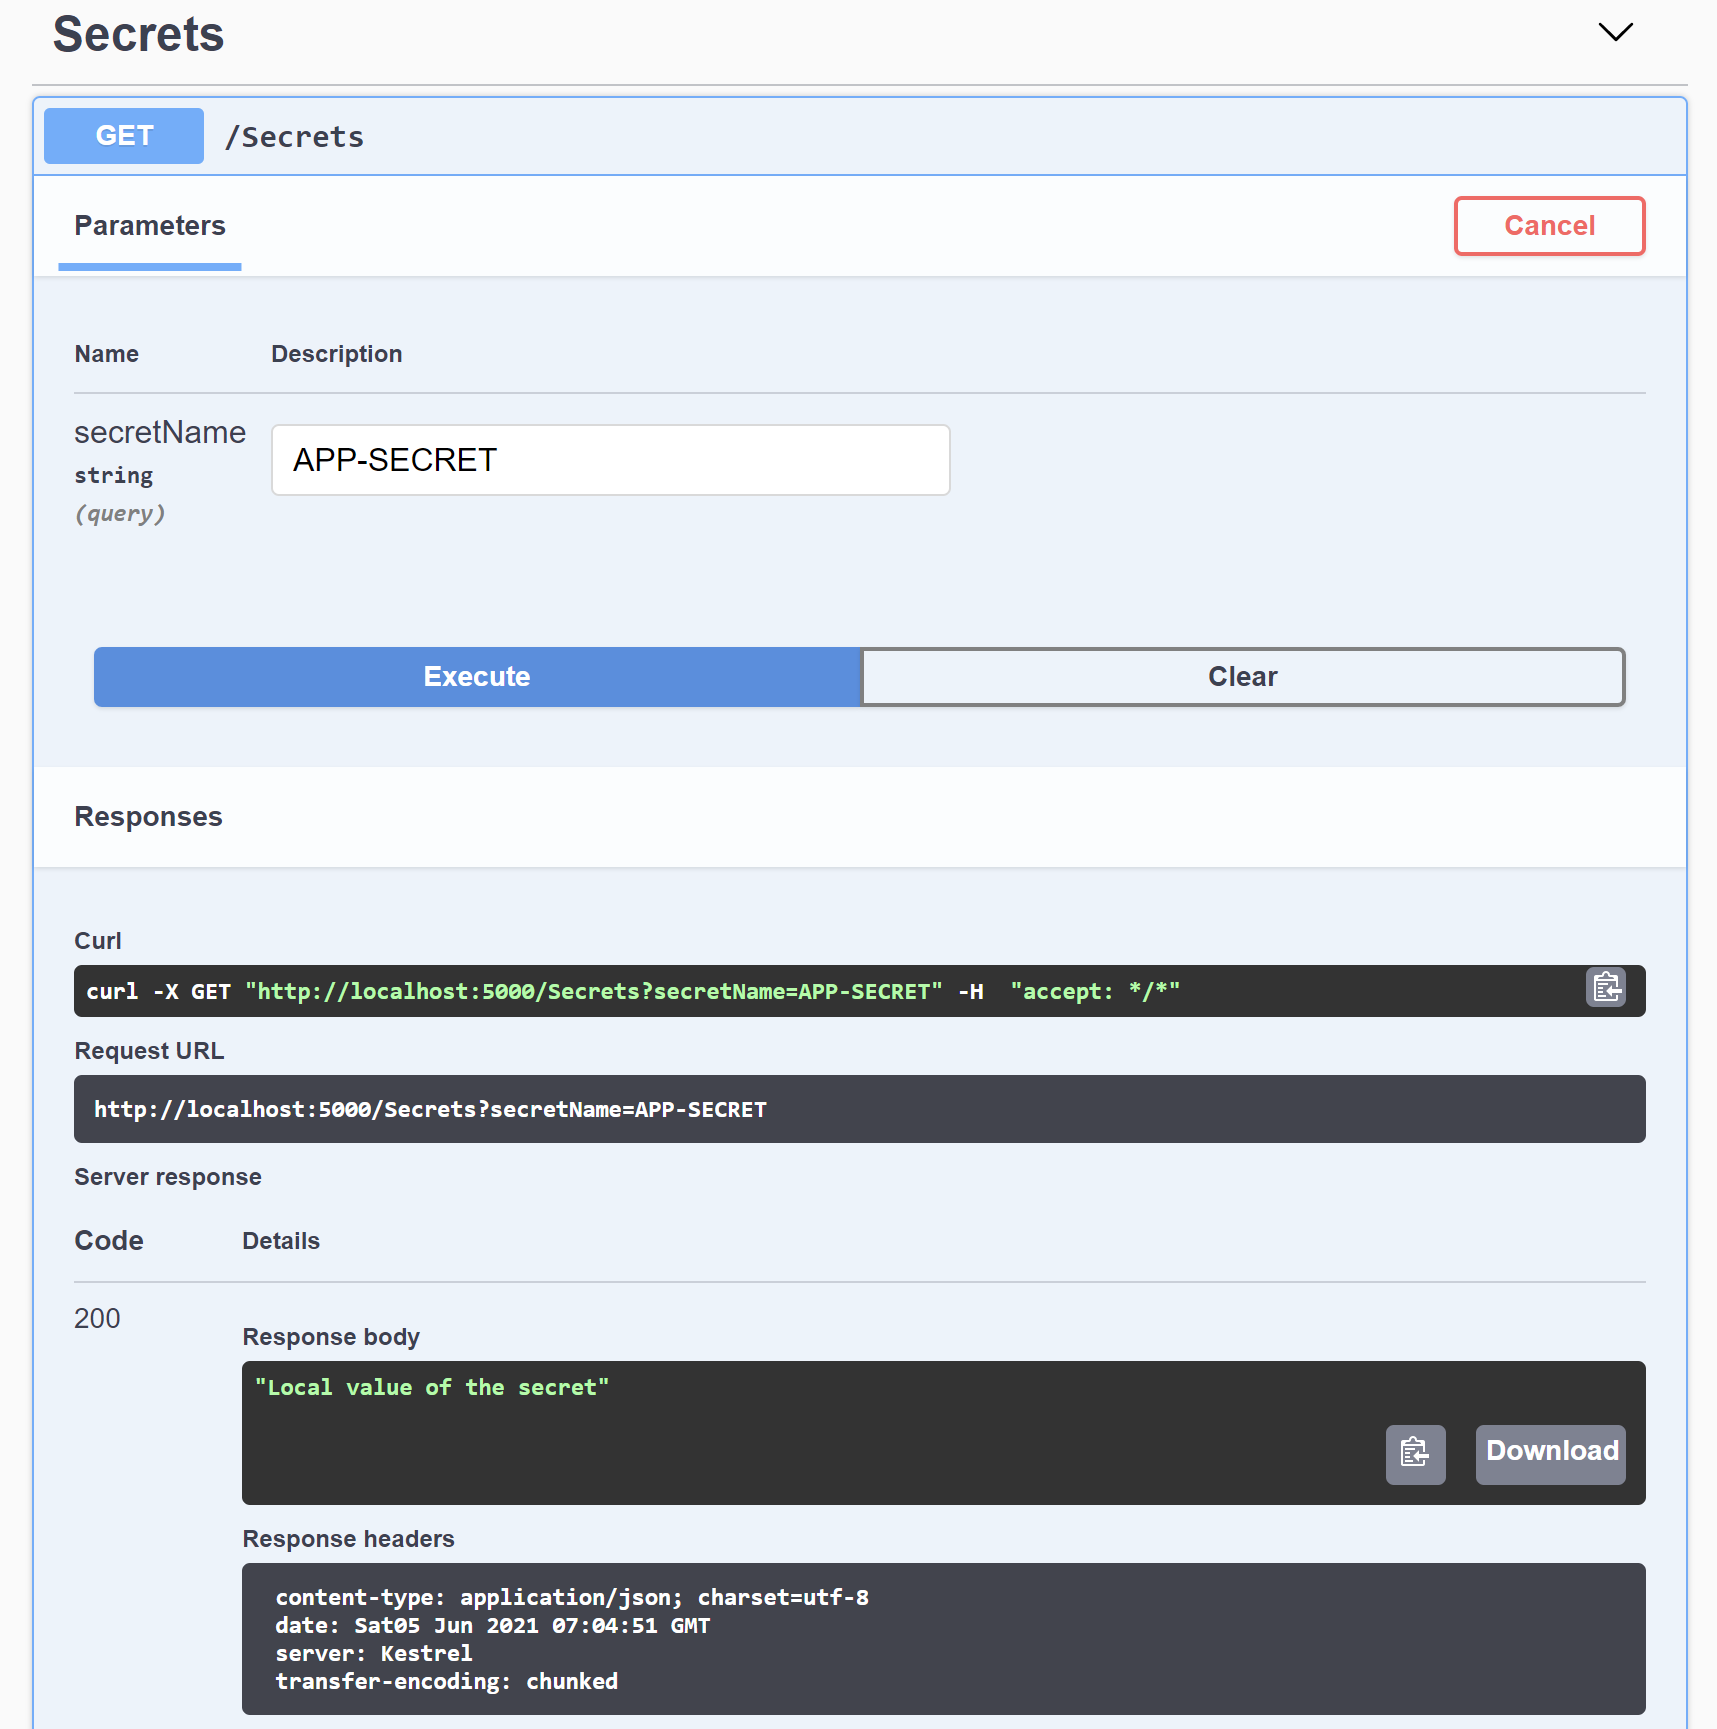
In the example shown in the picture, the endpoint returns the expected value.
### Run your application in the cloud
To verify if managed identity we configured before in the Azure portal works correctly and our application can retrieve our secret from the Azure Key Vault, we have to deploy the application to the Azure Web App. We follow [these instructions](https://docs.microsoft.com/en-us/visualstudio/deployment/quickstart-deploy-to-azure?view=vs-2019) to publish the application to the Azure cloud by directly using Visual Studio.
Once the application is deployed, we can display the `Swagger` page using the URL of our Azure Web App. In my case, the URL is `https://app-auth0-demo-secrets.azurewebsites.net/swagger/index.html`. We call the */Secrets* endpoint via HTTP GET with *APP-SECRET* as its query parameter. The secret stored in the Azure Key Vault should be displayed, as shown in the following picture:

## Conclusion
In this article, we learned how to use managed identities to eliminate the requirement of storing secrets in the application configuration files. Having managed identities enabled for the Azure resources, we can directly access different resources without using connection strings and passwords. Also, we discovered how to use managed identities to allow an Azure Web App to access secrets stored in the Azure Key Vault.
Combining managed identities enabled for the services in the cloud with the Secret Manager tool used on the local machine can significantly improve the security of our applications.
Now we have the basics to manage our .NET application's secrets better in both scenarios — when working locally and once the application is deployed to the cloud.