---
title: "Securing Spring Boot APIs and SPAs with OAuth 2.0"
description: "Learn how to secure your Spring Boot APIs and your SPAs with OAuth 2.0."
authors:
- name: "Vladimir Fomene"
url: "https://auth0.com/blog/authors/vladimir-fomene/"
date: "Oct 29, 2018"
category: "Developers,Tutorial,Spring Boot"
tags: ["spring-boot", "oauth", "oauth2", "spa", "single-page-apps", "spring", "java", "security", "auth0", "implicit"]
url: "https://auth0.com/blog/securing-spring-boot-apis-and-spas-with-oauth2/"
---
# Securing Spring Boot APIs and SPAs with OAuth 2.0
**TL;DR:** In this article, you will learn how to create and secure a [jQuery](https://jquery.com/) SPA and a [Spring Boot](https://spring.io/projects/spring-boot) API using [OAuth 2.0](https://tools.ietf.org/html/rfc6749). You will start by scaffolding a new Spring Boot project. Then you will add some endpoints to it. After that, you will use Spring Security to secure the whole thing. Lastly, you will create a SPA (with jQuery) to consume the API. If needed, you can find the reference code developed throughout the article in [this GitHub repository](https://github.com/auth0-blog/spring-boot-oauth2).
## Prerequisites
To follow this article along, you will need to have the following software installed in your local machine:
* [JDK 8](https://www.oracle.com/technetwork/java/javase/downloads/jdk8-downloads-2133151.html) or [JDK 10 (this article was tested with JDK 10)](https://www.oracle.com/technetwork/java/javase/downloads/jdk10-downloads-4416644.html).
* Any Java IDE of your choice (e.g., [IntelliJ](https://www.jetbrains.com/idea/), [Eclipse](http://www.eclipse.org), or [Netbeans](https://netbeans.org/)).
## What is OAuth 2.0?
Nothing better then the official specification itself to teach you what OAuth 2.0 is:
> OAuth 2.0 is an authorization framework that enables a third-party application to obtain limited access to an HTTP service, either on behalf of a resource owner (usually a user) or by allowing a third-party application to obtain access on its own behalf. - [The OAuth 2.0 Authorization Framework](https://tools.ietf.org/html/rfc6749)
In other words, this protocol allows a user to grant limited access to their data on one app (web app, mobile app, etc.), to another app, without having to expose their credentials. [If you don't know much about OAuth 2.0 and want to learn more, make sure you check out this resource](https://auth0.com/docs/protocols/oauth2).
## OAuth 2.0 and Single-Page Apps: using the Implicit Grant
Since you are going to develop a demo application that is composed of a Single-Page App (SPA) that consumes resources from a Spring Boot API that is secured with OAuth 2.0, you will have to implement what is known as [the OAuth 2.0 Implicit Grant](https://auth0.com/docs/api-auth/tutorials/implicit-grant). The Implicit Grant is an OAuth 2.0 flow specifically tailored for public SPAs clients that want to consume APIs. If you were developing a different kind of client (for example, a mobile app), you would have to choose another flow.
[To learn more about the different flows and how to implement each one, take a look at this resource](https://auth0.com/docs/api-auth/which-oauth-flow-to-use).
## Securing Spring Boot APIs with OAuth 2.0
In this section, you will start from scratch, create a new Spring Boot API, secure it with OAuth 2.0, and then create a SPA to consume this API. However, before you can dive deep in the code, you will need an identity provider that implements the OAuth 2.0 protocol. For this demo application, you will use [Auth0](https://auth0.com/) and, for that, you'll need to sign up for a free Auth0 account here.
After signing up for your Auth0 account, you will need to create an API on Auth0 to represent your backend API and to be able to configure it to authenticate requests. To do this, head to [the _APIs_ section on your Auth0 dashboard](https://manage.auth0.com/#/apis) and click on the _Create API_ button. After that, the dashboard will show you a form where you will have to enter:
* a _name_ for your API (this can be something like "Spring Boot Implicit Flow");
* an _identifier_ (in this case, it can be `http://localhost:8080/api` or anything that resembles a valid URL);
* and the _signing algorithm_ (for this field, make sure you choose `RS256`).
Then, you can create your Auth0 API by clicking on the _Create_ button.
After clicking on this button, the dashboard will redirect you to a section where you will find instructions on how to configure your backend. As this article will address everything related to the configuration, you can ignore this section and move to the _Scopes_ section. There, you will register an [OAuth scope](https://auth0.com/docs/scopes/current):
* Name: `read:messages`
* Description: "Read messages"
After inserting the above values on the form, hit the _Add_ button to save this new scope into your Auth0 API. With this in place, you are done with the configuration and can start working on your backend API.
### Scaffolding Your Spring Boot API
In this section, you will create a new Spring Boot application that will serve as your API. This API will expose public and private endpoints. For starters, go to [the Spring Initializr page](https://start.spring.io/) and fill out the form like this:
* *Generate a*: `Gradle Project`
* *with*: `Java`
* *and Spring Boot*: `2.0.x`
* *Group*: `com.example`
* *Artifact*: `spring-boot-oauth2`
Then, on the _Dependencies_ section, you will have to use the search box to include two libraries: `Web` and `Security`.
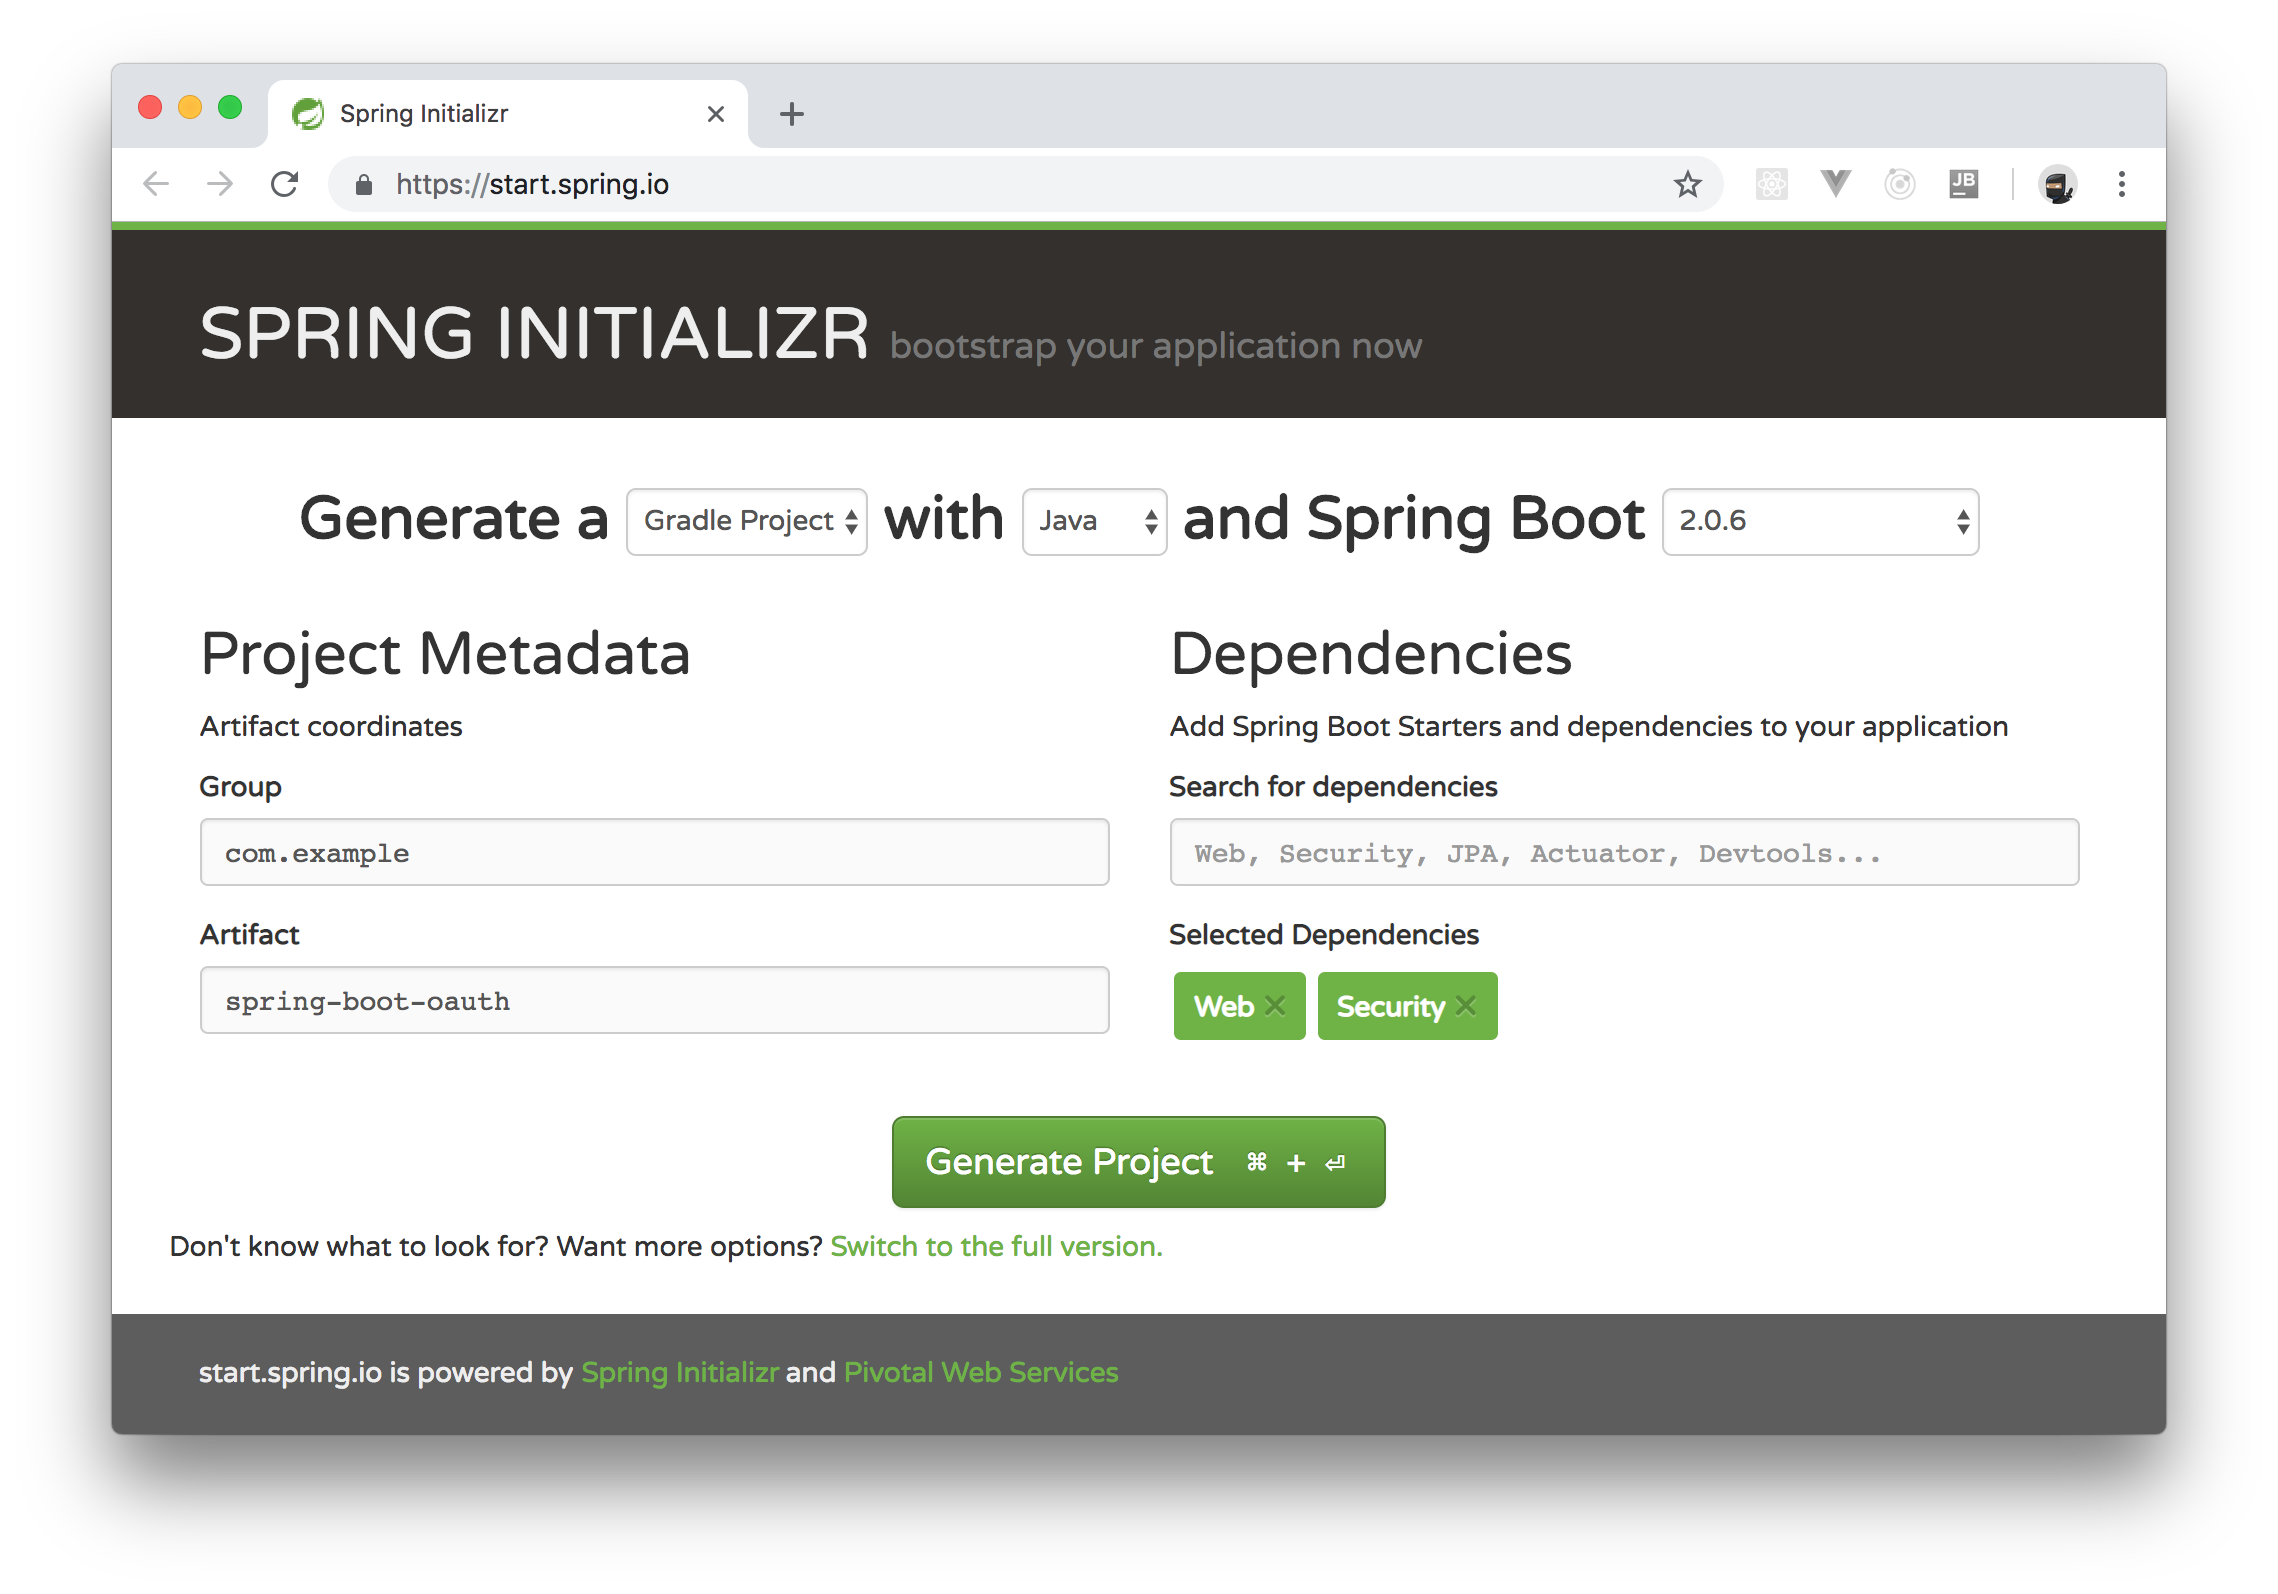
After filling out the form, click on the _Generate Project_ button to download your new application. When your browser finished downloading it, extract the contents of the downloaded file and import the project into your preferred IDE.
As you can see through your IDE, for now, your project contains only one class called `SpringBootOauthApplication`. If you open the `build.gradle` file, you will also see that your project defines four dependencies: `spring-boot-starter-security`, `spring-boot-starter-web`, `spring-boot-starter-test`, and `spring-security-test`. If you are using Java 10, you will have to update this file to include a library that handles Java to XML marshalling:
```gradle
// ... leave everything else untouched ...
dependencies {
// ... other dependencies ...
compile('org.glassfish.jaxb:jaxb-runtime:2.3.1')
}
```
### Defining Endpoints on Spring Boot
After scaffolding your Spring Boot project, you can focus on creating its first endpoints. To do so, you will create a new class that will define the following endpoints:
* `/api/public`: This endpoint will be publicly accessible and will return a simple text message.
* `/api/private`: This endpoint will only be accessible by users who have been authenticated.
* `/api/private-scoped`: This endpoint will only be accessible by users who have been authenticated and that have granted a particular scope.
* `/config`: This endpoint will be publicly accessible and will return some configuration properties that your SPA will use to authenticate users.
So, to define these endpoints, create a class called `AppController` inside the `com.example.springbootoauth2` package and insert the following code into it:
```java
package com.example.springbootoauth2;
import org.json.JSONObject;
import org.springframework.beans.factory.annotation.Value;
import org.springframework.web.bind.annotation.RequestMapping;
import org.springframework.web.bind.annotation.RequestMethod;
import org.springframework.web.bind.annotation.ResponseBody;
import org.springframework.web.bind.annotation.RestController;
@RestController
public class AppController {
@Value("${security.oauth2.resource.id}")
private String resourceId;
@Value("${auth0.domain}")
private String domain;
@Value("${auth0.clientId}")
private String clientId;
@RequestMapping(value = "/api/public", method = RequestMethod.GET, produces = "application/json")
@ResponseBody
public String publicEndpoint() {
return new JSONObject()
.put("message", "Hello from a public endpoint! You don\'t need to be authenticated to see this.")
.toString();
}
@RequestMapping(value = "/api/private", method = RequestMethod.GET, produces = "application/json")
@ResponseBody
public String privateEndpoint() {
return new JSONObject()
.put("message", "Hello from a private endpoint! You need to be authenticated to see this.")
.toString();
}
@RequestMapping(value = "/api/private-scoped", method = RequestMethod.GET, produces = "application/json")
@ResponseBody
public String privateScopedEndpoint() {
return new JSONObject()
.put("message", "Hello from a private endpoint! You need to be authenticated and have a scope of read:messages to see this.")
.toString();
}
@RequestMapping(value = "/config", method = RequestMethod.GET, produces = "application/json")
@ResponseBody
public String getAppConfigs() {
return new JSONObject()
.put("domain", domain)
.put("clientID", clientId)
.put("audience", resourceId)
.toString();
}
}
```
After inserting this code, your IDE will probably start yelling at you because it does not know where to find the `org.json.JSONObject` class. To solve this issue, add the following dependency to your `build.gradle` file:
```gradle
// ... leave everything else untouched ...
dependencies {
// ... other dependencies ...
compile('org.json:json:20180813')
}
```
With that in place, the next thing you will need to do is to define the environment variables that the `AppController` class consumes. That is, if you take a close look at this class, you will see that it contains three `String` fields annotated with `@Value`:
- `resourceId`: This will reference your Auth0 API identifier (e.g., `http://localhost:8080/api`).
- `domain`: This will reference your Auth0 domain (e.g., `blog-samples.auth0.com`)
- `clientId`: This will reference the _Client ID_ of the Auth0 Application that you still need to create.
To define these environment variables, open the `application.properties` file and add the following content to it:
```properties
auth0.domain=
auth0.clientId=
security.oauth2.resource.id=
```
Just make sure you replace `` and `` with your own Auth0 values. Don't worry about the `` placeholder now, you will replace it later.
### Securing the Spring Boot API with OAuth 2.0
Now that you have defined your endpoints, it is time to secure your API using OAuth 2.0. To do so, you are going to import another library provided by Spring that will facilitate the configuration of everything. So, open the `gradle.build` file and add the following dependency to it:
```gradle
// ... leave everything else untouched ...
dependencies {
// ... other dependencies ...
compile('org.springframework.security.oauth.boot:spring-security-oauth2-autoconfigure:2.0.6.RELEASE')
}
```
Then, to secure your API, create a new class called `SecurityConfig` inside the `com.example.springbootoauth2` package and add the following code to it:
```java
package com.example.springbootoauth2;
import org.springframework.beans.factory.annotation.Value;
import org.springframework.context.annotation.Configuration;
import org.springframework.security.config.annotation.web.builders.HttpSecurity;
import org.springframework.security.oauth2.config.annotation.web.configuration.EnableResourceServer;
import org.springframework.security.oauth2.config.annotation.web.configuration.ResourceServerConfigurerAdapter;
import org.springframework.security.oauth2.config.annotation.web.configurers.ResourceServerSecurityConfigurer;
@Configuration
@EnableResourceServer
public class SecurityConfig extends ResourceServerConfigurerAdapter {
@Value("${security.oauth2.resource.id}")
private String resourceId;
@Override
public void configure(HttpSecurity http) throws Exception {
http.authorizeRequests()
.mvcMatchers("/api/public").permitAll()
.antMatchers("/api/private-scoped").access("#oauth2.hasScope('read:messages')")
.mvcMatchers("/api/**").authenticated()
.anyRequest().permitAll();
}
@Override
public void configure(ResourceServerSecurityConfigurer resources) throws Exception {
resources.resourceId(resourceId);
}
}
```
As you can see, you annotated this class with `@EnableResourceServer`. This annotation is a convenient feature for resource servers secured with OAuth 2.0 as it automatically enables a Spring Security filter that authenticates requests via an incoming OAuth 2.0 token. Besides this annotation, this class contains the following methods:
* `configure(ResourceServerSecurityConfigurer resources)`, used to set the identifier of your API (e.g., `http://localhost:8080/api`);
* `configure(HttpSecurity http)`, used to specify which API endpoints are secured (in this case, `mvcMatchers("/api/**").authenticated()`), which are secured and require a particular scope (i.e., `antMatchers("/api/private-scoped").access("#oauth2.hasScope('read:messages')")`), and which endpoints are public (i.e., `mvcMatchers("/api/public").permitAll()`).
The only problem now is that the `SecurityConfig` class does not know how to verify your access token. That is, whenever your users send requests to your secured endpoints, they will include access tokens that are signed with a private key. In order for this class to know if it can trust or not these access tokens, Spring will need the public key that pairs with this private key used to sign the token. To get this public key, your backend API will need to issue a request [to an endpoint known as the JWKS endpoint](https://auth0.com/docs/jwks). You don't really have to understand the details about how this works but, if you are curious, you can read all about it [here](https://auth0.com/docs/jwks) and on [the official specification](https://tools.ietf.org/html/rfc7517#section-4).
Suffices to say that, for your Spring Boot API to get a copy of the public key used to validate access tokens, you will have to open the `application.properties` file and add the following property into it:
```properties
# ... leave other properties untouched ...
security.oauth2.resource.jwk.keySetUri=https:///.well-known/jwks.json
```
> **Note:** You will have to replace `` with your own Auth0 domain. Just like you did before while configuring the `auth0.domain` environment variable.
From the backend API point of view, this is everything you need to define endpoints and to secure them with OAuth 2.0. The next section will focus on creating and defining a client app (a SPA) to consume this API. Basically, this SPA will be responsible for three things:
1. enabling users to authenticate;
2. getting access tokens back from the authentication server (Auth0);
3. enabling users to use this access tokens to issue requests to your new Spring Boot API.
### Creating and Securing a SPA with the OAuth 2.0 Implicit Grant
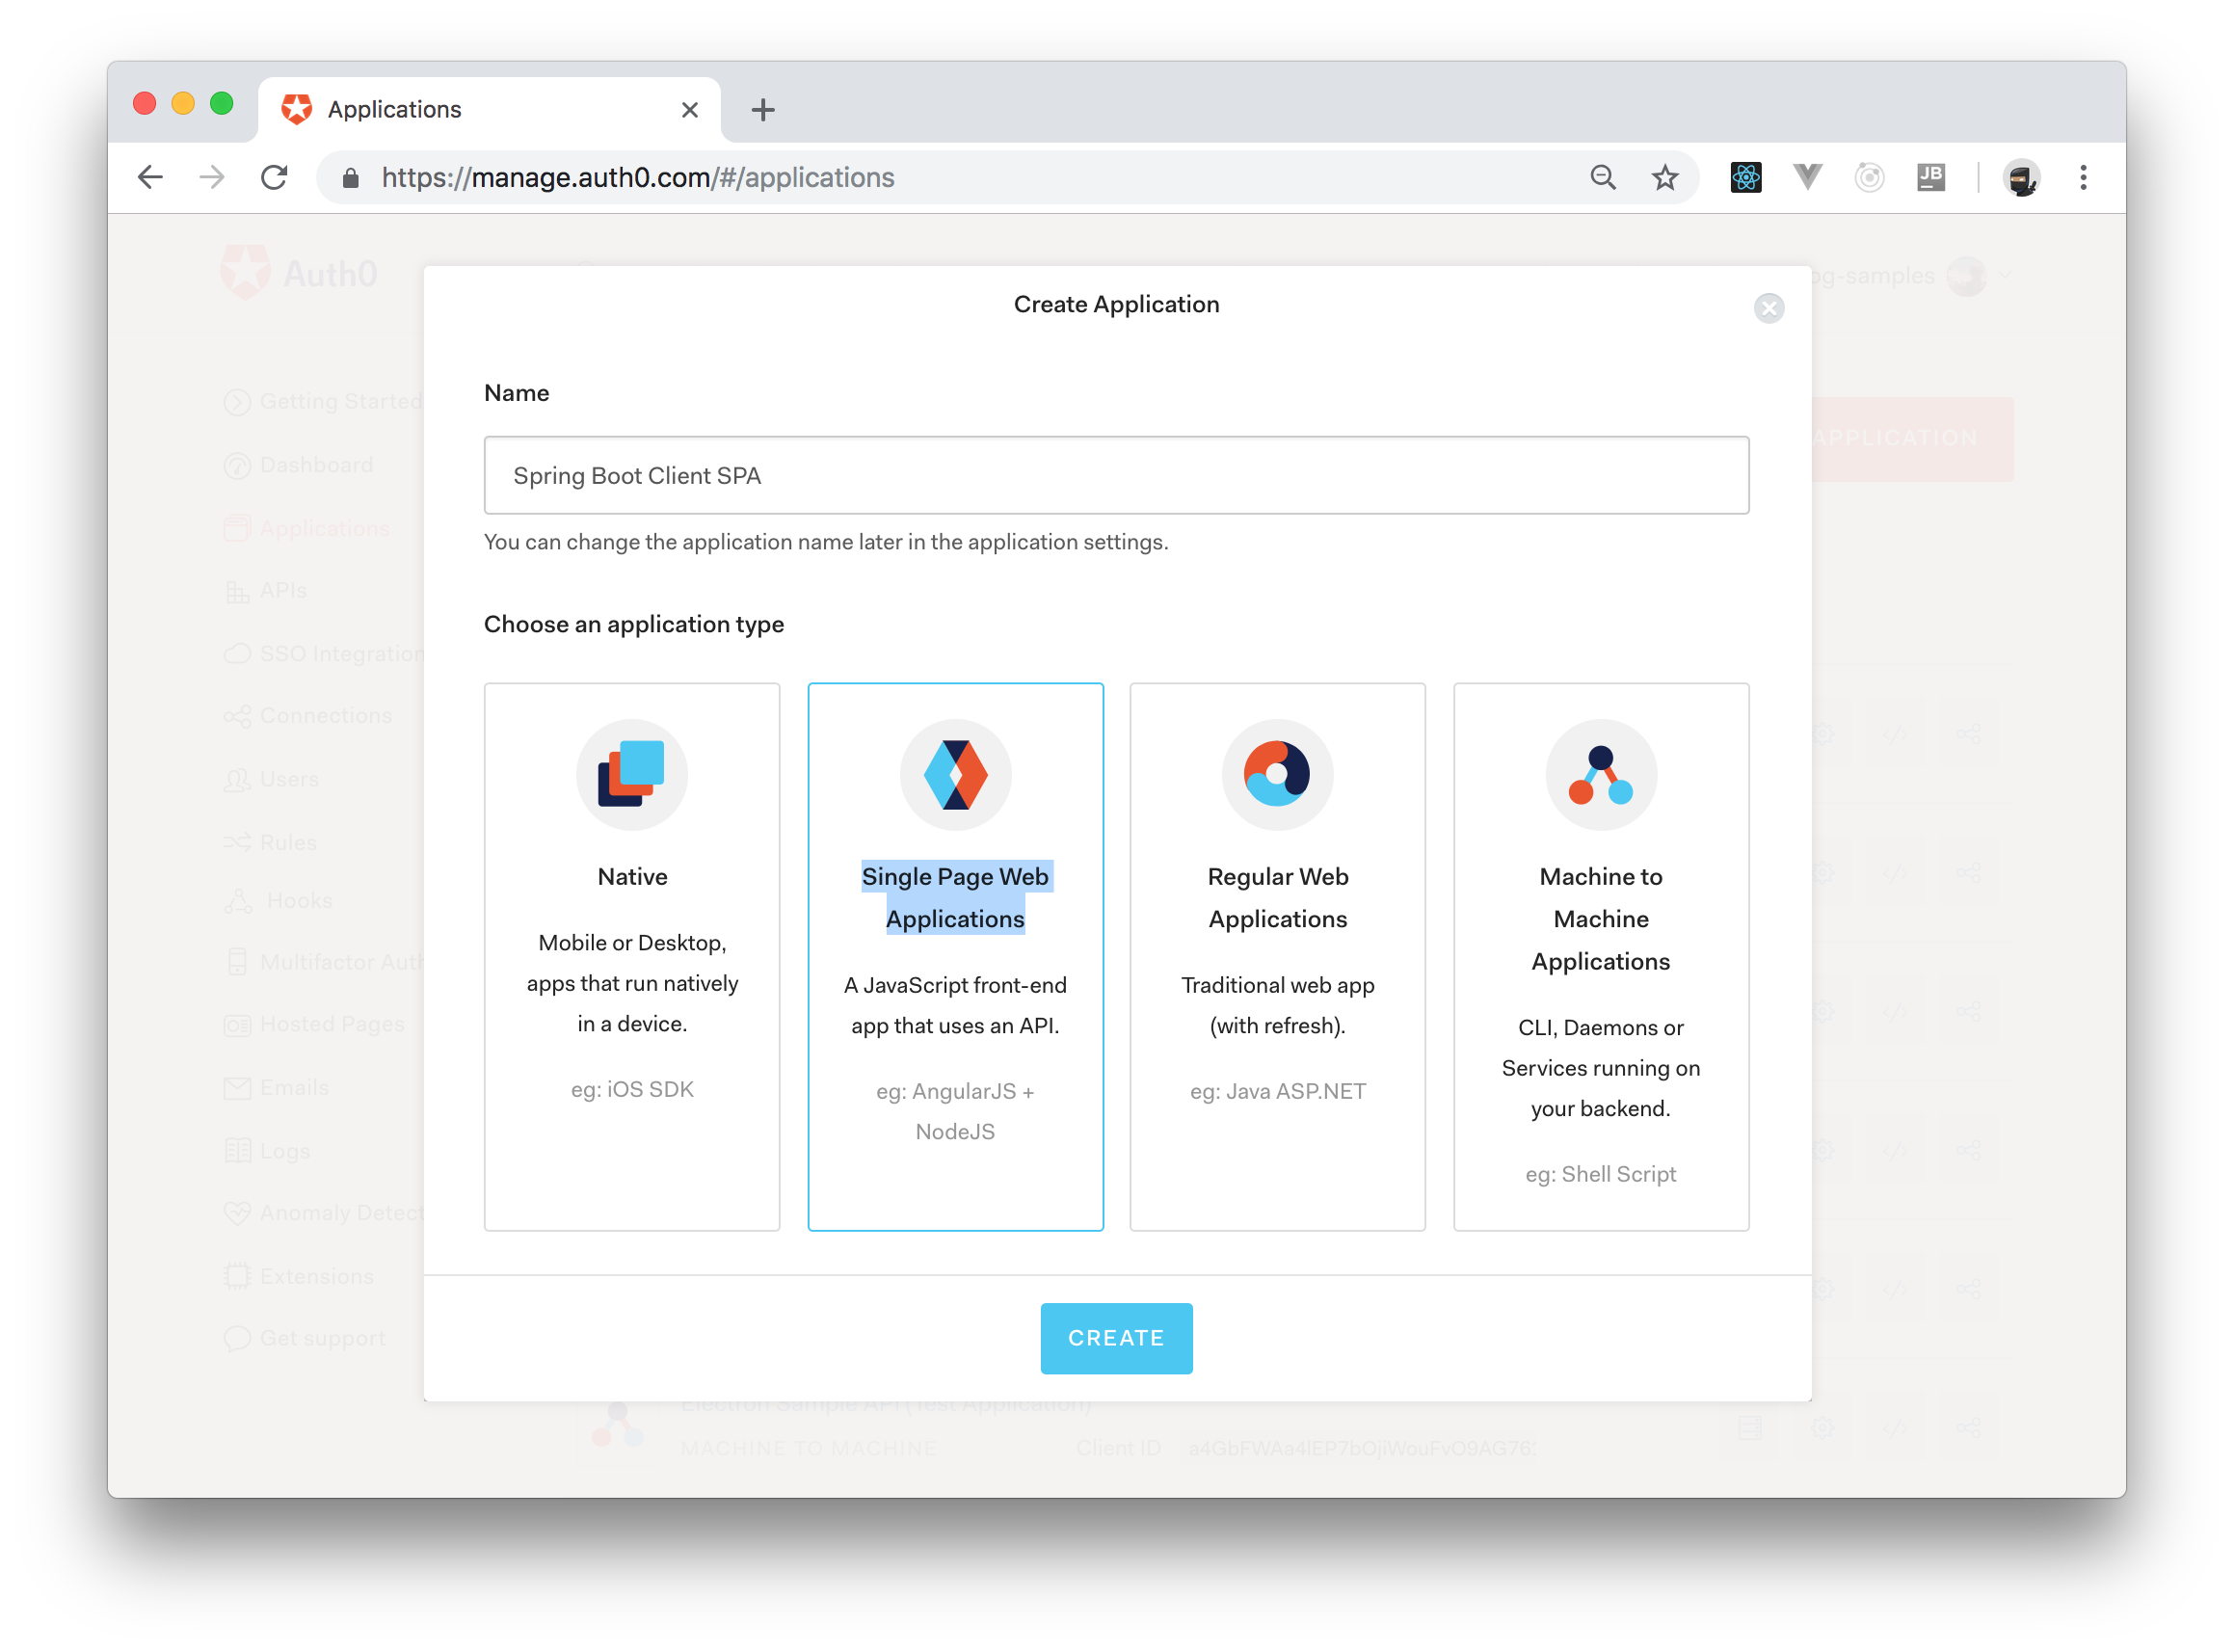
In this section, you are going to create a jQuery SPA that will interact with your Spring Boot API. Before starting, you will need to create an Auth0 Application to represent your SPA. To do so, head [to the _Applications_ page in your Auth0 dashboard](https://manage.auth0.com/#/applications) and click on _Create Application_. After clicking on it, Auth0 will show a dialog where you will have to input a _name_ for your app (you can call it "Spring Boot Client SPA" or anything like that) and define the type of the application. As you are going to build an app that resembles a SPA, choose the _Single Page Web Applications_ type.
Now, clicking on the _Create_ button will make Auth0 redirect you to the _Quick Start_ section of your new app. From there, click on the _Settings_ tab and add `http://localhost:8080` to the _Allowed Callback URLs_ field. As a security measure, Auth0 will only redirect users (after the authentication process) back to the URLs listed on this field (i.e., whenever you move into production, make sure you have a configuration that only lists your real internet domain). Now, click on _Save Changes_.
After saving it, copy the value showed on the _Domain_ field and insert it after `auth0.domain=` in the `application.properties` field (if you haven't done so yet). Then, copy the value showed on the _Client ID_ field and use it to replace `` in this same file. In the end, your file will look like this:
```properties
auth0.domain=blog-samples.auth0.com
auth0.clientId=4Oi9...Vlab8uB
security.oauth2.resource.id=http://localhost:8080/api
security.oauth2.resource.jwk.keySetUri=https://blog-samples.auth0.com/.well-known/jwks.json
```
With that covered, you are ready to create your SPA. For starters, create an `assets` directory under `/src/main/resources/static`. This is where you are going to put all files related to your client application.
Now, create a new file called `style.css` inside the `assets` directory and fill it with the following CSS rules:
```css
.btn-margin {
margin-top: 7px
}
#profile-view,
#ping-view {
display: none;
}
.profile-area img {
max-width: 150px;
margin-bottom: 20px;
}
.panel-body h3 {
margin-top: 0;
}
```
This is just a Cascading Style Sheets (CSS) file to make your client app look nice. Now, you need a page for your SPA. So, create an `index.html` page in your `static` directory and fill it with the following content:
``` html
Calling an API
Profile
Make a Call to the Server
Log in to call a private (secured) server endpoint.
```
It is worth noting that this file includes [Bootstrap's CSS library](https://getbootstrap.com) and your custom stylesheet (`style.css`) in the `head` element. Also, before the closing `body` tag, this file includes Bootstrap's JavaScript library, [Auth0's JavaScript library](https://github.com/auth0/auth0.js), [jQuery])(https://jquery.com/), and a local JavaScript file called `app.js`. Don't worry about the missing `app.js`, you will create it in no time.
Now, if you take a closer look at the HTML definition, you will see that your page contains eight buttons:
- _Home_ (`btn-home-view`): This button will show the default view.
- _Profile_ (`btn-profile-view`): This button will show a view with the profile of the logged-in user.
- _Ping_ (`btn-ping-view`): This button will show a view where users will be able to issue different types of requests.
- _Log In_ (`btn-login`): This button will start the authentication process.
- _Log Out_ (`btn-logout`): This button will log out the current user.
- _Call Public_ (`btn-ping-public`): This button will call the public endpoint (`/api/public`) and show the returned message.
- _Call Private_ (`btn-ping-private`): This button will call one of the private endpoints (`/api/private` in this case) and show the returned message.
- _Call Private Scoped_ (`btn-ping-private-scoped`): This button will call the other private endpoint (`/api/private-scoped`) and show the returned message.
The rest of the elements defined in this HTML file is there so you can show users' profiles, messages returned by the server, etc.
Now, the last thing you will need to do is to create the `app.js` file in the `assets` directory. After creating it, add the following code to this file:
```js
$('document').ready(function() {
const apiUrl = 'http://localhost:8080/api';
// load environment variables
const envVar = $.parseJSON($.ajax({
url: '/config',
dataType: 'json',
async: false
}).responseText);
// create an Auth0 client
const webAuth = new auth0.WebAuth({
domain: envVar.domain,
clientID: envVar.clientID,
redirectUri: location.href,
audience: envVar.audience,
responseType: 'token id_token',
scope: 'openid profile read:messages',
leeway: 60
});
// sections and buttons
const homeView = $('#home-view');
const profileView = $('#profile-view');
const pingView = $('#ping-view');
const callPrivateMessage = $('#call-private-message');
const pingMessage = $('#ping-message');
// buttons
const loginBtn = $('#btn-login');
const logoutBtn = $('#btn-logout');
const homeViewBtn = $('#btn-home-view');
const profileViewBtn = $('#btn-profile-view');
const pingViewBtn = $('#btn-ping-view');
const pingPublic = $('#btn-ping-public');
const pingPrivate = $('#btn-ping-private');
const pingPrivateScoped = $('#btn-ping-private-scoped');
// listeners
pingPublic.click(() => callAPI('/public', false));
pingPrivate.click(() => callAPI('/private', true));
pingPrivateScoped.click(() => callAPI('/private-scoped', true));
loginBtn.click(() => webAuth.authorize());
logoutBtn.click(logout);
homeViewBtn.click(displayHome);
profileViewBtn.click(displayProfile);
pingViewBtn.click(displayPingView);
let accessToken = null;
let userProfile = null;
handleAuthentication();
displayButtons();
// function definitions
function logout() {
// Remove tokens and expiry time from browser
accessToken = null;
pingMessage.css('display', 'none');
displayButtons();
}
function isAuthenticated() {
return accessToken != null;
}
function handleAuthentication() {
webAuth.parseHash(function(err, authResult) {
if (authResult && authResult.accessToken) {
window.location.hash = '';
accessToken = authResult.accessToken;
userProfile = authResult.idTokenPayload;
loginBtn.css('display', 'none');
homeView.css('display', 'inline-block');
} else if (err) {
homeView.css('display', 'inline-block');
console.log(err);
alert(
'Error: ' + err.error + '. Check the console for further details.'
);
}
displayButtons();
});
}
function callAPI(endpoint, secured) {
const url = apiUrl + endpoint;
let headers;
if (secured && accessToken) {
headers = { Authorization: 'Bearer ' + accessToken };
}
$.ajax({
url: url,
headers: headers
}).done(({message}) => $('#ping-view h2').text(message))
.fail(({statusText}) => $('#ping-view h2').text('Request failed: ' + statusText));
}
function displayButtons() {
const loginStatus = $('.container h4');
if (isAuthenticated()) {
loginBtn.css('display', 'none');
logoutBtn.css('display', 'inline-block');
profileViewBtn.css('display', 'inline-block');
pingPrivate.css('display', 'inline-block');
pingPrivateScoped.css('display', 'inline-block');
callPrivateMessage.css('display', 'none');
loginStatus.text(
'You are logged in! You can now send authenticated requests to your server.'
);
} else {
homeView.css('display', 'inline-block');
loginBtn.css('display', 'inline-block');
logoutBtn.css('display', 'none');
profileViewBtn.css('display', 'none');
profileView.css('display', 'none');
pingView.css('display', 'none');
pingPrivate.css('display', 'none');
pingPrivateScoped.css('display', 'none');
callPrivateMessage.css('display', 'block');
loginStatus.text('You are not logged in! Please log in to continue.');
}
}
function displayHome() {
homeView.css('display', 'inline-block');
profileView.css('display', 'none');
pingView.css('display', 'none');
}
function displayProfile() {
// display the elements
homeView.css('display', 'none');
pingView.css('display', 'none');
profileView.css('display', 'inline-block');
// display profile data
$('#profile-view .nickname').text(userProfile.nickname);
$('#profile-view .full-profile').text(JSON.stringify(userProfile, null, 2));
$('#profile-view img').attr('src', userProfile.picture);
}
function displayPingView() {
homeView.css('display', 'none');
profileView.css('display', 'none');
pingView.css('display', 'inline-block');
}
});
```
As you can see, this file is quite big (almost 150 lines of JavaScript code). However, it's easy to understand what is going on there. First, your script is waiting until the document is ready (`$('document').ready(...)`) before doing anything. When your document is ready, your script prepares the client app by:
1. issuing an AJAX request to `http://localhost:8080/api/config` to read some environment variables;
3. configuring an Auth0 client (`var webAuth = new auth0.WebAuth(...)`) with these variables;
4. and by defining and attaching event listeners to the buttons defined in your HTML file.
Another important thing that this script does is to define a function that is responsible for fetching user details after they authenticate through Auth0. If you take a look, you will see a function called `handleAuthentication` inside this script. This function calls `webAuth.parseHash` to fetch two things returned by Auth0:
- `accessToken`: Your script will use this token while issuing requests to the secured endpoints in your Spring Boot API.
- `idTokenPayload`: Your client app will use this info to display information about the logged-in user.
That's it! You are ready to run your Spring Boot API and to consume it through this simple SPA. So, open a terminal and execute the following commands:
```bash
# move into the project root
cd spring-boot-oauth2
# use Gradle to start your project
gradle bootRun
```
> **Note:** If you imported your project correctly inside your IDE, you will probably be able to run through the IDE's interface.
After running your app, if you head to [`http://localhost:8080`](http://localhost:8080), you will see a screen where you will be able to login.
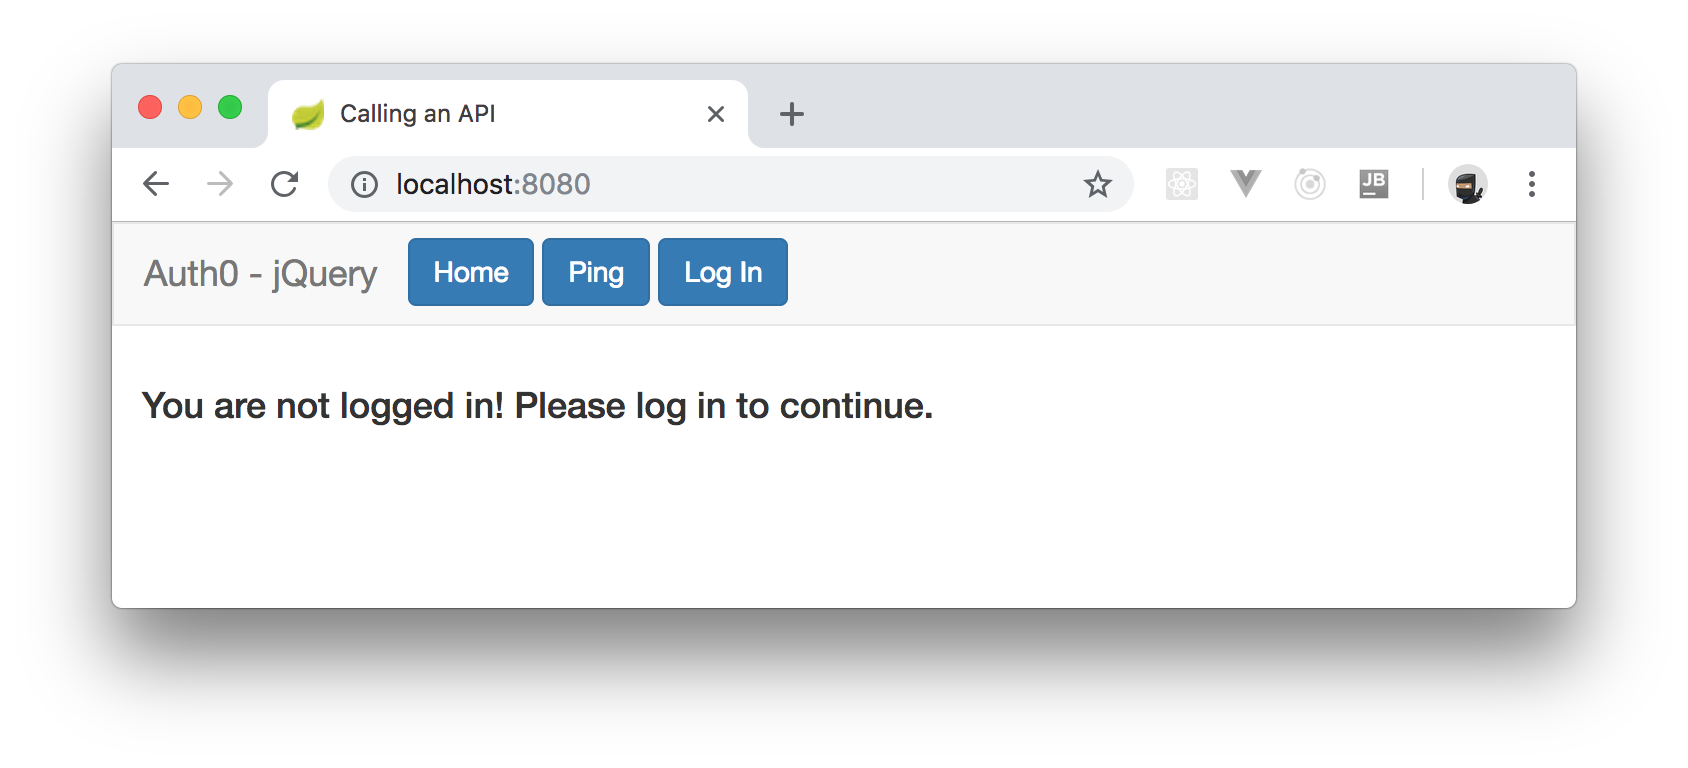
After logging in, you will be redirected back to the SPA where you will see a similar screen but with some other buttons. If you click on the _Ping_ button, you will see a section where you will have three options. The first one will be a button to issue requests to the public endpoint. The second one will be a button to issue requests to the endpoint that is secured, but that doesn't require any scopes. The last option will be a button that issues requests to the endpoint that is both secured and that requires a scope (in this case, `read:messages`). Clicking on any of these buttons will issue requests to your Spring Boot API and will output the result on the screen.

## Conclusion
In this article, you learned how to create and secure a Spring Boot API with OAuth 2.0 using the official OAuth 2.0 library provided by the framework. You also took a quick look at how to create and authenticate a SPA so that it can consume your Spring Boot API. If you are interested in learning more about OAuth 2.0 and its Spring Boot support, visit the following links:
* [OAuth 2.0 Protocol](https://auth0.com/docs/protocols/oauth2)
* [Spring Boot and OAuth 2.0](https://spring.io/guides/tutorials/spring-boot-oauth2/)
* [Spring Security OAuth 2.0 Project](https://projects.spring.io/spring-security-oauth/docs/oauth2.html)
Again, you can find the accompanying repository and code developed throughout this article in [this GitHub repository](https://github.com/auth0-blog/spring-boot-oauth2). If you have comments or questions, don't hesitate to reach out to us through the comments area down there. I hope you enjoyed.