

TL;DR: This article demonstrates the use of LocalStack and how it can simulate many of the AWS services locally. We will use Spring Cloud Messaging to create a publisher-subscriber sample application. We will use Amazon SNS and SQS to do that.
The sample app can be found here.
Spring Cloud Messaging With AWS and LocalStack
Introduction
With an ever-growing demand for cloud services, Spring provides amazing support to integrate with Cloud providers and relevant services. Spring Cloud for Amazon Web Services is one such project that makes it easy to integrate with AWS services using familiar Spring APIs.
In this article, we will look into a simple application that acts as a message producer and a consumer using Amazon SNS and SQS. On top of that, we will not create an AWS account or use AWS services directly from AWS. We will instead use LocalStack, which will allow us to create AWS resources locally.
The sample app can be found here.
Pre-requisites:
- Basic knowledge of AWS, AWS CLI, and related services like Amazon SQS.
- Basic knowledge of Java 11 and Spring Boot
2.4.7. - Docker and Docker Compose for the setup.
Introduction to Amazon SNS and SQS
Amazon SNS
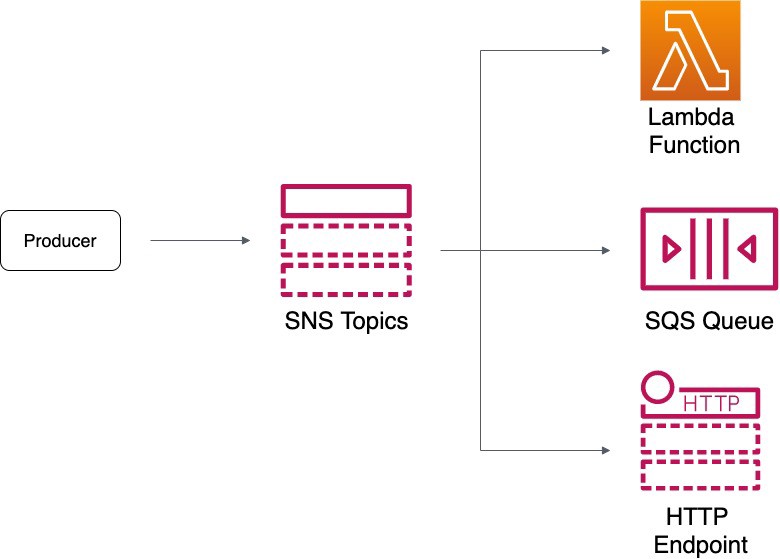
Amazon SNS is an acronym for Simple Notification Service. It provides developers with the highly scalable, cost-effective, and flexible capability to publish messages from an application and send them to other applications. It follows the pub-sub architecture to deliver messages from publishers to the subscribers. It is a highly decoupled service that can be linked to a variety of sources. It can be used to publish emails, messages to SQS, SMS, etc.
The Publisher (e.g., CloudWatch Alarm, S3 events, SNS, Micro-service) publishes the message on a Topic which is then published to all the Subscribers (web servers, email addresses, Amazon SQS queues, AWS Lambda) of that particular topic.
Amazon SQS
Amazon SQS is an acronym for Simple Queue Service, and the names convey a lot as it is really simple to use as it is a fully managed service from AWS. It follows similar messaging semantics of the producer putting a message on the queue and consumer reading from it.
Once consumed, the message has to be deleted from the queue. Deleting is important because SQS assumes that processing can fail. To prevent that, after the consumer receives a message, it is hidden from the queue for a defined period of time, and after that, if it is not deleted, the message shows up in the queue again.
Both SNS and SQS are fully managed lightweight, easy-to-use APIs. You can use Amazon SQS and SNS to decouple and scale microservices, distributed systems, and serverless applications and improve reliability.
Introduction to LocalStack
LocalStack is an open-source mock of the real AWS services. It provides a testing environment on our local machine with the same APIs as the real AWS services. We switch to using the real AWS services only in the integration environment and beyond. There are plenty of reasons to use LocalStack, few out of which are more important than others, such as:
- The ability to play with AWS services without interacting with AWS. All developers love to get their hands dirty, and what better way to learn something than to try. Localstack allows you to play with S3, SQS, DynamoDB, SNS, and the list goes on.
- The ability to test the applications in the local dev environment. You can write integration tests for your application using LocalStack, driving down your costs and increasing the confidence in your code.
Spring Cloud Messaging app linked to LocalStack
Spring Cloud AWS provides Amazon SQS and Amazon SNS integration that simplifies the publication and consumption of messages. It reduces a lot of boilerplate code and does the heavy lifting for configuring and SNS and SQS. Let's set up a Spring boot project with support for SNS and SQS.
Setting up Spring Boot app
Let us first create a Spring Boot project with the help of the Spring boot Initializr, and then open the project in our favorite IDE. Select Maven project and Java language. Last but not least, select Spring boot version 2.4.7. Fill in the project metadata and click generate.
For Spring Cloud, We need to configure Spring Cloud AWS BOM in our pom.xml file using this dependencyManagement block:
<dependencyManagement>
    <dependencies>
        <dependency>
            <groupId>io.awspring.cloud</groupId>
            <artifactId>spring-cloud-aws-dependencies</artifactId>
            <version>2.3.1</version>
            <type>pom</type>
            <scope>import</scope>
        </dependency>
    </dependencies>
</dependencyManagement>
For adding the support for messaging, we need to include the module dependency for Spring Cloud AWS Messaging into our Maven configuration. We do this by adding the starter module spring-cloud-starter-aws-messaging:
<dependency>
    <groupId>io.awspring.cloud</groupId>
    <artifactId>spring-cloud-starter-aws-messaging</artifactId>
</dependency>
These are the dependencies required for Spring Cloud AWS. Next, we add some other dependencies such as Spring boot starter web and Lombok.
<dependencies>
    <dependency>
        <groupId>org.springframework.boot</groupId>
        <artifactId>spring-boot-starter-web</artifactId>
        <version>2.4.7</version>
    </dependency>
    <dependency>
        <groupId>org.projectlombok</groupId>
        <artifactId>lombok</artifactId>
        <version>1.18.20</version>
        <scope>provided</scope>
    </dependency>
</dependencies>
This completes our setup process for the Spring boot project.
Let's jump into adding the SNS and SQS configs and start publishing our first message.
Amazon SNS Config:
import com.amazonaws.auth.AWSStaticCredentialsProvider;
import com.amazonaws.auth.BasicAWSCredentials;
import com.amazonaws.client.builder.AwsClientBuilder;
import com.amazonaws.services.sns.AmazonSNS;
import com.amazonaws.services.sns.AmazonSNSClientBuilder;
import io.awspring.cloud.messaging.core.NotificationMessagingTemplate;
import org.springframework.context.annotation.Bean;
import org.springframework.context.annotation.Configuration;
import org.springframework.context.annotation.Primary;

import static com.authga.springcloudaws.config.AWSConfigConstants.ACCESS_KEY;
import static com.authga.springcloudaws.config.AWSConfigConstants.SECRET_KEY;

@Configuration
public class SnsConfig {

    @Bean
    public NotificationMessagingTemplate notificationMessagingTemplate(AmazonSNS amazonSNS) {
        return new NotificationMessagingTemplate(amazonSNS);
    }

    @Bean
    @Primary
    public AmazonSNS amazonSNS(final AwsClientBuilder.EndpointConfiguration endpointConfiguration) {
        BasicAWSCredentials credentials = new BasicAWSCredentials(ACCESS_KEY, SECRET_KEY);
        return AmazonSNSClientBuilder
                .standard()
                .withEndpointConfiguration(endpointConfiguration)
                .withCredentials(new AWSStaticCredentialsProvider(credentials))
                .build();
    }
}
Here, we create a simple AmazonSNSClient with a custom endpoint and credentials. Spring has an auto-configured AmazonSNSClient, but that requires valid AWS credentials and actual resources. We instead want to run our service locally with AWS resources using LocalStack. More on this later. Let's finish this setup.
Amazon SQS Config:
import com.amazonaws.auth.AWSStaticCredentialsProvider;
import com.amazonaws.auth.BasicAWSCredentials;
import com.amazonaws.client.builder.AwsClientBuilder;
import com.amazonaws.services.sqs.AmazonSQSAsync;
import com.amazonaws.services.sqs.AmazonSQSAsyncClientBuilder;
import io.awspring.cloud.messaging.config.QueueMessageHandlerFactory;
import io.awspring.cloud.messaging.support.NotificationMessageArgumentResolver;
import org.springframework.context.annotation.Bean;
import org.springframework.context.annotation.Configuration;
import org.springframework.context.annotation.Primary;
import org.springframework.messaging.converter.MappingJackson2MessageConverter;
import org.springframework.messaging.converter.MessageConverter;

import java.util.List;

import static com.authga.springcloudaws.config.AWSConfigConstants.*;

@Configuration
public class SqsConfig {

    @Bean
    public AwsClientBuilder.EndpointConfiguration endpointConfiguration() {
        return new AwsClientBuilder.EndpointConfiguration(ENDPOINT, EU_CENTRAL_1);
    }

    @Bean
    @Primary
    public AmazonSQSAsync amazonSQSAsync(final AwsClientBuilder.EndpointConfiguration endpointConfiguration) {
        BasicAWSCredentials credentials = new BasicAWSCredentials(ACCESS_KEY, SECRET_KEY);
        return AmazonSQSAsyncClientBuilder
                .standard()
                .withEndpointConfiguration(endpointConfiguration)
                .withCredentials(new AWSStaticCredentialsProvider(credentials))
                .build();
    }

    @Bean
    public QueueMessageHandlerFactory queueMessageHandlerFactory(MessageConverter messageConverter) {
        var factory = new QueueMessageHandlerFactory();
        factory.setArgumentResolvers(List.of(new NotificationMessageArgumentResolver(messageConverter)));
        return factory;
    }

    @Bean
    protected MessageConverter messageConverter() {
        var converter = new MappingJackson2MessageConverter();
        converter.setSerializedPayloadClass(String.class);
        converter.setStrictContentTypeMatch(false);
        return converter;
    }
}
In the code above, we did the following:
- Similar to the
AmazonSNSClient, we create theAmazonSQSClientwith a custom endpoint and credentials. - Setup
QueueMessageHandlerFactoryso it can convert incoming messages from SQS as String to the actual object we want, in this case,Event, using aMessageConverter. - The converter will take care of converting the
Stringmessage to the actualEventobject.
The Event model is described below. I am using Lombok to reduce the boilerplate code.
Event.java
import lombok.AllArgsConstructor;
import lombok.Builder;
import lombok.Data;
import lombok.NoArgsConstructor;

@Data
@AllArgsConstructor
@NoArgsConstructor
@Builder
public class Event implements Comparable<Event> {
    private String eventId;
    private String version;
    private String occurredAt;
    private EventData data;

    @Override
    public int compareTo(Event o) {
        int otherVersion = Integer.parseInt(o.getVersion());
        int thisVersion = Integer.parseInt(this.getVersion());
        return Integer.compare(thisVersion, otherVersion);
    }
}EventData.java
import lombok.AllArgsConstructor;
import lombok.Builder;
import lombok.Data;
import lombok.NoArgsConstructor;

@Data
@AllArgsConstructor
@NoArgsConstructor
@Builder
public class EventData {
    private String orderId;
    private String owner;
    private EventType eventType;
}EventType.java
import java.io.Serializable;

public enum EventType implements Serializable {
    ORDER_CREATED, ORDER_CANCELLED
}
Producer code:
import com.authga.springcloudaws.model.Event;
import io.awspring.cloud.messaging.core.NotificationMessagingTemplate;
import lombok.extern.slf4j.Slf4j;
import org.springframework.beans.factory.annotation.Autowired;
import org.springframework.stereotype.Service;

import static com.authga.springcloudaws.config.AWSConfigConstants.ORDER_CREATED_TOPIC;

@Slf4j
@Service
public class SimpleMessageProducer {

    @Autowired
    private NotificationMessagingTemplate notificationMessagingTemplate;

    public void publish(Event event) {
        notificationMessagingTemplate.convertAndSend(ORDER_CREATED_TOPIC, event);
    }
}- We use the
NotificationMessagingTemplatecreated in the config above. It gives us several methods to send messages on an SNS topic. We will use the defaultconvertAndSend()method that takes care of converting our object to a Message using theMessageConverterthat we provide in theSqsConfigclass.
Consumer code:
import com.authga.springcloudaws.model.Event;
import io.awspring.cloud.messaging.config.annotation.NotificationMessage;
import io.awspring.cloud.messaging.listener.SqsMessageDeletionPolicy;
import io.awspring.cloud.messaging.listener.annotation.SqsListener;
import lombok.extern.slf4j.Slf4j;
import org.springframework.stereotype.Controller;

import static com.authga.springcloudaws.config.AWSConfigConstants.ORDER_QUEUE;

@Slf4j
@Controller
public class SimpleMessageConsumer implements MessageConsumer {

    @Override
    @SqsListener(value = ORDER_QUEUE, deletionPolicy = SqsMessageDeletionPolicy.ON_SUCCESS)
    public void consume(@NotificationMessage Event event) {
        if (event != null) {
            log.info("Received order event for consumer 1: " + event);
        }
    }
}- We only need
@SqsListenerannotation that automatically makes our consume method get the messages from the queue. - We also add
@NotificationMessageannotation to have the correct deserialization and extract our Event from the SNS message because the SNS message is wrapped inside aMessageobject.
Setup LocalStack and create resources
Setting up LocalStack is dead simple; you just need to use the docker-compose file below, and it will start SNS and SQS services locally. Add the docker compose.yml to the repository's root directory. Start the LocalStack using: docker-compose up.
version: '3.0'

services:

  localstack:
    image: localstack/localstack:latest
    environment:
      - AWS_DEFAULT_REGION=eu-central-1
      - EDGE_PORT=4566
      - SERVICES=sqs,sns
    ports:
      - '4566:4566'
Once it is up and running, we can create the required AWS resources. We will create one SNS topic to which two SQS queues will be listening. The code to or publishing and listening is simple. Go to your command line, e.g., terminal, and execute the following commands.
To create the topic:
aws --endpoint-url=http://localhost:4566 sns create-topic --name order-created-topicTo create the queues:
aws --endpoint-url=http://localhost:4566  sqs create-queue  --queue-name  order-queue
aws --endpoint-url=http://localhost:4566  sqs create-queue  --queue-name  order-queue-2
To subscribe the queues to the topic:
aws --endpoint-url=http://localhost:4566 sns subscribe
--topic-arn arn:aws:sns:eu-central-1:000000000000:order-created-topic
--protocol sqs
--notification-endpoint arn:aws:sqs:eu-central-1:000000000000:order-queue

aws --endpoint-url=http://localhost:4566 sns subscribe
--topic-arn arn:aws:sns:eu-central-1:000000000000:order-created-topic
--protocol sqs
--notification-endpoint arn:aws:sqs:eu-central-1:000000000000:order-queue-2
To verify you can list queues and subscriptions:
aws --endpoint-url=http://localhost:4566  sqs list-queues
aws --endpoint-url=http://localhost:4566  sns list-subscriptions
That's it!
Verify sending and receiving of events
Run the Spring Boot app:
- Clone the sample code from the repo. Go to the root directory.
- Use Maven plugin to run your Spring Boot app using the command in the project directory.
mvn spring-boot:runThe groundwork is complete now. With the app running, we can send messages to the Amazon SNS Topic and read those messages from the queues. In the repo, I have created a controller to trigger the publishing of events. If you download the sample app, you should be able to run it, and going to http://localhost:8080/create-order will trigger the publisher, which in turn will trigger the consumers. In the application logs, you should be able to see. This means that our producer code publishes the code to the SNS topic. The two queues that are subscribed to the topic receive those messages, and finally, the consumer receives those messages and prints the event.
Received order event for consumer 1:
Event{eventId='386cca76-3669-4d36-b2db-01f388bbce5f', version='0',
occurredAt='2021-06-19T13:42:32.946781Z', data=EventData(orderId=9a002b95-f10b-428e-8d39-cae90d1e631d,
owner=SampleProducer, eventType=ORDER_CREATED)}

Received order event for consumer 2:
Event{eventId='386cca76-3669-4d36-b2db-01f388bbce5f', version='0', occurredAt='2021-06-19T13:42:32.946781Z',
data=EventData(orderId=9a002b95-f10b-428e-8d39-cae90d1e631d, owner=SampleProducer, eventType=ORDER_CREATED)}
Conclusion
LocalStack provides a simple and convenient way to simulate AWS services without having an actual AWS account. You can build applications using various AWS services like Amazon SNS, SQS, S3 DynamoDB, and many more.
In this article, we have learned how to build a Spring Cloud Messaging app that utilizes LocalStack. We saw how Spring Cloud Messaging provides a layer of abstraction to create an Amazon SQS listener and SNS publisher with just a few lines of code. Furthermore, we saw how to use Amazon SNS and SQS to create an event-driven application.
You can refer to the repository used in the article on Github.


