---
title: "Test Authorization in ASP.NET Core Web APIs With the user-jwts Tool"
description: "How to use the new user-jwts tool to test a protected ASP.NET Core Web API without involving an authorization server."
authors:
- name: "Andrea Chiarelli"
url: "https://auth0.com/blog/authors/andrea-chiarelli/"
date: "Dec 12, 2022"
category: "Developers,Tutorial,.NET"
tags: ["dotnet", "dotnet-7", "aspnet-core", "web-api", "authorization"]
url: "https://auth0.com/blog/test-authorization-in-aspnet-core-webapi-with-user-jwts-tool/"
---
# Test Authorization in ASP.NET Core Web APIs With the user-jwts Tool
Testing a protected Web API is not an easy task. At the very least, you need to configure an authorization server, such as your [Auth0 tenant](https://auth0.com/docs/get-started/auth0-overview/create-tenants), configure your app, and get specific access tokens for your authorization scenarios. This implies several back and forths between your development environment and the Auth0 dashboard (or any other authorization server backend), which may be time-consuming, error-prone, and require an Internet connection, of course. The `user-jwts` tool, included with the .NET CLI version 7.0, simplifies this Web API testing approach.
## Meet the `user-jwts` Tool
The `user-jwts` tool allows you to generate tokens customized for your needs and test your ASP.NET Core Web API without the need for a real authorization server. It's a CLI tool integrated with the .NET CLI starting from [version 7.0 of the .NET SDK](https://dotnet.microsoft.com/en-us/download/dotnet/7.0), so make sure you have this version installed on your machine.
The tool simplifies the interactive testing process of your protected API. Its general syntax is as follows:
```bash
dotnet user-jwts [options] [command]
```
You can pass commands to the tool to specify how to manage your JWT tokens and options to work with projects or solutions. In the following sections, you will learn the main commands you may need for testing your ASP.NET Core Web API. For a complete reference to the commands and options available, check out the [official documentation](https://learn.microsoft.com/en-us/aspnet/core/security/authentication/jwt-authn).
## Set Up Your Project
You will learn how to use the `user-jwts` tool with a practical approach by testing a ready-to-use ASP.NET Core Web API. Download it by running the following command in a terminal window:
```bash
git clone https://github.com/auth0-blog/glossary-aspnet-core-webapi
```
You will find the project in the `glossary-aspnet-core-webapi` folder. Go to that folder and run the application with the following command:
```bash
dotnet run
```
Then, point your browser to the [https://localhost:5001/swagger](https://localhost:5001/swagger) URL. You should get the following page:
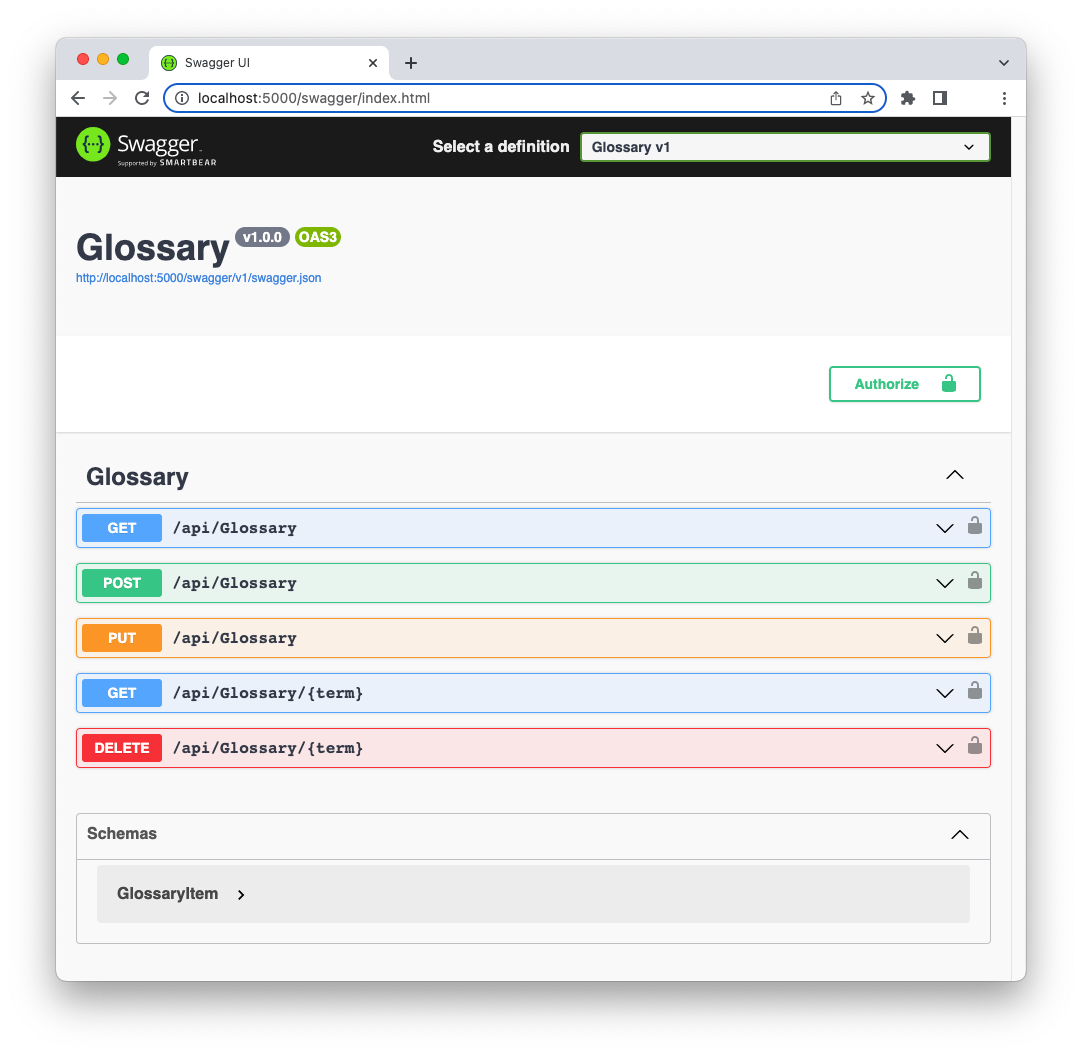
The Web API provides a few endpoints that allow you to manage a glossary of terms. This is a slightly modified application coming from [this article about using permissions with ASP.NET Core Web APIs](https://auth0.com/blog/permission-based-security-aspnet-webapi).
You can perform the typical [CRUD (*Create*, *Retrieve*, *Update*, *Delete*)](https://en.wikipedia.org/wiki/Create,_read,_update_and_delete) operations on a list of term definitions. The endpoints are protected, and each operation requires an [access token](https://auth0.com/docs/secure/tokens/access-tokens) with different permissions:
- The GET method on the `/api/Glossary` and the `/api/Glossary/{term}` endpoints requires an access token, but it doesn't care about specific permissions.
- The POST and PUT methods on the `/api/Glossary` endpoint require an access token with `create:term` and `update:term` permissions.
- The DELETE method on the `/api/Glossary/{term}` endpoint requires an access token with `delete:term` permission.
> The ASP.NET Core Web API application provides a Web UI for interacting with it, but in this article, we will use `curl` to make HTTP requests just to be consistent with the CLI nature of the `user-jwts` tool. Feel free to use the tool you prefer to make your HTTP requests.
If you try to call these endpoints without an access token, you will get an "unauthorized" response message. For example, assume you call the `/api/Glossary` endpoint as follows:
```bash
curl -i https://localhost:5001/api/glossary
```
You will get the following error message as a response:
```bash
HTTP/1.1 401 Unauthorized
Content-Length: 0
Date: Mon, 05 Dec 2022 09:28:37 GMT
Server: Kestrel
WWW-Authenticate: Bearer
```
This message tells you that you are not authorized to call that endpoint, and you must pass a [bearer token](https://oauth.net/2/bearer-tokens/) as a credential (`WWW-Authenticate: Bearer`).
> You can read [this article to learn more about the different HTTP response messages you can receive from a protected web API](https://auth0.com/blog/forbidden-unauthorized-http-status-codes/).
## Create a Simple JWT
Let's put the `user-jwts` tool to work right away to obtain the missing access token. Simply go to the root folder of the ASP.NET Core Web API project and run the following command in your terminal window:
```bash
dotnet user-jwts create
```
You will get an output similar to the following:
```bash
New JWT saved with ID '6f9bc340'.
Name: andreachiarelli
Token: eyJhbGciOiJIUzI1NiIs... omitted content...HRBgI
```
As you may guess, the `user-jwts` tool generates access tokens in [JSON Web Token (JWT)](https://jwt.io/introduction) format.
The output's first line provides you with the identifier of the newly created JWT. Take note of it. You will learn how to use it later on.
The second line displays your username on the current machine. This is the user the JWT is issued to.
Finally, the third line shows the token's actual content. Take note of it. We are going to use it soon.
### Infrastructure initialization
Before using the token issued by `user-jwts`, let's take a look at what happened behind the scenes when you ran the `create` command.
The first time you run the `create` command on a project, the tool creates the infrastructure to support token management for testing purposes. The internal infrastructure is the same as the [Secret Manager tool](https://learn.microsoft.com/en-us/aspnet/core/security/app-secrets#secret-manager). A storage is created in your local machine's user profile folder and its identifier is added to your .NET project for future reference. In fact, if you take a look at the `Glossary.csproj` file in the project's root folder, you will find a new `UserSecretsId` element in it, as in the following example:
```xml
net7.0
50960023-f197-4aa0-bfa5-1ad79803ff6f
```
The next time you use the `user-jwts` tool, it will look at the value of this `UserSecretsId` element to retrieve data about issued tokens.
> Check out [this article to learn more about the Secret Manager tool and how to use it](https://auth0.com/blog/secret-management-in-dotnet-applications/).
In addition, the `user-jwts` tool will add a new configured section in your project's `appsettings.Development.json` file. This file keeps specific configurations for your development environment. Checking this file in your project, you should see the new `Authentication` section similar to the one shown below:
```json
// appsettings.Development.json
{
"Logging": {
"LogLevel": {
"Default": "Information",
"Microsoft": "Warning",
"Microsoft.Hosting.Lifetime": "Information"
}
},
// 👇new section
"Authentication": {
"Schemes": {
"Bearer": {
"ValidAudiences": [
"http://localhost:23647",
"https://localhost:44313",
"https://localhost:5001",
"http://localhost:5000"
],
"ValidIssuer": "dotnet-user-jwts"
}
}
}
// 👆new section
}
```
This new section is one of the [new authentication and authorization features introduced by .NET 7](https://auth0.com/blog/whats-new-in-dotnet-7-for-authentication-and-authorization/). It greatly simplifies how authentication and authorization middleware is configured.
You notice that a set of valid [audiences](https://auth0.com/docs/glossary#audience) are defined. They represent your API and, in this case, match the URLs of your application.
As a valid issuer of the token, you find the value `dotnet-user-jwts`.
### Inspect your token
Now, copy the value of the JWT issued by `user-jwts` earlier and paste it into the *Encoded* field of the [jwt.io](https://jwt.io/) online tool. You should be able to see the decoded version of your token as shown in the following picture:
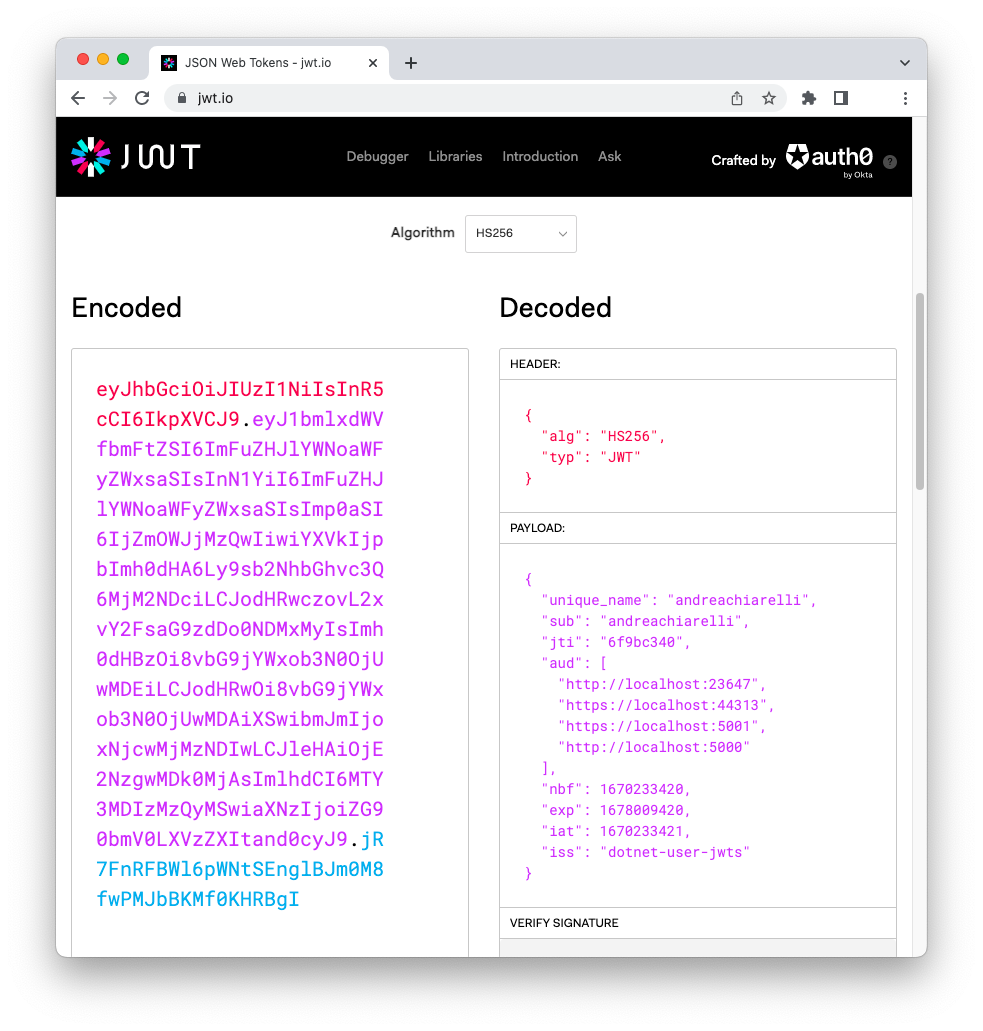
As you can see, this is a very simple token containing just minimal information about the user, the audience (i.e., the API it is meant for), the issuer, and some dates to control its validity.
> Keep in mind that tokens issued by the `user-jwts` tool are meant to be used only in your development environment for testing purposes.
### Use the access token
Now that you know a little bit more about the `user-jwts` tool infrastructure and the issued token, let's use the JWT to make the request that previously failed.
Stop and run the ASP.NET Core Web API application again to make sure it loads the new settings. Retype the curl statement to call the `/api/Glossary` endpoint as you did earlier. Though, this time you will pass the access token as a bearer token in the `Authorization` header, as shown below:
```bash
curl -i https://localhost:5001/api/glossary \
-H 'Authorization: Bearer eyJhbGciOiJIUzI1NiIs... omitted content...HRBgI'
```
As a response, you will get the list of terms defined in the glossary.
Cool! You unblocked the first endpoint. You can use the same JWT to call the `/api/Glossary/{term}` endpoint with GET as well. For example, if you invoke GET on the `/api/Glossary/jwt` endpoint, you will obtain the JWT definition stored in the glossary.
However, if you try to call the API by using the other HTTP methods, you will get a "403 Forbidden" error message. For example, try to add a new term to the glossary by making a POST request as the following:
```bash
curl -i 'https://localhost:5001/api/glossary' \
-H 'Authorization: Bearer eyJhbGciOiJIUzI1NiIs... omitted content...HRBgI' \
-X 'POST' \
-H 'Content-Type: application/json' \
-d '{
"term": "test",
"definition": "This is a test"
}'
```
You will see the following response:
```bash
HTTP/1.1 403 Forbidden
Content-Length: 0
Date: Mon, 05 Dec 2022 11:28:14 GMT
Server: Kestrel
```
It means that you provided an access token as required, but you don't have the needed permissions to make this request. In other words, your access token must contain the `create:term` permission.
## Create a JWT With Custom Claims
Let's create an access token with the required permission. Be sure to be in the root folder of your project and type the following command in your terminal window:
```bash
dotnet user-jwts create --claim permissions=create:term
```
This command asks the `user-jwts` tool to create a JWT with a custom claim `permissions` with the value `create:term`. You should get an output similar to the following:
```bash
New JWT saved with ID '3ac99ee7'.
Name: andreachiarelli
Custom Claims: [permissions=create:term]
Token: eyJhbGciO...omitted content...JQwewWYg
```
As you can see, you obtain a new token with its own identifier. The custom claim you added is specified as well. You can inspect the new token in [jwt.io](https://jwt.io/) to check its content.
By using this new access token in your POST request, you will be able to add a new term to the glossary:
```bash
curl -i 'https://localhost:5001/api/glossary' \
-H 'Authorization: Bearer Bearer eyJhbGciO...omitted content...JQwewWYg' \
-X 'POST' \
-H 'Content-Type: application/json' \
-d '{
"term": "test",
"definition": "This is a test"
}'
```
In the same way that you added a custom claim, you can also specify scopes, roles, audience, etc. Check out the [documentation](https://learn.microsoft.com/en-us/aspnet/core/security/authentication/jwt-authn) to learn what options to use for each specific element.
## Display Issued Tokens
Beyond creating customized JWTs, the `user-jwts` tool allows you to manage them with a few specific commands. For example, to show all the tokens issued for the current project, run the following command in its root folder:
```bash
dotnet user-jwts list
```
The command's output will look like the following:
```bash
User Secrets ID: '50960023-f197-4aa0-bfa5-1ad79803ff6f'
------------------------------------------------------------------------------------------
| ID | Scheme | Audience(s) | Issued On | Expires On |
------------------------------------------------------------------------------------------
| 6f9bc340 | Bearer | http://localhost:236 | 2022-12-05T09:43:41. | 2023-03-05T09:43:40. |
| | | 47, https://localhos | 0000000+00:00 | 0000000+00:00 |
| | | t:44313, https://loc | | |
| | | alhost:5001, http:// | | |
| | | localhost:5000 | | |
------------------------------------------------------------------------------------------
| 3ac99ee7 | Bearer | http://localhost:236 | 2022-12-05T12:05:35. | 2023-03-05T12:05:34. |
| | | 47, https://localhos | 0000000+00:00 | 0000000+00:00 |
| | | t:44313, https://loc | | |
| | | alhost:5001, http:// | | |
| | | localhost:5000 | | |
------------------------------------------------------------------------------------------
```
Each row in this table corresponds to an issued JWT. To learn about the details of a specific JWT, take note of its identifier and run a command like the following:
```bash
dotnet user-jwts print 3ac99ee7
```
You will get an output similar to this:
```bash
Found JWT with ID '3ac99ee7'.
ID: 3ac99ee7
Name: andreachiarelli
Scheme: Bearer
Audience(s): http://localhost:23647, https://localhost:44313, https://localhost:5001, http://localhost:5000
Not Before: 2022-12-05T12:05:34.0000000+00:00
Expires On: 2023-03-05T12:05:34.0000000+00:00
Issued On: 2022-12-05T12:05:35.0000000+00:00
Custom Claims: [permissions=create:term]
Token: eyJhbGciO...omitted content...JQwewWYg
```
You may notice all the main details of the token. You can also ask for the decoded version of the token by adding the `--show-all` option to that command, as in here:
```bash
dotnet user-jwts print 3ac99ee7 --show-all
```
In this case, a complete output will be shown:
```bash
Found JWT with ID '3ac99ee7'.
ID: 3ac99ee7
Name: andreachiarelli
Scheme: Bearer
Audience(s): http://localhost:23647, https://localhost:44313, https://localhost:5001, http://localhost:5000
Not Before: 2022-12-05T12:05:34.0000000+00:00
Expires On: 2023-03-05T12:05:34.0000000+00:00
Issued On: 2022-12-05T12:05:35.0000000+00:00
Scopes: none
Roles: [none]
Custom Claims: [permissions=create:term]
Token Header: {"alg":"HS256","typ":"JWT"}
Token Payload: {"unique_name":"andreachiarelli","sub":"andreachiarelli","jti":"3ac99ee7","permissions":"create:term","aud":["http://localhost:23647","https://localhost:44313","https://localhost:5001","http://localhost:5000"],"nbf":1670241934,"exp":1678017934,"iat":1670241935,"iss":"dotnet-user-jwts"}
Compact Token: eyJhbGciO...omitted content...JQwewWYg
```
The `--output` option allows you to get a specific format as the command output at token creation time. For example, if you want just the token value when you create a new token, you can run the `user-jwts` tool as follows:
```bash
dotnet user-jwts create --output token
```
This command will return only the token's value. No identifier, no username as in the usual output. This output could be useful in case you want to write a script where the token is stored into a variable and then used in a curl request. Beyond `token`, you can also specify `json` as a specific output format to get the decoded version of the token.
Finally, you can also use the `remove` and `clear` commands to respectively delete a specific JWT (e.g., `dotnet user-jwts remove 3ac99ee7`) or clear all the issued JWTs (e.g., `dotnet user-jwts clear`).
## Integrate with Auth0
You tested your ASP.NET Core Web API application on your local machine using customized access tokens issued by the `user-jwts` tool. Remember that those tokens and the overall infrastructure are meant only for local development purposes.
If you have ever tested a protected Web API using tokens issued by a real authorization server, you have experienced how time-consuming it is. Take a look at the tests explained in [this article's section](https://auth0.com/blog/permission-based-security-aspnet-webapi/#Testing-Permissions) to get an idea.
The `user-jwts` tool speeds up your local tests allowing you to create customized access tokens on the fly, with no need to interact with an authorization server, configure it and your app, go back and forth to get the proper access token with the required permissions, and so on. But at some point, you need to configure your application to work with an authorization server, such as your Auth0 tenant.
You don't need to change your code. You just have to deal with configuration, both on the Auth0 and your application sides.
### Auth0 configuration
Let's start by registering your Web API with Auth0. Sign up for a free account if you don't have one yet. Then, in the [Auth0 dashboard](https://manage.auth0.com/), move to the [API section](https://manage.auth0.com/#/apis) and follow these steps:
1. Click on *Create API*.
2. Provide a friendly name for your API (for example, *Glossary API*) and a unique identifier in the URL format (for example, *[https://glossary.com](https://glossary.com/)*).
3. Leave the signing algorithm as RS256 and click the *Create* button.
These steps make Auth0 aware of your Web API and allow you to control access.
Then, define the permissions required by your API as described in [this section](https://auth0.com/blog/permission-based-security-aspnet-webapi/#Defining-Permissions-for-an-API).
### Web API configuration
Let's configure your Web API now. Create a new file named `appsettings.Auth0.json` in the root folder of your application project and add the following content:
```json
// appsettings.Auth0.json
{
"Logging": {
"LogLevel": {
"Default": "Information",
"Microsoft": "Warning",
"Microsoft.Hosting.Lifetime": "Information"
}
},
"Authentication": {
"Schemes": {
"Bearer": {
"Authority": "https://YOUR_AUTH0_DOMAIN",
"ValidAudiences": [ "YOUR_UNIQUE_IDENTIFIER" ],
"ValidIssuer": "YOUR_AUTH0_DOMAIN"
}
}
}
}
```
Replace the placeholders YOUR_AUTH0_DOMAIN and YOUR_UNIQUE_IDENTIFIER with the respective Auth0 domain and API identifier from the Auth0 dashboard. Notice that this time you have an additional key: `Authority`. This key tells your application that you are using an access token issued by a real authorization server, not the local `user-jwts` infrastructure.
### Run the right configuration
Now you have two configurations for getting tokens in your ASP.NET Core Web API:
- One is based on the `appsettings.Development.json` configuration file and uses the `user-jwts` tool.
- One is based on the `appsettings.Auth0.json` configuration file and uses Auth0.
You can decide what configuration to use by leveraging the standard [environment configuration](https://learn.microsoft.com/en-us/aspnet/core/fundamentals/environments) approach.
In other words, if you run your application with `dotnet run`, the default environment configuration will be used, that is, *Development*. This means that the `appsetting.Development.json` configuration will be taken into account, and your application will accept tokens issued by the `user-jwts` tool.
To make your Web API accept tokens issued by Auth0, you have to run your application with the following command:
```bash
dotnet run --environment Auth0
```
In this case, the `appsetting.Auth0.json` configuration will be taken into account, and your application will accept only tokens issued by Auth0.
While your Web API runs with the Auth0 settings, test it as explained in [this article's section](https://auth0.com/blog/permission-based-security-aspnet-webapi/#Testing-Permissions).
You should obtain the same result as you got with the local tests.
## Summary
Throughout this article, you learned how to use the `user-jwts` tool to generate and manage customized JWT tokens for testing purposes. You used the tool to make HTTP requests to a protected ASP.NET Core Web API and learned how to add custom claims to the generated token. You were also able to list the currently issued tokens, get details on each of them, and display the token creation output in different ways. Finally, you've seen how to configure your API to work with Auth0 and selectively support both token issuers.
The ability to get the token output in specific formats through the `--output` option enables developers to automate tests with shell scripts. While it is feasible, I personally think that the best option would be having an integrated access to the tool so that you can use it with C# from [your usual testing framework](https://auth0.com/blog/xunit-to-test-csharp-code/).
What is your experience in using the `user-jwts` tool? Share it in the comments below.