---
title: "Secure Third-Party Tool Calling in LlamaIndex Using Auth0"
description: "Learn how to implement secure, user-level third-party tool calling in LlamaIndex using Auth0 Token Vault to act on behalf of users securely."
authors:
- name: "Raphael do Vale"
url: "https://auth0.com/blog/authors/raphael-do-vale/"
date: "Jan 21, 2026"
category: "AI,Developers"
tags: ["python", "ai", "llamaindex"]
url: "https://auth0.com/blog/third-party-tool-calling-llamaindex-auth0-python/"
---
# Secure Third-Party Tool Calling in LlamaIndex Using Auth0
Using frameworks like LlamaIndex makes it easy to integrate internal tools with LLMs and expand their capabilities. Even with several internal tools mapped to an LLM, we may still need to integrate with third-party tools. This task becomes more complex when those third-party tools require authentication. In this blog post, you will learn how to implement secure third-party tool calling with LlamaIndex.
## Tool Calling and Authentication
Where tools and authentication are concerned, we can distinguish two types of tool calling:
- System-level tool calling: the application calls the third-party tool using its own credentials. Regardless of which user interacts with the app, the third-party tool only recognizes the application.
- User-level tool calling: the application calls third-party tools on the user’s behalf. With OAuth 2.0, the app obtains an access token from the user’s identity provider that can call the third-party tool. The tool, in turn, recognizes the user. This is useful for auditing and for accessing user-level resources like email, messages, files, etc.
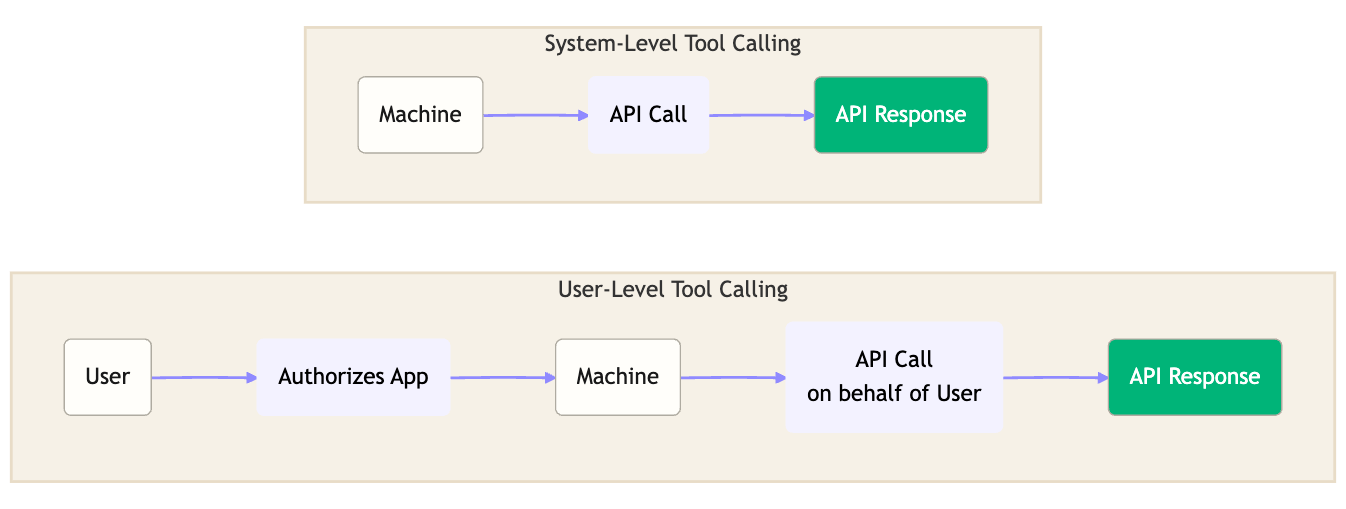 In both cases we want to keep credentials secure and avoid exposing tokens to the LLMs. But for the second case we also need the user to allow the application to perform a collection of actions on the user’s behalf. This is where Auth0’s [Token Vault](https://auth0.com/docs/secure/tokens/token-vault) comes into play.
As the name suggests, Token Vault securely stores tokens that allow the application to access third-party APIs: you don’t need to manage third-party tokens or scopes directly. When a user authenticates with a supported external provider and authorizes access using OAuth scopes, Auth0 stores the external provider’s access and refresh tokens in the Token Vault which organizes these tokens into tokensets, with one tokenset per authorized user connection.
## Adding Third-Party Tool Call in a LlamaIndex-Powered Application
For the sake of this tutorial, we will add third-party tool integration to an application that already has LlamaIndex configured called “Teacher’s Aide”. This application serves as a teacher assistant. The app allows a teacher to check student grades, organize classes, and speculate which students are likely to pass the class. The application provides a simple chat-like interface in which the teacher can interact by asking questions about classes and students. Currently, the LLM is able to do the following:
- List teacher classes
- Get details of a specific teaching class by its ID
- List all students
- Get details of a unique student by its id
In addition, all authentication is already implemented using Auth0 and all LLM-related tasks are implemented using OpenAI.
In this tutorial, we are going to implement an email send feature on behalf of the teacher. The goal is to allow the teacher to send warnings or motivational messages to students who need help. The LLM will compose the entire email based on the teacher's advice and the students' performance. Ultimately, the email will appear to come from the teacher, but it will have been generated by the LLM on the teacher's behalf.
## Prerequisites
* Python 3.11 or later
* [Poetry for dependency management](https://python-poetry.org/). Check [how to install](https://python-poetry.org/docs/#installation).
* An Auth for AI Agents account. [Create one](https://a0.to/ai-content).
* An OpenAI account and API key. [Create one](https://platform.openai.com/) or use any [other LLM provider supported by LammaIndex](https://docs.llamaindex.ai/en/stable/module_guides/models/llms/modules/).
* [Our repository](https://a0.to/teachersaide) cloned
### Cloning and installing dependencies
This is the starter application you'll find in [the repository](hhttps://a0.to/teachersaide):
```bash
── teacher_assistant/
│ ├── main.py # FastAPI application and routes
│ ├── auth.py # Auth0 authentication configuration
│ ├── context.py # Context variables for agent state management
│ ├── grades/
│ │ ├── data.py # Sample student and class data
│ │ └── model.py # Data models
│ └── llm/
│ ├── llamaindex_agent.py # LlamaIndex agent configuration
│ └── send_email.py # Gmail integration with Auth0 Token Vault
├── static/
│ ├── index.html # Frontend chat interface
│ └── app.js # Frontend JavaScript
├── poetry.lock # Poetry file
├── .env.sample # Environment variables template
└── README.md
```
After cloning the repository, you can go to the starter branch `step1-starter`
```bash
git clone https://github.com/auth0/auth0-teachersaide
git switch step1-starter
```
This branch provides all necessary code to spin up our application, already with authentication and FastAPI integrated. Use `poetry` to install all dependencies:
```bash
poetry install
```
Now, we are ready to set up Auth0 and fill some environment variables.
## Setting up Google Authentication with Auth0
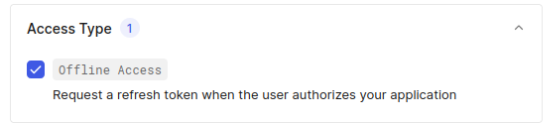
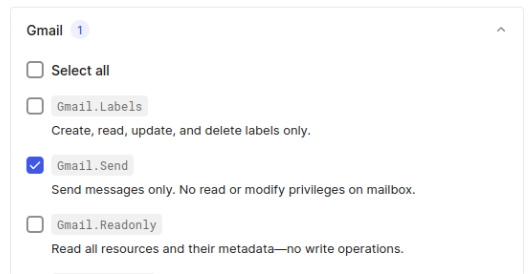
To integrate email functionality, we need to configure how users will authenticate in our application using Google's
social login. Follow [this documentation](https://auth0.com/ai/docs/integrations/google) to set up Google Authentication and enable the `Offline Access` and `Gmail.Send` permissions, which are the only two permissions required for this
integration.
In both cases we want to keep credentials secure and avoid exposing tokens to the LLMs. But for the second case we also need the user to allow the application to perform a collection of actions on the user’s behalf. This is where Auth0’s [Token Vault](https://auth0.com/docs/secure/tokens/token-vault) comes into play.
As the name suggests, Token Vault securely stores tokens that allow the application to access third-party APIs: you don’t need to manage third-party tokens or scopes directly. When a user authenticates with a supported external provider and authorizes access using OAuth scopes, Auth0 stores the external provider’s access and refresh tokens in the Token Vault which organizes these tokens into tokensets, with one tokenset per authorized user connection.
## Adding Third-Party Tool Call in a LlamaIndex-Powered Application
For the sake of this tutorial, we will add third-party tool integration to an application that already has LlamaIndex configured called “Teacher’s Aide”. This application serves as a teacher assistant. The app allows a teacher to check student grades, organize classes, and speculate which students are likely to pass the class. The application provides a simple chat-like interface in which the teacher can interact by asking questions about classes and students. Currently, the LLM is able to do the following:
- List teacher classes
- Get details of a specific teaching class by its ID
- List all students
- Get details of a unique student by its id
In addition, all authentication is already implemented using Auth0 and all LLM-related tasks are implemented using OpenAI.
In this tutorial, we are going to implement an email send feature on behalf of the teacher. The goal is to allow the teacher to send warnings or motivational messages to students who need help. The LLM will compose the entire email based on the teacher's advice and the students' performance. Ultimately, the email will appear to come from the teacher, but it will have been generated by the LLM on the teacher's behalf.
## Prerequisites
* Python 3.11 or later
* [Poetry for dependency management](https://python-poetry.org/). Check [how to install](https://python-poetry.org/docs/#installation).
* An Auth for AI Agents account. [Create one](https://a0.to/ai-content).
* An OpenAI account and API key. [Create one](https://platform.openai.com/) or use any [other LLM provider supported by LammaIndex](https://docs.llamaindex.ai/en/stable/module_guides/models/llms/modules/).
* [Our repository](https://a0.to/teachersaide) cloned
### Cloning and installing dependencies
This is the starter application you'll find in [the repository](hhttps://a0.to/teachersaide):
```bash
── teacher_assistant/
│ ├── main.py # FastAPI application and routes
│ ├── auth.py # Auth0 authentication configuration
│ ├── context.py # Context variables for agent state management
│ ├── grades/
│ │ ├── data.py # Sample student and class data
│ │ └── model.py # Data models
│ └── llm/
│ ├── llamaindex_agent.py # LlamaIndex agent configuration
│ └── send_email.py # Gmail integration with Auth0 Token Vault
├── static/
│ ├── index.html # Frontend chat interface
│ └── app.js # Frontend JavaScript
├── poetry.lock # Poetry file
├── .env.sample # Environment variables template
└── README.md
```
After cloning the repository, you can go to the starter branch `step1-starter`
```bash
git clone https://github.com/auth0/auth0-teachersaide
git switch step1-starter
```
This branch provides all necessary code to spin up our application, already with authentication and FastAPI integrated. Use `poetry` to install all dependencies:
```bash
poetry install
```
Now, we are ready to set up Auth0 and fill some environment variables.
## Setting up Google Authentication with Auth0
To integrate email functionality, we need to configure how users will authenticate in our application using Google's
social login. Follow [this documentation](https://auth0.com/ai/docs/integrations/google) to set up Google Authentication and enable the `Offline Access` and `Gmail.Send` permissions, which are the only two permissions required for this
integration.
 At the end, you should have the social connection `google-oauth2` configured.
 ## Setting Up Token Exchange with Token Vault
Now, we need to configure authentication for our agent project. We also need to add Token Exchange with [Token Vault](https://auth0.com/docs/secure/tokens/token-vault) enabled. This feature will be able to receive a user’s Google account token with permission to send emails.
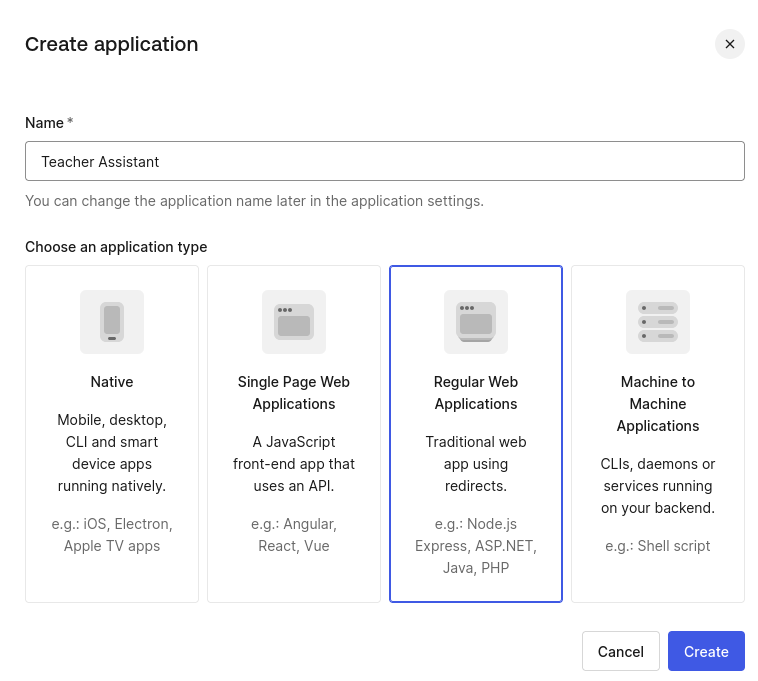
In your Auth0 Dashboard, go to the [Applications](https://manage.auth0.com/#/applications) section and create a new application. Select _Regular Web Applications_ and give the name `Teacher Assistant` to the application.
## Setting Up Token Exchange with Token Vault
Now, we need to configure authentication for our agent project. We also need to add Token Exchange with [Token Vault](https://auth0.com/docs/secure/tokens/token-vault) enabled. This feature will be able to receive a user’s Google account token with permission to send emails.
In your Auth0 Dashboard, go to the [Applications](https://manage.auth0.com/#/applications) section and create a new application. Select _Regular Web Applications_ and give the name `Teacher Assistant` to the application.
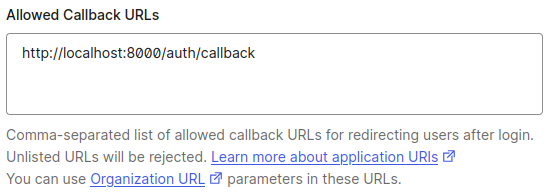
 After the creation, go to the application settings and fill the following values:
* `Allowed callback URL` - http://localhost:8000/auth/callback
After the creation, go to the application settings and fill the following values:
* `Allowed callback URL` - http://localhost:8000/auth/callback
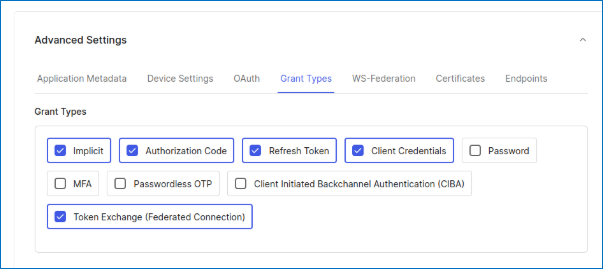
 * Advanced settings, grant types, also enable **Token Exchange (Federated Connection)**
 In the tab Connections, enable `google-oauth2` connection and disable any other connection.
 Make sure Token Vault is enabled for your tenant, navigate to **Authentication -> Social** select `google-oauth2`, and navigate to the bottom. In the Advanced section enable the toggle _enable Token Vault_ and remember to Save Changes.
### Setting up the environment variables
Create a `.env` file in the root folder with the following content (you can copy the `.env.sample` file):
```bash
AUTH0_DOMAIN="YOUR_AUTH0_DOMAIN"
AUTH0_CLIENT_ID="YOUR_AUTH0_CLIENT_ID"
AUTH0_CLIENT_SECRET="YOUR_AUTH0_CLIENT_SECRET"
APP_SECRET_KEY="use [openssl rand -hex 32] to generate a 32 bytes value"
OPENAI_API_KEY="YOUR_OPEN_AI_KEY"
```
You must change the values of the following properties, anything else you can keep as is.
* `AUTH0_DOMAIN`, `AUTH0_CLIENT_ID` and `AUTH0_CLIENT_SECRET` – You can get it in your Auth0 Application Settings.
* `APP_SECRET_KEY` – This key is used to encrypt the user session as a cookie in the user's browser. You can use the command above to generate a unique value.
* `OPENAI_API_KEY` – You can create an [OpenAI API here](https://platform.openai.com/).
## Running the Application
We should now test the application to check if everything is working as expected. Run the following command in the root folder:
```bash
poetry run uvicorn main:app --reload
```
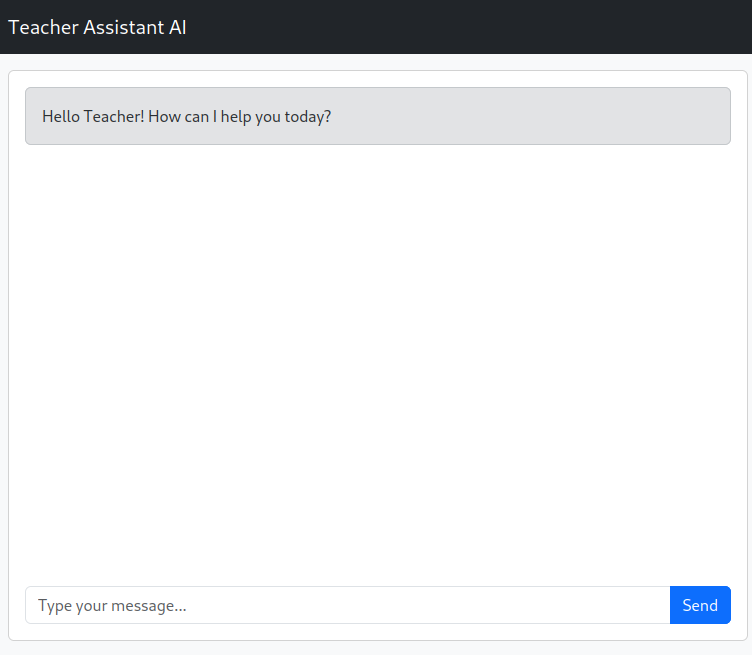
Now, open the browser window and navigate to [`http://localhost:8000`](http://localhost:8000). You will be redirected to Auth0 Universal Login. Login with an GMail account, in the end, you should see a screen like this:
Make sure Token Vault is enabled for your tenant, navigate to **Authentication -> Social** select `google-oauth2`, and navigate to the bottom. In the Advanced section enable the toggle _enable Token Vault_ and remember to Save Changes.
### Setting up the environment variables
Create a `.env` file in the root folder with the following content (you can copy the `.env.sample` file):
```bash
AUTH0_DOMAIN="YOUR_AUTH0_DOMAIN"
AUTH0_CLIENT_ID="YOUR_AUTH0_CLIENT_ID"
AUTH0_CLIENT_SECRET="YOUR_AUTH0_CLIENT_SECRET"
APP_SECRET_KEY="use [openssl rand -hex 32] to generate a 32 bytes value"
OPENAI_API_KEY="YOUR_OPEN_AI_KEY"
```
You must change the values of the following properties, anything else you can keep as is.
* `AUTH0_DOMAIN`, `AUTH0_CLIENT_ID` and `AUTH0_CLIENT_SECRET` – You can get it in your Auth0 Application Settings.
* `APP_SECRET_KEY` – This key is used to encrypt the user session as a cookie in the user's browser. You can use the command above to generate a unique value.
* `OPENAI_API_KEY` – You can create an [OpenAI API here](https://platform.openai.com/).
## Running the Application
We should now test the application to check if everything is working as expected. Run the following command in the root folder:
```bash
poetry run uvicorn main:app --reload
```
Now, open the browser window and navigate to [`http://localhost:8000`](http://localhost:8000). You will be redirected to Auth0 Universal Login. Login with an GMail account, in the end, you should see a screen like this:
 This application already has fictitious data in an in-memory database, so you can start interacting with it. You can check and modify the data at `teacher_assistant/grades/data.py` file.
Here's a prompt suggestion for the first interaction:
> How are my students going this semester?
Which the LLM will respond by giving you a table of all the students, its grades, and some highlights:
This application already has fictitious data in an in-memory database, so you can start interacting with it. You can check and modify the data at `teacher_assistant/grades/data.py` file.
Here's a prompt suggestion for the first interaction:
> How are my students going this semester?
Which the LLM will respond by giving you a table of all the students, its grades, and some highlights:
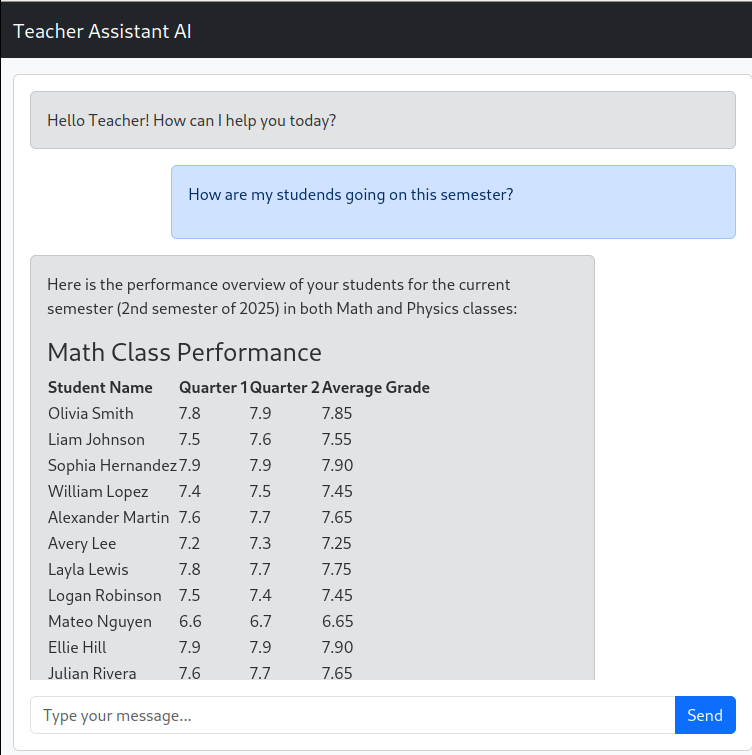
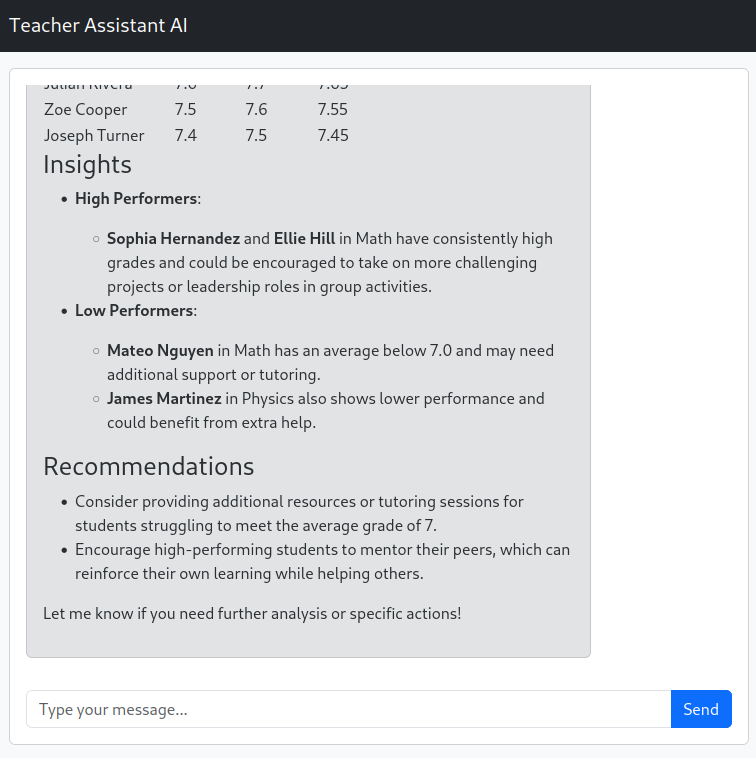 Maybe Mateo Nguyen and James Martinez need some motivation, let's implement a feature to send an e-mail to them.
## Implementing Third-party Tool Integration in LlamaIndex
We already have Google Authentication set up with the necessary grant to send emails. Once you log in your application with Auth0 and Google, Auth0 already stores Google's refresh token in the Token Vault. Now, we need to generate the Access Token with the correct grant to send emails.
[Auth0 AI LlamaIndex library](https://pypi.org/project/auth0-ai-llamaindex/) provides a simple way to do this and is already installed in the starter branch through Poetry. Let's discuss how to use it while we are implementing the feature.
### Adding Context Variables to the Agent
First, we need to create a way to get the user's Auth0 refresh token to the library. Since LlammaIndex does not have a context object, we need to create one that handles variables between different functions but in the same request.
Let's create the file `teacher_assistant/context.py`:
```bash
touch teacher_assistant/context.py
```
Now, fill the following content:
```python
from contextvars import ContextVar
agent_context = ContextVar("agent_context", default={})
def get_agent_context():
return agent_context.get()
def clean_agent_context():
agent_context.set({})
```
This module will provide a way to get the user's context and clean it after each request. A `contextvar` is a variable that is shared between different functions, even using _asyncio_.
Change the function `run_agent` in `teacher_assistant/llm/llama_index_agent.py` to:
```python
async def run_agent(user_input: str, chat_id: str, refresh_token: str):
try:
context = get_agent_context()
context["refresh_token"] = refresh_token
memory = await _get_memory(chat_id)
return await _agent.run(user_msg=user_input, memory=memory)
finally:
clean_agent_context()
```
This will allow us to get the user's refresh token and store it in the context. The refresh token will be available for all LlammaIndex tools we've implemented.
Now, we need to pass the refresh token to this function, change `query_genai` function `teacher_assistant/main.py` file to the following:
```python
@app.post("/prompt")
async def query_genai(
data: Prompt,
request: Request,
auth_session=Depends(auth_client.require_session),
):
chat_id = get_chat_id(request)
result = await run_agent(
data.prompt,
refresh_token=auth_session.get("refresh_token"),
chat_id=chat_id,
)
return {"response": result.response.content}
```
**Note**: in both files, remember to import the necessary modules.
Now, we can implement the mail send feature.
### Sending Emails
First, create a file called "send\_email.py" in the `teacher_assistant/llm/` folder.
```bash
touch teacher_assistant/llm/send_email.py
```
Now, let's add the _imports_ for this file:
```python
import base64
from email.mime.text import MIMEText
import requests
from auth0_ai.authorizers.federated_connection_authorizer import (
get_access_token_for_connection,
)
from auth0_ai_llamaindex.auth0_ai import Auth0AI
from dotenv import load_dotenv
from llama_index.core.tools import FunctionTool
from openai import BaseModel
from pydantic import Field
from teacher_assistant.llm.context import get_agent_context
load_dotenv()
auth0_ai = Auth0AI()
```
Some highlights:
* `auth0_ai_llamaindex.auth0_ai` is the library we installed with poetry and will help us to generate the access token for the user. The library simplifies authentication flow integration with LlamaIndex.
* `get_access_token_for_connection` is a function from the library that will generate the access token for the third-party service for us.
* `get_agent_context` will help us get the user's Auth0 refresh token.
* `auth0_ai` is the Auth0 client we created. It loads the environment variables from the `.env` file to automatically configure the client.
The next step is to configure the library:
```python
def refresh_token(**kwargs):
return get_agent_context()["refresh_token"]
with_send_email_gmail = auth0_ai.with_federated_connection(
connection="google-oauth2",
scopes=["https://www.googleapis.com/auth/gmail.send"],
refresh_token=refresh_token,
)
```
The `refresh_token` function will be called every time the library needs to generate a new access token for the third-party service. The `auth0_ai.with_federated_connection` function will create a new tool that will use the refresh token to generate a new access token for the third-party service. This function receives the connection name and the scopes that the tool will need.
Following, we create the sending email function:
```python
def send_email(to_email: str, subject: str, body: str) -> str:
try:
gmail_access_token = get_access_token_for_connection()
message = MIMEText(body)
message["to"] = to_email
message["subject"] = subject
raw_message = base64.urlsafe_b64encode(message.as_bytes()).decode("utf-8")
response = requests.post(
"https://gmail.googleapis.com/gmail/v1/users/me/messages/send",
headers={
"Authorization": f"Bearer {gmail_access_token}",
"Content-Type": "application/json",
},
json={"raw": raw_message},
)
response.raise_for_status()
sent_message = response.json()
return (
f"Email sent successfully to {to_email}. Message ID: {sent_message['id']}"
)
except Exception as e:
return f"Unexpected error sending email: {e}"
```
This function uses Google's Gmail API to send an email, the highlight here is the `get_access_token_for_connection` function. This function will generate a new access token for the Google Gmail API using the refresh token stored in the context. Hidden in the library, every time an access token is needed, the library will call Auth0 servers to generate a new access token with the selected scopes.
Finally, we create a LlamaIndex tool that will use the `send_email` function:
```python
class StudentEmailArgs(BaseModel):
email: str = Field(..., description="Email of the student")
subject: str = Field(..., description="Subject of the email")
body: str = Field(..., description="Message to the student")
def send_email_to_student(
email: str,
subject: str,
body: str,
) -> str:
return send_email(
to_email=email,
subject=subject,
body=body,
)
send_email_to_student_tool = with_send_email_gmail(FunctionTool.from_defaults(
name="send_email_to_student",
description="Send email to students",
fn=send_email_to_student,
fn_schema=StudentEmailArgs
))
```
Before running the application, we must add the tool to the agent. Edit the file `teacher_assistant/llm/llama_index_agent.py` and add the tool to the agent (remember to import the tool):
```python
__TOOLS = [
list_teaching_classes,
list_students,
get_student,
get_teaching_class,
send_email_to_student_tool
]
```
Also, you should improve the system prompt to improve the LLM correctness:
```python
__SYSTEM_MESSAGE_PREFIX = f"""
You are a grading and teacher assistant. You are able to check teaching classes, students and grades. Keep in mind that:
* Each class has three evaluations, one for each quarter. At the end, the average grade is calculated and must be
7 at least.
* Your main objective is to help the teacher analyze their classes and students and give insights about them,
and how to improve them.
* When speaking with the teacher, always provide students names.
* Current year is {_current_year} and current semester is {_current_semester}.
* The current semester may not have all grades yet as the students are still in the class. Your main goal is to advise the
teacher about low performances that need better assistance, and high performances that the teacher can improve.
* Use markdown tables for displaying data
* When asked by the teacher, you can send emails for the students following the teacher's instructions. All the
student data like full name and destination email should be retrieved from the database as the teacher does not have
this information
"""
```
Now, you can test the application again.
```bash
poetry run uvicorn main:app --reload
```
**Note**: Since we are testing the application, you should change the student's email to your own in the file `teacher_assistant/grades/data.py`.
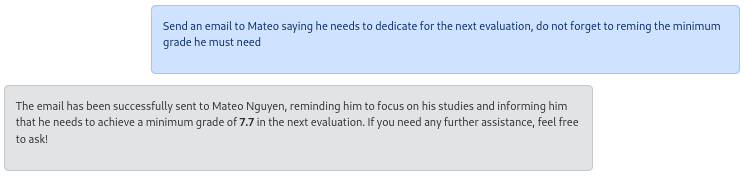
Now, ask the tool to help Mateo:
Maybe Mateo Nguyen and James Martinez need some motivation, let's implement a feature to send an e-mail to them.
## Implementing Third-party Tool Integration in LlamaIndex
We already have Google Authentication set up with the necessary grant to send emails. Once you log in your application with Auth0 and Google, Auth0 already stores Google's refresh token in the Token Vault. Now, we need to generate the Access Token with the correct grant to send emails.
[Auth0 AI LlamaIndex library](https://pypi.org/project/auth0-ai-llamaindex/) provides a simple way to do this and is already installed in the starter branch through Poetry. Let's discuss how to use it while we are implementing the feature.
### Adding Context Variables to the Agent
First, we need to create a way to get the user's Auth0 refresh token to the library. Since LlammaIndex does not have a context object, we need to create one that handles variables between different functions but in the same request.
Let's create the file `teacher_assistant/context.py`:
```bash
touch teacher_assistant/context.py
```
Now, fill the following content:
```python
from contextvars import ContextVar
agent_context = ContextVar("agent_context", default={})
def get_agent_context():
return agent_context.get()
def clean_agent_context():
agent_context.set({})
```
This module will provide a way to get the user's context and clean it after each request. A `contextvar` is a variable that is shared between different functions, even using _asyncio_.
Change the function `run_agent` in `teacher_assistant/llm/llama_index_agent.py` to:
```python
async def run_agent(user_input: str, chat_id: str, refresh_token: str):
try:
context = get_agent_context()
context["refresh_token"] = refresh_token
memory = await _get_memory(chat_id)
return await _agent.run(user_msg=user_input, memory=memory)
finally:
clean_agent_context()
```
This will allow us to get the user's refresh token and store it in the context. The refresh token will be available for all LlammaIndex tools we've implemented.
Now, we need to pass the refresh token to this function, change `query_genai` function `teacher_assistant/main.py` file to the following:
```python
@app.post("/prompt")
async def query_genai(
data: Prompt,
request: Request,
auth_session=Depends(auth_client.require_session),
):
chat_id = get_chat_id(request)
result = await run_agent(
data.prompt,
refresh_token=auth_session.get("refresh_token"),
chat_id=chat_id,
)
return {"response": result.response.content}
```
**Note**: in both files, remember to import the necessary modules.
Now, we can implement the mail send feature.
### Sending Emails
First, create a file called "send\_email.py" in the `teacher_assistant/llm/` folder.
```bash
touch teacher_assistant/llm/send_email.py
```
Now, let's add the _imports_ for this file:
```python
import base64
from email.mime.text import MIMEText
import requests
from auth0_ai.authorizers.federated_connection_authorizer import (
get_access_token_for_connection,
)
from auth0_ai_llamaindex.auth0_ai import Auth0AI
from dotenv import load_dotenv
from llama_index.core.tools import FunctionTool
from openai import BaseModel
from pydantic import Field
from teacher_assistant.llm.context import get_agent_context
load_dotenv()
auth0_ai = Auth0AI()
```
Some highlights:
* `auth0_ai_llamaindex.auth0_ai` is the library we installed with poetry and will help us to generate the access token for the user. The library simplifies authentication flow integration with LlamaIndex.
* `get_access_token_for_connection` is a function from the library that will generate the access token for the third-party service for us.
* `get_agent_context` will help us get the user's Auth0 refresh token.
* `auth0_ai` is the Auth0 client we created. It loads the environment variables from the `.env` file to automatically configure the client.
The next step is to configure the library:
```python
def refresh_token(**kwargs):
return get_agent_context()["refresh_token"]
with_send_email_gmail = auth0_ai.with_federated_connection(
connection="google-oauth2",
scopes=["https://www.googleapis.com/auth/gmail.send"],
refresh_token=refresh_token,
)
```
The `refresh_token` function will be called every time the library needs to generate a new access token for the third-party service. The `auth0_ai.with_federated_connection` function will create a new tool that will use the refresh token to generate a new access token for the third-party service. This function receives the connection name and the scopes that the tool will need.
Following, we create the sending email function:
```python
def send_email(to_email: str, subject: str, body: str) -> str:
try:
gmail_access_token = get_access_token_for_connection()
message = MIMEText(body)
message["to"] = to_email
message["subject"] = subject
raw_message = base64.urlsafe_b64encode(message.as_bytes()).decode("utf-8")
response = requests.post(
"https://gmail.googleapis.com/gmail/v1/users/me/messages/send",
headers={
"Authorization": f"Bearer {gmail_access_token}",
"Content-Type": "application/json",
},
json={"raw": raw_message},
)
response.raise_for_status()
sent_message = response.json()
return (
f"Email sent successfully to {to_email}. Message ID: {sent_message['id']}"
)
except Exception as e:
return f"Unexpected error sending email: {e}"
```
This function uses Google's Gmail API to send an email, the highlight here is the `get_access_token_for_connection` function. This function will generate a new access token for the Google Gmail API using the refresh token stored in the context. Hidden in the library, every time an access token is needed, the library will call Auth0 servers to generate a new access token with the selected scopes.
Finally, we create a LlamaIndex tool that will use the `send_email` function:
```python
class StudentEmailArgs(BaseModel):
email: str = Field(..., description="Email of the student")
subject: str = Field(..., description="Subject of the email")
body: str = Field(..., description="Message to the student")
def send_email_to_student(
email: str,
subject: str,
body: str,
) -> str:
return send_email(
to_email=email,
subject=subject,
body=body,
)
send_email_to_student_tool = with_send_email_gmail(FunctionTool.from_defaults(
name="send_email_to_student",
description="Send email to students",
fn=send_email_to_student,
fn_schema=StudentEmailArgs
))
```
Before running the application, we must add the tool to the agent. Edit the file `teacher_assistant/llm/llama_index_agent.py` and add the tool to the agent (remember to import the tool):
```python
__TOOLS = [
list_teaching_classes,
list_students,
get_student,
get_teaching_class,
send_email_to_student_tool
]
```
Also, you should improve the system prompt to improve the LLM correctness:
```python
__SYSTEM_MESSAGE_PREFIX = f"""
You are a grading and teacher assistant. You are able to check teaching classes, students and grades. Keep in mind that:
* Each class has three evaluations, one for each quarter. At the end, the average grade is calculated and must be
7 at least.
* Your main objective is to help the teacher analyze their classes and students and give insights about them,
and how to improve them.
* When speaking with the teacher, always provide students names.
* Current year is {_current_year} and current semester is {_current_semester}.
* The current semester may not have all grades yet as the students are still in the class. Your main goal is to advise the
teacher about low performances that need better assistance, and high performances that the teacher can improve.
* Use markdown tables for displaying data
* When asked by the teacher, you can send emails for the students following the teacher's instructions. All the
student data like full name and destination email should be retrieved from the database as the teacher does not have
this information
"""
```
Now, you can test the application again.
```bash
poetry run uvicorn main:app --reload
```
**Note**: Since we are testing the application, you should change the student's email to your own in the file `teacher_assistant/grades/data.py`.
Now, ask the tool to help Mateo:
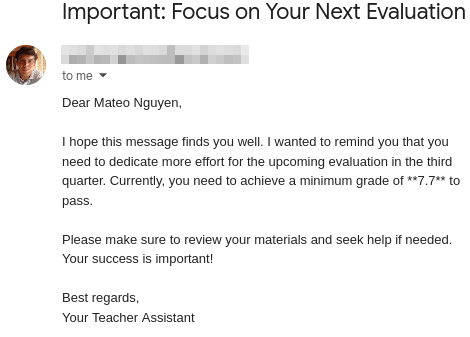
 Now check Mateo’s e-mail (which you should have changed before the test…)
 **Note**: if something is not working, you can check the update code at `step2-thirdparty-tool-integration` branch.
## Recap
The article explains how to extend an existing [LlamaIndex-based teacher assistant](https://a0.to/teachersaide) to call third-party tools on behalf of the logged-in user using Auth0’s Token Vault. It contrasts system-level tool calling (app-scoped credentials) with user-level tool calling ([acting on a user’s behalf](https://auth0.com/ai/docs/intro/token-vault) via OAuth 2.0), highlighting why the latter is essential for actions like sending emails that should reflect the user’s identity. Using Auth0 with Google as a social connection, Token Vault securely stores refresh tokens and issues scoped access tokens as needed, avoiding exposure of sensitive credentials to the LLM. The setup covers configuring Google OAuth with the `Gmail.Send` scope, enabling Token Exchange (Federated Connection) in Auth0, and preparing environment variables and dependencies.
On the application side, the workflow passes the user’s refresh token through request-scoped context so tools can fetch short-lived access tokens just-in-time. With the Auth0 AI LlamaIndex SDK, the agent new tool is capable of sending emails via the Gmail API, allowing the assistant to generate and deliver motivational or warning messages to students as if sent by the teacher. After wiring the tool into the agent and refining the system prompt to guide behavior, the result is a secure, auditable user-level action pipeline: the LLM orchestrates intent and content, Auth0 manages token exchange and storage, and Gmail executes the final delivery under the user’s identity.
**Note**: if something is not working, you can check the update code at `step2-thirdparty-tool-integration` branch.
## Recap
The article explains how to extend an existing [LlamaIndex-based teacher assistant](https://a0.to/teachersaide) to call third-party tools on behalf of the logged-in user using Auth0’s Token Vault. It contrasts system-level tool calling (app-scoped credentials) with user-level tool calling ([acting on a user’s behalf](https://auth0.com/ai/docs/intro/token-vault) via OAuth 2.0), highlighting why the latter is essential for actions like sending emails that should reflect the user’s identity. Using Auth0 with Google as a social connection, Token Vault securely stores refresh tokens and issues scoped access tokens as needed, avoiding exposure of sensitive credentials to the LLM. The setup covers configuring Google OAuth with the `Gmail.Send` scope, enabling Token Exchange (Federated Connection) in Auth0, and preparing environment variables and dependencies.
On the application side, the workflow passes the user’s refresh token through request-scoped context so tools can fetch short-lived access tokens just-in-time. With the Auth0 AI LlamaIndex SDK, the agent new tool is capable of sending emails via the Gmail API, allowing the assistant to generate and deliver motivational or warning messages to students as if sent by the teacher. After wiring the tool into the agent and refining the system prompt to guide behavior, the result is a secure, auditable user-level action pipeline: the LLM orchestrates intent and content, Auth0 manages token exchange and storage, and Gmail executes the final delivery under the user’s identity.