---
title: "The Ultimate Guide to Next.js Authentication with Auth0"
description: "Learn how (and where) to authenticate your user in the different deployment models that exist for Next.js"
authors:
  - name: "Sandrino Di Mattia"
    url: "https://auth0.com/blog/authors/sandrino-di-mattia/"
  - name: "Juan Cruz Martinez"
    url: "https://auth0.com/blog/authors/juan-cruz-martinez/"
date: "Mar 9, 2023"
category: "Developers,Deep Dive,Next.js"
tags: ["next.js", "react", "auth0", "authentication", "security", "javascript", "ssr", "server-side-rendering", "sdk"]
url: "https://auth0.com/blog/ultimate-guide-nextjs-authentication-auth0/"
---

# The Ultimate Guide to Next.js Authentication with Auth0

[Next.js](https://nextjs.org) is a minimalist framework for building single-page JavaScript applications in a simple yet customizable way. The framework focuses on performance and out-of-the-box support for Server-Side Rendering (SSR). The [Next.js showcase](https://nextjs.org/showcase) confirms the success of the framework, which companies big and small use to build their applications, including Netflix, Scale.ai, Marvel, Jet, and even [Auth0](https://auth0.com/developers/).

> If you are new to Next.js and want to learn how to use this framework to build full-stack Jamstack applications, check out the video playlist below by [James Quick](https://twitter.com/jamesqquick):

<AmpContent>
<amp-youtube
    data-videoid="1rgeO_EbSGg"
    layout="responsive"
    width="480" height="270">
</amp-youtube>

</AmpContent>

<NonAmpContent>

<iframe width="560" height="315" src="https://www.youtube.com/embed/videoseries?list=PLZ14qQz3cfJJOcbbVi_nVEPqC2334LLMz" frameborder="0" allow="accelerometer; autoplay; clipboard-write; encrypted-media; gyroscope; picture-in-picture" allowfullscreen></iframe>

</NonAmpContent>

## New Tools, New Challenges

Providing a solution to support authentication in Next.js was [one of the most requested features](https://github.com/vercel/next.js/issues?q=is%3Aissue+sort%3Acomments-desc+is%3Aclosed) in the platform. But why is that? 

Can't we use any of the tools that we've been using for so long in React and Node.js, such as [`passport`](https://github.com/auth0/passport-auth0) or [`auth0.js`](https://github.com/auth0/auth0.js)? Or new ones such as the [Auth0 React SDK](https://auth0.com/blog/complete-guide-to-react-user-authentication/) or [Express OpenID Connect](https://github.com/auth0/express-openid-connect)?

Next.js blurs the line between frontend and backend, making the existing ecosystem suboptimal if you want to use Next.js to its full potential.

One example is [Passport](http://www.passportjs.org/), which depends on the availability of Express. And while you could technically use Express in your Next.js application, it will make all performance improvements fade away. If you want to optimize for fast cold starts and improve the reliability and scalability of your application, you need to shift to the [serverless deployment model](https://nextjs.org/docs#serverless-deployment).

There are different ways to build and deploy Next.js applications. In this blog post, we'll explore those Next.js use cases, explain their architecture, and define the strategy you can use to implement authentication for each one.

## What Does Authentication Mean For Next.js?

When you're building a Next.js application, you may need authentication in the following cases:

- When accessing a page: "My Invoices"

- When accessing a Next.js API route: `/api/my/invoices`

- When your application calls an API hosted outside of your Next.js application on behalf of the user: from `www.mycompany.com` to `billing.mycompany.com/api`

Now that we understand where and when our application might require authentication let's explore the authentication strategies you can implement for different Next.js deployment models.

## Next.js Static Site Approach

Next.js allows you to generate [a standalone static application](https://nextjs.org/docs/advanced-features/static-html-export) without needing a Node.js server. You can run the `next build && next export` command to generate HTML files for each page that supports it. You can use this generated output to deploy your site to any static hosting service, such as [Vercel](https://vercel.com/), [Amazon S3](https://aws.amazon.com/s3/), or [Netlify](https://www.netlify.com).

![Screenshot of the build command](https://images.ctfassets.net/23aumh6u8s0i/24hD6uKaX0ZqBxfxSnUE8m/e2469db08e5b19770ff4143ead4b334c/static-site-build)

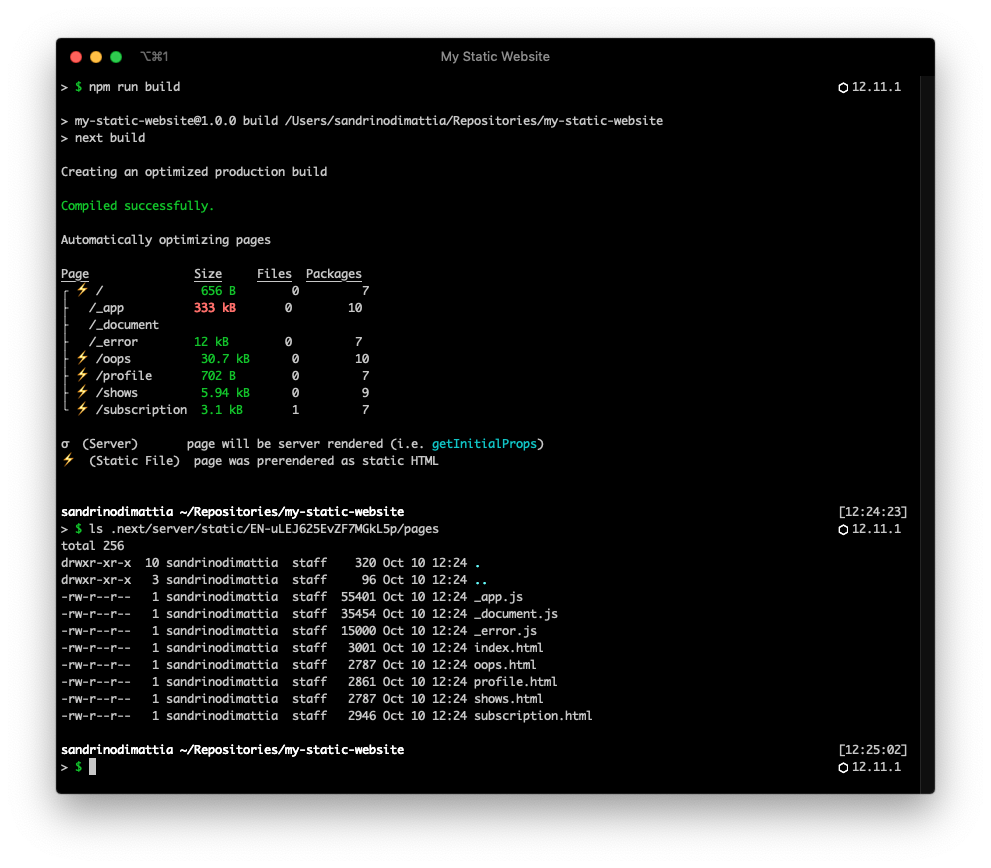
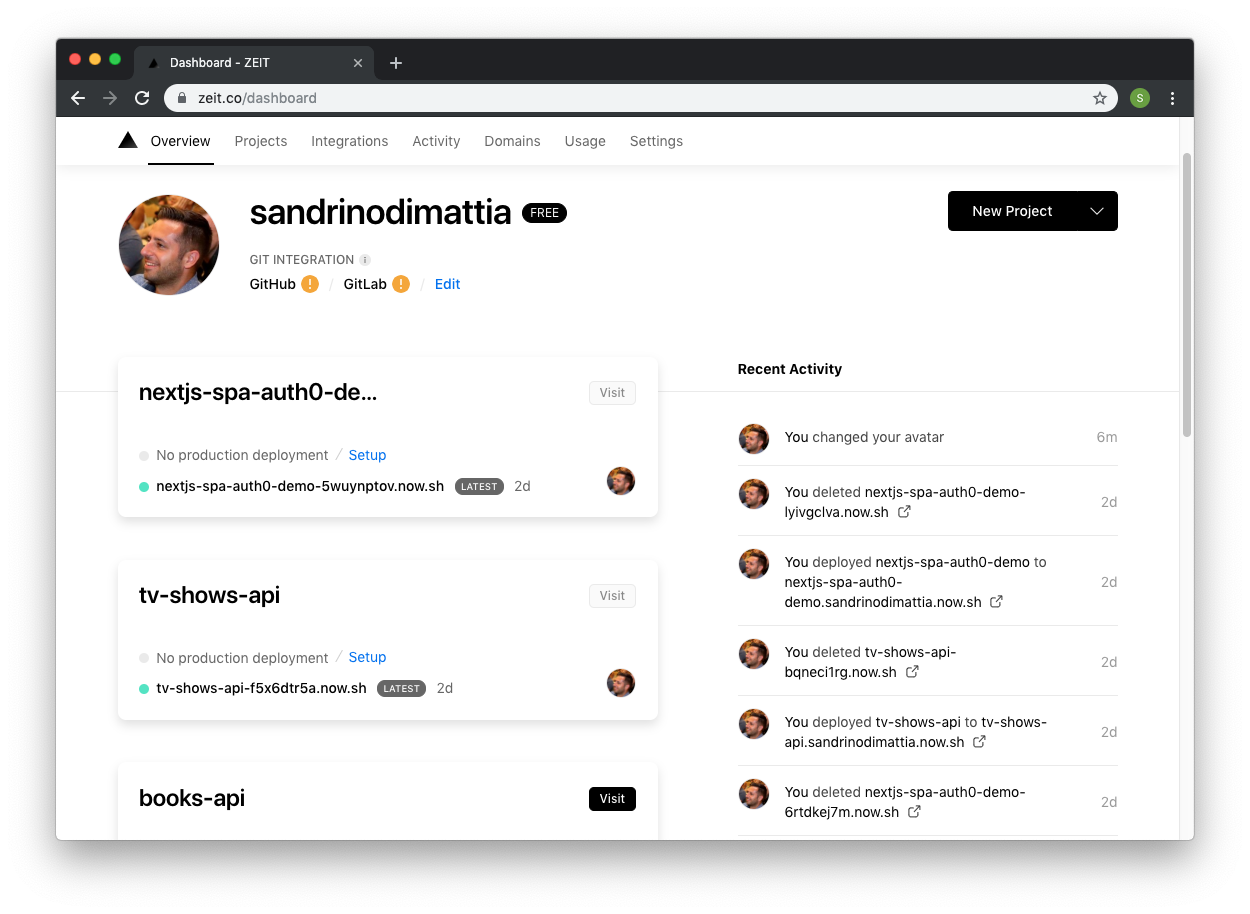
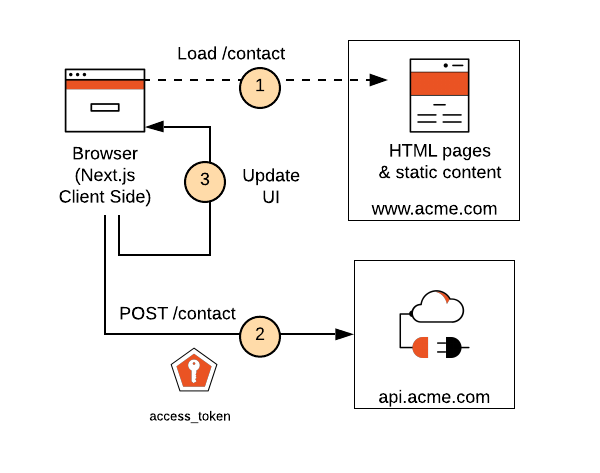
You can use this technique to generate complete websites as static sites, like a company public front page, or when creating an "admin dashboard". The generated HTML could be the shell of your application &mdash; think of this shell as your application's header and footer. The [Vercel dashboard](https://vercel.com/dashboard) is one of the best examples out there of how this could look:

![Screenshot of Vercel dashboard shell](https://images.ctfassets.net/23aumh6u8s0i/1qN79apyWxpQSSgEQhgBFc/ba52dabaddd1b9487ea4ef96e444c155/zeit-shell)

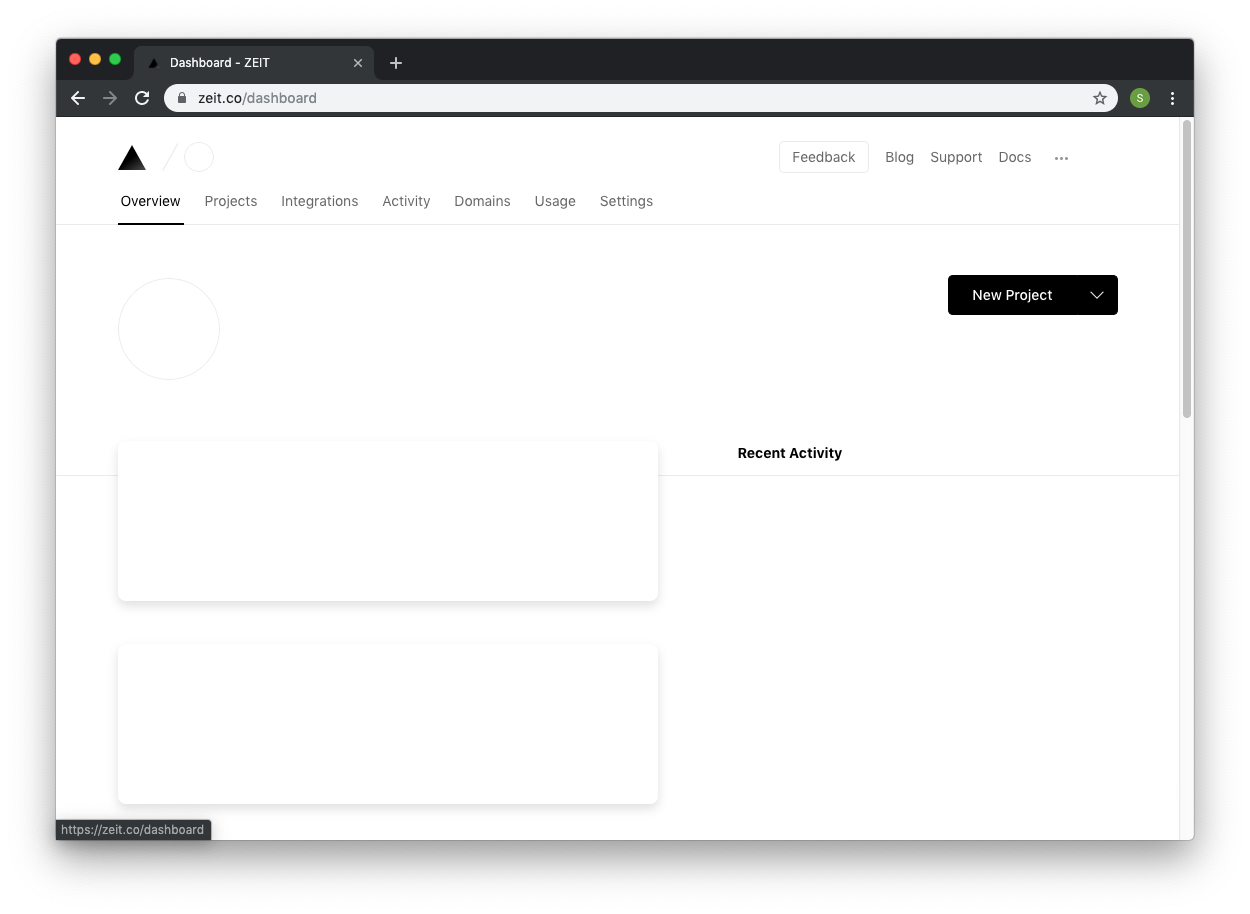
Once the "shell" has been served, the client side will call the necessary APIs (carrying the user information), fetch user-specific content, and update the page:

![Screenshot of Vercel dashboard with user information](https://images.ctfassets.net/23aumh6u8s0i/2tEIAuQVMLGyszWa7iK2aq/e635edf4a32b99ef11bd58d1d920f606/zeit-loaded)

This model has several advantages when it comes to hosting. Static hosting sites (like [Vercel](https://vercel.com/home), [Amazon S3](https://aws.amazon.com/s3/), [Azure Blob Storage](https://azure.microsoft.com/en-us/services/storage/blobs/), [Netlify](https://www.netlify.com), and others) are battle-tested, inexpensive, but more importantly, they are extremely fast and play well with CDNs.

![Diagram of a Next.js Static Site Deployment](https://images.ctfassets.net/23aumh6u8s0i/3eN0LatTzZNf2NaZeiAKV4/3f753bb6f50c8a9fe3b6bf9c121d0100/static-site)

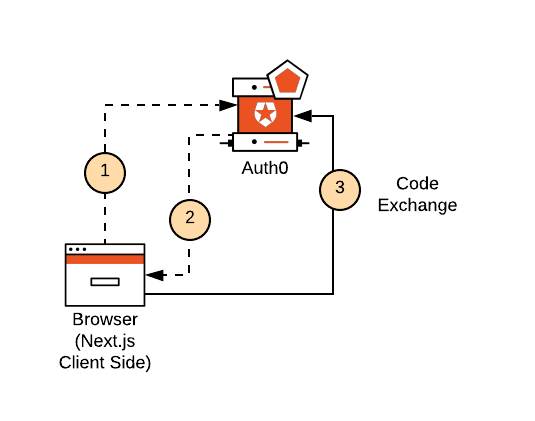
One thing that will be different is how we handle authentication. The model where a server is available can handle the interaction with Auth0 and create a session, but in this model, we don't have a backend. All the work happens on the frontend:
  
 1. Your static site redirects your users to Auth0 to log in.
 2. When your users successfully log in, Auth0 redirects them to your static site. 
 3. Your static site performs a code exchange with Auth0 to retrieve the user's `id_token` and `access_token`, which it stores in memory.

![Diagram illustrating the Authorization Code Exchange form the client-side](https://images.ctfassets.net/23aumh6u8s0i/3QAgfCNzEXJKITUtyyXkaw/731951b3cac4a04c21a1b8a2195276c6/static-site-authentication)

If your use case requires dynamic content or user-specific content, you will also need to deploy something else, like an API. This API won't run as part of your static hosting site. You'll use a platform like AWS Lambda, Heroku, or Now to deploy it. Your static site (the client-side) will use the `access_token` to make secure calls to that API directly, fetch the dynamic content, and enrich the static page served by the hosting platform.

![Diagram of the client-side making calls to an API](https://images.ctfassets.net/23aumh6u8s0i/JSDuXwmwFtaVPezoKvkij/bed30214cf17c2af6c3719a71652a67b/static-site-api-calls)

This architecture is similar to how you can build any single-page application, where the application doesn't have an actual "backend" but instead calls one or more APIs. You'll find a variety of examples in the community of how to sign in to this type of application:

- [`auth0-react`](https://github.com/auth0/auth0-react) (using [`auth0-spa-js`](https://github.com/auth0/auth0-spa-js))
- [`useAuth`](https://github.com/Swizec/useAuth) (using [`auth0.js`](https://github.com/auth0/auth0.js)) 

<include src="SignupCTA" text="Try out the most powerful authentication platform for free." linkText="Get started →" />

With `auth0-react`, for example, it's as easy as configuring your application like so:

``` javascript  
// pages/_app.jsx
import { Auth0Provider } from '@auth0/auth0-react';

export default class Root extends App {
  render () {
    const { Component, pageProps } = this.props;
    return (
      <Auth0Provider
        domain="YOUR_DOMAIN"
        clientId="YOUR_CLIENT_ID"
        authorizationParams={{
          redirect_uri: window.location.origin
        }}
        >
          <Component {...pageProps} />
      </Auth0Provider>
    );
  }
}
```

You can then use [React Hooks](https://reactjs.org/docs/hooks-intro.html) to retrieve the user profile information and request an access token to make secure calls to your APIs. Your Next.js static site sends the `access_token` in the authorization headers of your API calls, which the following example does through the [useSWR](https://github.com/vercel/swr) hook:

``` javascript  
import { useAuth0 } from '@auth0/auth0-react';
import useSWR from 'swr';

export default function MyShows() {
  const {
    user,
    isAuthenticated,
    isLoading,
    getAccessTokenSilently,
  } = useAuth0();

  const { data, error } = useSWR(
    isLoading || !isAuthenticated ? null : '/api/my/shows',
    async (url) => {
      const accessToken = await getAccessTokenSilently({
        authorizationParams: {
          audience: 'https://api/tv-shows',
          scope: 'read:shows',
        },
      });
      const res = await fetch(url, {
        headers: {
          authorization: `Bearer ${accessToken}`,
        },
      });
      return res.json();
    }
  );

  if (isLoading) {
    return <div>Loading your user information...</div>;
  }

  if (!isAuthenticated) {
    return <div>You must first sign in to access your subscriptions.</div>;
  }

  if (error) {
    return <div>There was an error loading your subscriptions.</div>;
  }

  if (!data) {
    return (
      <div>
        <h1>Subscriptions for {user.email}</h1>
        <div>Loading your subscriptions ...</div>
      </div>
    );
  }
  return (
    <div>
      <h1>Subscriptions for {user.email}</h1>
      <div>You have subscribed to a total of {data.length} shows...</div>
    </div>
  );
}
```

> Visit the [Next.js Practical Introduction](https://auth0.com/blog/next-js-practical-introduction-for-react-developers-part-1/) to learn how to use the Next.js framework to build React applications.

### What exactly happens behind the curtains here?

When using `auth0-spa-js` the user will sign in using the [Authorization Code Grant with PKCE](https://auth0.com/docs/flows/concepts/auth-code-pkce). At a high level, your Next.js application redirects the user to Auth0 to log in. Auth0 will handle all the required authentication and authorization logic (sign-up, sign-in, MFA, consent, and so on). After users complete the authentication process with Auth0, Auth0 redirects them to your application with an **Authorization Code** in the query string.

The client side will exchange that code for an `id_token` and optionally an `access_token` **(1,2)**. You can use the `access_token` to call your API. When the `access_token` expires, the same flow will happen again under the covers, using an `<iframe>`. This "silent authentication" approach will keep working as long as the user is logged in &mdash; as long as the user has a session in Auth0. When the user's session in Auth0 expires or a sign-out takes place, this call will fail, and the user will be required to log in again.

![Authorization Code Exchange from the client side](https://images.ctfassets.net/23aumh6u8s0i/4qZXuFNhMCbH8QwQrZyVI0/8202c0e569a9e7b8284f982d290b61d1/code-exchange)

## Next.js Serverless Deployment Model

Where Next.js shines is in the [serverless deployment model](https://nextjs.org/docs#serverless-deployment), where you deploy all pages and API routes as separate serverless functions implemented using Vercel or AWS Lambda, for example.

In this model, you don't have a full-blown web framework running (like Express.js), but instead, the runtime will execute functions by passing them a request and a response object (`(req, res) => { }`). This is why we can't use traditional web frameworks (like [Express.js](https://expressjs.com/)) or any of the building blocks they offer for authenticating users in this model (like [Passport.js](http://www.passportjs.org/)) and creating sessions (`express-sessions`).

The following diagram illustrates how this model works: Next.js pages and API routes run as separate serverless functions. When the browser tries to access the **TV Shows** page **(1)**, a function will take care of rendering and serving the page, effectively performing server-side rendering. This function will also call any APIs the page needs to fetch the necessary data **(2)**.

![Next.js Serverless Deployment Diagram](https://images.ctfassets.net/23aumh6u8s0i/1ZvaCklMnhu6WeFra03dXd/60af9b35f3b02c49a03b0fe0491af5f3/serverless)

If the entire site has already been loaded, the rendering happens on the client whenever you visit another page. At that point, the client application makes all subsequent API calls directly. As you can see, this is where the line between the frontend and backend layers starts to become blurry.

![Next.js SSR and API Call Diagram](https://images.ctfassets.net/23aumh6u8s0i/3jxcYlODmN5vpNbPZ8ebfp/3f07b1c878fcf6bfcb97c512608abaee/serverless-client-side)

Before we go into any specifics, it's important to call out that there are two specific flavors of the serverless model when it comes to authentication, depending on where you need the user to be available.

### Serverless with the user on the frontend

The diagram below shows one flavor, which is very similar to the **Static Site**. You will execute these calls in a serverless function whenever you need to render a page on the server side or call an API route. In this model, authentication takes place on the client side:

 1. The client application redirects the user to Auth0.
 2. When users log in successfully, Auth0 redirects them to the client application.
 3. The client application completes the code exchange with Auth0 and retrieves the user's `id_token` and `access_token`, which it stores in memory. 

![Next.js client-side authentication for the Serverless Deployment model](https://images.ctfassets.net/23aumh6u8s0i/3QAgfCNzEXJKITUtyyXkaw/731951b3cac4a04c21a1b8a2195276c6/static-site-authentication)

Any page rendered by the serverless function can only return content that all users can access without needing any form of authentication. When your client application loads the page, it can execute some logic to fetch user-specific content by calling API routes or calling other APIs.

![Next.js client-side logic in the Serverless Deployment model](https://images.ctfassets.net/23aumh6u8s0i/2wsV3uNIyExxtnCOAn8Mwj/93d9fa991a7d1f47671d64409779db97/serverless-client-api-call)

In the diagram above, you can see an example of how this could work:

1. A serverless function (SSR) can render the `/account` page.
2. In turn, this serverless function also calls the `/api/pricing-tiers` API route, which simply returns the different subscription types available in the application (for example, Free, Developer, Enterprise). This is public information, so authentication is not required to access the pricing data.
3. When the client side is ready, it can now call the `/api/billing-info` API route and provide the user's access token. The client side can then render content that is specific to the user. Accessing user billing information requires authentication.

Only the client-side and the API routes are aware of the user, while the server-side rendering of pages could only render public content, which is perfectly fine for SEO purposes.

### Serverless with the user on the backend

The second flavor in this model involves a serverless function that needs the user when rendering the page. When that happens, you can't just rely on client-side authentication.

![Next.js Serverless Diagram](https://images.ctfassets.net/23aumh6u8s0i/3FfAL4aBTfb5VotjE2mAbo/02270036429ea2db708b74ebe4b8e2b8/serverless-server-api-call)

This diagram is similar to the one from the frontend model, except for a few subtle but important differences:

1. A serverless function (SSR) can render the `/account` page, but the browser sends a session cookie to it.
3. This serverless function can call `/api/billing-info` by forwarding the session cookie. The serverless function can now render user content.
3. This serverless function can also call the `/api/pricing-tiers` API route (nothing changes here from the frontend model).

In this example, the server side can render the user's account page completely.

You'll also need to consider the case where the site is already fully loaded, and the user navigates to the account page. In that case, the client side can call the endpoints directly, and the cookie will automatically be provided to the API route:

1. The client application can call an API route that requires authentication (because the browser will automatically provide the session cookie).
2. The client application can also call API routes that don't require authentication.

![Next.js Serverless API Call Diagram](https://images.ctfassets.net/23aumh6u8s0i/2jmcJH03WDbkcLDW8SC9gx/a19e5cae44e1fa600998c9d29cd8ebac/serverless-server-user-client-api-call)

To accommodate this use case, we've published [`@auth0/nextjs-auth0`](https://github.com/auth0/nextjs-auth0), which takes care of authentication in the serverless deployment model using the [Authorization Code Grant](https://auth0.com/docs/flows/concepts/auth-code). This package also creates a session for the authenticated user using an [`HttpOnly` cookie](https://www.owasp.org/index.php/HttpOnly), which mitigates the [most common XSS attack](https://auth0.com/docs/security/common-threats).

To use the library, you'll start by defining some environment variables in a `.env.local` file in the root of your application:

``` shell  
# A long secret value used to encrypt the session cookie
AUTH0_SECRET=some-very-very-very-very-very-very-very-long-secret
# The base url of your application
AUTH0_BASE_URL=http://localhost:3000
# The url of your Auth0 tenant domain
AUTH0_ISSUER_BASE_URL=https://YOUR_AUTH0_DOMAIN.auth0.com
# Your Auth0 application's Client ID
AUTH0_CLIENT_ID=YOUR_AUTH0_CLIENT_ID
# Your Auth0 application's Client Secret
AUTH0_CLIENT_SECRET=YOUR_AUTH0_CLIENT_SECRET
```

> Read the ["Environment Variables" document](https://nextjs.org/docs/basic-features/environment-variables) for more details about loading environmental variables in Next.js.

You can execute the following command to generate a suitable string for the session secret easily:

``` bash  
node -e "console.log(crypto.randomBytes(32).toString('hex'))"
```

Then, create a [Dynamic API Route](https://nextjs.org/docs/api-routes/dynamic-api-routes) handler at `/pages/api/auth/[...auth0].js`.

``` javascript  
import { handleAuth } from '@auth0/nextjs-auth0';

export default handleAuth();
```

This will create the following urls: `/api/auth/login`, `/api/auth/callback`, `/api/auth/logout`, and `/api/auth/me`.

And that's it! You've now setup the server side of your application.

To setup, the client side, wrap your `pages/_app.js` component in the `UserProvider` component.

``` javascript  
// pages/_app.js
import React from 'react';
import { UserProvider } from '@auth0/nextjs-auth0/client';

export default function App({ Component, pageProps }) {
  return (
    <UserProvider>
      <Component {...pageProps} />
    </UserProvider>
  );
}
```

Now you can log in, log out, and access the user on the client.

``` javascript  
// pages/index.js
import { useUser } from '@auth0/nextjs-auth0/client';

export default () => {
  const { user, error, isLoading } = useUser();

  if (isLoading) return <div>Loading...</div>;
  if (error) return <div>{error.message}</div>;

  if (user) {
    return (
      <div>
        Welcome {user.name}! <a href="/api/auth/logout">Logout</a>
      </div>
    );
  }

  return <a href="/api/auth/login">Login</a>;
};
```

Note that authentication takes place on the server in this model, meaning that the client isn't aware that the user is logged in. The `useUser` hook makes it aware by accessing that information in the initial state or through the `/api/auth/profile` endpoint, but it won't expose any `id_token` or `access_token` to the client. That information remains on the server side.

### What exactly happens behind the curtains here?

When using `nextjs-auth0`, the user logs in using the [Authorization Code Grant](https://auth0.com/docs/flows/concepts/auth-code). At a high level, the client application redirects the user to Auth0 **(1,2)**, who handles all the required authentication and authorization logic (sign-up, sign-in, MFA, consent, and so on). Once users log in, Auth0 redirects them to your application with an **Authorization Code** in the query string **(3)**.

![Authorization Code Exchnage diagram](https://images.ctfassets.net/23aumh6u8s0i/7lQ8wvidkS5KjKKUdFO0Oz/b920f3d5bd9fcd20966ca6c920efcab3/serverless-server-auth)

The server side (or better, the serverless function) then exchanges **(4)** that code for an `id_token` and optionally an `access_token` and `refresh_token`. After the library validates the `id_token`, it creates a session and stores it in an encrypted cookie **(5)**. Each time you render a page on the server side or you call an API route, you send the session cookie to the serverless functions, which can then access the session and any relevant user information.

### Calling an external API

The pages and API routes can all access the user's session, but that is not the case for external APIs, typically hosted on other (sub-)domains. When consuming those APIs, you'll need to provide them with an `access_token` to authorize the user to access their protected resources.

When you need to call an external API on behalf of the user, you must proxy that call through a Next.js API route. These routes will have access to the user's session, and depending on how the user logged in, that session might contain the user's information. Optionally, the session may also have the following:

 - `id_token`
 - `access_token`
 - `refresh_token`

![Identity icons for users, authentication, and API interaction graphics](https://images.ctfassets.net/23aumh6u8s0i/74Gi90M8td0AXe2tt5bSbX/5ca808a8cce168777e0c924d508cdb16/session)

When the Next.js API route needs to call an external API on behalf of the user, it can extract the `access_token` from the session and add it to the `Authorization` header of the HTTP call.

![Next.js external API with access token diagram model](https://images.ctfassets.net/23aumh6u8s0i/6IxgVEWwjzray325iE8OhT/0b4779bdf2854773fff557d738ef4b56/serverless-proxy)

The following example illustrates how you would create an API route that extracts the `access_token` from the session and then uses it to call a downstream API.

``` js  
import { getAccessToken, withApiAuthRequired } from '@auth0/nextjs-auth0';

export default withApiAuthRequired(async function products(req, res) {
  try {
    const { accessToken } = await getAccessToken(req, res);
    const client = new BillingApiClient(accessToken);
    return client.getBillingInfo();
  } catch(error) {
    console.error(error)
    res.status(error.status || 500).end(error.message)
  }
});
```

The biggest difference with the frontend model is that the server will be aware of the user authentication status when rendering pages. As such, the server side won't be limited to loading public data. The server side could also load data specific to the user and render that information.

You can find a full Auth0 example in the official [Next.js repository](https://github.com/vercel/next.js/tree/canary/examples/auth0).

## The Custom Server Approach

A very common (but legacy) deployment model you'll see with Next.js is where you use a custom server to host the Next.js application. You can implement a [custom server in Next.js](https://nextjs.org/docs#custom-server-and-routing) using something like Express.js. It works like this:

- The custom server accepts the request.
- The custom server calls the `app.getRequestHandler()` method to get a Next.js request handler.
- The custom server forwards the request to the Next.js request handler.

With this approach, the custom server can act as a proxy and process the request before Next.js handles it:

![Custom Server Approach Next.js handling request diagram](https://images.ctfassets.net/23aumh6u8s0i/6SlqvPE9ttyqHT1eQSUx29/2604917c0467fa45763fca805134cd26/custom-server-ssr)

Middlewares, which run before the Next.js server-side rendering, provide building blocks to your application like:

- Authentication
- Sessions
- Enforcing authentication and authorization
- Rate limiting

All the building blocks and tools that you can use today with Express.js are available to you in this custom server model. Here's the most basic example of how you would host your Next.js application with Express.js:

``` js  
const next = require('next');
const express = require('express');
...

const app = next({ dev });
const handle = app.getRequestHandler();

app.prepare()
  .then(() => {
    const server = express();
    ...
    passport.use(auth0);
    ...
    server.use(passport.initialize());
    server.use(passport.session());
    server.use(myApiRoutes);
    ...
    server.get('*', (req, res) => {
      return handle(req, res);
    });

    server.listen(3000, (err) => {
      if (err) {
        throw err;
      }

      console.log('Listening on http://localhost:3000')
    });
  })
  .catch((ex) => {
    console.error(ex.stack);
    process.exit(1);
  });
```

When it comes to authenticating users in the custom server model, you can use [Passport.js](http://www.passportjs.org/) (which is by far the most popular framework for authentication in Node.js) in combination with [`passport-auth0`](https://github.com/auth0/passport-auth0). When the user logs in, Passport.js creates a session using [`express-session`](https://www.npmjs.com/package/express-session) and persists it in the browser using an `HttpOnly` cookie.

![Custom Server model cookie HttpOnly diagram](https://images.ctfassets.net/23aumh6u8s0i/1Yip1ZbmyofDeqv3gprbmZ/1f8914ab21b1d1264b0705c01e4fc0a2/custom-server-authentication)

Once the user has a session, they can access pages or call API endpoints that require authentication using Next.js API routes or traditional Express endpoints. The client application sends the session cookie along with each request, which makes the user information available on the server-side automatically.

![Custom Server model server-side exchange diragram](https://images.ctfassets.net/23aumh6u8s0i/3MBbh9tqwvFJVf9mb9IHC9/afde67dd26306307d7a58dc1435c8774/custom-server-api-calls)

In this model, you basically [use Node.js and Express to build a regular web application](https://auth0.com/blog/create-a-simple-and-secure-node-express-app/). Authentication, database access, and other features are already a solved problem.

> Visit the [Next.js Authentication Tutorial](https://auth0.com/blog/next-js-authentication-tutorial/) for a complete example of how to create a Next.js application using the custom server model.

### A legacy model?

The [Next.js docs](https://nextjs.org/docs) no longer list this model because it's the least optimal from a cost and performance point of view:

- You miss out on the advantages of [the serverless deployment model](https://nextjs.org/docs#serverless-deployment), such as distributed points of failure, infinite scalability, and low cost.
- You can't generate static sites, which could be something you want if you're running a public-facing website. Static sites are fast and inexpensive to host.

## Conclusion
 
And with that, we've covered the different deployment models which exist today for the Next.js framework, and we've explained the best way to authenticate in those models and the reasoning behind it.

If this tutorial has helped you better decide what to use for your deployment model, let us know in the comments below!

<include src="asides/AboutAuth0" />
