> ## Documentation Index
> Fetch the complete documentation index at: https://auth0.com/llms.txt
> Use this file to discover all available pages before exploring further.
> Learn how to configure the Auth0 as the identity provider using the SAML2 Web App addon for Oracle Eloqua.
# Configure Oracle Eloqua Marketing Cloud as SAML Service Provider
Use the following SAML configuration for Oracle Eloqua Marketing Cloud.
## Configure SAML SSO in Auth0
1. Go to [Dashboard > Applications > Applications](https://manage.auth0.com/#/applications) and either create a new application or click the name of the application you want to update.
2. Go to the **Addons** tab and enable the **SAML2 Web App** toggle.
3. On the **Settings** tab, set the **Application Callback URL** to: `https://login.eloqua.com/auth/saml2/acs`.
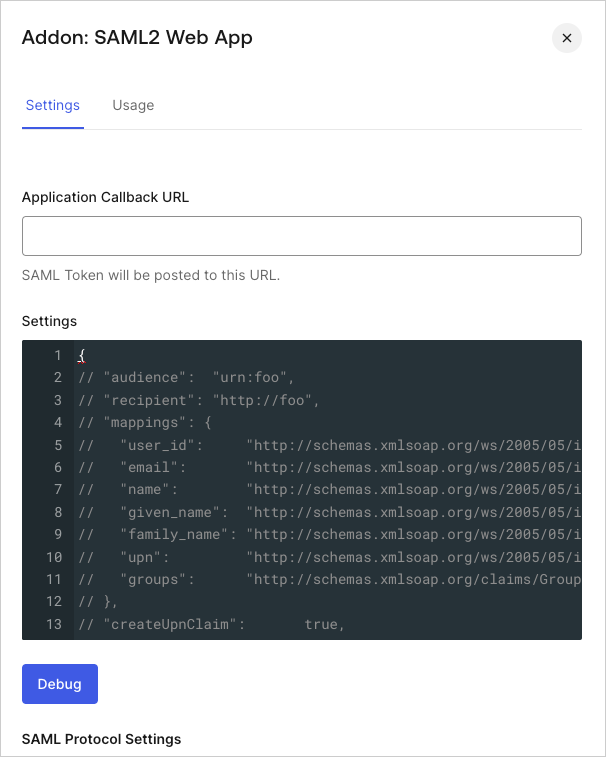 4. Paste the following code into the **Settings** text box and click **Debug**.
```json lines theme={null}
{
"audience": "",
"recipient": "https://login.eloqua.com/auth/saml2/acs",
"mappings": {
"user_id": "http://schemas.xmlsoap.org/ws/2005/05/identity/claims/nameidentifier",
"email": "http://schemas.xmlsoap.org/ws/2005/05/identity/claims/emailaddress",
"name": "http://schemas.xmlsoap.org/ws/2005/05/identity/claims/name",
},
"nameIdentifierFormat": "urn:oasis:names:tc:SAML:1.1:nameid-format:emailAddress",
"nameIdentifierProbes": [
"http://schemas.xmlsoap.org/ws/2005/05/identity/claims/emailaddress"
],
"destination": "https://login.eloqua.com/auth/saml2/acs"
}
```
Note that the `audience` is set to `http://foo`. This will be changed when the identity provider settings are completed on the Eloqua side.
5. Scroll to the bottom of the tab and click **Enable**.
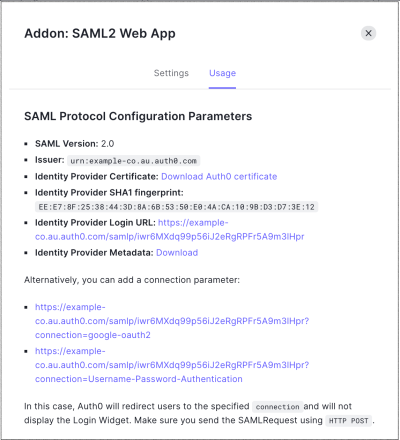
6. On the **Usage** tab, locate the **Identity Provider Metadata** and click **Download** to download the metadata file. You'll need this when you configure Auth0 as the identity provider in Eloqua.
4. Paste the following code into the **Settings** text box and click **Debug**.
```json lines theme={null}
{
"audience": "",
"recipient": "https://login.eloqua.com/auth/saml2/acs",
"mappings": {
"user_id": "http://schemas.xmlsoap.org/ws/2005/05/identity/claims/nameidentifier",
"email": "http://schemas.xmlsoap.org/ws/2005/05/identity/claims/emailaddress",
"name": "http://schemas.xmlsoap.org/ws/2005/05/identity/claims/name",
},
"nameIdentifierFormat": "urn:oasis:names:tc:SAML:1.1:nameid-format:emailAddress",
"nameIdentifierProbes": [
"http://schemas.xmlsoap.org/ws/2005/05/identity/claims/emailaddress"
],
"destination": "https://login.eloqua.com/auth/saml2/acs"
}
```
Note that the `audience` is set to `http://foo`. This will be changed when the identity provider settings are completed on the Eloqua side.
5. Scroll to the bottom of the tab and click **Enable**.
6. On the **Usage** tab, locate the **Identity Provider Metadata** and click **Download** to download the metadata file. You'll need this when you configure Auth0 as the identity provider in Eloqua.
 ## Configure SAML SSO in Oracle Eloqua
1. Login as Admin on Eloqua and click on **Settings > Users > Single Sign-On > Identity Provider Settings**.
2. Click **Upload Identity Provider from Metadata**. Upload the **Identity Provider metadata** you downloaded from the **Usage** tab in the Auth0 Dashboard.
3. Browse to find the downloaded metadata file.
4. Edit the newly added identity provider and complete the following steps:
1. Set the **User Identity Mapping** to `Assertion contains the Email Address from the User object` and click **Save**.
2. From the **Identity Provider Details** copy the **Service Provider Entity URL**.
3. Within ELOQUA IdP settings, if this is the default IdP, mark this IdP as default.
## Update Audience Restriction in Auth0
Use the **Service Provider Entity URL** copied from the identity provider settings in Eloqua to set the `audience` restriction in the Auth0 Dashboard.
1. Go to [Dashboard > Applications > Applications](https://manage.auth0.com/#/applications) and click the name of the application you want to update.
2. Go to the **Addons** tab and enable the **SAML2 Web App** toggle.
3. On the **Settings** tab, update the `audience` to the value you copied from Eloqua.
## Test configuration
**Login to Eloqua with Auth0** should be enabled now. You can sign in to Eloqua with both IdP-initiated login and SP-initiated login.
* For SP-initiated login, go to \<[https://login.eloqua.com/auth/saml2>](https://login.eloqua.com/auth/saml2>) and enter your company name and start the SAML login process with Auth0.
* For IdP-Initiated login use the **Identity Provider Login URL** defined here: **Dashboard > Applications > Applications** on the **Addons** tab, **SAML 2 Web App**, **Usage** tab.
## Configure SAML SSO in Oracle Eloqua
1. Login as Admin on Eloqua and click on **Settings > Users > Single Sign-On > Identity Provider Settings**.
2. Click **Upload Identity Provider from Metadata**. Upload the **Identity Provider metadata** you downloaded from the **Usage** tab in the Auth0 Dashboard.
3. Browse to find the downloaded metadata file.
4. Edit the newly added identity provider and complete the following steps:
1. Set the **User Identity Mapping** to `Assertion contains the Email Address from the User object` and click **Save**.
2. From the **Identity Provider Details** copy the **Service Provider Entity URL**.
3. Within ELOQUA IdP settings, if this is the default IdP, mark this IdP as default.
## Update Audience Restriction in Auth0
Use the **Service Provider Entity URL** copied from the identity provider settings in Eloqua to set the `audience` restriction in the Auth0 Dashboard.
1. Go to [Dashboard > Applications > Applications](https://manage.auth0.com/#/applications) and click the name of the application you want to update.
2. Go to the **Addons** tab and enable the **SAML2 Web App** toggle.
3. On the **Settings** tab, update the `audience` to the value you copied from Eloqua.
## Test configuration
**Login to Eloqua with Auth0** should be enabled now. You can sign in to Eloqua with both IdP-initiated login and SP-initiated login.
* For SP-initiated login, go to \<[https://login.eloqua.com/auth/saml2>](https://login.eloqua.com/auth/saml2>) and enter your company name and start the SAML login process with Auth0.
* For IdP-Initiated login use the **Identity Provider Login URL** defined here: **Dashboard > Applications > Applications** on the **Addons** tab, **SAML 2 Web App**, **Usage** tab.