> ## Documentation Index
> Fetch the complete documentation index at: https://auth0.com/llms.txt
> Use this file to discover all available pages before exploring further.
# LDAPを使ったActive Directoryへのアプリ接続
> エンタープライズ接続を介して、Lightweight Directory Access Protocol(LDAP)を使用してアプリをActive Directory(AD)に接続する方法を説明します。
Auth0は、ネットワークにインストールする **Active Directory/LDAPコネクター** を介して、Lightweight Directory Access Protocol(LDAP)を使ってActive Directory(AD)と統合します。
**AD/LDAPコネクター** (1)は、**Active Directory/LDAP** (2)と **Auth0 Service** (3)間の橋渡し役です。AD/LDAPが通常内部ネットワークに制限されている一方、Auth0はまったく異なるコンテキストで実行されるクラウドサービスであるため、橋渡しを必要とします。
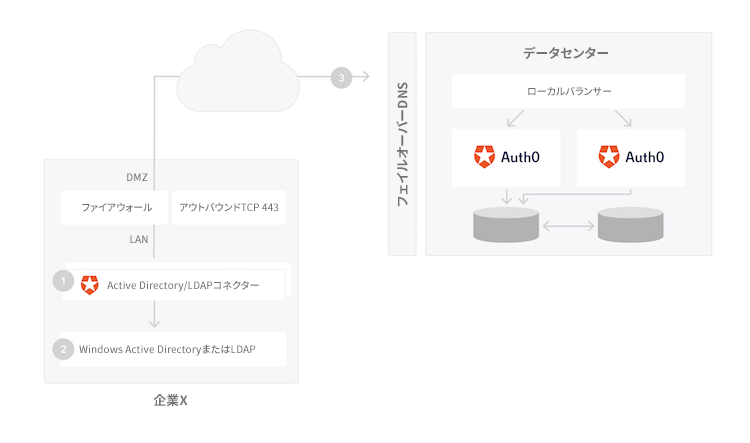 [高可用性とロードバランシング](/docs/ja-jp/authenticate/identity-providers/enterprise-identity-providers/active-directory-ldap/ad-ldap-connector/ad-ldap-high-availability)を実現するために、複数のコネクターのインスタンスをインストールすることができます。すべての接続はコネクターからAuth0サーバーに向かって送信されるため、ファイアウォールへの変更は通常不要です。
## 前提条件
始める前に以下を行います。
* [Auth0にアプリケーションを登録します](/docs/ja-jp/get-started/auth0-overview/create-applications)。
* 適切な **[Application Type(アプリケーションタイプ)]** を選択します。
* `{https://yourApp/callback}`の **[Allowed Callback URL(許可されているコールバックURL)]** を追加します。
* アプリケーションの[**[Grant Types(付与タイプ)]** ](/docs/ja-jp/get-started/applications/update-grant-types)に適切なフローが必ず含まれていることを確認してください。
## ステップ
アプリケーションをActive Directory/LDAPに接続するには、以下を行う必要があります。
1. [Auth0でエンタープライズ接続を作成し](#create-an-enterprise-connection-in-auth0)、インストーラーをダウンロードする
2. [ネットワークにコネクタをインストールする](#install-the-connector-on-your-network)
3. [Auth0アプリケーションでエンタープライズ接続を有効にする](#enable-the-enterprise-connection-for-your-auth0-application)
4. [接続のテスト](#test-the-connection)
## Auth0でエンタープライズ接続を作成する
1. [[Auth0 Dashboard]>[Authentication(認証)]>[Enterprise(エンタープライズ)]](https://manage.auth0.com/#/connections/enterprise)に移動し、**[Active Directory/LDAP]** を見つけ、その`[+]`を選択します。
[高可用性とロードバランシング](/docs/ja-jp/authenticate/identity-providers/enterprise-identity-providers/active-directory-ldap/ad-ldap-connector/ad-ldap-high-availability)を実現するために、複数のコネクターのインスタンスをインストールすることができます。すべての接続はコネクターからAuth0サーバーに向かって送信されるため、ファイアウォールへの変更は通常不要です。
## 前提条件
始める前に以下を行います。
* [Auth0にアプリケーションを登録します](/docs/ja-jp/get-started/auth0-overview/create-applications)。
* 適切な **[Application Type(アプリケーションタイプ)]** を選択します。
* `{https://yourApp/callback}`の **[Allowed Callback URL(許可されているコールバックURL)]** を追加します。
* アプリケーションの[**[Grant Types(付与タイプ)]** ](/docs/ja-jp/get-started/applications/update-grant-types)に適切なフローが必ず含まれていることを確認してください。
## ステップ
アプリケーションをActive Directory/LDAPに接続するには、以下を行う必要があります。
1. [Auth0でエンタープライズ接続を作成し](#create-an-enterprise-connection-in-auth0)、インストーラーをダウンロードする
2. [ネットワークにコネクタをインストールする](#install-the-connector-on-your-network)
3. [Auth0アプリケーションでエンタープライズ接続を有効にする](#enable-the-enterprise-connection-for-your-auth0-application)
4. [接続のテスト](#test-the-connection)
## Auth0でエンタープライズ接続を作成する
1. [[Auth0 Dashboard]>[Authentication(認証)]>[Enterprise(エンタープライズ)]](https://manage.auth0.com/#/connections/enterprise)に移動し、**[Active Directory/LDAP]** を見つけ、その`[+]`を選択します。
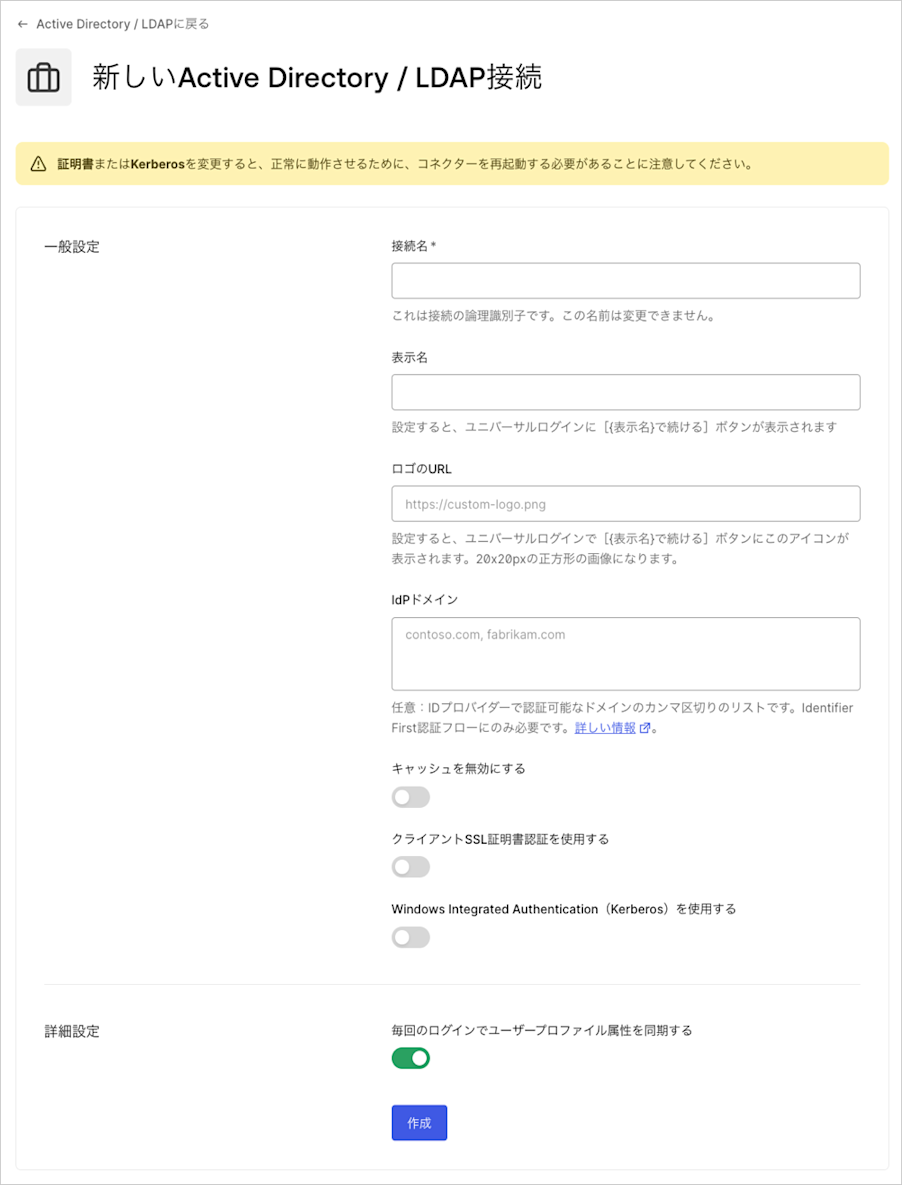
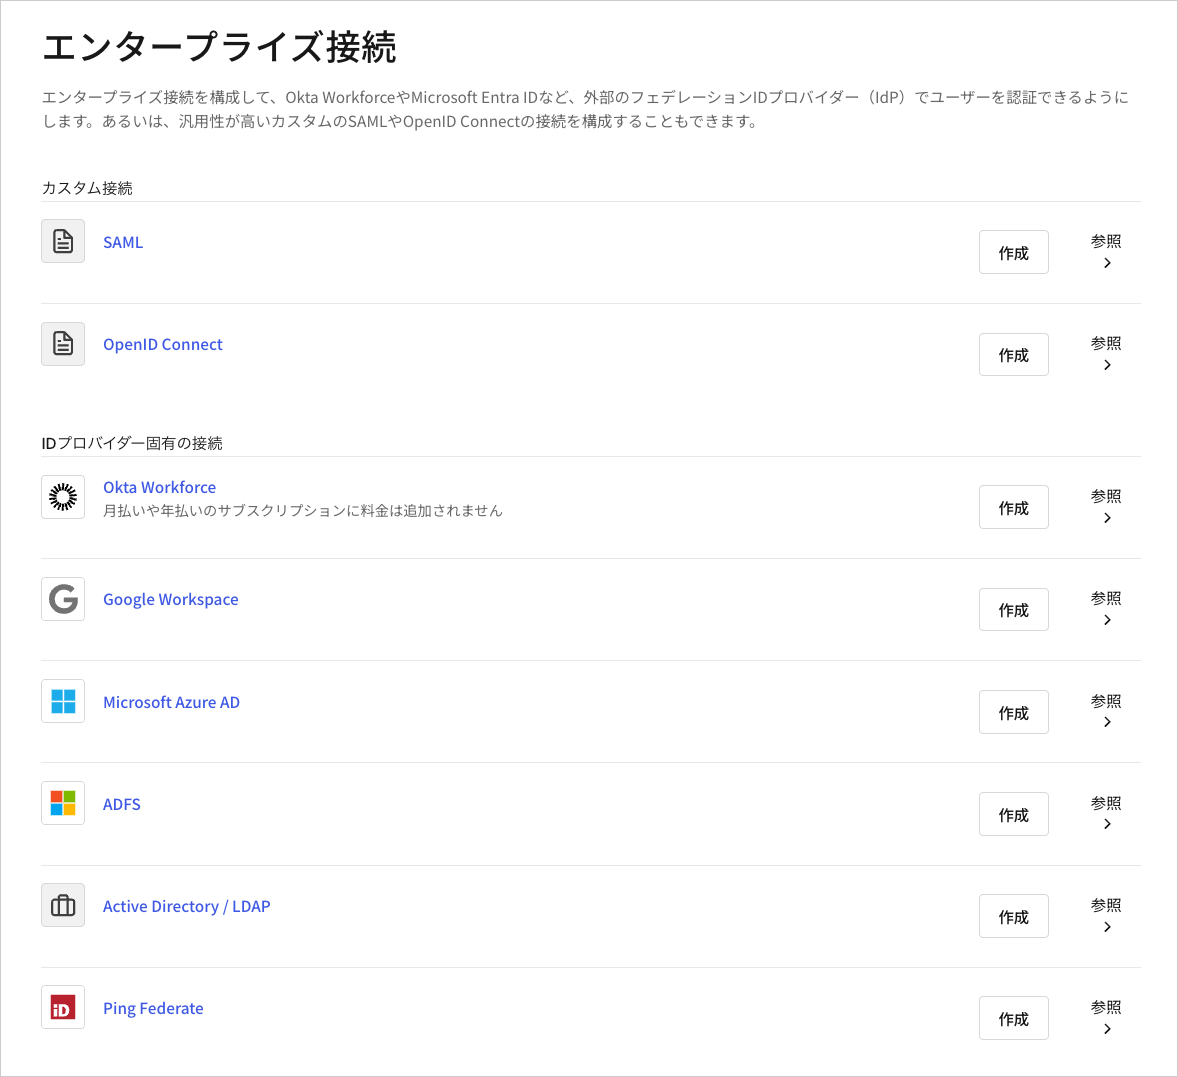 2. 接続の詳細を入力し、 **[Create(作成)]** をクリックします。
| フィールド | 説明 |
| -------------------------------------------------------------------------- | --------------------------------------------------------------------------------------------------------------------------------------------------- |
| **Connection name(接続名)** | 接続の論理識別子です。テナント内で一意でなければなりません。一度設定すると、この名前は変更できません。 |
| **Display name(表示名)**(任意) | ユニバーサルログインのログインボタンをカスタマイズするテキストです。設定すると、ユニバーサルログインのログインボタンは、[{表示名}で続ける]と表示されます。 |
| **Logo URL(ロゴURL)**(任意) | ユニバーサルログインのログインボタンをカスタマイズする画像のURLです。設定すると、ユニバーサルログインのログインボタンに画像が20px x 20pxの正方形で表示されます。 |
| **IdP Domains(IdPのドメイン)**(任意) | カンマ区切りのリストで、この接続を使用してログインできる有効なメールドメインが指定されます。Lockログインウィジェットの使用では必須です。 |
| **Disable cache(キャッシュを無効にする)** | 有効にすると、キャッシュの使用が中止されます。 |
| **Use client SSL certificate authentication(クライアントSSL証明書の認証を使用する)** | 有効にすると、クライアントのSSL証明書を使用して認証します。 |
| **Use Windows Integrated Auth (Kerberos)(Windowsに統合された認証(Kerberos)を使用する)** | 有効にすると、IPアドレスの範囲を入力するように求められます。ユーザーがこれらのIPアドレスからログインする際には、Kerberosが使用されます。そうでない場合には、AD/LDAPのユーザ名とパスワードが要求されます。通常、入力されるIPアドレスの範囲は、イントラネットのアドレスになります。 |
| **Sync user profile attributes at each login(各ログインでユーザープロファイル属性を同期する)** | 有効にすると、ユーザーがログインするたびに、Auth0は自動的にユーザープロファイルのデータを同期します。これによって、接続元で行われた変更が自動的にAuth0上でも反映されます。 |
2. 接続の詳細を入力し、 **[Create(作成)]** をクリックします。
| フィールド | 説明 |
| -------------------------------------------------------------------------- | --------------------------------------------------------------------------------------------------------------------------------------------------- |
| **Connection name(接続名)** | 接続の論理識別子です。テナント内で一意でなければなりません。一度設定すると、この名前は変更できません。 |
| **Display name(表示名)**(任意) | ユニバーサルログインのログインボタンをカスタマイズするテキストです。設定すると、ユニバーサルログインのログインボタンは、[{表示名}で続ける]と表示されます。 |
| **Logo URL(ロゴURL)**(任意) | ユニバーサルログインのログインボタンをカスタマイズする画像のURLです。設定すると、ユニバーサルログインのログインボタンに画像が20px x 20pxの正方形で表示されます。 |
| **IdP Domains(IdPのドメイン)**(任意) | カンマ区切りのリストで、この接続を使用してログインできる有効なメールドメインが指定されます。Lockログインウィジェットの使用では必須です。 |
| **Disable cache(キャッシュを無効にする)** | 有効にすると、キャッシュの使用が中止されます。 |
| **Use client SSL certificate authentication(クライアントSSL証明書の認証を使用する)** | 有効にすると、クライアントのSSL証明書を使用して認証します。 |
| **Use Windows Integrated Auth (Kerberos)(Windowsに統合された認証(Kerberos)を使用する)** | 有効にすると、IPアドレスの範囲を入力するように求められます。ユーザーがこれらのIPアドレスからログインする際には、Kerberosが使用されます。そうでない場合には、AD/LDAPのユーザ名とパスワードが要求されます。通常、入力されるIPアドレスの範囲は、イントラネットのアドレスになります。 |
| **Sync user profile attributes at each login(各ログインでユーザープロファイル属性を同期する)** | 有効にすると、ユーザーがログインするたびに、Auth0は自動的にユーザープロファイルのデータを同期します。これによって、接続元で行われた変更が自動的にAuth0上でも反映されます。 |
 3. 提供されているインストーラをダウンロードし、提供されている **プロビジョニングチケットURL** をメモします。
コネクターは、WindowsやLinuxのプラットフォームにインストールできるように、さまざまなバージョンで提供されています。
## ネットワークにコネクタをインストールする
プラットフォームの手順に従って、[AD/LDAPコネクタ](/docs/ja-jp/authenticate/identity-providers/enterprise-identity-providers/active-directory-ldap/ad-ldap-connector)をセットアップします。
* [WindowsにAD/LDAPコネクタをインストールする](/docs/ja-jp/authenticate/identity-providers/enterprise-identity-providers/active-directory-ldap/ad-ldap-connector/install-configure-ad-ldap-connector)
* [Microsoft以外のプラットフォームにAD/LDAPコネクタをインストールする](/docs/ja-jp/authenticate/identity-providers/enterprise-identity-providers/active-directory-ldap/ad-ldap-connector/install-configure-ad-ldap-connector)
## Auth0アプリケーションでエンタープライズ接続を有効化する
新たなAD接続を使うにはまずAuth0アプリケーションの[接続を有効](/docs/ja-jp/authenticate/identity-providers/enterprise-identity-providers/enable-enterprise-connections)にする必要があります。
## 接続をテストする
これで[接続をテスト](/docs/ja-jp/authenticate/identity-providers/enterprise-identity-providers/test-enterprise-connections)する準備が整いました。
## 次の手順
* [Auth0のライブラリーを使ってAuth0を統合する](/docs/ja-jp/libraries)
* [Authentication APIを使ってAuth0を統合する](/docs/ja-jp/api/authentication)
* [認証フローについての詳細を読む](/docs/ja-jp/get-started/authentication-and-authorization-flow)
* [追加のパラメーターをIDプロバイダーに渡す](/docs/ja-jp/authenticate/identity-providers/pass-parameters-to-idps)
* [アクセス許可のためにユーザーを再度プロンプトする](/docs/ja-jp/authenticate/identity-providers/social-identity-providers/reprompt-permissions)
3. 提供されているインストーラをダウンロードし、提供されている **プロビジョニングチケットURL** をメモします。
コネクターは、WindowsやLinuxのプラットフォームにインストールできるように、さまざまなバージョンで提供されています。
## ネットワークにコネクタをインストールする
プラットフォームの手順に従って、[AD/LDAPコネクタ](/docs/ja-jp/authenticate/identity-providers/enterprise-identity-providers/active-directory-ldap/ad-ldap-connector)をセットアップします。
* [WindowsにAD/LDAPコネクタをインストールする](/docs/ja-jp/authenticate/identity-providers/enterprise-identity-providers/active-directory-ldap/ad-ldap-connector/install-configure-ad-ldap-connector)
* [Microsoft以外のプラットフォームにAD/LDAPコネクタをインストールする](/docs/ja-jp/authenticate/identity-providers/enterprise-identity-providers/active-directory-ldap/ad-ldap-connector/install-configure-ad-ldap-connector)
## Auth0アプリケーションでエンタープライズ接続を有効化する
新たなAD接続を使うにはまずAuth0アプリケーションの[接続を有効](/docs/ja-jp/authenticate/identity-providers/enterprise-identity-providers/enable-enterprise-connections)にする必要があります。
## 接続をテストする
これで[接続をテスト](/docs/ja-jp/authenticate/identity-providers/enterprise-identity-providers/test-enterprise-connections)する準備が整いました。
## 次の手順
* [Auth0のライブラリーを使ってAuth0を統合する](/docs/ja-jp/libraries)
* [Authentication APIを使ってAuth0を統合する](/docs/ja-jp/api/authentication)
* [認証フローについての詳細を読む](/docs/ja-jp/get-started/authentication-and-authorization-flow)
* [追加のパラメーターをIDプロバイダーに渡す](/docs/ja-jp/authenticate/identity-providers/pass-parameters-to-idps)
* [アクセス許可のためにユーザーを再度プロンプトする](/docs/ja-jp/authenticate/identity-providers/social-identity-providers/reprompt-permissions)