> ## Documentation Index
> Fetch the complete documentation index at: https://auth0.com/llms.txt
> Use this file to discover all available pages before exploring further.
# SproutVideoをSAMLサービスプロバイダーとして構成する
> Auth0をSproutVideoのIDプロバイダーとして構成する方法を説明します。
以下のSproutVideo用SAML構成を使用します。
1. [[Dashboard]>[Applications(アプリケーション)]>[Applications(アプリケーション)]](https://manage.auth0.com/#/applications)の順に移動し、新しいアプリケーションを作成するか、更新するアプリケーションの名前をクリックします。
2. **[Addons(アドオン)]** タブに移動し、 **[SAML2 Web App(SAML2 Webアプリ)]** トグルを有効にします。
3. **[Settings(設定)]** タブで **[Application Callback URL(アプリケーションのコールバックURL)]** を設定します。これはSproutVideoの設定で取得できます。通常、`https://app.sproutvideo.com/auth/sso/consumption`のようなURLです。
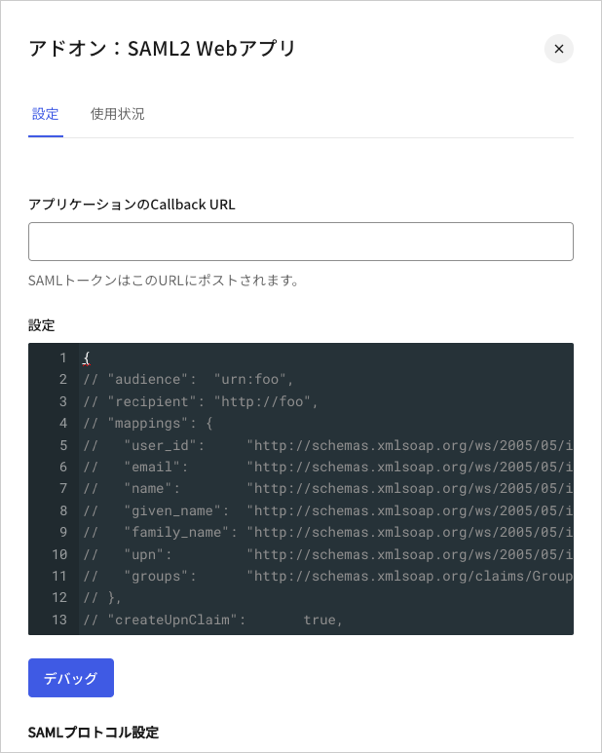 4. 以下のコードを **[Settings(設定)]** テキストボックスに貼り付け、 **[Debug(デバッグ)]** をクリックします。
```json lines theme={null}
{
"audience": "https://{yourSproutVideoAccount}.vids.io",
"mappings": {
"user_id": "http://schemas.xmlsoap.org/ws/2005/05/identity/claims/nameidentifier",
"email": "http://schemas.xmlsoap.org/ws/2005/05/identity/claims/emailaddress",
},
"createUpnClaim": false,
"passthroughClaimsWithNoMapping": false,
"mapUnknownClaimsAsIs": false,
"mapIdentities": false,
"nameIdentifierFormat": "urn:oasis:names:tc:SAML:1.1:nameid-format:emailAddress",
"nameIdentifierProbes": [
"http://schemas.xmlsoap.org/ws/2005/05/identity/claims/emailaddress",
],
}
```
5. ページの最後までスクロールし、 **[Enable(有効)]** をクリックします。
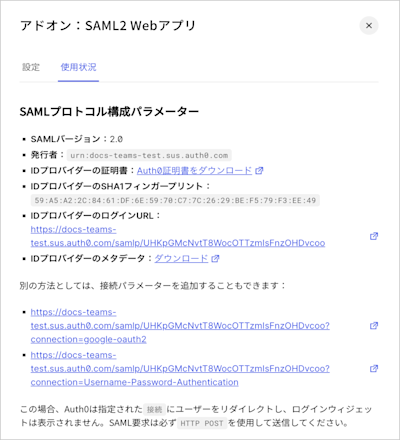
6. **[Usage(使用状況)]** タブで **[Identity Provider Metadata(IDプロバイダーのメタデータ)]** を見つけ、 **[Download(ダウンロード)]** をクリックしてメタデータファイルをダウンロードします。これは、Auth0をIDプロバイダーとして構成する際に必要になります。
4. 以下のコードを **[Settings(設定)]** テキストボックスに貼り付け、 **[Debug(デバッグ)]** をクリックします。
```json lines theme={null}
{
"audience": "https://{yourSproutVideoAccount}.vids.io",
"mappings": {
"user_id": "http://schemas.xmlsoap.org/ws/2005/05/identity/claims/nameidentifier",
"email": "http://schemas.xmlsoap.org/ws/2005/05/identity/claims/emailaddress",
},
"createUpnClaim": false,
"passthroughClaimsWithNoMapping": false,
"mapUnknownClaimsAsIs": false,
"mapIdentities": false,
"nameIdentifierFormat": "urn:oasis:names:tc:SAML:1.1:nameid-format:emailAddress",
"nameIdentifierProbes": [
"http://schemas.xmlsoap.org/ws/2005/05/identity/claims/emailaddress",
],
}
```
5. ページの最後までスクロールし、 **[Enable(有効)]** をクリックします。
6. **[Usage(使用状況)]** タブで **[Identity Provider Metadata(IDプロバイダーのメタデータ)]** を見つけ、 **[Download(ダウンロード)]** をクリックしてメタデータファイルをダウンロードします。これは、Auth0をIDプロバイダーとして構成する際に必要になります。