> ## Documentation Index
> Fetch the complete documentation index at: https://auth0.com/llms.txt
> Use this file to discover all available pages before exploring further.
# ログイントリガー
> アクションログインフローと、ユーザーがログインした後、リフレッシュトークンが要求されたときに実行されるログイン後のアクショントリガーについて説明します。
ログイントリガーは、ユーザーがAuth0テナント上のアプリケーションに対して正常に認証された場合に実行されます。これにはサインアップ後の認証も含まれます。
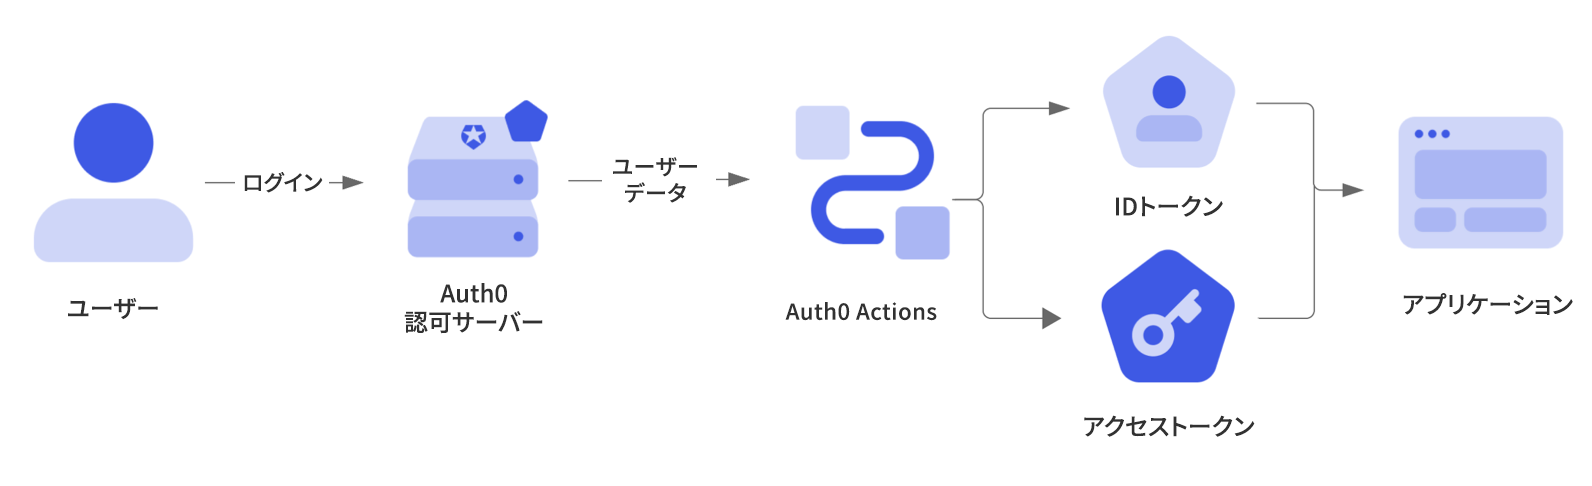 このトリガー内のアクションはブロッキング(同期的)であり、トリガーのプロセスの一部として実行されます。そのため、アクションが完了するまでAuth0パイプラインの他の部分の実行が停止されます。
## トリガー
### ログイン/ログイン後
`post-login`トリガーは、ユーザーがログインした後とリフレッシュトークンが要求されたときに実行される関数です。
#### 参照
* [イベントオブジェクト](/docs/ja-jp/customize/actions/explore-triggers/signup-and-login-triggers/login-trigger/post-login-event-object):Auth0を通してログインする1人のユーザーについてのコンテキスト情報を提供します。
* [APIオブジェクト](/docs/ja-jp/customize/actions/explore-triggers/signup-and-login-triggers/login-trigger/post-login-api-object):フローの動作を変更するためのメソッドを提供します。
## 一般的なユースケース
### アクセス制御
ログイン後のアクションを使用すると、アプリケーションにアクセスしようとしているユーザーへのアクセスを拒否するためのカスタムロジックを提供できます。
```javascript lines theme={null}
/**
* @param {Event} event - Details about the user and the context in which they are logging in.
* @param {PostLoginAPI} api - Interface whose methods can be used to change the behavior of the login.
*/
exports.onExecutePostLogin = async (event, api) => {
if (event.user.email && event.user.email.endsWith("@example.com") && event.client.name === "My SPA") {
api.access.deny(`Access to ${event.client.name} is not allowed.`);
}
};
```
### 特定のアプリケーションに平日のみのアクセスを許可する
アクセスを平日のみに限定したいアプリケーションがある場合は、次のアクションを作成できます。
```javascript lines theme={null}
/**
* @param {Event} event - Details about the user and the context in which they are logging in.
* @param {PostLoginAPI} api - Interface whose methods can be used to change the behavior of the login.
*/
exports.onExecutePostLogin = async (event, api) => {
if (event.client.name === "APP_NAME") {
const d = new Date().getDay();
if (d === 0 || d === 6) {
api.access.deny("This app is only available during the week.");
}
}
}
```
### APIを呼び出すユーザーのすべてにアクセスを拒否する
たとえば、APIを呼び出すユーザーのすべてに対して、アクセスを拒否したいとします。この場合は、[[Dashboard]>[Applications(アプリケーション)]>[APIs]](https://manage.auth0.com/#/apis)の **[API Audience(APIオーディエンス)]** フィールドにあるAPIのオーディエンスの値に基づいてアクセスを拒否する必要があります。これを行うには、以下のアクションを作成します。
```javascript lines theme={null}
/**
* @param {Event} event - Details about the user and the context in which they are logging in.
* @param {PostLoginAPI} api - Interface whose methods can be used to change the behavior of the login.
*/
exports.onExecutePostLogin = async (event, api) => {
// In Actions, an API will be referred to as a Resource Server.
if (event.resource_server && event.resource_server.identifier === "http://todoapi2.api") {
api.access.deny("end_users_not_allowed");
}
}
```
### ユーザーのロールをIDおよびアクセストークンに追加する
Auth0が発行したトークンにユーザーロールを追加するには、`event.authorization`オブジェクトと`api.idToken.setCustomClaim`および`api.accessToken.setCustomClaim`メソッドを使用します。
```javascript lines theme={null}
/**
* @param {Event} event - Details about the user and the context in which they are logging in.
* @param {PostLoginAPI} api - Interface whose methods can be used to change the behavior of the login.
*/
exports.onExecutePostLogin = async (event, api) => {
const namespace = 'https://my-app.example.com';
if (event.authorization) {
api.idToken.setCustomClaim(`${namespace}/roles`, event.authorization.roles);
api.accessToken.setCustomClaim(`${namespace}/roles`, event.authorization.roles);
}
}
```
* カスタムクレームには特定の用語を含めることができないため、URI形式の名前空間クレームの使用を強くお勧めします。詳細については、[カスタムクレームに関する当社のドキュメント](/docs/ja-jp/secure/tokens/json-web-tokens/create-custom-claims)を参照してください。
* 要求元のアプリケーションに返されるJWTは、トリガー処理の終わりに作成され、署名されます。最終の署名済みJWTはアクションでは処理できません。
### ユーザープロファイルを充実させる
Auth0には[ユーザープロファイル](/docs/ja-jp/manage-users/user-accounts/user-profiles/normalized-user-profiles)にメタデータを保存するためのシステムがあります。ログイン中にユーザープロファイルの`user_metadata`または`app_metadata`を設定するには、`api.user.setUserMetadata`または`api.user.setAppMetadata`関数を使用します。
```javascript lines theme={null}
/**
* @param {Event} event - Details about the user and the context in which they are logging in.
* @param {PostLoginAPI} api - Interface whose methods can be used to change the behavior of the login.
*/
exports.onExecutePostLogin = async (event, api) => {
api.user.setUserMetadata("favorite_color", "blue");
};
```
ログイン後のアクションがすべて実行し終わると、Actionsが1回の操作でユーザープロファイルを更新します。この操作は、ユーザー書き込みに対する[レート制限](/docs/ja-jp/troubleshoot/customer-support/operational-policies/rate-limit-policy/management-api-endpoint-rate-limits)の対象となります。
### カスタムMFAポリシーを適用する
ログイン後のアクションを使用すると、アプリケーションのニーズに応じて、ユーザーのMFAを動的に要求できます。
```javascript lines theme={null}
/**
* @param {Event} event - Details about the user and the context in which they are logging in.
* @param {PostLoginAPI} api - Interface whose methods can be used to change the behavior of the login.
*/
exports.onExecutePostLogin = async (event, api) => {
// Require MFA for anyone logging in from North America.
if (event.request.geoip.continentCode === "NA") {
api.multifactor.enable("any");
};
};
```
ログインでMFAを有効にするには、MFAプロバイダーを構成する必要があります。詳細については、「[多要素認証](/docs/ja-jp/secure/multi-factor-authentication)」をお読みください。
### パスキーの煩わしさを軽減する
ログイン後のアクションを使用すると、パスキーで認証したユーザーのMFAを動的にスキップすることで、煩わしさを軽減できます。
```javascript lines theme={null}
/**
* Handler that will be called during the execution of a PostLogin flow.
*
* @param {Event} event - Details about the user and the context in which they are logging in.
* @param {PostLoginAPI} api - Interface whose methods can be used to change the behavior of the login.
*/
exports.onExecutePostLogin = async (event, api) => {
// Check if a passkey was used to authenticate
const skipMFA = event.authentication?.methods.some(
(method) => method.name === "passkey"
);
// If a passkey was used skip MFA
if (skipMFA) {
api.multifactor.enable("none");
}
};
```
接続にパスキーとMFAが有効化されている必要があります。詳細については、「[パスキー](/docs/ja-jp/authenticate/database-connections/passkeys)」と「[多要素認証](/docs/ja-jp/secure/multi-factor-authentication)」をお読みください。
### ユーザーを外部サイトにリダイレクトする
[リダイレクトルール](/docs/ja-jp/customize/rules/redirect-users)と同様に、ログイン後のアクションを使用してユーザーを外部サイトに送信できます。完了すると、ユーザーをAuth0にリダイレクトで戻し、ログインフローを続行できます。以下の例では、リダイレクトのアクションを使ってユーザーに好きな色の指定を求めています。
```javascript lines theme={null}
/**
* @param {Event} event - Details about the user and the context in which they are logging in.
* @param {PostLoginAPI} api - Interface whose methods can be used to change the behavior of the login.
*/
exports.onExecutePostLogin = async (event, api) => {
// Skip the redirect if the user has already chosen a favorite color.
if (event.user.user_metadata.favorite_color) {
return;
}
const token = api.redirect.encodeToken({
secret: event.secrets.MY_SHARED_SECRET,
payload: {
email: event.user.email,
},
});
// Send the user to https://my-app.example.com along
// with a `session_token` query string param.
api.redirect.sendUserTo("https://my-app.example.com", {
query: { session_token: token }
});
};
/**
* @param {Event} event - Details about the user and the context in which they are logging in.
* @param {PostLoginAPI} api - Interface whose methods can be used to change the behavior of the login.
*/
exports.onContinuePostLogin = async (event, api) => {
// Once the /continue endpoint has been called, unpack the signed token
// and store the favorite color as user metadata.
const payload = api.redirect.validateToken({
secret: event.secrets.MY_SHARED_SECRET,
});
api.user.setUserMetadata("favorite_color", payload.favorite_color);
};
```
ユーザーがリダイレクトされている間、アクションパイプラインは停止されます。ユーザーがAuth0のログインプロセスを続行すると、アクションパイプラインは中断された場所から再開されます。リダイレクト前に実行されたアクションは再度実行されません。
リダイレクトのアクションについては、「[アクションを使用してリダイレクトする](/docs/ja-jp/customize/actions/explore-triggers/signup-and-login-triggers/login-trigger/redirect-with-actions)」をお読みください。
### アクセストークンのスコープを変更する
アクセストークンに関連付けられたスコープを変更する場合は、オーディエンス仕様に関するベストプラクティスに従ってください。
* スコープを追加する前に、必ず予期されているオーディエンスを確認してください。
* スコープを追加するときには、信頼できない入力を使用してはけません。
```javascript lines theme={null}
/**
* @param {Event} event - Details about the user and the context in which they are logging in.
* @param {PostLoginAPI} api - Interface whose methods can be used to change the behavior of the login.
*/
exports.onExecutePostLogin = async (event, api) => {
if (event?.resource_server?.identifier === 'https://example.com/api') {
api.accessToken.addScope("read:xyz");
}
};
```
## もっと詳しく
* [ログイン後のアクショントリガーでユーザーメタデータを管理する](/docs/ja-jp/manage-users/user-accounts/metadata/manage-user-metadata)
* [アクションを使用してダイレクトする](/docs/ja-jp/customize/actions/explore-triggers/signup-and-login-triggers/login-trigger/redirect-with-actions)
* [ユーザープロファイルでのメタデータの使い方](/docs/ja-jp/manage-users/user-accounts/metadata)
このトリガー内のアクションはブロッキング(同期的)であり、トリガーのプロセスの一部として実行されます。そのため、アクションが完了するまでAuth0パイプラインの他の部分の実行が停止されます。
## トリガー
### ログイン/ログイン後
`post-login`トリガーは、ユーザーがログインした後とリフレッシュトークンが要求されたときに実行される関数です。
#### 参照
* [イベントオブジェクト](/docs/ja-jp/customize/actions/explore-triggers/signup-and-login-triggers/login-trigger/post-login-event-object):Auth0を通してログインする1人のユーザーについてのコンテキスト情報を提供します。
* [APIオブジェクト](/docs/ja-jp/customize/actions/explore-triggers/signup-and-login-triggers/login-trigger/post-login-api-object):フローの動作を変更するためのメソッドを提供します。
## 一般的なユースケース
### アクセス制御
ログイン後のアクションを使用すると、アプリケーションにアクセスしようとしているユーザーへのアクセスを拒否するためのカスタムロジックを提供できます。
```javascript lines theme={null}
/**
* @param {Event} event - Details about the user and the context in which they are logging in.
* @param {PostLoginAPI} api - Interface whose methods can be used to change the behavior of the login.
*/
exports.onExecutePostLogin = async (event, api) => {
if (event.user.email && event.user.email.endsWith("@example.com") && event.client.name === "My SPA") {
api.access.deny(`Access to ${event.client.name} is not allowed.`);
}
};
```
### 特定のアプリケーションに平日のみのアクセスを許可する
アクセスを平日のみに限定したいアプリケーションがある場合は、次のアクションを作成できます。
```javascript lines theme={null}
/**
* @param {Event} event - Details about the user and the context in which they are logging in.
* @param {PostLoginAPI} api - Interface whose methods can be used to change the behavior of the login.
*/
exports.onExecutePostLogin = async (event, api) => {
if (event.client.name === "APP_NAME") {
const d = new Date().getDay();
if (d === 0 || d === 6) {
api.access.deny("This app is only available during the week.");
}
}
}
```
### APIを呼び出すユーザーのすべてにアクセスを拒否する
たとえば、APIを呼び出すユーザーのすべてに対して、アクセスを拒否したいとします。この場合は、[[Dashboard]>[Applications(アプリケーション)]>[APIs]](https://manage.auth0.com/#/apis)の **[API Audience(APIオーディエンス)]** フィールドにあるAPIのオーディエンスの値に基づいてアクセスを拒否する必要があります。これを行うには、以下のアクションを作成します。
```javascript lines theme={null}
/**
* @param {Event} event - Details about the user and the context in which they are logging in.
* @param {PostLoginAPI} api - Interface whose methods can be used to change the behavior of the login.
*/
exports.onExecutePostLogin = async (event, api) => {
// In Actions, an API will be referred to as a Resource Server.
if (event.resource_server && event.resource_server.identifier === "http://todoapi2.api") {
api.access.deny("end_users_not_allowed");
}
}
```
### ユーザーのロールをIDおよびアクセストークンに追加する
Auth0が発行したトークンにユーザーロールを追加するには、`event.authorization`オブジェクトと`api.idToken.setCustomClaim`および`api.accessToken.setCustomClaim`メソッドを使用します。
```javascript lines theme={null}
/**
* @param {Event} event - Details about the user and the context in which they are logging in.
* @param {PostLoginAPI} api - Interface whose methods can be used to change the behavior of the login.
*/
exports.onExecutePostLogin = async (event, api) => {
const namespace = 'https://my-app.example.com';
if (event.authorization) {
api.idToken.setCustomClaim(`${namespace}/roles`, event.authorization.roles);
api.accessToken.setCustomClaim(`${namespace}/roles`, event.authorization.roles);
}
}
```
* カスタムクレームには特定の用語を含めることができないため、URI形式の名前空間クレームの使用を強くお勧めします。詳細については、[カスタムクレームに関する当社のドキュメント](/docs/ja-jp/secure/tokens/json-web-tokens/create-custom-claims)を参照してください。
* 要求元のアプリケーションに返されるJWTは、トリガー処理の終わりに作成され、署名されます。最終の署名済みJWTはアクションでは処理できません。
### ユーザープロファイルを充実させる
Auth0には[ユーザープロファイル](/docs/ja-jp/manage-users/user-accounts/user-profiles/normalized-user-profiles)にメタデータを保存するためのシステムがあります。ログイン中にユーザープロファイルの`user_metadata`または`app_metadata`を設定するには、`api.user.setUserMetadata`または`api.user.setAppMetadata`関数を使用します。
```javascript lines theme={null}
/**
* @param {Event} event - Details about the user and the context in which they are logging in.
* @param {PostLoginAPI} api - Interface whose methods can be used to change the behavior of the login.
*/
exports.onExecutePostLogin = async (event, api) => {
api.user.setUserMetadata("favorite_color", "blue");
};
```
ログイン後のアクションがすべて実行し終わると、Actionsが1回の操作でユーザープロファイルを更新します。この操作は、ユーザー書き込みに対する[レート制限](/docs/ja-jp/troubleshoot/customer-support/operational-policies/rate-limit-policy/management-api-endpoint-rate-limits)の対象となります。
### カスタムMFAポリシーを適用する
ログイン後のアクションを使用すると、アプリケーションのニーズに応じて、ユーザーのMFAを動的に要求できます。
```javascript lines theme={null}
/**
* @param {Event} event - Details about the user and the context in which they are logging in.
* @param {PostLoginAPI} api - Interface whose methods can be used to change the behavior of the login.
*/
exports.onExecutePostLogin = async (event, api) => {
// Require MFA for anyone logging in from North America.
if (event.request.geoip.continentCode === "NA") {
api.multifactor.enable("any");
};
};
```
ログインでMFAを有効にするには、MFAプロバイダーを構成する必要があります。詳細については、「[多要素認証](/docs/ja-jp/secure/multi-factor-authentication)」をお読みください。
### パスキーの煩わしさを軽減する
ログイン後のアクションを使用すると、パスキーで認証したユーザーのMFAを動的にスキップすることで、煩わしさを軽減できます。
```javascript lines theme={null}
/**
* Handler that will be called during the execution of a PostLogin flow.
*
* @param {Event} event - Details about the user and the context in which they are logging in.
* @param {PostLoginAPI} api - Interface whose methods can be used to change the behavior of the login.
*/
exports.onExecutePostLogin = async (event, api) => {
// Check if a passkey was used to authenticate
const skipMFA = event.authentication?.methods.some(
(method) => method.name === "passkey"
);
// If a passkey was used skip MFA
if (skipMFA) {
api.multifactor.enable("none");
}
};
```
接続にパスキーとMFAが有効化されている必要があります。詳細については、「[パスキー](/docs/ja-jp/authenticate/database-connections/passkeys)」と「[多要素認証](/docs/ja-jp/secure/multi-factor-authentication)」をお読みください。
### ユーザーを外部サイトにリダイレクトする
[リダイレクトルール](/docs/ja-jp/customize/rules/redirect-users)と同様に、ログイン後のアクションを使用してユーザーを外部サイトに送信できます。完了すると、ユーザーをAuth0にリダイレクトで戻し、ログインフローを続行できます。以下の例では、リダイレクトのアクションを使ってユーザーに好きな色の指定を求めています。
```javascript lines theme={null}
/**
* @param {Event} event - Details about the user and the context in which they are logging in.
* @param {PostLoginAPI} api - Interface whose methods can be used to change the behavior of the login.
*/
exports.onExecutePostLogin = async (event, api) => {
// Skip the redirect if the user has already chosen a favorite color.
if (event.user.user_metadata.favorite_color) {
return;
}
const token = api.redirect.encodeToken({
secret: event.secrets.MY_SHARED_SECRET,
payload: {
email: event.user.email,
},
});
// Send the user to https://my-app.example.com along
// with a `session_token` query string param.
api.redirect.sendUserTo("https://my-app.example.com", {
query: { session_token: token }
});
};
/**
* @param {Event} event - Details about the user and the context in which they are logging in.
* @param {PostLoginAPI} api - Interface whose methods can be used to change the behavior of the login.
*/
exports.onContinuePostLogin = async (event, api) => {
// Once the /continue endpoint has been called, unpack the signed token
// and store the favorite color as user metadata.
const payload = api.redirect.validateToken({
secret: event.secrets.MY_SHARED_SECRET,
});
api.user.setUserMetadata("favorite_color", payload.favorite_color);
};
```
ユーザーがリダイレクトされている間、アクションパイプラインは停止されます。ユーザーがAuth0のログインプロセスを続行すると、アクションパイプラインは中断された場所から再開されます。リダイレクト前に実行されたアクションは再度実行されません。
リダイレクトのアクションについては、「[アクションを使用してリダイレクトする](/docs/ja-jp/customize/actions/explore-triggers/signup-and-login-triggers/login-trigger/redirect-with-actions)」をお読みください。
### アクセストークンのスコープを変更する
アクセストークンに関連付けられたスコープを変更する場合は、オーディエンス仕様に関するベストプラクティスに従ってください。
* スコープを追加する前に、必ず予期されているオーディエンスを確認してください。
* スコープを追加するときには、信頼できない入力を使用してはけません。
```javascript lines theme={null}
/**
* @param {Event} event - Details about the user and the context in which they are logging in.
* @param {PostLoginAPI} api - Interface whose methods can be used to change the behavior of the login.
*/
exports.onExecutePostLogin = async (event, api) => {
if (event?.resource_server?.identifier === 'https://example.com/api') {
api.accessToken.addScope("read:xyz");
}
};
```
## もっと詳しく
* [ログイン後のアクショントリガーでユーザーメタデータを管理する](/docs/ja-jp/manage-users/user-accounts/metadata/manage-user-metadata)
* [アクションを使用してダイレクトする](/docs/ja-jp/customize/actions/explore-triggers/signup-and-login-triggers/login-trigger/redirect-with-actions)
* [ユーザープロファイルでのメタデータの使い方](/docs/ja-jp/manage-users/user-accounts/metadata)