> ## Documentation Index
> Fetch the complete documentation index at: https://auth0.com/llms.txt
> Use this file to discover all available pages before exploring further.
# カスタムメールプロバイダーを構成する
> コードベースのカスタムメールプロバイダーのセットアップ方法について説明します。
カスタムメールプロバイダを使用して、任意のメールプロバイダーをセットアップできます。デフォルトのメールプロバイダーでは非対応のメールプロバイダーにメッセージを送信するには、[Actionsコードエディター](/docs/ja-jp/customize/actions/actions-overview)を活用できます。また、メール配信プロセスを完全に制御することで、以下のようなユースケースに対応できます。
* 再試行の失敗
* 受信者の変更
* メッセージペイロードの変更
* Organization固有のロジックの作成
Auth0 Dashboardを使用して、カスタムメールプロバイダーを構成できます。
## Auth0 Dashboardでカスタムメールプロバイダーを構成する
1. [[Auth0 Dashboard]>[Branding(ブランディング)]>[Email Provider(メールプロバイダー)]](https://manage.auth0.com/#/templates/provider)に移動します。
2. **[Use my own email provider(独自のメールプロバイダーを使用する)]** を有効にします。
3. **[Email Provider(メールプロバイダー)]** セクションで、 **[Custom Provider(カスタムプロバイダー)]** を選択します。
4. **[From(差出人)]** フィールドに、メールの送信元となるデフォルトのメールアドレスを入力します。
5. コードエディターで、カスタムメールプロバイダーにメッセージを送信するための適切なアクションコードを追加します。プロバイダーのAPIにメッセージを送信する方法については、プロバイダーのドキュメントを参照してください。他のアクションと同様に、[Management API](https://auth0.com/docs/api/management/v2/actions/get-actions)を使用して、アクションとその[バージョン](/docs/ja-jp/customize/actions/manage-versions)を管理します。
6. 左側のメニューでキーをクリックして、APIでの認証に必要な[シークレット](/docs/ja-jp/customize/actions/write-your-first-action)を追加します。
7. 左側のメニューでボックスをクリックして依存関係を追加します。
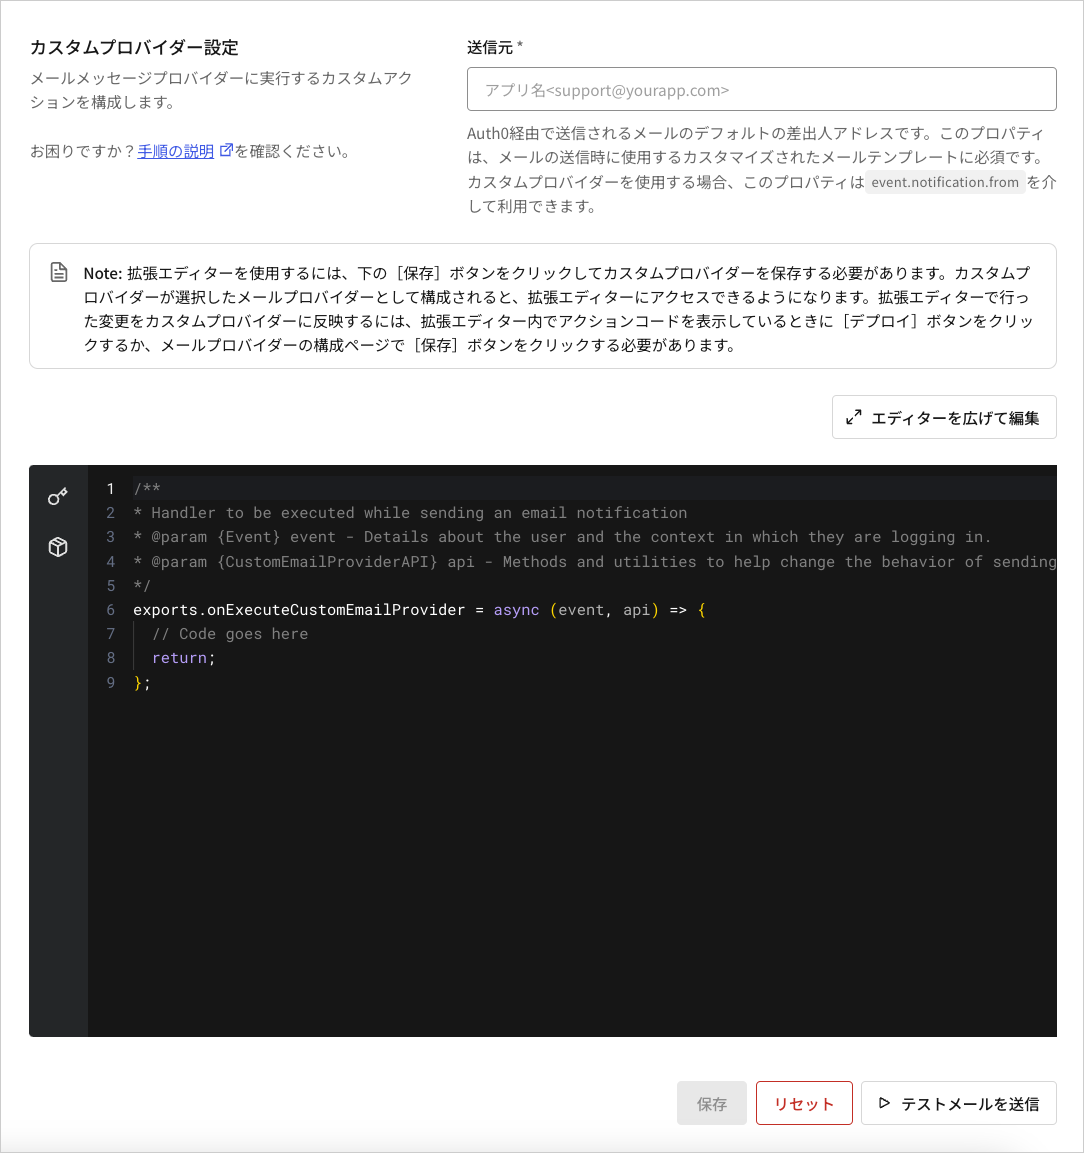 拡張エディターを使用するには、まず、カスタムメールプロバイダーの構成を保存する必要があります。
8. **[Edit in Expanded Editor(拡張エディターで編集)]** をクリックします。拡張エディターでは、シークレットや依存関係を追加したり、アクションをテストしたりできます。過去にデプロイされたアクションのバージョン履歴にアクセスすることもできます。`custom-email-provider`アクションの書き方については、「[custom-email-providerアクションの例](#example-custom-email-provider-action)」を参照してください。
拡張エディターを使用するには、まず、カスタムメールプロバイダーの構成を保存する必要があります。
8. **[Edit in Expanded Editor(拡張エディターで編集)]** をクリックします。拡張エディターでは、シークレットや依存関係を追加したり、アクションをテストしたりできます。過去にデプロイされたアクションのバージョン履歴にアクセスすることもできます。`custom-email-provider`アクションの書き方については、「[custom-email-providerアクションの例](#example-custom-email-provider-action)」を参照してください。
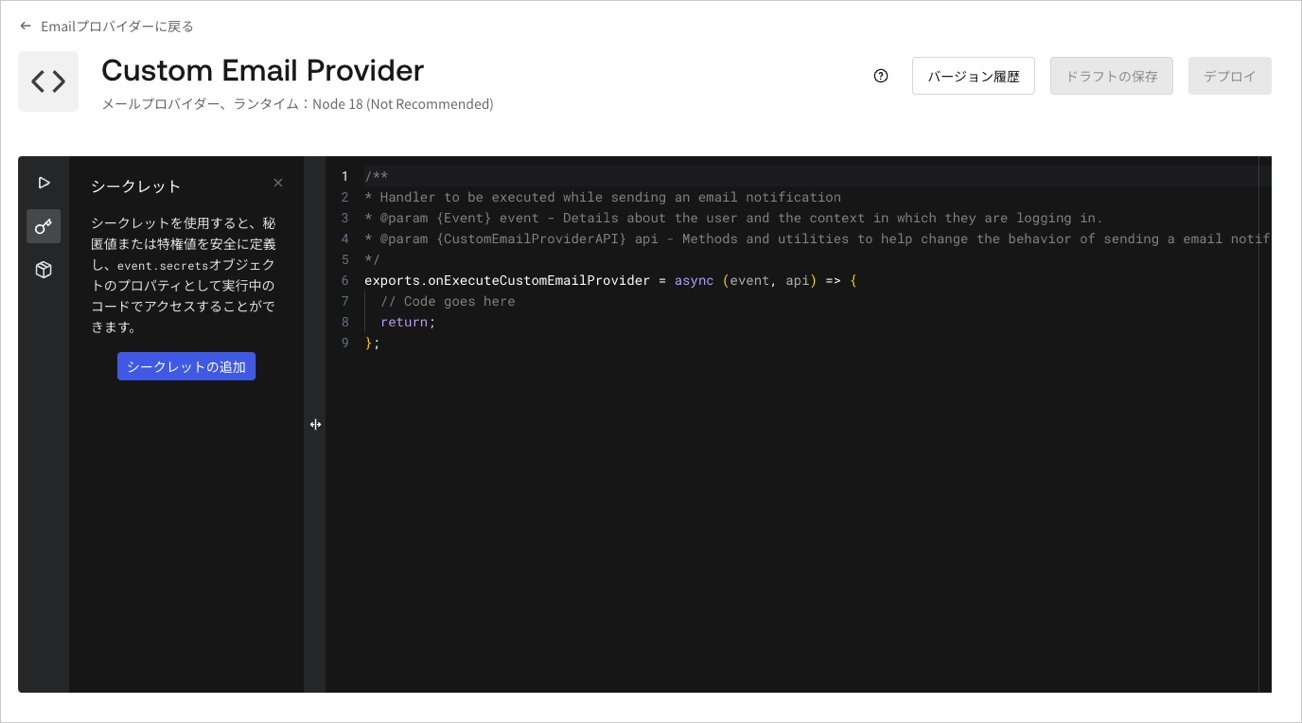 9. アクションをデプロイするには、拡張エディターの右上にある **[Deploy(デプロイ)]** をクリックします。
10. 拡張エディターの左上にある **[Back to Email Provider(メールプロバイダーに戻る)]** をクリックします。 **[Provider Configuration(プロバイダーの構成)]** セクションに緑のチェックマークと **[Enabled(有効)]** が表示されるはずです。
11. **[Save(保存)]** をクリックして、カスタムメールプロバイダーの構成を確定します。 **[Save(保存)]** をクリックすると、アクションが自動的に保存されてデプロイされます。
12. 運用環境で使い始める前に、 **[Send Test Email(テストメールの送信)]** をクリックして、カスタムメールプロバイダーをテストします。カスタムメールプロバイダーの構成を保存するまで、テストメールは送信できません。
アクションには、すべて同じ[制限](/docs/ja-jp/customize/actions/limitations)が適用されます。
## アクションを削除する
アクションを削除するには、まず[[Auth0 Dashboard]>[Branding(ブランディング)]>[Email Provider(メールプロバイダー)]](https://manage.auth0.com/#/templates/provider)で **[Custom Email Provider(カスタムメールプロバイダー)]** を無効にしてからアクションを削除することで、メール配信の失敗を防ぐことができます。
## custom-email-providerアクションの例
以下のサンプルコードでは、メール通知の送信にトリガーされた`onExecuteCustomEmailProvider`関数が2つの引数を取ります。
1. `event`:ユーザーと通知のコンテキストに関する情報を含みます。詳細については、「[アクショントリガー:custom-email-providerイベントオブジェクト](https://auth0.com/docs/customize/email/configure-a-custom-email-provider/action-triggers-custom-email-provider-event-object)」を参照してください。
2. `api`:通知送信中のカスタム動作にヘルパーメソッドを提供します。詳細については、「[アクショントリガー:custom-email-provider API オブジェクト](https://auth0.com/docs/customize/email/configure-a-custom-email-provider/action-triggers-custom-email-provider-api-object)」を参照してください。
コードエディターで左側のメニューを使用して、`api_key`シークレットと`undici`依存関係を追加します。
```javascript lines expandable theme={null}
/**
* Handler to be executed while sending an email notification.
* @param {Event} event - Details about the user and the context in which they are logging in.
* @param {CustomEmailProviderAPI} api - Methods and utilities to help change the behavior of sending an email notification.
*/
exports.onExecuteCustomEmailProvider = async (event, api) => {
// Define the email payload
const emailPayload = {
from: {
name: "Test Sender",
email: "sender@example.com"
},
to: [{ email: event.user.email }],
subject: event.notification.message_type,
html: event.notification.html,
text: event.notification.text,
};
try {
// Make the API call to send the email
const response = await fetch('https://api.example.com/send-email', {
method: 'POST',
headers: {
'Authorization': `Bearer ${event.secrets.api_key}`,
'Content-Type': 'application/json',
},
body: JSON.stringify(emailPayload),
});
if (response.ok) {
console.log('Email sent successfully');
} else if (response.status >= 500) {
api.notification.retry(
`Internal Server Error received from Messaging Proxy. Status code: ${response.status}.`
);
return;
}
} catch (error) {
console.error(`Error sending email: ${error.message}`);
api.notification.drop(`An unexpected error occurred. Error: ${error.message}`);
}
return;
};
```
アクションの書き方やデプロイメントについては。「[アクションを初めて作成する](/docs/ja-jp/customize/actions/write-your-first-action)」をお読みください。
9. アクションをデプロイするには、拡張エディターの右上にある **[Deploy(デプロイ)]** をクリックします。
10. 拡張エディターの左上にある **[Back to Email Provider(メールプロバイダーに戻る)]** をクリックします。 **[Provider Configuration(プロバイダーの構成)]** セクションに緑のチェックマークと **[Enabled(有効)]** が表示されるはずです。
11. **[Save(保存)]** をクリックして、カスタムメールプロバイダーの構成を確定します。 **[Save(保存)]** をクリックすると、アクションが自動的に保存されてデプロイされます。
12. 運用環境で使い始める前に、 **[Send Test Email(テストメールの送信)]** をクリックして、カスタムメールプロバイダーをテストします。カスタムメールプロバイダーの構成を保存するまで、テストメールは送信できません。
アクションには、すべて同じ[制限](/docs/ja-jp/customize/actions/limitations)が適用されます。
## アクションを削除する
アクションを削除するには、まず[[Auth0 Dashboard]>[Branding(ブランディング)]>[Email Provider(メールプロバイダー)]](https://manage.auth0.com/#/templates/provider)で **[Custom Email Provider(カスタムメールプロバイダー)]** を無効にしてからアクションを削除することで、メール配信の失敗を防ぐことができます。
## custom-email-providerアクションの例
以下のサンプルコードでは、メール通知の送信にトリガーされた`onExecuteCustomEmailProvider`関数が2つの引数を取ります。
1. `event`:ユーザーと通知のコンテキストに関する情報を含みます。詳細については、「[アクショントリガー:custom-email-providerイベントオブジェクト](https://auth0.com/docs/customize/email/configure-a-custom-email-provider/action-triggers-custom-email-provider-event-object)」を参照してください。
2. `api`:通知送信中のカスタム動作にヘルパーメソッドを提供します。詳細については、「[アクショントリガー:custom-email-provider API オブジェクト](https://auth0.com/docs/customize/email/configure-a-custom-email-provider/action-triggers-custom-email-provider-api-object)」を参照してください。
コードエディターで左側のメニューを使用して、`api_key`シークレットと`undici`依存関係を追加します。
```javascript lines expandable theme={null}
/**
* Handler to be executed while sending an email notification.
* @param {Event} event - Details about the user and the context in which they are logging in.
* @param {CustomEmailProviderAPI} api - Methods and utilities to help change the behavior of sending an email notification.
*/
exports.onExecuteCustomEmailProvider = async (event, api) => {
// Define the email payload
const emailPayload = {
from: {
name: "Test Sender",
email: "sender@example.com"
},
to: [{ email: event.user.email }],
subject: event.notification.message_type,
html: event.notification.html,
text: event.notification.text,
};
try {
// Make the API call to send the email
const response = await fetch('https://api.example.com/send-email', {
method: 'POST',
headers: {
'Authorization': `Bearer ${event.secrets.api_key}`,
'Content-Type': 'application/json',
},
body: JSON.stringify(emailPayload),
});
if (response.ok) {
console.log('Email sent successfully');
} else if (response.status >= 500) {
api.notification.retry(
`Internal Server Error received from Messaging Proxy. Status code: ${response.status}.`
);
return;
}
} catch (error) {
console.error(`Error sending email: ${error.message}`);
api.notification.drop(`An unexpected error occurred. Error: ${error.message}`);
}
return;
};
```
アクションの書き方やデプロイメントについては。「[アクションを初めて作成する](/docs/ja-jp/customize/actions/write-your-first-action)」をお読みください。