> ## Documentation Index
> Fetch the complete documentation index at: https://auth0.com/llms.txt
> Use this file to discover all available pages before exploring further.
# CIBAでユーザーを認証する
> クライアントが開始するバックチャネル認証(CIBA)フローでユーザーを認証する方法について説明します。
現在、クライアントが開始するバックチャネル認証は早期アクセスで利用できます。CIBAを有効化するには、テクニカルアカウントマネージャーまでお問い合わせください。
CIBA(Client-Initiated Backchannel Authentication)はログインや認証の処理について、クライアントアプリケーションがブラウザーでユーザーをリダイレクトすることに依存しません。その代わりに、クライアントアプリケーションがバックチャネル要求を通して直接OpenIDプロバイダーを呼び出し、認証フローを開始します。
以下のシーケンス図はCIBAフローの実装をまとめたものです。
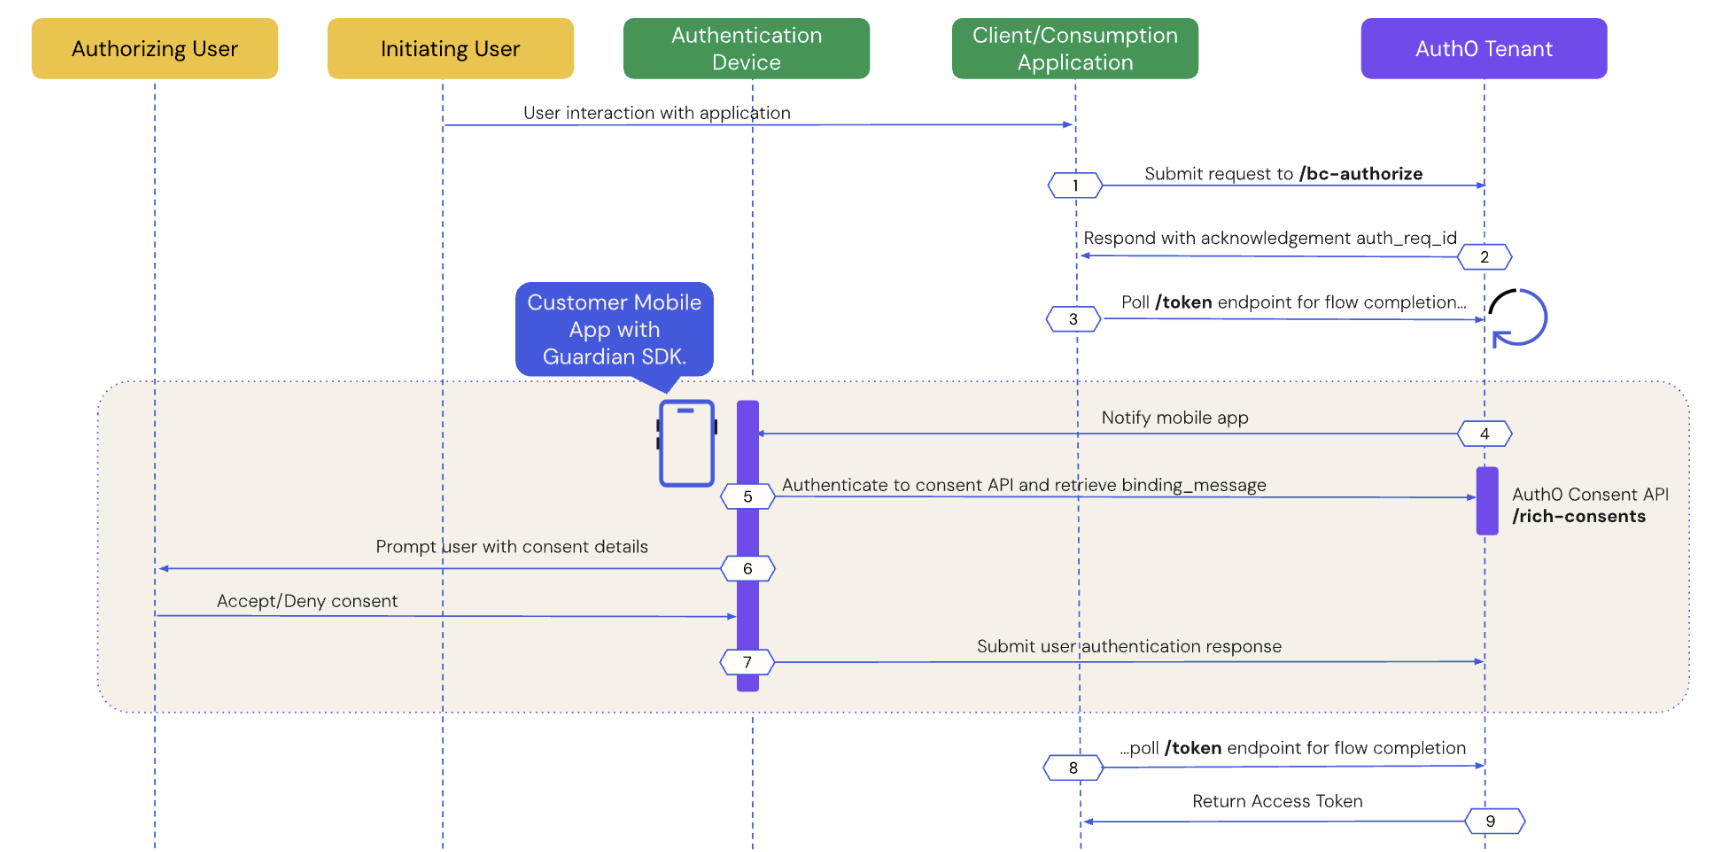 シーケンス図では、認可しているユーザーと開始しているユーザーという2人の行為者が定義されています。認可や開始を行うユーザーは、たとえばコールセンターに問い合わせている人とコールセンターの担当者など、別の2人になる可能性があります。他のユースケースでは、たとえば認証して販売店や別の接続デバイスにアクセスしようとしている人など、同じ人になる可能性もあります。
以下のセクションでは、CIBAフローでユーザー認証が動作する仕組みについて、手順を追って説明します。
* [前提条件](#prerequisites)
* [ステップ1:クライアントアプリケーションがCIBA要求を開始する](#step-1-client-application-initiates-a-ciba-request)
* [ステップ2:Auth0テナントがCIBA要求を確認する](#step-2-auth0-tenant-acknowledges-the-ciba-request)
* [ステップ3:クライアントアプリケーションが応答をポーリングする](#step-3-client-application-polls-for-a-response)
* [ステップ4:モバイルアプリケーションがプッシュ通知を受け取る](#step-4-mobile-application-receives-the-push-notification)
* [ステップ5:モバイルアプリケーションが同意の詳細を取得する](#step-5-mobile-application-retrieves-the-consent-details)
* [ステップ6:モバイルアプリケーションが同意の詳細をユーザーに表示する](#step-6-mobile-application-presents-the-consent-details-to-the-user)
* [ステップ7:モバイルアプリケーションがユーザーの応答をAuth0に送信する](#step-7-mobile-application-sends-the-user-response-back-to-auth0)
* [ステップ8:フローが完了した後でAuth0がユーザーの応答を受け取る](#step-8-auth0-receives-user-response-after-the-flow-completes)
## 前提条件
CIBAのプッシュ要求を開始するには、認可しているユーザーがプッシュ通知でMFAに登録されていなければなりません。Auth0 Dashboardで確認するには、\*\*[User Management(ユーザーの管理)]>[Users(ユーザー)]\*\*に移動して、ユーザーをクリックします。
シーケンス図では、認可しているユーザーと開始しているユーザーという2人の行為者が定義されています。認可や開始を行うユーザーは、たとえばコールセンターに問い合わせている人とコールセンターの担当者など、別の2人になる可能性があります。他のユースケースでは、たとえば認証して販売店や別の接続デバイスにアクセスしようとしている人など、同じ人になる可能性もあります。
以下のセクションでは、CIBAフローでユーザー認証が動作する仕組みについて、手順を追って説明します。
* [前提条件](#prerequisites)
* [ステップ1:クライアントアプリケーションがCIBA要求を開始する](#step-1-client-application-initiates-a-ciba-request)
* [ステップ2:Auth0テナントがCIBA要求を確認する](#step-2-auth0-tenant-acknowledges-the-ciba-request)
* [ステップ3:クライアントアプリケーションが応答をポーリングする](#step-3-client-application-polls-for-a-response)
* [ステップ4:モバイルアプリケーションがプッシュ通知を受け取る](#step-4-mobile-application-receives-the-push-notification)
* [ステップ5:モバイルアプリケーションが同意の詳細を取得する](#step-5-mobile-application-retrieves-the-consent-details)
* [ステップ6:モバイルアプリケーションが同意の詳細をユーザーに表示する](#step-6-mobile-application-presents-the-consent-details-to-the-user)
* [ステップ7:モバイルアプリケーションがユーザーの応答をAuth0に送信する](#step-7-mobile-application-sends-the-user-response-back-to-auth0)
* [ステップ8:フローが完了した後でAuth0がユーザーの応答を受け取る](#step-8-auth0-receives-user-response-after-the-flow-completes)
## 前提条件
CIBAのプッシュ要求を開始するには、認可しているユーザーがプッシュ通知でMFAに登録されていなければなりません。Auth0 Dashboardで確認するには、\*\*[User Management(ユーザーの管理)]>[Users(ユーザー)]\*\*に移動して、ユーザーをクリックします。
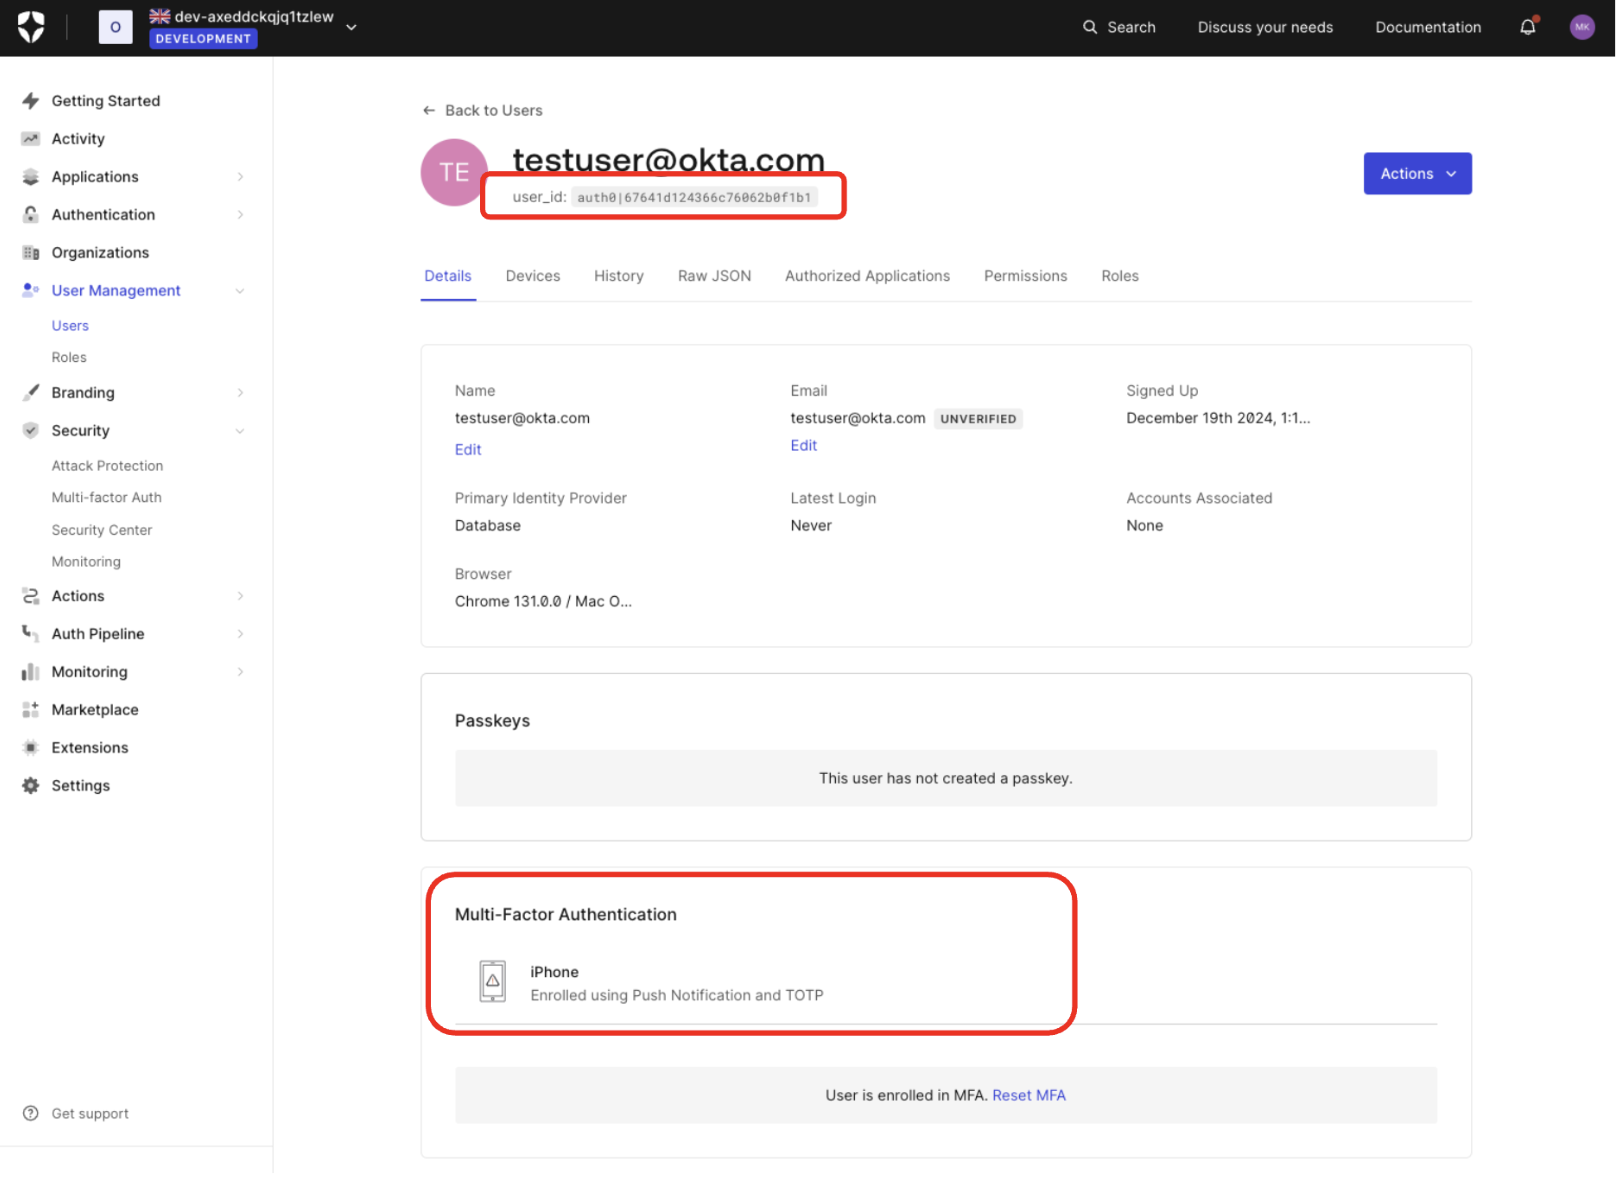 テナントで多要素認証を常に必須に設定した場合は、ユーザーが次回にログインするときに、MFAへの登録が求められます。また、[Actions](https://auth0.com/blog/using-actions-to-customize-your-mfa-factors/)を使用して、MFAの登録を促すこともできます。
MFAのプッシュ通知は通常、Guardian SDKを組み込んだカスタムのモバイルアプリ内で実装されます。詳細については、「[CIBA(Client-Initiated Backchannel Authentication)を構成する](/docs/ja-jp/get-started/applications/configure-client-initiated-backchannel-authentication)をお読みください。
## ステップ1:クライアントアプリケーションがCIBA要求を開始する
[ユーザー検索API](https://auth0.com/docs/manage-users/user-search)を使用して、認可しているユーザーを見つけます。このユーザーのためにCIBA要求を始めてユーザーIDを取得することになります。
認可しているユーザーのユーザーIDを入手したら、Authentication APIまたはAuth0の[SDK](/docs/ja-jp/libraries)を使用して、CIBA要求を`/bc-authorize`エンドポイントに送信します。
```bash lines theme={null}
curl --location 'https://$tenant.auth0.com/bc-authorize' \
--header 'Content-Type: application/x-www-form-urlencoded' \
--data-urlencode 'client_id=$client_id' \
--data-urlencode 'client_secret=$client_secret' \
--data-urlencode 'login_hint={ "format": "iss_sub", "iss": "https://$tenant.auth0.com/", "sub": "$user_id" }' \
--data-urlencode 'scope=$scope' \
--data-urlencode 'binding_message=$binding_message'
```
```csharp lines theme={null}
var response = await authenticationApiClient.ClientInitiatedBackchannelAuthorization(
new ClientInitiatedBackchannelAuthorizationRequest()
{
ClientId = "your-client-id",
Scope = "openid",
ClientSecret = "your-client-secret",
BindingMessage = "your-binding-message",
LoginHint = new LoginHint()
{
Format = "iss_sub",
Issuer = "your-issuer-domain",
Subject = "auth0|user-id-here"
}
}
);
```
```go lines theme={null}
resp, err := authAPI.CIBA.Initiate(context.Background(), ciba.Request{
ClientID: mgmtClientID,
ClientSecret: mgmtClientSecret,
Scope: "openid",
LoginHint: map[string]string{
"format": "iss_sub",
"iss": "your-issuer-domain",
"sub": "auth0|user-id-here",
},
BindingMessage: "TEST-BINDING-MESSAGE",
})
```
```java lines theme={null}
//Creating AuthClient Instance
AuthAPI auth = AuthAPI.newBuilder(domain, clientId, clientSecret).build();
//Authorize
Map loginHint = new HashMap<>();
loginHint.put("format", "iss_sub");
loginHint.put("iss", "your-issuer-domain");
loginHint.put("sub", "auth0|user-id-here");
Request request = auth.authorizeBackChannel("openid", "your-binding-message", loginHint);
BackChannelAuthorizeResponse resp = request.execute().getBody();
```
| パラメーター | 説明 |
| --------------- | ---------------------------------------------------------------------------------------------------------------------------------------------------------- |
| TENANT | テナント名。カスタムドメインにすることもできます。 |
| CLIENT ID | クライアントアプリケーション識別子 |
| CLIENT SECRET | クライアントシークレット、プライベートキーJWT、mTLS認証など、CIBAを使ったユーザー認証に使用されるクライアント認証方法。 |
| SCOPE | `openid`を含める必要があります。
テナントで多要素認証を常に必須に設定した場合は、ユーザーが次回にログインするときに、MFAへの登録が求められます。また、[Actions](https://auth0.com/blog/using-actions-to-customize-your-mfa-factors/)を使用して、MFAの登録を促すこともできます。
MFAのプッシュ通知は通常、Guardian SDKを組み込んだカスタムのモバイルアプリ内で実装されます。詳細については、「[CIBA(Client-Initiated Backchannel Authentication)を構成する](/docs/ja-jp/get-started/applications/configure-client-initiated-backchannel-authentication)をお読みください。
## ステップ1:クライアントアプリケーションがCIBA要求を開始する
[ユーザー検索API](https://auth0.com/docs/manage-users/user-search)を使用して、認可しているユーザーを見つけます。このユーザーのためにCIBA要求を始めてユーザーIDを取得することになります。
認可しているユーザーのユーザーIDを入手したら、Authentication APIまたはAuth0の[SDK](/docs/ja-jp/libraries)を使用して、CIBA要求を`/bc-authorize`エンドポイントに送信します。
```bash lines theme={null}
curl --location 'https://$tenant.auth0.com/bc-authorize' \
--header 'Content-Type: application/x-www-form-urlencoded' \
--data-urlencode 'client_id=$client_id' \
--data-urlencode 'client_secret=$client_secret' \
--data-urlencode 'login_hint={ "format": "iss_sub", "iss": "https://$tenant.auth0.com/", "sub": "$user_id" }' \
--data-urlencode 'scope=$scope' \
--data-urlencode 'binding_message=$binding_message'
```
```csharp lines theme={null}
var response = await authenticationApiClient.ClientInitiatedBackchannelAuthorization(
new ClientInitiatedBackchannelAuthorizationRequest()
{
ClientId = "your-client-id",
Scope = "openid",
ClientSecret = "your-client-secret",
BindingMessage = "your-binding-message",
LoginHint = new LoginHint()
{
Format = "iss_sub",
Issuer = "your-issuer-domain",
Subject = "auth0|user-id-here"
}
}
);
```
```go lines theme={null}
resp, err := authAPI.CIBA.Initiate(context.Background(), ciba.Request{
ClientID: mgmtClientID,
ClientSecret: mgmtClientSecret,
Scope: "openid",
LoginHint: map[string]string{
"format": "iss_sub",
"iss": "your-issuer-domain",
"sub": "auth0|user-id-here",
},
BindingMessage: "TEST-BINDING-MESSAGE",
})
```
```java lines theme={null}
//Creating AuthClient Instance
AuthAPI auth = AuthAPI.newBuilder(domain, clientId, clientSecret).build();
//Authorize
Map loginHint = new HashMap<>();
loginHint.put("format", "iss_sub");
loginHint.put("iss", "your-issuer-domain");
loginHint.put("sub", "auth0|user-id-here");
Request request = auth.authorizeBackChannel("openid", "your-binding-message", loginHint);
BackChannelAuthorizeResponse resp = request.execute().getBody();
```
| パラメーター | 説明 |
| --------------- | ---------------------------------------------------------------------------------------------------------------------------------------------------------- |
| TENANT | テナント名。カスタムドメインにすることもできます。 |
| CLIENT ID | クライアントアプリケーション識別子 |
| CLIENT SECRET | クライアントシークレット、プライベートキーJWT、mTLS認証など、CIBAを使ったユーザー認証に使用されるクライアント認証方法。 |
| SCOPE | `openid`を含める必要があります。
スコープには、リフレッシュトークンを要求するための`offline_access`をオプションで含めることができます。ただし、CIBAフローを使ったトランザクションのワンタイム認証にはリフレッシュトークンは必要なく、その場合は意味を持ちません。 |
| USER ID | `login_hint`構造で渡される、認証を受けるユーザーのユーザーID。
フェデレーション接続のユーザーIDは、フォーマットが異なることがあります。 |
| EXPIRY | CIBAフローの要求された有効期限は1秒から300秒の間で、デフォルトは300秒です。 |
| BINDING MESSAGE | 認証デバイスと消費デバイス間でCIBAフローをバインドするために使用されるメッセージ。バインドメッセージは必須で、最大64文字です。英数字と`+-_.,:#`の文字のみを使用してください。 |
| AUDIENCE | 発行されたトークンに対するオーディエンスを表す一意の識別子。 |
ユーザー固有のレート制限があり、認可するユーザーには1分あたり5件を超える要求は送信されません。
## ステップ2:Auth0テナントがCIBA要求を確認する
Auth0テナントがPOST要求の受信に成功したら、その要求を参照した`auth-req-id`のある応答を受け取るはずです。
```json lines theme={null}
{
"auth_req_id": "eyJh...",
"expires_in": 300,
"interval": 5
}
```
`auth_req_id`値はCIBAフローの完了をポーリングするために、`/token`エンドポイントに渡されます。
## ステップ3:クライアントアプリケーションが応答をポーリングする
Authentication APIまたはAuth0の[SDK](/docs/ja-jp/libraries)を使用して`/token`エンドポイントを呼び出し、`urn:openid:params:grant-type:ciba`の付与タイプと`/bc-authorize`エンドポイントから受け取った`auth_req_id`を渡します。
```bash lines theme={null}
curl --location 'https://$tenant.auth0.com/oauth/token' \
--header 'Content-Type: application/x-www-form-urlencoded' \
--data-urlencode 'client_id=$client_id' \
--data-urlencode 'client_secret=$client_secret' \
--data-urlencode 'auth_req_id=$auth_req_id' \
--data-urlencode 'grant_type=urn:openid:params:grant-type:ciba'
```
```csharp lines theme={null}
var token = await authenticationApiClient.GetTokenAsync(
new ClientInitiatedBackchannelAuthorizationTokenRequest()
{
AuthRequestId = response.AuthRequestId,
ClientId = "your-client-id",
ClientSecret = "your-client-secret"
}
);
```
```go lines theme={null}
token, err := authAPI.OAuth.LoginWithGrant(context.Background(),
"urn:openid:params:grant-type:ciba",
url.Values{
"auth_req_id": []string{resp.AuthReqID},
"client_id": []string{clientID},
"client_secret": []string{clientSecret},
},
oauth.IDTokenValidationOptions{})
```
```java lines theme={null}
Request tokenRequest = auth.getBackChannelLoginStatus(authReqId, "grant-type");
BackChannelTokenResponse tokenResponse = tokenRequest.execute().getBody();
```
認可しているユーザーがトランザクションを承認するまでは、以下の応答を受け取ります。
```json lines theme={null}
{
"error": "authorization_pending",
"error_description": "The end-user authorization is pending"
}
```
ポーリングの間隔は約5秒です。ポーリングが頻繁すぎると、以下の応答を受け取ります。その内容はバックオフ間隔によって異なります。
```json lines theme={null}
{
"error": "slow_down",
"error_description": "You are polling faster than allowed. Try again in 10 seconds."
}
```
エラーを解消するには、次の間隔(秒単位)まで待ってから、`/token`エンドポイントをポーリングします。
## ステップ4:モバイルアプリケーションがプッシュ通知を受け取る
Auth0はプッシュ通知をユーザーの登録済みのモバイルアプリまたはモバイルデバイスに送信します。[Guardian SDK](/docs/ja-jp/secure/multi-factor-authentication/auth0-guardian)にはプッシュ通知で受け取ったデータを解析するメソッドが備わっているため、即座に使える`Notification`インスタンスを返します。`Notification`インスタンスにはトランザクションリンクIDまたは`txlinkid`が含まれており、モバイルアプリケーションはAuth0から同意の詳細を取得するためにそれを使用します。
以下のサンプルコードはGuardian SDKを使用して、iOSとAndroidのモバイルプッシュ通知を実装する例です。
```swift lines theme={null}
//implementing UNUserNotificationCenterDelegate
func userNotificationCenter(_ center: UNUserNotificationCenter, willPresent notification: UNNotification, withCompletionHandler completionHandler: (UNNotificationPresentationOptions) -> Void) {
let userInfo = notification.request.content.userInfo
if let notification = Guardian.notification(from: userInfo) {
// Implement this function to display the prompt and handle user's consent/rejection.
handleGuardianNotification(notification: notification)
}
}
```
```java lines theme={null}
// at the FCM listener you receive a RemoteMessage
@Override
public void onMessageReceived(RemoteMessage message) {
Notification notification = Guardian.parseNotification(message.getData());
if (notification != null) {
// you received a Guardian notification, handle it
handleGuardianNotification(notification);
return;
}
/* handle other push notifications you might be using ... */
}
```
## ステップ5:モバイルアプリケーションが同意の詳細を取得する
モバイルアプリケーションからGuardian SDKを呼び出して、同意の詳細である`binding_message`の内容をAuth0 Consent APIから取得します。
以下のサンプルコードは、Auth0 Consent APIからのデータ取得をiOSとAndroidに実装する例です。
```swift lines theme={null}
let device: AuthenticationDevice = // the object you obtained during the initial Guardian SDK enrollment process and stored locally
if let consentId = notification.transactionLinkingId {
Guardian
.consent(forDomain: {yourTenantDomain}, device: device)
.fetch(consentId: consentId, notificationToken: notification.transactionToken)
.start{result in
switch result {
case .success(let payload):
// present consent details to the user
case .failure(let cause):
// something went wrong
}
}
}
```
```java lines theme={null}
Enrollment enrollment = // the object you obtained during the initial Guardian SDK enrollment process and stored locally
if (notification.getTransactionLinkingId() != null) {
guardian
.fetchConsent(notification, enrollment)
.start(new Callback {
@Override
void onSuccess(RichConsent consentDetails) {
// present consent details to the user
}
@Override
void onFailure(Throwable exception) {
// something went wrong
}
});
}
```
## ステップ6:モバイルアプリケーションが同意の詳細をユーザーに表示する
Auth0 Consent APIは、同意の詳細である`binding_message`を応答に含めてモバイルアプリケーションに送信します。モバイルアプリケーションは認証要求や同意の詳細をユーザーに表示します。
以下のサンプルコードはAuth0 Consent APIからの応答の例です。
```json lines theme={null}
{
"id": "cns_abc123",
"requested_details": {
"audience": "https://$tenant.auth0.com/userinfo",
"scope": ["openid"],
"binding_message": "21-49-38"
},
"created_at": 1746693720
"expires_at": 1746693750
}
```
ユーザーはこの時点で認証要求を受け入れるか拒否できます。
## ステップ7:モバイルアプリケーションがユーザーの応答をAuth0に送信する
ユーザーによる認証要求の受け入れまたは拒否に応じて、モバイルアプリケーションがユーザーの応答をAuth0に返します。
以下のサンプルコードは、ユーザー応答の処理をiOSとAndroidに実装する例です。
### ユーザーが認証要求を受け入れる
```swift lines theme={null}
Guardian
.authentication(forDomain: "{yourTenantDomain}", device: device)
.allow(notification: notification)
// or reject(notification: notification, withReason: "hacked")
.start { result in
switch result {
case .success:
// the auth request was successfully rejected
case .failure(let cause):
// something failed, check cause to see what went wrong
}
}
```
```java lines theme={null}
guardian
.allow(notification, enrollment)
.execute(); // or start(new Callback<> ...)
```
### ユーザーが認証要求を拒否する
```swift lines theme={null}
Guardian
.authentication(forDomain: "{yourTenantDomain}", device: device)
.reject(notification: notification)
// or reject(notification: notification, withReason: "hacked")
.start { result in
switch result {
case .success:
// the auth request was successfully rejected
case .failure(let cause):
// something failed, check cause to see what went wrong
}
}
```
```java lines theme={null}
guardian
.reject(notification, enrollment) // or reject(notification, enrollment, reason)
.execute(); // or start(new Callback<> ...)
```
## ステップ8:フローが完了した後でAuth0がユーザーの応答を受け取る
クライアントアプリケーションは`/token` エンドポイントから応答を受け取ったら、ポーリングを完了します。承認や拒否にかかわらず、CIBAフローには認可しているユーザーからの応答が常に必要です。既存の付与は確認されません。
ユーザーがプッシュ要求を拒否した場合は、以下の応答を受け取ります。
```json lines theme={null}
{
"error": "access_denied",
"error_description": "The end-user denied the authorization request or it has been expired"
}
```
ユーザーがプッシュ要求を承認した場合は、以下の応答を受け取ります。
```json lines theme={null}
{
"access_token": "eyJh...",
"id_token": "eyJh...",
"expires_in": 86400,
"scope": "openid",
"token_type": "Bearer"
}
```
## もっと詳しく
* [クライアントが開始するバックチャネル認証フロー](/docs/ja-jp/get-started/authentication-and-authorization-flow/client-initiated-backchannel-authentication-flow)
* [クライアントが開始するバックチャネル認証を設定する](/docs/ja-jp/get-started/applications/configure-client-initiated-backchannel-authentication)